

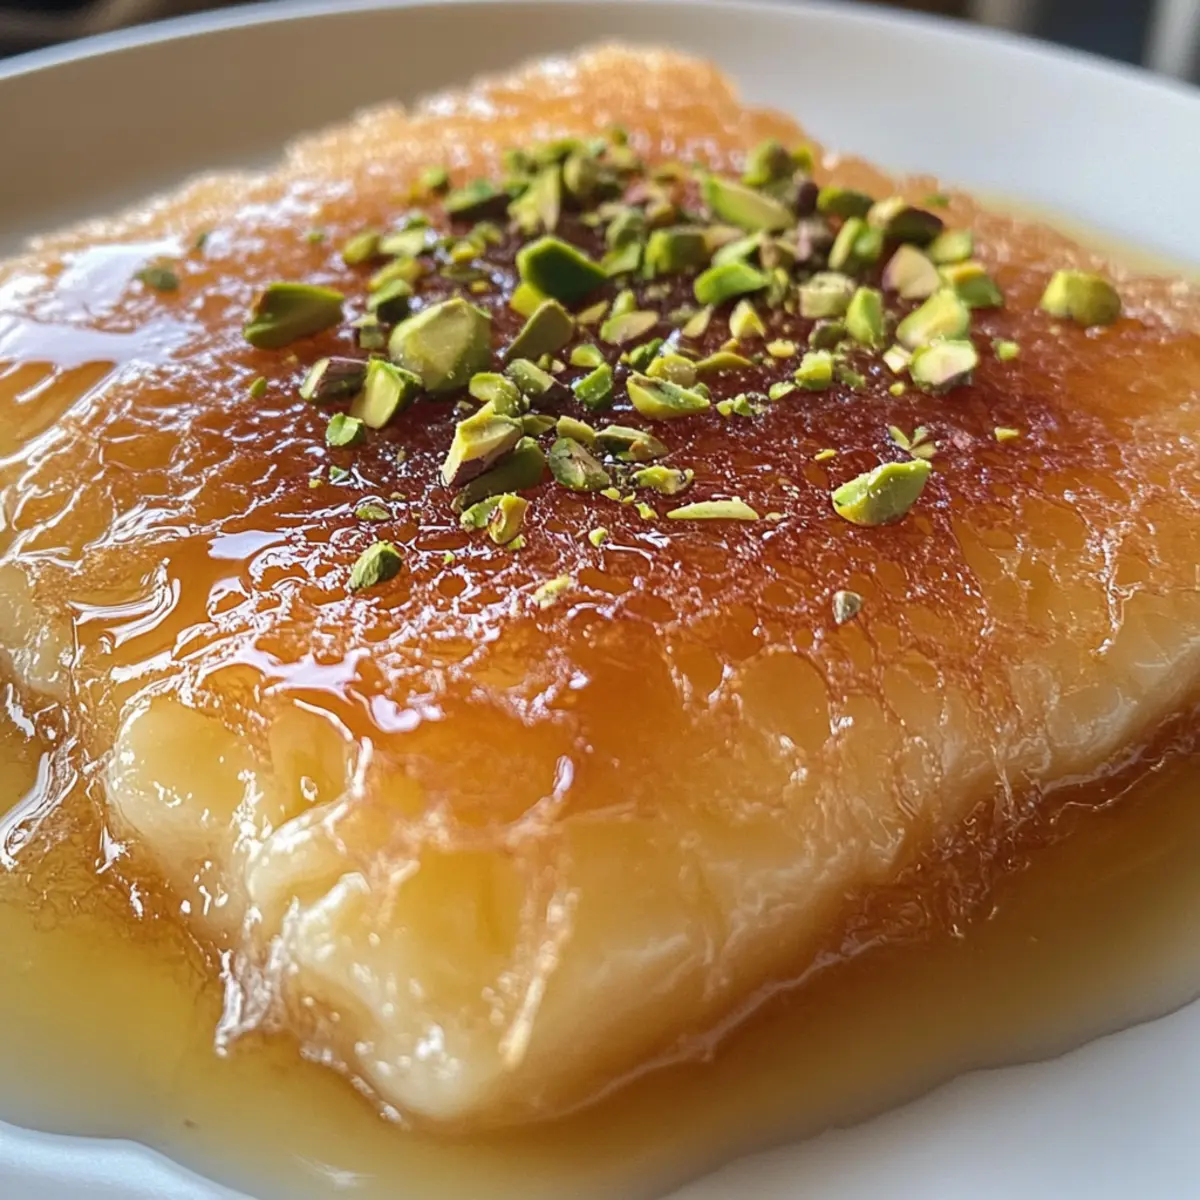
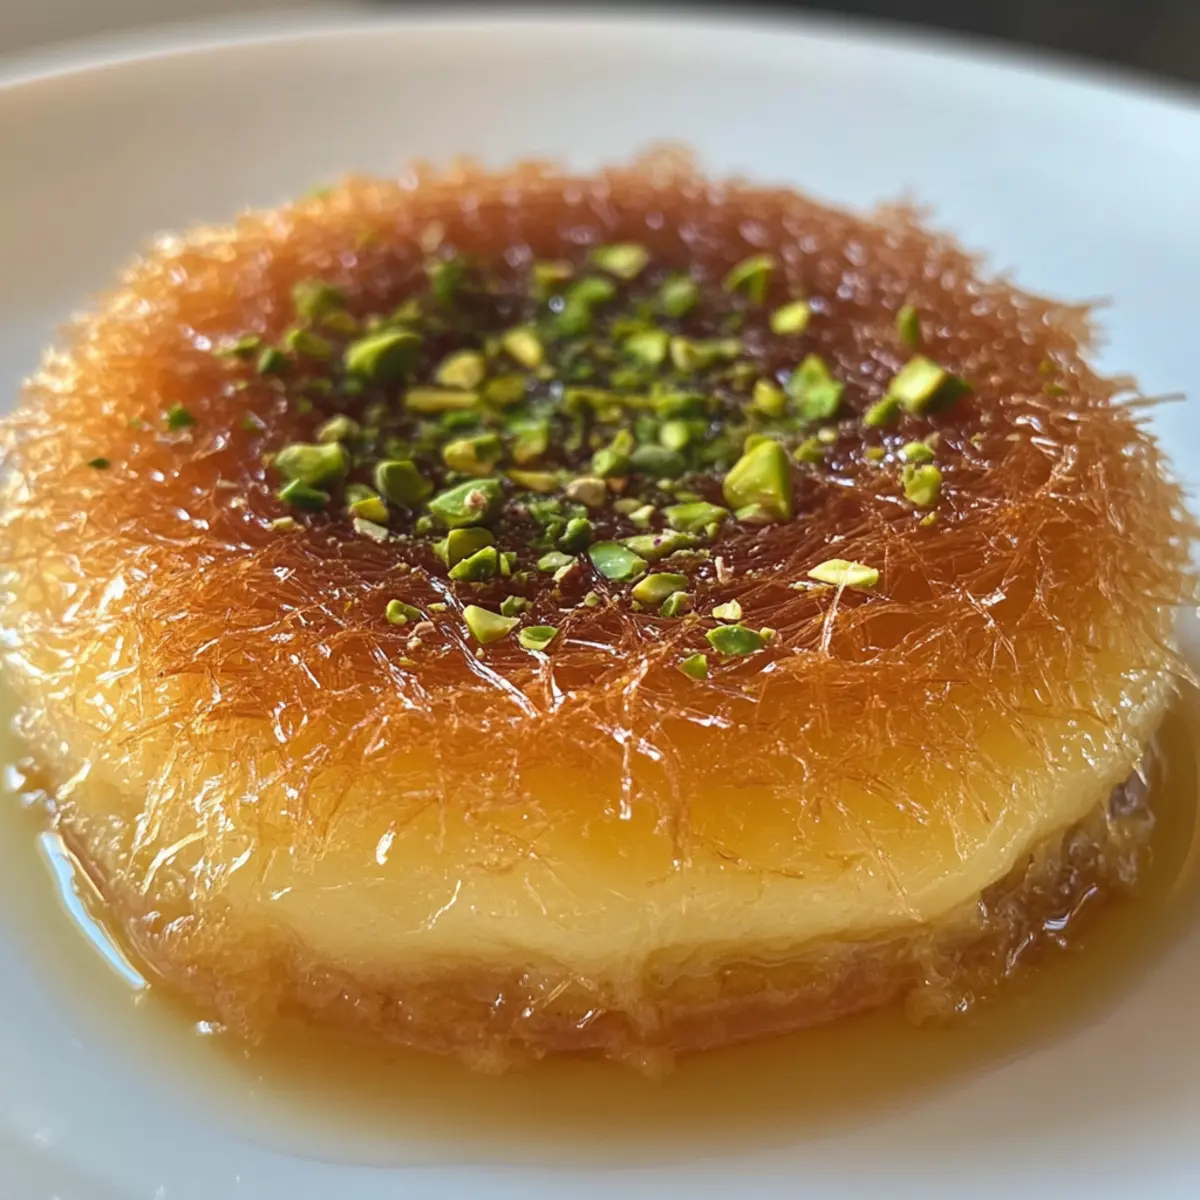
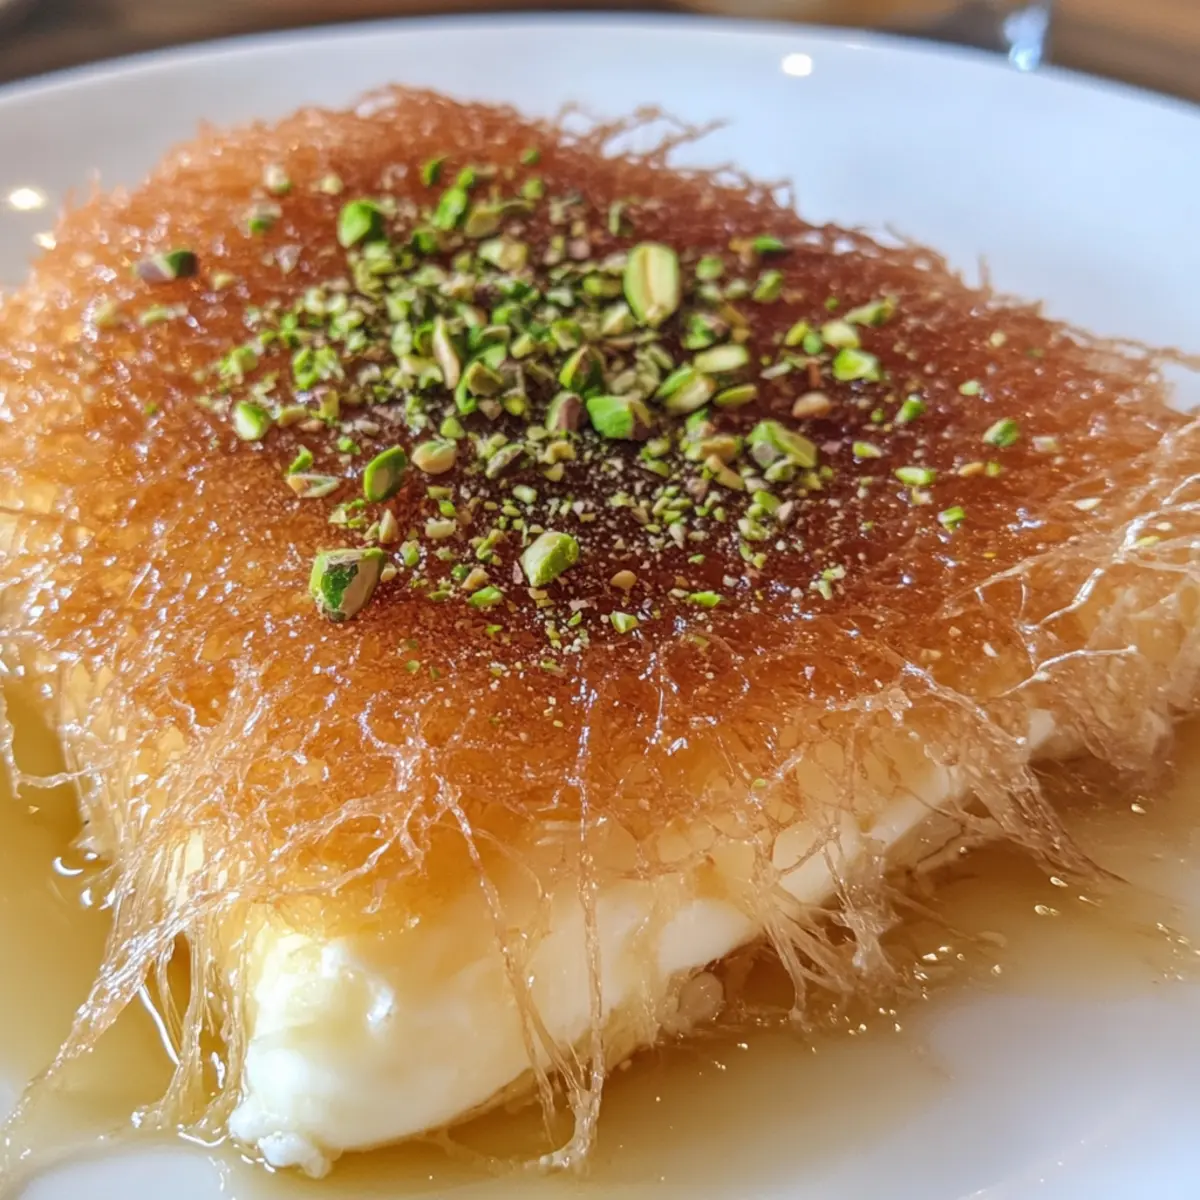
As I savored my first bite of Knafeh, I could feel the warmth of traditions and flavors intertwining on my palate, transporting me straight to a bustling Middle Eastern market. This delightful dessert features a luscious layer of gooey sweet cheese nestled between crispy kataifi dough, creating a glorious contrast of textures. It’s wonderful how this cheesecake-like treat can bring people together, whether served hot, allowing the cheese to stretch beautifully, or chilled for a refreshing bite on a warm day. Preparing Knafeh not only amps up dessert presentations but also offers a delightful escape from the mundane fast-food routine. Who wouldn’t want to impress friends with this homemade gem? Curious about how to create this irresistible dish? Let’s dive in!

Why is Knafeh the Perfect Dessert?
Decadent Delights: Knafeh boasts a heavenly blend of crispy kataifi and gooey sweet cheese that will leave your taste buds singing.
Impressive Presentation: This dessert not only looks beautiful on a plate but is sure to be a stunning centerpiece at your next gathering.
Versatile Enjoyment: Whether you prefer it hot out of the oven or chilled from the fridge, Knafeh can be served in various ways to suit any occasion.
Cultural Experience: As a beloved dish across the Middle East, this dessert brings a touch of tradition and communal joy to your table.
Simple Ingredients: You likely have most of the ingredients on hand. For a deeper dive into Middle Eastern flavors, check out our guide on traditional dessert techniques.
Crowd Pleaser: Friends and family will be clamoring for seconds, making Knafeh the ultimate crowd-pleaser for your next get-together.
Knafeh Ingredients
• Ready to create this creamy, cheesy masterpiece? Here’s what you’ll need!
For the Syrup
- Water – Provides the base for the syrup and balances sweetness.
- Granulated Sugar – Sweetens the syrup, creating a lovely glaze.
- Rose Water – Adds floral notes that characterize the dish; substitute with orange blossom water for a twist.
- Lemon Juice – Optional, for balancing sweetness in the syrup.
For the Dough and Filling
- Kataifi Dough – The star of Knafeh; its shreds give the dessert its signature texture. Can substitute with filo dough, but will yield a drier result.
- Melted Butter – Binds kataifi pieces and adds richness to every bite.
- Sweet Cheese – Core filling providing a creamy texture; fresh mozzarella or a mix of ricotta and mozzarella offers the best results.
For Garnish
- Crushed Pistachios – Optional, these add delightful crunch and a nutty flavor to finish your presentation.
- Kunafa Powdered Coloring – Optional, for traditional coloring; yellow food gel can be used instead for a visual boost.
Now that you have the essential Knafeh ingredients, you’re one step closer to making this irresistible Middle Eastern delight!
Step‑by‑Step Instructions for Knafeh
Step 1: Prepare Syrup
In a medium saucepan, combine 1 cup of water and 1 cup of granulated sugar over medium-high heat. Stir until the sugar dissolves completely, bringing the mixture to a gentle boil. Once dissolved, allow the syrup to simmer for about 10 minutes until slightly thickened. Remove from heat, then gently stir in 2 tablespoons of rose water and a splash of lemon juice. Set aside to cool.
Step 2: Prepare Kataifi
Take your thawed kataifi dough and cut it into smaller, manageable pieces using kitchen scissors. Place the cut kataifi in a large bowl and drizzle with 1 cup of melted butter. Toss and mix until each strand of dough is thoroughly coated, ensuring all pieces are glistening with butter. This will create the perfect crispy texture for your Knafeh.
Step 3: Assemble Layers
Grease a baking dish with additional melted butter. Begin layering half of the buttered kataifi into the bottom of the dish, pressing it down gently to create an even base. Next, take your sweet cheese, such as fresh mozzarella or a blend of ricotta, and spread it evenly over the kataifi layer, ensuring every inch is covered. Finally, layer the remaining kataifi on top, pressing it down slightly to compact the layers for baking.
Step 4: Bake
Preheat your oven to 350°F (175°C). Place the assembled Knafeh in the oven and bake for 40-50 minutes, or until the top is golden brown and bubbling. You’ll know it’s done when the edges are crisp and the center is heated through, filling your kitchen with a delightful aroma that promises sweetness to come.
Step 5: Cool & Invert
After baking, remove the Knafeh from the oven and let it cool for about 10 minutes. This cooling period is essential as it allows the dessert to set slightly. Carefully place a serving plate on top of the baking dish, and with a swift, confident motion, flip the dish upside down. Gently lift off the dish, revealing the beautifully golden Knafeh.
Step 6: Finish
To finish your Knafeh, generously pour the cooled rose water syrup over the warm dessert, allowing it to seep into the layers for maximum sweetness. For a finishing touch, sprinkle crushed pistachios on top for added flavor and a lovely crunch. Serve warm or cold, allowing everyone to indulge in this decadent Middle Eastern delight!
Expert Tips for Making Knafeh
-
Perfectly Coated Dough: Ensure that the kataifi dough is thoroughly coated in melted butter; this prevents dryness and helps achieve a delightful crispy texture when baked.
-
Cheese Moisture: Reduce moisture in the cheese by draining fresh mozzarella properly; excess liquid can lead to soggy Knafeh.
-
Syrup Timing: Pour the rose water syrup over the Knafeh while it’s still warm; this allows the layers to absorb the sweetness beautifully.
-
Inversion Technique: When inverting the Knafeh onto a serving plate, use one with raised edges to catch any overflow syrup, keeping your presentation tidy.
-
Serving Temperature: Experiment with serving Knafeh both hot and cold; each temperature offers a distinct tasting experience to enjoy this delectable Middle Eastern dessert.
Make Ahead Options
Preparing Knafeh in advance is a time-saver for those busy weeknights! You can assemble the layers up to 24 hours ahead; just cover the baking dish tightly with plastic wrap and refrigerate. This helps the kataifi absorb the butter and flavor, keeping it moist and delicious. Additionally, you can prepare the rose water syrup up to 3 days in advance—just store it in the refrigerator. When you’re ready to serve, bake the Knafeh straight from the fridge for about 10 extra minutes to ensure it’s heated through properly. Dropping this delightful dessert into your meal prep routine means you’ll have a stunning treat ready to impress your family or guests with minimal effort!
Knafeh: Sweet Variations Await
Feel free to get creative with your Knafeh and make it uniquely yours with these fun twists!
-
Cheese Swap: Use goat cheese for a tangy kick or experiment with a blend of cream cheese and mascarpone for a luscious feel.
Embrace the creamy goodness and let your taste buds explore. A cheese swap can change the entire flavor profile! -
Nutty Twist: Substitute crushed pistachios with walnuts or almonds to alter the topping while keeping that lovely crunch.
Adding different nuts can introduce exciting flavors and textures, elevating your dessert experience! -
Syrup Flavor Enhancements: Enhance the traditional syrup using vanilla or almond extract instead of rose water for a fragrant flair.
These slight modifications can bring a new dimension to the classic sweetness of Knafeh. -
Fruit Infusion: Layer in fresh berries or sliced bananas between the kataifi and cheese for a fruity surprise.
Imagine the delightful burst of flavors adding a fresh twist to your dessert! -
Spice it Up: Add a hint of cinnamon or cardamom to the kataifi mixture for a warm and fragrant upgrade.
These spices will infuse an aromatic essence that celebrates traditional Middle Eastern flavors. -
Gluten-Free Option: Consider using gluten-free pastry dough as an alternative to kataifi for a gluten-sensitive version.
This way, everyone can enjoy Knafeh without missing out on the fun! -
Choco Delights: Drizzle melted chocolate over the top or incorporate chocolate chips directly into the cheese filling.
Chocolate lovers, rejoice! This variation merges your two favorite desserts into one irresistible treat. -
Chilled Garnish: Serve each slice with a dollop of whipped cream or a scoop of vanilla ice cream for an extra indulgent touch.
Imagine a luscious slice of Knafeh paired with a cold treat—pure bliss!
No matter how you choose to adapt your Knafeh, each variation promises to deliver a delicious experience that honors this beloved Middle Eastern delight!
Storage Tips for Knafeh
Fridge: Store leftover Knafeh in an airtight container in the refrigerator for up to 3 days. This will help maintain its texture and flavor.
Freezer: For longer storage, freeze Knafeh by wrapping it tightly in plastic wrap and then placing it in a freezer bag. It can last up to 2 months when frozen.
Reheating: To enjoy Knafeh again, reheat individual slices in the microwave for 30-60 seconds or in the oven at 350°F (175°C) for about 10 minutes until heated through.
Serving Tip: Whether served warm with syrup or chilled, a sprinkle of crushed pistachios adds a delightful crunch to your Knafeh.
What to Serve with Authentic Knafeh?
Delight in a full culinary experience by complementing your Knafeh with these delicious pairings.
-
Creamy Yogurt: Serve a dollop of tangy yogurt alongside to balance the sweetness, creating a refreshing contrast.
-
Mint Tea: This fragrant tea will enhance the floral notes of the Knafeh, creating a soothing and aromatic sip to enjoy.
-
Pistachio Baklava: Bring a taste of the Middle East to your table with this sweet and nutty treat that harmonizes beautifully.
-
Honey Drizzled Fruit: Fresh fruits like figs or oranges, drizzled with honey, offer a light and refreshing touch to complement Knafeh.
-
Spiced Coffee: Serve up a robust coffee infused with cardamom or cinnamon, perfect for cutting through the richness of the dessert.
-
Rose Water Sorbet: This cool, floral sorbet not only refreshes the palate but enhances the flavors of the Knafeh in a delightful way.
-
Nuts and Dried Fruits: A mix of almonds, walnuts, and dried apricots adds crunch and texture that elevates the sweet experience of your meal.
-
Mint Salad: A vibrant salad with fresh herbs and citrus will cleanse the palate, making room for that indulgent Knafeh.
These accompaniments will not only enhance your Knafeh delight but also create a memorable dining experience!
Knafeh Recipe FAQs
What type of cheese is best for Knafeh?
I recommend using fresh mozzarella or a combination of ricotta and mozzarella for Knafeh. This blend provides a creamy texture that complements the crispy kataifi dough beautifully. If you prefer a stronger flavor, feel free to experiment with other cheeses, but ensure they melt well.
How should I store leftover Knafeh?
Leftover Knafeh can be stored in an airtight container in the refrigerator for up to 3 days. This method helps to maintain its delightful texture and taste. Make sure to let it cool completely before placing it in the container to prevent moisture buildup.
Can I freeze Knafeh?
Absolutely! To freeze Knafeh, wrap it tightly in plastic wrap and place it in a freezer bag. It can be stored in the freezer for up to 2 months. When you’re ready to enjoy it, simply thaw it in the refrigerator overnight and reheat individual slices in the microwave for 30-60 seconds or in the oven at 350°F (175°C) for about 10 minutes.
Why is my Knafeh soggy?
A common reason for soggy Knafeh is excess moisture in the cheese. Before using fresh mozzarella, be sure to drain it to remove as much liquid as possible. Additionally, ensure that the kataifi dough is thoroughly coated with melted butter to create the best texture during baking.
How can I tell when Knafeh is done baking?
Your Knafeh is ready when it turns a beautiful golden brown and is bubbling at the edges, usually after about 40-50 minutes at 350°F (175°C). The aromatic smell will fill your kitchen, signaling that it’s time to take it out! Allow it to cool for about 10 minutes before inverting it for perfect serving.
Is Knafeh suitable for vegetarians?
Yes! Knafeh is made with vegetarian-friendly ingredients, so it’s an excellent dessert choice for vegetarians. However, always double-check the cheese products you’re using as some might contain animal rennet. Choose rennet-free varieties to ensure it meets your dietary preferences.
Irresistible Knafeh: Your New Favorite Middle Eastern Delight
Ingredients
Equipment
Method
- In a medium saucepan, combine 1 cup of water and 1 cup of granulated sugar over medium-high heat. Stir until the sugar dissolves completely, bringing the mixture to a gentle boil. Allow the syrup to simmer for about 10 minutes until slightly thickened. Remove from heat, then stir in 2 tablespoons of rose water and a splash of lemon juice. Set aside to cool.
- Take your thawed kataifi dough and cut it into smaller pieces using kitchen scissors. Place the cut kataifi in a large bowl and drizzle with 1 cup of melted butter. Toss until each strand is thoroughly coated.
- Grease a baking dish with additional melted butter. Begin layering half of the buttered kataifi into the bottom of the dish. Spread the sweet cheese evenly over the kataifi layer, followed by the remaining kataifi on top.
- Preheat your oven to 350°F (175°C). Place the assembled Knafeh in the oven and bake for 40-50 minutes, or until the top is golden brown and bubbling.
- After baking, remove the Knafeh from the oven and let it cool for about 10 minutes. Invert onto a serving plate.
- Pour the cooled rose water syrup over the warm dessert and sprinkle crushed pistachios on top. Serve warm or cold.