A Simple Delight: Apple Puff Pastry in Just 10 Minutes

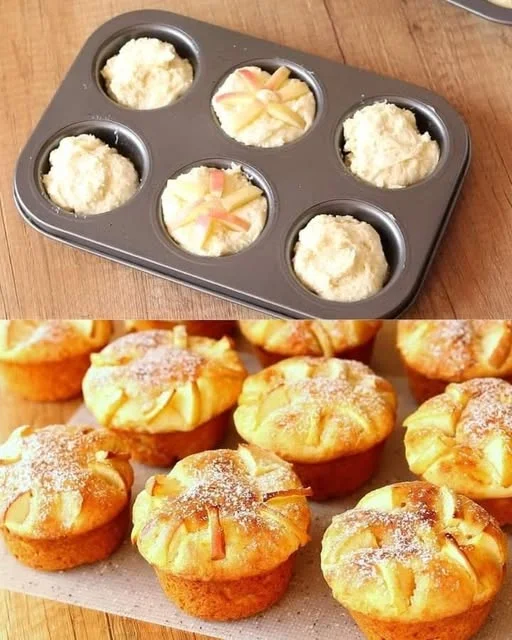
There’s something magical about the aroma of apples and cinnamon filling a kitchen, especially when you’re in the mood for a quick, comforting dessert. It takes me back to afternoons spent in my grandmother’s kitchen. She was never one for complicated recipes or long baking sessions; instead, she embraced simplicity. And some of her most unforgettable creations were born from just a few ingredients, effortlessly brought together to form something beautiful.

I still remember the first time I learned how to make a simple apple pastry, much like this recipe. I was young and struggling with the pressures of school, work, and life. One afternoon, I visited my grandmother, and she offered me a fresh, warm slice of her apple dessert. The moment I bit into the flaky pastry, with the tender apples, cinnamon, and sugar mingling together, I was transported into a state of calm. It was more than just a treat — it was a reminder that life doesn’t need to be overly complicated to bring joy.

This Apple Puff Pastry is inspired by that same spirit of simplicity and comfort. It’s the perfect dessert when you want something quick but delicious, whether you’re entertaining guests or enjoying a quiet evening at home. In just 10 minutes, you can create a dessert that’s as easy as it is comforting. Every bite is a reminder that sometimes, the best things in life come in simple packages.

Why Puff Pastry and Apples Are a Perfect Pair

There’s a reason why puff pastry and apples are a classic combination. The buttery, flaky layers of puff pastry offer the perfect contrast to the sweet, tender apples. As the pastry bakes, it rises and crisps up around the apples, creating a golden, crisp crust that holds all the juicy sweetness inside.

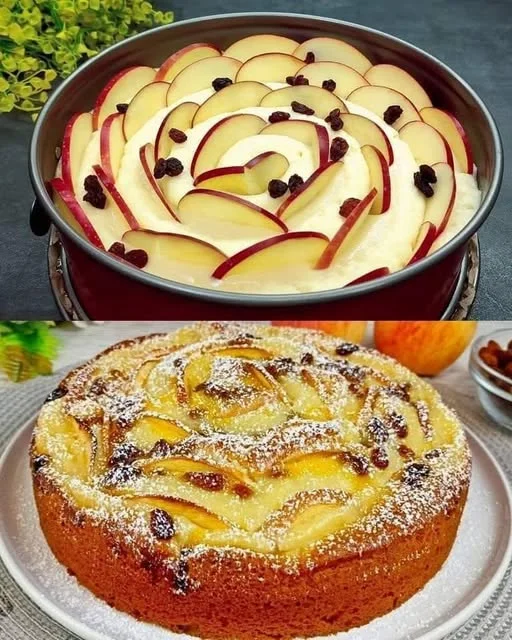
Apples, with their natural sweetness and crisp texture, make the ideal filling for this dessert. They hold their shape during baking, allowing the filling to stay chunky and rich, while releasing just enough moisture to soften and create a beautiful contrast against the puff pastry. The addition of cinnamon brings warmth and depth, transforming simple ingredients into a dessert that feels both indulgent and homey.

Another benefit of puff pastry is its versatility. While store-bought versions are convenient and easy to use, you can also make your own for a more homemade touch. Regardless of the option you choose, the result is a decadent, yet simple treat that’s perfect for any occasion.

Ingredients:

IngredientQuantity
Dough (store-bought or homemade)500 g
Apples2 medium, peeled and diced
Sugar20 g
Cinnamon5 g (about 1 teaspoon)

Directions:

  1. Preheat your oven to 200°C (390°F). If you’re using store-bought puff pastry, roll it out onto a baking sheet lined with parchment paper.
  2. In a small bowl, combine the diced apples with sugar and cinnamon. Mix well to coat the apples evenly.
  3. Spoon the apple mixture onto the center of the rolled-out dough, leaving a small border around the edges.
  4. Fold the edges of the dough over the apples, creating a rustic, open-faced tart.
  5. Bake in the preheated oven for 10-12 minutes, or until the puff pastry is golden and crispy, and the apples are tender.
  6. Remove from the oven, let it cool for a few minutes, then slice and serve!

Nutritional Information (per serving):

NutrientAmount per Serving
Calories150 kcal
Protein2g
Carbohydrates25g
Sugars14g
Fat6g
Saturated Fat3g
Fiber2g
Sodium120mg

The Benefits of Quick Desserts: A Solution for Busy Lives

In our fast-paced world, there are often times when we crave something sweet but don’t have the luxury of time. This is where quick and easy desserts like Apple Puff Pastry come in. The beauty of this recipe lies not just in its flavor but in its ability to come together effortlessly. In just 10 minutes, you can prepare a delightful dessert that feels like it came from a bakery, but with minimal effort.

Quick desserts also provide an opportunity to show creativity without the stress of complicated preparations. Whether you’re hosting a last-minute gathering or simply want to treat yourself after a long day, this pastry will save you time while still impressing your guests. There’s no need to spend hours in the kitchen, making multiple layers or waiting for dough to rise. Instead, this recipe offers simplicity, allowing you to focus on what really matters: enjoying the moment.

The Versatility of Apple Puff Pastry: Variations and Adaptations

What makes Apple Puff Pastry even more appealing is its versatility. While the basic combination of apples, sugar, and cinnamon is delicious on its own, there are countless ways to tweak this recipe to suit your tastes or dietary preferences. For example, you can add a handful of chopped nuts, like walnuts or pecans, to introduce a crunchy texture and an earthy flavor that complements the sweetness of the apples.

If you’re feeling adventurous, you can experiment with different fruits alongside the apples. Pears, for instance, offer a softer texture and a delicate sweetness that pairs wonderfully with cinnamon. Or, for a tropical twist, add some finely chopped pineapple for a sweet and tangy filling. You can also drizzle the pastry with honey or caramel sauce once it’s baked to elevate the dessert and add an extra touch of richness.

For those with dietary restrictions, this recipe is easily adaptable. You can use gluten-free puff pastry if necessary, or substitute the butter with coconut oil for a dairy-free version. The apples themselves are naturally gluten-free, making this dessert a great option for people with food sensitivities. Additionally, you can use a sugar substitute like stevia or monk fruit to make the recipe lower in sugar without sacrificing flavor.

Frequently Asked Questions (FAQs)

1. Can I use store-bought puff pastry?

Absolutely! Store-bought puff pastry is a great option for this recipe, especially if you’re looking for convenience. It saves time and effort while still producing a delicious dessert. Just be sure to follow the package instructions for rolling it out and baking.

2. Can I make this pastry ahead of time?

While puff pastry is best enjoyed fresh out of the oven, you can make it ahead of time and store it in the fridge for a few hours. When you’re ready to bake, simply pop it in the oven, and it will bake up fresh in just a few minutes. If you’re planning to make it in advance, be sure to store it in an airtight container to prevent it from drying out.

3. How can I make this recipe gluten-free?

To make the recipe gluten-free, use a gluten-free puff pastry alternative. You can find these at most grocery stores or online. Just make sure the rest of your ingredients, including the apples and cinnamon, are certified gluten-free.

4. Can I add other fruits to the filling?

Yes! Feel free to experiment with different fruits to customize the filling. Pears, berries, or even stone fruits like peaches work beautifully with the apples. Adjust the sugar and cinnamon based on the sweetness of the fruit to achieve the perfect flavor balance.

5. Can I make this dessert in individual servings?

Certainly! You can cut the puff pastry into smaller squares or circles and create individual portions. This makes for a more elegant presentation, and they’re easier to serve for gatherings or parties. Just adjust the baking time slightly depending on the size of the pastries.

Conclusion: A Timeless Recipe for Every Occasion

Apple Puff Pastry is a dessert that reminds us of the simple pleasures in life. It’s quick, it’s delicious, and it’s incredibly versatile. Whether you’re baking it for yourself or sharing it with others, it’s a treat that brings comfort and warmth to any occasion. The perfect balance of flaky pastry, sweet apples, and warm cinnamon makes this dessert a timeless classic that will never go out of style.

As you bake these pastries in your kitchen, take a moment to appreciate how something so simple can bring so much joy. Life may be complicated at times, but with a few simple ingredients and a little creativity, we can make something sweet out of the everyday. So go ahead, grab that puff pastry, slice those apples, and create a dessert that will make your day just a little bit brighter.

Amal

A Simple Delight: Apple Puff Pastry in Just 10 Minutes

Looking for a quick dessert that’s bursting with flavor? This Apple Puff Pastry is the perfect solution. With flaky, buttery puff pastry and tender, cinnamon-spiced apples, it’s a delightful treat that comes together in just 10 minutes.
Prep Time 5 minutes
Cook Time 15 minutes
Total Time 20 minutes
Servings: 4 –6 servings
Course: Dessert
Cuisine: American

Ingredients
  

  • 500 g store-bought or homemade puff pastry dough
  • 2 medium apples peeled and diced
  • 20 g sugar
  • 5 g about 1 teaspoon cinnamon

Method
 

  1. Preheat your oven to 200°C (390°F). If you’re using store-bought puff pastry, roll it out onto a baking sheet lined with parchment paper.
  2. In a small bowl, combine the diced apples with sugar and cinnamon. Stir until the apples are evenly coated.
  3. Spoon the apple mixture onto the center of the puff pastry, leaving a border around the edges.
  4. Fold the edges of the pastry over the apples, creating a rustic, open-faced tart.
  5. Bake in the preheated oven for 10-12 minutes or until the puff pastry is golden brown and crispy, and the apples are tender.
  6. Remove from the oven and let it cool for a few minutes before slicing and serving.

Notes

  • If you prefer a sweeter dessert, feel free to adjust the amount of sugar according to your taste.
  • You can add a sprinkle of chopped nuts, like walnuts or pecans, for an extra crunchy texture.
  • This puff pastry can be made ahead of time and stored in the fridge for a few hours before baking. Just make sure to bake it fresh when you’re ready to serve.
  • For a fun variation, try adding a drizzle of caramel or honey on top after baking for an added touch of sweetness.
  • If you need a gluten-free version, opt for gluten-free puff pastry and check the label for any other potential allergens.

Cottage Cheese Apple Muffins: A Sweet, Comforting Journey

There are moments in life that are marked by a particular scent, a flavor, or a dish that takes us back to a place of comfort. For me, Cottage Cheese Apple Muffins are one of those dishes. I can still remember the first time I made them. It was a cold winter morning, and I had spent the night before feeling a little out of sorts. Life had become overwhelming, and it seemed that everything was a little harder to handle. On that morning, I decided to try something simple and nourishing — a recipe I had come across years ago in a family cookbook. I had all the ingredients at home, and it seemed like the perfect way to start my day.

As the muffins baked, a warm, sweet aroma began to fill the house. It was as if the scent was erasing all the chaos in my mind and replacing it with calm. I felt comforted and uplifted, not just by the warm muffins, but by the process of baking itself. The texture of the cottage cheese in the batter, the sweetness of the apples, and the comforting flavor that emerged when I bit into one of those freshly baked muffins made me realize how powerful food could be in moments of stress. This recipe has since become one of my go-to choices when I need to bring some positivity back into my day.

Over the years, these muffins have evolved. Sometimes, I add in a handful of raisins or chopped nuts, depending on what I have available. But what always remains is the comforting, tender texture of the cottage cheese and the delightful freshness of the apples. Whether shared with friends or enjoyed alone on a quiet morning, Cottage Cheese Apple Muffins have become more than just a snack — they are a symbol of finding peace in the simplest moments.

The Perfect Balance of Flavor and Texture

One of the reasons Cottage Cheese Apple Muffins have become a family favorite is their remarkable balance of flavors and textures. When you think of muffins, you might imagine a soft, spongy texture and a slightly sweet flavor. While these muffins certainly have that classic muffin appeal, they also bring something unique to the table — the creamy, slightly tangy cottage cheese. This ingredient gives the muffins a richness that sets them apart from traditional muffins, while adding moisture and making them surprisingly tender.

The apples, on the other hand, add freshness, lightness, and a touch of natural sweetness. Whether you use tart Granny Smith apples or sweeter varieties like Fuji or Honeycrisp, the apples enhance the overall flavor, creating a perfect contrast to the richness of the cottage cheese. The added bonus is that the apples also add a bit of fiber, making the muffins not just a delicious treat but a satisfying one, too.

Why Cottage Cheese is the Secret Ingredient

Many people may not immediately think to add cottage cheese to muffins, but once you try it, you’ll understand why it works so well. Cottage cheese is packed with protein and offers a creamy texture that helps create a moist muffin. The presence of casein protein in cottage cheese is also beneficial for those who are looking for a more substantial snack. Unlike simple carbohydrates, the protein content helps keep you feeling fuller for longer, making these muffins a great choice for breakfast or as a mid-afternoon snack.

Cottage cheese also brings a slight tanginess to the flavor profile, which balances the sweetness of the apples and sugar. It might seem like an unconventional muffin ingredient, but the flavor and texture it imparts are what make these muffins so special.

A Versatile Recipe with Endless Variations

While the base recipe is already delicious, one of the best parts about making Cottage Cheese Apple Muffins is the ability to customize it. The muffins can easily be transformed to suit your preferences, dietary needs, or seasonal ingredients. You can add a variety of mix-ins like raisins, chopped walnuts, or even cinnamon chips. If you’re looking for a healthier option, you can substitute the butter with coconut oil or applesauce, or use whole wheat flour for added fiber.

Feel free to experiment with different apple varieties, too. For example, you could use sweet Gala apples for a sweeter muffin, or opt for tart Granny Smith apples for a more balanced, refreshing flavor. If you prefer to make a more indulgent muffin, adding a handful of chocolate chips or a sprinkle of cinnamon sugar on top before baking can take the recipe to the next level.

Ingredients:

IngredientQuantity
Cottage cheese220g
Eggs2
Butter (softened)80g
Flour1 1/2 cups (180-200g)
Sugar1/2 cup (100g)
Baking powder1 tsp (8g)
SaltA pinch
Apples (peeled and chopped)1-2
Optional: Finely chopped nuts or raisinsAs desired

Directions:

  1. Preheat your oven to 180°C (350°F) and line a muffin tin with paper liners or grease it lightly.
  2. In a large mixing bowl, whisk together the cottage cheese, eggs, and softened butter until the mixture is smooth and creamy.
  3. In another bowl, sift together the flour, sugar, baking powder, and salt.
  4. Gradually add the dry ingredients to the wet mixture, stirring gently to combine until just incorporated. Do not overmix.
  5. Fold in the chopped apples, and if desired, add finely chopped nuts or raisins for extra texture and flavor.
  6. Spoon the batter evenly into the muffin tin, filling each cup about 2/3 full.
  7. Bake for 20-25 minutes, or until the muffins are golden brown and a toothpick inserted into the center comes out clean.
  8. Allow the muffins to cool in the tin for 5 minutes before transferring them to a wire rack to cool completely.

Nutritional Information (per muffin):

NutrientAmount per Serving
Calories180 kcal
Protein5g
Carbohydrates23g
Fiber1g
Sugars12g
Fat8g
Saturated Fat5g
Sodium120mg
Calcium60mg

Frequently Asked Questions (FAQs)

1. Can I make these muffins gluten-free?

Yes! You can make these muffins gluten-free by substituting the all-purpose flour with a gluten-free flour blend. Be sure to check the measurements on the gluten-free flour bag, as it may vary slightly from regular flour. Additionally, ensure that the baking powder is also gluten-free.

2. Can I make these muffins without eggs?

If you’re looking to make these muffins without eggs, you can use a flaxseed egg substitute (1 tablespoon of ground flaxseed mixed with 3 tablespoons of water, left to sit for 5 minutes) or a commercial egg replacer. The texture may be slightly different, but the muffins will still turn out soft and delicious.

3. How do I store leftover muffins?

Once baked and cooled, these muffins can be stored in an airtight container at room temperature for up to three days. If you want to keep them for longer, you can freeze them for up to a month. To thaw, simply leave them at room temperature for a few hours or heat them in the microwave for a quick warm-up.

4. Can I use non-dairy alternatives for this recipe?

Yes! If you’re looking for a dairy-free version, you can swap the cottage cheese for a non-dairy alternative such as silken tofu or a cashew-based cream cheese. Additionally, use plant-based butter or oil in place of the regular butter. Just keep in mind that the flavor and texture might change slightly, but it should still be delicious.

5. How can I make these muffins more moist?

If you’re finding that the muffins are too dry, you can add more wet ingredients like applesauce or yogurt. This will help enhance the moisture content and make the muffins even more tender. Just be sure to adjust the flour measurements if you add extra wet ingredients to maintain the right consistency of the batter.

Conclusion: A Recipe That Transcends Time

Cottage Cheese Apple Muffins have not only become a favorite in my household but also a comforting symbol of the power of simple, nourishing ingredients. Over the years, I have found that these muffins are more than just a treat; they are a reminder of the importance of taking time to enjoy the little things, especially when life feels overwhelming. Whether I make them for a busy morning or share them with loved ones, these muffins have brought warmth, joy, and nourishment to countless moments.

If you’re looking for a recipe that blends the goodness of cottage cheese with the sweetness of apples, all wrapped up in a soft, flavorful muffin, this is the one to try. The balance of textures and flavors makes these muffins perfect for any occasion, from a comforting breakfast to an afternoon snack. Once you experience the cozy satisfaction of these muffins, you’ll understand why they hold a special place in my heart — and hopefully, in yours as well.

Amal

Cottage Cheese Apple Muffins: A Sweet, Comforting Journey

These Cottage Cheese Apple Muffins are a delightful combination of soft, tender muffin texture and a creamy, slightly tangy cottage cheese twist. Filled with the natural sweetness of apples, these muffins make a perfect breakfast or snack.
Prep Time 10 minutes
Cook Time 25 minutes
Total Time 35 minutes
Servings: 10 -12 muffins
Course: Dessert
Cuisine: American

Ingredients
  

  • 220 g cottage cheese
  • 2 eggs
  • 80 g butter softened
  • 1 1/2 cups 180-200g flour
  • 1/2 cup 100g sugar
  • 1 tsp 8g baking powder
  • A pinch of salt
  • 1-2 apples peeled and chopped
  • Optional: Finely chopped nuts or raisins to taste

Method
 

  1. Preheat your oven to 180°C (350°F) and line a muffin tin with paper liners or lightly grease the cups.
  2. In a large bowl, whisk together the cottage cheese, eggs, and softened butter until smooth and well combined.
  3. In another bowl, sift together the flour, sugar, baking powder, and salt.
  4. Gradually add the dry ingredients into the wet ingredients, stirring until just incorporated. Be careful not to overmix.
  5. Gently fold in the chopped apples, and add optional nuts or raisins if desired.
  6. Spoon the batter into the muffin cups, filling each about 2/3 full.
  7. Bake for 20-25 minutes, or until the muffins are golden brown and a toothpick inserted into the center comes out clean.
  8. Allow the muffins to cool in the tin for 5 minutes, then transfer to a wire rack to cool completely.

Notes

  • These muffins are best enjoyed fresh but can be stored in an airtight container at room temperature for up to 3 days.
  • To freeze, let the muffins cool completely, then wrap them in plastic wrap and store in a freezer-safe bag for up to 1 month. Thaw at room temperature or reheat in the microwave.
  • Feel free to experiment with different types of apples based on your preference for sweetness or tartness. You can also add cinnamon or nutmeg for extra flavor.
  • For a dairy-free version, substitute the cottage cheese with a plant-based alternative such as soy or almond-based cheese.

Energizing Seed & Apple Snack for a Slim Waist: A Journey to Wellness

There was a time in my life when I was constantly juggling the demands of work, family, and personal goals, which made it incredibly hard to focus on my health. I remember rushing from one task to the next, grabbing unhealthy snacks in between, hoping that they would provide a quick burst of energy to get me through the day. Unfortunately, these quick fixes often left me feeling sluggish, unmotivated, and unsatisfied. It wasn’t until one afternoon, when I was feeling particularly drained and irritable, that I realized the importance of fueling my body with the right foods.

It started as a simple experiment. I wanted to create a snack that would not only fuel my body for longer periods but also help me feel lighter, more energized, and content. I turned to whole foods, rich in fiber, protein, and healthy fats. The result was this Energizing Seed & Apple Snack, a recipe that I now make regularly, whether I’m heading to the gym, running errands, or simply needing a pick-me-up during a long workday. The best part is that it’s not just about energy — it’s about feeling satisfied, balanced, and confident in my body.

This snack became my go-to, helping me feel lighter and more energized without feeling heavy or bloated. It’s full of nourishing ingredients like pumpkin seeds, sesame seeds, sunflower seeds, and apples, all of which contribute to a slimmer waistline and sustained energy. This recipe quickly became a part of my routine, and it’s not just a snack — it’s a reminder that taking a moment to focus on nourishing your body can make all the difference.

Why This Snack is the Ultimate Energy Boost

We all know how hard it can be to maintain energy levels throughout the day, especially with busy schedules and endless tasks. Traditional snacks like chips or sugary treats offer a quick burst of energy but often come with a sugar crash shortly after. This Energizing Seed & Apple Snack is different. It’s a combination of wholesome ingredients that provide both sustained energy and the right nutrients to keep you feeling satisfied and balanced.

1. A Balance of Healthy Fats and Protein

One of the standout features of this recipe is its balance of healthy fats and protein, which are key to helping you feel full and energized. Pumpkin seeds, sesame seeds, and sunflower seeds are all packed with essential fatty acids that support brain function, reduce inflammation, and keep your body in an optimal state for fat burning. Additionally, these seeds are rich in protein, which helps repair and build muscles, making them an excellent choice for those with active lifestyles.

2. A Boost of Natural Energy from Apples

The addition of grated apple provides a natural sweetness and an energy boost from complex carbohydrates. Unlike the refined sugars found in many packaged snacks, the sugars in apples are slow-releasing, providing a steady source of energy without the crash. Apples are also high in fiber, which promotes healthy digestion and helps regulate blood sugar levels.

3. Low in Calories, Big on Flavor

This snack is low in calories yet packed with flavor, making it a perfect option for those looking to maintain a slim waistline without sacrificing taste. Each bite is filled with a satisfying crunch from the seeds, a touch of sweetness from the apple, and a slight richness from the egg white (or applesauce substitute). It’s a snack that satisfies both your hunger and your taste buds without making you feel weighed down.

4. Perfect for a Busy Lifestyle

One of the main reasons this snack has become a staple in my routine is because of how easy it is to prepare. Whether I’m running out the door or looking for something quick to satisfy a craving, this snack can be made ahead of time and stored for several days. It’s portable, easy to carry in a small container, and provides a convenient solution to those mid-afternoon slumps.

Ingredients:

IngredientQuantity
Raisins (dried and chopped)50 g
Apple (grated)1
Egg white (or substitute with baked applesauce)1
Pumpkin seeds1/2 cup (60 g)
Sesame seeds1/2 cup (60 g)
Sunflower seeds1/2 cup (60 g)

Directions:

  1. Preheat your oven to 350°F (175°C) and line a baking sheet with parchment paper.
  2. In a large mixing bowl, combine the grated apple, raisins, and egg white (or applesauce substitute). Stir well until everything is evenly mixed.
  3. Add the pumpkin seeds, sesame seeds, and sunflower seeds to the mixture, stirring to combine.
  4. Spoon small portions of the mixture onto the prepared baking sheet, forming bite-sized clusters.
  5. Bake for 12-15 minutes, or until the snack clusters are golden and firm to the touch.
  6. Allow the snacks to cool completely before serving or storing.

Nutritional Information (per serving):

NutrientAmount per Serving
Calories180 kcal
Protein6g
Carbohydrates20g
Fiber4g
Sugars12g
Fat10g
Saturated Fat1g
Sodium5mg
Calcium25mg

Frequently Asked Questions (FAQs)

1. How long can I store this snack?

You can store the Energizing Seed & Apple Snack in an airtight container for up to a week. For longer storage, you can freeze the clusters and thaw them as needed. The snack holds its texture well, even after freezing, making it a perfect option for meal prep.

2. Can I make this snack without the egg white?

Yes! If you prefer not to use egg white, you can substitute it with baked applesauce, which adds natural sweetness and helps hold the snack together. The baked applesauce not only provides moisture but also enhances the flavor with its rich, caramelized taste. You can also experiment with other egg substitutes like chia or flaxseed gel.

3. Is this snack suitable for a vegan diet?

Absolutely! By using baked applesauce or chia gel as a substitute for the egg white, this snack can easily be made vegan-friendly. The rest of the ingredients — the seeds, raisins, and apple — are all plant-based, making it a great option for anyone following a vegan or plant-based lifestyle.

4. Can I adjust the sweetness of the snack?

Yes! If you prefer a sweeter snack, you can increase the amount of raisins or add a drizzle of honey or maple syrup before baking. Just keep in mind that adding extra sweeteners will increase the calorie count. On the other hand, if you prefer a less sweet snack, you can reduce the raisins or omit them entirely.

5. What are the best ways to enjoy this snack?

While this snack is delicious on its own, it can also be paired with other meals. Enjoy it as a pre-workout snack, an afternoon pick-me-up, or even a topping for your morning yogurt or smoothie bowl. You can also serve it as a crunchy addition to salads or mixed with your favorite dried fruits and nuts for a homemade trail mix.

6. Is this snack suitable for those with allergies?

This recipe contains seeds, raisins, and egg whites, so if you have allergies to any of these ingredients, you can either omit them or substitute them with safe alternatives. For example, if you’re allergic to seeds, you can substitute them with oats or nuts. If you need an egg substitute, baked applesauce works well, as mentioned earlier.

7. How can I make this snack more filling?

For an extra boost of protein, you can add a spoonful of nut butter (like almond or peanut butter) to the mixture before baking. This will increase the protein and healthy fat content, making the snack even more filling. Another option is to pair the snack with a high-protein beverage, such as a smoothie or protein shake.

Conclusion: A Snack That Does More Than Just Satisfy Hunger

The Energizing Seed & Apple Snack is more than just a healthy snack — it’s a reminder that the foods we choose to fuel our bodies with have the power to enhance our energy, our mood, and our overall well-being. This simple, wholesome snack is packed with nutrients that support a slim waistline, boost energy levels, and provide long-lasting satiety. Whether you enjoy it as a snack on-the-go, a pre-workout bite, or as part of a larger meal, it’s a versatile and nourishing option that can easily fit into any lifestyle.

As we navigate through the hustle and bustle of everyday life, it’s easy to reach for quick, processed snacks. But taking the time to prepare something wholesome and full of energy-giving ingredients is a small act of self-care that can have lasting benefits. This Energizing Seed & Apple Snack isn’t just a recipe; it’s a reminder that nourishment is within reach, and sometimes the simplest ingredients are the ones that can make the biggest difference in how we feel.

Amal

Energizing Seed & Apple Snack for a Slim Waist: A Journey to Wellness

Fuel your day with this simple, nutritious, and satisfying Energizing Seed & Apple Snack. Packed with wholesome seeds and natural sweetness from grated apples, this snack will give you a steady energy boost without the sugar crash.
Prep Time 10 minutes
Cook Time 15 minutes
Total Time 25 minutes
Servings: 4 –6 servings
Course: Snack
Cuisine: Healthy

Ingredients
  

  • 50 g raisins dried and chopped
  • 1 apple grated
  • 1 egg white or substitute with baked applesauce
  • 1/2 cup 60 g pumpkin seeds
  • 1/2 cup 60 g sesame seeds
  • 1/2 cup 60 g sunflower seeds

Method
 

  1. Preheat the oven to 350°F (175°C) and line a baking sheet with parchment paper.
  2. In a large mixing bowl, combine the grated apple, raisins, and egg white (or applesauce substitute). Stir everything together until well mixed.
  3. Add the pumpkin seeds, sesame seeds, and sunflower seeds to the mixture. Stir to evenly distribute the seeds.
  4. Scoop small portions of the mixture and place them on the baking sheet, forming bite-sized clusters.
  5. Bake for 12-15 minutes, or until the clusters are golden and firm to the touch.
  6. Allow the snacks to cool completely on the baking sheet before serving or storing.

Notes

  • Store the baked snack in an airtight container for up to one week.
  • You can freeze the clusters for longer storage. Just thaw them at room temperature or reheat gently in the oven.
  • If you want a sweeter snack, feel free to increase the amount of raisins or drizzle some honey on top before baking.
  • This recipe can be made vegan by using baked applesauce or chia gel instead of the egg white.

Savory Cabbage and Carrot Scramble: A Comforting, Wholesome Meal

The first time I made this Savory Cabbage and Carrot Scramble was on a rainy Sunday afternoon when the world outside felt a little colder, a little quieter. I had just returned from the farmers’ market, bags full of fresh produce that would eventually become the base for my meals in the coming week. Among the vibrant colors of tomatoes, carrots, and leafy greens, one ingredient stood out to me — a head of cabbage. There’s something inherently comforting about cabbage; it’s humble, but it can be transformed into something truly special with the right ingredients and care.

As I started to cook, I realized just how simple and nourishing a cabbage-based dish could be. The earthy aroma of the cabbage, combined with the sweetness of carrots and the richness of eggs, brought warmth to my kitchen, not just in temperature but in spirit. I thought about all the times my grandmother used to prepare simple meals with whatever ingredients she had on hand — meals that were filled with love and care. This dish, though modern in its simplicity, felt like a tribute to her. It’s a reminder that nourishing meals don’t need to be complex to be deeply satisfying.

This Savory Cabbage and Carrot Scramble became a comforting staple in my household. It’s a dish that not only makes use of readily available ingredients but also brings people together around the table. It’s quick, hearty, and versatile, making it perfect for breakfast, lunch, or dinner. But more than that, it’s a reminder that with just a few simple ingredients, you can create something wholesome, hearty, and full of flavor.

Why This Recipe is a Winner: Comfort, Simplicity, and Nutrition

This Savory Cabbage and Carrot Scramble is a perfect example of how simple ingredients can combine to create something truly satisfying. The cabbage, a vegetable that often gets overlooked, becomes the star of the dish when cooked slowly to tender perfection. The carrots add natural sweetness, balancing the savory cabbage and eggs, while the onions and garlic infuse the entire dish with depth and fragrance.

One of the greatest things about this recipe is its versatility. You can enjoy it as a light meal on its own, or pair it with whole-grain toast, a side of roasted potatoes, or even a fresh salad. It’s an ideal dish for any meal of the day, and it can be easily customized to suit your preferences. Want to add a little protein? Throw in some crumbled feta or cooked sausage. Need to make it vegan? Simply skip the eggs and use tofu scramble as a substitute. The options are endless.

Another reason why this recipe is a keeper is its nutritional benefits. Cabbage is an incredibly nutrient-dense vegetable that’s low in calories but high in fiber, antioxidants, and vitamin C. Carrots are similarly packed with vitamins and minerals, including vitamin A, which supports healthy vision, immune function, and skin health. Eggs provide a rich source of protein and essential amino acids, making this dish not just delicious but also nourishing.

Ingredients:

IngredientQuantity
Cabbage, thinly sliced1 kg (35 oz)
Onion, finely chopped1 medium-sized
Carrot, grated1
Garlic, minced3 cloves
Eggs5 large

Directions:

  1. In a large skillet, heat a little oil over medium heat. Add the chopped onion and sauté until softened, about 4-5 minutes.
  2. Stir in the minced garlic and grated carrot, cooking for another 2 minutes until the garlic becomes fragrant.
  3. Add the thinly sliced cabbage to the skillet, stirring well to combine. Cook, stirring occasionally, for about 10 minutes or until the cabbage is tender.
  4. Crack the eggs directly into the skillet, stirring them into the vegetable mixture. Continue cooking, stirring constantly, until the eggs are fully scrambled and cooked through.
  5. Season with salt and pepper to taste, and serve warm.

Nutritional Information (per serving):

NutrientAmount per Serving
Calories170 kcal
Protein10g
Carbohydrates15g
Fiber5g
Sugars6g
Fat10g
Saturated Fat3g
Sodium210mg
Calcium50mg

Frequently Asked Questions (FAQs)

1. Can I make this dish ahead of time?

Yes! This Savory Cabbage and Carrot Scramble can be made ahead of time and stored in the refrigerator for up to 2-3 days. Simply reheat it in a skillet over medium heat with a splash of water or oil to restore its moisture. This makes it an excellent option for meal prep, allowing you to enjoy a hearty breakfast or lunch with minimal effort during the week.

2. Can I freeze the leftovers?

While this dish is best enjoyed fresh, you can freeze leftovers for up to a month. Just make sure to let the scramble cool completely before transferring it to an airtight container or freezer bag. To reheat, simply thaw overnight in the refrigerator and warm it up in a skillet. Note that the texture of the cabbage may change slightly after freezing, but the flavor will still be delicious.

3. Is this recipe suitable for a vegan diet?

Yes, this dish can easily be adapted for a vegan diet by omitting the eggs and substituting them with crumbled tofu or a plant-based egg substitute. To make the scramble even more hearty, you can also add chickpeas or other legumes to boost the protein content.

4. Can I add other vegetables to the dish?

Absolutely! This recipe is highly adaptable. Feel free to add vegetables like bell peppers, mushrooms, spinach, or even zucchini for added flavor and nutrients. You can also experiment with different herbs and spices to enhance the flavor profile. A sprinkle of turmeric or cumin can add a wonderful depth, while fresh herbs like parsley or dill can provide a fresh, aromatic finish.

5. Can I make this dish spicier?

If you enjoy a bit of heat, you can easily add some chili flakes, cayenne pepper, or a chopped fresh chili to the dish. The sweetness of the carrots and cabbage will balance out the spiciness, creating a flavorful contrast. Add the spices gradually to suit your taste.

6. What can I serve with this dish?

This scramble is delicious on its own but also pairs beautifully with a variety of side dishes. For a hearty breakfast, serve it with some crispy toast, a dollop of avocado, or a side of roasted potatoes. For lunch or dinner, you can pair it with a simple green salad or a portion of brown rice or quinoa. The dish is also great for meal prepping, as it complements other grains and vegetables well.

7. Can I use pre-shredded cabbage for this recipe?

While fresh cabbage is always preferred for this dish, pre-shredded cabbage can be used in a pinch. Just be sure to check the texture and moisture content, as pre-shredded cabbage can sometimes be a bit drier than fresh cabbage. If using pre-shredded cabbage, you may need to adjust the cooking time slightly.

8. How can I make this dish more filling?

To make this dish more filling, consider adding protein-packed ingredients like cooked chicken, turkey, sausage, or even tofu. For a vegetarian option, you can stir in some cooked quinoa or beans for extra fiber and protein. The great thing about this recipe is that it can easily be turned into a full meal with just a few additions.

Nutritional Benefits: What Makes This Dish So Healthy?

The Savory Cabbage and Carrot Scramble is not only tasty but also packed with nutrients. Here’s a closer look at the health benefits of some of the key ingredients:

Cabbage: This cruciferous vegetable is an excellent source of vitamin C, a powerful antioxidant that supports immune function and skin health. It’s also rich in fiber, which aids digestion and helps maintain healthy cholesterol levels. Cabbage is low in calories and high in water content, making it a great option for weight management.

Carrots: Carrots are loaded with beta-carotene, which the body converts into vitamin A. This vitamin is essential for maintaining good vision, supporting a healthy immune system, and promoting healthy skin. Carrots also provide a good amount of fiber, which helps regulate digestion and maintain a feeling of fullness.

Eggs: Eggs are a rich source of high-quality protein, containing all the essential amino acids that the body needs for muscle repair and growth. They also provide important nutrients like vitamin B12, choline, and selenium, which support brain health, energy production, and immune function.

Garlic and Onion: Both garlic and onion are known for their numerous health benefits. Garlic contains compounds like allicin, which have anti-inflammatory and antioxidant properties, while onions are rich in flavonoids that help reduce inflammation and promote heart health.

Conclusion: A Simple Dish with Endless Possibilities

The Savory Cabbage and Carrot Scramble is a dish that embodies everything I love about home cooking — simplicity, nourishment, and the ability to bring people together. With just a few fresh ingredients, you can create a meal that’s not only delicious but also packed with health benefits. Whether you’re cooking for yourself, your family, or friends, this dish is a reminder that the best meals don’t need to be complicated; they just need to be made with love.

This recipe has become a go-to in my home, and I’m sure it will be in yours too. It’s a dish that can be enjoyed any time of day, and it’s adaptable enough to suit any occasion or dietary preference. So, next time you find yourself with a head of cabbage and a few simple ingredients, remember this recipe — it’s a comforting, wholesome meal that will leave everyone feeling nourished and satisfied.

Amal

Savory Cabbage and Carrot Scramble: A Comforting, Wholesome Meal

This Savory Cabbage and Carrot Scramble is a simple yet nourishing dish perfect for any time of day. Tender cabbage, sweet carrots, and savory onions come together in a quick, flavorful scramble that is both comforting and nutritious. With a generous dose of eggs to tie everything together, this dish provides a wholesome and satisfying meal that is quick to prepare.
Prep Time 10 minutes
Cook Time 15 minutes
Total Time 25 minutes
Servings: 4 –6 servings
Course: Main Dish
Cuisine: Vegetarian

Ingredients
  

  • 1 kg 35 oz cabbage, thinly sliced
  • 1 medium onion finely chopped
  • 1 carrot grated
  • 3 cloves garlic minced
  • 5 large eggs
  • Salt and pepper to taste
  • Olive oil or your preferred cooking oil

Method
 

  1. Heat a tablespoon of olive oil in a large skillet over medium heat. Add the finely chopped onion and sauté for 4-5 minutes until softened.
  2. Stir in the grated carrot and cook for another 2 minutes, allowing it to become tender.
  3. Add the minced garlic to the skillet and cook for 1-2 minutes until fragrant.
  4. Add the thinly sliced cabbage to the pan, stirring to combine. Season with salt and pepper. Cook the mixture for 8-10 minutes, stirring occasionally, until the cabbage becomes tender and slightly caramelized.
  5. In a separate bowl, whisk the eggs until well combined. Pour the eggs into the skillet, stirring gently to incorporate them with the vegetables. Cook for another 3-5 minutes until the eggs are scrambled and fully cooked through.
  6. Taste and adjust seasoning with additional salt and pepper if needed, then serve warm.

Notes

  • You can prepare this dish ahead of time and store it in the refrigerator for 2-3 days. Reheat in a skillet for a quick meal.
  • For a vegan version, simply omit the eggs and use crumbled tofu or another egg alternative. You can also add chickpeas for an added protein boost.
  • Add some chili flakes or hot sauce if you like a bit of spice in your meal.
  • Feel free to experiment by adding other vegetables like bell peppers, zucchini, or spinach to the scramble for extra flavor and nutrition.

Summer Garden Zucchini Casserole: A Taste of Comfort and Freshness

I remember the first time I made this Summer Garden Zucchini Casserole. It was one of those days when the sun was shining brightly, and the warm breeze carried the promise of a delicious dinner shared with family. My garden had overflowed with fresh zucchini, and I was looking for a way to make use of all the beautiful vegetables that had flourished over the summer. The thought of creating a dish that combined the vibrant flavors of garden-fresh zucchini with the rich, comforting textures of a casserole was too tempting to resist. I wanted something that was both light and hearty, satisfying yet not too heavy, and that could hold the attention of my whole family.

As the casserole baked in the oven, the savory aroma of roasted vegetables filled my home, and soon, everyone was gathered around the dinner table, eagerly anticipating a bite. The casserole had that perfect balance of flavors: the sweet undertones of sautéed onions and peppers, the hearty richness of melted cheese, and the refreshing crispness of zucchini. Each bite was like a warm hug, a reminder of the simple joys of cooking and family.

This recipe has become a tradition in our home, not just for its incredible taste, but for the memories it creates. It’s a dish that brings us together and reminds us of the beauty of fresh, seasonal ingredients. Whether served for a casual family dinner, a potluck, or a gathering with friends, this Summer Garden Zucchini Casserole is sure to become a favorite in your home, just as it has in mine.

Why This Casserole Is a Must-Try

There’s something undeniably special about a casserole that brings together a medley of ingredients and transforms them into something greater than the sum of its parts. The Summer Garden Zucchini Casserole is no exception. The beauty of this dish lies in its simplicity, with the fresh, natural flavors of zucchini, peppers, and tomatoes shining through, while the savory cheese and seasonings add depth and richness.

Not only is this casserole a celebration of fresh vegetables, but it also offers an opportunity to experiment with different flavor combinations. If you’re looking to add a bit of heat, you can easily incorporate red pepper flakes or a dash of hot sauce. For a heartier version, add cooked chicken, ground turkey, or even quinoa. The versatility of this recipe allows you to customize it to your liking, whether you’re sticking to the original recipe or creating your own twist.

Ingredients

IngredientQuantity
Zucchini, peeled and cut into cubes2 medium-sized
SaltTo taste
Onion, chopped1 medium-sized
Olive oil2 tablespoons
Sweet green peppers, diced2
Garlic, chopped3 cloves
Tomatoes, diced3 medium-sized
Tomato paste1 tablespoon
Black pepper1/4 teaspoon
Paprika1/4 teaspoon
Dried basil1/4 teaspoon
Cheese (grated)100 grams (3.5 oz)

Directions:

  1. Preheat your oven to 375°F (190°C).
  2. In a large skillet, heat the olive oil over medium heat. Add the chopped onion and sweet green peppers, sautéing until softened, about 5-7 minutes.
  3. Add the garlic and cook for an additional 1-2 minutes, until fragrant.
  4. Stir in the diced tomatoes, tomato paste, black pepper, paprika, and dried basil. Let the mixture simmer for about 5 minutes until it thickens slightly.
  5. In a large casserole dish, combine the sautéed mixture with the zucchini cubes and salt. Mix well to ensure everything is evenly coated.
  6. Top the casserole with the grated cheese, spreading it evenly across the surface.
  7. Bake in the preheated oven for 20-25 minutes, or until the zucchini is tender and the cheese is melted and golden.
  8. Let the casserole rest for a few minutes before serving.

Nutritional Information (per serving):

NutrientAmount per Serving
Calories160 kcal
Protein4g
Carbohydrates14g
Fiber3g
Sugars6g
Fat11g
Saturated Fat3g
Sodium220mg
Calcium150mg

Frequently Asked Questions (FAQs)

1. Can I use frozen zucchini in this recipe?

While fresh zucchini is always the best choice for this casserole due to its texture and flavor, frozen zucchini can be used if fresh zucchini is unavailable. However, frozen zucchini tends to release more moisture during cooking, which can result in a slightly different texture. To mitigate this, it’s a good idea to thaw and drain the zucchini before adding it to the casserole.

2. Can I prepare this casserole ahead of time?

Yes! One of the great things about this Summer Garden Zucchini Casserole is that it can be prepared in advance. You can assemble the casserole the night before, cover it with foil, and store it in the refrigerator. The next day, simply bake it in the oven until the cheese is melted and bubbly. This makes it a fantastic option for busy nights or for entertaining guests.

3. Can I substitute the cheese for a dairy-free alternative?

Absolutely! If you are following a dairy-free diet or have a lactose intolerance, you can easily swap out the cheese for a plant-based alternative. There are several excellent dairy-free cheeses on the market that melt beautifully, such as those made from cashews or coconut milk. You can also use nutritional yeast for a cheesy flavor without the dairy.

4. How can I make this dish more filling?

If you want to make this casserole a more substantial meal, you can add some protein to it. Adding cooked chicken, ground turkey, or even crumbled tofu can turn this side dish into a main course. If you’re looking for a vegetarian option, consider adding beans like black beans or chickpeas for a hearty, plant-based protein boost.

5. Can I freeze this casserole?

Yes, this casserole freezes wonderfully! After baking, allow it to cool completely, then wrap it tightly with plastic wrap or aluminum foil before placing it in the freezer. When you’re ready to enjoy it, simply thaw it in the refrigerator overnight and reheat in the oven. This makes it a great make-ahead meal for busy days when you don’t feel like cooking.

6. Can I substitute other vegetables in this casserole?

Absolutely! While zucchini is the star of the show in this recipe, you can easily substitute it with other summer vegetables such as yellow squash, eggplant, or even mushrooms. The key is to use vegetables that have similar moisture content and cooking times to zucchini, so they don’t release too much water into the casserole.

7. Is this casserole gluten-free?

Yes, this Summer Garden Zucchini Casserole is naturally gluten-free! However, if you’re using breadcrumbs for a crunchy topping, make sure to choose gluten-free breadcrumbs or omit them altogether. The casserole is delicious without any breadcrumbs as well.

Nutritional Benefits of Summer Garden Zucchini Casserole

Not only is this casserole a comforting and satisfying meal, but it also packs a punch when it comes to nutrition. Zucchini, the main ingredient in this dish, is a low-calorie vegetable that is rich in vitamins A and C, potassium, and fiber. It’s also a great source of antioxidants, which help to fight free radicals in the body and promote overall health.

The sweet peppers and tomatoes add additional vitamins and minerals, contributing to a well-rounded, nutrient-dense meal. Onions and garlic, staples in any savory dish, are known for their immune-boosting properties and their ability to enhance the flavors of the other ingredients.

The addition of cheese provides calcium, which is essential for strong bones and teeth, as well as protein to help build and repair tissues in the body. You can make this dish even more nutrient-dense by adding lean proteins like chicken or tofu, or by incorporating quinoa for a gluten-free, protein-packed base.

A Meal for All Occasions

Whether you’re looking for a side dish for a summer barbecue, a comforting family dinner, or a dish to take to a potluck, this Summer Garden Zucchini Casserole is the perfect choice. It’s the kind of recipe that can easily be adapted to suit your dietary preferences, and it’s always a crowd-pleaser. The combination of fresh vegetables, savory seasonings, and gooey cheese makes for a dish that feels both wholesome and indulgent.

The best part? It’s incredibly easy to prepare. You don’t need to be a master chef to pull this dish together, making it a great option for novice cooks or busy weeknights. Plus, it’s a great way to make use of the abundant summer vegetables that are often sitting in your garden or at your local farmer’s market.

Conclusion: A Dish That Brings People Together

As with any recipe that is passed down or shared over the years, the Summer Garden Zucchini Casserole holds more than just its delicious flavors—it carries with it memories, traditions, and the simple joy of cooking for loved ones. This casserole is more than just a meal; it’s an experience. It’s a dish that brings people together at the dinner table, encourages conversation, and sparks memories that will last for years to come.

So, whether you’re making it for a quiet night at home, or serving it as part of a larger feast, this casserole will be a comforting and satisfying choice. With its vibrant colors, fresh flavors, and easy preparation, it’s sure to become a cherished dish in your own kitchen, just as it has in mine. Take a bite, savor the moment, and share the love.

Amal

Summer Garden Zucchini Casserole: A Taste of Comfort and Freshness

If you’re looking for a comforting yet healthy meal, this Summer Garden Zucchini Casserole is the perfect option. Packed with fresh garden vegetables, rich seasonings, and a delicious layer of melted cheese, this casserole offers the best of summer’s bounty in every bite. Whether you’re serving it as a side dish or making it the main course, it’s a dish that will impress everyone at the table.
Prep Time 15 minutes
Cook Time 25 minutes
Total Time 40 minutes
Servings: 4 –6 servings
Course: Main Dish
Cuisine: Mediterranean-Inspired

Ingredients
  

  • 2 medium zucchini peeled and cut into cubes
  • Salt to taste
  • 1 medium onion chopped
  • 2 tablespoons olive oil
  • 2 sweet green peppers diced
  • 3 cloves garlic chopped
  • 3 medium tomatoes diced
  • 1 tablespoon tomato paste
  • 1/4 teaspoon black pepper
  • 1/4 teaspoon paprika
  • 1/4 teaspoon dried basil
  • 100 grams 3.5 oz cheese, grated (cheddar, mozzarella, or your choice)

Method
 

  1. Preheat your oven to 375°F (190°C).
  2. Heat olive oil in a large skillet over medium heat. Add the chopped onion and sweet green peppers. Sauté for 5-7 minutes until they become soft and fragrant.
  3. Add the garlic and cook for another 1-2 minutes, stirring to release the flavors.
  4. Stir in the diced tomatoes, tomato paste, black pepper, paprika, and dried basil. Let the mixture simmer for 5 minutes, allowing it to thicken slightly.
  5. In a large casserole dish, combine the sautéed vegetables with the zucchini cubes and season with salt to taste. Mix everything together until well combined.
  6. Sprinkle the grated cheese evenly over the top of the casserole.
  7. Bake for 20-25 minutes, or until the zucchini is tender and the cheese has melted and is golden.
  8. Let it cool for a few minutes before serving, and enjoy!

Notes

  • You can prepare this casserole ahead of time and store it in the refrigerator overnight. Simply bake it when ready to serve.
  • Feel free to substitute the cheese with a dairy-free alternative to make it vegan-friendly.
  • For a heartier meal, add cooked chicken, turkey, or quinoa to the casserole.
  • Frozen zucchini can be used if fresh zucchini is unavailable, but be sure to thaw and drain it before adding to the dish.
  • You can freeze the casserole for future meals. Just make sure it cools completely before freezing.

Recipe That Saved My Busy Morning: The Power of Quick and Simple Meals

There’s something inherently comforting about a meal that brings both joy and nostalgia—especially when it’s one that saves the day. This dish, a simple and satisfying combination of tofu, eggs, sausage, and a few veggies, has become a beloved morning ritual in my home. For me, it’s more than just a recipe; it’s a story, a piece of my heart, and the solution to the endless rush of mornings filled with chaos.

As a parent, mornings can feel like a whirlwind—getting everyone ready, packing lunches, and making sure we’re all out the door on time. The struggle is real, but there’s one thing that always helps me stay grounded: breakfast. This dish became my secret weapon during those hectic mornings when I felt overwhelmed and underprepared.

I remember a particularly challenging week, where everything seemed to be moving at lightning speed. School events, work deadlines, and family commitments all collided in a way that left little room for anything else. I was scrambling to find something quick yet nutritious for my son before we rushed out the door, and that’s when this dish came to mind. The simplicity of it—yet the flavor and nourishment it provided—was just what we needed.

My son, who often insists on a hearty breakfast, immediately fell in love with the taste. It was rich, satisfying, and full of familiar flavors that we both adored. It became a go-to dish, not only saving time but also offering comfort in those precious morning moments.

Now, whenever life gets busy, this recipe is my little slice of calm. It’s a reminder that sometimes the simplest meals have the power to bring the most joy—and can be made in mere minutes, which is exactly what makes it so special. It may not be fancy, but it’s a meal that brings me back to those moments of connection and love with my family, even in the busiest of times.

Why This Recipe Works: Simple Yet Nourishing

In today’s world, we often overcomplicate things—especially when it comes to meals. However, there’s something beautiful about a dish that’s straightforward, yet provides everything your body needs in a single bite. This recipe works because it strikes the perfect balance of protein, flavor, and nutrients.

Tofu, while often overlooked, is a fantastic source of plant-based protein. It’s versatile, taking on the flavor of whatever you pair it with, which makes it the perfect addition to this dish. It’s also rich in calcium, iron, and other essential minerals, making it a great choice for those who want to reduce their meat consumption but still need a protein-packed meal.

Eggs are a nutritional powerhouse, full of high-quality protein and healthy fats. They provide energy and help keep you full throughout the morning. When combined with tofu, eggs create a satisfying and well-rounded meal that fuels your body for the day ahead.

The addition of sausage adds a savory element, which contrasts nicely with the mild flavor of tofu and the creaminess of scrambled eggs. If you want to make it healthier, you can opt for turkey sausage or plant-based alternatives.

Finally, the inclusion of carrot and green onions brings a boost of vitamins, minerals, and fiber. These vegetables not only enhance the taste but also add texture and color, making the dish visually appealing as well.

Ingredients

IngredientAmount
Tofu3 pieces
Eggs6
Green onions2 stalks
Sausage1
Carrot1

Directions:

  1. Prepare the Ingredients: Drain the tofu and cut it into bite-sized cubes. Set aside.
  2. Prepare the Vegetables: Grate the carrot and slice the green onions thinly.
  3. Cook the Sausage: In a large skillet, cook the sausage over medium heat until fully cooked through, breaking it apart with a spatula into crumbles.
  4. Scramble the Eggs: In a bowl, beat the eggs and season with a pinch of salt and pepper. Pour the eggs into the skillet with the sausage and scramble until just set.
  5. Add the Tofu and Vegetables: Gently fold the tofu cubes, grated carrot, and green onions into the egg and sausage mixture. Cook for another 2-3 minutes until everything is heated through and well combined.
  6. Serve and Enjoy: Serve immediately, either on its own or with a side of rice or toast for a complete meal.

Nutritional Information (Per Serving)

NutrientAmount
Calories290 kcal
Protein22 g
Carbohydrates10 g
Fat20 g
Saturated Fat6 g
Fiber3 g
Sugar4 g
Sodium450 mg

How to Customize This Recipe to Your Taste

One of the best things about this recipe is its flexibility. You can easily tweak the ingredients to suit your tastes, dietary preferences, or what you have on hand in your kitchen. Here are a few ideas to customize the dish:

Add More Veggies

The beauty of this dish lies in its simplicity, but that doesn’t mean it can’t be enhanced with more vegetables. Try adding spinach, bell peppers, or mushrooms for added flavor, color, and nutritional value. Sautéed zucchini or broccoli also work well.

Make It Spicy

If you enjoy a little heat in your meals, you can add chili flakes, jalapeños, or a dash of hot sauce to spice things up. The creamy eggs and tofu pair beautifully with a bit of heat, creating a flavor balance that is both comforting and exciting.

Switch Up the Protein

While sausage adds a savory kick to the dish, feel free to swap it out based on your preferences. Bacon, chicken sausage, or ground turkey would make a great alternative. For a vegetarian option, you could opt for vegan sausage or even tempeh for a plant-based protein boost.

Vegan Option

For those who follow a vegan diet, you can easily make this dish without the eggs and sausage. Simply scramble tofu in place of the eggs and use a plant-based sausage or skip the protein altogether. This version is still delicious and packed with protein.

Making the Most of Your Morning: Tips for Efficient Cooking

It’s no secret that mornings can be rushed, and sometimes it feels like there’s never enough time to get everything done. Here are a few tips to help you make this recipe in just a few minutes, without adding stress to your already-packed morning:

Prep Ahead of Time

If you’re really in a rush, consider prepping your ingredients the night before. Drain and cube the tofu, chop the vegetables, and even cook the sausage in advance. Then, when it’s time to cook in the morning, all you have to do is scramble the eggs, heat the ingredients, and serve.

Use a Nonstick Pan

Using a nonstick pan makes cooking and cleaning up easier. It prevents sticking, especially when cooking the eggs and tofu, and ensures that everything cooks evenly and smoothly.

Keep It Simple

Sometimes, the key to a successful breakfast is keeping it simple. The beauty of this dish is that you don’t need to overthink it. Use what you have on hand, and make adjustments based on your schedule. Even if you skip one ingredient, it can still taste delicious.

FAQs: Everything You Need to Know

Can I make this dish ahead of time?

Yes! If you’re preparing for a busy week, you can make this dish ahead of time and store it in the fridge for up to 2-3 days. Simply reheat it in a skillet or microwave when you’re ready to eat.

What if I don’t have tofu?

If you don’t have tofu on hand, you can use chickpeas, cottage cheese, or even avocado as a substitute. These will provide a creamy texture and a good source of protein.

Can I make this recipe dairy-free?

Absolutely! Simply swap the eggs with a plant-based egg alternative or scrambled tofu, and use a dairy-free sausage if you prefer. This makes for a completely dairy-free meal.

How can I make this more filling?

If you want to make this dish even more filling, serve it with a side of avocado toast, whole-grain toast, or quinoa for a boost of fiber and healthy fats.

Conclusion: A Recipe that Brings Comfort and Energy

In the whirlwind of life, especially in the busy mornings, having a quick, nutritious, and satisfying meal at the ready can make all the difference. This Egg and Tofu Dish has been a saving grace in our house, offering a comforting and nourishing start to the day. It’s simple to prepare, versatile, and always hits the spot, whether you’re making it for yourself or sharing it with loved ones.

This recipe is proof that even in the busiest moments, taking time to prepare a thoughtful, nourishing meal can bring warmth, energy, and a sense of connection. It’s not just about feeding the body; it’s about feeding the soul. And in my case, this dish has become a small ritual that helps me navigate even the most hectic mornings with a little more ease and a lot more joy.

Amal

Recipe That Saved My Busy Morning: The Power of Quick and Simple Meals

This quick and delicious dish is a perfect way to start your day! It’s packed with protein, vitamins, and flavor. The combination of scrambled eggs, tofu, sausage, and veggies creates a nutritious and satisfying breakfast that can be made in just 5 minutes. It’s a family favorite that my son loves, and it has quickly become a staple in our morning routine.
Prep Time 5 minutes
Cook Time 10 minutes
Total Time 15 minutes
Servings: 4 –6 servings
Course: Breakfast
Cuisine: American Comfort Food

Ingredients
  

  • 3 pieces of tofu
  • 6 eggs
  • 2 stalks of green onions sliced
  • 1 sausage your choice of type
  • 1 carrot grated

Method
 

  1. Prepare the Ingredients: Drain the tofu and cut it into bite-sized cubes. Set aside. Grate the carrot and slice the green onions thinly.
  2. Cook the Sausage: In a large skillet, cook the sausage over medium heat, breaking it into small crumbles as it cooks until fully browned and cooked through.
  3. Scramble the Eggs: In a bowl, beat the eggs with a pinch of salt and pepper. Pour the eggs into the skillet with the sausage, scrambling them until they are just set.
  4. Add Tofu and Vegetables: Gently fold in the tofu cubes, grated carrot, and sliced green onions into the egg mixture. Cook for another 2-3 minutes, stirring occasionally until everything is heated through.
  5. Serve and Enjoy: Serve immediately, either on its own or with a side of rice, toast, or any other breakfast sides you prefer.

Notes

  • Customizations: Feel free to add other vegetables like bell peppers, spinach, or mushrooms. You can also switch out the sausage for turkey sausage, bacon, or a plant-based sausage for a different flavor.
  • Storage: Leftovers can be stored in the fridge for up to 2 days. Reheat in a skillet or microwave before serving.
  • Vegan Option: Substitute eggs with a plant-based scramble or simply add more tofu for extra protein.
  • Spicy Version: Add chili flakes or fresh chopped jalapeños for a spicy twist.

A Heartwarming Meal: The Comfort of Egg and Tofu

There are moments in life when the simplest meals hold the most profound memories. For me, the Egg and Tofu Dish represents not only the combination of flavors but a chapter from my childhood that I hold dear. Growing up, my family didn’t always have access to the fanciest ingredients. But we made do with what we had—simple, wholesome food that filled our bellies and our hearts. My mother, a woman with an unshakable love for food, could create something magical from the most humble ingredients.

I remember a particular winter evening when we’d come inside from the cold, our cheeks flushed with the brisk air. The house smelled of something savory, the scent of eggs, tofu, and sausage filling the air. It was a dish that always felt like home—warm, comforting, and nourishing. The tofu, soft and delicate, paired perfectly with the rich eggs and the savory sausage. It wasn’t just the taste, though; it was the comfort of sitting around the dinner table with my family, sharing stories and laughter over this simple yet flavorful meal.

To this day, I prepare this dish whenever I need to reconnect with those memories—those moments of warmth and love that only a home-cooked meal can provide. While the ingredients may be common, the comfort they provide is anything but ordinary. This dish, which takes just a few minutes to prepare, serves as a reminder that even the simplest meals have the power to nourish both the body and the soul.

Why Tofu and Eggs Together? A Nutritional Powerhouse

When you think of tofu, you may not immediately think of it as a main ingredient in savory dishes like eggs. Yet, combining tofu with eggs creates a harmonious balance of protein, texture, and flavor that is surprisingly satisfying. The tofu, which absorbs the flavors around it, becomes a soft and mild base that complements the rich, velvety texture of scrambled eggs. Add in the sausage for an extra layer of savoriness, and you have a complete, hearty meal that will leave you feeling full and satisfied.

The addition of tofu isn’t just for flavor; it’s a nutritional powerhouse. Tofu is an excellent source of plant-based protein and is rich in iron, calcium, and other essential minerals. Eggs, on the other hand, provide a complete protein source with healthy fats and important vitamins. Together, they make a balanced meal that provides energy and nourishment. If you are someone looking to eat more plant-based foods or simply want a meal that’s both filling and nutritious, this dish is perfect.

Additionally, the carrot and green onions in the recipe bring a splash of color, texture, and an added dose of vitamins and antioxidants. Not only do these vegetables enhance the flavor, but they also contribute to the dish’s overall health benefits. The best part? This meal is versatile and can be tailored to your dietary needs, whether you prefer vegetarian, low-carb, or even gluten-free options.

Ingredients

IngredientAmount
Tofu3 pieces
Eggs6
Green onions2 stalks
Sausage1
Carrot1

Directions

  1. Prepare the Ingredients: Drain the tofu and cut it into bite-sized cubes. Set aside.
  2. Prepare the Vegetables: Peel and grate the carrot. Slice the green onions thinly.
  3. Cook the Sausage: In a large skillet, cook the sausage over medium heat until fully cooked through, breaking it apart with a spatula into crumbles.
  4. Scramble the Eggs: In a bowl, beat the eggs and season with a pinch of salt and pepper. Pour the eggs into the skillet with the sausage and scramble until just set.
  5. Add the Tofu and Vegetables: Gently fold the tofu cubes, grated carrot, and green onions into the egg and sausage mixture. Cook for another 2-3 minutes until everything is heated through and well combined.
  6. Serve and Enjoy: Serve immediately, either on its own or with a side of rice or toast for a complete meal.

Nutritional Information (Per Serving)

NutrientAmount
Calories290 kcal
Protein22 g
Carbohydrates10 g
Fat20 g
Saturated Fat6 g
Fiber3 g
Sugar4 g
Sodium450 mg

A Meal for Every Occasion

One of the things I love most about the Egg and Tofu Dish is its versatility. It can be served for breakfast, lunch, or dinner, making it a go-to meal for busy days or for moments when you want something both easy and comforting.

On a busy weekday morning, I often make this dish for breakfast. It’s quick and satisfying, giving me the energy I need to start the day. If you have a hectic schedule, this dish can be prepared in under 15 minutes, making it a perfect option for those mornings when time is short but you still want something nourishing.

For lunch, this dish can be served alongside a simple side salad or some steamed rice. It’s filling without being overly heavy, making it a great midday meal that will keep you going through the afternoon. It’s also easy to pack and take to work, ensuring that you have a nutritious meal on hand even when you’re on the go.

And for dinner? This dish makes a wonderful, low-effort evening meal. Whether you’re cooking for yourself or for family and friends, the flavors are satisfying, and the ingredients are familiar yet delicious. It can easily be scaled up or down, depending on the number of people you’re serving.

Creative Variations and Tips

While this basic version of the Egg and Tofu Dish is delicious as it is, the possibilities for customization are endless. Here are a few variations and tips to take your dish to the next level:

Add More Vegetables

To make the dish even more nutritious and vibrant, consider adding more vegetables. Mushrooms, spinach, bell peppers, or zucchini would all make great additions. You can sauté them along with the carrots and green onions for added flavor and texture.

Make It Spicy

If you enjoy a bit of heat, add some chili flakes, sriracha, or chopped fresh chili to the dish. The heat will complement the richness of the eggs and tofu, giving the dish a fiery twist.

Try Different Proteins

While sausage is a delicious choice, feel free to experiment with other proteins. Bacon, ground turkey, or even tofu bacon can be used for a vegetarian option. For a more traditional approach, you could even add shredded chicken or beef to the mix.

Make It Vegan

For a vegan version of this dish, simply replace the eggs with a tofu scramble or chickpea flour scramble. You can also swap out the sausage for plant-based sausage or another favorite vegan protein source.

Frequently Asked Questions (FAQs)

Can I use firm tofu instead of soft tofu?

Yes, you can use firm tofu if you prefer a slightly firmer texture. However, soft tofu is typically used in this dish because it absorbs the flavors more easily and gives the dish a creamier consistency. If you use firm tofu, you may want to crumble it or press it lightly to achieve a similar texture.

How can I make this dish lower in calories?

If you’re looking to reduce the calorie content, you can use fewer eggs or opt for egg whites instead. You can also reduce the amount of sausage used or substitute it with a leaner protein such as turkey or chicken sausage.

Can I make this dish ahead of time?

Yes, you can prepare the egg and tofu mixture ahead of time and store it in the refrigerator for up to 24 hours. When you’re ready to eat, simply reheat it in a skillet and serve. This makes for a convenient meal option on busy days.

What can I serve this dish with?

This dish can be paired with a variety of sides, such as steamed rice, quinoa, or a simple green salad. For a lighter option, serve it with fresh fruit or some whole-grain toast.

Conclusion – The Joy of Simple Comfort

At the end of the day, it’s the simple meals that often bring the most joy. The Egg and Tofu Dish is a testament to the power of simplicity. It’s a meal that brings nourishment to both the body and the soul, creating a sense of warmth and comfort that lingers long after the last bite. Whether you’re cooking it for yourself, your family, or friends, this dish is a reminder that food, at its core, is about connection. It’s not just about filling your stomach; it’s about sharing a moment, a memory, and a meal that makes you feel at home.

So next time you’re looking for a quick, satisfying dish that’s packed with flavor and goodness, look no further than this Egg and Tofu Dish. It’s more than just food—it’s an experience, a story, and a piece of home all in one.

Amal

A Heartwarming Meal: The Comfort of Egg and Tofu

A savory and comforting meal that blends soft tofu, scrambled eggs, and savory sausage, with a touch of fresh green onions and carrots. This simple yet flavorful dish is perfect for breakfast, lunch, or dinner, offering a nutritious, protein-packed meal for any occasion.
Prep Time 10 minutes
Cook Time 10 minutes
Total Time 20 minutes
Servings: 4 –6 servings
Course: Lunch
Cuisine: Asian-inspired

Ingredients
  

  • 3 pieces of tofu
  • 6 eggs
  • 2 stalks of green onions
  • 1 sausage your choice of type
  • 1 carrot

Method
 

  1. Drain the tofu and cut it into bite-sized cubes. Set aside.
  2. Grate the carrot and slice the green onions thinly.
  3. Cook the sausage in a skillet over medium heat, breaking it into small crumbles.
  4. In a bowl, beat the eggs and season with a pinch of salt and pepper.
  5. Add the beaten eggs to the skillet with the sausage and scramble until fully cooked.
  6. Gently fold in the tofu cubes, grated carrot, and green onions. Cook for another 2-3 minutes until everything is well mixed and heated through.
  7. Serve immediately, paired with rice or toast if desired.

Notes

  • Storage: Leftovers can be stored in the fridge for up to 2 days. Reheat gently in a skillet or microwave.
  • Variations: Feel free to experiment with different types of sausage or add extra veggies like bell peppers, mushrooms, or spinach for a different twist.
  • Vegan Option: Swap the eggs with scrambled tofu or a plant-based egg substitute for a fully vegan dish.

A Taste of Home – The Comfort of Cocoa Honey-Brushed Crepes”

There are some foods that are so deeply tied to memories that the mere scent or taste can take you back in time. For me, crepes are one of those foods. I can still recall the early mornings spent with my grandmother, the kitchen warm with the scent of freshly brewed coffee and the subtle, comforting aroma of crepes cooking on the stove. My grandmother had a way of making even the simplest meals feel extraordinary. She wasn’t a chef with Michelin stars or an influencer posting perfectly styled plates, but in her kitchen, she created magic.

Every Sunday, she would make crepes—light, delicate, and just a little bit crispy on the edges. They were never fussy, just simple, with a little sugar and butter to start, or sometimes with a drizzle of honey that soaked into the warm crepe like an old friend returning home. It wasn’t about the ingredients or the process; it was about the love that went into every fold. These crepes, much like the memories they bring, were simple, yet filled with a warmth that’s hard to describe.

The recipe I’m sharing here is a tribute to those mornings. A mix of nostalgia, simplicity, and a little twist of chocolate with cocoa powder and honey for an added layer of sweetness. These crepes are everything I remember about those Sunday mornings—light, soft, and delicious, with just a hint of indulgence.

Crepes: More Than Just a Meal – A Story of Simplicity and Comfort

Crepes are the ultimate comfort food. Not quite a pancake, not quite a dessert, they find themselves in that perfect middle ground where they can be served sweet or savory, depending on the mood or the occasion. In many ways, crepes are a reflection of life’s simpler pleasures: they are humble, adaptable, and filled with possibilities.

There’s something magical about watching batter transform into a delicate, paper-thin pancake. The way it moves in the pan, filling the air with a soft, buttery scent, is a joy all its own. And even though crepes may appear intimidating to some, they are actually deceptively simple. Once you have the basics down, the variations are endless—whether you want them lightly dusted with sugar, filled with fresh fruit, or drizzled with decadent honey, like the ones in this recipe.

But for me, the best part of crepes is how they bring people together. I can still hear my grandmother’s laughter as she passed me a warm, golden crepe with a dollop of jam, inviting me to come closer to the kitchen table. In those moments, life felt simple. The crepes were just the backdrop for what really mattered—the connection, the conversation, and the shared joy of food made with love.

Ingredients

IngredientAmount
Eggs4
SaltA pinch
Vanillin1 teaspoon
Sugar50 g
Milk600 ml, added in portions
All-purpose flour250 g
Corn starch50 g
Butter, melted25 g
Cocoa powder15 g
HoneyFor brushing

Directions

  1. In a mixing bowl, beat the eggs with a pinch of salt, vanillin, and sugar until smooth and slightly frothy.
  2. Gradually add in the milk (in 2–3 portions), whisking continuously to prevent lumps.
  3. Sift in the flour, corn starch, and cocoa powder. Whisk until you achieve a smooth, lump-free batter.
  4. Stir in the melted butter and mix well. Let the batter rest for 10–15 minutes to relax the gluten.
  5. Heat a non-stick skillet or crepe pan over medium heat. Lightly grease with butter if necessary.
  6. Pour a small ladle of batter into the pan, swirling to cover the bottom in a thin layer.
  7. Cook for about 1–2 minutes on one side until the edges lift easily and the underside is golden. Flip and cook the other side briefly.
  8. Repeat with the remaining batter.
  9. While warm, brush each crepe lightly with honey for a beautiful sheen and natural sweetness.
  10. Serve stacked, folded, or rolled with your favorite fillings or just as they are.

Nutritional Information (Per Crepe, approx. 1 of 12)

NutrientAmount
Calories140 kcal
Carbohydrates18 g
Protein4 g
Fat5 g
Saturated Fat2 g
Fiber1 g
Sugar5 g
Sodium40 mg

Why Cocoa and Honey? A Perfect Pairing for the Soul

You might wonder why I chose to add cocoa powder and honey to this recipe. The answer is simple: it was a way to bring a little more richness to an already beloved classic. Cocoa, with its deep, bittersweet notes, gives the crepes a subtle chocolate flavor that’s not overpowering but adds a little luxury to the meal. Honey, on the other hand, evokes warmth and nostalgia, reminding me of sweet mornings spent in the kitchen with loved ones.

But the choice also goes beyond taste. It’s about creating a moment of indulgence—a reminder that even the most humble meals can be made special with just a little bit of effort. In the hustle of our daily lives, it’s easy to forget the value of a slow morning with good food. These cocoa honey-brushed crepes are an invitation to pause, savor, and enjoy.

Crepes: The Ultimate Canvas for Creativity

One of the reasons I love crepes so much is because they can be adapted to whatever you feel like eating. Their versatility makes them an endless canvas for creativity. You can experiment with different fillings, toppings, and even batter variations. For a savory twist, try adding spinach, cheese, and mushrooms. For a lighter option, swap in some almond milk for the dairy, or experiment with gluten-free flour if you have dietary restrictions.

Here are a few ideas to elevate your crepe game further:

  • Sweet Fillings: Fresh berries, whipped cream, or even a scoop of ice cream can turn these crepes into a decadent dessert.
  • Savory Fillings: Stuff them with smoked salmon, scrambled eggs, and a touch of dill for a savory breakfast option.
  • Toppings: Try a dusting of powdered sugar, or add a sprinkle of cinnamon for a warm, cozy flavor.
  • Sauces: A drizzle of chocolate syrup, maple syrup, or even a tangy fruit compote can take these crepes to the next level.

The possibilities are truly endless, and it’s part of the fun of making them. Whether you choose to keep them simple or get creative with toppings, you’ll find that there’s no wrong way to enjoy them.

Frequently Asked Questions (FAQs)

How do I make the crepes extra thin?

The key to thin, delicate crepes is to make sure your batter is smooth and slightly runny. The batter should be liquid enough to spread easily in the pan but not too thin. If you find that the batter is too thick, simply add a little more milk to reach the desired consistency.

Can I make these crepes ahead of time?

Yes! You can prepare the crepes ahead of time and store them in the fridge for up to 2 days. Simply stack them with parchment paper in between each crepe to prevent sticking. To reheat, warm them in a dry skillet for 30 seconds on each side, or in the microwave for a few seconds.

How do I make the crepes more flavorful?

Adding a bit of vanilla extract, cinnamon, or nutmeg to the batter can enhance the flavor of your crepes. For an even richer taste, consider using milk or cream instead of water. You can also experiment with different sweeteners, like maple syrup or brown sugar.

What can I substitute for honey?

If you’re not a fan of honey or want to try something different, you can substitute it with maple syrup, agave nectar, or a fruit syrup. The goal is to add a touch of sweetness and moisture, so choose whatever appeals to your taste.

Can I freeze the crepes?

Yes! Crepes freeze beautifully. To freeze, allow them to cool completely, then place a sheet of parchment paper between each crepe and stack them. Store the stack in an airtight container or freezer bag. When ready to eat, thaw the crepes and warm them in a skillet or microwave.

Conclusion – Crepes that Connect Generations

There’s a reason certain foods stay with us for a lifetime. Crepes, in all their simplicity, represent a connection to the past, a link to the moments that matter most. Whether you’re making them for a leisurely weekend breakfast, as a quick after-school snack, or for a special occasion, they have a way of bringing people together.

As I watch the crepes turn golden in the pan and drizzle them with honey, I’m reminded of the joy in sharing something simple yet special with the people you love. These cocoa honey-brushed crepes aren’t just a recipe—they’re a piece of my heart, a way to keep the warmth of those mornings with my grandmother alive. I hope they bring a little warmth to your kitchen too, and that each bite feels like home.

Let these crepes be your invitation to slow down, savor the moment, and enjoy the sweet simplicity of life—one golden bite at a time.

Amal

A Taste of Home – The Comfort of Cocoa Honey-Brushed Crepes”

These indulgent cocoa honey-brushed crepes are the perfect balance of sweetness and richness. With a delicate cocoa flavor and a gentle honey glaze, these soft, golden crepes are ideal for breakfast, brunch, or dessert. Simple to make and versatile enough for any occasion.
Prep Time 15 minutes
Cook Time 15 minutes
Total Time 30 minutes
Servings: 12 crepes
Course: Dessert
Cuisine: French-inspired

Ingredients
  

  • 4 eggs
  • A pinch of salt
  • 1 teaspoon vanillin
  • 50 g sugar
  • 600 ml milk added in portions
  • 250 g flour
  • 50 g corn starch
  • 25 g butter melted
  • 15 g cocoa powder
  • Honey for brushing

Method
 

  1. In a mixing bowl, whisk together eggs, salt, vanillin, and sugar until smooth and frothy.
  2. Gradually add in the milk, one portion at a time, while whisking continuously to avoid lumps.
  3. Sift in the flour, corn starch, and cocoa powder. Mix until smooth and well combined.
  4. Stir in the melted butter and mix thoroughly. Let the batter rest for 10–15 minutes.
  5. Heat a non-stick skillet or crepe pan over medium heat. Lightly grease with butter if necessary.
  6. Pour a small amount of batter into the pan, swirling it to cover the surface in a thin layer.
  7. Cook for 1–2 minutes until the edges lift and the underside is golden brown. Flip and cook for another 30 seconds.
  8. Brush the crepes with honey while they are still warm.
  9. Serve as is, or with your favorite toppings and fillings.

Notes

  • Storage: Crepes can be stored in an airtight container for up to 2 days in the refrigerator. Reheat them gently before serving.
  • Serving Suggestions: These crepes are perfect with whipped cream, fresh fruit, or a sprinkle of powdered sugar. For a savory version, try adding sautéed spinach or scrambled eggs.
  • Freezing Tip: You can freeze crepes by layering them with parchment paper and storing them in a freezer bag for up to 1 month. Reheat them in a skillet or microwave.

Golden Bites of Comfort – Cheesy Veggie Potato Sticks That Warm the Heart

Growing up, my favorite kind of cooking wasn’t the kind with fancy ingredients or extravagant timing. It was the kind that quietly happened in the background—something born from leftovers, intuition, and love. I remember the smell of grated cheese melting into buttered potatoes and the quiet clatter of a spoon stirring everything together while my mother stood barefoot in the kitchen, a dish towel tossed over one shoulder and a song humming through the house.

It was never extravagant. Just something simple she made when she didn’t want food to go to waste—a way to turn extra boiled potatoes and vegetables into something golden, delicious, and deeply satisfying. She never called them anything specific, but I’ve come to think of them as cheesy veggie potato sticks—humble, pan-fried parcels of comfort, soft on the inside with crispy, golden edges.

These sticks became a childhood favorite—not because they were flashy, but because they were ours. She’d place a plate of them on the table without a word, and we’d gather like magnets. They came with no rules. Dip them in ketchup, smear them in sour cream, crumble them into soup, or just eat them standing in the kitchen, still too hot to handle.

This recipe is inspired by that same spirit—making something simple and joyful from what you have. The kind of food that says more with a golden crust than a thousand words ever could.

The Magic Behind the Method – Why This Recipe Works

The beauty of these potato sticks lies in their sheer simplicity. They’re a masterclass in using what’s on hand and transforming it into something you want to eat again and again. Here’s why this recipe wins hearts (and stomachs):

1. Simple Ingredients, Big Comfort

Potatoes are the soul of this recipe—filling, mild, and perfect for binding the other elements. Carrots add a hint of sweetness and vibrant color, while cheese brings the salty, melty goodness that takes it over the top. Butter adds depth and richness. And then there’s parsley, bright and fresh, tucked in just for balance.

2. Adaptable for Every Kitchen

No mozzarella? Use cheddar. No parsley? Use dill or chives. You can even toss in leftover peas, corn, or finely chopped spinach. This recipe thrives on flexibility.

3. Bake or Fry—Your Choice

For a classic crispy finish, pan-frying in a bit of butter or oil gives that golden edge everyone craves. But for those looking for a lighter alternative, these sticks bake beautifully in the oven with minimal fuss.

4. Kid-Friendly & Freezer-Ready

These sticks are naturally kid-approved. They’re soft, flavorful, and can be shaped however you like—sticks, patties, or even nuggets. Make a double batch and freeze some for those days when you need a comforting bite in minutes.

Ingredients

For the Sticks:

IngredientAmount
Potatoes600 grams (about 4 medium)
Carrot1, grated
WaterAs needed, for boiling
Butter2 tablespoons
ParsleyChopped, to taste
Any hard cheese or mozzarella½ cup, grated
SaltTo taste

Directions

  1. Boil the potatoes: Peel and cut the potatoes into chunks. Place them in a pot of cold salted water. Bring to a boil and cook until completely soft and mashable.
  2. Prepare the base: Drain the potatoes and mash them while still warm. Add butter, grated carrot, salt, and chopped parsley. Mix until smooth and well combined.
  3. Add the cheese: Fold in the grated cheese until evenly distributed throughout the potato-carrot mixture.
  4. Shape the sticks: Once the mixture is cool enough to handle, form it into small stick shapes (about finger-length). You can lightly flour your hands if needed.
  5. Pan-fry or bake: Heat a non-stick skillet over medium heat with a little oil or butter. Fry the sticks until golden and crisp on all sides. Alternatively, bake at 400°F (200°C) for 20–25 minutes until golden.
  6. Serve and enjoy: Serve hot with your favorite dip or as a side to a main dish. These also make a great snack for kids and adults alike.

Nutritional Information (Per 2–3 sticks, approx.)

NutrientAmount
Calories180 kcal
Carbohydrates20 g
Protein4 g
Fat9 g
Saturated Fat4 g
Fiber2 g
Sodium180 mg

Creative Serving Ideas – Elevate the Experience

  • As a snack: Serve hot with sour cream, garlic yogurt sauce, or a spicy dip.
  • As a side: They go beautifully with roasted chicken, grilled vegetables, or hearty soups.
  • For brunch: Top with a poached egg and a sprinkle of paprika.
  • For kids: Serve with ketchup or cheese sauce and watch them disappear.

They’re a little rustic, a little nostalgic, and always the first thing gone at the table.

Storage and Make-Ahead Tips

  • Refrigerator: You can keep the formed, uncooked sticks in the fridge for up to 24 hours.
  • Freezer: Freeze them on a tray first, then transfer to a bag or container. Cook straight from frozen—just add a few extra minutes.
  • Reheating: Reheat in the oven or air fryer to regain the crisp texture. Avoid microwaving, as it softens the crust.

Frequently Asked Questions (FAQs)

Can I use leftover mashed potatoes for this recipe?

Yes! This recipe works beautifully with leftover mashed potatoes—just ensure they’re not too wet. If they are, add a bit of flour or breadcrumbs to help with shaping.

What’s the best cheese to use?

Any hard, meltable cheese works—cheddar, gouda, mozzarella, or even parmesan. For a sharper flavor, try aged cheddar or a mix of cheeses.

Can I make these gluten-free?

Absolutely. There’s no flour in the base recipe, but if your mashed potatoes feel too soft for shaping, add a gluten-free flour or fine cornmeal to firm them up.

How do I keep them from falling apart while frying?

If your mixture feels too soft, chill it for 15–30 minutes before shaping and cooking. Cold potato mix firms up and holds better in the pan.

Can I bake these instead of frying?

Yes, and they turn out wonderfully! Brush with a bit of oil or melted butter and bake at 400°F (200°C) for 20–25 minutes, flipping once halfway through.

Are they good for meal prep or packed lunches?

Definitely. You can pack them warm or cold, and they reheat nicely. They’re sturdy enough for lunchboxes and pair well with fresh veggies and dips.

Why We Love These Little Golden Sticks

In a world full of gourmet meals and complicated plating, there’s something soul-soothing about a dish that’s both accessible and delicious. These cheesy veggie potato sticks aren’t trying to be anything fancy. They’re the culinary equivalent of a cozy blanket, a handwritten letter, or a favorite song from years ago—simple, nostalgic, and full of quiet joy.

They remind us that food doesn’t have to be complicated to be memorable. Sometimes, the recipes we return to again and again are the ones that ask the least from us—just a few ingredients, a little time, and the willingness to enjoy something homemade.

Conclusion – Small Moments, Big Flavor

It’s easy to overlook a recipe like this one. It doesn’t shout or sparkle. But that’s exactly what makes it special. These cheesy veggie potato sticks are made from what’s already in your kitchen. They take almost no effort, and yet somehow—they bring a kind of satisfaction that lingers long after the last bite.

Whether you’re cooking for your family, using up leftovers, or just need something comforting on a cold afternoon, these golden little sticks will be there. Just like my mother’s quiet kitchen warmth, they’re the kind of recipe that makes a house feel like home.

So grab a bowl, mash some potatoes, and let the humble magic begin.

Amal

Golden Bites of Comfort – Cheesy Veggie Potato Sticks That Warm the Heart

These cheesy veggie potato sticks are crispy on the outside and soft on the inside, packed with comforting flavors from buttery mashed potatoes, sweet carrots, and melty cheese. They’re the perfect snack, side dish, or lunchbox favorite—simple to make, yet irresistibly satisfying.
Prep Time 20 minutes
Cook Time 15 minutes
Total Time 35 minutes
Servings: 16 sticks
Course: Snack
Cuisine: Comfort Food

Ingredients
  

  • 600 grams potatoes about 4 medium
  • 1 carrot grated
  • Water as needed for boiling
  • 2 tablespoons butter
  • Chopped parsley to taste
  • ½ cup grated hard cheese or mozzarella
  • Salt to taste

Method
 

  1. Peel and chop the potatoes. Boil them in salted water until soft and fork-tender.
  2. Drain the potatoes well and mash them in a large bowl while still warm.
  3. Add grated carrot, butter, chopped parsley, and salt to the mashed potatoes. Mix thoroughly.
  4. Stir in the grated cheese and mix until the cheese is evenly incorporated.
  5. Let the mixture cool slightly. Then shape it into sticks (about finger-sized).
  6. Heat a skillet over medium heat and lightly grease it with oil or butter.
  7. Pan-fry the sticks until golden and crisp on all sides. Alternatively, bake them at 400°F (200°C) for 20–25 minutes until golden.
  8. Serve warm with your favorite dipping sauce.

Notes

  • You can use leftover mashed potatoes for this recipe—just be sure they aren’t overly wet.
  • Swap in zucchini, corn, or spinach for added variety. Just make sure to squeeze out excess moisture from watery vegetables.
  • These freeze beautifully after shaping—just flash freeze on a tray, transfer to a container, and cook from frozen when needed.

Whispers of Autumn – A Rustic Apple Pie Cake to Soothe the Soul

The scent of baked apples has always felt like a memory to me. Not a sharp, crystal-clear recollection, but the kind that drifts into the present softly, like a breeze slipping under a door on a quiet afternoon. It smells like home. Like the edge of September. Like my grandmother’s kitchen where a worn apron, a chipped ceramic bowl, and a small paring knife were all she needed to turn fruit into magic.

Every fall, we would drive out to a local orchard, the kind with crooked trees and baskets of fresh cinnamon sticks by the counter. I remember stuffing apples into paper bags, sticky from cider and laughter, while she haggled over the price of honey. But the part I cherished most came later—back home—when she’d make a rustic apple cake that wasn’t quite pie and wasn’t quite bread. It was golden and dense, soft inside, and always warm, whether from the oven or just from her love.

This Rustic Apple Pie Cake is inspired by that same spirit. It’s unfussy, deeply comforting, and celebrates the humble apple in all its forms—soft cubes baked into the batter and delicate slices fanned on top like a rustic crown. It isn’t the kind of dessert you’d expect on a patisserie menu; it’s the kind you wrap in parchment and bring to a friend who’s having a hard day. It’s the kind you leave on your kitchen counter to slice piece by piece until only crumbs remain.

The Heart of a Hybrid: Not Quite Cake, Not Quite Pie

What exactly is an Apple Pie Cake? Think of it as a beautiful hybrid—where the texture of soft, moist cake meets the warm, spiced flavor of apple pie. It’s not layered or frosted; it’s not lattice-topped. It’s somewhere delightfully in between.

The base is a tender batter infused with warm milk and oil, resulting in a soft, fluffy crumb that holds its shape but still feels rich. The cubed apples and plump raisins scattered throughout add sweetness and texture, while the sliced apples on top create a natural, artful finish that caramelizes just enough in the oven. The overall effect? A rustic showstopper that tastes like it took far more effort than it did.

This recipe is perfect for casual gatherings, fall brunches, lunchbox treats, or a simple dessert served with a cup of tea. And despite its old-world appeal, it’s incredibly simple to make—even beginner bakers will find it forgiving and satisfying.

Ingredients

For the Cake:

IngredientAmount
Apples2 (1 cubed, 1 thinly sliced)
Sugar (for apples)1 tablespoon
Eggs2
SaltA pinch
Vanilla sugar8g (1 tsp)
Granulated sugar120g (0.6 cup)
Vegetable oil100ml (1/2 cup)
Warm milk130ml (1/2 cup)
All-purpose flour280g (1.75 cups)
Baking powder16g (2 tsp)
Raisins50g

Directions

  1. Prepare the apples: Peel and core the apples. Dice one apple into small cubes and slice the other thinly. Toss the cubed apple with 1 tablespoon of sugar and set both aside.
  2. Whisk the wet ingredients: In a large bowl, beat the eggs with a pinch of salt until frothy. Add the vanilla sugar and granulated sugar, and beat until light and creamy.
  3. Add oil and milk: Slowly add the vegetable oil and warm milk, whisking until well combined.
  4. Mix the dry ingredients: In a separate bowl, combine flour and baking powder. Gradually fold the dry mixture into the wet mixture until a smooth batter forms.
  5. Add fruits: Gently fold in the sugared apple cubes and raisins.
  6. Assemble the cake: Pour the batter into a greased and floured cake pan (8- or 9-inch). Arrange the thin apple slices in a circular pattern on top.
  7. Bake to golden perfection: Preheat the oven to 350°F (180°C). Bake for 40–45 minutes, or until a toothpick inserted in the center comes out clean and the top is golden.
  8. Cool and serve: Let the cake cool in the pan for 10 minutes before transferring to a wire rack. Serve warm or at room temperature.

Nutritional Information (Per Slice – based on 10 slices)

NutrientAmount
Calories260 kcal
Carbohydrates38 g
Protein4 g
Fat10 g
Saturated Fat1.5 g
Fiber2 g
Sugar20 g
Sodium90 mg

Why This Cake Works

1. The contrast of textures: Cubed apples melt softly into the crumb, while the thin slices on top create a golden, tender finish. You get bites that are moist and fruity, balanced with cake that isn’t too sweet or heavy.

2. Oil instead of butter: Using oil keeps the cake moist for days. Unlike butter-based cakes that firm up when cool, this one stays soft—even after refrigeration.

3. Warm milk for a tender crumb: Slightly warming the milk before adding it to the batter helps create a finer texture and supports better rise.

4. No special tools required: This is a one-bowl, spoon-stirred, oven-loving kind of cake. No mixers, no dough chill times—just classic, straight-to-the-heart baking.

Serving Ideas and Variations

This Apple Pie Cake is versatile enough to wear many hats. Here are a few ways you can serve it up or switch it around:

  • Dusted with powdered sugar: The simplest way to finish it—classic and elegant.
  • Served warm with vanilla ice cream: Let the heat of the cake gently melt the scoop, and thank yourself later.
  • Add chopped walnuts or pecans: Fold them into the batter for extra texture and a nutty contrast.
  • Switch up the fruit: Pears or quinces would work beautifully here too, or even a mix of both.
  • Spice it up: Add a teaspoon of ground cinnamon or nutmeg for a more pie-like flavor.

Tips for Apple Cake Success

  • Choose the right apples: Use firm, slightly tart apples like Granny Smith or Honeycrisp for cubing. For the top slices, a sweeter apple like Fuji or Gala works well and caramelizes beautifully.
  • Avoid overmixing: Once the flour goes in, mix just until incorporated. Overmixing can make the cake dense.
  • Line your pan: Either grease it well or use parchment paper. This cake is moist and can stick if not prepared properly.
  • Let it rest: Like many spiced or fruit-based cakes, the flavor deepens after a few hours. It’s even better the next day.

Frequently Asked Questions (FAQs)

Can I make this cake ahead of time?
Yes! In fact, this cake tastes even better after resting for several hours or overnight. You can bake it a day in advance and store it covered at room temperature or in the fridge.

How do I store leftovers?
Store the cake in an airtight container at room temperature for up to 2 days. For longer storage, keep it in the refrigerator for up to 5 days. You can also freeze individual slices for up to 2 months—just thaw at room temperature.

Can I use gluten-free flour?
You can try a 1-to-1 gluten-free baking flour. The texture may be slightly different, but the flavor should remain delicious.

Can I reduce the sugar?
Yes, you can reduce the sugar by up to 25% without affecting the texture too much. Keep in mind the apples and raisins also provide natural sweetness.

Do I have to use raisins?
Not at all! They add a pleasant chewiness and sweetness, but you can omit them or swap for dried cranberries, chopped dates, or even chocolate chips.

What type of pan should I use?
An 8-inch or 9-inch round cake pan works best. You can also use a square pan or even a loaf tin, but the baking time may vary slightly.

Can I make it dairy-free?
Yes—swap the warm milk with almond milk, oat milk, or any plant-based alternative.

When to Bake This Apple Pie Cake

While it sings loudest in autumn, this cake has a year-round soul. Here are just a few occasions where it truly shines:

  • Holiday gatherings – Serve it alongside heavier desserts as a lighter, nostalgic option.
  • Afternoon tea parties – It pairs beautifully with black or spiced teas.
  • Simple family dinners – A comforting end to a weeknight meal.
  • Picnics and potlucks – Travel-friendly and sliceable with ease.
  • Just because – No season, no reason required.

The Soul of a Season in One Dish

This rustic apple pie cake is more than a recipe. It’s a vessel for memory, comfort, and connection. It reminds us that food doesn’t need to be extravagant to be meaningful. Sometimes, the simplest things—like a bowl of batter, a couple of apples, and a warm oven—can bring the deepest joy.

Whether you’re baking it to relive a childhood moment, share with friends, or simply enjoy with your morning coffee, this cake is a reminder that love often comes in the form of something warm, shared, and baked with care.

Conclusion: Bake to Remember, Bake to Feel

In a world that often moves too quickly, baking something like this apple pie cake slows us down. It invites us into a quieter rhythm—one where the scent of cinnamon and fruit can wrap around us like a familiar hug. So preheat the oven. Slice your apples. Mix slowly. And as your home fills with that old, comforting aroma, take a breath and remember: this is the taste of simplicity, the sound of stories baked into crumb, the beauty of being home.

Amal

Whispers of Autumn – A Rustic Apple Pie Cake to Soothe the Soul

This comforting apple pie cake combines the moist tenderness of a simple cake with the flavor and charm of a classic apple pie. With apples folded into the batter and layered on top, every slice is rich with fall nostalgia and golden-baked warmth—no complicated techniques required.
Prep Time 15 minutes
Cook Time 45 minutes
Total Time 1 hour 5 minutes
Servings: 8 -10 servings
Course: Dessert
Cuisine: European-inspired

Ingredients
  

  • 2 apples 1 cut into small cubes, 1 into thin slices
  • 1 tablespoon sugar for apples
  • 2 eggs
  • A pinch of salt
  • 8 g 1 tsp vanilla sugar
  • 120 g 0.6 cup granulated sugar
  • 100 ml 1/2 cup vegetable oil
  • 130 ml 1/2 cup warm milk
  • 280 g 1.75 cups all-purpose flour
  • 16 g 2 tsp baking powder
  • 50 g raisins

Method
 

  1. Preheat your oven to 350°F (180°C). Grease and flour an 8- or 9-inch round cake pan.
  2. Peel and core both apples. Dice one apple into small cubes and slice the other into thin wedges. Toss the cubed apple with 1 tablespoon of sugar and set aside.
  3. In a large bowl, beat the eggs with a pinch of salt until light and frothy.
  4. Add the vanilla sugar and granulated sugar. Continue whisking until the mixture becomes pale and creamy.
  5. Pour in the vegetable oil and warm milk, mixing gently to combine.
  6. In a separate bowl, mix together the flour and baking powder. Gradually fold the dry ingredients into the wet mixture to form a smooth batter.
  7. Stir in the cubed, sugared apples and raisins.
  8. Pour the batter into the prepared pan. Arrange the thin apple slices on top in a circular or fanned pattern.
  9. Bake for 40–45 minutes, or until a toothpick inserted in the center comes out clean and the top is golden.
  10. Allow the cake to cool in the pan for 10 minutes, then transfer to a wire rack to cool completely before slicing.

Notes

  • Apple varieties: Tart apples like Granny Smith hold their shape and give a bright contrast to the sweetness. Sweeter varieties like Fuji or Honeycrisp also work beautifully.
  • Raisins optional: For extra moisture and a burst of sweetness, don’t skip the raisins. You can substitute with dried cranberries if desired.
  • Storage tip: Wrap tightly and store at room temperature for up to 3 days. Tastes even better the next day.
  • Serving suggestion: Dust with powdered sugar or serve warm with a scoop of vanilla ice cream.