Strawberry Mascarpone Puff Pastry Delight: A Light Dessert with Layers of Memory and Cream

There’s something special about strawberries and cream.

Not just the flavor—the kind of timeless sweetness that tastes like summer—but the memory that often comes with it. For me, the scent of strawberries takes me back to sun-drenched afternoons in my grandmother’s kitchen. She always kept a carton of heavy cream in the fridge and a basket of overripe strawberries on the counter. The moment the sun peeked through the windows, she’d pull out a mixing bowl, whip cream by hand, and slice the berries into delicate fans. She didn’t follow a recipe. She followed instinct.

And if puff pastry had been more common in her tiny kitchen, she would’ve wrapped that whole memory in golden layers and served it like royalty.

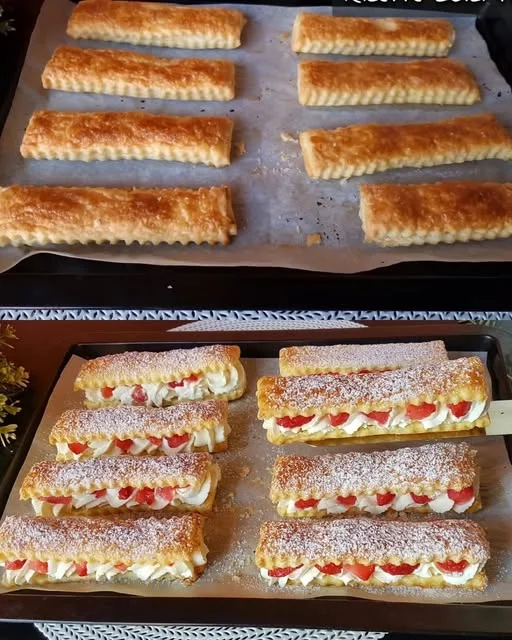
Years later, I found myself craving something that honored that memory—but with a little modern elegance. That’s how this Strawberry Mascarpone Puff Pastry Delight was born. It’s my take on the nostalgic strawberries and cream—but reimagined as a crisp, flaky, cloud-like dessert that’s as beautiful as it is delicious.

It’s light enough for spring brunch, impressive enough for a holiday table, and easy enough to make on a lazy Sunday afternoon. Whether you’re serving guests or simply treating yourself, this dessert will leave you smiling with every bite.

A Dessert That Feels Like a Celebration

This dessert is everything you want in a no-stress, high-impact sweet treat. It takes familiar ingredients—puff pastry, cream, mascarpone, strawberries—and combines them into something elegant and restaurant-worthy, without the complicated techniques.

What makes it truly stand out is the contrast in textures: crisp, buttery layers of puff pastry give way to cool, creamy filling and juicy slices of fresh strawberries. It’s light yet rich, refined but approachable.

Better still, it can be made ahead, customized with seasonal fruits, or even transformed into mini desserts for entertaining. It’s the kind of recipe that feels versatile and indulgent at the same time.

Why This Dessert Works Every Time

1. Puff Pastry Magic

Store-bought puff pastry is one of the most convenient and effective ingredients you can keep in your freezer. It puffs beautifully in the oven, creating dozens of airy layers that are the perfect contrast to smooth fillings.

Whether you cut it into elegant rectangles, charming hearts, or rustic rounds, the final product always feels special—without any rolling pins or dough-making required.

2. Mascarpone Cream That’s Just Sweet Enough

The filling is a simple combination of mascarpone cheese, whipped cream, and a touch of powdered sugar. It’s not overly sweet, allowing the richness of the mascarpone and the natural sweetness of the strawberries to shine through.

It’s luxurious, silky, and sturdy enough to hold between layers—yet still melts in your mouth.

3. Fresh Strawberries Bring It to Life

Strawberries offer color, juiciness, and brightness. They cut through the richness of the cream and the butteriness of the pastry. Plus, they make the final dessert feel fresh, seasonal, and visually stunning.

And because they’re layered raw, you get that pure, vibrant strawberry flavor in every bite.

Ingredients Table

IngredientQuantity
Puff pastry (leafy dough)1 sheet, thawed if frozen
Milk (for brushing)As needed
Vanilla sugar8 g (1 teaspoon)
Sweetened whipping cream200 ml (¾ cup)
Mascarpone cheese125 g (½ cup)
Powdered sugar (soft sugar)3 tablespoons
Fresh strawberries, slicedAs needed (approx. 1 cup)

Directions: Delicate Layers, Bold Delight

  1. Preheat the oven to 200°C (390°F) and line a baking tray with parchment paper.
  2. Cut and bake the pastry: Roll out puff pastry and cut into squares or rectangles. Place on tray, brush lightly with milk, and bake for 12–15 minutes or until golden and puffed. Cool completely.
  3. Whip the cream: In a cold bowl, whip sweetened cream with vanilla sugar until soft peaks form.
  4. Make the filling: In a separate bowl, mix mascarpone with powdered sugar until smooth. Gently fold in the whipped cream until fully combined.
  5. Assemble the pastries: Slice each pastry in half horizontally. Pipe or spoon mascarpone cream onto the bottom half, layer with sliced strawberries, and cap with the top half.
  6. Optional finish: Dust with powdered sugar and serve immediately or chill for 15–30 minutes before serving.

Nutritional Breakdown (Per Serving – Approximate)

NutrientAmount
Calories~320 kcal
Protein~4 g
Total Fat~23 g
Saturated Fat~13 g
Carbohydrates~24 g
Sugars~12 g
Fiber~1 g
Sodium~140 mg
Calcium~60 mg

Serving Ideas and Occasions

This dessert fits beautifully into so many moments:

  • Mother’s Day or Spring Brunch – Serve with a glass of sparkling wine or citrus-infused tea.
  • Date Night In – Elegant, shareable, and surprisingly easy to prep ahead.
  • Summer Gatherings – Use fresh berries from the market and keep the portions light and bite-sized.
  • Holiday Dessert Table – Add a dusting of powdered sugar and a sprig of mint to make it winter-festive.

It’s equally at home as a plated dessert or as part of a dessert buffet. And because you can prep most components ahead of time, it’s ideal for entertaining.

Creative Twists and Flavor Variations

1. Swap the Berries

Strawberries are classic, but raspberries, blueberries, blackberries, or a mix of all work beautifully. For a winter twist, try poached pears or roasted plums.

2. Add Citrus

Fold a little lemon or orange zest into the mascarpone cream for added brightness.

3. Infuse the Cream

Try adding a drop of almond extract, a splash of vanilla bean paste, or even a touch of rosewater to the filling for something unexpected.

4. Make it Mini

Cut puff pastry into smaller squares or rounds to create individual servings. Perfect for cocktail parties or dessert platters.

5. Turn it into a Tart

Bake the pastry as a full sheet, flattening the center slightly with a fork, and top with cream and fruit for a rustic tart-style presentation.

Tips for Success

Even with simple ingredients, a few thoughtful tips can help you create the perfect pastry every time:

  • Use chilled tools and ingredients when whipping cream. Cold bowls and beaters help the cream whip faster and hold its shape longer.
  • Let puff pastry fully cool before adding the filling to prevent melting or soggy layers.
  • Slice strawberries just before assembling for maximum freshness and presentation.
  • Don’t over-whip the cream. Stop when soft peaks form—it should be smooth, not grainy.
  • Dust with powdered sugar right before serving for that perfect patisserie finish.

Frequently Asked Questions (FAQs)

Can I make this ahead of time?

Yes! You can bake the puff pastry and make the mascarpone filling a few hours in advance. Store the pastry at room temperature and the cream in the refrigerator. Assemble just before serving for best texture.

Can I use cream cheese instead of mascarpone?

You can, though it will be a bit tangier and firmer. To soften it, blend cream cheese with a tablespoon or two of sour cream or additional whipped cream before folding it in.

What if I don’t have vanilla sugar?

You can substitute with regular sugar and a splash of vanilla extract. The flavor will be nearly identical.

Can I make this dessert dairy-free?

Yes. Use a dairy-free puff pastry (check the label), a non-dairy whipping cream, and a dairy-free mascarpone or thick coconut cream alternative.

How long will leftovers keep?

These are best enjoyed fresh, but leftovers can be stored in the refrigerator for up to 24 hours. The pastry may soften slightly over time but will still taste delicious.

Can I make it more indulgent?

Absolutely. Drizzle with dark chocolate, add chopped pistachios or almonds, or top with whipped cream and berry syrup for a decadent twist.

Can I freeze this dessert?

Freezing is not recommended once assembled, as the cream and berries will not thaw well. However, the puff pastry can be baked and frozen separately, then refreshed in the oven before assembling.

Conclusion: A Light, Luxurious Bite of Joy

In a world of complex desserts and endless recipe options, this Strawberry Mascarpone Puff Pastry Delight is a breath of fresh air.

It doesn’t ask for perfection. It doesn’t demand hours in the kitchen. It simply combines a few good ingredients—flaky pastry, rich cream, fresh strawberries—and lets them do what they do best.

Whether you’re carrying forward a memory, making something new for loved ones, or just giving yourself a sweet reward after a long week, this dessert is here for you. It’s proof that elegance and ease can live on the same plate.

So go ahead—bake the pastry, whip the cream, slice the strawberries. Stack it all together and take that first bite.

The Best Breast Chicken Recipe: Layers of Comfort in Every Bite

There are meals that bring people together—and then there are meals that make them stay longer at the table. This is one of those.

I still remember the first time I made this chicken and potato layered bake. It was a cold, gray afternoon, the kind that invites you to lean into the warmth of the kitchen. I wasn’t planning anything special. Just wanted to use up a few things: potatoes that were starting to sprout, a pack of chicken breast, some leftover mushrooms, and a small block of cheese that had been sitting in the fridge far too long.

As I grated the potatoes and stirred the onions with a bit of butter, a kind of rhythm set in. The scent of mushrooms and garlic filled the air. I layered everything in the dish—soft vegetables, seasoned chicken cubes, golden potato mixture—and slid it into the oven. I didn’t expect much. But when I pulled it out, bubbling and golden under a melted blanket of cheese, I knew I had something worth remembering.

When we sat down to eat, no one said a word—until the second bite. Then came the compliments. Then the requests for more. That dish, born out of necessity, quickly became a comfort-food classic in our home.

And now, I’m sharing it with you.

A Family Recipe in the Making

What makes this dish so special isn’t just how good it tastes. It’s how easy it is to love.

This baked chicken and potato casserole is a fusion of familiar flavors—tender chicken breast, grated potatoes, sautéed mushrooms, buttery onions, fresh herbs, and just enough cheese to make it feel indulgent. It’s the kind of meal that feels homemade and hearty, yet structured and beautiful enough to serve at a family dinner or casual gathering.

It’s cozy but not heavy, rich but balanced. It’s what happens when a few simple ingredients are brought together with purpose and a little bit of love.

Why This Recipe Works

1. It’s a One-Dish Wonder

Everything bakes in one dish—protein, vegetables, and carbs—making it a full meal that saves you time and cleanup. There’s no need for sides unless you want them.

2. Textural Contrast

The layering of ingredients gives you that magical combination of textures: creamy chicken, soft mushrooms, buttery onions, and crisp edges of golden potato and melted cheese.

3. Balanced Flavors

The potatoes and flour base provide comfort and structure. The chicken brings protein and flavor. Mushrooms add depth and earthiness. And the herbs and cheese brighten and round it all out.

4. Adaptable to Taste

This dish works whether you want it light or indulgent. You can easily substitute ingredients depending on what you have or what your dietary preferences are.

Main Ingredients Table

IngredientQuantity
Eggs2
Medium potatoes, grated7
Onions, chopped2
Butter (for sautéing)As needed
Carrot, grated1
Parsley, choppedTo taste
All-purpose flour5 tablespoons
Chicken fillet, cubed500 g (1.1 lbs)
Medium mushrooms, sliced9
Cheese (cheddar or mozzarella), grated100 g (3.5 oz)

Directions: A Savory Bake with Layers of Love

  1. Preheat oven to 180°C (350°F). Grease a baking dish with a bit of butter or oil.
  2. Sauté the vegetables: In a skillet, melt some butter and sauté the chopped onions, grated carrot, and sliced mushrooms until soft and lightly golden. Set aside.
  3. Prepare the potato mixture: In a large bowl, mix the grated potatoes with flour, eggs, parsley, salt, and pepper. Stir until evenly combined.
  4. Assemble the bake:
    • Spread half the potato mixture into the base of the baking dish.
    • Layer the cubed chicken fillet evenly over the potatoes.
    • Add the sautéed vegetables on top of the chicken.
    • Spread the remaining potato mixture over the top and smooth it out.
  5. Bake uncovered for 35–40 minutes. Remove from the oven, sprinkle the grated cheese evenly on top, and return to the oven for another 10–15 minutes, or until the cheese is melted and golden.
  6. Let rest for 5 minutes, slice, and serve hot.

Nutritional Breakdown (Per Serving – Based on 6 servings)

NutrientApprox. Amount
Calories~430 kcal
Protein~31 g
Total Fat~18 g
Saturated Fat~8 g
Carbohydrates~35 g
Fiber~4 g
Sugars~4 g
Sodium~420 mg
Calcium~180 mg
Iron~2.7 mg

Ingredient Highlights

Chicken Breast

Lean, mild, and quick-cooking, chicken breast is the perfect protein for this dish. Cubing it keeps it juicy and ensures it cooks evenly with the other ingredients.

Potatoes

Grated raw and mixed with flour, potatoes become the “crust” and filler of this casserole. They crisp up beautifully on the top layer while staying soft underneath.

Onions & Carrots

These two create the sweet, aromatic base. Sautéed in butter, they infuse every layer with comforting flavor.

Mushrooms

Sliced and softened with the other vegetables, mushrooms add that subtle earthiness that gives this dish depth.

Eggs & Flour

They bind the grated potato mixture together, giving it texture and helping it crisp up in the oven.

Cheese

The final layer of cheddar or mozzarella brings everything together with a creamy, bubbling finish. Use your favorite melting cheese or a mix of several.

Fresh Herbs

Parsley and dill (or chives, thyme, or basil) add a pop of freshness that balances the richness of the dish.

Serving Ideas

This casserole is a full meal in itself, but here are a few simple accompaniments to elevate the experience:

  • A crisp side salad with lemon vinaigrette
  • Steamed green beans or roasted broccoli
  • Pickled vegetables for a tangy contrast
  • A dollop of sour cream or herbed yogurt
  • Crusty bread to scoop up the soft, cheesy edges

Variations to Try

One of the best things about this recipe is its flexibility. Try some of these variations to make it your own:

1. Add a Sauce Layer

A light cream sauce or even a spoonful of tomato purée between layers adds moisture and flavor.

2. Go Vegetarian

Swap chicken with roasted cauliflower, lentils, or plant-based protein. Keep the rest of the ingredients the same.

3. Make It Spicy

Add chili flakes to the sautéed vegetables or mix a pinch of cayenne into the grated potatoes for heat lovers.

4. Use Sweet Potatoes

For a deeper flavor and more nutrients, swap some or all of the regular potatoes with grated sweet potato.

5. Try Different Cheeses

Gouda, provolone, or even feta work well here. Mixing in parmesan gives a salty, nutty finish.

Tips for Success

  • Grate your potatoes last: They oxidize quickly. Keep them submerged in water until you’re ready to mix, then squeeze out excess moisture before adding to the bowl.
  • Season each layer: A bit of salt and pepper on the vegetables, chicken, and potato mix makes all the difference.
  • Bake uncovered: This ensures the top becomes beautifully golden and slightly crispy.
  • Let it rest before slicing: Like lasagna, it holds together better if you wait a few minutes after baking.

Frequently Asked Questions (FAQs)

Can I use chicken thighs instead of breast?

Yes, absolutely. Chicken thighs are juicier and more forgiving if slightly overcooked. Just chop into small cubes, same as the breast.

Can I prepare this in advance?

Yes. You can assemble the entire dish ahead of time and refrigerate it (covered) for up to 24 hours. Bake just before serving.

Can I freeze leftovers?

Definitely. Let the dish cool completely, slice into portions, and freeze in airtight containers. Thaw in the fridge overnight and reheat in the oven.

How do I make it gluten-free?

Use a gluten-free flour blend in place of the regular flour. The rest of the ingredients are naturally gluten-free.

What kind of cheese works best?

Cheddar and mozzarella are great melting cheeses, but you can mix in parmesan, gouda, or provolone for added flavor.

Can I add more vegetables?

Of course! Zucchini, bell peppers, spinach, or even corn can be added to the sautéed vegetable mix. Just make sure to remove excess moisture.

How long will leftovers keep?

Stored in an airtight container in the fridge, leftovers will keep for 3–4 days. They reheat well in the oven or microwave.

Conclusion: A Recipe That Brings People to the Table

In the end, this isn’t just a dish. It’s a reminder of what simple ingredients can do when they come together with care.

This cheesy chicken and potato bake doesn’t rely on fancy techniques or hard-to-find ingredients. It’s food from the heart—unfussy, nourishing, and quietly impressive. The kind of meal that fills your kitchen with warmth and brings everyone to the table, no matter how busy the day.

Whether you’re cooking for your family, hosting a casual dinner, or just feeding yourself with something that feels like home, this recipe delivers.

It’s not only the best chicken breast recipe because of how it tastes—but because of how it makes people feel.

Pasta for the Whole Family in Minutes: A Creamy Pork Spaghetti They’ll Ask for Again and Again

There are meals you cook because they’re quick. Others, because they’re comforting. And sometimes—if you’re lucky—you find one that does both.

For me, this Creamy Pork Spaghetti is that meal.

It came to life on a weekday that had run too long. I was juggling work, family, and an overwhelming to-do list. My kitchen looked like it hadn’t been loved in a while—just the basics in the fridge, and a bit of hope in the pantry. I needed something fast, filling, and familiar. Something that wouldn’t just feed my family, but anchor us, bring us around the table, even for just 20 minutes of togetherness.

So I reached for the staples: pasta, garlic, a small slab of pork left over from Sunday, and a block of cheese that had seen better days. With those few ingredients, I threw together a simple garlic cream sauce, sliced the pork thin, and gave it all a generous handful of herbs.

I wasn’t expecting magic—but that’s exactly what it turned into.

My family didn’t just eat dinner that night. We lingered. We shared stories between bites. Seconds were served, plates wiped clean. It wasn’t fancy. It wasn’t even planned. But it was one of the best meals we’d had in weeks.

Since then, this creamy pork spaghetti has become a go-to recipe in our house. It’s the kind of dish that meets you where you are—busy, tired, or just craving something warm. It’s quick, it’s easy, and best of all, it feels like it was made with care—even when it comes together in under 30 minutes.

Why This Recipe Works So Well

1. It’s Incredibly Fast and Practical

This meal is ready in the time it takes to boil pasta and sear a few slices of pork. You don’t need anything fancy, and you likely already have the ingredients. It’s ideal for busy weeknights or when you’re short on time but still want to sit down to something satisfying.

2. It’s Creamy, But Not Heavy

The sauce is made with milk and a touch of flour for thickening, so it’s lighter than traditional cream-based sauces. The butter and cheese bring richness without overwhelming the dish, and the balance of garlic, paprika, and herbs adds brightness.

3. It’s Family-Friendly

There’s no spice unless you want it. The flavors are warm, mild, and familiar, which makes it a big hit with kids and adults alike. The texture of the pork adds variety, while the melted cheese holds everything together in one happy bite.

4. It’s Versatile

Don’t have pork? Use chicken, turkey, ham, or even sautéed mushrooms for a vegetarian spin. No mozzarella? Any melty cheese will do. This recipe is all about using what you have—and making it shine.

Ingredients Table

IngredientQuantity
Spaghetti250 g
Pork breast, sliced200 g
Garlic cloves, minced2
Olive oil1 tablespoon
Butter40 g
SaltTo taste
Black pepperTo taste
All-purpose flour1 tablespoon
Milk300 ml
Cheese (cheddar or mozzarella), grated100 g
Paprika1 teaspoon
Fresh parsley and dillFor garnish

Directions: Creamy Comfort, Ready in No Time

  1. Cook the pasta: Boil spaghetti in salted water until al dente. Drain and set aside, reserving a bit of pasta water if needed for loosening the sauce.
  2. Sauté the pork: In a large skillet, heat olive oil over medium heat. Add sliced pork and cook until browned. Add minced garlic and cook for another minute until fragrant. Season with salt, pepper, and paprika.
  3. Make the creamy sauce: Push the pork to one side of the pan and melt butter in the cleared space. Stir in the flour and cook for 1 minute. Gradually pour in milk, whisking to avoid lumps. Simmer until the sauce thickens.
  4. Add cheese: Stir in grated cheese until melted and smooth. Adjust seasoning to taste.
  5. Combine: Add the cooked spaghetti to the skillet and toss to coat in the sauce. Add a splash of pasta water if needed for a silkier texture.
  6. Serve: Plate the pasta and garnish with chopped parsley and dill for a fresh finish.

Nutritional Breakdown (Per Serving – Approx. 1 of 3 servings)

NutrientAmount (Approx.)
Calories~580 kcal
Protein~28 g
Total Fat~30 g
Saturated Fat~14 g
Carbohydrates~48 g
Sugars~5 g
Fiber~2 g
Sodium~520 mg
Calcium~220 mg
Iron~2.5 mg

The Ingredients: Simple, But Intentional

Every component of this dish serves a purpose. Let’s look at why it works so well.

Spaghetti

You could use penne or fusilli, but spaghetti brings just the right amount of slurp and holds the sauce beautifully. It cooks quickly, and its texture balances the richness of the pork and cheese.

Pork Breast

Thinly sliced pork cooks fast and brings a juicy, savory flavor that stands out against the creamy base. It’s leaner than beef but still hearty, making it perfect for pasta dishes.

Garlic and Paprika

These two seasonings form the flavor base. Garlic adds depth and warmth, while paprika gives the dish color and a subtle smokiness.

Milk, Butter, and Flour

This classic trio forms the creamy béchamel-style sauce. It’s lighter than cream and thickens perfectly with a little whisking. The butter enhances flavor, and the flour binds the milk into a silky sauce.

Cheese

Melted cheese takes the sauce from good to irresistible. Cheddar brings sharpness, mozzarella brings that stretchy pull—use what you love or what’s in your fridge.

Fresh Herbs

A final sprinkle of parsley and dill brightens the dish and adds a fresh note to balance the richness. It also makes the plate look fresh and inviting.

Serving Suggestions: Make It a Meal

  • With a fresh salad: Try arugula with lemon vinaigrette or a simple cucumber and tomato salad.
  • Add a vegetable side: Roasted broccoli, green beans, or grilled zucchini go beautifully.
  • Garlic bread or toast: Because when there’s sauce, you’ll want to soak up every drop.
  • Wine pairing: A dry white like Pinot Grigio or a light red like Gamay works well with the creamy, savory tones of this dish.

Variations to Try

Once you’ve made the original, try one of these twists to keep things interesting:

1. Make It Spicy

Add a pinch of red pepper flakes or chili oil to the garlic while cooking for a little heat.

2. Go Herb-Heavy

Stir chopped basil, thyme, or oregano into the sauce for more complexity.

3. Add Vegetables

Toss in spinach, peas, or mushrooms to bulk it up and boost nutrition.

4. Use a Different Pasta

Fettuccine or rigatoni give the dish a new feel. Gluten-free pasta also works perfectly.

5. Turn It into a Bake

Mix everything together, transfer to a baking dish, top with extra cheese, and bake until golden.

Frequently Asked Questions (FAQs)

Can I use chicken instead of pork?

Absolutely. Chicken breast or thigh both work well. Just slice it thin for quick, even cooking.

Is this dish freezer-friendly?

While pasta and dairy sauces don’t always freeze perfectly, this dish can be frozen in portions. Let it cool, freeze in airtight containers, and thaw gently before reheating.

What type of cheese works best?

Cheddar and mozzarella are both great. You can also use gouda, provolone, or even parmesan for a sharper kick. A mix of cheeses adds depth.

Can I make this without flour?

Yes—skip the flour and reduce the milk slightly for a thinner sauce, or use cornstarch as a gluten-free thickener.

How do I reheat leftovers?

Reheat gently on the stovetop or in the microwave with a splash of milk to loosen the sauce. It tastes just as good the next day.

Is this suitable for kids?

Very much so. It’s flavorful but mild, and the creamy texture makes it easy for little ones to enjoy. You can also chop the pork smaller for easier eating.

What herbs work best?

Parsley and dill are fresh and bright, but basil, chives, or even thyme work well depending on your flavor preferences.

Conclusion: Quick Doesn’t Have to Mean Ordinary

In a world that often moves too fast, meals like this offer a moment of pause.

This Creamy Pork Spaghetti is more than a dinner—it’s a reminder that delicious food doesn’t need to be complicated or time-consuming. It’s about working with what you have, cooking with intention, and feeding the people you love (yourself included).

Whether you’re cooking for a full house, a quiet night in, or something in between, this recipe is the kind that quietly wins hearts. It’s the dish your kids will ask for again. The one your partner will brag about to friends. The one you’ll keep in your back pocket, ready for when life gets messy but dinner still matters.

So go ahead—boil the water, sear the pork, and let the garlic and butter do the heavy lifting. Because when you serve this creamy spaghetti, you’re not just making pasta.

Garden Glory on a Plate: The Story Behind Juicy Chicken Fillet with Vegetables

Some recipes are created, others are remembered—and this one, for me, is both.

The first time I made this dish, it wasn’t for a blog post, a dinner party, or even a planned meal. It was the end of a long day, and I was standing in my kitchen with a couple of chicken fillets, a drawer full of vegetables on the brink of becoming forgotten, and that quiet hunger for something warm and wholesome.

As I chopped, tossed, and seared, I wasn’t following any recipe. Just instincts, flavors I love, and the comforting rhythm of cooking for myself. That night, when I pulled the tray from the oven, golden fillets resting atop a colorful bed of vegetables, I knew I had stumbled on something simple yet special.

Since then, this Juicy Chicken Fillet with Vegetables has become one of those go-to meals in my kitchen. It’s easy but elegant, light but satisfying. It’s the kind of meal you can eat on your own, or serve to friends, and either way—it feels like you’ve done something good.

A Meal That Nourishes Without Fuss

This recipe is everything we look for in everyday cooking: fresh, balanced, and full of flavor without being fussy. It’s a one-pan wonder that brings together lean protein, seasonal vegetables, and Mediterranean-inspired seasoning. But most importantly, it respects your time without compromising taste.

The ingredients are humble—chicken fillets, zucchini, peppers, onion, garlic. But when seasoned with paprika, oregano, and finished with lemon juice and fresh herbs, they come alive. A quick sear on the chicken gives it a golden crust, while baking ensures it stays tender and juicy. Meanwhile, the vegetables roast into soft, caramelized perfection beneath.

It’s a dish that proves healthy eating doesn’t have to be boring—or difficult.

Why You’ll Keep Coming Back to This Dish

Aside from being delicious, there are plenty of reasons why this meal deserves a regular spot on your table.

1. It’s Nutritious and Balanced

This dish hits all the key food groups in one meal—lean protein, fiber-rich vegetables, healthy fats, and loads of vitamins. It’s gluten-free, naturally low in carbs, and can easily be made dairy-free or low-fat, depending on your needs.

2. It’s Versatile

You can make this dish with whatever vegetables you have on hand. Swap eggplant for broccoli, or carrots for sweet potatoes. It’s a forgiving recipe that works year-round.

3. It’s Meal-Prep Friendly

Make a double batch and you’ve got lunch or dinner sorted for days. It reheats beautifully and holds up well in the fridge for up to four days.

4. It’s Family-Approved

Even picky eaters tend to love this recipe—thanks to the juicy chicken, mild seasoning, and colorful presentation. It’s easy to adjust the flavors depending on your household preferences.

Ingredients Table

IngredientQuantity
Chicken fillets2 (approx. 400 g)
SaltTo taste
Black pepperTo taste
Paprika1 teaspoon
Garlic powder1 teaspoon
Olive oil (for searing)1 tablespoon
Zucchini, sliced1 medium
Red bell pepper, sliced1
Yellow bell pepper, sliced1
Eggplant, cubed1 small
Carrot, thinly sliced1 medium
Red onion, sliced1 small
Garlic cloves, minced2
Olive oil (for vegetables)2 tablespoons
Dried oregano1 teaspoon
Lemon juiceFrom 1/2 lemon
Fresh parsley or basilFor garnish

Directions

  1. Preheat oven to 200°C (400°F) and line a baking tray with parchment paper.
  2. Season the chicken fillets with salt, pepper, paprika, and garlic powder.
  3. Sear the chicken in 1 tablespoon of olive oil over medium-high heat for 2–3 minutes per side until golden brown. Do not fully cook through. Set aside.
  4. Toss the vegetables—zucchini, bell peppers, eggplant, carrot, onion, and garlic—in 2 tablespoons olive oil, oregano, salt, and pepper.
  5. Spread vegetables evenly on the baking tray and place the seared chicken fillets on top.
  6. Bake in the oven for 20–25 minutes, or until the chicken is cooked through and the vegetables are tender.
  7. Finish with freshness by drizzling lemon juice over the top and garnishing with freshly chopped parsley or basil.

Nutritional Breakdown (Per Serving – Based on 2 servings)

NutrientAmount
Calories~420 kcal
Protein~38 g
Total Fat~22 g
Saturated Fat~4 g
Carbohydrates~18 g
Sugars~8 g
Fiber~6 g
Sodium~320 mg
Vitamin C~90% DV
Iron~2.5 mg

The Flavor Equation: Simple Seasoning, Big Impact

You don’t need a long list of spices or sauces to make this dish sing. Here’s why the seasoning matters:

  • Paprika adds color and a warm depth without heat. Use sweet or smoked, depending on your preference.
  • Garlic powder + fresh garlic work together to build flavor from the inside out—both subtle and aromatic.
  • Oregano brings a Mediterranean herbaceous note that ties the dish together.
  • Lemon juice at the end adds a bright finish and lifts the whole plate.
  • Fresh herbs (like parsley or basil) bring it to life with color and freshness.

These simple additions make the vegetables shine and keep the chicken incredibly flavorful without overpowering it.

Vegetables That Make the Plate Beautiful

This dish is as much about the vegetables as it is the protein. The natural sweetness of bell peppers, the earthiness of eggplant, the softness of roasted onion—all come together to create a medley that supports the star of the plate: the juicy chicken.

Roasting vegetables brings out their best textures and flavors. The zucchini caramelizes at the edges, the onion becomes soft and fragrant, and the eggplant melts into the mix, absorbing every drop of olive oil and seasoning.

Don’t be afraid to pile your tray high with veggies—this dish only gets better with abundance.

Ways to Make It Your Own

As much as I love the base recipe, part of what makes this dish so rewarding is how easy it is to customize. Here are some ideas:

1. Add a Sauce

Drizzle with tahini, garlic yogurt, or pesto before serving for a saucier finish.

2. Make It Spicy

Add chili flakes or cayenne to the chicken seasoning for a subtle heat.

3. Add a Carb

Serve over couscous, quinoa, rice, or even mashed potatoes for a heartier meal.

4. Use Different Proteins

Try turkey fillets, boneless thighs, tofu, or salmon. The method works across proteins with minor adjustments to cooking time.

5. Go Sheet-Pan Style

Toss everything together in a single tray for true one-pan ease. No searing required.

Tips for Success

Even though this dish is beginner-friendly, a few small tips will elevate your results:

  • Pat the chicken dry before searing to ensure a golden crust.
  • Don’t overcrowd the tray—space helps vegetables roast instead of steam.
  • Use uniform cuts for your vegetables so they cook evenly.
  • Add lemon juice and herbs at the end to preserve their brightness.
  • Let the chicken rest before slicing to keep it juicy inside.

Frequently Asked Questions (FAQs)

Can I make this recipe ahead of time?

Yes! You can roast the vegetables and cook the chicken ahead. Reheat gently in the oven or microwave. Add fresh herbs and lemon juice right before serving.

Is this recipe freezer-friendly?

While the vegetables may lose some texture after freezing, the dish is still freezer-friendly. Store in airtight containers and thaw overnight in the fridge before reheating.

What other vegetables can I use?

Anything that roasts well! Broccoli, cauliflower, sweet potatoes, cherry tomatoes, mushrooms, or asparagus all work beautifully.

How do I keep the chicken juicy?

Sear it first for flavor, and then bake just until it reaches an internal temperature of 74°C (165°F). Let it rest before cutting to keep juices inside.

Can I use chicken thighs instead of fillets?

Absolutely. Thighs will be even juicier—just adjust cooking time slightly, as they may take longer.

Is this suitable for kids?

Yes! It’s flavorful but mild. Skip the lemon and herbs if your kids prefer simpler tastes. You can also cut the vegetables into fun shapes to make them more appealing.

What’s the best way to serve this dish?

It’s delicious on its own, but also pairs well with grains, salads, or a simple yogurt dip. It makes a fantastic lunchbox meal or light dinner.

Conclusion: Real Food, Real Flavor, Real Comfort

There’s a certain kind of comfort in recipes like this one. The kind you find at the end of a long day, when you want something real. Something that fills you up without slowing you down. Something that reminds you how rewarding cooking can be, even when you don’t have a lot of time or ingredients.

This Juicy Chicken Fillet with Vegetables is one of those dishes you’ll return to again and again—not because it’s complicated, but because it’s complete. It tastes like effort, even when it doesn’t take much. It’s colorful, fresh, balanced, and endlessly versatile.

And maybe best of all—it makes you feel like you’ve done something good, both for your body and for your table.

So whether you’re cooking for yourself, your family, or friends you want to impress without stress, let this dish be your go-to. A simple idea, beautifully done. That’s real cooking.

Surprise Your Guests: A Family-Inspired Comfort Dish with Creamy Layers and Rich Flavor

Some recipes find their way into your life quietly. They don’t come from cookbooks or cooking shows, but from real conversations and shared meals—the kind where people sit long after the plates are empty, still talking. This creamy minced meat and egg potato bake is one of those recipes.

I first tasted a version of this dish at a friend’s dinner table. It was a cool autumn evening, and we had gathered for what was meant to be a simple weeknight meal. But when she brought out the baking dish, steaming and golden on top, the room went quiet. The smell alone had us all sitting straighter in our chairs.

It was rustic and rich, with layers of seasoned minced meat, tender potatoes, creamy sauce, and bubbling cheese on top. The flavor was deep and warming, with little surprises in every bite—mushrooms here, sweet leeks there, and just a hint of garlic and dill tying it all together.

“This,” she said, “is what I make when I want to make people feel at home.”

And it did.

That night, the bake became more than a meal—it became a memory. Since then, I’ve adapted it in my own kitchen, made it for friends, for holidays, and even just on quiet Sundays when I need something cozy. It’s one of those dishes that always gets a reaction, always gets asked for again, and always reminds me why cooking is so much more than feeding—it’s giving.

Why This Recipe Works So Well

This potato bake is one of those magic combinations of ingredients that feels elevated yet deeply familiar. At its core, it’s simple: ground meat, vegetables, eggs, dairy, and potatoes. But it’s the thoughtful layering and balance of textures and flavors that makes it shine.

It’s Comforting and Hearty

The creamy mixture of milk, eggs, and cheese settles into the meat and potatoes during baking, creating almost a custard-like base that holds everything together. It’s rich but not overwhelming. The cream and cheese balance the protein of the meat and the starch of the potatoes, making every forkful satisfying.

It Feels Special Without Being Complicated

While the ingredient list is humble, the result is worthy of a dinner party. That’s the magic—this is the kind of dish you could serve to guests or keep as a go-to for cozy family meals.

It’s Adaptable

Once you understand the structure, you can modify this recipe endlessly. Want to make it vegetarian? Swap in lentils and mushrooms. Need to feed a crowd? Double the batch and bake it in a larger dish. Cooking for kids? Dial down the garlic and herbs, or sneak in finely chopped veggies.

Ingredients Table

IngredientQuantity
Ground meat (Hackfleisch)500 g (1.1 lbs)
Eggs2
SaltTo taste
Sweet paprika1 teaspoon
Dried garlic1 teaspoon
Mixed pepperTo taste
Fresh garlic, minced1 clove
Fresh dill, choppedA few sprigs
Cream100 g (3.5 oz)
Onion, finely chopped1
Butter (for sautéing)20 g (0.7 oz)
Tomato paste2 tablespoons
Potatoes, peeled and sliced500 g (1.1 lbs)
Leek, finely chopped1
Olive oil (for frying)As needed
Butter (for potatoes)20 g (0.7 oz)
Mushrooms, sliced100 g (3.5 oz)
Cheese, grated50 g (1.8 oz)
Milk100 ml (3.4 fl oz)

Directions: Layers of Flavor, Straight from the Oven

  1. Sauté the vegetables: In a pan, heat a bit of olive oil and butter. Sauté the finely chopped onion, leek, and mushrooms until soft and fragrant. Remove from heat.
  2. Prepare the meat mixture: In a large bowl, combine the ground meat with eggs, salt, sweet paprika, dried garlic, minced fresh garlic, mixed pepper, and chopped dill. Stir in the cream and tomato paste. Mix well until fully combined.
  3. Par-cook the potatoes: Lightly fry the sliced potatoes in a bit of butter until just tender but not fully cooked. Season with salt and set aside.
  4. Assemble the bake: Preheat oven to 180°C (350°F). In a greased baking dish, layer the fried potatoes at the bottom. Spread the sautéed vegetables over the potatoes. Add the meat mixture on top and smooth it out.
  5. Make it creamy: In a separate bowl, whisk together the milk and grated cheese. Pour over the top of the assembled bake.
  6. Bake it: Bake uncovered for 35–40 minutes or until the top is golden and the center is cooked through.
  7. Serve hot: Let it cool for a few minutes before slicing and serving. Garnish with extra dill or chives if desired.

Nutritional Breakdown (Per Serving – Approx. 1 of 6 servings)

NutrientAmount (Approx.)
Calories~430 kcal
Protein~24 g
Total Fat~28 g
Saturated Fat~11 g
Carbohydrates~20 g
Sugars~3 g
Fiber~2 g
Sodium~480 mg
Calcium~150 mg
Iron~3 mg

What Makes It Stand Out

This isn’t just another meat and potato casserole. Several ingredients bring depth and interest that set it apart from typical one-pan meals.

Mushrooms

They lend a meaty, earthy note that rounds out the richness of the dish and adds that “umami” layer you want in comfort food.

Leeks

Softer and slightly sweeter than onions, leeks melt into the background of the dish, giving it a luxurious, aromatic undertone.

Fresh Dill

A sprinkle of dill adds brightness and an unexpected herbal twist. It cuts through the richness of the dairy and complements the garlic beautifully.

Tomato Paste

Just a touch adds acidity and color, giving the meat mixture body and a savory depth that makes it feel slow-cooked, even though it’s not.

Serving Suggestions: Make It a Meal

While the dish is hearty enough to stand alone, here are some ideas to complete the experience:

  • Serve with a crisp side salad of greens and lemon vinaigrette for balance.
  • Pair it with a simple cucumber-yogurt dip or tzatziki to echo the dill and brighten the plate.
  • Add roasted vegetables like carrots or green beans on the side for extra color and nutrition.
  • Offer crusty bread to soak up every last bit of the creamy base.

If you’re serving a crowd or hosting a dinner party, this dish holds well and even improves in flavor after a few hours, making it ideal for preparing ahead.

Creative Variations to Try

One of the best things about this dish is how easily it invites creativity. Here are some favorite twists:

1. Vegetarian Option

Replace the meat with cooked lentils, chickpeas, or a mixture of mushrooms and walnuts for a plant-based version.

2. Spicy Upgrade

Add a dash of chili flakes, cayenne, or smoked paprika to the meat mixture for a bold, spicy edge.

3. Cheesy Crust

Top the final layer with a blend of cheeses—cheddar, mozzarella, or gouda for more melt and stretch.

4. Mediterranean Twist

Add olives, sun-dried tomatoes, and oregano for a Greek-inspired flavor profile.

5. Lightened Up

Use Greek yogurt instead of cream, and reduce the cheese for a lighter (but still creamy) version. You can also use sweet potatoes or a mix of root vegetables.

FAQs: What Readers Might Ask

Can I prepare this in advance?

Yes! You can fully assemble the dish a day ahead, cover it, and store it in the fridge. When ready to bake, let it sit at room temperature for 20 minutes and then bake as usual.

Can I freeze leftovers?

Absolutely. Once cooled, portion it out and freeze in airtight containers. To reheat, thaw in the fridge overnight and warm in the oven or microwave.

Can I make this dairy-free?

You can try using plant-based cream and milk alternatives. Oat milk and coconut cream offer good results, though the flavor will change slightly. Nutritional yeast can replace some of the cheesy flavor.

What’s the best meat to use?

Beef or a mix of beef and pork is traditional and flavorful, but ground chicken or turkey also work well for a leaner option.

Do I have to pre-cook the potatoes?

A quick pre-fry or parboil ensures they become tender during baking and helps them absorb flavor. Skipping this step may result in undercooked or dry potatoes.

Can I use pre-cooked or leftover potatoes?

Yes! This is a great way to use up boiled or roasted potatoes—just slice and layer them in as you would normally.

Can I double the recipe?

Definitely. Just use a larger baking dish and extend the baking time slightly. It’s perfect for batch cooking or feeding guests.

Conclusion: A Dish That Feels Like Home

In a world full of flash and fast fixes, there’s something deeply grounding about a dish like this.

It doesn’t try to be trendy. It doesn’t rely on expensive ingredients. But it offers comfort, warmth, and a kind of culinary nostalgia that’s hard to replicate.

Whether you’re making it for your family, hosting friends, or simply craving something hearty and real after a long day, this creamy minced meat and egg potato bake delivers. It feeds more than hunger—it brings people together, sparks conversation, and carries with it that quiet message that says: You’re home.

So surprise your guests—or yourself—with this timeless recipe. Let it fill your kitchen with warmth and your table with joy.

Layers of Love: A Creamy Cabbage Bake Inspired by Home, Heritage, and Simplicity

It’s amazing how a single dish can take you back in time.

I remember sitting in my grandmother’s sun-drenched kitchen, the smell of garlic and fresh dill hanging in the air, the windows fogged from the bubbling oven. She had this way of cooking that didn’t require recipes. No measuring cups, no timers. Just instinct, taste, and heart.

One of the dishes she made often was a layered cabbage bake—soft, steamy cabbage at the base, tender vegetables folded in, and a creamy topping of sour cream, yogurt, and herbs that would set into a light, golden crust. It wasn’t glamorous. It wasn’t trendy. But it was soul-warming. A recipe passed down from her mother and likely from her mother’s mother, too.

Years later, living in a small apartment and learning to cook for myself, I found myself craving that taste. That warmth. That simplicity. So I recreated it, with the help of memory and intuition—and it worked. It felt like a hug from the past. And now, I’m sharing it with you.

This creamy cabbage and vegetable bake is rustic, nutrient-rich, and wonderfully flexible. Whether you grew up with similar dishes or are trying it for the first time, it brings with it a quiet comfort that’s hard to explain and even harder to forget.

Why This Dish Is So Much More Than Cabbage

Cabbage doesn’t often get the love it deserves. It’s humble, yes—but it’s also incredibly versatile, affordable, and packed with nutrition. In this dish, cabbage becomes something magical. When blanched and baked, it softens into a buttery, almost sweet texture that melts in your mouth. And when paired with a mix of mushrooms, peppers, tomatoes, and a tangy herb topping, it transforms into something comforting and craveable.

This dish isn’t about fancy ingredients. It’s about making something truly satisfying with what you have on hand. It’s about letting simple components—cabbage, eggs, garlic, yogurt—shine in a new and beautiful way.

Ingredients Table

IngredientQuantity
Cabbage400g, chopped
Boiling waterFor blanching
Onion1, finely chopped
Vegetable oil1–2 tbsp
Garlic cloves3, minced
Mushrooms7, sliced
Sweet red pepper1, diced
Tomatoes3, peeled and diced
Boiling water (for tomatoes)As needed
Fresh parsleySmall handful, chopped
Eggs4
Sour cream150g
Ground black pepperTo taste
Plain yogurt250g
Fresh dillTo taste, chopped
Lemon1/2, juiced
SaltTo taste

Directions

  1. Blanch the cabbage
    Place the chopped cabbage in a bowl and pour boiling water over it. Let sit for 3–4 minutes, then drain thoroughly and set aside.
  2. Peel and prep tomatoes
    Place the tomatoes in boiling water for 1–2 minutes. Remove, peel off the skins, and dice them.
  3. Sauté the vegetable mixture
    In a large skillet, heat vegetable oil over medium heat. Add chopped onion and garlic. Sauté until fragrant. Add mushrooms and red pepper, cook until softened. Stir in the diced tomatoes and parsley. Simmer for 5–7 minutes until the mixture reduces slightly and becomes saucy.
  4. Assemble the bake
    Preheat your oven to 180°C (350°F). Lightly grease a baking dish. Begin layering with cabbage on the bottom, then a layer of the sautéed vegetable mixture. Repeat layers as needed.
  5. Mix the topping
    In a separate bowl, whisk together the eggs, sour cream, yogurt, lemon juice, chopped dill, salt, and black pepper until smooth and well combined.
  6. Top and bake
    Pour the creamy mixture evenly over the layered vegetables and cabbage. Smooth with a spatula if needed.
  7. Bake for 30–35 minutes, or until the top is golden and set.
  8. Serve slightly cooled. Enjoy warm with fresh herbs, crusty bread, or a crisp salad.

Nutritional Breakdown (Per Serving – Approx. 1 of 6 servings)

NutrientAmount
Calories~210 kcal
Protein~10 g
Total Fat~12 g
Saturated Fat~4 g
Carbohydrates~16 g
Sugars~6 g
Fiber~3 g
Sodium~220 mg
Calcium~120 mg
Iron~1.8 mg

A Comfort Dish Rooted in Tradition

This creamy cabbage bake is inspired by traditional Eastern European and Balkan recipes, where cabbage is a dietary staple and used in everything from soups to stews to stuffed rolls. Versions of this dish exist in many kitchens under different names—some bake it with cheese, others include rice or ground meat.

The beauty of this particular version is its lightness. It’s vegetarian, balanced, and protein-rich, thanks to eggs, yogurt, and sour cream. The flavor is gentle but layered: garlic and onion give it depth, tomatoes bring brightness, and dill and parsley finish it with freshness.

It’s the kind of dish that brings people to the table without fanfare. It doesn’t try to be the star of the show, yet somehow, it always is.

The Layers of Nutrition

Besides being delicious, this recipe is packed with nutrients. Let’s take a moment to break down some of its core ingredients and what they offer:

  • Cabbage: Low in calories but high in fiber, vitamin C, and antioxidants. It’s great for digestion and supports immune health.
  • Mushrooms: A plant-based source of protein and B vitamins. Mushrooms also bring a meaty, umami-rich flavor that enhances vegetarian meals.
  • Garlic & Onion: Not only flavor boosters, but also excellent for cardiovascular health and immune support.
  • Tomatoes: Rich in lycopene, a powerful antioxidant that supports heart health and may reduce inflammation.
  • Eggs: A complete protein and great source of healthy fats, vitamins D and B12, and choline, which supports brain function.
  • Yogurt & Sour Cream: Add protein and calcium while giving the dish creaminess. Use full-fat varieties for richness or opt for lighter versions depending on your dietary needs.
  • Herbs (Dill and Parsley): More than garnish—fresh herbs add flavor, color, and nutrients, especially vitamins A and K.

This dish proves that comfort food doesn’t have to be heavy or indulgent to be satisfying. It nourishes the body and spirit alike.

How to Make It Your Own: Delicious Variations

One of the best things about this recipe is its adaptability. Whether you’re working with seasonal produce, different dietary preferences, or just your own personal taste, you can customize this bake easily.

1. Add a Grain Layer

For a heartier version, layer in cooked rice, quinoa, or bulgur between the vegetables and cabbage. It becomes more like a one-dish meal.

2. Include Protein

Want to make it even more filling? Add cooked lentils, white beans, or crumbled tofu between the layers. Or, if you’re not vegetarian, cooked ground chicken or turkey works wonderfully.

3. Swap the Sauce

Instead of yogurt and sour cream, you can try ricotta or even a light béchamel sauce if you want a creamier finish. Or add a sprinkle of cheese on top for extra golden goodness.

4. Make It Spicy

Stir a bit of crushed red pepper or chili flakes into the vegetable mixture for a little kick.

5. Go Full Garden

This recipe works with whatever vegetables you have on hand. Zucchini, shredded carrots, spinach, or eggplant all fit beautifully.

Tips for Success

Even though this dish is rustic and forgiving, here are a few tips to make it shine:

  • Blanch the cabbage just enough to soften it without losing texture. This step is essential for even baking and a silky mouthfeel.
  • Drain your tomatoes if they’re very watery, or cook down the filling a bit longer so the final dish doesn’t get soggy.
  • Season each layer lightly—especially the cabbage. Don’t rely on the sauce alone to flavor the whole dish.
  • Let it rest after baking. It will slice cleaner, and the layers will set beautifully.
  • Use fresh herbs when possible. They make a world of difference in a dish this simple.

Frequently Asked Questions (FAQs)

Can I make this recipe ahead of time?

Yes! You can assemble it completely and store it covered in the fridge for up to 24 hours before baking. You can also bake it fully and reheat before serving.

Is it freezer-friendly?

It freezes well. Let it cool completely, slice into portions, and freeze in airtight containers. To reheat, thaw overnight and warm in the oven or microwave.

Can I make it dairy-free?

Absolutely. Substitute the yogurt and sour cream with non-dairy alternatives like coconut yogurt, cashew cream, or a vegan sour cream. Just make sure to use options that hold up well to baking.

What kind of cabbage should I use?

Green cabbage works best, but you could also use savoy cabbage or napa cabbage for a softer texture. Avoid red cabbage, as it will change the color and flavor profile.

Can I serve this cold or at room temperature?

Yes! It tastes delicious warm or chilled. It makes a great addition to lunchboxes or as part of a brunch spread.

What can I serve this with?

It pairs beautifully with crusty bread, a green salad, or a tangy cucumber yogurt side. It can be a main or a hearty side dish depending on the occasion.

Conclusion: A Dish That Feeds More Than Just Hunger

Some recipes are about precision, but this one is about feeling.

It’s about standing in your kitchen on a quiet afternoon, layering simple, nourishing ingredients with care. It’s about watching them come together in the oven to become something comforting and complete. It’s about honoring the foods our families and cultures have always leaned on—ingredients that were once considered humble but are now celebrated for their depth and nourishment.

This creamy cabbage and vegetable bake may not be flashy. It may not go viral on social media. But it will win hearts.

It’s the kind of meal you bring to a neighbor in need, serve to a loved one on a rainy day, or make for yourself when the world feels loud and you need something soft, quiet, and kind.

May it warm your home the way it has warmed mine.

The Best Dinner I’ve Ever Eaten – A Pasta Bake Passed Down with Love

It’s funny how some of the best meals in life don’t come from cookbooks or restaurants—but from friends. Shared not with measuring cups and timers, but with laughter, casual conversation, and the sort of storytelling that turns dinner into an experience.

I remember vividly the night I first tasted this pasta bake. I was visiting an old friend who had grown up in a small town near Florence, Italy. We hadn’t seen each other in years, and over the course of catching up, I watched her pull ingredients from the fridge with ease and familiarity. There was no recipe card, no fancy equipment—just intuition, olive oil, and the confidence of someone raised in a culture where food is love and cooking is second nature.

She said her mother used to make this dish every Sunday, layering pasta, meat, vegetables, creamy béchamel, and bubbling mozzarella into one big casserole dish. She called it pasta al forno, but told me, smiling, “You can call it whatever you want—as long as you make it with your heart.” That dinner—warm, comforting, and deeply flavorful—was one of the most memorable I’ve ever had. It wasn’t just the taste that stayed with me—it was the feeling of being welcomed, nourished, and cared for.

Since then, I’ve made this recipe for countless dinners, from family gatherings to weeknight comfort meals. Every time, it brings the same sense of home, of stories shared across the table. This isn’t just a recipe. It’s an heirloom of affection.

The Soul of Italian Comfort Food

What makes this dish truly special isn’t just the ingredients—it’s the intention behind it. Italian cuisine is rooted in simplicity, balance, and honoring the ingredients. This dish does exactly that. It layers the everyday (pasta, meat, vegetables) with warmth and indulgence (béchamel sauce, mozzarella), creating a meal that’s both deeply satisfying and nostalgic.

Where many pasta bakes rely on shortcuts or ready-made sauces, this one insists on going just one step further—and it shows. The silky béchamel sauce envelops every ingredient, tying the dish together with a creamy, delicate touch. The sweet red pepper and leeks add brightness and earthiness. The minced meat brings richness and body, while the mozzarella gives that irresistible golden finish.

It’s not fussy. It doesn’t try to impress. It just works—every single time.

Ingredients Table

IngredientQuantity
Pasta (penne or rigatoni)250 g
Onion, finely chopped1 medium
Garlic cloves, minced2
Sweet red pepper, chopped1
Minced meat (beef or mixed)600 g
Tomatoes, diced2 medium
Leek stalk, thinly sliced1
Butter40 g
All-purpose flour20 g
Milk500 ml
Hard mozzarella cheese, grated100 g
Vegetable oilAs needed
SaltTo taste
Ground black pepperTo taste

Directions

  1. Boil the pasta
    Cook pasta in a large pot of salted boiling water until just under al dente. Drain and set aside.
  2. Make the meat and vegetable filling
    In a large skillet, heat a bit of vegetable oil over medium heat. Add chopped onion, garlic, and red pepper. Sauté for 3–4 minutes until softened. Add minced meat and cook, breaking it apart, until browned. Add diced tomatoes and sliced leek. Season generously with salt and ground black pepper. Simmer for 10–12 minutes until the mixture thickens.
  3. Prepare the béchamel sauce
    In a separate saucepan, melt butter over medium heat. Whisk in the flour and stir constantly for about 1–2 minutes. Slowly add the milk while whisking continuously to avoid lumps. Cook until the sauce thickens and becomes smooth. Season with a pinch of salt and pepper.
  4. Assemble the dish
    Preheat the oven to 180°C (350°F). In a large baking dish, layer the cooked pasta first, then the meat and vegetable mixture. Pour the béchamel sauce evenly over the top and sprinkle generously with grated mozzarella.
  5. Bake to golden perfection
    Place the dish in the oven and bake for 20–25 minutes, or until bubbling and golden on top.
  6. Rest and serve
    Allow the dish to rest for 5–10 minutes after baking before serving. Serve warm with a crisp salad or fresh bread.

Nutritional Breakdown (Per Serving – Approx. 1 of 6 servings)

NutrientAmount
Calories~510 kcal
Protein~32 g
Total Fat~25 g
Saturated Fat~11 g
Carbohydrates~38 g
Sugars~6 g
Fiber~3 g
Sodium~430 mg
Calcium~190 mg
Iron~3.2 mg

Why This Dish Is Always a Crowd-Pleaser

One of the reasons this recipe has stayed in my personal rotation for so long is how adaptable it is. It’s a dinner party hero, a weekday staple, and a freezer-friendly fallback all in one.

Here’s why it shines:

  • Layered flavor: Every bite offers contrast—savory meat, tender pasta, soft vegetables, creamy sauce, and golden cheese.
  • Make-ahead friendly: You can assemble it in advance and refrigerate it until ready to bake.
  • Feeds a crowd: One baking dish can easily serve 4–6 people generously.
  • Kid-approved: Even picky eaters tend to love it—mild flavors, soft textures, and melted cheese tend to do the trick.
  • Perfectly balanced: It’s rich, but not overwhelming. Creamy, but not heavy.

And perhaps best of all—it looks and smells as good as it tastes. The bubbling top, the aroma of garlic and herbs, the slightly crisp edges of baked cheese—it’s comfort, celebration, and warmth on a plate.

Ingredient Highlights: A Love Letter to Each Layer

Minced Meat

This is the heart of the filling. Whether you use ground beef, pork, veal, or a combination, the meat adds savory depth and richness. It also acts as the perfect carrier for all the sautéed aromatics and vegetables.

Sweet Red Pepper and Leek

These two ingredients elevate the dish beyond a basic meat sauce. The red pepper adds subtle sweetness and color, while leeks bring a gentle onion flavor with a creamy texture once cooked down.

Tomatoes

Used fresh in this recipe, tomatoes help balance the richness with acidity and brightness. You can use canned if needed, but ripe fresh tomatoes truly enhance the rustic charm.

Béchamel Sauce

This is where the magic happens. Instead of using a tomato-based sauce or store-bought cream, you make a simple white sauce from butter, flour, and milk. It brings a velvety texture and gently coats the pasta, making every bite luxurious without being overpowering.

Mozzarella

The final layer—the crown. A generous sprinkle of hard mozzarella on top bubbles and browns as it bakes, giving the dish that irresistible golden crust and cheesy finish.

Ways to Make It Your Own

While the original version is perfect as-is, this dish is also highly versatile. Depending on your mood, season, or dietary needs, you can adapt it in many delicious directions.

Vegetarian Version

Skip the meat entirely and add sautéed mushrooms, spinach, or zucchini instead. You can also add lentils for extra protein.

Spicy Kick

Add a chopped chili or some crushed red pepper flakes to the meat mixture for a touch of heat.

Extra Herby

Add a handful of fresh herbs like basil, oregano, or thyme to the béchamel or meat sauce for added depth.

Gluten-Free

Use gluten-free pasta and substitute the flour in the béchamel with cornstarch or a gluten-free flour blend.

Cheese Variations

Hard mozzarella works best for its melt and flavor, but you can experiment with provolone, parmesan, or even a bit of gorgonzola if you’re feeling bold.

Tips for Success

  • Use high-quality pasta: A sturdy pasta like rigatoni or penne holds its shape and doesn’t become mushy after baking.
  • Don’t overcook your pasta: Boil it until just under al dente, as it will continue to cook in the oven.
  • Let it rest before serving: This helps the layers set and makes serving easier.
  • Grate your own cheese: Pre-shredded cheese often has anti-caking agents that affect melt quality.
  • Double the recipe: It freezes beautifully. Make one for now, one for later.

Frequently Asked Questions (FAQs)

1. Can I make this dish ahead of time?

Yes! You can assemble the entire dish, cover it, and refrigerate for up to 24 hours before baking. It’s perfect for prepping the night before.

2. Can I freeze it?

Absolutely. You can freeze it either before baking (assembled and uncooked) or after it’s fully baked. To reheat, thaw in the fridge overnight and bake as usual.

3. Can I use different meats?

Yes. A mix of beef and pork is traditional, but feel free to use ground turkey, chicken, or even plant-based meat alternatives.

4. Can I add more vegetables?

Of course! This recipe is very forgiving. Mushrooms, spinach, zucchini, or eggplant can be delicious additions.

5. How do I store leftovers?

Store in an airtight container in the fridge for up to 4 days. Reheat in the oven or microwave until hot throughout.

6. What should I serve with it?

It pairs beautifully with a simple green salad, roasted vegetables, or garlic bread. A glass of red wine doesn’t hurt either.

Conclusion: A Recipe That Feels Like Home

Some recipes are made for dinner. Others, like this one, are made for memories.

Whether it’s passed down from a friend, scribbled on a napkin, or discovered over a bottle of wine, a dish like this becomes part of your story. It becomes something you crave not just for its taste, but for the way it makes you feel—nourished, connected, and at peace.

So the next time you want to cook something that feels like a hug, something that fills your kitchen with joy and your table with smiles, remember this pasta bake. It’s more than a meal. It’s a gift from a friend—and now, from you to the ones you love.

Warm Mornings and Gentle Starts: The Cozy Charm of Baked Apple Oatmeal with Cottage Cheese

There’s a quiet kind of magic in slow mornings—the kind where you’re not racing against the clock, but instead, easing into the day with intention. For me, these moments always start in the kitchen. And few recipes evoke that sense of calm and comfort quite like a dish of Baked Oatmeal with Apples and Cottage Cheese.

It began during a time when life felt uncertain. I had just moved into a small apartment in a new city—windows that creaked when they opened, a tiny stove that sometimes needed convincing to light, and a heart craving familiarity. The world outside was moving fast, but I was determined to build a pocket of warmth for myself within those four walls. On a chilly autumn morning, I chopped some apples, warmed some milk, and stirred together oats, cottage cheese, and a few pantry staples. What emerged from the oven was something far greater than the sum of its parts: it was soft, comforting, and quietly nourishing—exactly what I needed.

Since then, this recipe has been my go-to for chilly mornings, weekend resets, and sharing love with others. It’s simple, yet deeply satisfying—a warm hug in edible form.

A Breakfast That Nourishes Beyond Hunger

At first glance, baked oatmeal might not seem revolutionary. But when you add fresh apples, creamy cottage cheese, and just the right hint of spice, it transforms into something special—warm, hearty, lightly sweet, and rich in texture. It’s not just a breakfast—it’s a moment of pause, a way to slow down and center yourself before the day takes over.

Unlike traditional oatmeal, which can sometimes feel mushy or one-note, baked oatmeal offers structure. It’s spoonable but sliceable, soft yet slightly crisp on the top. And the cottage cheese? That’s the secret star. It adds a protein boost and a rich creaminess without overpowering the apple or oats.

This dish balances indulgence and nutrition. It’s the kind of food that makes you feel cared for—whether you’re feeding yourself or the people you love.

Ingredients Table

IngredientQuantity
Rolled oatmeal1 cup (90 g)
Warm milk½ cup (150 ml)
Apples, peeled and chopped2 medium
Butter1 tbsp (20 g)
Cottage cheese½ cup (120 g)
Egg1 large
Honey or maple syrup2 tbsp (optional)
Cinnamon1 tsp
Vanilla extract½ tsp
Baking powder½ tsp
Pinch of saltTo taste

Baking Directions: “From Bowl to Cozy Bliss”

  1. Preheat & Prep:
    Preheat your oven to 180°C (350°F). Lightly grease a small baking dish or individual ramekins with butter.
  2. Soften the Base:
    In a large bowl, combine the oatmeal and warm milk. Let it sit for 5–10 minutes to soften the oats.
  3. Mix It Up:
    Add in the chopped apples, cottage cheese, egg, butter (melted), cinnamon, vanilla extract, baking powder, salt, and sweetener if using. Mix until fully combined.
  4. Into the Oven:
    Pour the mixture into the prepared dish. Spread evenly and press down gently with a spoon.
  5. Bake to Golden:
    Bake for 30–35 minutes, or until the top is set and lightly golden.
  6. Serve Warm:
    Let it cool slightly before serving. Enjoy as a nourishing breakfast or a wholesome snack. Pairs perfectly with a dollop of yogurt or an extra drizzle of honey.

Nutritional Breakdown (Per Serving – approx. 1 of 4 servings)

NutrientAmount
Calories~220 kcal
Protein~9 g
Total Fat~6 g
Saturated Fat~3 g
Carbohydrates~30 g
Sugars~12 g
Fiber~3 g
Sodium~160 mg
Calcium~120 mg
Iron~1.5 mg

Why This Recipe Works: The Harmony of Ingredients

Each ingredient in this recipe plays a thoughtful role—not just in flavor, but in creating the perfect texture and nutritional profile.

Oats

Rolled oats are the base. They’re hearty and full of fiber, creating a satisfying structure that absorbs the flavors around them. They also offer a slow-release energy that keeps you full for hours.

Apples

Fresh apples bring sweetness, moisture, and that classic fall flavor. As they bake, they soften slightly but still hold their shape, adding bites of freshness throughout.

Cottage Cheese

Often underrated, cottage cheese is the protein powerhouse here. It melts into the oats, giving the dish a custard-like creaminess. It also adds calcium, probiotics, and a mild tang that balances the sweetness of the apples and honey.

Warm Milk & Egg

These create the liquid binder that softens the oats while baking and helps hold the dish together. The egg gives it structure, while the milk adds richness.

Spices & Sweetener

Cinnamon, vanilla, and a touch of honey (or maple syrup) round out the flavor with warmth and subtle sweetness—though you can absolutely adjust these to your taste.

What Makes It Stand Out: A Versatile, Feel-Good Meal

Beyond taste and texture, what makes this baked oatmeal so beloved is its versatility. It fits beautifully into all kinds of lifestyles and routines.

  • Meal prep friendly: Bake once, eat all week. Store it in the fridge and reheat in the morning.
  • Customizable: You can adjust the sweetener, fruit, and mix-ins based on what’s in your kitchen.
  • Nutritious: High in fiber, protein, and slow-digesting carbs, it’s the kind of breakfast that energizes you without a crash.
  • Family-approved: Kids love the soft texture and natural sweetness. Adults appreciate how it feels indulgent without being heavy.

It’s also one of those rare recipes that feels equally at home on a cozy weekday morning or as part of a weekend brunch spread.

Creative Variations to Keep It Fresh

Once you’ve tried the original, you’ll find countless ways to make this recipe your own. Here are a few variations to spark your imagination:

Berry Almond Crunch

Swap apples for blueberries or raspberries, and add slivered almonds on top before baking.

Banana Nut Bake

Use mashed bananas in place of apples, and stir in chopped walnuts and a pinch of nutmeg.

Tropical Morning

Add chopped pineapple, shredded coconut, and a bit of lime zest for a sunny flavor twist.

Chocolate & Cherry Delight

Toss in dried cherries and dark chocolate chips for a more decadent (but still breakfast-appropriate) option.

Vegan-Friendly Version

Use plant-based milk, skip the egg, and substitute cottage cheese with a vegan yogurt or tofu-based mixture.

The base recipe is endlessly flexible. Let your cravings and pantry guide you.

Tips for Best Results

To help you achieve that perfectly baked, golden-topped dish every time, here are a few extra tips:

  • Soften the oats first: Letting the oats soak in warm milk for a few minutes helps them soften slightly and absorb flavor.
  • Use firm apples: Varieties like Honeycrisp or Granny Smith hold up well during baking and offer a great balance of tart and sweet.
  • Add texture on top: A sprinkle of oats or chopped nuts on top adds a bit of crunch.
  • Chill it for later: This dish tastes just as good cold or reheated the next day. Drizzle a little milk or yogurt over leftovers to refresh the texture.
  • Avoid overbaking: Take it out once the top is golden and the center is just set—it will continue to cook slightly as it cools.

Frequently Asked Questions (FAQs)

1. Can I make this recipe dairy-free?

Yes! Use plant-based milk like almond or oat milk, and swap the cottage cheese for dairy-free yogurt or blended tofu for a creamy texture.

2. Is it suitable for kids?

Absolutely. It’s naturally sweetened, soft in texture, and packed with nutrients. You can leave out any added sugar for younger children and still have a flavorful result.

3. Can I use steel-cut oats?

Not for this particular version, as they require more liquid and a longer cooking time. Stick with rolled oats for best texture.

4. How long does it keep?

Store in the fridge for up to 5 days. Reheat in the microwave or oven, or enjoy cold.

5. Can I freeze it?

Yes! Slice it into portions and wrap individually. Freeze for up to 3 months and reheat from frozen in the microwave or oven.

6. Can I serve this as dessert?

Absolutely. With a drizzle of maple syrup or a scoop of vanilla yogurt on top, it becomes a wholesome dessert option.

Conclusion: A Breakfast That Feels Like Home

There’s a quiet joy in cooking something simple yet meaningful—something that smells like comfort and tastes like care. Baked Oatmeal with Apples and Cottage Cheese is more than just a recipe. It’s a way to welcome yourself into the day. To nourish your body, yes—but also to remind yourself that you deserve softness, warmth, and intention first thing in the morning.

Whether you’re making it for a bustling household, meal-prepping for a busy week, or setting the tone for a gentle Sunday, this dish offers something real. Something grounding. Something good.

So the next time you find yourself craving a slow start, preheat your oven, gather your oats and apples, and give yourself the gift of a breakfast worth waking up for.

From Sunday Dinners to Soulful Bites: The Story Behind Stuffed Meatballs with Vegetables and Cheese

There’s something deeply comforting about a family recipe that travels with you through life. For me, Stuffed Meatballs with Vegetables and Cheese isn’t just a meal—it’s a memory, a moment in time suspended by flavor.

When I was ten, my grandmother would invite all of us over on Sundays, the kitchen already humming with the scents of browned garlic and sizzling onions by the time we arrived. Her kitchen was her canvas, and those little stuffed meatballs were her masterpiece. But what made them truly special wasn’t just the tender meats or gooey cheese hidden inside—it was the love she kneaded into every bite. She’d always wink and say, “These meatballs have secrets inside. Just like people. Be gentle with both.”

Years later, when I moved to a new city and felt the inevitable ache of distance, I found myself making these meatballs one quiet weekend. As the aroma filled my apartment, I was home again. That’s the magic of a dish like this—it nourishes far more than your hunger.

A Recipe That Does More Than Fill a Plate

These meatballs are a layered experience—literally and metaphorically. The combination of three types of meat (beef, chicken, and pork) creates a deeply savory foundation. Then, in the center, you find a medley of finely chopped vegetables and melting cheese. It’s a hidden treasure with every bite, offering contrast in texture, flavor, and comfort.

What elevates this dish is how adaptable it is. You can dress it up for a dinner party with a rustic tomato basil sauce and handmade pasta, or keep it casual with a side of garlic bread and salad. It works as a freezer-friendly prep-ahead meal just as well as it does a crowd-pleaser on game night.

Ingredients Table

IngredientQuantity
Minced chicken400 g
Ground beef400 g
Minced pork400 g
Eggs2
Onion (chopped)1 medium
Garlic cloves (minced)2
Bell peppers (diced)1/2 cup
Carrot (grated)1/3 cup
Zucchini (finely chopped)1/3 cup
Shredded cheese (mozzarella or cheddar)1 cup
Breadcrumbs3/4 cup
Fresh parsley (chopped)2 tbsp
SaltTo taste
Black pepperTo taste
Olive oilFor brushing

Step-by-Step Directions: “The Meatball Masterpiece”

  1. Preheat & Prep:
    Preheat your oven to 190°C (375°F). Lightly grease a baking sheet or line with parchment paper.
  2. Mix the Base:
    In a large bowl, combine minced chicken, ground beef, and minced pork. Add eggs, chopped onion, minced garlic, parsley, salt, pepper, and breadcrumbs. Mix well until all ingredients are evenly combined.
  3. Shape the Magic:
    Take a portion of the meat mixture (about the size of a golf ball), flatten it in your palm, and place a spoonful of mixed vegetables and shredded cheese in the center. Carefully close and shape into a ball, sealing the filling inside.
  4. Bake to Perfection:
    Place the stuffed meatballs on the prepared baking sheet. Lightly brush the tops with olive oil for a nice golden finish.
  5. Into the Oven:
    Bake for 25–30 minutes or until meatballs are cooked through and nicely browned on the outside.
  6. Serve and Savor:
    Serve hot with a side of tomato sauce, pasta, or roasted vegetables for a hearty meal.

Nutritional Breakdown (Per Serving – Approx. 2 meatballs)

NutrientAmount
Calories~380 kcal
Protein~28 g
Total Fat~24 g
Saturated Fat~9 g
Carbohydrates~10 g
Sugars~2 g
Fiber~1 g
Sodium~400 mg
Calcium~150 mg
Iron~2.5 mg

The Power of the Trio: Understanding the Meat Blend

Why three kinds of meat? It’s not just to be extra—though it is indulgent. Each protein brings something to the table:

  • Ground beef delivers depth and richness.
  • Minced chicken lightens the mix and keeps it lean.
  • Minced pork adds moisture and subtle sweetness.

The blend creates a balance that’s hard to achieve with a single meat alone. This harmony allows the other flavors—especially the cheese and veggies—to shine rather than get lost in a heavy base.

If you’re following a specific diet, this blend is easy to adapt. Swap pork for turkey, or use all chicken for a leaner version. Just remember that fat = flavor, so if you go lean, add a splash of olive oil or a bit more cheese to keep everything juicy.

The Hidden Heart: Vegetables and Cheese as Soulful Fillings

Let’s talk about the filling—that warm, gooey center that feels like the culinary version of a surprise hug. The vegetables (think bell peppers, grated carrots, zucchini) are more than just healthy fillers. They add a fresh bite, a slight crunch, and nutrients that round out the richness of the meat.

Then there’s the cheese. Oh, the cheese.

Mozzarella brings that classic melt. Cheddar introduces a tang. Gouda, if you’re feeling fancy, adds a touch of smokiness. Mix and match depending on what’s in your fridge or what you’re craving that day.

The beauty of stuffing these meatballs is that it turns something simple into something thoughtful. It says, “I went the extra mile.” And your dinner guests—or your future self—will thank you for it.

Tips to Nail It Every Time

Getting stuffed meatballs just right takes a little care, but it’s absolutely worth it. Here are a few tips to ensure they come out perfect every time:

1. Don’t Overmix the Meat

Overmixing can make the meat tough. Combine ingredients until just incorporated—it’s okay if it looks a little rustic.

2. Use Cold Fillings

Chill your vegetable and cheese filling before stuffing the meatballs. This helps the center stay put while cooking and prevents the cheese from leaking too early.

3. Size Matters

If your meatballs are too large, they may cook unevenly. Aim for golf-ball-sized portions for even cooking with enough room for stuffing.

4. Seal Them Like a Pro

Ensure the stuffing is completely sealed inside the meat. Wet hands can help shape and smooth the meatballs more easily without sticking.

5. Bake, Don’t Fry (Unless You’re Feeling Bold)

Baking ensures even cooking and keeps things a little healthier. But if you want that crisp golden exterior, sear them in a pan before baking.

Creative Variations: Your Meatball, Your Rules

Don’t be afraid to experiment. The base recipe is endlessly customizable:

  • Spicy Kick: Add chopped jalapeños or red pepper flakes to the meat mix.
  • Italian Classic: Use basil, oregano, and Parmesan in both the mix and filling.
  • Mediterranean Mood: Add chopped olives, sun-dried tomatoes, and feta to the filling.
  • Vegetarian Twist: Use lentils and mashed chickpeas with breadcrumbs and egg as the base, then stuff with roasted vegetables and cheese.

You can even make a breakfast version with scrambled eggs and cheese inside. Sounds wild, but trust me—it works.

Frequently Asked Questions (FAQs)

1. Can I make these meatballs in advance?

Yes! You can prepare them ahead of time and refrigerate for up to 24 hours before baking. They also freeze beautifully—just flash-freeze on a tray, then store in a sealed bag. Bake straight from frozen, adding an extra 5–10 minutes.

2. What if my meatballs fall apart?

This usually happens if the binding agents (eggs, breadcrumbs) aren’t balanced. Make sure your mixture holds its shape when pressed. Also, don’t skip chilling them before baking—it helps them stay firm.

3. What cheese is best for stuffing?

Mozzarella is a classic for meltability, but you can use cheddar, gouda, provolone, or even cream cheese blended with herbs. Hard cheeses like Parmesan work better mixed into the meat rather than as stuffing.

4. How do I serve stuffed meatballs?

They’re versatile. Serve over pasta, tucked into a sub roll, or alongside mashed potatoes and gravy. For low-carb options, go with cauliflower rice or sautéed greens.

5. Can I make a gluten-free version?

Absolutely. Use gluten-free breadcrumbs or almond flour as a substitute. Make sure any sauces or seasonings you use are gluten-free too.

More Than a Recipe: A Moment of Connection

Food has a way of bridging distances—across generations, across cities, across the gaps we sometimes feel in our day-to-day lives. These Stuffed Meatballs with Vegetables and Cheese are more than just a combination of meat, cheese, and veggies. They are comfort wrapped in warmth, a small reminder that home isn’t always a place—it’s sometimes just a plate of food made with intention.

Whether you’re feeding a hungry family on a weeknight or looking for that perfect recipe to bring to your next gathering, this dish never disappoints. It’s rich without being overwhelming, creative without being complicated. But above all, it tells a story. And that story is yours to continue, one meatball at a time.

The Soul of the Mediterranean in a Loaf: Why Olive Bread Deserves a Place in Your Kitchen

There’s something about the smell of rising dough, warm olive oil, and briny olives that instantly transports me. Maybe it’s childhood. Maybe it’s an old trip to Greece. Or maybe it’s just the power of honest food made slowly.

I first fell in love with olive bread at a small coastal café tucked along the edge of a cliff somewhere in southern Italy. I don’t even remember the name of the town, but I remember the bread. It was served warm, torn by hand at the table, dipped in rich local olive oil, and eaten between sips of wine and quiet conversation. There was nothing fancy about it. No butter. No sauces. Just rustic, crusty bread with dark green olives woven into its golden core. It was soft, fragrant, and deeply flavorful. I didn’t know bread could taste like that.

Years later, back in my own kitchen, I chased that memory. I experimented with flours, different yeasts, water temperatures, fermentation times. But the key turned out to be simplicity—and patience. Good olive bread doesn’t need bells and whistles. It needs time, warmth, and quality ingredients.

This recipe is the result of all that trial, error, and love. And I promise you: once you make it, you’ll never want to go back to store-bought again.

What Makes This Olive Bread So Special?

At its core, olive bread is a celebration of Mediterranean simplicity. It honors ingredients that have been staples for centuries—flour, water, oil, salt, and yeast—brought to life with one humble addition: olives.

But don’t be fooled by its simplicity. This bread is layered with depth. The exterior develops a beautiful golden crust while the interior stays pillowy and soft. As you slice into it, you’ll notice flecks of green and black olives peeking through, each one a burst of savory saltiness that complements the richness of the dough.

Ingredients Table

IngredientQuantityNotes
Olive oil4 tablespoons (60 ml)Adds moisture and flavor
Dry yeast1 tablespoon (10 g)For a soft, risen dough
Salt1 teaspoonEnhances overall flavor
Warm water1 1/3 cups (320 ml)Activates the yeast
Plain flour4 3/4 cups (570 g)All-purpose flour works best

Optional Add-in:

  • 1 cup chopped olives (black, green, or mixed) – folded into the dough before shaping

Directions

  1. Activate the Yeast
    In a large bowl, mix warm water with dry yeast and let sit for 5–10 minutes until it becomes frothy.
  2. Build the Dough
    Add olive oil and salt to the yeast mixture. Gradually add the flour, stirring with a wooden spoon or dough hook until a rough dough forms.
  3. Knead and Rise
    Knead the dough on a floured surface for 8–10 minutes until smooth and elastic. Place in a lightly oiled bowl, cover, and let it rise for 1 to 1.5 hours or until doubled in size.
  4. Add the Olives (Optional)
    If using olives, gently knead them into the dough after the first rise.
  5. Shape and Proof
    Shape the dough into a round or oval loaf. Place on a baking sheet lined with parchment paper or into a floured banneton basket. Cover and let it rise again for about 30–45 minutes.
  6. Bake to Golden Perfection
    Preheat your oven to 220°C (425°F). Bake the bread for 25–30 minutes, or until the crust is golden and the loaf sounds hollow when tapped on the bottom.
  7. Cool and Slice
    Let the bread cool on a rack for at least 20 minutes before slicing. Serve warm or at room temperature.

Nutritional Information (Per Slice – Approx. 1/10 of Loaf)

NutrientAmount
Calories~210 kcal
Protein5 g
Fat5.5 g
Carbohydrates35 g
Fiber1.5 g
Sodium180 mg

The Perfect Contrast of Texture and Flavor

Olive bread balances the chewy structure of artisan loaves with the silky moisture of olive oil-enriched dough. Every slice delivers a satisfying bite: crisp crust, tender crumb, and a touch of brine from the olives. It’s not too dense. Not too light. Just right.

The olive oil adds not just flavor but also softness and moisture, giving the bread longer shelf life and a rich aroma that lingers in your kitchen long after it’s baked.

Baking Bread as Ritual, Not Just Recipe

There’s something meditative about making bread. Measuring, kneading, shaping—it forces you to slow down and connect. It’s tactile. Grounding. Alive. Yeast needs warmth and time to grow. Dough responds to your hands. Bread is not something you rush. It’s something you build.

Making olive bread, especially, feels almost sacred. From the moment the yeast blooms in warm water to when you fold in the olives and form your loaf, you’re participating in an ancient practice. It’s the kind of food that speaks in generations, not trends.

When it comes out of the oven—golden, cracked on top, steam rising—it’s more than food. It’s an offering.

Ways to Enjoy Olive Bread

This bread is wonderfully versatile. It’s flavorful enough to stand alone, but pairs beautifully with countless dishes. Here are some ideas to make the most of it:

1. Classic Olive Oil & Herbs Dip

Serve warm slices with a shallow bowl of extra virgin olive oil, a splash of balsamic vinegar, crushed garlic, and a pinch of dried oregano or rosemary.

2. Elevated Sandwiches

Use thick slices for grilled paninis with roasted vegetables, cheese, or even thinly sliced steak or chicken.

3. Soup’s Best Friend

Olive bread turns a simple bowl of tomato soup, lentil stew, or minestrone into a full meal.

4. Charcuterie Companion

Add it to a grazing board with cheeses, hummus, olives, grapes, and roasted nuts.

5. Rustic Breakfast

Toast it and top with avocado, poached eggs, or a drizzle of honey and feta for sweet-savory balance.

The Ingredients Matter—Choose with Care

Olives

You can use black olives, green olives, or a combination. Kalamata olives add depth, while green olives provide brightness and bite. Make sure they’re pitted and well-drained.

Flour

Plain all-purpose flour works well here, though you can substitute up to 25% with whole wheat for a heartier texture.

Olive Oil

This is the flavor anchor of the bread. Use a high-quality extra virgin olive oil for the dough—it adds subtle fruitiness and helps soften the crumb.

Yeast

Dry active yeast or instant yeast both work. The rise time is flexible depending on room temperature and how much depth of flavor you want from fermentation.

Frequently Asked Questions (FAQs)

Can I use whole wheat flour?

Yes, but don’t substitute all of the flour. Try using 25–30% whole wheat and the rest plain flour. This gives you added nutrition and a slightly nuttier taste without sacrificing softness.

How long does this bread stay fresh?

Stored in a sealed container at room temperature, it stays fresh for up to 3 days. You can extend shelf life by refrigerating it, though it’s best to reheat slices before serving.

Can I freeze olive bread?

Absolutely. Slice the bread after it cools and wrap it tightly in plastic wrap or foil. Freeze in a sealed bag for up to 2 months. Toast or bake from frozen when ready to eat.

Can I make it without a stand mixer?

Yes. This dough can easily be made by hand. The kneading takes a bit more time but is very manageable—and rewarding.

Can I add herbs or other flavors?

Definitely. Try adding chopped fresh rosemary, thyme, sun-dried tomatoes, roasted garlic, or even a pinch of chili flakes. These additions work beautifully with olives and enhance the Mediterranean vibe.

Is this bread vegan?

Yes. As long as you use plant-based toppings and fillings, the bread itself is 100% vegan. No dairy, no eggs—just pure plant-based simplicity.

Tips for Perfect Olive Bread

  • Don’t rush the rise. Let the dough rise fully—both after kneading and after shaping. This gives the bread a light, airy texture and allows flavor to develop.
  • Drain the olives well. Too much moisture can make the dough soggy or unstable. Pat olives dry with a paper towel before adding them.
  • Score the top. Before baking, use a sharp knife or blade to score the top of the dough. This helps it expand evenly and gives you that bakery-style look.
  • Use a baking stone or steel. If you have one, it helps create a beautifully crisp crust by conducting high, even heat from the bottom.
  • Steam the oven. Place a pan of water in the oven or spray water into the hot oven right before baking. This helps develop a crisp, golden crust.

Why Homemade Olive Bread is Worth the Effort

Making bread from scratch isn’t just about saving money or eating better. It’s about reconnecting with the roots of cooking—slowing down, working with your hands, feeding people something real.

Olive bread, in particular, holds a special kind of magic. It’s rustic yet elegant, simple yet layered, humble yet completely impressive. It makes the everyday feel a little more elevated.

Whether you serve it at a gathering or tear it apart on a quiet night with soup, it brings a sense of satisfaction no store-bought loaf ever could. It tastes like effort, like care, like something meant to be shared.

Conclusion: Bread That Brings People to the Table

At the end of the day, food is about more than flavor. It’s about comfort, memory, and connection. And that’s exactly what this olive bread delivers.

Every bite tells a story. Of old kitchens. Of passed-down traditions. Of sun-drenched countries where people gather for long meals and good bread. But mostly, it’s a story you get to write—every time you knead the dough, every time the loaf rises in your kitchen, every time you serve it still warm to the people you love.

So let your home smell like olives and flour. Let your hands get sticky with dough. Let your table be the place where this humble, perfect loaf lives its best life.