Simple Chocolate Dream Cups

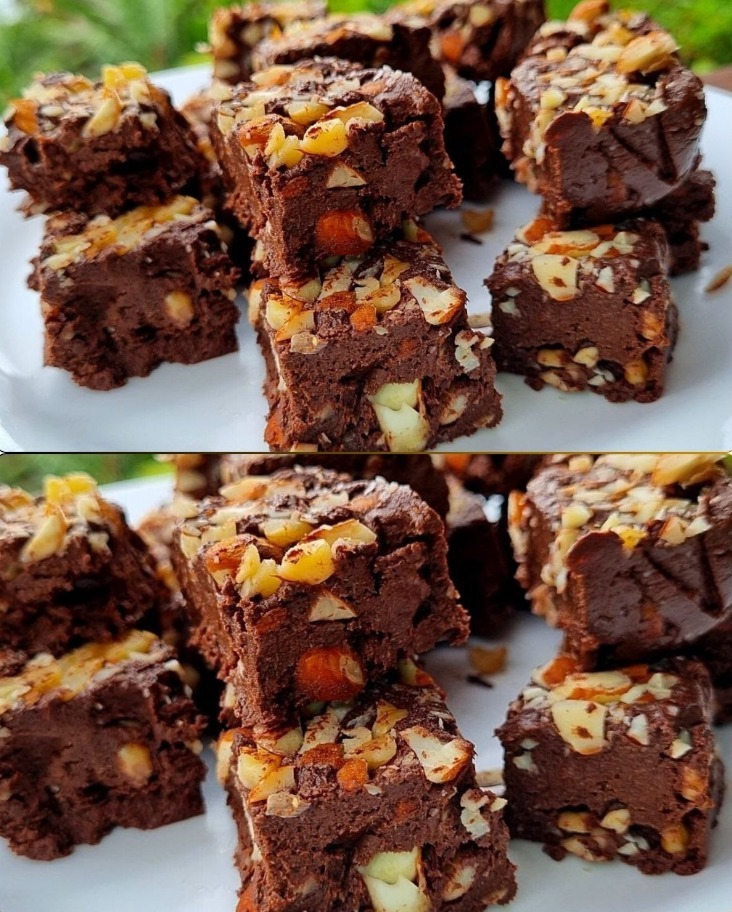
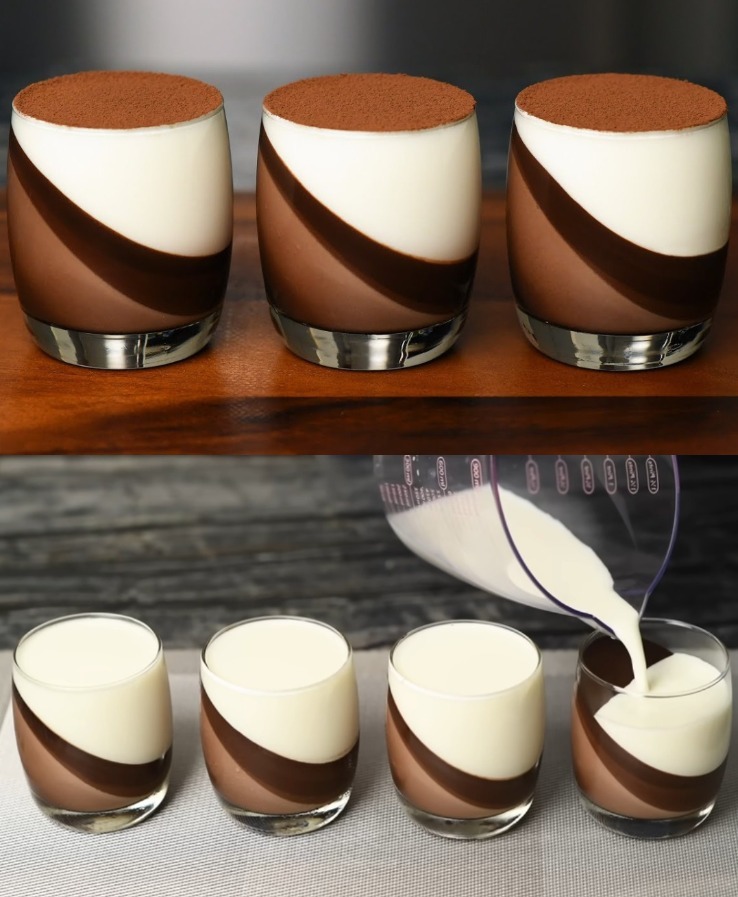
If you’re looking for a yummy chocolate treat that’s easy to make and looks like you fussed, you’re in the right place! Our Chocolate Cream Delight is a no-bake dessert that’s creamy and rich. You don’t need an oven, just a fridge, and some simple ingredients. It’s perfect for when you want something sweet and chocolaty. Plus, you can make it fancy with some berries or a puff of whipped cream on top! Ready to make a dessert that’ll make everyone say “wow”? Let’s get started!

You’ll Need:

  • 2 cups of thick cream
  • 1/2 cup of regular white sugar
  • 7 oz of your favorite dark chocolate, chopped up small
  • 2 tsp of gelatin
  • 2 tbsp of cold water to mix with the gelatin
  • 1 tsp of vanilla for a sweet scent
  • A tiny bit of salt
  • Some berries or a dollop of whipped cream to make it look pretty (if you want)

Let’s Make It:

  1. Gelatin Time:
    • Mix the gelatin with the cold water in a little dish and let it sit. It’ll get thick.
  2. Chocolate Cream Mixture:
    • Pour the cream into a pot and add the sugar. Warm it up on the stove, but don’t let it boil.
    • Once it’s hot, take the pot off the heat and add the dark chocolate pieces. Stir it all up until the chocolate melts into the cream.
  3. Mixing in the Gelatin:
    • Get your gelatin (it should be thick now) and stir it into the warm chocolate cream until it’s all smooth.
  4. Flavoring:
    • Drop in the vanilla and a little pinch of salt to the mix for that nice flavor.
  5. Setting the Dessert:
    • Pour the chocolatey cream into some cups or molds. Then, you have to wait—put them in the fridge for a few hours until they’re firm.
  6. Finishing Touches:
    • When you’re ready to eat, you can add some berries on top or a swirl of whipped cream.

Now you’ve got a homemade Chocolate Cream Delight that’s as easy to make as it is delicious to eat!

Banana Cocoa Nut Delight: A No-Sugar, Oat-Free Vegan Dessert

Indulge in a guilt-free, delicious dessert that combines the natural sweetness of bananas with the rich depth of cocoa and the crunchy texture of nuts. This vegan and healthy treat is perfect for satisfying your sweet tooth without any added sugar.

Ingredients:

  • 80g (approximately 1/2 cup) mixed nuts or peanuts, finely chopped
  • 375g ripe bananas (about 2-3 bananas), to make 1-1/2 cups of banana puree
  • 50g (1/2 cup) unsweetened cocoa powder

For Decorating:

  • A handful of mixed nuts or peanuts, roughly chopped
  • A sprinkle of raisins

Instructions:

  1. Prepare the Base:
    • Begin by peeling the bananas and mashing them in a large bowl until you achieve a smooth puree. For a finer texture, you can blend the bananas in a food processor.
  2. Mix the Ingredients:
    • To the banana puree, add the unsweetened cocoa powder and the 80g of finely chopped mixed nuts or peanuts. Stir the mixture until all the ingredients are well combined and you have a uniform, thick batter.
  3. Shape the Dessert:
    • Line a tray or plate with parchment paper. Using a spoon or your hands, form the mixture into small balls or bars, depending on your preference. Place these on the parchment paper, leaving some space between each piece.
  4. Decorate:
    • Sprinkle the tops of your shaped desserts with the roughly chopped nuts or peanuts and a few raisins for a touch of natural sweetness and an appealing look.
  5. Chill and Serve:
    • Refrigerate your banana cocoa nut delights for at least an hour to set. This step is crucial for achieving a firm texture that’s easy to eat as a finger food.
  6. Enjoy:
    • Once set, serve your no-sugar, oat-free vegan dessert as a healthy treat. These delights are perfect for snacking, after-dinner desserts, or even as a nutritious addition to breakfast.

This Banana Cocoa Nut Delight is not only a testament to the versatility of simple, wholesome ingredients but also a wonderful way to enjoy a dessert that’s both healthy and vegan. Enjoy the natural flavors and textures of this easy-to-make treat any day of the week!

Chocolate Chiffon Cake with Chocolate Frosting

Indulge in the airy lightness of chiffon paired with the rich intensity of chocolate frosting. This recipe guides you through creating a chocolate chiffon cake that’s as delightful to eat as it is to present.

Ingredients:

Cake:

  • 80g fine cake flour
  • 20g unsweetened cocoa powder
  • 3 large egg yolks
  • 1/4 teaspoon baking soda
  • 1/2 teaspoon baking powder
  • 55g granulated sugar
  • 1/4 teaspoon fine salt
  • 50g light vegetable oil
  • 100g whole milk
  • 1 teaspoon pure vanilla extract
  • 3 large egg whites
  • 60g granulated sugar (for the meringue)
  • 1/2 teaspoon fresh lemon juice

Chocolate Frosting:

  • 300g cold water
  • 40g cornstarch
  • 350g evaporated milk
  • 200g granulated sugar
  • 50g unsweetened cocoa powder
  • 1 teaspoon agar-agar powder
  • 150g unsalted butter, room temperature

Directions:

  1. Cake Preparation:
    • Preheat your oven to 170°C (340°F). Sift together cake flour, cocoa powder, baking soda, and baking powder into a bowl. Add 55g sugar and salt, whisking to combine.
    • In a separate bowl, mix egg yolks, vegetable oil, milk, and vanilla extract until smooth. Combine this with the dry ingredients, stirring until just blended.
  2. Make the Meringue:
    • Beat the egg whites with lemon juice until foamy. Gradually add 60g sugar, continuing to beat until stiff peaks form. Gently fold the meringue into the batter in thirds, being careful not to deflate the mixture.
  3. Bake the Cake:
    • Pour the batter into an ungreased chiffon cake pan. Bake for about 35-40 minutes, or until a skewer inserted into the center comes out clean. Invert the pan and cool completely.
  4. Frosting:
    • Mix cornstarch with water until smooth. Combine this slurry with evaporated milk, sugar, cocoa powder, and agar-agar in a saucepan over medium heat. Stir constantly until the mixture thickens. Remove from heat and let cool slightly.
    • Beat the butter until creamy, then gradually incorporate the cooled chocolate mixture until the frosting is smooth and spreadable.
  5. Assemble the Cake:
    • Once the cake is cool, use a serrated knife to level the top if needed. Apply a generous layer of chocolate frosting over the top and sides of the cake. Use a spatula or knife to create swirls or patterns.
  6. Serving:
    • Let the cake set in the refrigerator for at least an hour before slicing. Serve chilled for a refreshing contrast, or at room temperature for a softer texture.

Enjoy this exquisite chocolate chiffon cake with its smooth and velvety chocolate frosting, perfect for any occasion that calls for a touch of elegance and a lot of chocolate.

Savory Beef and Cheese Wrap

Ingredients:

For the Beef Filling:

  • 1 tablespoon vegetable oil
  • 1 tablespoon finely minced garlic
  • 500 grams ground beef
  • 1 teaspoon salt, adjust to taste
  • 2 teaspoons paprika or ground red chili for a milder option
  • 1 teaspoon crushed red pepper flakes for a bit of heat
  • 2-3 tablespoons of your favorite hot sauce or sriracha for a spicy kick

For the Homemade Sour Cream:

  • 150ml heavy cream
  • 1 tablespoon fresh lemon juice
  • 2-3 tablespoons milk to adjust consistency

For the Fresh Salad Mix:

  • 1/2 cup thinly sliced red cabbage
  • Fresh lettuce leaves, torn
  • 1/2 cup julienned carrots
  • 1/2 cup boiled sweet corn kernels
  • 1/2 cup finely chopped onions
  • Pickled red jalapeños (optional) for extra zing
  • 1 tablespoon fresh lemon juice
  • 1/2 teaspoon salt
  • 1/2 teaspoon ground black pepper

Additional Ingredients:

  • Soft tortillas
  • A mix of grated mozzarella and cheddar cheese
  • Butter, for cooking

Instructions:

  1. Cook the Beef: Heat the oil in a pan over medium heat. Add the minced garlic and sauté until fragrant. Add the ground beef, breaking it apart with a spoon. Season with salt, paprika (or ground red chili), crushed red pepper flakes, and hot sauce. Cook until the beef is browned and cooked through. Set aside.
  2. Prepare the Sour Cream: In a small bowl, whisk together the heavy cream, lemon juice, and milk until smooth. Adjust the thickness by adding more milk if necessary. Set aside.
  3. Assemble the Salad: In a large bowl, combine the red cabbage, lettuce, carrots, boiled corn, onions, and optional pickled jalapeños. Dress with lemon juice, salt, and black pepper. Toss well to combine.
  4. Prepare the Tortillas: Warm the tortillas in a dry pan or microwave. Spread a thin layer of butter on one side for added flavor.
  5. Assemble the Wraps: On each tortilla, layer a generous amount of the beef mixture, followed by the salad mix. Sprinkle a mix of mozzarella and cheddar cheese on top. Drizzle with the homemade sour cream.
  6. Cook the Wrap: Fold the tortillas over the filling and press gently. Heat a pan over medium heat and cook each wrap with a bit of butter until golden and crispy on both sides.

Serve these savory beef and cheese wraps hot, accompanied by extra sour cream or your favorite dipping sauce. Enjoy a deliciously satisfying meal that’s packed with flavor!

Spicy Cucumber and Black Fungus Salad

Let’s make a yummy salad with cucumbers and a special kind of mushroom called black fungus. It’s going to be a little spicy and really tasty. We’ll mix in some soy sauce, vinegar, and sesame oil to make it flavorful, and add some chili to give it a kick. It’s easy to make and super fresh!

Ingredients:

  • 2 medium cucumbers
  • 1 cup black fungus (also known as wood ear mushrooms), soaked and cleaned
  • 3 tablespoons soy sauce
  • 1 tablespoon vinegar (rice vinegar preferred)
  • 1 tablespoon sesame oil
  • 1 teaspoon sugar
  • 2 cloves garlic, minced
  • 1-2 red chili peppers, thinly sliced (adjust to taste)
  • 1 teaspoon roasted sesame seeds
  • Fresh cilantro for garnish (optional)
  • Salt to taste

Instructions:

  1. Start by soaking the black fungus in warm water for about 20 minutes or until they become soft. Rinse them in clean water, trim off any hard parts, and tear them into bite-sized pieces.
  2. Peel the cucumbers and cut them in half lengthwise. Use a spoon to scoop out the seeds if you prefer. Then, cut the cucumbers into bite-sized chunks.
  3. Bring a pot of water to a boil and blanch the black fungus for about 1-2 minutes. Drain and set aside to cool.
  4. In a small bowl, combine soy sauce, vinegar, sesame oil, sugar, minced garlic, and sliced red chili peppers to create the dressing. Stir well until the sugar is dissolved.
  5. In a large mixing bowl, combine the cucumber pieces and blanched black fungus. Pour the dressing over the vegetables and toss to coat evenly.
  6. Taste and adjust the seasoning with salt if needed. Let the salad sit for about 10 minutes to allow the flavors to meld.
  7. Garnish with roasted sesame seeds and fresh cilantro before serving.

Enjoy your fresh and spicy cucumber salad, perfect as a side dish or a light, healthy snack!

Ultimate Cheesy Potato and Onion Bake

Discover the magic of a simple yet incredibly flavorful dish that might just change the way you think about potatoes and onions. This Ultimate Cheesy Potato and Onion Bake combines everyday ingredients into something truly special, proving that sometimes, the most humble vegetables can outshine even the finest cuts of meat. Perfect for a hearty meal or a comforting side dish, this recipe is a testament to the power of good, simple food. Let’s dive into creating this delicious bake that’s sure to become a new favorite.

Ingredients:

  • Potatoes: 3, peeled and sliced
  • Onions: 2, thinly sliced
  • Eggs: 3-4, beaten
  • Salt: To taste
  • Cornstarch: 3-4 tablespoons, for thickening
  • Spring Onion: Chopped, for garnish
  • Cheese: 150g (5.29 oz), grated, plus 4 slices for topping
  • Mayonnaise or Yogurt: 2 tablespoons, for creaminess
  • Dried Garlic: To taste, for a flavor kick
  • Black Pepper: To taste
  • Tomatoes: 3 small, sliced

Instructions:

  1. Prep the Veggies:
    • Preheat your oven to 180°C (356°F). In a large mixing bowl, combine the sliced potatoes and onions. Season with salt, dried garlic, and black pepper, tossing well to ensure even coverage.
  2. Create the Mixture:
    • To the potato and onion mixture, add the beaten eggs, cornstarch, grated cheese, and mayonnaise or yogurt. Mix thoroughly until all ingredients are well combined and the potatoes are evenly coated.
  3. Assemble the Bake:
    • Transfer the potato mixture to a greased baking dish, spreading it out evenly. Layer the sliced tomatoes on top, followed by the slices of cheese, ensuring a generous coverage.
  4. Bake:
    • Place the dish in the preheated oven and bake for about 45-60 minutes, or until the potatoes are tender, the cheese is bubbly and golden, and the top is slightly crispy.
  5. Serve:
    • Once baked, remove from the oven and let it cool for a few minutes. Garnish with chopped spring onions before serving. Enjoy the creamy, cheesy goodness of this potato and onion bake, a dish that’s sure to comfort and satisfy.

This Ultimate Cheesy Potato and Onion Bake is more than just a recipe; it’s a celebration of simple ingredients coming together to create a dish that’s both nourishing and indulgent. Whether you’re enjoying it on its own or as a side to your favorite meal, it’s a testament to the fact that sometimes, the best flavors come from the most unexpected places. Enjoy your meal, and here’s to many more delicious discoveries!

Refreshing Mediterranean Chickpea Salad

Welcome to a super easy and tasty recipe that’s all about bringing a bit of the sunny Mediterranean right to your plate! This chickpea salad is not just any salad; it’s a colorful mix of fresh veggies, juicy tomatoes, crunchy cucumbers, and, of course, chickpeas, all tossed together with a zesty dressing that’ll make your taste buds dance. It’s perfect for when you want something light yet filling, and the best part? It’s so simple to make, you’ll have it ready in no time. Whether you’re looking for a healthy lunch option or a quick side dish for dinner, this salad has got you covered. Let’s dive in and mix up some deliciousness!

Instructions:

  1. Prepare the Salad Base:
    • In a large mixing bowl, combine the drained and rinsed garbanzo beans, diced cucumber, halved cherry tomatoes, diced mixed bell peppers, sliced olives, and chopped onion. Toss gently to mix.
  2. Make the Dressing:
    • In a small bowl, whisk together the minced garlic, lemon juice, honey, white vinegar, and olive oil until well combined. Season with salt and black pepper according to your taste.
  3. Combine and Chill:
    • Pour the dressing over the salad mixture and toss until all the ingredients are evenly coated. Let the salad chill in the refrigerator for at least 30 minutes to allow the flavors to meld together.
  4. Serve:
    • Before serving, give the salad a final toss and garnish with freshly chopped parsley. This adds a fresh, herby flavor that complements the zesty dressing.

This Mediterranean Chickpea Salad is a testament to the simplicity and beauty of fresh ingredients coming together to create a dish that’s both satisfying and healthy. Whether you’re enjoying it on its own or as a complement to your main course, this salad is a delightful way to bring the flavors of the Mediterranean to your table. Enjoy the crisp vegetables, tender chickpeas, and tangy dressing in every bite!

Talk-of-the-Town Puff Pastry Delight

Dive into the world of desserts with this sensational Puff Pastry Delight, a recipe that’s been the subject of much delight and discussion. Combining the flakiness of puff pastry with the creamy richness of whipped cream and Greek yogurt, and the crunchiness of peanuts, this dessert is not just simple to make but irresistibly delicious. Let’s create this crowd-pleaser that’s perfect for any occasion.

Ingredients:

  • Puff Pastry: 1.2 kg (42 oz), divided
  • Water: 40 ml (1.4 fl oz), divided
  • Sugar: 60 g (2.2 oz), divided for caramelizing
  • Whipping Cream: 470 ml (16.1 fl oz), divided
  • Powdered Sugar: 50 g (1.8 oz)
  • Greek Yogurt: 250 g (8.8 oz)
  • Butter: 80 g (2.8 oz)
  • Peanuts: 150 g (5.3 oz), roughly chopped

Instructions:

  1. Prepare the Puff Pastry:
    • Preheat your oven according to the puff pastry package instructions. Roll out 800g (28 oz) of puff pastry and cut it into desired shapes. Prick the surface with a fork to prevent it from puffing up too much. Bake until golden and crispy. Let cool.
  2. Make the Caramel:
    • In a saucepan, combine 30g (1.1 oz) of sugar with 20ml (0.7 fl oz) of water. Cook over medium heat until the sugar dissolves and turns into a golden caramel. Carefully add 80g (2.8 oz) of butter and stir until smooth.
  3. Whip the Cream:
    • In a mixing bowl, whip 350ml (12 fl oz) of whipping cream with 50g (1.8 oz) of powdered sugar until stiff peaks form. In another bowl, mix the Greek yogurt with 180g (6.3 oz) of sugar until well combined. Gently fold the whipped cream into the yogurt mixture.
  4. Assemble the Dessert:
    • Break the cooled puff pastry into bite-sized pieces. In a large dessert dish, layer half of the puff pastry pieces. Drizzle with half of the caramel sauce and then spread half of the yogurt and whipped cream mixture over the top. Sprinkle with half of the chopped peanuts. Repeat the layers once more.
  5. Chill and Serve:
    • Refrigerate the dessert for at least an hour to allow the flavors to meld together. Serve chilled for a delightful dessert experience.

This Puff Pastry Delight is a testament to the beauty of combining simple ingredients to create a dessert that’s both elegant and satisfying. Whether you’re looking to impress guests or treat yourself, this dessert is sure to be the topic of conversation. Enjoy the layers of texture and flavor that make this dish a true delight.

Norwegian Melt-in-Your-Mouth Cake

Discover the charm of Norwegian baking with this exquisite cake recipe, renowned for its simplicity and irresistible taste. This cake is a celebration of light, fluffy textures and rich flavors, making it a perfect treat for any occasion. Let’s embark on a culinary journey to Norway and create a dessert that’s sure to delight everyone who tries it.

Ingredients:

  • Butter: 100g (3.5 oz), softened to room temperature
  • Sugar: 100g (3.5 oz)
  • Milk: 60ml (2 fl oz)
  • Eggs: 4, with yolks and whites separated
  • Flour: 150g (5.2 oz)

Instructions:

  1. Cream Butter and Sugar:
    • In a large mixing bowl, combine the softened butter and sugar. Using an electric mixer or a whisk, beat the mixture for 3-4 minutes until it becomes light and fluffy. This process incorporates air into the butter, setting the foundation for a soft cake.
  2. Incorporate Egg Yolks:
    • Add the egg yolks to the creamed butter and sugar mixture, one at a time, beating well after each addition. Ensure each yolk is fully incorporated before adding the next. This step adds richness and color to the cake.
  3. Mix in Milk:
    • Gradually pour in the milk while continuing to mix. The milk helps to loosen the batter slightly, making it easier to combine with the dry ingredients.
  4. Fold in Flour:
    • Sift the flour into the wet ingredients. Gently fold it in using a spatula or a wooden spoon, being careful not to overmix. Overmixing can lead to a dense cake, so stop as soon as the flour is just incorporated.
  5. Whip Egg Whites:
    • In a separate, clean bowl, beat the egg whites until stiff peaks form. This step is crucial for achieving the cake’s signature light and airy texture.
  6. Combine Mixtures:
    • Carefully fold the whipped egg whites into the batter, using a folding motion to keep as much air in the mixture as possible.
  7. Bake:
    • Preheat your oven to 180°C (356°F). Pour the batter into a greased and floured cake pan. Bake for about 25-30 minutes, or until a toothpick inserted into the center comes out clean.
  8. Cool and Serve:
    • Let the cake cool in the pan for a few minutes before transferring it to a wire rack to cool completely. Serve as is, or dust with powdered sugar for an extra touch of sweetness.

This Norwegian cake is a testament to the beauty of simplicity in baking. With its melt-in-your-mouth texture and delightful flavor, it’s a dessert that’s bound to become a favorite. Whether you’re celebrating a special occasion or simply indulging in a sweet treat, this cake is a perfect choice. Enjoy the process and the delicious outcome!

Simple and Wholesome Oatmeal Cookies

Dive into the world of baking with this super simple recipe for healthy oatmeal cookies. Perfect for anyone looking to enjoy a sweet treat without the guilt, these cookies combine the goodness of oats, the natural sweetness of honey or maple syrup, and a hint of cinnamon for that warm, comforting flavor. Whether you’re a baking pro or just starting out, these cookies are foolproof and delicious. Let’s get started on these wholesome goodies that are sure to become a new favorite.

Ingredients:

  • Rolled Oats: 1 cup, for that hearty texture
  • Whole Wheat Flour: 1/2 cup, adding to the wholesomeness
  • Honey or Maple Syrup: 1/4 cup, for natural sweetness
  • Coconut Oil: 1/4 cup, melted, for moisture
  • Unsweetened Applesauce: 1/4 cup, for added flavor and softness
  • Vanilla Extract: 1/2 teaspoon, for that lovely aroma
  • Ground Cinnamon: 1/2 teaspoon, for a hint of spice

Instructions:

  1. Mix Dry Ingredients:
    • In a large bowl, combine the rolled oats and whole wheat flour. Sprinkle in the ground cinnamon and mix well to distribute the spice evenly.
  2. Combine Wet Ingredients:
    • In another bowl, mix together the melted coconut oil, honey or maple syrup, unsweetened applesauce, and vanilla extract. Stir until everything is well blended.
  3. Combine Wet and Dry:
    • Pour the wet ingredients into the bowl with the dry ingredients. Stir everything together until you have a cohesive dough. The mixture should be sticky but manageable.
  4. Shape the Cookies:
    • Preheat your oven to 180°C (356°F) and line a baking sheet with parchment paper. Scoop out tablespoon-sized portions of the dough, roll them into balls, and place them on the baking sheet. Flatten each ball slightly with the back of a spoon or your fingers.
  5. Bake:
    • Bake the cookies in the preheated oven for about 10-12 minutes, or until they are lightly golden around the edges. They will still be soft but will firm up as they cool.
  6. Cool and Enjoy:
    • Let the cookies cool on the baking sheet for a few minutes before transferring them to a wire rack to cool completely. Enjoy them as a healthy snack or a quick breakfast on the go!

These easy, healthy oatmeal cookies are not just delicious but also packed with ingredients that are good for you. Perfect for satisfying your sweet tooth without overindulging, these cookies are a treat you can feel good about. Happy baking!