

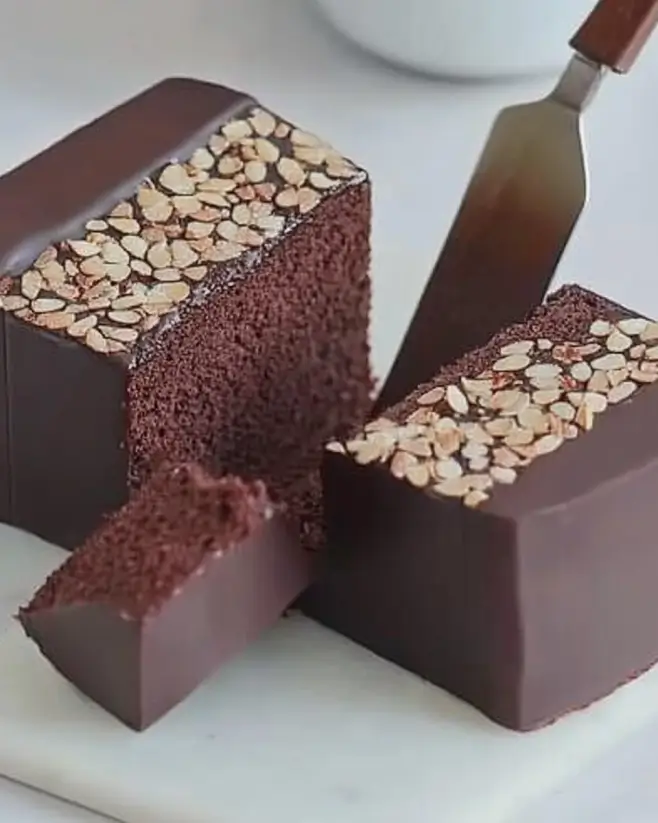
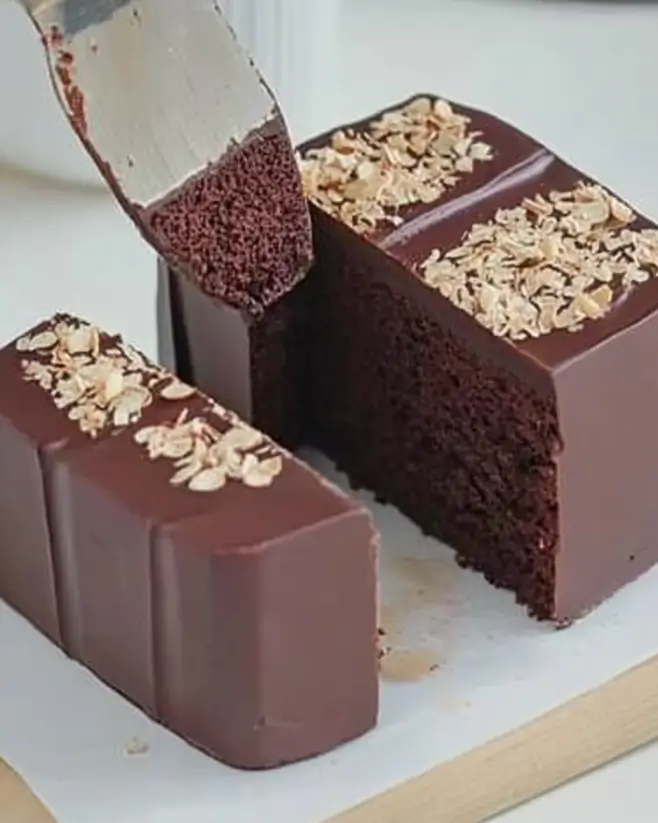
Introduction to Chocolate Terrine Cake
There’s something magical about a rich, velvety dessert that can turn an ordinary day into a celebration. The Chocolate Terrine Cake is just that—a decadent treat that’s perfect for chocolate lovers and anyone looking to impress at their next gathering. I remember the first time I made this cake; the aroma of melting chocolate filled my kitchen, and I knew I was onto something special. This recipe is not only simple but also a fantastic way to show your loved ones you care. Whether it’s a quick weeknight dessert or a showstopper for a dinner party, this cake has you covered.
Why You’ll Love This Chocolate Terrine Cake
This Chocolate Terrine Cake is a dream come true for busy home cooks. It’s incredibly easy to whip up, requiring just a handful of ingredients and minimal prep time. The rich, chocolatey flavor is sure to satisfy any sweet tooth, making it a hit with family and friends. Plus, it can be made ahead of time, allowing you to enjoy the moment without the stress of last-minute baking. What’s not to love?
Ingredients for Chocolate Terrine Cake
Gathering the right ingredients is the first step to creating your Chocolate Terrine Cake masterpiece. Here’s what you’ll need:
- Semi-sweet chocolate chips: These are the stars of the show, providing that rich chocolate flavor. You can also use dark chocolate for a more intense taste.
- Heavy cream: This adds creaminess and helps create a smooth texture. It’s essential for that luxurious mouthfeel.
- Large eggs: They act as a binding agent, giving the cake structure and richness. Fresh eggs work best for optimal flavor.
- Granulated sugar: This sweetens the cake and balances the bitterness of the chocolate. You can adjust the amount based on your sweetness preference.
- Vanilla extract: A splash of this adds depth and enhances the overall flavor profile. Always opt for pure vanilla for the best results.
- Salt: Just a pinch elevates the flavors, making the chocolate taste even more pronounced.
- Unsweetened cocoa powder: This intensifies the chocolate flavor and adds a lovely richness to the cake.
- Powdered sugar: For dusting, this adds a touch of sweetness and a beautiful presentation.
- Fresh berries (optional): These make a delightful garnish, adding a pop of color and a refreshing contrast to the rich cake.
For exact measurements, check the bottom of the article where you can find everything listed for easy printing. Happy baking!
How to Make Chocolate Terrine Cake
Now that you have all your ingredients ready, let’s dive into the steps to create this Chocolate Terrine Cake. Each step is straightforward, making it easy for anyone to follow along. Let’s get started!
Step 1: Preheat and Prepare
First things first, preheat your oven to 350°F (175°C). This ensures your cake bakes evenly. While the oven warms up, grab a 9×5-inch loaf pan. Grease it well and line it with parchment paper, leaving some overhang. This little trick will make it a breeze to remove the cake later.
Step 2: Melt the Chocolate
In a medium saucepan, combine the semi-sweet chocolate chips and heavy cream. Place it over low heat, stirring gently until everything melts together into a smooth, glossy mixture. Be patient; this is where the magic begins! Once melted, remove it from the heat and let it cool slightly.
Step 3: Whisk the Eggs
In a large mixing bowl, crack the four large eggs. Add the granulated sugar, vanilla extract, and salt. Whisk them together until the mixture is well combined and slightly frothy. This step adds air, which helps the cake rise beautifully.
Step 4: Combine Mixtures
Now, it’s time to bring the two mixtures together. Slowly pour the melted chocolate mixture into the egg mixture while whisking continuously. This helps prevent the eggs from cooking. Keep whisking until everything is fully incorporated and you have a luscious batter.
Step 5: Fold in Cocoa Powder
Next, sift in the unsweetened cocoa powder. Gently fold it into the batter using a spatula. Be careful not to overmix; you want to keep that airy texture. The cocoa powder will deepen the chocolate flavor, making it even more irresistible.
Step 6: Bake the Cake
Pour the batter into your prepared loaf pan, smoothing the top with a spatula. Place it in the preheated oven and bake for 30-35 minutes. The edges should be set, but the center will still be slightly soft. This is key for that melt-in-your-mouth texture!
Step 7: Cool and Refrigerate
Once baked, remove the cake from the oven and let it cool in the pan for about 10 minutes. After that, carefully transfer it to a wire rack to cool completely. For the best results, refrigerate the cake for at least 2 hours or overnight. This allows the flavors to meld beautifully.
Step 8: Serve and Garnish
When you’re ready to serve, dust the top of the cake with powdered sugar for a touch of elegance. If you like, add fresh berries for a pop of color and a refreshing contrast to the rich chocolate. Slice, serve, and watch your guests’ faces light up!
Tips for Success
- Use high-quality chocolate for the best flavor; it makes a noticeable difference.
- Don’t skip the refrigeration step; it enhances the texture and flavor.
- For a richer taste, consider adding a tablespoon of espresso powder to the chocolate mixture.
- Make sure to whisk the eggs well; this helps create a light, airy cake.
- Experiment with different garnishes like whipped cream or mint leaves for a unique touch.
Equipment Needed
- 9×5-inch loaf pan: A standard size for this cake. If you don’t have one, a round cake pan works too.
- Medium saucepan: For melting chocolate. A double boiler can be used if you prefer.
- Mixing bowls: A large bowl for the egg mixture and a medium one for the chocolate.
- Whisk: Essential for combining ingredients. A fork can work in a pinch.
- Spatula: Perfect for folding in ingredients and smoothing the batter.
Variations
- Dark Chocolate Delight: Swap semi-sweet chocolate chips for dark chocolate to intensify the flavor. This variation is perfect for true chocolate aficionados.
- Nutty Addition: Fold in chopped nuts like walnuts or hazelnuts for added texture and a delightful crunch.
- Minty Fresh: Add a few drops of peppermint extract to the chocolate mixture for a refreshing twist that’s perfect for the holidays.
- Gluten-Free Option: Substitute regular cocoa powder with gluten-free cocoa powder to make this cake suitable for gluten-sensitive friends.
- Fruit Fusion: Incorporate pureed fruits like raspberries or cherries into the batter for a fruity flavor that complements the chocolate beautifully.
Serving Suggestions
- Pair with Coffee: A rich cup of coffee or espresso enhances the chocolate flavor beautifully.
- Ice Cream Delight: Serve with a scoop of vanilla or salted caramel ice cream for a decadent contrast.
- Fresh Berries: Garnish with strawberries or raspberries for a refreshing touch and vibrant color.
- Chocolate Sauce: Drizzle warm chocolate sauce over the top for an extra indulgent experience.
- Elegant Plating: Use a cake stand for presentation, and dust with powdered sugar just before serving for a stunning finish.
FAQs about Chocolate Terrine Cake
As you embark on your journey to create this delightful Chocolate Terrine Cake, you might have a few questions. Here are some common queries that can help you along the way:
Can I make Chocolate Terrine Cake ahead of time?
Absolutely! This cake actually tastes better after chilling in the fridge for a few hours or overnight. It’s perfect for preparing in advance for gatherings.
What’s the best way to store leftovers?
Store any leftover cake in an airtight container in the refrigerator. It should stay fresh for up to a week, but I doubt it will last that long!
Can I freeze Chocolate Terrine Cake?
Yes, you can freeze it! Wrap the cooled cake tightly in plastic wrap and then in aluminum foil. It can be frozen for up to three months. Just thaw it in the fridge before serving.
What can I substitute for heavy cream?
If you’re looking for a lighter option, you can use half-and-half or a non-dairy cream alternative. Keep in mind that the texture may vary slightly.
How can I make this cake gluten-free?
To make a gluten-free Chocolate Terrine Cake, simply use gluten-free cocoa powder and ensure that all other ingredients are certified gluten-free. It’s that easy!
Final Thoughts
Creating a Chocolate Terrine Cake is more than just baking; it’s an experience that brings joy to both the cook and those who indulge in it. The rich, velvety texture and deep chocolate flavor make every bite a moment to savor. Whether you’re celebrating a special occasion or simply treating yourself after a long day, this cake is sure to impress. I love how it transforms a simple gathering into a memorable event. So, roll up your sleeves, embrace the process, and enjoy the sweet rewards of your hard work. Happy baking!
Chocolate Terrine Cake: A Decadent Recipe You’ll Love!
Ingredients
Method
- Preheat your oven to 350°F (175°C). Grease a 9x5-inch loaf pan and line it with parchment paper, leaving some overhang for easy removal later.
- In a medium saucepan over low heat, melt the chocolate chips and heavy cream together, stirring until smooth. Remove from heat and let cool slightly.
- In a large mixing bowl, whisk together the eggs, granulated sugar, vanilla extract, and salt until well combined and slightly frothy.
- Slowly pour the melted chocolate mixture into the egg mixture, whisking continuously until fully incorporated.
- Sift in the cocoa powder and gently fold it into the batter until no lumps remain.
- Pour the batter into the prepared loaf pan and smooth the top with a spatula.
- Bake in the preheated oven for 30-35 minutes, or until the edges are set but the center is still slightly soft.
- Remove from the oven and let the cake cool in the pan for about 10 minutes before transferring it to a wire rack to cool completely.
- Once cooled, refrigerate the cake for at least 2 hours or overnight for best results.
- Before serving, dust the top with powdered sugar and garnish with fresh berries if desired.
Notes
- For a richer flavor, add a tablespoon of espresso powder to the chocolate mixture.
- You can substitute the semi-sweet chocolate chips with dark chocolate for a more intense chocolate flavor.