

I remember the first time I made cheese at home—it wasn’t out of necessity but rather curiosity. I had always been intimidated by the idea of making cheese, thinking it required elaborate techniques and expensive equipment. But one afternoon, on a whim, I decided to give it a try. I had a liter of whole milk in my fridge, and instead of using it for the usual cup of coffee or a bowl of cereal, I thought, “Why not try to make cheese?” It sounded impossible, but after following a simple recipe, the result was incredible—rich, creamy, and just the right amount of tangy. I was hooked.
Making cheese at home was a game-changer. I felt empowered, knowing I could turn something as simple as milk into something far more complex and delicious. It was no longer a mystery; it was within my reach. The best part? It took only a few minutes, and the ingredients were ones I already had in my kitchen. No fancy equipment, no complicated steps, just patience and a bit of curiosity. Since then, I’ve made cheese countless times, and every time I do, it takes me back to that first joyful experience.
Why Make Your Own Cheese?
Homemade cheese, although often associated with complex processes, is far simpler than most people think. With just a few ingredients and a little patience, you can create a delicious product that far surpasses many store-bought options in terms of flavor and texture. Here are just a few reasons why making your own cheese is worth it:
1. Control Over Ingredients
One of the main reasons I decided to start making cheese at home was to have control over the ingredients. Store-bought cheeses often contain preservatives, stabilizers, and added chemicals. When you make your cheese, you know exactly what goes into it. You can even decide whether to use organic milk, add your preferred seasoning, or avoid preservatives altogether.
2. Taste and Freshness
The taste of homemade cheese is incomparable. It’s incredibly fresh and can be customized to your preferences. Whether you prefer a mild or a stronger flavor, you can adjust the amount of acid or seasoning to achieve the exact taste you want. There is something deeply satisfying about enjoying cheese that was made in your own kitchen just hours before.
3. Cost-Effective
Store-bought cheese can be expensive, especially when you’re looking for high-quality options. Making your own cheese can save you a significant amount of money in the long run. A liter of milk will yield a good amount of cheese, which can be a fraction of the cost of store-bought varieties. For those who use cheese frequently, this can add up to substantial savings over time.
4. Simple and Quick Process
This recipe, in particular, is quick and easy. Many traditional cheese-making processes can be time-consuming and require specialized equipment, but this one cuts through the complexity and gives you fresh cheese in a matter of minutes. All you need are a few basic ingredients—milk, acid (lemon juice or vinegar), and a pinch of salt—and you’ll have cheese in less than half an hour.
5. A Fun and Rewarding Experience
Making cheese at home is incredibly satisfying. It allows you to take something as humble as milk and transform it into a flavorful, versatile ingredient that can be used in a variety of dishes. Whether you’re a beginner or an experienced cook, there’s something deeply rewarding about making your own food from scratch, and cheese-making offers that rewarding experience in a short amount of time.
Ingredients
| Ingredient | Amount |
|---|---|
| Whole milk | 1 liter (4 cups) |
| Lemon juice (or white vinegar) | 2 tablespoons |
| Salt | 1/2 teaspoon |
| Butter (optional, for creaminess) | 10 g |
| Herbs or spices (optional, for flavoring) | To taste |
Directions:
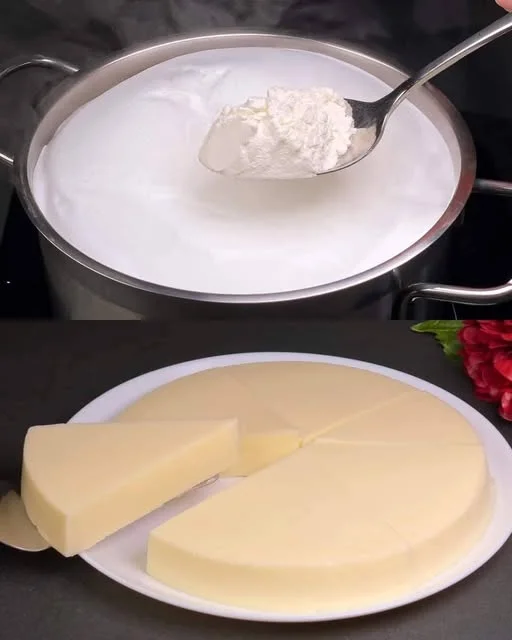
- Heat the Milk: Pour the whole milk into a large pot and heat it over medium heat. Stir occasionally to prevent it from burning. Heat until the milk reaches a temperature of about 85°C (185°F), just below boiling.
- Add Acid: Once the milk is hot, add the lemon juice (or white vinegar) and stir gently. You’ll see the milk begin to curdle as the acid reacts with the milk. Continue stirring gently for 1-2 minutes.
- Let the Curd Form: Allow the milk to sit undisturbed for about 5 minutes. You’ll notice the curds (solid) separating from the whey (liquid).
- Strain the Curds: Using a fine-mesh strainer or cheesecloth, strain the curds from the whey. Gently press the curds to remove excess whey. You can save the whey for other uses like smoothies or baking.
- Optional Butter & Flavoring: Transfer the curds back into the pot and add butter if desired for creaminess. At this point, you can also mix in any herbs or spices of your choice to infuse additional flavor into the cheese.
- Chill and Serve: Let the cheese cool to room temperature, then refrigerate it for about 30 minutes to firm up. Your fresh, homemade cheese is now ready to enjoy!
Nutritional Information (per serving):
| Nutrient | Amount |
|---|---|
| Calories | 150 |
| Fat | 8 g |
| Carbohydrates | 6 g |
| Protein | 10 g |
| Sodium | 150 mg |
Frequently Asked Questions (FAQs)
1. Can I use any type of milk to make cheese?
Yes, but for the best results, whole milk is recommended. It has a higher fat content, which gives the cheese a richer, creamier texture. However, you can also use low-fat or skim milk, though the final product will be less creamy. For a dairy-free alternative, consider using plant-based milks such as almond or soy milk, but be aware that the texture may differ slightly.
2. What can I do with the leftover whey?
Whey is the liquid byproduct that remains after curdling the milk. Don’t throw it away! It’s packed with nutrients and can be used in a variety of ways. You can use it as a base for smoothies, in baking recipes to replace some of the liquid, or even as a cooking liquid for soups and stews. It’s a great way to make sure nothing goes to waste.
3. How long does homemade cheese last?
Homemade cheese will last about 3-4 days in the refrigerator, depending on the conditions and how fresh the milk was when you made it. If you add butter or other flavorings to the cheese, it may last a bit longer. It’s best enjoyed fresh but can be kept in an airtight container in the fridge for a few days.
4. Can I add herbs or spices to the cheese?
Absolutely! This recipe is a blank canvas, and you can add various herbs or spices to create different flavors. Fresh herbs like rosemary, thyme, or basil can be incorporated for a savory cheese, while a dash of chili flakes or garlic powder will add a bit of heat and flavor. You can experiment with different combinations to suit your taste.
5. Can I make this recipe dairy-free?
While this recipe relies on dairy (milk and butter), you can use dairy-free milk alternatives, such as almond or soy milk. The texture and flavor will differ, but you can still achieve a similar result. If you’re looking for a completely dairy-free cheese, consider trying nut-based cheeses or vegan cheese recipes, which require a different process.
6. What’s the best way to use homemade cheese?
This homemade cheese can be used in a variety of dishes. Enjoy it as a topping for salads, spread it on crackers or toast, or add it to pasta dishes for a rich, creamy texture. You can also enjoy it on its own, drizzled with a little olive oil and sprinkled with salt and pepper for a simple, satisfying snack.
The Versatility of Homemade Cheese
What’s remarkable about this recipe is its versatility. While you can enjoy the cheese on its own, it can also be incorporated into a variety of dishes. From pasta to pizza, salads to sandwiches, this cheese can add a delightful touch to almost any meal. Here are just a few ideas:
- Pasta Dishes: Add this homemade cheese to your favorite pasta for extra creaminess. Whether you’re making a carbonara or a simple pasta with olive oil and garlic, this cheese will melt beautifully and add a rich flavor.
- Salads: Crumbled or shaved over a fresh salad, this cheese makes a wonderful addition. Its mild flavor pairs well with a variety of greens and dressings.
- Sandwiches: Spread this cheese on sandwiches or wraps, where its creamy texture complements other fillings such as vegetables, meats, or spreads.
- Baked Goods: This cheese can be used in baking, adding a subtle richness to savory pastries, muffins, or bread.
Conclusion: A Newfound Skill You’ll Cherish
Making cheese at home is more than just a cooking skill—it’s an experience that connects you to the food you eat and offers a sense of accomplishment. It’s something simple yet deeply satisfying. From the moment I made that first batch of cheese, I’ve never looked back. Each time I make cheese now, I feel a sense of pride knowing that I’ve created something wholesome and delicious with my own hands. It’s a skill I’ll always cherish, and it’s one I encourage you to try as well. You’ll be amazed at how something as simple as milk can turn into a product that’s rich, creamy, and infinitely customizable. So, the next time you find yourself with a liter of milk, don’t hesitate—make cheese. It’s one of the easiest and most rewarding experiences you’ll have in the kitchen.
From Milk to Cheese: A Simple, Life-Changing Recipe
Ingredients
Method
- Heat the Milk: Pour the whole milk into a pot and heat over medium heat. Stir occasionally to prevent burning. Heat the milk until it reaches about 85°C (185°F), just before it begins to boil.
- Add the Acid: Once the milk is heated, add the lemon juice (or vinegar) and stir gently. The milk should begin to curdle immediately, separating into curds and whey.
- Let It Sit: Allow the milk to sit undisturbed for 5 minutes. This will give the curds time to form fully.
- Strain the Curds: Using a fine mesh strainer or cheesecloth, strain the curds from the whey. Press gently to remove any excess liquid.
- Optional Additions: Return the curds to the pot, then add the butter for creaminess, and stir. If you’d like, you can add herbs or spices to flavor the cheese. Mix well to incorporate.
- Cool and Serve: Allow the cheese to cool to room temperature, then refrigerate for about 30 minutes to firm up. Your fresh homemade cheese is now ready to be enjoyed.
Notes
- Milk Choices: Whole milk is ideal for a rich, creamy cheese, but you can substitute with low-fat or skim milk for a lighter version.
- Storing: Homemade cheese is best consumed fresh but can be stored in the refrigerator for 3-4 days. Keep it in an airtight container to preserve its texture and flavor.
- Freezing: You can freeze the cheese if necessary. Wrap it tightly in plastic wrap and store it in a freezer bag for up to a month. Thaw it in the fridge when ready to use.
- Flavor Variations: Add a pinch of garlic powder, dried herbs, or chili flakes to the curds for a more flavorful, customized cheese.