

Introduction to the Rainbow Cheesecake Recipe
Are you ready to brighten up your dessert table? The Rainbow Cheesecake Recipe is not just a treat for your taste buds; it’s a feast for your eyes too! This delightful dessert combines the creamy richness of cheesecake with vibrant colors that resemble a beautiful rainbow. Perfect for birthdays, celebrations, or just a fun family dessert night, this cheesecake is sure to impress everyone.
What Makes the Rainbow Cheesecake Unique?
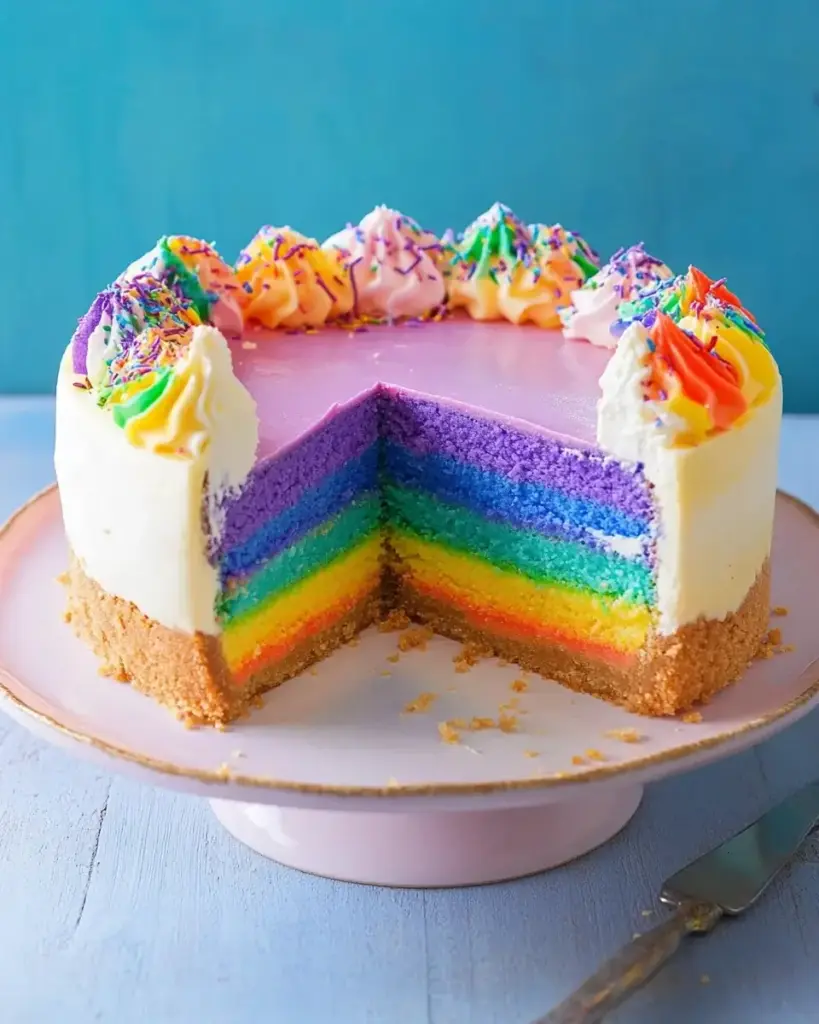
What sets the Rainbow Cheesecake apart from traditional cheesecakes? First, it’s the stunning visual appeal. Each slice reveals layers of bright colors, making it a showstopper at any gathering. The combination of flavors and textures also plays a significant role. The creamy filling contrasts beautifully with the crunchy graham cracker crust, creating a delightful experience with every bite.
Moreover, this cheesecake is versatile. You can customize the colors and flavors to suit your preferences. Whether you want a classic rainbow or a themed color palette, the possibilities are endless! Plus, it’s a fun activity to make with kids or friends, allowing everyone to get creative in the kitchen.
In the following sections, we will guide you through the ingredients and step-by-step preparation of this delicious Rainbow Cheesecake Recipe. Get ready to create a dessert that not only tastes amazing but also brings joy and excitement to your table!
Ingredients for the Rainbow Cheesecake Recipe
To create your stunning Rainbow Cheesecake, you’ll need a selection of simple yet essential ingredients. Each component plays a vital role in achieving that creamy texture and vibrant colors. Here’s what you’ll need:
- 1 ½ cups graham cracker crumbs
- ½ cup unsalted butter, melted
- 2 cups cream cheese, softened
- 1 cup granulated sugar
- 1 teaspoon vanilla extract
- 1 cup sour cream
- 4 large eggs
- 1 cup heavy cream
- Food coloring (red, orange, yellow, green, blue, purple)
These ingredients come together to create a rich and colorful cheesecake that everyone will love. The graham cracker crumbs form a delicious crust, while the cream cheese and sour cream provide that classic cheesecake flavor. The addition of heavy cream adds a lightness to the filling, making it even more enjoyable.
Don’t forget the food coloring! This is what transforms your cheesecake into a rainbow masterpiece. You can use gel or liquid food coloring, depending on what you have on hand. Now that you have your ingredients ready, let’s move on to the step-by-step preparation of this delightful Rainbow Cheesecake Recipe!
Step-by-Step Preparation of the Rainbow Cheesecake Recipe
Now that you have gathered all your ingredients, it’s time to dive into the fun part: preparing your Rainbow Cheesecake! Follow these simple steps to create a dessert that will wow your family and friends.
Step 1: Preparing the Crust
Start by preheating your oven to 325°F (163°C). This ensures that your cheesecake bakes evenly. Next, take a 9-inch springform pan and grease it lightly. This will help the cheesecake come out easily once it’s done.
In a medium bowl, combine 1 ½ cups of graham cracker crumbs with ½ cup of melted unsalted butter. Mix them together until the crumbs are fully coated. Then, press this mixture firmly into the bottom of your prepared pan. Make sure it’s even and compact. This crust will provide a delicious base for your cheesecake!
Step 2: Making the Cheesecake Filling
In a large mixing bowl, beat together 2 cups of softened cream cheese and 1 cup of granulated sugar. Use an electric mixer on medium speed until the mixture is smooth and creamy. This step is crucial for a velvety texture.
Next, add 1 teaspoon of vanilla extract and 1 cup of sour cream to the bowl. Mix until everything is well combined. Now, it’s time to add the eggs. Crack 4 large eggs into the bowl, adding them one at a time. Mix on low speed after each addition until just combined. Be careful not to overmix, as this can make your cheesecake dense.
Step 3: Dividing and Coloring the Batter
Once your filling is ready, it’s time to create those vibrant colors! Divide the cheesecake batter evenly into six separate bowls. This will allow you to create each color of the rainbow.
Now, add a few drops of food coloring to each bowl. You can use red, orange, yellow, green, blue, and purple. Mix each bowl until the colors are well incorporated. Don’t be afraid to adjust the colors to your liking; the more vibrant, the better!
Step 4: Layering the Colors
With your colorful batter ready, it’s time to layer the colors into the crust. Start with the first color and pour a layer of batter into the center of the crust. This technique helps create a marbled effect.
Continue pouring each subsequent color in the center, one after the other. You’ll see the colors blend beautifully as you go. Take your time with this step; it’s where the magic happens!
Step 5: Baking the Cheesecake
Now that your cheesecake is layered, it’s time to bake! Place the springform pan in the preheated oven and bake for 50-60 minutes. You’ll know it’s done when the edges are set, but the center is still slightly jiggly. This is important for a creamy texture.
Once baked, turn off the oven and leave the cheesecake inside for an additional hour. This gentle cooling helps prevent cracks on the surface.
Step 6: Cooling and Setting
After the hour is up, carefully remove the cheesecake from the oven. Let it cool to room temperature on a wire rack. Once cooled, cover it and refrigerate for at least 4 hours, or overnight if you can wait! This chilling time allows the flavors to meld and the cheesecake to set perfectly.
When you’re ready to serve, whip 1 cup of heavy cream until soft peaks form. Spread it over the top of the cheesecake for an extra touch of creaminess. Now, your Rainbow Cheesecake is ready to dazzle everyone!
Variation of the Rainbow Cheesecake Recipe
While the classic Rainbow Cheesecake is a delightful treat, there are many ways to customize it. You can play with flavors and colors to create a unique version that suits your taste. Let’s explore some alternative flavors and colors, as well as options for those with dietary restrictions.
Alternative Flavors and Colors
Why not switch things up a bit? Instead of the traditional vanilla flavor, you can experiment with different extracts. For instance, almond extract adds a lovely nutty flavor, while lemon extract gives a refreshing citrus twist. You can even mix in some cocoa powder for a chocolatey version!
When it comes to colors, the sky’s the limit! You can create a pastel rainbow by using less food coloring or opt for a monochromatic look with shades of blue or pink. For a fun twist, try using seasonal colors, like red and green for Christmas or orange and black for Halloween. The possibilities are endless, and it’s a great way to personalize your cheesecake!
Gluten-Free and Vegan Options
If you or your guests have dietary restrictions, don’t worry! You can still enjoy a delicious Rainbow Cheesecake. For a gluten-free version, simply substitute regular graham cracker crumbs with gluten-free ones. Many brands offer tasty options that work perfectly for the crust.
For a vegan version, you can replace the cream cheese with a plant-based alternative. There are many brands available that mimic the creamy texture of traditional cream cheese. Use coconut cream instead of heavy cream for a rich topping. Additionally, replace the eggs with flaxseed meal or a commercial egg replacer to bind the ingredients together. With these adjustments, you can create a delightful vegan Rainbow Cheesecake that everyone can enjoy!
These variations not only cater to different dietary needs but also allow you to get creative in the kitchen. So, gather your ingredients and let your imagination run wild with this Rainbow Cheesecake Recipe!
Cooking Note for the Rainbow Cheesecake Recipe
When making the Rainbow Cheesecake, there are a few important cooking notes to keep in mind. These tips will help ensure that your cheesecake turns out perfectly every time. Let’s dive into some key points to consider during the baking process.
First, always use room temperature ingredients. This includes the cream cheese, eggs, and sour cream. Room temperature ingredients blend more easily, resulting in a smoother batter. If you forget to take them out ahead of time, you can warm the cream cheese slightly in the microwave for about 10 seconds. Just be careful not to melt it!
Next, avoid overmixing the batter. While it’s tempting to whip it until it’s super smooth, overmixing can introduce too much air into the batter. This can lead to cracks in your cheesecake as it bakes. Mix just until combined, and you’ll achieve that creamy texture without the unwanted air bubbles.
Another important note is to use a water bath for baking. This method helps regulate the temperature and keeps the cheesecake moist. To create a water bath, wrap the outside of your springform pan with aluminum foil to prevent leaks. Place the pan in a larger baking dish filled with hot water. This will help your cheesecake bake evenly and reduce the risk of cracks.
Lastly, patience is key! After baking, allow the cheesecake to cool gradually in the oven. This gentle cooling process helps prevent sudden temperature changes that can cause cracks. Once it’s cooled to room temperature, refrigerate it for the recommended time. The longer it chills, the better the flavors will meld together.
By following these cooking notes, you’ll be well on your way to creating a stunning and delicious Rainbow Cheesecake that will impress everyone at your gathering!
Serving Suggestions for the Rainbow Cheesecake Recipe
Now that your Rainbow Cheesecake is beautifully prepared and chilled, it’s time to think about how to serve it! Presentation can elevate your dessert experience, making it even more enjoyable for your guests. Here are some delightful serving suggestions to consider:
- Garnish with Fresh Fruits: Top your cheesecake with fresh fruits like strawberries, blueberries, or kiwi slices. These not only add a pop of color but also provide a refreshing contrast to the creamy cheesecake.
- Drizzle with Sauce: A drizzle of chocolate or caramel sauce can enhance the flavor and visual appeal. You can also use fruit sauces, like raspberry or mango, for a fruity twist.
- Serve with Whipped Cream: As mentioned earlier, whipped cream is a fantastic addition. Spread it over the top or serve it on the side for guests to add as they please.
- Use Edible Decorations: Consider adding edible glitter or sprinkles to make your cheesecake even more festive. This is especially fun for birthday parties or celebrations!
- Pair with Beverages: Serve your cheesecake with a side of coffee, tea, or a fruity beverage. A nice cup of herbal tea can complement the flavors beautifully.
- Slice and Serve: When slicing, use a hot knife for clean cuts. Simply dip the knife in hot water, wipe it dry, and slice through the cheesecake. This will help maintain the beautiful layers.
These serving suggestions will not only enhance the look of your Rainbow Cheesecake but also make it a delightful experience for everyone. Whether it’s a special occasion or a casual family dinner, your cheesecake will surely be the star of the show!
Tips for Perfecting Your Rainbow Cheesecake Recipe
Creating the perfect Rainbow Cheesecake is an art that combines technique, patience, and a little creativity. To help you achieve a stunning and delicious dessert, here are some valuable tips to keep in mind:
- Use Quality Ingredients: The quality of your ingredients can make a big difference. Opt for high-quality cream cheese and fresh eggs for the best flavor and texture. This will ensure your cheesecake is rich and creamy.
- Don’t Skip the Cooling Time: Allowing your cheesecake to cool gradually in the oven and then chilling it in the fridge is crucial. This helps prevent cracks and ensures a smooth texture. Patience pays off!
- Check for Doneness: Keep an eye on your cheesecake while it bakes. It’s done when the edges are set, but the center still has a slight jiggle. Overbaking can lead to a dry cheesecake.
- Experiment with Colors: Feel free to get creative with your food coloring! You can mix colors to create unique shades or even use natural colorants like beet juice or matcha for a healthier option.
- Layering Technique: When pouring the batter, aim for the center of the crust. This technique helps create beautiful layers without disturbing the previous colors. Pour slowly and steadily for the best results.
- Use a Water Bath: As mentioned earlier, a water bath can help your cheesecake bake evenly. It prevents the edges from cooking too quickly while keeping the center creamy. Wrap your pan well to avoid leaks!
- Chill Before Serving: For the best flavor and texture, serve your cheesecake chilled. This allows the flavors to meld and enhances the overall experience. It’s worth the wait!
- Practice Makes Perfect: Don’t be discouraged if your first attempt isn’t perfect. Baking is a learning process. Each time you make the Rainbow Cheesecake, you’ll discover new ways to improve!
By following these tips, you’ll be well on your way to mastering the Rainbow Cheesecake Recipe. With a little practice and creativity, you can create a dessert that not only looks amazing but tastes incredible too!
Breakdown of Time for the Rainbow Cheesecake Recipe
Understanding the time required for each step of the Rainbow Cheesecake Recipe is essential for planning your baking session. Here’s a detailed breakdown of the time you’ll need to allocate for preparation, cooking, and cooling.
Prep Time
The prep time for this delightful dessert is approximately 30-40 minutes. This includes gathering your ingredients, preparing the crust, and mixing the cheesecake filling. Make sure to have everything ready before you start, as this will make the process smoother and more enjoyable.
Cooking Time
Once your cheesecake is assembled, the cooking time is about 50-60 minutes. During this time, the cheesecake will bake in the oven. After baking, you’ll leave it in the oven for an additional hour to cool gently. This step is crucial for achieving that perfect creamy texture without cracks.
Total Time
In total, you should plan for about 5 to 6 hours from start to finish, including cooling and chilling time. After baking, it’s important to let the cheesecake cool to room temperature before refrigerating it for at least 4 hours, or ideally overnight. This chilling time allows the flavors to meld beautifully, resulting in a deliciously rich cheesecake.
By understanding the time breakdown, you can better manage your schedule and ensure that your Rainbow Cheesecake turns out perfectly. Happy baking!
Nutritional Information for the Rainbow Cheesecake Recipe
When indulging in a delicious dessert like the Rainbow Cheesecake, it’s important to be aware of its nutritional content. This will help you enjoy it mindfully while still satisfying your sweet tooth. Below, we break down the key nutritional information for each serving of this delightful cheesecake.
Calories
350 calories. This calorie count includes the rich ingredients that make this dessert so creamy and flavorful. While it’s a treat, it’s good to enjoy it in moderation, especially if you’re watching your calorie intake.
Protein
6 grams. The protein comes mainly from the cream cheese and eggs used in the recipe. This makes the cheesecake not only a sweet delight but also a source of some essential nutrients.
Sodium
250 mg of sodium. This sodium level is typical for desserts that include cream cheese and butter. If you’re monitoring your sodium intake, it’s wise to enjoy this cheesecake as an occasional treat rather than a regular indulgence.
Overall, while the Rainbow Cheesecake is a delightful dessert, being aware of its nutritional information can help you make informed choices. Enjoying it as part of a balanced diet will allow you to savor its deliciousness without any guilt!
FAQs about the Rainbow Cheesecake Recipe
Can I make the Rainbow Cheesecake ahead of time?
Absolutely! The Rainbow Cheesecake is perfect for making ahead of time. In fact, it tastes even better after chilling in the fridge for a while. You can prepare it a day or two in advance. Just make sure to cover it well with plastic wrap or aluminum foil to keep it fresh. This way, you can enjoy your dessert without the last-minute rush!
How do I store leftover Rainbow Cheesecake?
Storing leftover Rainbow Cheesecake is easy! Simply cover the cheesecake with plastic wrap or place it in an airtight container. Keep it in the refrigerator, where it will stay fresh for up to 5 days. If you want to keep it longer, you can freeze individual slices. Just wrap them tightly in plastic wrap and then place them in a freezer-safe bag. They can last for up to 2 months in the freezer. When you’re ready to enjoy, thaw in the fridge overnight!
What can I use instead of cream cheese in the Rainbow Cheesecake Recipe?
If you’re looking for alternatives to cream cheese, there are several options! For a vegan version, you can use plant-based cream cheese, which mimics the texture and flavor. Silken tofu blended until smooth is another great substitute. It provides a creamy consistency without dairy. Additionally, you can try using cashew cream, made by soaking cashews and blending them until smooth. Each option will give your cheesecake a unique twist while still being delicious!
Can I use different colors for the Rainbow Cheesecake?
Of course! The beauty of the Rainbow Cheesecake is its versatility. You can use any colors you like to create a stunning visual effect. For a pastel look, use less food coloring. You can also choose seasonal colors, like red and green for Christmas or orange and black for Halloween. Feel free to mix colors to create your own unique shades. The only limit is your imagination!
Conclusion on the Rainbow Cheesecake Recipe
In conclusion, the Rainbow Cheesecake Recipe is a delightful way to bring joy and color to your dessert table. This stunning dessert not only captivates the eyes but also pleases the palate with its creamy texture and rich flavors. Whether you’re celebrating a special occasion or simply indulging in a sweet treat, this cheesecake is sure to impress.
By following the step-by-step instructions and tips provided, you can create a beautiful masterpiece that showcases your baking skills. Remember, the key to a perfect Rainbow Cheesecake lies in using quality ingredients, allowing for proper cooling, and getting creative with colors and flavors. Don’t hesitate to experiment with different extracts or toppings to make it your own!
As you gather your friends and family around the table, the vibrant layers of your Rainbow Cheesecake will surely spark joy and excitement. It’s a dessert that encourages sharing and celebration, making it a wonderful addition to any gathering. So, roll up your sleeves, unleash your creativity, and enjoy the process of making this delightful treat!
Happy baking, and may your Rainbow Cheesecake be as delicious as it is beautiful!

Rainbow Cheesecake Recipe: A Colorful Delight Awaits!
Ingredients
Method
- Crush graham crackers into fine crumbs using a food processor or by sealing them in a bag and crushing with a rolling pin. Mix with melted butter until evenly coated. Press firmly into the bottom and sides of a springform pan. Freeze to firm up the crust.
- In a large mixing bowl, beat cream cheese, sweetened condensed milk, lemon juice, and vanilla extract until smooth and creamy.
- Divide the cheesecake filling evenly into 7 bowls. Tint each portion with a different food coloring to create the rainbow spectrum.
- Starting with the red layer, spread it gently over the frozen crust. Freeze for 15 to 30 minutes until set. Continue layering each color in order—orange, yellow, green, light blue, royal blue, and violet—freezing between each to set.
- Once the final violet layer is set, whip the heavy cream to stiff peaks. Pipe it around the edges of the cheesecake and top with confetti sprinkles.
- Keep the cheesecake in the freezer until ready to serve. For best results, slice while frozen using a warm, clean knife between each cut.
Notes
Use gel food coloring for the most vibrant hues without thinning the filling.
Store any leftovers tightly covered in the freezer for up to 1 week.
For a more pastel look, use less food coloring per layer.