

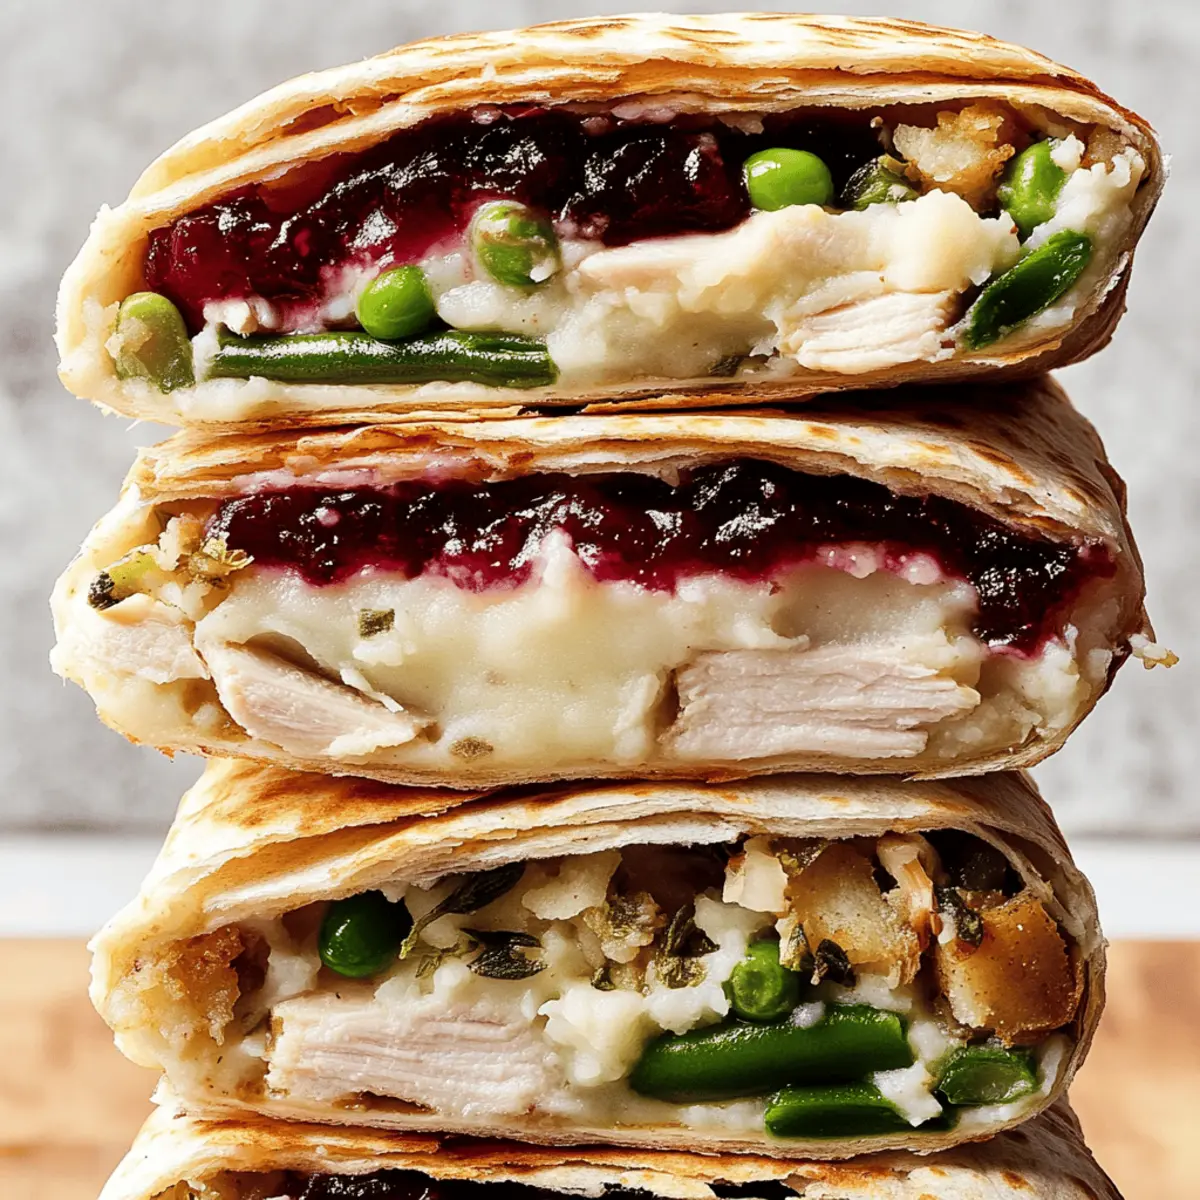
As I scoured my kitchen post-Thanksgiving, I couldn’t help but feel a pang of uncertainty about what to do with the towering pile of leftovers. Enter the Thanksgiving Crunchwrap—a clever solution that turns your uneaten turkey, stuffing, and mashed potatoes into a crunchy, flavor-packed masterpiece. This delightful wrap not only showcases the mouthwatering essence of your holiday feast but also offers an easy, no-fuss way to savor every last bite without being stuck with the same old sandwich routine. With its crispy exterior and melty, savory filling, it’s perfect for a quick lunch or dinner, making it a true crowd-pleaser. Ready to elevate your leftovers into something extraordinary? Let’s dive into this fun and delicious recipe!
Why Make a Thanksgiving Crunchwrap?
Creative use of leftovers: This recipe transforms your uneaten turkey and sides into a delightful wrap that reinvents holiday favorites.
Crispy Texture: Enjoy a satisfyingly crunchy exterior while reveling in a warm, melty filling that’s bursting with flavor.
Quick and Easy: Perfect for busy days, this simple wrap comes together in just a few minutes, making it a great choice for lunch or dinner.
Customizable: Adjust the ingredients based on what you have on hand. Try adding sautéed veggies or different sauces for a personalized twist!
Crowd-Pleaser: This Thanksgiving Crunchwrap is a fun way to get everyone excited about leftovers. Serve with a side of homemade gravy for an unbeatable meal experience!
Thanksgiving Crunchwrap Ingredients
For the Wrap
• Large Flour Tortillas – The sturdy base that holds all the delicious fillings together; you can swap for whole wheat or gluten-free tortillas if needed.
• Leftover Mashed Potatoes – Provides a creamy texture and bulk; sweet potatoes or cauliflower mash are great alternatives.
• Leftover Green Beans – Adds a nutritious, crunchy element; feel free to use other green veggies like broccoli instead.
• Shredded Leftover Turkey – The star protein that delivers that festive flavor; chicken or ham can also work just as well.
• Leftover Cranberry Sauce – Offers a tangy sweetness to balance the flavors; any fruit preserves or chutney can be substituted.
• Leftover Stuffing – Contributes herby flavors and heartiness; any savory bread mixture will do the trick.
• Shredded White Cheddar – Adds a decadent cheesy component; consider Monterey Jack or mozzarella for a different flavor profile.
• Gravy (warmed, for serving) – Enhances moisture and flavor when drizzled on your wrap; broth or plant-based options can be used if gravy isn’t available.
Optional Add-Ins
• Sautéed Onions or Peppers – These can provide extra flavor and texture; feel free to sprinkle in your favorites for a personalized touch.
• Jalapeños or Chili Flakes – Add some heat if you like it spicy; these will bring a fun kick to your Thanksgiving Crunchwrap.
• Alternative Sauces – Swap out gravy for ranch, BBQ, or even a drizzle of hot sauce for a unique twist on flavors.
Step‑by‑Step Instructions for Thanksgiving Crunchwrap
Step 1: Prepare Your Workspace
Begin by gathering all your leftover ingredients and equipment, including a large skillet, spatula, and a clean cutting board. Make sure your leftover mashed potatoes, turkey, and other components are all accessible and at room temperature. This will make the assembly process quick and efficient, setting the stage for your delicious Thanksgiving Crunchwrap.
Step 2: Assemble the Wrap
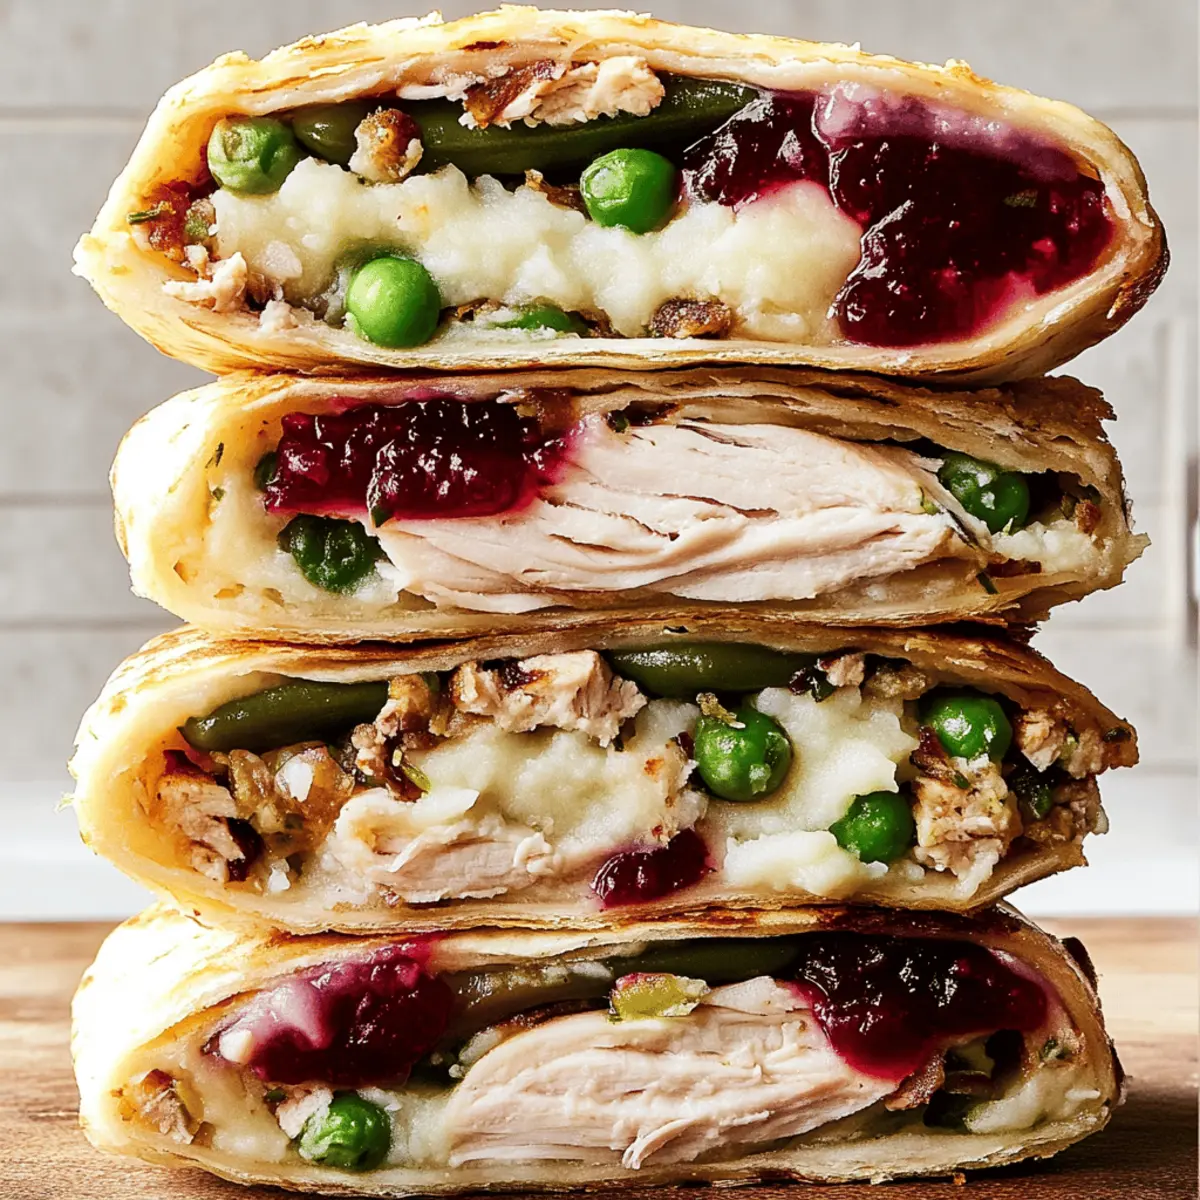
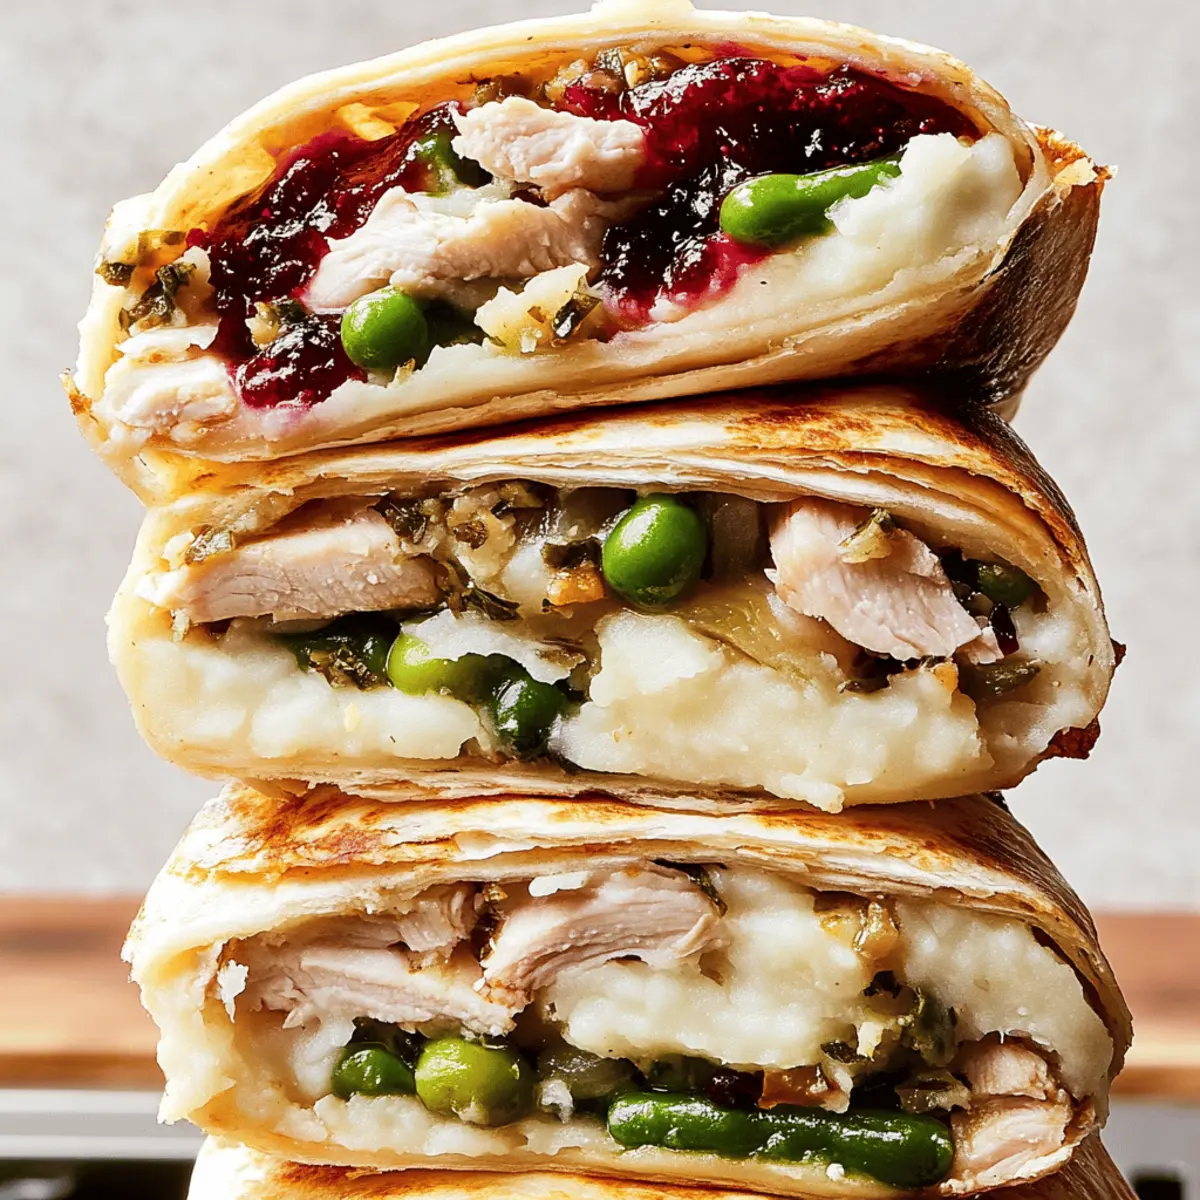
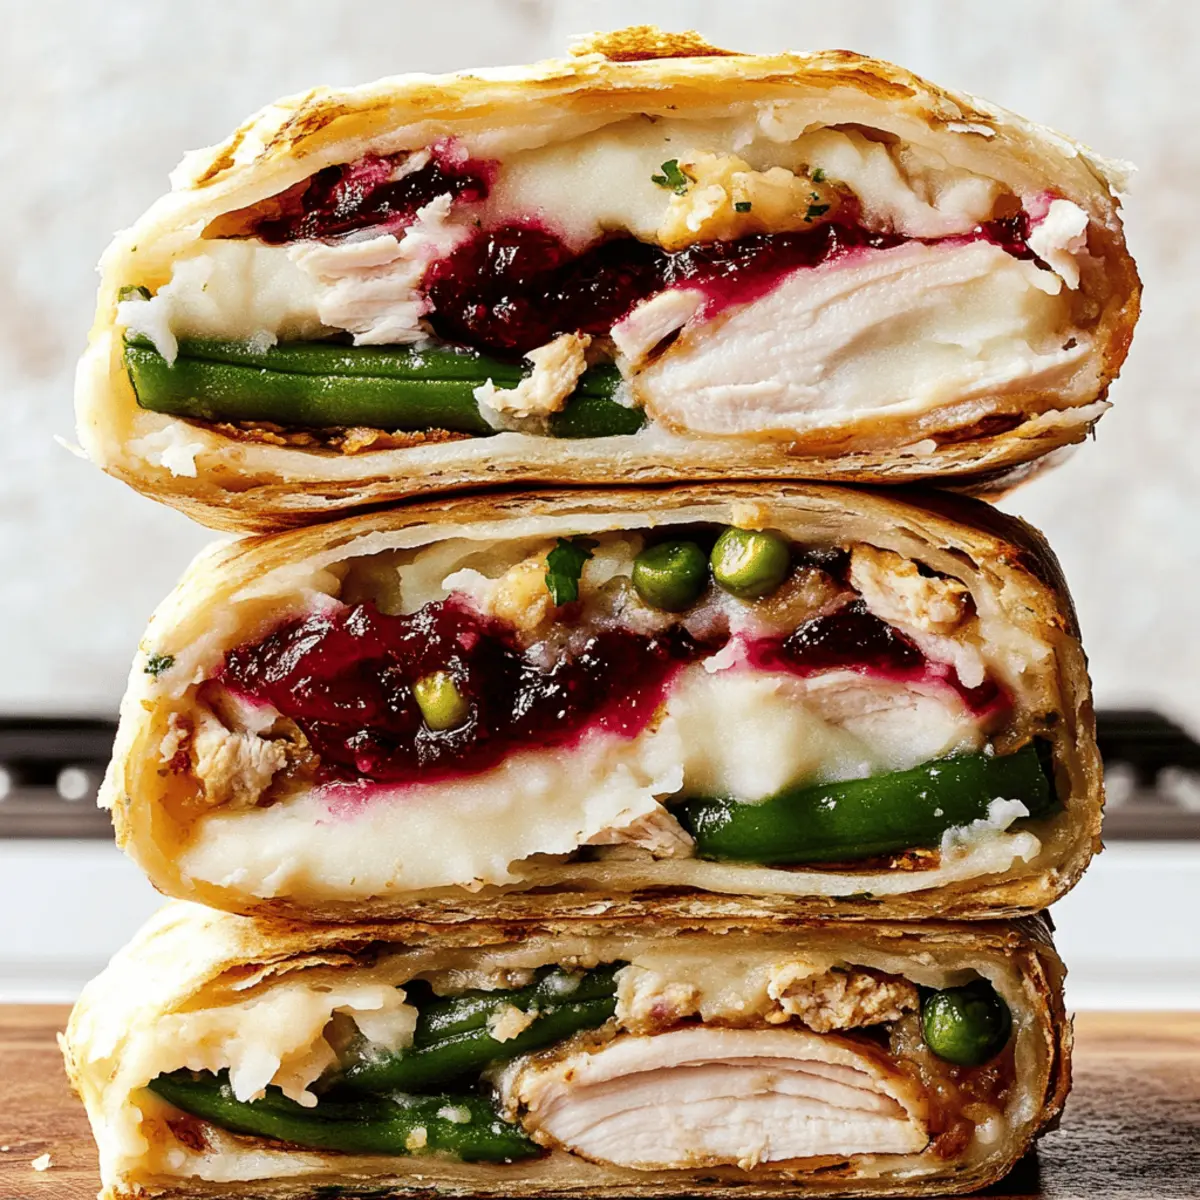
Lay a large flour tortilla flat on your cutting board. Start by spooning a layer of mashed potatoes in the center, followed by green beans, shredded turkey, cranberry sauce, stuffing, and a sprinkle of shredded white cheddar. Be mindful not to overfill; you want to ensure everything is contained within the tortilla’s edges for easy folding.
Step 3: Fold the Tortilla
Gently fold the edges of the tortilla towards the center to create a secure wrap. Start by bringing the left edge over, followed by the right edge, then the top and bottom edges to seal in the flavorful ingredients. Press down gently to secure the shape of your Thanksgiving Crunchwrap, making sure it’s tightly wrapped but not too bursting.
Step 4: Heat the Skillet
Preheat your skillet over medium heat for about 2 minutes. This step is crucial for achieving a crispy exterior on your Thanksgiving Crunchwrap. Once hot, carefully place the wrapped tortilla seam-side down in the skillet. Cook for approximately 3-4 minutes, or until the bottom is golden brown and crunchy, monitoring closely to avoid burning.
Step 5: Flip and Finish Cooking
Using a spatula, carefully flip the Thanksgiving Crunchwrap to the other side. Cook for an additional 3-4 minutes until that side is also golden brown and the cheese is melted. You’ll know it’s ready when you hear that satisfying sizzle and see a crisp outer layer—this is what makes the wrap so delicious!
Step 6: Serve with Gravy
Once both sides of the Thanksgiving Crunchwrap are cooked to golden perfection, remove it from the skillet and place it on a cutting board. Allow it to cool for a minute before slicing it in half. Serve warm with a side of warmed gravy for dipping, enhancing the flavors of your delightful creation!
What to Serve with Thanksgiving Crunchwrap
To complement the flavors of your crunchy masterpiece, consider these delightful pairings that will elevate your meal to new heights.
-
Homemade Gravy: Serve a side of warm, rich gravy for dipping, enhancing the flavors of your wrap and adding moisture.
-
Fresh Garden Salad: A crisp salad with mixed greens and a tangy vinaigrette adds a refreshing contrast to the warm crunchwrap. This pairing keeps your meal light and balanced.
-
Roasted Brussels Sprouts: The crunchy, caramelized edges of roasted Brussels sprouts bring a delightful texture and earthy flavor that perfectly complements the savory wrap.
-
Sweet Potato Fries: Crispy sweet potato fries add a hint of sweetness while keeping with the Thanksgiving theme, making for a fun and satisfying addition.
-
Apple Pie: For dessert, a slice of warm apple pie with a scoop of vanilla ice cream creates a nostalgic finish to your holiday-inspired meal.
-
Sparkling Cider: A glass of sparkling cider ties the meal together beautifully, offering a bubbly sweetness that pairs well with the flavors of the crunchwrap.
Whether you’re aiming for a fresh salad, a comforting side, or a sweet treat, these pairings will make your Thanksgiving Crunchwrap celebration feel complete and satisfying.
Make Ahead Options
These Thanksgiving Crunchwraps are a fantastic choice for meal prep! You can assemble the wraps up to 24 hours in advance by prepping all the fillings and layering them in the tortillas, then covering them tightly in plastic wrap or an airtight container to prevent them from drying out. For best results, store them in the refrigerator and keep the gravy separate until you’re ready to serve. When it’s time to enjoy your delicious wraps, simply heat a skillet over medium heat and cook the assembled crunchwraps for 3-4 minutes per side or until golden brown. With this make-ahead method, you’ll have a comforting and flavorful meal ready to serve with minimal effort!
Expert Tips for the Best Thanksgiving Crunchwrap
-
Preheat the Skillet: Make sure your skillet is hot before adding the wrap to achieve that perfect crispy texture without burning.
-
Don’t Overfill: Avoid the temptation to add too many fillings; this can lead to tearing. Remember, less is more for a secure wrap.
-
Customize Freely: Feel free to swap in different veggies or proteins—make the Thanksgiving Crunchwrap your own with what you have available!
-
Grilling Time: Ensure you give each side enough cooking time for a golden-brown finish. A little patience goes a long way in achieving that crunch!
-
Serve Fresh: For the best flavor and texture, enjoy the wrap right after cooking. Leftovers can be stored but won’t retain that delightful crispiness.
Thanksgiving Crunchwrap Variations
Feel free to adjust this recipe and make the Thanksgiving Crunchwrap your own with these delightful twists and substitutions!
-
Vegetarian Delight: Replace turkey with extra veggies like sautéed mushrooms or roasted butternut squash for a hearty, meat-free option.
-
Spicy Kick: Add sliced jalapeños or a sprinkle of chili flakes to boost the heat level for those who love a little spice in their life.
-
Cheesy Goodness: Swap the white cheddar for pepper jack cheese to introduce a zesty twist that enhances your crunchy wrap experience.
-
BBQ Flavor: Drizzle some BBQ sauce rather than gravy for a smoky flavor that brings a fun twist to your Thanksgiving leftovers.
-
Creamy Alternative: Use creamy ranch dressing instead of cranberry sauce for a tangy base that pairs wonderfully with the other fillings.
-
Crunchy Texture: Toss in some crushed tortilla chips or fried onions for an extra layer of crunch that contrasts beautifully with the softness of the other ingredients.
-
Sweet Swaps: Try using peach preserves or spiced apple butter in place of cranberry sauce for a sweet and fruity flavor explosion.
-
Wrap Varieties: Experiment with different types of tortillas—sundried tomato wraps or spinach tortillas can add a lovely color and flavor to your Thanksgiving Crunchwrap.
These suggestions can take your wrap to new heights, ensuring each bite remains as exciting as the last, so don’t hesitate to play around! Keep it easy and flavorful, and maybe enjoy it with a side of homemade gravy!
How to Store and Freeze Thanksgiving Crunchwrap
Fridge: Store leftover Thanksgiving Crunchwraps in an airtight container for up to 3 days. This helps maintain their texture and flavor for quick snacking later.
Freezer: For longer storage, wrap the crunchwraps individually in plastic wrap and then place them in a freezer-safe bag. They’ll keep well for up to 2 months.
Reheating: To enjoy, thaw in the fridge overnight, then reheat on a skillet over medium heat for about 4-5 minutes per side until crispy and heated through.
Wrap Carefully: If freezing, ensure each wrap is tightly sealed to prevent freezer burn and preserve the delightful flavors of your Thanksgiving Crunchwrap.
Thanksgiving Crunchwrap Recipe FAQs
How do I select the right tortillas for my Thanksgiving Crunchwrap?
Absolutely! Look for large flour tortillas that are pliable and free of tears. If you’re gluten-free or prefer a healthier option, whole wheat or gluten-free tortillas work wonderfully as substitutes. Ensure they are fresh to prevent breakage while wrapping.
What is the best way to store leftover Thanksgiving Crunchwraps?
You can store leftover Thanksgiving Crunchwraps in an airtight container in the fridge for up to 3 days. Make sure they’re completely cooled before sealing to avoid condensation, which can make them soggy. For best results, reheat them on a skillet to maintain their crispy texture.
Can I freeze Thanksgiving Crunchwraps?
Absolutely! To freeze, wrap each crunchwrap tightly in plastic wrap and then place them in a freezer-safe bag. They can be stored for up to 2 months. When you’re ready to enjoy, thaw them in the fridge overnight and reheat on a skillet over medium heat for 4-5 minutes per side until they’re crispy.
What should I do if my crunchwraps aren’t getting crispy?
Very! If your crunchwraps aren’t crispy enough, ensure your skillet is adequately preheated before cooking. Cook them on medium heat for the suggested time, flipping only once for even browning. If the filling is cold, you can also cover the skillet briefly to help heat the insides faster without compromising the crispy exterior.
Are there any dietary considerations I should keep in mind with this recipe?
Of course! If you have allergies, you can easily customize the ingredients. For instance, substitute dairy cheese with plant-based cheese for a vegan option, or swap out turkey for a vegetarian protein like quinoa. Always check food labels where necessary, especially with sauces or pre-made ingredients.
What if I don’t have all the leftover ingredients?
Don’t fret! This Thanksgiving Crunchwrap is super customizable! You can easily swap fillings based on what you have—like using leftover vegetables, different proteins, or even varieties of sauce. The more, the merrier when experimenting with flavors, so let your creativity shine!
Thanksgiving Crunchwrap: Relish Your Leftovers in Style
Ingredients
Equipment
Method
- Prepare Your Workspace: Gather all leftover ingredients and equipment, ensuring they are at room temperature.
- Assemble the Wrap: Lay tortilla flat, add mashed potatoes, green beans, turkey, cranberry sauce, stuffing, and cheddar.
- Fold the Tortilla: Gently fold edges towards the center to seal in the ingredients.
- Heat the Skillet: Preheat skillet over medium heat and cook wrapped tortilla seam-side down for 3-4 minutes.
- Flip and Finish Cooking: Carefully flip the wrap and cook for another 3-4 minutes until golden brown.
- Serve with Gravy: Allow to cool slightly, slice in half, and serve warm with gravy for dipping.