

There’s something about the smell of rising dough, warm olive oil, and briny olives that instantly transports me. Maybe it’s childhood. Maybe it’s an old trip to Greece. Or maybe it’s just the power of honest food made slowly.
I first fell in love with olive bread at a small coastal café tucked along the edge of a cliff somewhere in southern Italy. I don’t even remember the name of the town, but I remember the bread. It was served warm, torn by hand at the table, dipped in rich local olive oil, and eaten between sips of wine and quiet conversation. There was nothing fancy about it. No butter. No sauces. Just rustic, crusty bread with dark green olives woven into its golden core. It was soft, fragrant, and deeply flavorful. I didn’t know bread could taste like that.
Years later, back in my own kitchen, I chased that memory. I experimented with flours, different yeasts, water temperatures, fermentation times. But the key turned out to be simplicity—and patience. Good olive bread doesn’t need bells and whistles. It needs time, warmth, and quality ingredients.
This recipe is the result of all that trial, error, and love. And I promise you: once you make it, you’ll never want to go back to store-bought again.
What Makes This Olive Bread So Special?
At its core, olive bread is a celebration of Mediterranean simplicity. It honors ingredients that have been staples for centuries—flour, water, oil, salt, and yeast—brought to life with one humble addition: olives.
But don’t be fooled by its simplicity. This bread is layered with depth. The exterior develops a beautiful golden crust while the interior stays pillowy and soft. As you slice into it, you’ll notice flecks of green and black olives peeking through, each one a burst of savory saltiness that complements the richness of the dough.
Ingredients Table
| Ingredient | Quantity | Notes |
|---|---|---|
| Olive oil | 4 tablespoons (60 ml) | Adds moisture and flavor |
| Dry yeast | 1 tablespoon (10 g) | For a soft, risen dough |
| Salt | 1 teaspoon | Enhances overall flavor |
| Warm water | 1 1/3 cups (320 ml) | Activates the yeast |
| Plain flour | 4 3/4 cups (570 g) | All-purpose flour works best |
Optional Add-in:
- 1 cup chopped olives (black, green, or mixed) – folded into the dough before shaping
Directions
- Activate the Yeast
In a large bowl, mix warm water with dry yeast and let sit for 5–10 minutes until it becomes frothy. - Build the Dough
Add olive oil and salt to the yeast mixture. Gradually add the flour, stirring with a wooden spoon or dough hook until a rough dough forms. - Knead and Rise
Knead the dough on a floured surface for 8–10 minutes until smooth and elastic. Place in a lightly oiled bowl, cover, and let it rise for 1 to 1.5 hours or until doubled in size. - Add the Olives (Optional)
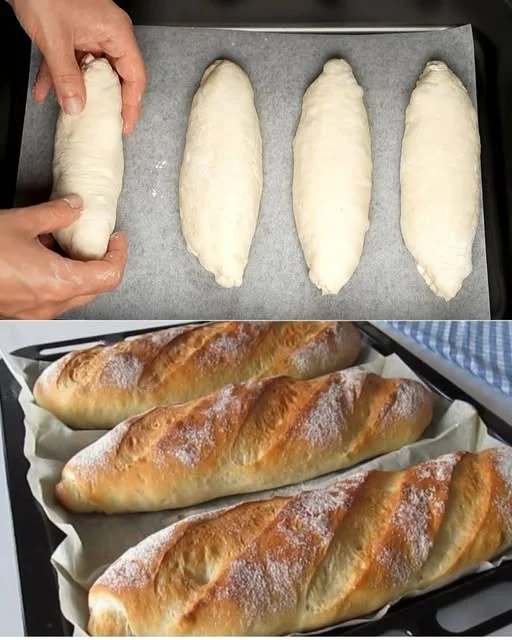
If using olives, gently knead them into the dough after the first rise. - Shape and Proof
Shape the dough into a round or oval loaf. Place on a baking sheet lined with parchment paper or into a floured banneton basket. Cover and let it rise again for about 30–45 minutes. - Bake to Golden Perfection
Preheat your oven to 220°C (425°F). Bake the bread for 25–30 minutes, or until the crust is golden and the loaf sounds hollow when tapped on the bottom. - Cool and Slice
Let the bread cool on a rack for at least 20 minutes before slicing. Serve warm or at room temperature.
Nutritional Information (Per Slice – Approx. 1/10 of Loaf)
| Nutrient | Amount |
|---|---|
| Calories | ~210 kcal |
| Protein | 5 g |
| Fat | 5.5 g |
| Carbohydrates | 35 g |
| Fiber | 1.5 g |
| Sodium | 180 mg |
The Perfect Contrast of Texture and Flavor
Olive bread balances the chewy structure of artisan loaves with the silky moisture of olive oil-enriched dough. Every slice delivers a satisfying bite: crisp crust, tender crumb, and a touch of brine from the olives. It’s not too dense. Not too light. Just right.
The olive oil adds not just flavor but also softness and moisture, giving the bread longer shelf life and a rich aroma that lingers in your kitchen long after it’s baked.
Baking Bread as Ritual, Not Just Recipe
There’s something meditative about making bread. Measuring, kneading, shaping—it forces you to slow down and connect. It’s tactile. Grounding. Alive. Yeast needs warmth and time to grow. Dough responds to your hands. Bread is not something you rush. It’s something you build.
Making olive bread, especially, feels almost sacred. From the moment the yeast blooms in warm water to when you fold in the olives and form your loaf, you’re participating in an ancient practice. It’s the kind of food that speaks in generations, not trends.
When it comes out of the oven—golden, cracked on top, steam rising—it’s more than food. It’s an offering.
Ways to Enjoy Olive Bread
This bread is wonderfully versatile. It’s flavorful enough to stand alone, but pairs beautifully with countless dishes. Here are some ideas to make the most of it:
1. Classic Olive Oil & Herbs Dip
Serve warm slices with a shallow bowl of extra virgin olive oil, a splash of balsamic vinegar, crushed garlic, and a pinch of dried oregano or rosemary.
2. Elevated Sandwiches
Use thick slices for grilled paninis with roasted vegetables, cheese, or even thinly sliced steak or chicken.
3. Soup’s Best Friend
Olive bread turns a simple bowl of tomato soup, lentil stew, or minestrone into a full meal.
4. Charcuterie Companion
Add it to a grazing board with cheeses, hummus, olives, grapes, and roasted nuts.
5. Rustic Breakfast
Toast it and top with avocado, poached eggs, or a drizzle of honey and feta for sweet-savory balance.
The Ingredients Matter—Choose with Care
Olives
You can use black olives, green olives, or a combination. Kalamata olives add depth, while green olives provide brightness and bite. Make sure they’re pitted and well-drained.
Flour
Plain all-purpose flour works well here, though you can substitute up to 25% with whole wheat for a heartier texture.
Olive Oil
This is the flavor anchor of the bread. Use a high-quality extra virgin olive oil for the dough—it adds subtle fruitiness and helps soften the crumb.
Yeast
Dry active yeast or instant yeast both work. The rise time is flexible depending on room temperature and how much depth of flavor you want from fermentation.
Frequently Asked Questions (FAQs)
Can I use whole wheat flour?
Yes, but don’t substitute all of the flour. Try using 25–30% whole wheat and the rest plain flour. This gives you added nutrition and a slightly nuttier taste without sacrificing softness.
How long does this bread stay fresh?
Stored in a sealed container at room temperature, it stays fresh for up to 3 days. You can extend shelf life by refrigerating it, though it’s best to reheat slices before serving.
Can I freeze olive bread?
Absolutely. Slice the bread after it cools and wrap it tightly in plastic wrap or foil. Freeze in a sealed bag for up to 2 months. Toast or bake from frozen when ready to eat.
Can I make it without a stand mixer?
Yes. This dough can easily be made by hand. The kneading takes a bit more time but is very manageable—and rewarding.
Can I add herbs or other flavors?
Definitely. Try adding chopped fresh rosemary, thyme, sun-dried tomatoes, roasted garlic, or even a pinch of chili flakes. These additions work beautifully with olives and enhance the Mediterranean vibe.
Is this bread vegan?
Yes. As long as you use plant-based toppings and fillings, the bread itself is 100% vegan. No dairy, no eggs—just pure plant-based simplicity.
Tips for Perfect Olive Bread
- Don’t rush the rise. Let the dough rise fully—both after kneading and after shaping. This gives the bread a light, airy texture and allows flavor to develop.
- Drain the olives well. Too much moisture can make the dough soggy or unstable. Pat olives dry with a paper towel before adding them.
- Score the top. Before baking, use a sharp knife or blade to score the top of the dough. This helps it expand evenly and gives you that bakery-style look.
- Use a baking stone or steel. If you have one, it helps create a beautifully crisp crust by conducting high, even heat from the bottom.
- Steam the oven. Place a pan of water in the oven or spray water into the hot oven right before baking. This helps develop a crisp, golden crust.
Why Homemade Olive Bread is Worth the Effort
Making bread from scratch isn’t just about saving money or eating better. It’s about reconnecting with the roots of cooking—slowing down, working with your hands, feeding people something real.
Olive bread, in particular, holds a special kind of magic. It’s rustic yet elegant, simple yet layered, humble yet completely impressive. It makes the everyday feel a little more elevated.
Whether you serve it at a gathering or tear it apart on a quiet night with soup, it brings a sense of satisfaction no store-bought loaf ever could. It tastes like effort, like care, like something meant to be shared.
Conclusion: Bread That Brings People to the Table
At the end of the day, food is about more than flavor. It’s about comfort, memory, and connection. And that’s exactly what this olive bread delivers.
Every bite tells a story. Of old kitchens. Of passed-down traditions. Of sun-drenched countries where people gather for long meals and good bread. But mostly, it’s a story you get to write—every time you knead the dough, every time the loaf rises in your kitchen, every time you serve it still warm to the people you love.
So let your home smell like olives and flour. Let your hands get sticky with dough. Let your table be the place where this humble, perfect loaf lives its best life.