

As the leaves fall and the air grows crisp, I can’t help but feel a surge of excitement for Halloween treats. This season is all about indulgence and imagination in the kitchen, and what could be more delightful than Wicked Witch Hat Brownies? This playful recipe combines rich, fudgy chocolate brownies topped with whimsical chocolate ice cream cone “hats” and vibrant green frosting, making it a perfect masterpiece for your Halloween gatherings. Not only are these brownies easy enough for even the most novice bakers, but they’re also a guaranteed hit with both kids and adults alike—no one can resist that festive flair! Whether you’re sticking to traditional ingredients or exploring gluten-free and vegan variations, these treats will elevate any spooky celebration. So, are you ready to cast a delicious spell this Halloween?
Why are these brownies so enchanting?
Whimsical Delight: These Wicked Witch Hat Brownies bring a playful twist to your Halloween festivities. Kids and adults alike will delight in the chocolate cone hats and vibrant green frosting, making them the perfect centerpiece for any gathering.
Endless Versatility: With options for gluten-free and vegan adaptations, everyone can join in on the fun. Consider exploring other creative desserts like our Banana Bread Brownies to keep your festive spirit alive!
Quick and Easy: The straightforward steps mean you’ll spend less time in the kitchen and more time enjoying the spooky season, all while impressing your friends and family.
Rich, Fudgy Goodness: The combination of rich chocolate flavor and moist brownie texture ensures each bite is a heavenly experience. Trust me, nobody will be able to resist reaching for a second!
Wicked Witch Hat Brownies Ingredients
• Let’s gather the essentials for these enchanting brownies!
For the Brownies
- Unsalted Butter – Provides moisture and richness; substitute with vegan butter for a dairy-free option.
- Granulated Sugar – Sweetens the brownies; no direct substitution recommended for best results.
- Large Eggs – Binds ingredients and adds structure; use flaxseed meal mixed with water for a vegan option.
- Vanilla Extract – Enhances flavor; no substitutions necessary.
- All-Purpose Flour – Gives structure to brownies; substitute with gluten-free flour blend for a gluten-free version.
- Unsweetened Cocoa Powder – Provides chocolate flavor; dark cocoa can be used for a richer taste.
- Salt – Balances sweetness and enhances flavor; no substitutions needed.
- Baking Powder – Leavening agent for texture; substituting with baking soda is possible but requires adjustment.
For the Witch Hats
- Chocolate Ice Cream Cones – Forms the witch hats; use gluten-free cones if necessary.
For the Frosting
- Powdered Sugar – Base for frosting; adjust quantity for desired sweetness and consistency.
- Milk – Liquid for frosting consistency; substitute with almond or soy milk for a dairy-free option.
- Green Food Coloring – Adds festive color; natural alternatives like spirulina or matcha can be used.
- Halloween-Themed Sprinkles – For decoration; optional but recommended for festive appeal.
Embrace the spirit of Halloween with these Wicked Witch Hat Brownies that are sure to cast a spell on your taste buds!
Step‑by‑Step Instructions for Wicked Witch Hat Brownies
Step 1: Preheat the Oven
Begin by preheating your oven to 350°F (175°C). This temperature is essential for baking the rich, fudgy chocolate brownies to perfection. Make sure your oven is fully heated before you move forward, as this will ensure even cooking.
Step 2: Melt the Butter
In a medium saucepan over low heat, melt ½ cup of unsalted butter until it’s completely liquid and glossy. Stir gently to prevent browning, then remove from heat and let it cool slightly—about 5 minutes—before adding to your mixing bowl.
Step 3: Mix Wet Ingredients
In a mixing bowl, combine the melted butter and 1 cup of granulated sugar, stirring until smooth. Then, crack in 2 large eggs, one at a time, mixing thoroughly before adding each subsequent egg. Add 1 teaspoon of vanilla extract to enhance the flavor, creating a luscious wet mixture for your Wicked Witch Hat Brownies.
Step 4: Combine Dry Ingredients
In a separate bowl, whisk together 1 cup of all-purpose flour, ⅓ cup of unsweetened cocoa powder, ½ teaspoon of salt, and ½ teaspoon of baking powder. Make sure all dry ingredients are well-combined, as this will help prevent clumping and ensure a smooth batter in your brownies.
Step 5: Fold Dry into Wet Mixture
Gently fold the dry ingredients into the wet mixture using a spatula, being careful not to overmix. You want to combine until just incorporated—this will keep your brownies nice and fudgy. The batter should be thick and glossy, indicating that you’re ready for the next step.
Step 6: Bake the Brownies
Pour the brownie batter into a greased 9×13 inch baking pan, spreading it evenly into the corners. Bake in your preheated oven for 25-30 minutes. To check for doneness, insert a toothpick into the center; it should come out with a few moist crumbs for those rich, fudgy brownies.
Step 7: Cool Before Frosting
Once baked, remove the brownies from the oven and cool them completely on a wire rack—this may take about 30-45 minutes. It’s crucial to let them cool fully before frosting to ensure the frosting adheres well and doesn’t melt into the brownies.
Step 8: Prepare the Frosting
While the brownies cool, prepare the festive green frosting. In a mixing bowl, combine 2 cups of powdered sugar, 2-3 tablespoons of milk, and a few drops of green food coloring. Mix until the frosting is smooth and spreadable, adjusting the milk for your desired consistency.
Step 9: Frost the Brownies
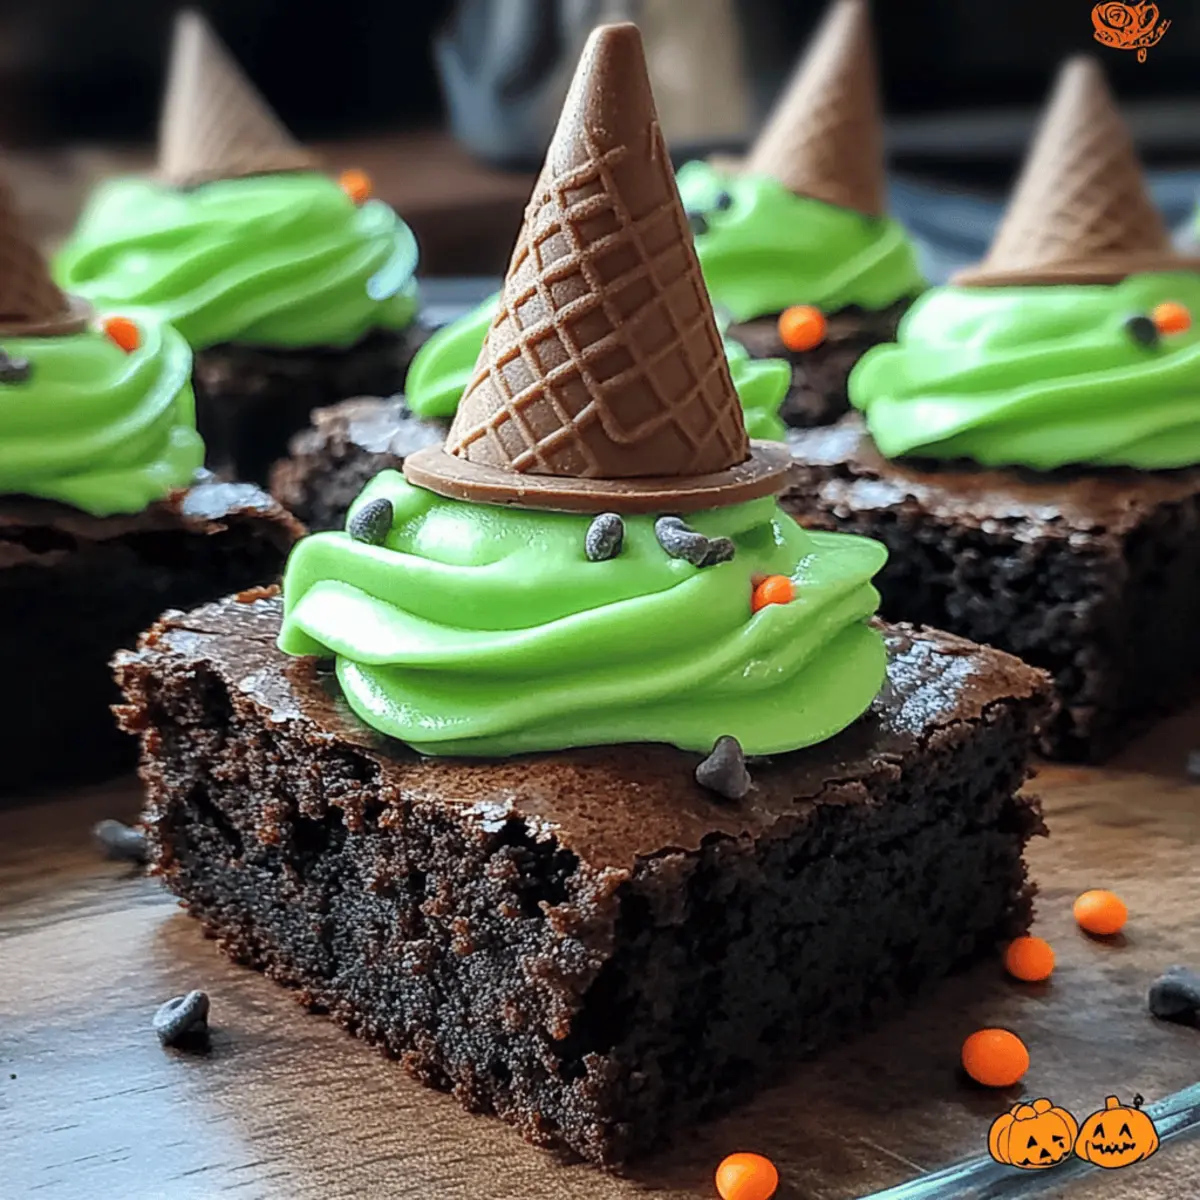
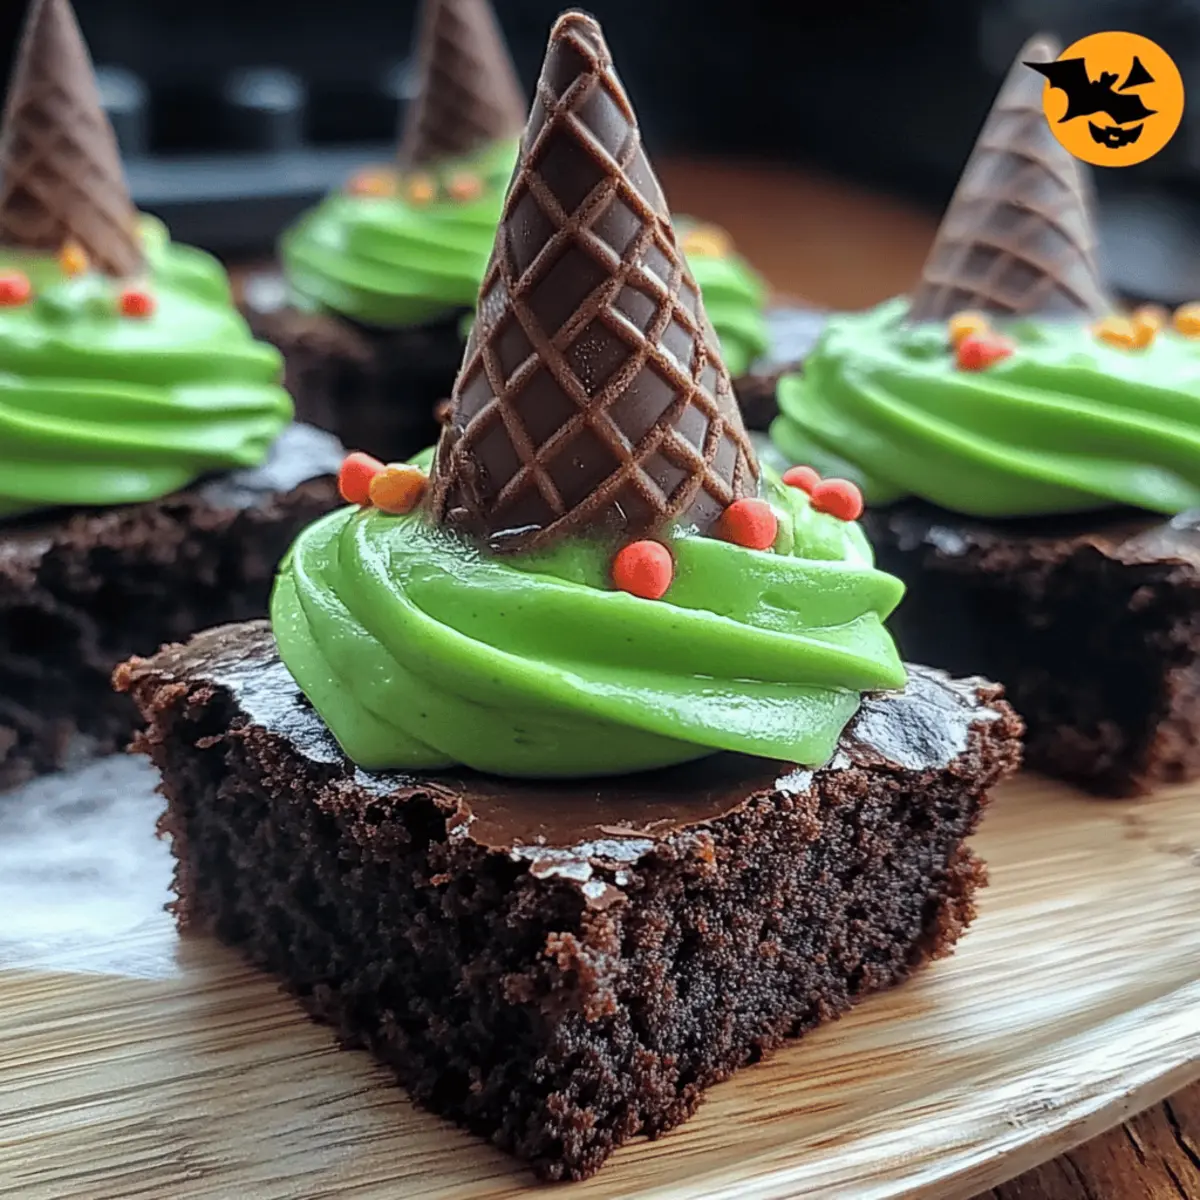
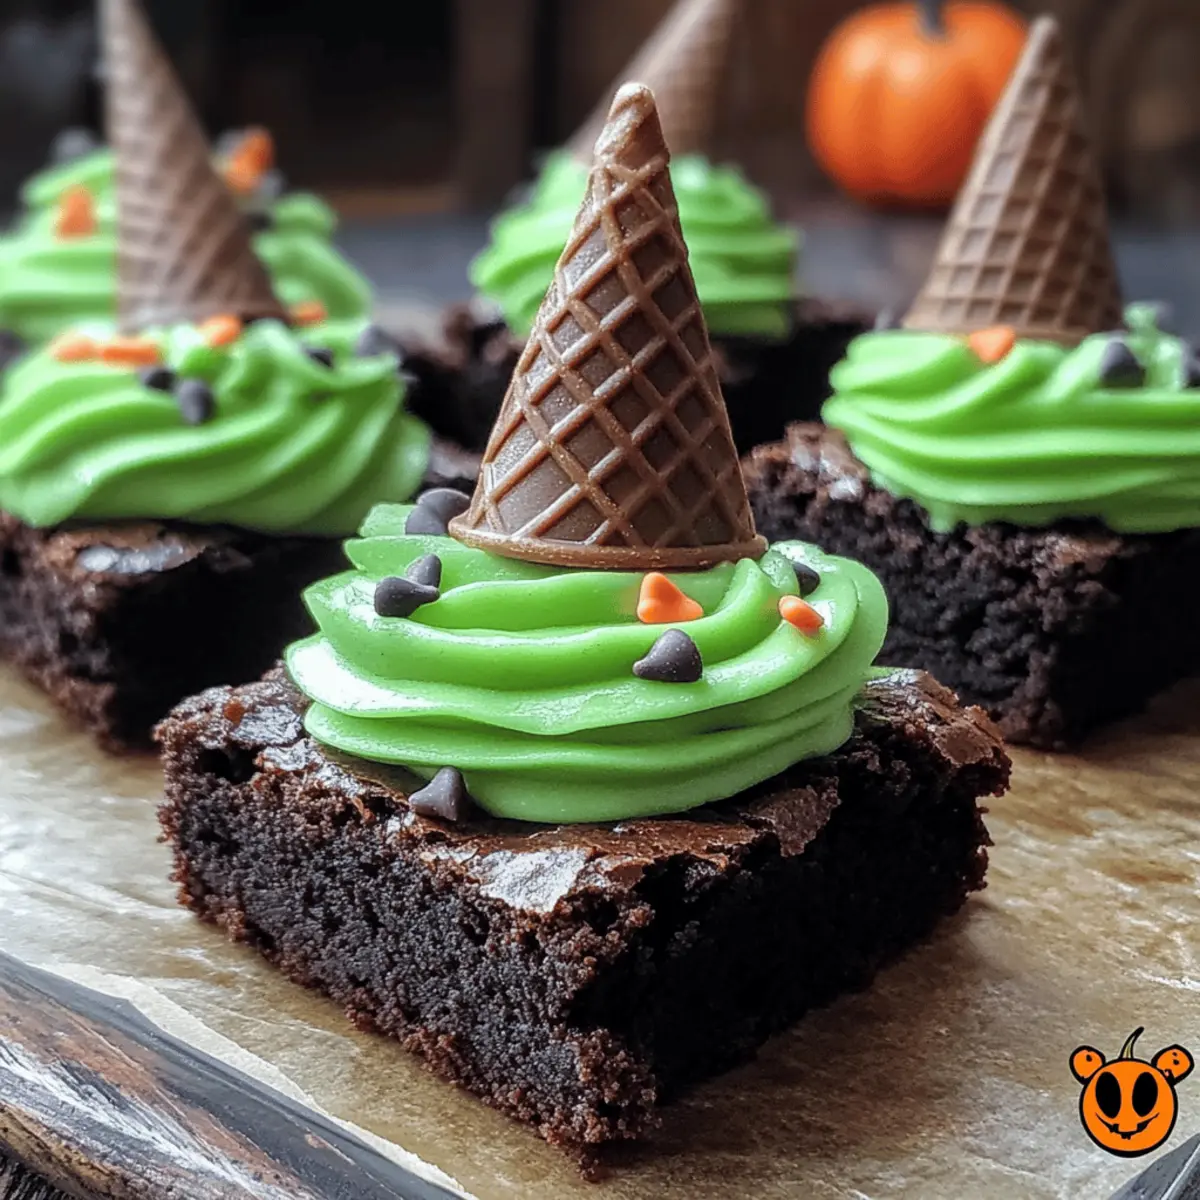
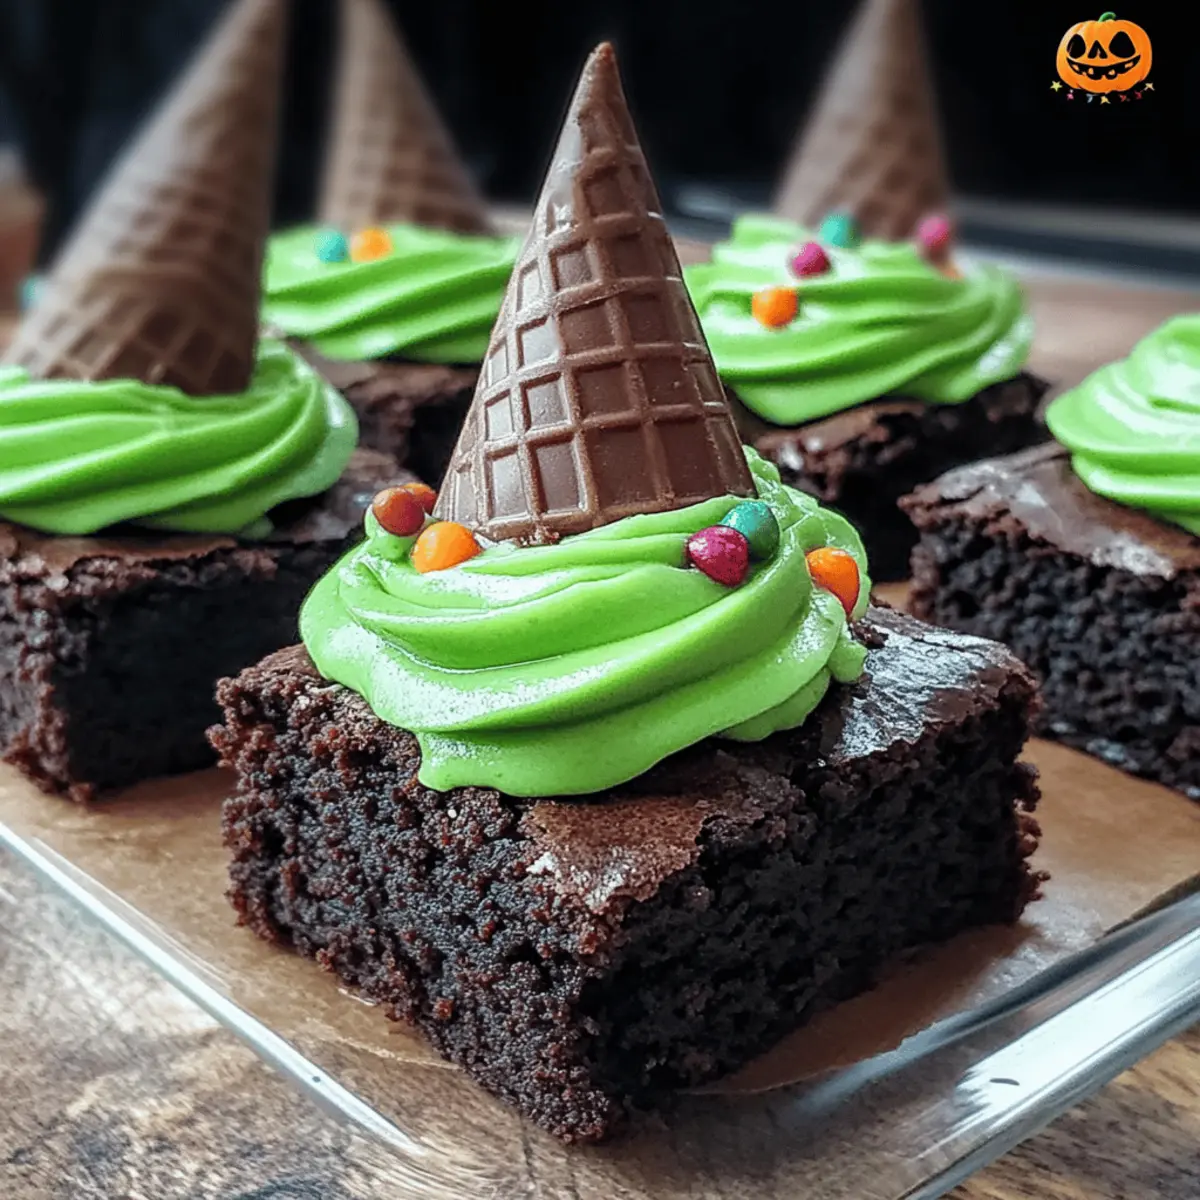
Once the brownies are completely cool, spread the green frosting generously over the top. Try to create a smooth surface, allowing the vibrant color to pop against the dark brownies, making your Wicked Witch Hat Brownies visually delightful.
Step 10: Add the Witch Hats
Now it’s time to add the chocolate ice cream cones as witch hats! Insert the cones upside down into the frosted brownies, evenly spaced. They should stand tall and look whimsical on top of your spooky dessert, bringing excitement to your Halloween gathering.
Step 11: Decorate and Serve
To finish, sprinkle Halloween-themed decorations atop your brownies. Use colorful sprinkles or edible glitter for that extra festive flair. Cut them into squares and serve at your Halloween party for a delightful treat that everyone will enjoy!
What to Serve with Wicked Witch Hat Brownies?
Indulging in spooky sweets is much more delightful when paired with complementary treats to create a festive spread.
- Charming Candy Apples: Crisp apples dipped in caramel or chocolate add a crisp texture and perfect sweetness that balances the fudgy brownies.
- Ghoulish Ghost Cupcakes: Light and fluffy vanilla cupcakes topped with ghostly marshmallow frosting will enchant both kids and adults, making them a fitting companion.
- Pumpkin Spice Latte: The warm, spicy flavors of this seasonal drink create a comforting contrast to the rich chocolate, enhancing your Halloween experience.
- Creepy Cheese Platter: A mix of creamy cheeses and salty crackers primes the palate, providing a savory counterpoint to satisfy diverse tastes throughout the gathering.
- Monster Fruit Kabobs: Colorful fruit skewers are refreshing and provide a healthy balance to the sweets, inspiring fun and creativity at your Halloween party.
- Haunted Hot Chocolate: Rich, creamy hot chocolate topped with whipped cream and spooky sprinkles creates a cozy atmosphere while keeping the spooky spirit alive.
- Chocolate-Dipped Pretzels: The crunchy, salty pretzels coated in chocolate create an irresistibly decadent snack, offering great texture contrasts to the brownies.
- Bubble Gum Slushy: A playful, icy drink bursting with sweetness will spark joy among younger guests, intersecting perfectly with the whimsical theme of your dessert spread.
Mix and match these delightful treats to craft an unforgettable Halloween feast that will thrill both ghouls and ghosts alike!
Make Ahead Options
These Wicked Witch Hat Brownies are perfect for busy home cooks looking to save time during Halloween festivities! You can prepare the brownie batter up to 24 hours in advance and store it in the refrigerator before baking; just remember to bring it back to room temperature before spreading it in the pan and baking. Additionally, you can make the frosting up to 3 days ahead and keep it in an airtight container in the fridge to maintain its vibrant color and texture. When you’re ready to serve, simply frost the cooled brownies, insert the chocolate ice cream cone hats, and garnish with sprinkles for a show-stopping dessert that will impress your guests without the last-minute rush!
How to Store and Freeze Wicked Witch Hat Brownies
Airtight Container: Store your brownies in an airtight container at room temperature for up to 5 days to keep them fresh and fudgy.
Refrigeration: If you’d like to make them ahead of time, you can store the un-frosted brownies in the fridge for up to a week. Once you’re ready to serve, frost them and add the witch hats.
Freezer-Friendly: For longer storage, freeze the unfrosted brownies wrapped tightly in plastic wrap and then placed in a freezer bag for up to 3 months. Thaw overnight in the fridge before frosting.
Reheating: If you prefer your brownies warm, gently reheat in the microwave for 10-15 seconds. Be careful not to overheat; you want to enjoy the rich texture of your Wicked Witch Hat Brownies!
Expert Tips for Wicked Witch Hat Brownies
-
Perfect Brownie Texture: Ensure your butter is melted and slightly cooled before mixing with sugar; this prevents your eggs from cooking, keeping the brownies fudgy.
-
Don’t Overmix: Gently fold your wet and dry ingredients until just combined. Overmixing can lead to tough brownies instead of the desired rich texture.
-
Cooling Time Counts: Allow the brownies to cool completely before frosting. This helps the frosting stick and keeps it from melting into the brownies.
-
Customization Option: Feel free to add colored sprinkles or Halloween-themed decorations to personalize your Wicked Witch Hat Brownies and make them even spookier!
-
Egg Substitutions: If you’re making a vegan version, use a flaxseed mixture instead of eggs. This ensures you maintain the brownies’ delicious richness while keeping them plant-based.
Wicked Witch Hat Brownies Variations
Feel free to get creative with your Wicked Witch Hat Brownies and make them your own!
-
Gluten-Free: Use a gluten-free flour blend with xanthan gum for a texture that everyone can enjoy. These brownies will still be fudgy and delicious!
-
Vegan: Swap out eggs for a flaxseed mixture (1 tablespoon flaxseed + 2.5 tablespoons water) and use vegan butter and dairy-free milk for a plant-based treat. Everyone will love these guilt-free goodies!
-
Dark Chocolate Delight: For an intense chocolate flavor, use dark cocoa powder instead of regular unsweetened cocoa. This will elevate your brownies to a deeper level of decadence.
-
Minty Fresh: Add a few drops of peppermint extract to the brownie batter for a refreshing twist. This will bring a delightful surprise to each bite, perfect for fall gatherings.
-
Nutty Crunch: Incorporate chopped walnuts or pecans into the brownie batter for added texture and flavor. The nuttiness complements the chocolate beautifully.
-
Spicy Kick: For those who love heat, sprinkle a pinch of cayenne or chili powder into the batter. It adds just the right amount of unexpected warmth to your brownies.
-
Fruity Fusion: Mix in mini chocolate chips or dried cranberries to bring a touch of fruitiness and an extra chocolatey bite. You could also drizzle some raspberry sauce on top for a tangy flair.
-
Whipped Frosting: Instead of the traditional frosting, whip some coconut cream with powdered sugar and green food coloring for a light and fluffy topping that enhances the overall aesthetic.
These adaptations will not only cater to your guest’s preferences but also keep the magic alive. And while you’re exploring variations, don’t forget to check out our delightful Banana Bread Brownies for another tasty treat that’s sure to impress!
Wicked Witch Hat Brownies Recipe FAQs
How do I choose ripe ingredients for this recipe?
Absolutely! When selecting your ingredients, ensure your eggs are fresh and the butter is unsalted for the best flavor. If you’re using flour, check that it’s free from any lumps or clumps, ensuring a smooth batter.
How should I store Wicked Witch Hat Brownies?
For optimal freshness, store your brownies in an airtight container at room temperature for up to 5 days. Keeping them at room temperature maintains their fudgy texture. If you want to keep them longer, place them in the fridge to extend their life by up to a week (just frost them before serving).
Can I freeze Wicked Witch Hat Brownies, and how?
Absolutely! To freeze your brownies, wrap the unfrosted brownies tightly in plastic wrap, then place them in a freezer-safe bag. They can be stored for up to 3 months. When you’re ready to enjoy them, simply thaw overnight in the fridge. Once thawed, frost and add the witch hats before serving for that perfect Halloween touch.
What should I do if my brownies turn out too cakey?
If your brownies are more cakey than fudgy, it’s usually due to overmixing the batter or baking them too long. Make sure to gently combine the wet and dry ingredients until just incorporated, and always check your brownies a few minutes before the stated baking time is up. They should come out with a few moist crumbs, ensuring that rich, fudge-like consistency.
Are there any dietary considerations for Wicked Witch Hat Brownies?
Very! These brownies can easily cater to dietary needs. For a gluten-free option, use a gluten-free flour blend with xanthan gum, and for a vegan adaptation, substitute the eggs with a flaxseed mixture (1 tablespoon flaxseed meal + 2.5 tablespoons water). Always check labels on your ingredients to avoid allergens, especially the chocolate cones, which may vary by brand.
Can these brownies be served to my pets?
No, it’s best not to share these brownies with your furry friends. The sugar and chocolate used are not suitable for pets, so ensure they stick to their treats. Enjoy these spooky delights yourself!
Wicked Witch Hat Brownies for Spooky Halloween Fun
Ingredients
Equipment
Method
- Preheat your oven to 350°F (175°C).
- In a medium saucepan over low heat, melt ½ cup of unsalted butter until it’s completely liquid and glossy. Let it cool slightly before adding to mixing bowl.
- Combine the melted butter and 1 cup of granulated sugar in a mixing bowl, stirring until smooth. Crack in 2 eggs one at a time, mixing thoroughly. Add 1 teaspoon of vanilla extract.
- In a separate bowl, whisk together 1 cup of all-purpose flour, ⅓ cup of unsweetened cocoa powder, ½ teaspoon of salt, and ½ teaspoon of baking powder.
- Gently fold the dry ingredients into the wet mixture using a spatula until just incorporated.
- Pour the brownie batter into a greased 9x13 inch baking pan and bake for 25-30 minutes. Check for doneness with a toothpick.
- Cool the brownies completely on a wire rack for about 30-45 minutes.
- In a mixing bowl, combine 2 cups of powdered sugar, 2-3 tablespoons of milk, and a few drops of green food coloring to prepare the frosting.
- Spread the green frosting generously over the cooled brownies.
- Insert the chocolate ice cream cones upside down into the frosted brownies as witch hats.
- Sprinkle Halloween-themed decorations atop the brownies, cut into squares, and serve.