

There’s something truly magical about baking your own bread. The smell of freshly baked dough filling your kitchen, the anticipation of slicing into a warm, golden loaf, and the satisfaction of knowing you made it from scratch—it’s an experience that never gets old.
For me, baking bread started as a challenge. I always thought making bread was complicated, requiring special equipment, fancy ingredients, and years of experience. But one day, I came across a simple recipe—just four ingredients—and decided to give it a try. To my surprise, it worked! The bread had a crispy crust, a soft interior, and a flavor that was far better than anything I could buy at the store.
From that moment, I was hooked. This four-ingredient homemade bread became a staple in my kitchen. It’s a recipe I turn to when I want something simple, delicious, and rewarding. Whether you’re a beginner or a seasoned baker, this recipe proves that anyone can make bread at home. No kneading, no complicated steps—just a few basic ingredients and a little patience.
Why You’ll Love This Recipe
1. No Fancy Ingredients or Equipment Needed
This bread is made with pantry staples: flour, water, salt, and yeast. There’s no need for expensive bread flour, eggs, butter, or sugar. You don’t even need a stand mixer—just a bowl, a spoon, and your hands.
2. Beginner-Friendly and Foolproof
Even if you’ve never baked before, this recipe is nearly impossible to mess up. There’s no kneading required—just mix, let it rise, and bake. The yeast does all the work, creating a beautifully soft and airy loaf.
3. Crispy on the Outside, Soft on the Inside
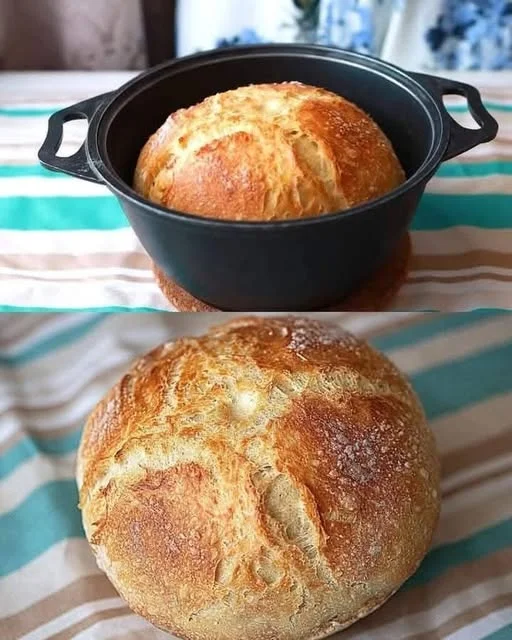
This bread has the perfect texture—crunchy crust with a soft, chewy inside. It’s great for sandwiches, toast, or simply enjoying with butter and jam.
4. Cheaper and Healthier Than Store-Bought Bread
Homemade bread costs just a fraction of what you’d pay at the store, and it’s free from preservatives and additives. You know exactly what’s going into your bread, making it a healthier option for you and your family.
5. Customizable to Your Taste
This basic recipe serves as a great foundation. You can experiment by adding seeds, herbs, cheese, or even garlic to create different flavors.
Ingredients
| Ingredient | Quantity |
|---|---|
| All-purpose flour | 500 g (4 cups) |
| Warm water | 350 ml (1 ½ cups) |
| Salt | 1 ½ teaspoons |
| Dry yeast | 1 teaspoon |
Directions
1. Prepare the Dough
- In a large bowl, mix the flour, salt, and dry yeast.
- Gradually add warm water while stirring with a spoon or your hands until a sticky dough forms.
2. Let It Rise
- Cover the bowl with a clean towel and let the dough rise in a warm place for 1–2 hours, or until it doubles in size.
3. Shape and Proof
- Lightly flour a surface and gently shape the dough into a round or loaf shape.
- Place it on a parchment-lined baking tray and let it rest for another 30 minutes.
4. Bake to Perfection
- Preheat the oven to 220°C (430°F).
- Place the dough in the oven and bake for 25–30 minutes, or until golden brown with a crispy crust.
- Let it cool before slicing and enjoying!
Nutritional Information (Per Serving, Approximate)
| Nutrient | Amount |
|---|---|
| Calories | 180–200 kcal |
| Protein | 5–6 g |
| Fat | 0.5–1 g |
| Carbohydrates | 40–45 g |
| Fiber | 2–3 g |
FAQs: Everything You Need to Know About Making Homemade Bread
What Type of Flour Works Best for This Recipe?
All-purpose flour works perfectly for this bread, but if you want a chewier texture, you can use bread flour. Whole wheat flour can also be used, but it will produce a denser loaf.
Do I Have to Knead the Dough?
No! This is a no-knead bread, meaning the gluten develops naturally during the resting period. This makes it perfect for beginners who don’t want to deal with complicated techniques.
How Do I Get a Crispy Crust?
Baking at a high temperature helps create a crispy crust. For an even better result, place a small oven-safe dish filled with water on the bottom rack of the oven while baking. The steam will enhance the crust’s texture.
Can I Use Instant Yeast Instead of Dry Yeast?
Yes! Instant yeast can be used in the same quantity as dry yeast. The only difference is that instant yeast doesn’t need to be dissolved in water first—you can mix it directly into the flour.
What If My Dough Doesn’t Rise?
If your dough isn’t rising, check these factors:
- Water Temperature: If the water is too hot, it can kill the yeast. If it’s too cold, the yeast won’t activate. Aim for warm water, around 40°C (100°F).
- Freshness of Yeast: If your yeast is old or expired, it may no longer be active.
- Room Temperature: If your kitchen is too cold, the dough may take longer to rise. Try placing the bowl in a warmer area, like near the stove or inside an oven with the light on.
Can I Make This Bread Gluten-Free?
You can try using gluten-free flour, but the texture will be different. A blend of gluten-free flour with xanthan gum tends to work best for achieving a good rise.
Can I Add Other Ingredients to the Dough?
Absolutely! This recipe is a blank canvas for creativity. Try adding:
- Seeds: Sunflower, sesame, or flaxseeds for added crunch.
- Herbs: Rosemary, thyme, or garlic powder for extra flavor.
- Cheese: Grated cheddar or parmesan mixed into the dough.
- Sweet Additions: A touch of honey or cinnamon for a sweeter version.
How Do I Store Homemade Bread?
Homemade bread doesn’t have preservatives, so it won’t last as long as store-bought bread. Here’s how to keep it fresh:
- Store at room temperature in a paper bag or wrapped in a clean kitchen towel for up to 3 days.
- Avoid plastic bags, as they trap moisture and make the crust soggy.
- For longer storage, slice the bread and freeze it in an airtight container for up to 3 months.
Can I Use a Bread Machine?
Yes! Simply follow your bread machine’s instructions, adding the ingredients in the recommended order. This recipe works well in most standard bread machines.
How Can I Tell If My Bread Is Fully Baked?
Tap the bottom of the loaf—it should sound hollow. If you’re unsure, use a food thermometer. The internal temperature should be around 90°C (195°F) when fully baked.
What’s the Best Way to Serve This Bread?
- For Breakfast: Toasted with butter and jam.
- For Lunch: As a sandwich base with your favorite fillings.
- For Dinner: As a side with soup, salad, or pasta.
- For Snacking: With cheese, hummus, or olive oil and balsamic vinegar.
A Loaf That Brings Joy to Every Kitchen
Baking your own bread is one of the most rewarding experiences in the kitchen. There’s a sense of accomplishment in watching the dough rise, hearing the crust crackle as it cools, and finally enjoying a warm slice fresh from the oven.
This four-ingredient bread proves that homemade baking doesn’t have to be complicated. Anyone—no matter their skill level—can make a perfect loaf with minimal effort. Whether you’re looking to cut down on store-bought bread, try something new, or simply enjoy the process of baking, this recipe is a must-try.
So, why not give it a go? With just a few simple ingredients and a little patience, you’ll have a fresh, homemade loaf that tastes better than anything from the grocery store. And once you taste it, you might just find yourself making it again and again!
Would you like more variations or tips for different types of bread? Let me know how your homemade loaf turns out!
4 Ingredients Only! The Easiest Homemade Bread Anyone Can Make
Ingredients
Method
- In a large bowl, combine the flour, salt, and dry yeast.
- Gradually pour in the warm water while stirring until a sticky dough forms.
- Cover the bowl with a clean towel and let the dough rest in a warm place for 1–2 hours until it doubles in size.
- Lightly flour a surface and gently shape the dough into a round or loaf shape.
- Place it on a parchment-lined baking tray and let it rest for another 30 minutes.
- Preheat the oven to 220°C (430°F).
- Bake the bread for 25–30 minutes until golden brown and crispy on the outside.
- Let it cool slightly before slicing and serving.
Notes
- If you prefer a softer crust, place a bowl of water in the oven while baking to create steam.
- You can add seeds, herbs, or cheese to customize the flavor.
- Store the bread in a paper bag or wrapped in a clean towel to keep it fresh for up to 3 days.