

There’s something magical about vanilla pudding tartlets. They’re the kind of dessert that instantly transports you back to childhood, to a time when the simplest treats brought the most joy. I still remember the first time I made them. I was a child, standing on my tiptoes in my grandmother’s kitchen, watching her roll out the dough with effortless grace. She never used a written recipe—just a handful of ingredients, measured by instinct and experience.
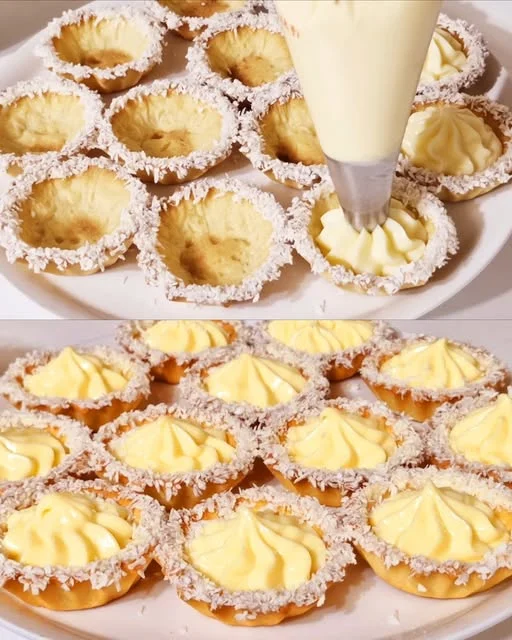
The scent of buttery pastry filled the air as the tart shells baked to golden perfection. Then came the best part—spooning the warm, silky custard into each shell, watching it settle into a smooth, glossy surface. I could hardly wait for them to chill, sneaking a spoonful of custard whenever my grandmother turned her back.
That first bite was pure bliss. The crisp, delicate crust crumbled perfectly, giving way to the creamy, vanilla-infused filling. It was simple yet elegant, comforting yet indulgent. Even now, as an adult, every time I make these tartlets, I feel that same sense of nostalgia.
Whether you’re baking for a special occasion, a family gathering, or just because you want something sweet, these vanilla pudding tartlets are the perfect treat. They’re easy to make, yet impressive enough to serve to guests. And best of all, they taste just as good as they look.
Why You’ll Love This Recipe
1. A Perfect Balance of Textures
The beauty of these tartlets lies in their contrast—crisp, buttery crust paired with a smooth, creamy filling. Every bite is an irresistible combination of crunch and silkiness.
2. Easy to Make, Yet Elegant
Despite their sophisticated appearance, these tartlets require simple ingredients and minimal effort. You don’t need advanced baking skills to create a dessert that looks and tastes like it came from a patisserie.
3. Versatile and Customizable
While the classic vanilla pudding filling is a timeless favorite, you can easily customize these tartlets with different flavors. Add a hint of citrus zest, drizzle with chocolate, or top with fresh fruit for a unique twist.
4. Perfect for Any Occasion
Whether served at a dinner party, a birthday celebration, or an afternoon tea, these tartlets always impress. They’re individually portioned, making them easy to serve and even easier to enjoy.
5. A Nostalgic Treat with a Modern Touch
Many of us grew up with simple custard desserts, but these tartlets elevate that childhood favorite into something truly special. They bring back fond memories while feeling fresh and sophisticated.
Ingredients
For the Crust:
| Ingredient | Quantity |
|---|---|
| Egg | 1 |
| Sugar | 50 g |
| Vanilla sugar | 5 g |
| Salt | A pinch |
| Butter | 100 g |
| Flour | 180 g |
Directions
1. Prepare the Dough
- In a bowl, whisk together the egg, sugar, vanilla sugar, and a pinch of salt.
- Add the softened butter and mix until smooth.
- Gradually add the flour, kneading until a soft dough forms.
- Wrap in plastic wrap and chill in the refrigerator for 30 minutes.
2. Shape the Tartlets
- Preheat the oven to 180°C (350°F).
- Roll out the chilled dough and cut into circles slightly larger than your tartlet molds.
- Press the dough into the molds, trimming any excess.
3. Bake the Crust
- Prick the base of each tartlet with a fork to prevent puffing.
- Bake for 12-15 minutes until golden.
- Let them cool completely before adding the filling.
4. Serve and Enjoy
- Fill with your favorite vanilla custard or pudding.
- Chill before serving for the best texture.
Nutritional Information (Per Tartlet – Approximate)
| Nutrient | Amount per Serving |
|---|---|
| Calories | ~180 kcal |
| Protein | ~3 g |
| Carbohydrates | ~22 g |
| Fats | ~9 g |
| Fiber | ~1 g |
| Sugar | ~8 g |
Frequently Asked Questions
1. Can I Use Store-Bought Pastry Instead of Making the Crust from Scratch?
Yes! If you’re short on time, pre-made tart shells or shortcrust pastry can be used as a shortcut. However, homemade dough has a richer flavor and flakier texture that’s worth the effort.
2. How Can I Make the Crust Extra Crispy?
To ensure a perfectly crisp crust, chill the dough before baking and avoid overworking it. Pricking the base with a fork before baking helps prevent it from puffing up. You can also blind-bake the shells by placing parchment paper and baking weights (or dry beans) inside them before baking.
3. Can I Prepare the Tartlets in Advance?
Absolutely! The tart shells can be baked a day in advance and stored in an airtight container. The custard can also be made ahead and chilled separately. Assemble the tartlets just before serving for the best texture.
4. What’s the Best Way to Thicken the Pudding Filling?
Cornstarch is the key to a smooth, thick custard. Make sure to whisk it well into the milk mixture to prevent lumps. If the pudding seems too thin, let it cook for a few extra minutes while stirring constantly.
5. Can I Make These Tartlets Dairy-Free?
Yes! Substitute butter with a dairy-free alternative and use almond, coconut, or oat milk for the custard. The texture may be slightly different, but they will still be delicious.
6. How Do I Prevent the Custard from Forming a Skin?
To keep the pudding smooth and creamy, place plastic wrap directly on the surface of the custard while it cools. This prevents a skin from forming.
7. Can I Add Other Flavors to the Custard?
Definitely! A splash of rum, a hint of cinnamon, or a bit of citrus zest can enhance the vanilla flavor beautifully. You can also fold in whipped cream after chilling for an even lighter texture.
8. What Are Some Creative Ways to Decorate These Tartlets?
For an elegant finish, try topping your tartlets with:
- Fresh berries (strawberries, raspberries, blueberries)
- A drizzle of melted chocolate or caramel
- A dusting of powdered sugar
- Shaved white or dark chocolate
- A dollop of whipped cream and a mint leaf
9. How Should I Store Leftovers?
Store assembled tartlets in the refrigerator for up to 2 days. If storing longer, keep the crust and filling separate and assemble just before serving.
10. Can I Freeze These Tartlets?
The tart shells freeze well—simply bake them, let them cool, and store in an airtight container for up to a month. The custard, however, does not freeze well, as it may become watery when thawed.
Conclusion: A Dessert Worth Making Again and Again
There’s something special about a homemade dessert that brings people together. These vanilla pudding tartlets are more than just a sweet treat—they’re a reminder of the joy of baking, the comfort of familiar flavors, and the simple pleasure of sharing something delicious with loved ones.
From the crisp, buttery crust to the luscious vanilla filling, every element of this dessert is designed to delight. Whether you’re making them for a celebration or just because you’re craving something sweet, these tartlets will never disappoint.
So next time you’re looking for an easy yet elegant dessert, skip the store-bought treats and make these instead. They’re proof that the best things in life are homemade.
Vanilla Pudding Tartlets – A Sweet Delight for Any Occasion
Ingredients
Method
- Prepare the Dough
- In a bowl, whisk together the egg, sugar, vanilla sugar, and salt.
- Add softened butter and mix until smooth.
- Gradually incorporate the flour, kneading into a soft dough.
- Wrap the dough in plastic wrap and refrigerate for 30 minutes.
- Shape and Bake the Tartlets
- Preheat oven to 180°C (350°F).
- Roll out the chilled dough and cut circles slightly larger than your tartlet molds.
- Press the dough into the molds, trimming any excess.
- Prick the base with a fork and bake for 12-15 minutes until golden.
- Let the tart shells cool completely.
- Make the Vanilla Pudding
- In a saucepan, heat the milk over medium heat until warm.
- In a separate bowl, whisk the egg yolks, sugar, and cornstarch until smooth.
- Gradually pour the warm milk into the egg mixture, whisking continuously.
- Return the mixture to the saucepan and cook over low heat, stirring constantly, until thickened.
- Remove from heat and stir in the vanilla extract.
- Let it cool slightly before filling the tartlets.
- Assemble and Serve
- Spoon the vanilla pudding into the cooled tartlet shells.
- Chill in the refrigerator for at least 1 hour before serving.
- Optionally, garnish with fresh fruit, powdered sugar, or a drizzle of chocolate.
Notes
- Extra Crispiness: Blind-bake the tart shells with baking weights for an even crisper crust.
- Dairy-Free Option: Use almond or coconut milk for the custard and vegan butter for the crust.
- Flavor Variations: Add lemon zest, caramel drizzle, or chocolate chips for a twist on the classic vanilla filling.
- Storage: Keep in an airtight container in the fridge for up to 3 days.