Lazy Loaf, Artisan Soul: A Love Letter to No-Knead Bread

There’s something sacred about the scent of fresh bread wafting through a home, a warmth that settles into the walls and hearts alike. For me, breadmaking began not in a fancy kitchen with high-end gadgets, but in my grandmother’s sun-drenched kitchen in the countryside. She didn’t fuss over yeast temperatures or kneading techniques. She believed in simplicity—and time.

I still remember the way she’d mix a dough with just a wooden spoon and an old ceramic bowl, cover it with a damp tea towel, and let it rest quietly by the window as the day went on. There was no rush, no pressure. Just trust. Hours later, we’d pull a golden loaf from the oven—crackly crust, impossibly soft inside, and always devoured within minutes.

This No-Knead Bread recipe is an ode to that kind of comfort. It strips away the intimidation of bread baking and replaces it with patience, ease, and a little bit of magic. You don’t need special tools. You don’t need strong arms. You just need time and a little faith in the alchemy of flour, water, and yeast.

The Miracle of No-Knead Bread

When Jim Lahey introduced his revolutionary no-knead method in the early 2000s, the baking world changed. What once seemed like the domain of skilled bakers became accessible to anyone with a pot, an oven, and the willingness to wait. The technique is as brilliant as it is simple: allow the dough to ferment slowly over time, and let nature do what kneading once did.

The long fermentation process develops gluten naturally and creates the deep, complex flavor typically found only in bakery-quality artisan bread. The result is a crusty, golden loaf with an open crumb—ideal for everything from soup-dipping to sandwich-making.

What sets this bread apart isn’t just the taste, but the transformation it sparks in home kitchens. It gives people the confidence to try something new and the satisfaction of creating something so beautiful with such little effort.

Ingredients

IngredientAmount
Warm water1 ½ cups (370 ml)
Dry yeast2 tablespoons (10 g)
All-purpose flour4 cups (500 g)
Salt1 teaspoon

Directions

  1. Activate the yeast: In a large mixing bowl, pour the warm water. Sprinkle the dry yeast over it and let it sit for about 5–10 minutes until it starts to foam.
  2. Mix the dough: Add the flour and salt to the yeast mixture. Stir with a wooden spoon or spatula until a shaggy, sticky dough forms. No kneading needed—just combine.
  3. Let time do the work: Cover the bowl with plastic wrap or a damp towel and let it rise at room temperature for 12 to 18 hours. The dough should double in size and have bubbles on the surface.
  4. Shape and rest: Lightly flour a work surface and turn out the dough. Fold it over itself a few times and shape it into a round loaf. Let it rest for 30–45 minutes while you preheat the oven.
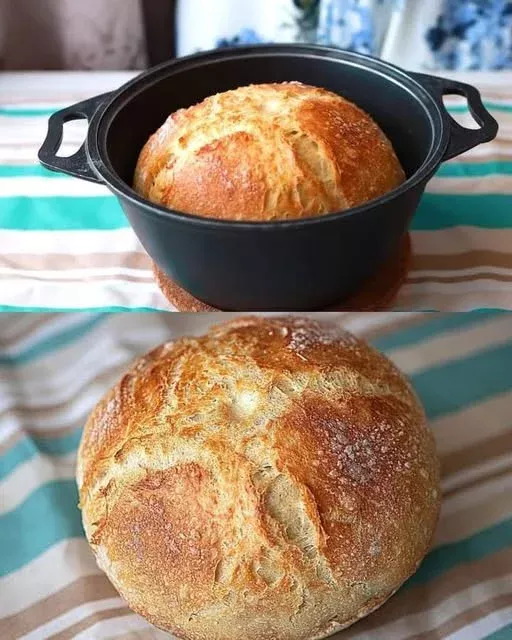
  5. Preheat the oven: Place a Dutch oven (or any heavy oven-safe pot with a lid) in the oven and preheat to 450°F (230°C).
  6. Bake it bold: Carefully remove the hot Dutch oven, place the dough inside (you can use parchment paper for easy lifting), cover, and bake for 30 minutes. Then remove the lid and bake for an additional 10–15 minutes until the crust is deep golden brown.
  7. Cool and enjoy: Transfer the bread to a wire rack and let it cool for at least 30 minutes before slicing.

Nutrition Facts (Per Slice, based on 12 slices)

NutrientAmount
Calories150 kcal
Carbohydrates30 g
Protein4 g
Fat0.5 g
Fiber1 g
Sodium200 mg
Sugar0 g

Why This Bread Works for Everyone

There’s a reason this recipe has been called “life-changing.” It demystifies the process, welcomes beginners, and gives seasoned bakers a shortcut without compromise. Whether you’re baking in a city apartment or a rustic cottage, this method delivers every time.

Here’s what makes No-Knead Bread so universally loved:

  1. Minimal Ingredients, Maximum Flavor: You only need four pantry staples—flour, water, yeast, and salt.
  2. No Special Equipment Required: A Dutch oven helps with that crisp crust, but you can also use a heavy lidded pot or even bake it free-form on a sheet with some adjustments.
  3. Time, Not Effort: The dough ferments over 12–18 hours, so you mix it and forget it until you’re ready to bake.
  4. Consistent Results: Whether you’re a first-timer or a seasoned bread baker, the structure of this recipe sets you up for success.
  5. Customizable: From adding herbs and cheeses to swapping flours, it’s incredibly versatile.

Crust Meets Crumb: What to Expect

No-Knead Bread is all about contrast. The exterior develops a deep, burnished crust that crackles when you tear into it. Inside, you’ll find a tender, chewy crumb with beautiful air pockets—light but not overly airy. This texture comes from the slow fermentation, which gives the dough time to develop complexity and elasticity on its own.

The flavor? Earthy, slightly tangy, and subtly sweet. It tastes like time itself—rich, warm, and comforting.

Frequently Asked Questions

1. Can I use whole wheat or other types of flour?

Absolutely! You can substitute up to 50% of the all-purpose flour with whole wheat flour for a nuttier, denser loaf. Just know that whole wheat absorbs more water and can make the dough a bit stiffer. Add a splash more water if needed. You can also experiment with rye, spelt, or bread flour—each brings a different texture and flavor.

2. Do I have to use a Dutch oven?

Not necessarily. The Dutch oven creates steam, which is essential for that crisp crust. However, if you don’t have one, here are alternatives:

  • Use a heavy lidded pot, like a cast iron or ceramic pot with a tight-fitting lid.
  • Bake the bread on a preheated baking stone or sheet, and place a pan of hot water in the oven to create steam.
  • Use a cloche or cover the loaf with a metal bowl for the first part of the bake.

3. Can I speed up the rising time?

While it’s possible to shorten the fermentation with more yeast or warmer temperatures, the magic lies in the wait. That said, if you’re short on time:

  • Let the dough rise in a warm (not hot) spot, like an oven with the light on.
  • Use a slightly higher amount of yeast (up to 1 tablespoon), which may cut the rise time to 6–8 hours.

But remember—flavor and texture benefit from patience.

4. Can I refrigerate the dough?

Yes! After the initial rise at room temperature, you can refrigerate the dough for up to 3 days. In fact, cold fermentation deepens the flavor. When you’re ready to bake, shape the dough, let it rest at room temperature for 45–60 minutes, then bake as usual.

5. Why is my dough so sticky? Is that normal?

Yes, very normal. No-knead dough is much wetter than traditional dough. It should be shaggy and sticky—don’t be tempted to add too much flour. Lightly flour your hands and surface when shaping, and trust the process. That stickiness helps create the open crumb you want.

6. Can I double the recipe?

Definitely. You can double or even triple the ingredients, just be sure your mixing bowl is large enough to accommodate the rise. If using a Dutch oven, divide the dough into separate loaves for even baking.

7. Is it freezer-friendly?

Yes. Let the baked loaf cool completely, then wrap it tightly in plastic wrap and freeze in a freezer-safe bag. When you’re ready to enjoy, thaw at room temperature or warm it in the oven to restore the crust.

Tips for a Beautiful Bake

  • Preheat thoroughly: Ensure your oven and Dutch oven are fully preheated before baking. A hot start gives the dough that lovely oven spring.
  • Score the top (optional): A quick slash with a sharp knife or razor blade allows controlled expansion and a pretty finish.
  • Add-ins welcome: Chopped olives, sun-dried tomatoes, rosemary, garlic, shredded cheese, seeds—the dough is a blank canvas.
  • Don’t slice too soon: Wait at least 30 minutes before slicing into your loaf. This resting time allows the crumb to set and prevents gummy texture.

Beyond the Loaf: Creative Serving Ideas

  • Rustic Breakfast: Toasted slices topped with avocado, eggs, or jam.
  • Soup Companion: A wedge of warm bread dipped into tomato basil or butternut squash soup is pure comfort.
  • Cheese Board Star: Pair with sharp cheeses, fruits, and honey for an elegant appetizer.
  • Gourmet Sandwiches: Think grilled cheese with caramelized onions or turkey with cranberry and arugula.
  • Croutons or Bread Crumbs: Day-old slices can be transformed into golden croutons or breadcrumbs for salads and casseroles.

Conclusion: A Loaf Worth Waiting For

No-Knead Bread isn’t just a recipe—it’s an invitation. An invitation to slow down, to trust simple ingredients, and to find joy in something so elemental yet so deeply satisfying. In a world that often rushes toward convenience, this loaf reminds us that patience can be deliciously rewarding.

It’s bread that tastes like home. It’s crust and crumb telling a story of time well spent. And it’s a reminder that sometimes, doing less can yield something truly extraordinary.

So go ahead—mix that dough, cover it up, and walk away. The bread will rise, and when it does, it’ll rise to meet you with warmth, flavor, and a crackly golden promise that good things are worth waiting for.

Amal

Lazy Loaf, Artisan Soul: A Love Letter to No-Knead Bread

This rustic No-Knead Bread delivers a crisp golden crust and soft, airy crumb—all with just four ingredients and no kneading. Perfect for beginners and seasoned bakers alike, this slow-risen loaf transforms your kitchen into an artisan bakery.
Prep Time 10 minutes
Cook Time 45 minutes
Total Time 13 hours
Servings: 10 –12 slices
Course: Bread
Cuisine: European-inspired

Ingredients
  

  • 1 ½ cups 370 ml warm water
  • 2 tablespoons 10 g dry yeast
  • 4 cups 500 g all-purpose flour
  • 1 teaspoon salt

Method
 

  1. In a large mixing bowl, combine warm water and yeast. Let it sit for 5–10 minutes until foamy.
  2. Add flour and salt. Stir with a spoon until a shaggy, sticky dough forms.
  3. Cover the bowl with plastic wrap or a clean towel. Let the dough rise at room temperature for 12–18 hours, until doubled in size and bubbly.
  4. Turn dough out onto a floured surface. Fold it over itself a few times and shape into a round loaf. Let it rest for 30–45 minutes.
  5. While the dough rests, place a Dutch oven (or heavy pot with lid) in the oven and preheat to 450°F (230°C).
  6. Carefully place the dough into the hot Dutch oven. Cover and bake for 30 minutes.
  7. Remove the lid and bake for another 10–15 minutes until the crust is deep golden brown.
  8. Remove the bread and cool on a wire rack for at least 30 minutes before slicing.

Notes

  • Flour Type: You can use bread flour for a slightly chewier texture.
  • Add-Ins: Try mixing in rosemary, garlic, olives, or seeds for variation.
  • No Dutch Oven? Use any oven-safe pot with a tight-fitting lid or create a steam bath with a tray of hot water on the bottom rack.
  • Don’t rush the rise: A long fermentation gives the best flavor and texture—overnight is ideal.

The Ultimate Walnut Delight Cake: A Simple Indulgence for the Soul

When I first discovered this recipe for walnut cake, it was on a cold winter evening, wrapped in the warmth of a cozy kitchen filled with the scent of melted butter and chocolate. The sky outside was a dull grey, and the cold air had driven everyone indoors. My grandmother, always the heart of family gatherings, invited me into the kitchen to help her prepare a cake she swore would “lift the spirits.” At that moment, I had no idea that this simple dessert would hold so much sentimental value for me.

As we went through the motions of preparing the cake, it struck me how a recipe so simple could hold such deep emotional ties. The act of baking, combined with the memories of laughter and love shared around the table, became a ritual that I would cherish forever. This walnut delight cake is more than just a dessert — it’s a symbol of warmth, comfort, and the timeless bonds we share with those we love. Every bite brings back a flood of memories, and each time I make it, I’m reminded of those cozy winter nights spent with family.

Now, with a quick and easy recipe in hand, you can create that same sense of warmth and togetherness in your own home. Whether you’re preparing it for a special occasion or simply as a sweet treat to enjoy with loved ones, this walnut delight cake is sure to bring joy and satisfaction to your table. So, let’s dive into what makes this dessert so irresistible.

Why This Cake is the Ultimate Comfort Dessert

In a world where time is often in short supply, there’s something special about a dessert that comes together effortlessly but still delivers an unforgettable taste. This walnut delight cake is exactly that — quick, easy, and utterly delicious. The combination of crushed cookies, walnuts, and cocoa powder creates a base that is rich in flavor and texture, while the creamy top layer adds a luxurious touch. The best part? It only takes about 5 minutes to prepare, making it the perfect option for busy individuals who want something sweet without the time commitment.

What makes this cake so special is not just its simplicity, but also its versatility. Whether you’re craving a light afternoon snack, a dessert for a dinner party, or even a thoughtful homemade gift for a loved one, this cake ticks all the boxes. It’s not overly sweet, so it can be enjoyed at any time of the day. The richness of the walnuts and the crunch they provide offer a contrast to the smooth, indulgent top layer, creating a balance that’s both comforting and sophisticated.

Ingredients

For the Base:

IngredientQuantity
Walnuts (cut into small pieces)120 g (4.2 oz)
Cookies (crushed)400 g (14 oz)
Sugar120 g (0.6 cup)
Vanilla sugar2 g (0.5 tsp)
Cocoa powder60 g (0.5 cup)
Milk250 ml (1.25 cups)
Butter150 g (5.3 oz)

For the Top Layer:

IngredientQuantity
Walnuts (for garnish)50 g (1.8 oz)
Powdered sugar30 g (2 tbsp)

Directions:

  1. Prepare the Base: Begin by crushing the cookies into fine crumbs. You can use a food processor or place them in a plastic bag and crush them with a rolling pin. Set aside.
  2. Make the Base Mixture: In a medium saucepan, melt the butter over low heat. Once melted, stir in the milk, sugar, and vanilla sugar. Gradually add the cocoa powder while stirring to avoid lumps. Allow the mixture to come together smoothly.
  3. Combine the Base Ingredients: Remove the saucepan from heat and stir in the crushed cookies and chopped walnuts. Mix until everything is well combined, forming a thick and sticky dough-like consistency.
  4. Form the Base Layer: Press the base mixture into the bottom of a greased or lined cake pan. Make sure to spread it evenly, pressing it down gently to create a firm base. Chill it in the refrigerator for about 10–15 minutes to set.
  5. Prepare the Top Layer: After the base has chilled, sprinkle the top layer with powdered sugar and top with the remaining chopped walnuts for garnish.
  6. Chill and Serve: Allow the cake to chill in the fridge for at least 30 minutes to an hour before slicing and serving. This will give the layers time to set and develop their full flavor.

Nutritional Breakdown

NutrientAmount (per serving)
Calories320 kcal
Protein5 g
Carbohydrates40 g
Fiber4 g
Fat18 g
Saturated Fat8 g
Sodium45 mg
Cholesterol30 mg
Calcium4% of Daily Value
Iron8% of Daily Value

The Secret Behind the Flavor

Though the ingredients in this recipe are basic, it’s the careful balance of flavors and textures that makes this walnut delight cake truly stand out. The crushed cookies form a sturdy base that holds the cake together while providing a light, buttery crunch. When mixed with the cocoa powder, sugar, and milk, the cookies become more than just a simple ingredient — they transform into a rich, decadent layer that gives the cake its signature flavor.

The walnuts play an essential role in the texture of the cake. Chopped into small pieces, they add a delightful crunch that contrasts beautifully with the creamy top layer. Walnuts are also packed with nutrients, including healthy fats and antioxidants, making this dessert not only indulgent but also somewhat nourishing.

The top layer is where the magic truly happens. Powdered sugar gives it a subtle sweetness, and the fresh walnuts sprinkled on top add another layer of texture and visual appeal. The cake’s simple presentation belies its complexity, and when you take your first bite, you’ll immediately taste the deep, rich flavors that come from the perfect combination of cocoa and walnuts.

Perfect for Any Occasion

One of the best things about this walnut delight cake is its versatility. Whether you’re making it for a holiday gathering, a family dinner, or a casual get-together with friends, it’s sure to impress. Its unique combination of flavors and textures makes it stand out from traditional cakes, and it pairs wonderfully with a cup of tea or coffee.

Not only does it look impressive, but it’s also incredibly easy to make, which makes it ideal for both beginner bakers and seasoned experts. This cake can also be modified to suit different tastes and dietary preferences. You can experiment with adding other nuts like almonds or hazelnuts, or even switch out the cocoa powder for a different flavor profile such as cinnamon or espresso.

The best part is that this cake doesn’t require baking, making it a great option for those who might not have access to an oven or simply don’t want to spend time in the kitchen. In just a few simple steps, you’ll have a dessert that looks and tastes as though it came from a bakery, with minimal effort required.

Frequently Asked Questions (FAQs)

1. Can I make this cake ahead of time?

Yes! This walnut delight cake actually tastes even better after being refrigerated for a few hours or overnight. The flavors have time to meld together, and the cake sets more firmly, making it easier to slice. If you’re planning to serve it at a party or family gathering, you can prepare it the night before and simply garnish it before serving.

2. Can I use a different type of nut instead of walnuts?

Absolutely! While walnuts add a rich, earthy flavor and texture, you can easily swap them out for other nuts like almonds, pecans, or hazelnuts. Each nut will give the cake a slightly different flavor, but all will work well with the cocoa and cookies.

3. Can I make this cake gluten-free?

Yes, it’s easy to make this cake gluten-free by using gluten-free cookies in place of regular cookies. There are plenty of gluten-free cookie options available in stores, or you can even make your own. Just be sure to check the ingredients of any other items (like the cocoa powder and sugar) to ensure they’re gluten-free.

4. How can I make this cake more decadent?

If you want to make this walnut delight cake even more indulgent, consider adding a layer of whipped cream or chocolate ganache on top. A drizzle of caramel or a sprinkle of chocolate shavings can also enhance the flavor and presentation.

5. How long will this cake keep in the fridge?

The walnut delight cake will keep well in the fridge for about 3-4 days. It’s best stored in an airtight container to prevent it from drying out. If you need to store it for longer, you can also freeze the cake for up to 1 month. Just make sure to wrap it tightly before freezing.

Tips for Perfecting the Walnut Delight Cake

  • Use high-quality cocoa powder: The richness of cocoa powder is key to the flavor of the cake. Invest in a good quality cocoa powder for the best results.
  • Don’t skip the chilling time: While this cake is quick to make, allowing it to chill for at least 30 minutes helps the layers set properly. This also improves the flavor, as the ingredients have time to meld together.
  • Customize your cake: Experiment with different flavor combinations! Add a bit of cinnamon for a warm, spiced flavor or even a splash of coffee to enhance the chocolate notes.

Conclusion: A Simple Cake with a Big Impact

The walnut delight cake may be quick and simple, but it delivers big on flavor. It’s a dessert that brings comfort, joy, and warmth, making it the perfect treat for any occasion. Whether you’re preparing it for a gathering or just to indulge in something sweet, this cake will quickly become a favorite in your recipe collection. It’s more than just a cake — it’s a reminder of the special moments shared with those we love. So go ahead, make this walnut delight cake, and let it become a part of your own family traditions.

Amal

The Ultimate Walnut Delight Cake: A Simple Indulgence for the Soul

This rich, indulgent walnut delight cake is the perfect dessert for any occasion. With a crisp, cookie-based layer topped with a creamy, cocoa-infused mixture and garnished with walnuts, it’s a simple yet decadent treat. Easy to make and full of flavor, this dessert will have your guests coming back for seconds!
Prep Time 10 minutes
Cook Time 30 minutes
Total Time 40 minutes
Servings: 8 -10 servings
Course: Dessert
Cuisine: American Comfort Food

Ingredients
  

For the Base:
  • 120 g walnuts cut into small pieces
  • 400 g cookies crushed
  • 120 g sugar
  • 2 g vanilla sugar
  • 60 g cocoa powder
  • 250 ml milk
  • 150 g butter
For the Top Layer:
  • 50 g walnuts for garnish
  • 30 g powdered sugar

Method
 

  1. Prepare the Base: Start by crushing the cookies into fine crumbs. You can use a food processor or place them in a plastic bag and crush them with a rolling pin. Set the crumbs aside.
  2. Make the Base Mixture: In a medium saucepan, melt the butter over low heat. Stir in the milk, sugar, and vanilla sugar. Gradually add the cocoa powder while stirring until fully combined and smooth.
  3. Combine the Base Ingredients: Remove the saucepan from heat and stir in the crushed cookies and chopped walnuts. Mix until everything is well combined into a thick, sticky mixture.
  4. Form the Base Layer: Press the cookie-walnut mixture into the bottom of a greased or lined cake pan. Use a spoon to press it down evenly to create a firm, solid base. Chill the mixture in the refrigerator for about 10–15 minutes to allow it to set.
  5. Prepare the Top Layer: After the base has set, sprinkle the powdered sugar over the top and garnish with the remaining chopped walnuts.
  6. Chill and Serve: Allow the cake to chill for at least 30 minutes in the fridge to firm up and allow the flavors to meld together. Slice and serve!

Notes

  • This cake can be prepared ahead of time, making it a great dessert for gatherings or holiday parties.
  • Feel free to experiment with different nuts, such as almonds or hazelnuts, to customize the flavor.
  • You can also add a bit of cinnamon or espresso powder to the cocoa mixture for a flavor twist.

A Dish for All Seasons: Broccoli and Cheese Delight

There’s something inherently comforting about a dish that combines fresh vegetables with rich, creamy sauce and melted cheese. For many of us, food is not just sustenance but a way to connect with memories, traditions, and moments that fill our hearts with warmth. This Broccoli and Cheese Delight evokes just that—a sense of contentment and nostalgia. I first made this dish one chilly evening when I was craving something hearty, yet light. I had a fridge full of fresh vegetables and a lingering yearning for the perfect balance of savory flavors. As I chopped the broccoli, onions, and bell peppers, I remembered how my grandmother used to make a similar dish when we were children, always gathering around the table to share meals that spoke of love and care.

The creamy sauce bubbling on the stove brought me back to those days of simple, soulful food that nourished more than just the body. With each bite of this dish, I could taste the generations before me—who had spent hours in kitchens, crafting dishes like this to feed their families. Whether it’s a family dinner, a potluck, or a quiet meal for yourself, this Broccoli and Cheese Delight will remind you of those moments of connection that go beyond the food itself.

The Appeal of Broccoli and Cheese

There’s a reason why the combination of broccoli and cheese is a timeless pairing in the culinary world. This dish is a beautiful way to enjoy the nutritional benefits of broccoli without compromising on flavor. Broccoli, rich in vitamins, minerals, and fiber, is one of the most healthful vegetables you can eat. When combined with a creamy sauce and melted cheese, it takes on a whole new dimension, making the vegetable both appealing to children and adults alike.

The texture of broccoli in this dish is perfectly tender, yet still retains enough bite to provide a satisfying contrast against the creaminess of the sauce. The vibrant red and yellow bell peppers add color, sweetness, and crunch to the dish, balancing out the rich flavors. Paired with a rich cheese and egg sauce, the result is a comforting dish that feels indulgent but is surprisingly simple to make.

Ingredients

IngredientQuantity
Broccoli (cut into small florets)1 medium-sized head
Onion (chopped)1 medium
Olive oil for fryingAs needed
Red bell pepper (diced)1 medium
Yellow bell pepper (diced)1 medium
Tomatoes (diced)2 medium
Eggs3 large
Milk2 cups (400 ml)
Flour130 g (4.58 oz)
Cheese (grated, e.g., cheddar)100 g (3.52 oz)
Dried garlic1 tsp
Salt and black pepperTo taste

For the Sauce:

IngredientQuantity
Olive oil2 tbsp
Garlic (minced)2 cloves
Heavy cream½ cup (120 ml)
Lemon juice1 tbsp
Fresh parsley (chopped)2 tbsp
Salt and pepperTo taste

Directions:

  1. Prep the Veggies:
    Start by prepping your vegetables. Cut the broccoli into small florets and dice the red and yellow bell peppers. Chop the onion and tomatoes. Set everything aside.
  2. Cook the Veggies:
    In a large skillet, heat olive oil over medium heat. Add the chopped onion, bell peppers, and tomatoes. Sauté until the veggies soften, about 5–7 minutes.
  3. Prepare the Cauliflower Mix:
    In a large bowl, whisk the eggs and milk together. Stir in the flour, garlic, and grated cheese. Season with salt and black pepper to taste. Fold in the sautéed vegetables, including the broccoli florets.
  4. Fry the Veggie Mixture:
    In the same skillet, add a little more olive oil if needed, and pour in the cauliflower mixture. Cook over medium heat for about 10–15 minutes, or until the edges turn golden and the center is set. You can cover the skillet with a lid to ensure even cooking.
  5. Make the Sauce:
    While the cauliflower cooks, make the sauce. In a small saucepan, heat olive oil over medium heat. Add the minced garlic and cook for 1 minute. Pour in the heavy cream, stirring occasionally. Add lemon juice and season with salt and pepper. Let the sauce simmer for a couple of minutes until thickened.
  6. Finish the Dish:
    Once the cauliflower is cooked through, remove from the skillet and plate it. Drizzle the creamy garlic sauce on top and garnish with fresh chopped parsley for a touch of color and flavor.

Nutritional Breakdown

NutrientAmount (per serving)
Calories320 kcal
Protein12 g
Carbohydrates25 g
Fiber4 g
Fat22 g
Saturated Fat8 g
Sodium450 mg
Cholesterol120 mg
Vitamin C90% of Daily Value
Calcium15% of Daily Value

Why This Recipe Works

This dish works because it is incredibly versatile. You can serve it as a standalone meal or as a side to complement any protein. It’s perfect for vegetarian meals, providing a substantial, filling dish without the need for meat. The beauty of this recipe is in its flexibility. You can swap in different types of cheese based on what you have in your fridge—cheddar, mozzarella, or even a sharp blue cheese can give the dish a completely different flavor profile. The creamy sauce can be adjusted based on dietary needs too. For those seeking a dairy-free or vegan alternative, swapping milk for plant-based milk and cheese for a dairy-free version still results in a satisfying dish.

The ease of preparation makes it an ideal choice for busy weeknights, but its comforting, rich flavors also make it worthy of special occasions. Plus, with ingredients like broccoli, tomatoes, and bell peppers, it’s packed with nutrients, making it a wholesome choice for those trying to eat more vegetables in their diet.

Frequently Asked Questions (FAQs)

Q: Can I use frozen broccoli for this recipe?
A: Yes, frozen broccoli can be used in place of fresh. However, make sure to thaw and drain any excess water from the frozen broccoli before adding it to the skillet. Fresh broccoli tends to retain a bit more texture, but frozen broccoli works just as well for this dish.

Q: What kind of cheese works best in this recipe?
A: This recipe is extremely flexible when it comes to cheese. Cheddar is a classic choice, but mozzarella can also add a stretchy, melty texture. For a stronger flavor, blue cheese or goat cheese can be used. It’s all about personal preference, so feel free to experiment!

Q: Can I make this dish ahead of time?
A: Absolutely! You can make this dish in advance and store it in the fridge. Simply assemble everything and refrigerate it before baking. When you’re ready to eat, reheat it in the oven or microwave. The flavors will have had time to meld together, making it even more delicious.

Q: How do I make this dish dairy-free?
A: To make this dish dairy-free, swap out the cheese for a dairy-free cheese alternative and use plant-based milk (like almond, soy, or oat milk). You can also skip the cream altogether or use coconut cream for a rich, dairy-free substitute.

Q: Can I add meat to this dish?
A: Yes, you can add meat to this dish to make it more filling. Ground turkey, chicken, or sausage can all be added. Simply brown the meat first, then incorporate it with the vegetables before adding the egg and cheese mixture

Nutritional Benefits of Broccoli

Broccoli is widely recognized for its health benefits. Packed with vitamin C, vitamin K, and fiber, it provides several important nutrients that promote overall health. It is rich in antioxidants, which help protect cells from damage, and it contains compounds that have been linked to improved heart health and cancer prevention. Additionally, broccoli is low in calories, making it a great addition to any healthy diet.

The Perfect Dish for Any Occasion

One of the best things about this dish is how adaptable it is. It can be served as a hearty vegetarian main course, a delicious side to a roast, or even a great addition to a brunch spread. Whether it’s for a busy weeknight dinner, a lazy weekend meal, or a festive holiday gathering, this Broccoli and Cheese Delight is sure to please.

Conclusion: A Recipe to Remember

Cooking is often about more than just following a set of instructions. It’s about creating an experience, building memories, and enjoying the flavors that come from love and care in the kitchen. This Broccoli and Cheese Delight is a recipe that brings people together, whether you’re sharing it with family at the dinner table or serving it at a gathering with friends. It’s a dish that’s both comforting and nourishing, and one that will leave everyone feeling satisfied and content. So next time you find yourself with a head of broccoli and a craving for something warm and creamy, reach for this recipe and create a little magic in the kitchen.

Whether you’re a novice cook or a seasoned chef, this recipe will be one you come back to time and time again. The combination of fresh vegetables, creamy sauce, and melted cheese is a timeless combination that will always have a place in your kitchen. So grab your apron, get cooking, and enjoy the delicious flavors of this Broccoli and Cheese Delight!

Amal

A Dish for All Seasons: Broccoli and Cheese Delight

A savory, cheesy skillet dish loaded with vibrant vegetables and creamy goodness, this cauliflower recipe is the ultimate comfort food with a healthy twist. Perfect for a quick dinner or meal prep, it’s packed with flavor and texture.
Prep Time 15 minutes
Cook Time 20 minutes
Total Time 35 minutes
Servings: 4 –6 servings
Course: Main Dish
Cuisine: American Comfort Food

Ingredients
  

  • 1 broccoli cut into small florets
  • 1 onion chopped
  • Olive oil for frying
  • 1 red bell pepper diced
  • 1 yellow bell pepper diced
  • 2 tomatoes diced
  • 3 eggs
  • 2 cups 400 ml milk
  • 130 g 4.58 oz flour
  • 100 g 3.52 oz cheese, grated (cheddar or mozzarella)
  • 1 tsp dried garlic
  • Salt and black pepper to taste
For the Sauce:
  • 2 tbsp olive oil
  • 2 cloves garlic minced
  • ½ cup 120 ml heavy cream
  • 1 tbsp lemon juice
  • 2 tbsp fresh parsley chopped
  • Salt and pepper to taste

Method
 

  1. Prepare the Veggies: Begin by cutting the broccoli into small florets. Dice the red and yellow bell peppers, chop the onion, and dice the tomatoes.
  2. Cook the Veggies: Heat olive oil in a large skillet over medium heat. Add the onion, bell peppers, and tomatoes. Sauté for about 5-7 minutes until softened.
  3. Make the Cauliflower Batter: In a large bowl, whisk together the eggs and milk. Stir in the flour, garlic, and grated cheese. Season with salt and pepper. Add the sautéed vegetables and fold them into the batter.
  4. Cook the Cauliflower Skillet: In the same skillet, add a bit more olive oil, if necessary, and pour the cauliflower mixture into the pan. Cook over medium heat for 10-15 minutes, until the edges are golden and the center is set. Cover the skillet with a lid to ensure even cooking.
  5. Make the Creamy Sauce: In a small saucepan, heat the olive oil over medium heat. Add the minced garlic and cook for 1 minute. Pour in the heavy cream, stirring occasionally. Add lemon juice, salt, and pepper, and let it simmer until thickened.
  6. Finish the Dish: Once the cauliflower skillet is ready, plate it. Drizzle the creamy garlic sauce over the top and garnish with chopped parsley.

Notes

  • This dish can be customized by adding other vegetables like spinach, zucchini, or mushrooms.
  • For a spicier twist, you can add a pinch of chili flakes to the sauce.
  • If you’re not a fan of heavy cream, you can substitute it with a lighter version or even coconut milk for a dairy-free alternative.

The Heartwarming Story Behind the Apricot Cake

Growing up, I spent countless afternoons in my grandmother’s kitchen, the smell of fresh-baked cakes and sweet fruit filling the air. One of my fondest memories is the apricot cake she would make during the summer months, when the trees in her garden were heavy with ripe, golden fruit. There was something about the way the tangy apricots blended with the soft, pillowy cake that made every bite feel like a little piece of home.

Every time we gathered around the table to enjoy her creations, the room would fill with laughter, stories, and a sense of togetherness. The apricot cake became more than just a dessert—it was a symbol of comfort, family, and the magic that happens when ingredients come together to create something truly special. Today, I’m passing on this cherished recipe, hoping to create new memories in my own kitchen with friends and family, just as my grandmother did with me.

What Makes This Apricot Cake So Special?

The beauty of this apricot cake lies in its perfect balance of textures and flavors. It’s not just a cake; it’s an experience. The light, airy layers of the cake pair perfectly with the smooth and creamy pudding center, creating a dessert that’s both indulgent and refreshing. The pudding is rich and velvety, providing a delightful contrast to the softness of the cake. The addition of apricots, whether fresh or canned, adds a lovely hint of sweetness and a touch of tartness that enhances every bite.

This cake is ideal for any occasion, whether you’re hosting a gathering, celebrating a special event, or simply treating yourself to something delightful. It’s a dessert that is sure to impress and become a staple in your recipe collection.

Ingredients:

For the Pudding Cream

IngredientAmount
Egg (separated)1
Egg yolk1
Milk (divided)350 ml (1 1/2 cups)
Cornstarch2 heaped tablespoons
Vanilla extract1 teaspoon
Sugar50 g (1/4 cup)

For the Cake

IngredientAmount
Eggs3
Egg white (reserved)1
SaltA pinch
Sugar130 g (2/3 cup)

Directions:

  1. Prepare the Pudding Cream:
    • In a bowl, whisk the egg yolk, cornstarch, and sugar together until smooth.
    • In a saucepan, bring 250 ml (1 cup) of milk to a simmer. Gradually whisk in the egg mixture, continuing to stir until it thickens, about 2-3 minutes.
    • Remove from heat and stir in the remaining 100 ml of milk and vanilla extract. Set aside to cool.
  2. Make the Cake:
    • Preheat your oven to 180°C (350°F) and grease a cake pan or line it with parchment paper.
    • In a bowl, whisk together 3 eggs, the reserved egg white, a pinch of salt, and the sugar until the mixture is frothy and light.
    • Pour the cake batter into the prepared pan, smoothing the top.
    • Bake for 15-18 minutes, or until a toothpick inserted comes out clean. Let the cake cool slightly once it’s done.
  3. Assemble the Cake:
    • Once the cake has cooled a bit, carefully slice it in half horizontally.
    • Spread the pudding cream evenly over the bottom layer.
    • Place the top layer back on and refrigerate the assembled cake for 1-2 hours before serving.

Nutritional Information (per serving):

NutrientAmount
Calories180
Carbohydrates25 g
Protein5 g
Fat7 g
Fiber1 g

Why You Should Try This Recipe

A Perfect Balance of Flavors and Textures

One of the standout features of this apricot cake is the fusion of cake and pudding. While the fluffy cake provides a light and airy base, the creamy pudding filling adds a smooth, indulgent richness. Together, they create a harmony of textures that’s incredibly satisfying. Each bite offers something unique—soft, moist cake paired with a rich, custard-like filling that melts in your mouth.

Versatility and Customization

While this recipe features apricots, the beauty of this cake is its versatility. You can easily swap out apricots for other fruits, such as peaches, berries, or even pears, depending on what’s in season or what you have on hand. The pudding cream is also incredibly customizable. If you prefer a more decadent option, you could add a bit of chocolate or caramel to the cream, or even infuse it with spices like cinnamon or nutmeg for an autumn-inspired twist. The possibilities are endless, allowing you to make this cake your own.

Easy to Prepare Yet Impressive to Serve

One of the most appealing aspects of this apricot cake is how easy it is to make. While it may look and taste like a dessert that took hours to prepare, it comes together fairly quickly. The steps are simple, and the ingredients are easy to find, making it a great choice for both novice and experienced bakers. Despite its simplicity, the cake has an elegant appearance and rich flavors that are sure to impress your guests.

Frequently Asked Questions (FAQs)

Can I Use Fresh Apricots Instead of Canned?

Yes, absolutely! Fresh apricots are a great alternative to canned apricots. Simply peel and slice them into thin pieces before layering them onto the cake. If you choose to use fresh apricots, be sure they are ripe for the best flavor. If they’re too tart, you might want to sprinkle a little sugar over them before baking to balance out the flavor.

How Do I Store Leftover Cake?

This apricot cake should be stored in an airtight container in the refrigerator to keep it fresh. The pudding filling will need to be refrigerated to maintain its texture, and the cake will last for about 3-4 days. If you want to store the cake for longer, you can freeze it. Wrap the cake tightly in plastic wrap and foil before placing it in the freezer. It should keep for up to 3 months. To thaw, simply let it sit at room temperature for a few hours.

Can I Make This Cake Ahead of Time?

Yes, this cake can be made ahead of time. In fact, it’s often even better the next day after the flavors have had time to meld together. You can prepare the cake and pudding cream a day in advance, store them separately in the refrigerator, and then assemble the cake when you’re ready to serve. This makes it an excellent choice for entertaining since much of the work can be done in advance.

Can I Make This Cake Gluten-Free?

Yes, you can make this cake gluten-free by substituting the all-purpose flour with a gluten-free flour blend. Keep in mind that the texture may differ slightly from the original recipe, but the flavor will still be delicious. If you’re using a gluten-free flour blend, ensure that it’s one designed for baking, as this will provide the best results.

How Can I Make the Cake Lighter?

If you prefer a lighter cake, you can substitute some of the sugar with a natural sweetener like honey or maple syrup. Additionally, you can reduce the amount of sugar in the pudding cream for a less sweet result. If you’re looking for a lower-calorie option, you can also use a lighter milk alternative, such as almond milk, and reduce the amount of butter or oil in the cake.

How to Personalize Your Apricot Cake

While this cake is already a showstopper, there are a few simple ways to make it even more personalized and reflective of your own tastes.

Fruit Variations

The apricot is the star of this recipe, but it’s versatile enough to allow for substitutions. You can experiment with other fruits like peaches, plums, or berries. If you’re using a different fruit, consider the sweetness of the fruit you choose, as this may affect the amount of sugar needed in the recipe.

Flavor Enhancements

Want to elevate the flavor profile? Consider adding a splash of liqueur such as amaretto or brandy to the pudding cream for an adult twist. You could also infuse the cream with vanilla bean or citrus zest for an added layer of flavor. For an indulgent touch, add a dollop of whipped cream or a drizzle of caramel sauce when serving.

Frosting and Garnishes

If you want to add a decorative touch, try topping the cake with a dusting of powdered sugar or finely chopped nuts like almonds or pistachios. You can also use fresh apricot slices to garnish the top of the cake before serving, enhancing its visual appeal and adding a fresh, fruity element.

Conclusion: A Cake That Brings People Together

This apricot cake is more than just a dessert—it’s an invitation to create memories. Whether you’re baking it for a holiday, a celebration, or a simple weekend gathering, this cake has the power to bring people together over shared moments and delicious food. Just like my grandmother’s kitchen was a place for laughter and connection, I hope this recipe finds its way into your home and becomes a part of your family’s traditions.

Its light, airy texture, creamy filling, and fresh fruit topping make it a perfect choice for any occasion. It’s a cake that can be personalized to your tastes and shared with the people you love, making it a timeless addition to your recipe collection.

Amal

The Heartwarming Story Behind the Apricot Cake

This Apricot Cake is the perfect blend of airy, soft cake layers and a smooth, creamy pudding filling. The combination of sweet apricots and rich pudding makes it an irresistible treat for any occasion.
Prep Time 20 minutes
Cook Time 30 minutes
Total Time 50 minutes
Servings: 8 -10 servings
Course: Dessert
Cuisine: European-inspired

Ingredients
  

For the Pudding Cream:
  • 1 egg separated
  • 1 egg yolk
  • 350 ml 1 1/2 cups milk (divided)
  • 2 heaped tablespoons cornstarch
  • 1 teaspoon vanilla extract
  • 50 g 1/4 cup sugar
For the Cake:
  • 3 eggs
  • 1 egg white reserved from the pudding cream
  • A pinch of salt
  • 130 g 2/3 cup sugar

Method
 

  1. Prepare the Pudding Cream: In a saucepan, whisk together the egg yolk, cornstarch, sugar, and vanilla extract. Gradually add 150 ml of milk while whisking continuously to create a smooth mixture. Heat the mixture over medium heat, stirring constantly until it begins to thicken. Once thickened, remove from heat and set aside to cool. In a separate bowl, whisk the egg white until stiff peaks form. Gently fold the whipped egg white into the cooled pudding mixture, ensuring it’s evenly incorporated. Set aside.
  2. Prepare the Cake: Preheat the oven to 180°C (350°F). Grease and flour a cake pan. In a mixing bowl, beat the 3 eggs with sugar and a pinch of salt until the mixture becomes light and fluffy. Gently fold in the pudding cream mixture. Mix well until smooth. Pour the batter into the prepared cake pan and bake for 25-30 minutes or until a toothpick inserted comes out clean. Once baked, let the cake cool completely before frosting or serving.
  3. Assemble and Serve: Once the cake has cooled, cut it into slices or serve as a whole. Top with fresh apricot slices or apricot jam for extra flavor.

Notes

  • If you prefer a stronger apricot flavor, you can add apricot jam or fresh apricot slices into the batter before baking.
  • Make sure to allow the cake to cool completely before slicing to ensure it holds its shape and the pudding filling stays intact.
  • For an extra touch of elegance, dust the cake with powdered sugar or garnish with a few fresh mint leaves before serving.

Banana, Cocoa & Oat: A Slice of Comfort in Every Bite

There are recipes that whisper comfort the moment you begin preparing them. For me, this banana, cocoa, and oat dessert wasn’t just another healthy treat—it was born in a quiet morning moment that I’ll never forget.

It started with a leftover banana, too ripe for cereal but too precious to waste. The kettle had just whistled, and as I poured hot milk into my mug, I reached for my jar of oats. That was the moment. I remembered the way my grandmother used to mash bananas into her oatmeal and sprinkle cocoa on top when we were kids. It felt indulgent, even magical back then. And suddenly, I wasn’t just making breakfast—I was about to revive a memory in the form of a bake.

With nothing but intuition and warmth guiding my hands, I mixed those familiar ingredients together, added a pinch of vanillin, some baking powder, and a handful of walnuts from the pantry. A few minutes later, a rich chocolate aroma filled the kitchen—one that took me straight back to my childhood. The result? A cake that wasn’t too sweet, perfectly moist, and bursting with flavor and nostalgia.

Now, this banana-oat chocolate bake has become a tradition in my kitchen. It’s the dessert I bake when I want to give my family something hearty, healthy, and deeply satisfying. It’s also my answer when someone asks, “What can I make with ripe bananas that isn’t banana bread?”

The Magic Behind the Mix

This dessert isn’t your standard banana bread, nor is it a classic chocolate cake. It’s something in between—soft, fudgy, gently sweet, and made with ingredients that nourish without compromising on taste.

Oats: The Backbone of Texture

Oats give the structure and heartiness to this bake. When soaked in hot milk, they swell and soften, providing a tender texture that mimics flour while packing in fiber and nutrients. You can use quick oats or rolled oats, depending on the texture you prefer—rolled oats give a bit more bite, while quick oats make it more tender.

Bananas: Nature’s Sweetener

Ripe bananas add more than just sweetness. They bring moisture, richness, and a creamy consistency. Their natural sugars replace the need for added sweeteners in many cases, making this dessert a healthier option that still satisfies sweet cravings.

Cocoa Powder: The Deep Flavor Layer

Bitter cocoa balances the natural sugars of the banana. It brings a rich, chocolaty depth to the dish without overwhelming it. You can use Dutch-processed cocoa for a smoother flavor or natural cocoa powder if you want a bolder kick.

Eggs, Baking Powder, and Vanillin: The Binders and Lifters

Eggs bind everything together, ensuring the final bake is tender yet stable. Baking powder adds lift, and a pinch of vanillin (or pure vanilla extract) brightens the whole flavor profile.

Optional, but Worth It: Walnuts and Chocolate Chips

These add texture and decadence. Walnuts bring crunch and healthy fats; chocolate chips melt into gooey surprises with every bite.

INGREDIENTS

IngredientQuantity
Oat flakes120 g (3/4 cup + 1 tbsp)
Hot milk200 ml (5/6 cup)
Eggs2
Bananas (ripe, mashed)2
VanillinA pinch
Bitter cocoa powder40 g (1/2 cup)
Baking powder1 teaspoon
Walnuts (chopped)To taste
Chocolate chipsTo taste

DIRECTIONS

  1. Preheat your oven to 180°C (350°F). Grease or line a small baking pan.
  2. In a bowl, pour hot milk over oat flakes and let them soak for 10 minutes until softened.
  3. Add mashed bananas, eggs, and a pinch of vanillin to the oat mixture. Stir to combine.
  4. Mix in cocoa powder and baking powder until smooth and evenly incorporated.
  5. Fold in chopped walnuts and chocolate chips to taste.
  6. Pour the mixture into the prepared baking pan and level the surface.
  7. Bake for 25–30 minutes or until a toothpick inserted comes out with moist crumbs.
  8. Let it cool slightly before slicing. Serve warm or chilled for a fudgier texture.

NUTRITION INFORMATION (Per Serving – Based on 8 Slices)

NutrientAmount
Calories~210 kcal
Protein6 g
Carbohydrates24 g
Sugars10 g
Fiber4 g
Fat10 g
Saturated Fat2.5 g
Sodium70 mg
Potassium~300 mg
Iron8% DV

Why This Recipe Works for Every Occasion

Whether you’re catering to kids, guests, or simply yourself, this chocolate-banana oat dessert adapts beautifully.

As a Breakfast

Yes, it’s technically a dessert—but its healthy profile makes it perfect for breakfast too. Pair it with a cup of black coffee or a matcha latte and you’re starting your day with fuel and flavor.

As a Snack

Cut it into bars and pack them in lunchboxes or tote bags. It doesn’t crumble easily, making it ideal for on-the-go snacking.

As a Dessert

Serve it warm with a dollop of Greek yogurt or a spoonful of whipped coconut cream. Sprinkle with powdered cinnamon for added warmth.

Healthier Sweet Tooth Satisfaction

This bake feels indulgent but stays grounded in whole food ingredients:

  • No refined sugar needed (thanks to bananas)
  • Whole grains from oats
  • Healthy fats from walnuts and eggs
  • Antioxidants from cocoa
  • No processed flour, keeping it light and gluten-friendly (if using certified GF oats)

It’s ideal for those who want to treat themselves without the sugar crash or post-dessert guilt.

Common Questions About the Recipe (FAQs)

1. Can I make this recipe vegan?

Absolutely. Replace the eggs with flax eggs (1 tbsp flaxseed meal + 2.5 tbsp water per egg, let sit 5 min) and use plant-based milk like almond, oat, or soy. The result will be slightly more moist but still delicious.

2. Can I use steel-cut oats?

Steel-cut oats are not recommended for this recipe as they do not soften enough in the soak. Stick to rolled or quick oats.

3. How ripe should the bananas be?

The riper, the better. Bananas with brown speckles or fully browned skin have higher sugar content and mash more easily, which improves both taste and texture.

4. Is it freezer-friendly?

Yes. Slice and freeze in an airtight container for up to 3 months. Defrost overnight in the fridge or reheat in the oven or microwave for a warm, gooey treat.

5. Can I make it in muffin form?

Definitely. Divide the batter into muffin tins and bake for 15–20 minutes or until a toothpick comes out clean.

6. How long does it last?

Stored in the fridge, it stays fresh for 4–5 days. You can also store it at room temperature for 2 days in an airtight container.

7. Can I skip the cocoa or add other flavors?

You can omit cocoa for a banana-oat version, or add cinnamon, nutmeg, or cardamom for a spiced twist. A handful of raisins or dried cranberries also works beautifully.

Tips for Success

  • Let it rest: After baking, allow it to sit for at least 10 minutes. This helps it firm up and intensifies the flavors.
  • Use parchment paper: It helps prevent sticking and makes cleanup easier.
  • Don’t overmix: Stir just enough to combine. Overmixing can lead to a denser texture.

A Slice of Home in Every Bite

What started as a spontaneous breakfast experiment became one of the most-loved recipes in my home. There’s something deeply satisfying about baking something so simple, so honest, and having it come out not just tasty, but memorable. Each slice carries the warmth of banana, the richness of cocoa, and the nourishment of oats—wrapped up in love and shared freely.

Food doesn’t need to be extravagant to be special. It just needs to be made with purpose and enjoyed with gratitude.

In Conclusion: A Dessert That Speaks of Comfort and Nourishment

This chocolate-banana oat dessert is more than a recipe—it’s a reminder. A reminder that the best flavors often come from humble ingredients, and that baking can be both healing and nourishing. It celebrates the everyday—what’s in the fruit bowl, what’s in the pantry—and transforms it into something that feels like a hug on a plate.

Whether you bake it for your family, a friend, or just for yourself, may it bring the same joy to your table as it has to mine.

Amal

Banana, Cocoa & Oat: A Slice of Comfort in Every Bite

A wholesome, fudgy chocolate dessert made with ripe bananas, oats, and cocoa—naturally sweet, nutrient-rich, and perfect for guilt-free indulgence. Moist, rich, and just the right amount of sweet, this bake is a crowd-pleaser at any time of day.
Prep Time 10 minutes
Cook Time 30 minutes
Total Time 40 minutes
Servings: 8 slices
Course: Dessert
Cuisine: Fusion

Ingredients
  

  • 120 g oat flakes approximately 3/4 cup + 1 tbsp
  • 200 ml hot milk
  • 2 ripe bananas mashed
  • 2 eggs
  • A pinch of vanillin or vanilla extract
  • 40 g unsweetened cocoa powder about 1/2 cup
  • 1 teaspoon baking powder
  • Chopped walnuts optional, to taste
  • Chocolate chips optional, to taste

Method
 

  1. Preheat the oven to 180°C (350°F). Grease or line a small baking pan.
  2. In a mixing bowl, pour the hot milk over the oat flakes and let them soak for 10 minutes.
  3. Add the mashed bananas, eggs, and vanillin to the soaked oats. Stir until well combined.
  4. Mix in cocoa powder and baking powder until the batter is smooth.
  5. Fold in chopped walnuts and chocolate chips if using.
  6. Pour the mixture into the prepared baking pan and smooth the top.
  7. Bake for 25–30 minutes, or until a toothpick inserted comes out with moist crumbs.
  8. Let cool slightly before slicing and serving.

Notes

  • This recipe is naturally sweetened by ripe bananas; no extra sugar needed unless desired.
  • For a more intense chocolate flavor, increase cocoa powder slightly or add dark chocolate chips.
  • For added protein, you can replace one egg with 2 tablespoons of Greek yogurt.
  • Keeps well in the fridge for up to 3 days and tastes even fudgier when chilled.

Cool & Crunchy: A Cucumber Snack That’s Always in Season

Some of the best recipes don’t come from a cookbook. They come from memories, trial and error, and a need to make something special out of what we already have. That’s exactly how this cucumber snack came to life in my kitchen—unexpectedly, during a summer afternoon when the sun was high, the fridge was nearly empty, and hunger was knocking.

I remember standing barefoot on the kitchen tiles, a slight breeze coming through the window. I had cucumbers from the garden—still cool from the soil—half a lemon, a small bunch of fresh dill, and garlic waiting patiently in the pantry. With a dash of olive oil and a sprinkle of salt, something magic happened. That first bite was crunchy, refreshing, and unexpectedly addictive. My family devoured the entire bowl before the iced tea had even been poured.

Since that day, this quick cucumber snack has become a permanent resident in my recipe box. It’s served on lazy weekends, at BBQs, as a fresh side to rich meals, or simply when I need something satisfying but light. It reminds me that great food doesn’t need fanfare—just a little balance, freshness, and intention.

The Humble Power of Cucumbers

Cucumbers are often seen as a sidekick ingredient—tucked into salads, sliced for sandwiches, or floating in spa water. But this recipe places them center stage, where they belong. Their naturally high water content, gentle crunch, and subtle flavor make cucumbers ideal for soaking up vibrant dressings and aromatic herbs.

This snack highlights the cucumber’s clean flavor and complements it with a touch of acidity, a hint of sweetness, a burst of garlic, and the bright, unmistakable flavor of fresh dill. It’s a recipe that brings balance: tangy yet mellow, crunchy yet juicy, familiar yet new.

Beyond flavor, cucumbers are a nutritional powerhouse. Low in calories, high in hydration, and packed with antioxidants and vitamins like C and K, they are the perfect guilt-free snack.

Ingredients

IngredientQuantity
Cucumbers400 g
Salt1/2 teaspoon
Fresh dill (chopped)1 bunch
Garlic (minced)3 cloves
Lemon juice2 tablespoons
Sugar1/2 teaspoon
Olive oil1 tablespoon
Salt and pepperTo taste

Directions

  1. Wash the cucumbers thoroughly. Slice them thinly or into sticks, depending on your preference.
  2. Place the cucumbers in a bowl and toss with the 1/2 teaspoon of salt. Let them sit for 10 minutes to release excess moisture.
  3. Drain any liquid, then add the chopped dill, minced garlic, lemon juice, sugar, olive oil, and additional salt and pepper to taste.
  4. Mix everything thoroughly, ensuring the cucumbers are evenly coated.
  5. Chill in the fridge for at least 15 minutes before serving.

Nutritional Information (Per serving, based on 4 servings)

NutrientAmount
Calories60 kcal
Protein1 g
Carbohydrates4 g
Fiber1 g
Sugars1.5 g
Fat4.5 g
Saturated Fat0.6 g
Sodium250 mg
Vitamin C10% DV
Vitamin K25% DV

Why This Snack Works Anytime, Anywhere

This cucumber snack isn’t tied to seasons or trends. It’s timeless. And more importantly, it’s flexible.

  • Hot summer day? This dish cools you down.
  • Hearty dinner menu? It balances heavy mains with something light.
  • Hosting a brunch? Serve it in little cups as a refreshing side.
  • Busy weekday? Prep it ahead and keep it chilled for a grab-and-go moment of freshness.

The prep is so minimal that you can whip it together in under 10 minutes, and the ingredients are pantry and fridge staples. No complicated steps. No fancy tools. Just a bowl, a spoon, and your hands.

Flavor Notes and Customizations

While the classic combination of lemon, garlic, dill, and olive oil is a surefire hit, the recipe is endlessly adaptable:

  • Love spice? Add chili flakes or a splash of hot sauce.
  • Craving richness? Stir in a spoonful of Greek yogurt or sour cream to make a creamy cucumber salad.
  • Want more crunch? Toss in thinly sliced radishes or red onions.
  • No lemon? Use vinegar—apple cider, rice, or white wine all work beautifully.

The core concept remains the same: cucumbers + acidity + seasoning + herb = a snack that sings.

Pairing Ideas: More Than Just a Snack

Though it shines on its own, this cucumber snack also plays well with others. Here are some great ways to serve it:

  • As a side dish with grilled meats, roasted chicken, or baked fish
  • With sandwiches or wraps as a crisp counterpoint
  • Alongside a mezze platter with olives, hummus, pita, and feta
  • As a cooling topping on spicy rice bowls, tacos, or curries
  • Or simply served in small bowls as a refreshing starter at your next gathering

Its simplicity allows it to complement bold, rich, or spicy foods without overwhelming them.

Health Benefits That Make You Feel Good

This cucumber snack isn’t just tasty—it’s nourishing. Each bite offers a health boost:

  • Hydration: Cucumbers are over 95% water, supporting hydration and skin health.
  • Digestive Support: Garlic can help stimulate digestion and support the gut microbiome.
  • Heart Health: Olive oil offers heart-friendly fats, and lemon juice adds vitamin C.
  • Low in Calories: This snack is ideal for anyone watching their intake or seeking lighter fare.
  • Detoxifying: The combination of cucumber and lemon is a natural detox duo, loved for cleansing effects.

It’s a great choice for wellness-focused eaters, but even the most indulgent food lovers will appreciate its flavor and crunch.

FAQs: All Your Cucumber Snack Questions Answered

Can I make this ahead of time?

Absolutely. It actually tastes better after chilling in the fridge for 15–30 minutes. Just note that cucumbers release water over time, so stir before serving and drain any excess liquid if needed.

What type of cucumbers should I use?

Persian or English cucumbers are ideal because they’re less watery and have tender skins. If using regular cucumbers, peel and deseed them for the best texture.

How long does it keep in the fridge?

For the best taste and crunch, enjoy within 24 hours. After that, it becomes softer, though still flavorful.

Can I use dried dill instead of fresh?

Yes, though fresh dill offers a brighter, more vibrant flavor. Use about 1 teaspoon of dried dill if that’s what you have.

Is this snack suitable for kids?

Definitely! It’s mild, fresh, and crunchy—great for little ones, especially if you reduce the garlic.

Can I add protein to make it more filling?

Yes! Add chickpeas, cooked shrimp, or grilled tofu for a protein-packed version that still keeps the light vibe.

What if I don’t like garlic?

You can leave it out or substitute with shallots, chives, or green onions for a milder flavor.

Culinary Inspiration from the Everyday

Recipes like this cucumber snack are a reminder that great food isn’t about expensive ingredients or complicated techniques—it’s about thoughtful combinations, intuitive flavor, and sharing moments.

It’s the kind of dish that feels more like a gesture than a production. Something you whip up without stress, knowing it will always bring smiles, freshness, and comfort. Whether it accompanies a lavish dinner or stands on its own as a quick bite between errands, it never fails to deliver a satisfying experience.

Conclusion: The Snack That Keeps Giving

There’s a reason this cucumber snack has stood the test of time in my kitchen. It’s the perfect example of what I love most about cooking: taking something ordinary and turning it into something memorable.

It reminds us that snacks don’t have to come from a package, meals don’t have to take hours, and flavor doesn’t have to be complicated. With a cucumber, a bit of dill, and a squeeze of lemon, you have something refreshing, nourishing, and deeply satisfying.

Keep this recipe close—it’s your go-to for heatwaves, unexpected guests, and those little moments when your taste buds crave something real. It might just become the most underrated star of your recipe collection.

Amal

Cool & Crunchy: A Cucumber Snack That’s Always in Season

A crisp, refreshing cucumber snack tossed with lemon, garlic, dill, and a hint of sweetness. This quick and healthy bite is perfect for hot days, party platters, or as a light side that always delivers on flavor.
Prep Time 10 minutes
Total Time 10 minutes
Servings: 2 -3 servings
Course: Snack
Cuisine: Healthy

Ingredients
  

  • 400 g cucumbers
  • 1/2 teaspoon salt
  • 1 bunch of fresh dill chopped
  • 3 cloves of garlic minced
  • 2 tablespoons lemon juice
  • 1/2 teaspoon sugar
  • 1 tablespoon olive oil
  • Salt and pepper to taste

Method
 

  1. Slice cucumbers into thin rounds or sticks.
  2. Toss them in a bowl with 1/2 tsp of salt and let sit for 10 minutes.
  3. Drain any excess water released from the cucumbers.
  4. Add dill, garlic, lemon juice, sugar, and olive oil.
  5. Season with additional salt and pepper to taste.
  6. Mix well and refrigerate for 15–30 minutes before serving for best flavor.

Notes

  • For extra zing, add a splash of apple cider vinegar or a pinch of chili flakes.
  • This snack is best served chilled.
  • You can make it ahead and store it for up to 2 days in the fridge.
  • Works wonderfully as a side for grilled meats, falafel, or rice dishes.

Pumpkin Power Bake: From Humble Ingredients to Hearty Delight

It all started one crisp autumn afternoon, the kind where the kitchen becomes the heart of the home. I was rummaging through the fridge, searching for inspiration, when I stumbled upon a half-used pumpkin, some eggs, and a small stash of ground meat left from the previous night’s dinner. I didn’t have a recipe in mind, just a desire to make something warm, filling, and comforting—a dish that could bring everyone to the table without the need for a grand occasion.

As the scent of roasting pumpkin began to fill the kitchen, something special began to happen. It wasn’t just the transformation of simple ingredients into a nourishing meal—it was the way the aroma pulled my family out from their screens, their distractions, and into the moment. That afternoon, this pumpkin-based creation became a new family favorite. What started as an improvised bake quickly became a signature dish in our home, a recipe now requested at gatherings, weekday dinners, and cozy weekends alike.

This pumpkin and meat bake, simple as it may seem, carries with it a powerful lesson: the best meals are not always the most elaborate. Sometimes, all it takes is a handful of basic ingredients, a baking sheet, and a bit of heart to create something unforgettable.

Why Pumpkin Deserves a Starring Role

Pumpkin is often underrated outside of its seasonal spotlight. We associate it with pies and lattes, but its versatility in savory dishes is where it truly shines. Naturally sweet and packed with nutrients like vitamin A, fiber, and potassium, pumpkin makes an ideal base for baked dishes.

In this recipe, it creates a soft, lightly sweet canvas that balances the savory richness of ground meat and cheese. The eggs bind everything together, forming a sliceable bake with texture and depth. Unlike pasta or pastry-heavy casseroles, this dish is gluten-light, vegetable-rich, and satisfying without being overly heavy.

Ingredients

IngredientQuantity
Eggs4
Cheese150 g
Pumpkin (peeled & grated or chopped)1 and a half pumpkins
Flour50 g
Salt10 g
Black pepper5 g
Oil for frying50 g
Ground meat400 g
Baking sheet size47 cm x 35 cm

Directions:

  1. Prep the Pumpkin Base:
    Grate or finely chop the pumpkin and combine it with flour, salt, pepper, and eggs in a large bowl. Mix thoroughly to form a thick batter.
  2. Cook the Meat:
    In a frying pan, heat oil and brown the ground meat. Season lightly with salt and pepper and set aside.
  3. Assemble the Layers:
    On a greased 47 x 35 cm baking sheet, spread half the pumpkin mixture evenly as the first layer. Distribute the cooked ground meat evenly on top, followed by grated cheese. Cover with the remaining pumpkin mixture.
  4. Bake to Perfection:
    Preheat oven to 180°C (350°F). Bake for 30–35 minutes until golden and firm. Allow it to rest before slicing.

Nutritional Information (per serving, based on 6 servings)

NutrientAmount
Calories370 kcal
Protein22 g
Carbohydrates12 g
Fiber2 g
Fat26 g
Saturated Fat9 g
Cholesterol150 mg
Sodium680 mg

The Unexpected Charm of Simplicity

One of the most charming aspects of this recipe is how little it asks of you—and how much it gives back. It doesn’t demand fancy techniques or expensive ingredients. It’s forgiving and flexible, perfect for beginner cooks or seasoned home chefs looking for something low-maintenance yet crowd-pleasing.

Have extra vegetables? Grate them in. Want more protein? Swap ground beef for turkey or plant-based crumbles. Want to keep it vegetarian? Leave out the meat and add spinach, mushrooms, or chickpeas. The base recipe is strong enough to handle creativity, which makes it ideal for weeknight dinners or clearing out the fridge in a delicious way.

Versatility for Every Occasion

While it was born as a no-fuss dinner, this bake has evolved to suit many needs in our household:

  • Meal Prep Hero: It stores beautifully in the fridge and reheats well, making it perfect for lunches throughout the week.
  • Brunch Showstopper: Sliced into squares and served warm with sour cream or yogurt, it pairs beautifully with salads or soup.
  • Kid-Friendly Favorite: Its soft texture and mild flavors appeal to picky eaters, and you can sneak in extra veggies without detection.
  • Dinner Party Dish: When dressed with herbs, spices, or drizzled with a flavorful sauce, it elevates into an elegant yet rustic offering.

Frequently Asked Questions (FAQs)

1. Can I use canned or frozen pumpkin instead of fresh?
Yes, though fresh pumpkin gives the best texture. If using canned, make sure it’s pure pumpkin (not pumpkin pie filling). Frozen pumpkin should be thawed and drained well to avoid excess moisture.

2. Is this recipe gluten-free?
Not as written due to the small amount of flour. However, you can easily substitute a gluten-free flour blend or oat flour without altering the results too much.

3. What kind of cheese works best?
The recipe is flexible. Hard cheeses like cheddar, mozzarella, or gouda melt beautifully, while sharper cheeses like feta or parmesan add bold flavor. Manchego also pairs wonderfully with pumpkin.

4. Can I prepare it in advance?
Absolutely. You can prepare the entire mixture and refrigerate it (uncooked) for a few hours, or bake it and reheat individual portions later. It keeps well in the fridge for 3–4 days and can be frozen for up to 2 months.

5. Is it suitable for vegetarians?
Yes, simply omit the meat and increase the amount of pumpkin or add sautéed vegetables like mushrooms, peppers, or lentils for added substance.

6. Can I make it dairy-free?
You can replace the cheese with a dairy-free version or leave it out entirely. For creaminess, add a few tablespoons of plant-based yogurt or a dairy-free béchamel layer.

7. How do I know when it’s done?
The top should be golden brown and set, and a knife inserted in the center should come out clean. If the top is browning too quickly, cover loosely with foil and continue baking until the inside is cooked through.

8. Can I add spices or herbs?
Definitely. This bake welcomes flavor! Try paprika, cumin, nutmeg, thyme, or rosemary. Fresh parsley or basil can also add a lovely brightness when served.

Nutrition and Health Benefits

This pumpkin bake isn’t just delicious—it’s good for you too. Pumpkin is low in calories and high in antioxidants, especially beta-carotene, which converts to vitamin A in the body. Combined with protein-rich eggs and meat, it makes a satisfying meal that supports muscle growth, eye health, and immune function.

Compared to traditional casseroles or pies, this version is lower in carbohydrates and can be modified to suit many dietary needs. It’s a great way to enjoy comfort food while still eating mindfully.

Serving Suggestions and Pairings

To make it a complete meal, serve this bake with a light side:

  • A fresh green salad with lemon vinaigrette
  • Steamed green beans or sautéed zucchini
  • Roasted garlic yogurt sauce or sour cream
  • A slice of rustic bread or flatbread on the side

For drinks, try pairing with:

  • A glass of dry white wine or light red (if you’re serving it for dinner)
  • Fresh mint lemonade or unsweetened iced tea

Tips for Success

  • Grate the pumpkin finely for even cooking and smoother texture.
  • Drain excess moisture from grated pumpkin if it’s too watery. A quick squeeze in a towel works well.
  • Let it rest after baking before slicing—this helps the layers settle and makes it easier to portion.

Conclusion: More Than Just a Bake

This simple pumpkin recipe is more than a quick dinner—it’s a story on a plate. It’s about resourcefulness, warmth, and the magic that happens when you bring together humble ingredients with care and creativity. Whether you’re feeding a crowd, trying to sneak vegetables into a kid’s plate, or just craving something wholesome and nourishing, this dish is a reminder that the best meals don’t always come from cookbooks—they come from the heart.

So next time you have a pumpkin in your pantry and no grand plan, remember this recipe. It might just become a family favorite, just like it did in my home.

Amal

Pumpkin Power Bake: From Humble Ingredients to Hearty Delight

A cozy, savory pumpkin bake layered with ground meat and melty cheese—this simple yet hearty dish transforms humble ingredients into a golden, comforting meal that the whole family will love. Perfect for chilly evenings, meal prepping, or when you want something wholesome without a lot of fuss.
Prep Time 15 minutes
Cook Time 35 minutes
Total Time 50 minutes
Servings: 4 –6 servings
Course: Main Dish
Cuisine: Comfort Food

Ingredients
  

  • 4 eggs
  • 150 g cheese grated
  • 1 and a half pumpkins peeled, grated or chopped finely
  • 50 g flour
  • 10 g salt
  • 5 g black pepper
  • 50 g oil for frying
  • 400 g ground meat
  • Baking sheet size: 47 cm x 35 cm

Method
 

  1. Preheat oven to 180°C (350°F). Grease your 47 x 35 cm baking sheet.
  2. In a large bowl, combine grated pumpkin, eggs, flour, salt, and pepper. Mix well.
  3. In a pan, heat oil and cook ground meat until browned and crumbly. Season lightly.
  4. Spread half of the pumpkin mixture over the baking sheet. Add the cooked meat on top, then sprinkle with grated cheese.
  5. Cover with the remaining pumpkin mixture, spreading evenly.
  6. Bake for 30–35 minutes or until golden and set.
  7. Let cool slightly before slicing and serving.

Notes

  • You can use mozzarella, cheddar, or even feta for a different cheese profile.
  • For added flavor, mix fresh herbs like thyme or parsley into the pumpkin batter.
  • The recipe works well for meal prep—just slice and reheat.
  • This dish also freezes well after baking.

Oatmeal, Egg, and Cheese Pizza: A Delicious Fusion of Comfort and Creativity

There are those dishes in life that begin as mere experiments, a blend of ingredients gathered in the kitchen based on whim, necessity, or a desire to use up what’s left in the fridge. These dishes, however, often end up being far more than just an improvised meal. They become staples in our homes, carrying with them stories of family gatherings, moments of solitude, and even the pure joy of creating something out of nothing. For me, oatmeal, egg, and cheese pizza is one such dish.

I remember the first time I stumbled upon the idea. It was a lazy Saturday morning when the weather outside had turned unexpectedly chilly. I didn’t want anything too heavy for breakfast, but I also wanted something hearty enough to fuel my day. The ingredients were simple: oatmeal, eggs, and some cheese in the fridge. At first, I wasn’t sure how they would come together, but I decided to give it a shot. To my surprise, not only did the combination work, but it also satisfied my cravings in a way that no typical pizza ever could. What started as an experiment quickly became a cherished recipe in my kitchen, one that I continue to make for myself and my loved ones when we need something warm, comforting, and just a little bit different.

What I love about this dish is how it combines the richness of eggs and cheese with the humble heartiness of oatmeal. It’s a marriage of two worlds: the savory and the nourishing. The result is a crispy, cheesy, and satisfying “pizza” that can easily be enjoyed for breakfast, lunch, or dinner. This recipe is an ode to the beauty of simplicity and creativity in cooking. It’s not just about what’s in the dish, but about how the ingredients come together in ways we least expect, surprising us with new flavors and textures.

The Fusion of Flavors: Why This Dish Works

At first glance, oatmeal might seem like an unusual base for pizza. After all, oatmeal is typically associated with breakfast, not something savory and satisfying like pizza. But that’s the beauty of this dish—it challenges our expectations and introduces us to a new way of looking at our favorite foods. Oatmeal, when prepared properly, provides a soft yet slightly chewy texture that holds up well as a base for toppings. Its mild flavor acts as the perfect canvas for the richness of eggs and the saltiness of cheese, while the addition of herbs and spices adds depth and complexity.

The eggs serve as both a flavor enhancer and a binding agent, holding the oatmeal base together and adding a creamy richness that complements the other ingredients. The cheese, of course, is the star of the show. Its meltiness and savory flavor bring the whole dish together, making each bite satisfying and full of flavor. Whether you opt for sharp cheddar, creamy mozzarella, or any other cheese you prefer, it adds an indulgent quality that transforms this simple dish into something special.

What’s more, this dish is highly customizable. You can add fresh herbs like parsley or basil to brighten the flavor, or sprinkle a bit of chili flakes for a gentle kick. The beauty of oatmeal, egg, and cheese pizza lies in its adaptability. You can experiment with different cheeses, herbs, and spices, or even add vegetables, bacon, or sausage to make it more filling. It’s a dish that can evolve with your taste preferences and the ingredients you have on hand, making it a go-to recipe when you need something easy, quick, and satisfying.

Ingredients

IngredientQuantity
Oatmeal1 cup
Eggs2
Milk1 glass
Parsley, choppedTo taste
Cheese, grated100g
SaltTo taste
Dry Provençal herbsTo taste
Chili flakesTo taste
Oil for fryingAs needed
Sesame seeds for garnishTo taste

Directions:

  1. Prepare the Oatmeal Mixture:
    In a medium-sized bowl, combine the oatmeal, eggs, and milk. Mix well until all ingredients are fully incorporated. Season with salt, dry Provençal herbs, and chili flakes to taste.
  2. Cook the Base:
    Heat a little oil in a frying pan over medium heat. Pour the oatmeal mixture into the pan, spreading it evenly to form a base. Cook for 3-4 minutes, allowing the base to firm up slightly.
  3. Add the Cheese and Parsley:
    Sprinkle the grated cheese and chopped parsley evenly over the top of the base. Let the cheese melt and the base cook for another 3-4 minutes until golden and crispy.
  4. Flip and Cook the Other Side:
    Carefully flip the base using a spatula, and cook for an additional 2-3 minutes until the other side is browned and the cheese has fully melted.
  5. Serve and Garnish:
    Remove the pizza from the pan and transfer to a plate. Sprinkle sesame seeds on top for an added crunch and serve hot.

Nutritional Information (per serving, assuming 2 servings):

NutrientAmount per serving
Calories350 kcal
Protein17g
Carbohydrates30g
Fiber4g
Fat20g
Saturated Fat5g
Cholesterol160mg
Sodium400mg
Sugars4g

A Healthier Take on Traditional Pizza

One of the key reasons I love this dish is that it’s a healthier alternative to traditional pizza. While the classic pizza dough is often heavy with refined flour, oatmeal provides a more nutrient-dense base. Oatmeal is high in fiber, which can help promote digestion and keep you feeling fuller for longer. It’s also a great source of complex carbohydrates, which provide sustained energy without causing blood sugar spikes.

In addition to the fiber, oatmeal is rich in vitamins and minerals, including manganese, phosphorus, magnesium, and iron. These nutrients support everything from bone health to immune function. Eggs, meanwhile, are an excellent source of high-quality protein, vitamins A, B12, and D, and choline, an essential nutrient that supports brain health. Cheese, though rich in fats, is also packed with protein and calcium, making it a good addition to a balanced diet when consumed in moderation.

This combination of nutrients makes oatmeal, egg, and cheese pizza not only delicious but also a filling and satisfying meal. It’s a great option for anyone looking for a healthier alternative to traditional pizza without sacrificing flavor or satisfaction. Plus, it’s a dish that can easily be adapted to suit various dietary preferences, from vegetarian to gluten-free.

How This Dish Can Be Customizable to Your Tastes

One of the reasons this dish has become a personal favorite is its versatility. It can be made to suit any occasion or mood, depending on what you feel like eating. If you’re in the mood for a more hearty meal, you can add sautéed mushrooms, spinach, or bell peppers to the top for extra nutrients and flavor. If you prefer a touch of sweetness, try adding a sprinkle of caramelized onions or roasted tomatoes. The possibilities are endless.

Another variation of this dish could include swapping out the cheese for a dairy-free option, making it suitable for those with lactose intolerance or vegan preferences. You could also experiment with adding a variety of spices to give the dish a more international flair. Imagine a sprinkle of cumin, coriander, or turmeric for a Middle Eastern-inspired twist, or perhaps a dash of smoked paprika for a touch of Spanish flavor.

What I particularly enjoy is that this recipe can easily be tailored to accommodate what you have in your pantry. The beauty of this dish lies in its simplicity, and its adaptability makes it a great go-to when you’re short on time or ingredients but still want something flavorful.

FAQs: Answering Your Questions About Oatmeal, Egg, and Cheese Pizza

  1. Can I make this dish ahead of time? Yes! You can prepare the base ahead of time and store it in the fridge. When ready to serve, just add the cheese and other toppings, then heat it through. This makes it a perfect meal prep option for busy mornings.
  2. Can I use instant oatmeal for this recipe? While it’s best to use traditional rolled oats for texture, you can use instant oatmeal in a pinch. However, be aware that the texture might be slightly different, and you may need to adjust the liquid amount.
  3. What if I don’t have milk on hand? You can substitute milk with water or a plant-based milk like almond or soy milk. This will not affect the overall flavor too much but might slightly change the texture.
  4. Can I add meat to this dish? Absolutely! Adding cooked bacon, sausage, or ham can make this dish more substantial and add an extra layer of savory flavor.
  5. How can I make this dish spicier? If you like heat, feel free to increase the amount of chili flakes or add fresh sliced jalapeños to the top for an extra kick.

Conclusion: A Dish That Brings Comfort, Creativity, and Flavor

Oatmeal, egg, and cheese pizza is more than just a quirky take on traditional pizza—it’s a dish that combines comfort, creativity, and nourishment in one delicious bite. Whether you’re cooking for yourself, your family, or friends, this recipe provides a satisfying meal that’s both healthy and indulgent. It’s a perfect example of how sometimes, the best dishes come from unexpected combinations, where simplicity and flavor collide in ways that leave you craving more.

This dish reminds us that cooking doesn’t always need to be complicated to be rewarding. With just a handful of ingredients, you can create something that feels both familiar and new. It’s the kind of recipe that invites experimentation, yet still delivers a comforting and satisfying result every time. So the next time you’re in need of a quick, nourishing meal, give oatmeal, egg, and cheese pizza a try. It might just become your new favorite go-to recipe.

Amal

Oatmeal, Egg, and Cheese Pizza: A Delicious Fusion of Comfort and Creativity

This oatmeal, egg, and cheese pizza is a creative and nutritious alternative to traditional pizza, blending the heartiness of oats with the richness of eggs and cheese. It’s crispy on the outside, soft on the inside, and packed with flavor. Perfect for breakfast, lunch, or a light dinner, this dish is quick to prepare and surprisingly satisfying.
Prep Time 5 minutes
Cook Time 10 minutes
Total Time 15 minutes
Servings: 2 -3 servings
Course: Breakfast
Cuisine: Healthy

Ingredients
  

  • 1 cup oatmeal
  • 2 eggs
  • 1 glass of milk
  • Parsley chopped
  • 100 g cheese grated
  • Salt to taste
  • Dry Provençal herbs to taste
  • Chili flakes to taste
  • Oil for frying
  • Sesame seeds for garnish

Method
 

  1. In a bowl, mix oatmeal, eggs, and milk until well combined. Season with salt, dry Provençal herbs, and chili flakes.
  2. Heat oil in a frying pan over medium heat. Pour the mixture in, spreading it evenly to form a round shape.
  3. Cook for 3-4 minutes until the bottom is firm, then sprinkle cheese and chopped parsley on top.
  4. Flip the base carefully and cook for another 2-3 minutes until golden and crispy.
  5. Transfer to a plate, garnish with sesame seeds, and serve hot.

Notes

  • Use any cheese you like—cheddar, feta, or mozzarella all work well.
  • For a spicier kick, add extra chili flakes or black pepper.
  • This dish pairs beautifully with a fresh salad or a dollop of yogurt on the side.
  • If you prefer a crunchier texture, cook the base a little longer before flipping.

Cabbage with Eggs: A Comforting Journey to Simplicity and Flavor

There are moments in life when food is not just sustenance, but a doorway to memories. For me, cabbage with eggs is one of those dishes. I remember my grandmother making it in her warm, cozy kitchen, where the scent of sautéed cabbage and onions would fill the house, wrapping everyone in a comforting embrace. This dish was humble, yet so satisfying—simple ingredients coming together to create something much greater than the sum of its parts. It was the kind of meal that brought the whole family around the table, sharing stories, laughter, and comfort.

At first glance, cabbage with eggs may seem like a basic, no-frills dish. However, its beauty lies in its simplicity and versatility. It’s a dish that can be made quickly with ingredients you probably already have in your kitchen, yet it offers an unexpected depth of flavor and heartiness. Over the years, this dish has become more than just a family favorite for me; it’s a symbol of the joy found in simple pleasures. Cooking this dish brings me back to those quiet moments in my grandmother’s kitchen, reminding me that sometimes the simplest meals are the ones that leave the most lasting impressions.

The Beauty of Cabbage with Eggs: Why This Dish Resonates

In a world filled with complex recipes and elaborate techniques, cabbage with eggs stands as a testament to the power of simplicity. It’s a dish that doesn’t require fancy ingredients or intricate methods. Yet, it delivers a deep, nourishing satisfaction that is hard to beat. Whether you are looking for a quick weeknight meal or something to serve for breakfast, brunch, or dinner, cabbage with eggs is an option that can easily fit into any part of your day.

The beauty of this dish lies in its balance of flavors and textures. The cabbage, when sautéed just right, becomes soft and sweet, while still maintaining a slight crunch. The eggs, whether scrambled or gently cooked, provide a creamy texture that complements the cabbage perfectly. Add a bit of grated cheese and fresh parsley, and you have a meal that is bursting with flavor yet grounded in a sense of comfort and warmth.

This dish is also incredibly versatile. The cabbage can be prepared in a variety of ways: shredded, chopped, or even lightly sautéed for a different texture. The eggs can be scrambled for a more traditional approach, or you can make them more runny if you prefer a softer consistency. If you’re feeling adventurous, you can even add other vegetables or spices to enhance the flavor. Some people enjoy a bit of garlic or onions, while others may add a dash of hot sauce for a touch of heat. The possibilities are endless, but no matter how you prepare it, cabbage with eggs always tastes like home.

Ingredients

IngredientQuantity
Olive oil2 tbsp
Medium onion, finely chopped1 medium
Carrot, grated1
White cabbage, shredded2 lb / 900g
Eggs, beaten5-6
All-purpose flour (optional)1 tbsp
Manchego cheese, grated (optional)As needed
Fresh parsley, chopped (optional)As needed

Directions:

  1. Sauté the Vegetables:
    Heat the olive oil in a large skillet over medium heat. Add the finely chopped onion and sauté for 2-3 minutes until softened. Add the grated carrot and shredded cabbage to the skillet. Stir well and cook for about 8-10 minutes until the cabbage is tender but still slightly crisp.
  2. Prepare the Eggs:
    While the cabbage mixture is cooking, beat the eggs in a bowl. If you’d like a thicker texture, you can whisk in the optional tablespoon of flour. This step is optional, but it helps to bind the ingredients together and give the dish a little extra body.
  3. Cook the Eggs:
    Once the cabbage is tender, create a little space in the center of the skillet, then pour in the beaten eggs. Allow them to cook for 1-2 minutes, stirring occasionally to scramble the eggs into the vegetables.
  4. Add the Finishing Touches:
    If desired, sprinkle some grated Manchego cheese over the top of the cabbage and eggs, allowing it to melt into the dish. Garnish with freshly chopped parsley for a burst of color and flavor.
  5. Serve and Enjoy:
    Once the eggs are fully cooked and the cheese has melted, serve your cabbage and eggs hot, either as a main dish or as a side dish with your favorite protein.

Nutritional Information (per serving, assuming 4 servings):

NutrientAmount per serving
Calories250 kcal
Protein10g
Carbohydrates15g
Fiber5g
Fat18g
Saturated Fat3g
Cholesterol180mg
Sodium150mg
Sugars6g

Why Cabbage with Eggs is the Ultimate Comfort Food

Comfort food is about more than just flavor. It’s about the memories, the feelings it evokes, and the nourishment it provides for the body and soul. Cabbage with eggs is the epitome of comfort food—unpretentious, yet incredibly satisfying. In a busy world full of distractions and demands, this dish offers a quiet moment of reprieve. It’s a chance to slow down, savor a homemade meal, and reconnect with something simple and grounding.

In many ways, cabbage with eggs is a perfect example of how food can bring people together. Whether served at a family dinner or made for yourself after a long day, this dish has a way of making everything feel just a little bit better. There’s something undeniably comforting about a hot plate of cabbage with eggs, especially when shared with loved ones.

The Nutritional Benefits of Cabbage with Eggs

While cabbage with eggs may be simple, it’s also surprisingly nutritious. Cabbage is a powerhouse of vitamins and minerals, packed with vitamin C, vitamin K, fiber, and antioxidants. It’s a great addition to any diet, helping to support digestion, reduce inflammation, and promote overall health. Eggs, of course, are an excellent source of protein, vitamins, and minerals, particularly vitamin B12 and choline, which are essential for brain health.

When combined, cabbage and eggs create a well-rounded, balanced dish that can help fuel your body for hours. This dish is low in carbohydrates, making it a great option for those following low-carb or ketogenic diets. It’s also a great option for vegetarians, provided you skip the optional meat additions. The healthy fats from the olive oil, along with the protein from the eggs, provide a filling meal that doesn’t leave you feeling overly full or sluggish.

Additionally, cabbage is incredibly versatile. It’s a low-calorie vegetable, which makes it an ideal choice for those looking to manage their weight while still enjoying a satisfying meal. The richness of the eggs and olive oil helps to balance out the dish, so you won’t feel deprived, even on a calorie-conscious diet.

A Versatile Dish: Customizing Cabbage with Eggs

One of the reasons cabbage with eggs continues to be such a beloved dish in my family is its versatility. There are endless variations of this recipe, and you can easily make it your own depending on your tastes and dietary preferences. Here are just a few ways you can customize this dish to make it uniquely yours:

  1. Add More Vegetables: While cabbage and eggs are the stars of this dish, feel free to add other vegetables you enjoy. Mushrooms, bell peppers, or zucchini would work wonderfully in this recipe. You can sauté them alongside the cabbage for a more hearty, veggie-packed meal.
  2. Try Different Cheeses: The recipe calls for Manchego cheese, which adds a rich, nutty flavor to the dish. However, you can substitute this with any cheese you like—cheddar, feta, or goat cheese would all work beautifully. Experiment with different cheeses to find your perfect match.
  3. Herbs and Spices: Fresh parsley is a great addition to this dish, but you can also add other herbs like thyme, dill, or rosemary. If you prefer a little heat, consider adding a pinch of chili flakes or a dash of hot sauce.
  4. Add Meat: For those who enjoy a bit of protein with their meal, adding bacon, sausage, or ham would make a delicious variation of this dish. These meats pair wonderfully with the sweetness of the cabbage and the richness of the eggs.
  5. Change the Cooking Method: While the eggs are typically scrambled into the cabbage, you can also prepare them in a different style. Try frying or poaching the eggs separately and serving them on top of the cabbage for a more elegant presentation.

FAQs about Cabbage with Eggs

1. Can I use a different type of cabbage?
Yes! While green cabbage is the most common choice for this recipe, you can use red cabbage or Savoy cabbage for a different flavor and texture. Each type of cabbage has its own unique flavor, so feel free to experiment.

2. Can I make this dish ahead of time?
Cabbage with eggs is best served fresh, but you can store leftovers in an airtight container in the refrigerator for up to 2 days. Reheat gently in a skillet to avoid overcooking the eggs.

3. Can I make this dish vegan?
Yes, this dish can easily be made vegan by replacing the eggs with a plant-based egg substitute, such as tofu scramble or chickpea flour batter. You can also omit the cheese or use a dairy-free alternative.

Conclusion: A Dish That Connects Generations

Cabbage with eggs may be simple, but it’s a dish that’s rich with meaning. It connects us to the past, to our roots, and to the people who taught us how to cook with love and care. Whether you’re preparing this dish for a family meal or a solo dinner, it’s a reminder that sometimes the best meals are the ones that don’t require a lot of effort—just a few good ingredients and a lot of heart. Cabbage with eggs is more than just food; it’s a celebration of simplicity, nourishment, and tradition.

Amal

Cabbage with Eggs: A Comforting Journey to Simplicity and Flavor

Cabbage with eggs is a simple yet delicious dish that combines the earthy flavor of sautéed cabbage with the rich, creamy texture of eggs. This hearty and nutritious meal is perfect for any time of day, whether you’re enjoying it as a satisfying breakfast, lunch, or dinner. With just a few basic ingredients, this dish offers both comfort and nourishment, all in one bowl.
Prep Time 10 minutes
Cook Time 15 minutes
Total Time 25 minutes
Servings: 4 –6 servings
Course: Main Dish
Cuisine: Mediterranean-Inspired

Ingredients
  

  • 2 tbsp olive oil
  • 1 medium onion finely chopped
  • 1 carrot grated
  • 2 lb / 900g white cabbage shredded
  • 5-6 eggs beaten
  • 1 tbsp all-purpose flour optional
  • Manchego cheese grated (optional)
  • Fresh parsley chopped (optional)

Method
 

  1. Heat the olive oil in a large skillet over medium heat. Add the finely chopped onion and cook for 2-3 minutes until softened.
  2. Stir in the grated carrot and shredded cabbage. Continue sautéing for 8-10 minutes, stirring occasionally, until the cabbage is tender but slightly crisp.
  3. In a separate bowl, beat the eggs. If you prefer a thicker texture, whisk in the optional tablespoon of flour. Add the beaten eggs to the skillet, stirring gently to combine with the cabbage and carrots. Cook for 2-3 minutes, allowing the eggs to scramble and cook through.
  4. If desired, sprinkle grated Manchego cheese over the top of the dish and let it melt into the eggs and cabbage.
  5. Garnish with freshly chopped parsley and serve hot.

Notes

  • For a creamier texture, you can add a splash of milk or cream to the beaten eggs before adding them to the skillet.
  • To make the dish more filling, you can add cooked sausage or bacon for extra protein and flavor.
  • Feel free to experiment with different cheeses like cheddar or feta for a unique twist on the dish.

Homemade Butter: A Journey to the Heart of Simplicity and Tradition

I’ll never forget the first time I made butter from scratch. It was a quiet afternoon in the kitchen, and I had just finished reading a passage in an old cookbook about the art of butter-making. Intrigued, I decided to give it a try, not fully expecting to succeed. The process was simple—almost deceptively so—but the result was nothing short of magical. As the cream transformed into soft, golden butter, I realized that what I was doing was not just a kitchen experiment—it was a step back in time, reconnecting with a tradition that’s been passed down through generations.

Growing up, I never considered making butter myself. It was always a product that came from the grocery store shelves. But as I started to delve deeper into the world of homemade, artisanal foods, I came to understand the joy and satisfaction that comes from making something so fundamental from scratch. Making butter isn’t just about the final product; it’s about the process, the connection to the ingredients, and the feeling of pride that comes from creating something with your own hands. It was during that first batch of homemade butter that I realized how much the simple, everyday things in life—like fresh butter on warm bread—can bring about the deepest sense of contentment.

The Magic of Making Homemade Butter

There’s something incredibly satisfying about making butter from scratch. It’s one of the oldest forms of food preparation, dating back to ancient civilizations. Butter-making is a process that’s deeply rooted in culture and history. It’s amazing how something as simple as cream can transform, through just a little patience and care, into a creamy, rich product that enhances so many dishes.

For generations, butter was made by hand, churned in large wooden barrels by farmers and homemakers alike. Today, making butter at home has become something of a lost art in many parts of the world. But for those who decide to make their own butter, the process is not only a connection to the past—it’s also a deeply rewarding experience. The final product is richer, fresher, and more flavorful than anything you can buy at the store. It carries the love and effort of the maker, and every spoonful is a reminder of the beauty in simple things.

What’s even more remarkable is how quickly the process can be done. In just five minutes, you can turn 1 liter of cream into a kilogram of butter. The trick is to use a stand mixer or hand mixer, which speeds up the churning process. The butter forms almost magically as the cream separates into thick, golden butter and buttermilk. It’s a fun, simple way to take control of your food, and the best part is you can use it immediately.

Ingredients

IngredientQuantity
Cream (33% fat)1 liter
Ice cubesAs needed
Cold waterAs needed

Directions:

  1. Prepare the Cream:
    Pour the 1 liter of cream (33% fat) into a stand mixer or a large bowl if you’re using a hand mixer. Ensure the cream is cold for the best results.
  2. Whip the Cream:
    Begin mixing the cream on medium speed. In a few minutes, the cream will start to thicken and whip into whipped cream. Continue mixing until the whipped cream turns into butter, separating from the buttermilk.
  3. Drain the Buttermilk:
    Once the butter forms, carefully drain the buttermilk from the mixing bowl. You can use the buttermilk for other recipes like pancakes or scones.
  4. Wash the Butter:
    To wash the butter, add cold water to the bowl and knead the butter to remove any remaining buttermilk. Repeat this process a few times, changing the water as necessary, until the water runs clear.
  5. Solidify the Butter:
    Place the butter into a clean bowl and add a few ice cubes. Knead the butter until it’s solidified and firm. The ice helps to quickly harden the butter.
  6. Store the Butter:
    Once the butter is firm and free from buttermilk, transfer it to an airtight container for storage. You can refrigerate it for up to 2 weeks or freeze it for longer storage.

Nutritional Information (per 100g of butter):

NutrientAmount per 100g
Calories717 kcal
Protein1g
Carbohydrates0g
Fat81g
Saturated Fat51g
Cholesterol215mg
Sodium11mg

Why Make Your Own Butter?

In today’s world of mass production and convenience, making your own butter might seem like a labor-intensive task. But the truth is, homemade butter offers several advantages that store-bought versions simply can’t match. Here are a few reasons why making butter at home is worth the effort:

  1. Freshness: Homemade butter is incredibly fresh. The moment you churn it, you’re able to taste the difference in texture and flavor compared to store-bought varieties, which may have been sitting on shelves for weeks or even months.
  2. Control Over Ingredients: When you make your own butter, you control what goes into it. There are no preservatives, additives, or artificial flavors—just pure cream. If you prefer, you can experiment with different flavors by adding herbs, spices, or even a bit of sea salt.
  3. Rich Flavor: Homemade butter has a richness and depth of flavor that store-bought butter simply can’t replicate. It’s smooth, creamy, and has a fuller taste. Whether spread on toast, added to recipes, or used to finish a dish, it’s a delight in every bite.
  4. Satisfaction and Tradition: Making butter is a hands-on process that connects you to the tradition of food-making. It’s a beautiful way to slow down and savor the process of creating something nourishing from scratch. There’s a deep satisfaction in making something so fundamental and basic, yet so full of flavor.
  5. Economic: While store-bought butter is relatively inexpensive, making your own can save money in the long run. One liter of cream yields about 1 kilogram of butter, which can be much more cost-effective compared to buying high-quality butter.
  6. Environmental Impact: By making your own butter, you can reduce packaging waste associated with buying pre-packaged butter. You also support smaller, local dairies if you choose to source your cream from local farmers.

What You’ll Need for Homemade Butter

Making butter at home requires just three basic ingredients: cream, ice cubes, and cold water. But more than the ingredients, the key to success lies in the process—the art of churning the cream until it separates into butter and buttermilk. While a stand mixer or hand mixer is ideal, you can also use a manual butter churn for a more traditional approach, though it requires a bit more time and effort.

The quality of your cream will make a big difference in the final product. Opt for heavy cream with a high-fat content (at least 33% fat). The higher the fat content, the more butter you’ll yield. Fresh, high-quality cream will give your butter the best flavor and texture. If possible, seek out cream from a local farm or a reputable dairy to ensure the freshest product.

Frequently Asked Questions (FAQs)

1. How do I know when the butter is ready?
You’ll know the butter is ready when the cream separates into clumps of butter and a thin, watery liquid (buttermilk). This process typically happens after a few minutes of mixing. If you’re unsure, just stop the mixer and check—if the mixture looks thick and the buttermilk is separated, you’re done.

2. Can I add flavors to my homemade butter?
Absolutely! Once your butter is formed and rinsed, you can add various flavors. Fresh herbs like rosemary or thyme, garlic, lemon zest, or even a pinch of sea salt can elevate your homemade butter. Simply knead the additions into the butter after it has been rinsed and shaped.

3. Can I use this method for smaller quantities of cream?
Yes, you can use this method for smaller amounts of cream. The process remains the same, but it will take less time to churn. However, the larger the amount of cream, the easier it is to get a good separation of butter and buttermilk.

4. What should I do with the buttermilk?
Buttermilk is a valuable byproduct of the butter-making process! It can be used in cooking and baking, such as in pancakes, muffins, biscuits, or as a marinade for chicken. Don’t throw it away—use it for its tangy, slightly acidic flavor.

5. How long does homemade butter last?
Homemade butter typically lasts for about two weeks in the refrigerator. If you want to keep it longer, you can freeze the butter for up to three months. Make sure to wrap it tightly in plastic wrap or store it in an airtight container.

Conclusion: The Joy of Homemade Butter

Making your own butter is a simple yet incredibly rewarding process. From the moment the cream transforms into golden butter, you experience the satisfaction of creating something fresh, flavorful, and full of history. It’s a journey into the past, a return to traditional methods of food preparation, and a reminder that some of the best things in life come from the simplest ingredients.

As I continue to make butter in my own kitchen, I am reminded of the connection between food, family, and tradition. Butter may seem like a small, everyday food, but it carries with it a sense of comfort, of home, and of care. Whether you’re using it to spread on warm bread, dollop onto pancakes, or enhance your favorite dishes, homemade butter has a way of making everything taste a little better. So, the next time you’re in the kitchen, consider making your own batch of butter—it’s not just a culinary skill, it’s a connection to the past, a labor of love, and a beautiful reminder of the joy found in simple things.

Amal

Homemade Butter: A Journey to the Heart of Simplicity and Tradition

Making butter at home is easier than you might think. With just a few simple ingredients and a little bit of patience, you can turn 1 liter of cream into 1 kilogram of fresh, creamy butter in just 5 minutes. The result is richer, fresher, and more flavorful than anything you’ll find in stores. This homemade butter will add a touch of luxury to your daily meals, whether you’re spreading it on toast or using it in your favorite recipes.
Prep Time 10 minutes
Cook Time 5 minutes
Total Time 15 minutes
Servings: 1 kg of butter
Course: Butter
Cuisine: Homemade

Ingredients
  

  • 1 liter of cream 33% fat
  • Ice cubes as needed
  • Cold water as needed

Method
 

  1. Pour the cream into a stand mixer or a large mixing bowl if you are using a hand mixer. Ensure the cream is cold for the best results.
  2. Begin whipping the cream on medium speed. As you continue mixing, the cream will thicken and eventually begin to turn into whipped cream.
  3. Keep mixing until the whipped cream separates into butter and buttermilk. This process should take around 5 minutes.
  4. Drain the buttermilk and save it for other recipes, like pancakes or scones.
  5. Add cold water to the butter and knead it to remove any remaining buttermilk. Change the water as needed until it runs clear.
  6. Place a few ice cubes into the butter and knead until it becomes firm. This will help solidify the butter and improve its texture.
  7. Transfer the butter into an airtight container for storage. Refrigerate for up to two weeks or freeze for longer storage.

Notes

  • For extra flavor, you can experiment with adding a pinch of salt or fresh herbs like rosemary or thyme to the butter after it has solidified.
  • Be sure to wash the butter thoroughly to remove any traces of buttermilk. This will help extend its shelf life.
  • If you want to make a larger batch, simply scale up the ingredients accordingly. For each liter of cream, you’ll get about 1 kilogram of butter.