Zucchini Pancakes with Cheese: Crispy, Golden, and Full of Home

The smell of frying pancakes always brings me back to the summers I spent at my aunt’s cottage tucked deep in the countryside. The garden was her pride—rows of tomatoes, fat bell peppers, unruly basil, and zucchini vines that seemed to grow inches overnight. By mid-July, we’d be swimming in zucchini. And every summer, without fail, she’d say with a sly smile, “Looks like it’s pancake season.”

We weren’t talking about the syrup-soaked kind. These were rustic, savory, golden zucchini pancakes speckled with cheese and kissed by the heat of a hot skillet. We’d gather in the small sun-dappled kitchen, the scent of butter and garlic drifting into the breeze through the open windows. Everyone knew that once those first pancakes hit the table—steaming and stacked high—it was time to drop whatever we were doing.

That’s the magic of this recipe. It’s not flashy. It’s not trendy. It’s just good. It’s the kind of food that brings people to the table, that vanishes faster than you can fry another batch, and that sticks in your memory long after the last bite. Today, I’m sharing this simple yet satisfying dish so you can experience that same warmth, comfort, and joy in your own kitchen.

From Garden to Griddle: What Makes These Pancakes So Special?

Zucchini pancakes are one of those brilliant recipes that celebrate abundance—specifically, the kind of abundance that grows in your backyard. They’re light, yet rich in flavor. Soft in the middle with a crispy edge. And they carry a gentle sweetness from the zucchini that pairs beautifully with the saltiness of cheese and the richness of eggs.

While they may sound like a side dish, zucchini pancakes can easily be the star of a meal. Served hot from the pan with a dollop of sour cream or yogurt, a drizzle of herbed sauce, or even topped with a poached egg, they’re endlessly versatile.

They’re also quick to make and easy to love, which is why they’ve become a go-to in kitchens around the world—from rustic European kitchens to modern family homes.

Ingredients

IngredientAmount
Zucchini2 medium (about 2 cups), grated
Cheese (Cheddar, Parmesan, or Mozzarella)½ cup, grated
Eggs2 large
All-Purpose Flour½ cup (65 g)
Salt½ teaspoon
Black Pepper¼ teaspoon
Garlic Powder (optional)¼ teaspoon
Milk¼ cup (60 ml)
Vegetable Oil or ButterFor frying

Directions

  1. Prep the Zucchini:
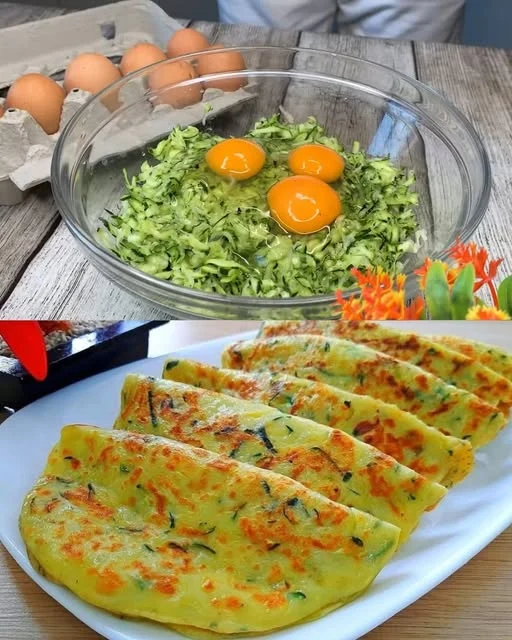
    Grate the zucchini and place it in a clean kitchen towel. Squeeze out as much excess moisture as possible—this helps prevent soggy pancakes.
  2. Mix the Batter:
    In a large bowl, combine grated zucchini, eggs, cheese, milk, flour, salt, pepper, and garlic powder (if using). Stir until well blended.
  3. Heat the Pan:
    Heat a non-stick skillet or frying pan over medium heat. Add a bit of oil or butter.
  4. Cook the Pancakes:
    Drop spoonfuls of batter into the pan, flattening slightly with the back of a spoon. Cook for 2–3 minutes per side or until golden brown and crisp on both sides.
  5. Serve:
    Drain briefly on paper towels and serve hot, optionally with sour cream or a herbed yogurt dip.

Nutritional Information (Per Serving – Approximate)

NutrientAmount
Calories180 kcal
Protein8 g
Fat12 g
Carbohydrates10 g
Fiber1 g
Sugars2 g
Sodium350 mg

The Versatility of Zucchini and Cheese

Zucchini, in all its mild glory, is a blank canvas. It absorbs flavor like a sponge, allowing the cheese, herbs, and spices you add to really shine through. The cheese you choose defines the overall tone of the pancake:

  • Cheddar adds sharpness and depth.
  • Parmesan lends a nutty, savory edge and crisps beautifully.
  • Mozzarella offers creaminess and a gentle pull that makes the texture dreamy.

This flexibility means you can tailor the recipe to your taste or use whatever you have in your fridge. Add chopped chives for freshness, or a pinch of chili flakes for heat. You can even toss in corn kernels, grated carrot, or leftover cooked quinoa to stretch the batter further.

Perfect for Every Meal: Serving Suggestions

Zucchini pancakes shine in any setting:

  • Breakfast: Top with a fried or poached egg and a sprinkle of smoked paprika.
  • Brunch: Serve with sour cream, fresh dill, and a slice of crusty bread.
  • Lunch: Pair with a green salad and tangy vinaigrette.
  • Dinner: Make them a side dish to roasted chicken, baked salmon, or grilled veggies.
  • Snack: Just grab and go. They’re perfect for busy hands and lunchboxes alike.

These pancakes also hold up well at room temperature, making them excellent picnic or potluck fare.

Nutrition That Doesn’t Compromise on Comfort

Zucchini is naturally low in calories and high in water content, making it a smart choice for lighter meals. It’s rich in vitamin C, potassium, and antioxidants. Pair that with protein from eggs and calcium from cheese, and you’ve got a dish that nourishes as much as it satisfies.

Using minimal oil for frying and adding milk instead of heavy cream keeps things balanced without sacrificing flavor. You can even swap in whole wheat flour or gluten-free flour blends for different dietary needs.

FAQs About Zucchini Pancakes with Cheese

Can I make zucchini pancakes ahead of time?
Absolutely. These pancakes store well in the refrigerator for up to 3 days. Reheat them in a skillet or toaster oven to revive their crispiness.

Can I freeze them?
Yes. Let the cooked pancakes cool completely, then layer with parchment paper and freeze in an airtight container. Reheat from frozen in the oven or toaster for best texture.

What kind of cheese works best?
Cheddar, Parmesan, and mozzarella are all great choices. Cheddar gives bold flavor, Parmesan adds crispiness and umami, while mozzarella adds a creamy texture. You can also mix cheeses for a more complex flavor.

How do I keep them from being soggy?
The key is squeezing the moisture from the grated zucchini before mixing. Wrap the zucchini in a clean kitchen towel or cheesecloth and squeeze well over the sink. This helps the pancakes crisp up and prevents them from being mushy.

Can I bake instead of frying?
Yes, though they won’t be as crispy. Bake them at 200°C (400°F) on a parchment-lined tray, lightly brushed with oil, for 15–20 minutes, flipping halfway through.

What can I serve with them?
They go well with sour cream, yogurt-based sauces, spicy mayo, or even tzatziki. Add a fresh salad or roasted tomatoes for a full meal.

Are they kid-friendly?
Very much so! Kids love the cheesy flavor and the fun finger-food format. Plus, it’s a sneaky way to get more veggies onto their plate.

A Comfort Dish That Never Fails

The beauty of this recipe is its reliability. Whether you’re cooking for a crowd, prepping a quick weekday lunch, or making use of a zucchini surplus, these pancakes never disappoint. They’re quick to assemble, fast to fry, and almost impossible to mess up.

Even better? They bring people together. Just like they did in my aunt’s kitchen. There’s something timeless about recipes that are made with simple ingredients and a whole lot of heart. Every time I cook these pancakes now, I think of those summer days—the laughter, the breeze through the kitchen window, and the smell of something good in the pan.

Conclusion: Pancakes with a Purpose

Zucchini pancakes with cheese are more than just a clever way to use up extra vegetables—they’re a celebration of seasonality, simplicity, and comfort. They adapt to your pantry, welcome your favorite add-ins, and deliver big on taste without asking for much in return.

So next time you find yourself with a couple of zucchinis and a handful of cheese, don’t overthink it. Grate, mix, fry, and serve. You’re just minutes away from golden, cheesy, crisp-edged joy.

And who knows—maybe one day someone will remember your kitchen as fondly as I remember mine.

Print
clock clock iconcutlery cutlery iconflag flag iconfolder folder iconinstagram instagram iconpinterest pinterest iconfacebook facebook iconprint print iconsquares squares iconheart heart iconheart solid heart solid icon

Zucchini Pancakes with Cheese: Crispy, Golden, and Full of Home


  • Author: Paul
  • Total Time: 25 minutes
  • Yield: 810 pancakes 1x

Description

These crispy, cheesy zucchini pancakes are the perfect way to turn fresh garden zucchini into a golden, savory treat. Quick to make and endlessly versatile, they’re ideal for breakfast, lunch, or a light dinner. Serve them with a dollop of sour cream or a fresh herb dip for a comforting dish everyone will love.


Ingredients

Scale
  • 2 medium zucchini (about 2 cups), grated
  • ½ cup grated cheese (Cheddar, Parmesan, or Mozzarella)
  • 2 large eggs
  • ½ cup all-purpose flour (65 g)
  • ½ teaspoon salt
  • ¼ teaspoon black pepper
  • ¼ teaspoon garlic powder (optional)
  • ¼ cup milk (60 ml)
  • Vegetable oil or butter, for frying

Instructions

  1. Grate the zucchini using a coarse grater. Place it in a clean kitchen towel and squeeze out as much excess moisture as possible. This helps ensure crispier pancakes.
  2. In a large mixing bowl, combine the grated zucchini, grated cheese, eggs, flour, salt, pepper, garlic powder (if using), and milk. Mix until well incorporated.
  3. Heat a skillet or non-stick frying pan over medium heat and add a bit of oil or butter.
  4. Scoop about 2 tablespoons of the batter per pancake into the hot pan. Flatten slightly with the back of the spoon.
  5. Cook for 2–3 minutes on each side or until golden brown and cooked through.
  6. Transfer to a paper towel-lined plate. Repeat with the remaining batter, adding more oil or butter as needed.
  7. Serve hot with your favorite dipping sauce, sour cream, or a sprinkle of fresh herbs.

Notes

  • For extra flavor, add chopped fresh herbs like dill, parsley, or chives to the batter.
  • You can mix and match the cheese based on what you have on hand.
  • Make a double batch and reheat leftovers in the oven or air fryer to retain crispness.
  • Great for using up extra zucchini during peak summer season.
  • Prep Time: 10 minutes
  • Cook Time: 15 minutes
  • Category: Side Dish
  • Method: Pan-fried
  • Cuisine: American

A Dish that Feels Like Home: Creamy Cauliflower Bake with Beet-Cabbage Salad

There’s something profoundly comforting about food that brings you back to simpler times. When I first learned this cauliflower recipe, it wasn’t from a cookbook or some online post. It was from my grandmother’s faded, handwritten recipe cards, tucked into the back of an old wooden drawer in her warm country kitchen. Every Sunday afternoon, she’d pull together whatever was fresh from the garden and the pantry, and somehow, without fail, a nourishing, unforgettable meal emerged from it.

One day, it was this humble yet spectacular cauliflower bake, served hot with a side of cool beet and cabbage salad. The contrast of textures—the creamy baked cauliflower mingling with the sharp, earthy crunch of beets and the crisp cabbage—was unforgettable. It was one of those dishes you remember not just for the flavor, but for how it made you feel: full, loved, and content. That same day, we sat around the table talking and laughing as the golden crust on top crackled under our forks. I’ll never forget it.

Today, I’m sharing this recipe not just because it’s delicious and easy to make, but because it represents everything I love about home cooking. It’s real food that warms you up, body and soul.

Why This Cauliflower Recipe Deserves a Spot in Your Kitchen

This isn’t your average cauliflower dish. It’s layered with flavor and contrast—from the soft and subtly sweet cauliflower, to the creamy richness of sour cream and eggs, to the sharpness of garlic and dill in the salad. The entire plate is a textural journey: velvety custard-like base, crisped breadcrumb topping, and a refreshing, crunchy side salad.

Whether you’re preparing a cozy family dinner, a potluck dish to impress, or just want something comforting on a quiet evening, this dish is versatile, balanced, and completely satisfying.

Ingredients

IngredientAmount
Cauliflower1 medium head
Salt2 teaspoons + 1 tablespoon
Breadcrumbs (for base)4 tablespoons
Eggs (for base)2
Sour cream (for base)200g
Sunflower oil2 tablespoons
Milk250ml
PepperTo taste
Breadcrumbs (for topping)3 tablespoons
Cheese70g, grated
Eggs (for topping)2
Chinese cabbage1/2 head, shredded
Beets2, boiled and grated
DillA handful, chopped
Sour cream (for salad)1 tablespoon
Mayonnaise1 tablespoon
Garlic2 cloves, minced

Directions

Step 1: Prepare the Cauliflower Base

  1. Preheat oven to 180°C (350°F).
  2. Break the cauliflower into florets and boil in salted water (2 tsp salt) until tender but firm. Drain well.
  3. In a bowl, beat 2 eggs, mix in 200g sour cream, 4 tablespoons breadcrumbs, and season with pepper.
  4. Fold the cauliflower into the mixture. Pour into a lightly oiled baking dish.

Step 2: Add the Creamy Topping
5. In a separate bowl, whisk 250ml milk, 1 tablespoon salt, 2 eggs, and mix in 70g grated cheese.
6. Pour this over the cauliflower mixture. Sprinkle 3 tablespoons breadcrumbs on top for crunch.
7. Drizzle with sunflower oil. Bake for 35–40 minutes, until golden and bubbling.

Step 3: Make the Beet-Cabbage Salad
8. In a bowl, combine shredded Chinese cabbage, grated beets, and chopped dill.
9. Mix 1 tablespoon sour cream with 1 tablespoon mayonnaise and minced garlic.
10. Stir the dressing into the salad just before serving.

Nutritional Information (per serving, approx.)

NutrientAmount
Calories340 kcal
Protein12g
Carbohydrates22g
Dietary Fiber5g
Fat22g
Saturated Fat6g
Calcium180mg
Iron2.1mg
Vitamin C55mg
Folate90µg

A Tale of Two Textures: Baked and Chilled Perfection

The beauty of this meal lies in its pairing. The baked cauliflower is deeply savory and slightly indulgent thanks to the cheese and sour cream. It’s creamy, yet the crispy breadcrumb topping provides the contrast that makes each bite interesting. Meanwhile, the salad of beets, Chinese cabbage, and dill delivers a cooling, crunchy bite that lifts the richness of the bake.

What makes the salad even more special is its use of both mayonnaise and sour cream—lending it that nostalgic Eastern European feel. The garlic and dill cut through the sweetness of the beets and the cabbage, creating a beautifully balanced, tangy, herby bite.

Healthier Than You Think, Yet Still Comforting

Cauliflower is a true star here—not just for its flavor but for its nutritional benefits. It’s low in calories but high in fiber, vitamin C, and antioxidants. Combined with milk, eggs, and a modest amount of cheese, the bake becomes a hearty yet nutrient-rich main course.

The side salad adds another layer of health-conscious benefits. Beets support heart health and blood flow, cabbage is loaded with vitamin K and fiber, and garlic offers immune-boosting properties. It’s a perfect combination of indulgence and wellness—a rare and welcome balance.

Perfect for Every Season

What’s remarkable about this dish is its year-round appeal. In the colder months, the hot, cheesy cauliflower bake is just the kind of thing you want to pull out of the oven as the rain taps at the window. It fills the house with a toasty, savory aroma that makes you want to curl up in a blanket.

In the warmer seasons, the chilled salad brings a refreshing note to the table. The beet-cabbage medley is light, colorful, and just the thing you’d want on a sunny patio lunch.

Make It Yours: Simple Swaps and Add-Ons

This recipe is wonderfully adaptable. Here are some ideas to make it your own:

  • Add Herbs: While dill is featured in the salad, you could add thyme or chives to the bake for an herby depth.
  • Switch the Cheese: Try Gruyère, feta, or even sharp cheddar for a bolder flavor.
  • Add Protein: Want more staying power? Shredded chicken or cooked lentils can be folded into the bake.
  • Vegan Twist: Swap the dairy elements with plant-based versions like almond milk, vegan sour cream, and cheese alternatives.

The salad can also be expanded with carrots, apples, or even a handful of walnuts for a bit of crunch and sweetness.

Tips for Getting It Just Right

  • Drain the Cauliflower Well: After boiling, let the cauliflower sit in a colander for a few minutes. Excess moisture will make the bake watery.
  • Use Fresh Beets: Boil them yourself instead of using canned. The difference in flavor and texture is worth it.
  • Grate, Don’t Chop: Grating the beets and cabbage helps the salad absorb the dressing more evenly, creating a creamier texture.

Frequently Asked Questions

Q: Can I make the cauliflower bake ahead of time?
Yes! Prepare and assemble the bake, cover, and refrigerate it up to 24 hours in advance. When ready to serve, simply bake as directed, adding an extra 5-10 minutes if straight from the fridge.

Q: Is this freezer-friendly?
The cauliflower bake can be frozen after baking. Allow it to cool completely, wrap tightly in foil or freezer-safe wrap, and store for up to 2 months. Reheat in the oven at 180°C (350°F) until warmed through.

Q: Can I use frozen cauliflower instead of fresh?
Absolutely. Just make sure to thaw and drain it well before using. Fresh tends to hold up better in texture, but frozen works in a pinch.

Q: How long will the salad keep?
The salad stays crisp for about 2 days in the fridge. After that, the cabbage may begin to soften and the colors from the beet may bleed more. It’s best served within the first 24 hours.

Q: Is Chinese cabbage the same as Napa cabbage?
Yes, they are often used interchangeably. Chinese/Napa cabbage has a softer texture and milder flavor than green cabbage, which makes it perfect for raw salads.

Q: Can I use Greek yogurt instead of sour cream?
You can! Greek yogurt will give a tangier flavor and a slightly lighter consistency, but it’s a great substitute, especially for the salad.

The Kind of Meal That Sticks With You

This cauliflower bake with beet-cabbage salad is more than just a meal—it’s a reminder of the small, nourishing moments that bring people together. It’s food that comforts without being heavy, delights without being complicated. And best of all, it brings vibrant colors and textures to the table.

Whether you’re making this for the first time or the fiftieth, it’s a recipe that becomes part of your home. The kind you pass down, tweak with love, and remember in the warmth of shared meals and stories.

So pull out your mixing bowls, turn up your oven, and make something simple and beautiful. You might just create a new memory around the table.

Print
clock clock iconcutlery cutlery iconflag flag iconfolder folder iconinstagram instagram iconpinterest pinterest iconfacebook facebook iconprint print iconsquares squares iconheart heart iconheart solid heart solid icon

A Dish that Feels Like Home: Creamy Cauliflower Bake with Beet-Cabbage Salad


  • Author: Paul
  • Total Time: 1 hour
  • Yield: 46 servings 1x

Description

This creamy cauliflower bake is comfort food at its finest—tender florets baked in a velvety sour cream and cheese mixture, finished with a golden breadcrumb topping. Paired with a refreshing beet and cabbage salad dressed in garlic, dill, sour cream, and mayo, this dish brings balance, color, and a whole lot of flavor to your table.


Ingredients

Scale

For the Cauliflower Bake:

  • 1 medium head cauliflower
  • 2 teaspoons salt (for boiling)
  • 4 tablespoons breadcrumbs
  • 2 eggs
  • 200g sour cream
  • 2 tablespoons sunflower oil
  • 250ml milk
  • 1 tablespoon salt
  • Pepper to taste
  • 3 tablespoons breadcrumbs (for topping)
  • 70g cheese, grated
  • 2 eggs (for topping)

For the Beet-Cabbage Salad:

  • 1/2 head Chinese cabbage, finely shredded
  • 2 cooked beets, grated
  • A handful of fresh dill, chopped
  • 1 tablespoon sour cream
  • 1 tablespoon mayonnaise
  • 2 cloves garlic, minced

Instructions

  1. Preheat the oven to 180°C (350°F).
  2. Break the cauliflower into florets. Boil in salted water (2 teaspoons salt) for about 5–7 minutes until tender but not mushy. Drain and set aside.
  3. In a large bowl, beat 2 eggs. Add sour cream, 4 tablespoons breadcrumbs, salt, and pepper. Stir to combine.
  4. Fold the cooked cauliflower into the mixture, coating it evenly. Pour into a greased baking dish.
  5. In a separate bowl, whisk 2 eggs with milk. Stir in grated cheese. Pour this mixture over the cauliflower in the baking dish.
  6. Sprinkle with 3 tablespoons of breadcrumbs and drizzle with sunflower oil.
  7. Bake for 35–40 minutes or until golden and bubbling on top.
  8. While the bake is in the oven, prepare the salad.
  9. In a mixing bowl, combine shredded cabbage, grated beets, dill, garlic, sour cream, and mayonnaise. Mix well and chill until serving.
  10. Serve the cauliflower bake hot, paired with a side of the beet-cabbage salad.

Notes

  • You can substitute Greek yogurt for sour cream for a lighter version.
  • Add a pinch of nutmeg or smoked paprika to the topping for extra warmth and depth.
  • The salad tastes even better when made a few hours ahead—perfect for meal prep!
  • Want extra crunch? Toss a few crushed walnuts into the salad.
  • Prep Time: 20 minutes
  • Cook Time: 40 minutes
  • Category: Main Dish
  • Method: Baking
  • Cuisine: European-inspired

Crispy Potato Strips: A Comforting Delight for Every Occasion

There’s something incredibly comforting about the simple act of frying potatoes. Growing up, my family had a tradition of making crispy potato strips on rainy days or when we needed a quick snack that would bring everyone together. I can still vividly recall the warmth of the kitchen, the sizzling sound of potatoes frying, and the smell that would fill the house. It wasn’t just about the food—it was about the memories, the conversations, and the laughter that accompanied every meal.

As I got older and moved away from home, I found myself craving that same sense of warmth. On a particularly chilly autumn evening, I decided to recreate those crispy potato strips that had been such a staple in my childhood. I grabbed a few simple ingredients from the pantry and set to work. As the potatoes fried and the aroma filled the air, I realized that it wasn’t just about the taste—it was about the connection to my roots, to family, and to the comfort of home.

This recipe for crispy potato strips is a tribute to those moments—simple, satisfying, and full of heart. It’s a reminder that comfort food doesn’t have to be complicated. Sometimes, it’s the most basic ingredients that create the most unforgettable experiences.

The Magic of Crispy Potato Strips

Potatoes have always been a staple in my kitchen. They are versatile, inexpensive, and incredibly satisfying. Whether mashed, roasted, or fried, they can be transformed into a variety of comforting dishes. However, there’s something uniquely satisfying about crispy potato strips, also known as French fries. When done right, they have a perfect balance of crunch on the outside and a tender, fluffy interior.

The secret to achieving the perfect crispy texture lies in a few key steps. First, the potatoes must be cut into even strips, ensuring they cook uniformly. The second step is the rinsing process—removing excess starch helps the fries achieve that crispy exterior. The final trick is to coat the potatoes with cornstarch, which adds an extra layer of crunch. It’s a technique that I learned through trial and error over the years, and I’m happy to share it with you now.

What makes these potato strips truly special is the addition of a cheese sauce made from melted cheese, onions, garlic, and red bell pepper. The sauce is creamy, rich, and perfectly complements the crispy potatoes. This combination of crispy fries and cheesy goodness is the ultimate indulgence and a meal that’s both comforting and satisfying.

Ingredients:

IngredientQuantity
Potatoes3
SaltTo taste
ParsleyChopped
Onion1 medium, finely chopped
Garlic2 cloves, minced
Red bell pepper1, diced
Cheese200g (reserve 50g for sauce)
Black pepperTo taste
Cornstarch5 tbsp

Directions:

  1. Prep the potatoes: Peel and cut the potatoes into thin strips. Rinse them well in cold water to remove excess starch, and pat them dry with a clean towel.
  2. Season the potatoes: In a large bowl, toss the potato strips with salt, pepper, and cornstarch. Make sure the potatoes are evenly coated. This will help them crisp up when fried.
  3. Fry the potatoes: Heat some vegetable oil in a deep pan over medium-high heat. Fry the potato strips in batches until they are golden and crispy. Remove them from the oil and drain on paper towels to remove excess oil.
  4. Make the sauce: In a separate pan, sauté the onion, garlic, and red bell pepper in a little oil until they are softened. Add the grated cheese (reserve 50g) and stir until it melts, creating a creamy sauce. Season with salt and pepper to taste.
  5. Serve: Toss the crispy fries with chopped parsley and top them with the cheese sauce before serving.

Nutrients (per serving, approx.):

NutrientAmount
Calories250-300 kcal
Protein6g
Carbohydrates35g
Fats12g
Fiber3g
Sugars2g

Why This Recipe Is Perfect for Every Occasion

One of the things I love most about crispy potato strips is their versatility. They can be served as a side dish for a family meal, an appetizer for a gathering, or even as a late-night snack. The crispy texture and cheesy topping make them an instant crowd-pleaser. Whether you’re having a casual dinner at home or hosting a party, this recipe will never disappoint.

When I make these crispy fries, they always seem to bring people together. I’ve had friends over for dinner, and as soon as they taste these fries, they want the recipe. It’s one of those dishes that instantly sparks conversation and creates a sense of togetherness. It’s also a recipe that can be adapted to suit different tastes—whether you prefer your fries plain or topped with herbs, spices, or even bacon, the options are endless.

The Nutritional Value of Crispy Potato Strips

While crispy potato strips are undeniably a treat, they also offer nutritional benefits. Potatoes are a great source of vitamins and minerals, particularly vitamin C, potassium, and fiber. When combined with fresh vegetables like red bell peppers and onions in the sauce, this dish becomes even more nutritious. The cheese provides a dose of protein and calcium, making it a balanced yet indulgent option for your meals.

It’s important to note that while this dish is a treat, it can be made healthier by adjusting the cooking method. For example, using an air fryer instead of deep frying can help reduce the fat content while still maintaining the crispy texture. Additionally, you can experiment with different cheese varieties for a lighter option. The beauty of this recipe is that it can be tailored to meet your dietary preferences while still delivering the comforting flavors you love.

FAQs About Crispy Potato Strips

1. Can I use other types of potatoes for this recipe? Yes! While russet potatoes are the most commonly used variety for fries due to their starchy content, you can also use Yukon Gold potatoes or even sweet potatoes for a different flavor and texture. Each type of potato will give you a slightly different result, but they all work well for crispy fries.

2. Can I bake the potato strips instead of frying them? Yes, you can bake the potato strips for a healthier alternative to deep frying. To do so, toss the potato strips with a little oil and bake them in a preheated oven at 425°F (220°C) for about 25-30 minutes, flipping them halfway through to ensure even crisping.

3. Can I prepare the potato strips in advance? You can prep the potatoes by slicing them and storing them in cold water for up to 24 hours. This helps remove excess starch and keeps them from browning. Just make sure to pat them dry thoroughly before cooking to achieve the best crispiness.

4. How can I make the cheese sauce without dairy? If you prefer a dairy-free version, you can substitute the cheese with a plant-based cheese or use a cashew-based sauce. There are many dairy-free cheese options available that melt well and can be used as a substitute in this recipe.

5. How do I store leftovers? If you have any leftover crispy potato strips, store them in an airtight container in the refrigerator for up to two days. While they’re best enjoyed fresh, you can reheat them in the oven to restore some of their crispiness. The cheese sauce can be stored separately and reheated gently on the stove.

The Joy of Sharing This Recipe

As I sit down to enjoy a plate of crispy potato strips with my loved ones, I’m reminded of the power of food to bring people together. Whether you’re sharing this dish with friends, family, or even enjoying it solo on a quiet evening, there’s something truly comforting about a plate of perfectly crispy potatoes. This recipe is a celebration of simplicity, flavor, and the joy of cooking something that not only tastes delicious but also creates lasting memories.

Conclusion: A Dish to Cherish

Crispy potato strips are more than just a snack or side dish—they are a way to connect with those around you and create lasting memories. Whether it’s a cozy family dinner or a weekend gathering with friends, this recipe is sure to be a hit. With its simple ingredients, easy preparation, and irresistible flavor, it’s a dish that will become a staple in your kitchen. I encourage you to try it, add your own twists, and make it a part of your own food traditions.

Sometimes, the best meals are the simplest ones. The crispy, golden potatoes topped with a creamy, cheesy sauce are a reminder that good food doesn’t have to be complicated to be memorable. So go ahead, make these crispy potato strips, and share them with the people you care about most. You’ll find that in each bite, you’re not just tasting the food—you’re savoring the moments that make life truly special.

Print
clock clock iconcutlery cutlery iconflag flag iconfolder folder iconinstagram instagram iconpinterest pinterest iconfacebook facebook iconprint print iconsquares squares iconheart heart iconheart solid heart solid icon

Crispy Potato Strips: A Comforting Delight for Every Occasion


  • Author: Paul
  • Total Time: 35 minutes
  • Yield: 46 servings 1x

Description

These crispy potato strips are the perfect combination of crunchy, tender, and delicious. Tossed in cornstarch and fried to golden perfection, they’re a snack everyone will love. Paired with a creamy, cheesy sauce made with fresh vegetables and savory cheese, they make for a mouthwatering side dish or a satisfying treat anytime.


Ingredients

Scale
  • 3 potatoes, peeled and cut into strips
  • Salt, to taste
  • Parsley, chopped (for garnish)
  • 1 onion, finely chopped
  • 2 cloves garlic, minced
  • 1 red bell pepper, diced
  • 200g cheese, grated (reserve 50g for the sauce)
  • Black pepper, to taste
  • 5 tbsp cornstarch

Instructions

  1. Prepare the potatoes: Peel and cut the potatoes into thin strips. Rinse them under cold water and pat them dry with paper towels to remove excess moisture.
  2. Season the potatoes: In a large mixing bowl, toss the potato strips with salt, pepper, and cornstarch. Make sure they are evenly coated, which helps achieve that crispiness.
  3. Fry the potatoes: Heat vegetable oil in a deep pan over medium-high heat. Fry the potato strips in batches for about 3-4 minutes until golden brown and crispy. Remove them from the oil and drain them on paper towels.
  4. Make the cheese sauce: In a separate pan, sauté the onion, garlic, and red bell pepper in a little oil until softened. Add the grated cheese (reserve 50g) and stir until it melts into a creamy sauce. Season with salt and pepper to taste.
  5. Serve: Arrange the crispy potato strips on a plate, drizzle the cheese sauce on top, and garnish with chopped parsley. Serve hot and enjoy!

Notes

  • If you prefer a lighter option, you can bake the potato strips instead of frying them. Just toss them with a little oil and bake at 425°F (220°C) for 25-30 minutes, flipping halfway through for even crispiness.
  • You can customize the cheese sauce by adding your favorite herbs or spices, such as oregano, thyme, or chili flakes, for an extra flavor kick.
  • For a complete meal, serve these crispy potato strips with a side of salad or grilled chicken.
  • Prep Time: 15 minutes
  • Cook Time: 20 minutes
  • Category: Snack
  • Method: Frying
  • Cuisine: American

Delightful and Simple Flourless Cake: A Daily Treat

There’s something deeply comforting about a cake that doesn’t require a long list of ingredients or hours in the kitchen. A cake that, despite its simplicity, can bring a smile to your face and joy to your day. This flourless cake is one of those recipes that always reminds me of the warmth of family gatherings and the simple pleasures in life. I first learned to make this cake from my mother, who would bake it as a light, everyday dessert. I remember sitting in the kitchen, the scent of the cake filling the air, and the excitement of sharing a slice with my siblings after school.

Unlike many complex desserts that require intricate techniques or special tools, this flourless cake brings together basic ingredients in a way that feels almost magical. With just a few pantry staples and a little love, you create a delicate cake that’s light yet indulgent. The first time I baked this cake on my own, I was in my early twenties, far away from home, living in a small apartment. I wanted to recreate those moments from my childhood, so I pulled out the recipe and followed it step by step. The first bite was an emotional one—it tasted like home, like all those wonderful memories of my family.

This cake has since become a staple in my kitchen, not just for special occasions but for those quiet, ordinary days when I need a little sweetness in my life. It’s a reminder that sometimes, the best things come from the simplest of ingredients, and that a little bit of effort can create something truly heartwarming.

Why Flourless? The Beauty of Simplicity

Flourless cakes have a long history, often associated with those who have gluten sensitivities or simply want a lighter, less heavy dessert. But the beauty of a flourless cake goes far beyond dietary needs. It’s a celebration of simplicity, using eggs, sugar, yogurt, and corn starch to create something that’s not only delicious but also surprisingly light. There’s no need for complex techniques or the addition of multiple layers or frostings; this cake’s charm lies in its uncomplicated nature.

The texture of a flourless cake is one of its most remarkable qualities. Instead of the dense, sometimes heavy feel of traditional cakes, a flourless cake is light, almost mousse-like. The combination of egg yolks, egg whites, and yogurt results in a soft, airy sponge that feels almost cloud-like when you take a bite. The beauty of this cake is in how these simple ingredients come together to form a delicate balance of flavors and textures, each bite melting effortlessly in your mouth.

Ingredients:

IngredientQuantity
Egg yolks4
Natural yoghurt400g
Sugar40g
Corn starch50g
Baking powder2g
Egg whites4
SaltA pinch
Sugar40g

Directions:

  1. Prepare the ingredients: Preheat the oven to 350°F (175°C) and line a round cake pan with parchment paper, ensuring it covers the base and sides.
  2. Make the batter: In a large bowl, whisk together the egg yolks, natural yogurt, 40g of sugar, corn starch, and baking powder until smooth and well combined. Set this mixture aside.
  3. Beat the egg whites: In a separate clean bowl, add the egg whites and a pinch of salt. Use an electric mixer to beat the egg whites until soft peaks form. Gradually add the remaining 40g of sugar and continue to beat until stiff peaks form.
  4. Combine the mixtures: Gently fold the beaten egg whites into the yogurt mixture. Be careful not to deflate the egg whites as you incorporate them. The mixture should be light and fluffy.
  5. Bake the cake: Pour the batter into the prepared cake pan and smooth the top. Bake in the preheated oven for 30-35 minutes, or until the cake is set and slightly golden on top.
  6. Cool and serve: Allow the cake to cool in the pan for a few minutes before transferring it to a wire rack. Once fully cooled, slice and serve. Enjoy this delicate, flourless cake as a sweet, light treat for any occasion.

Nutrients (per serving, approx.):

NutrientAmount
Calories120-140 kcal
Protein6g
Carbohydrates15g
Fats3g
Fiber0g
Sugars14g

How This Cake Became a Family Favorite

This cake is incredibly versatile—it can be dressed up for a special occasion or enjoyed on a quiet Sunday afternoon with a cup of tea. Over the years, I’ve adapted it to suit different occasions, adding fresh fruit, chocolate shavings, or even a dusting of powdered sugar. But no matter how I serve it, it always brings back memories of my family and the simple, delicious desserts we enjoyed together.

There’s a certain magic in the way this cake connects people. My mother would often make this when we had guests over, and it would never fail to elicit compliments from even the pickiest eaters. The cake, with its tender crumb and subtle sweetness, was always the star of the meal, despite being one of the easiest desserts to prepare. As I’ve gotten older, I’ve made it for my own family, passing on the tradition of enjoying a light, comforting treat at the end of a busy day.

A Cake for Every Occasion

While this flourless cake is simple enough for an everyday treat, it’s also elegant enough for a special gathering. The beauty of the cake lies in its adaptability. You can serve it as is, with its pure, unadulterated flavors, or you can experiment with different toppings and fillings. Adding a dollop of whipped cream or a drizzle of chocolate ganache can elevate the cake into something more indulgent. Fresh berries or citrus slices can give it a refreshing twist, making it the perfect dessert for any season.

For those who prefer a richer flavor, this cake also pairs wonderfully with a strong coffee or tea, offering a comforting end to a meal. It’s the kind of cake that never feels too heavy, which makes it perfect for any time of day. It’s the kind of cake that you can make without much thought, and yet it still manages to impress.

FAQs About the Flourless Cake

  1. Can I substitute the yogurt with something else? Yes, if you don’t have yogurt on hand, you can substitute it with sour cream, mascarpone, or even a bit of buttermilk. These substitutes will provide a similar creamy texture and mild tanginess to the cake.
  2. How can I store this cake? This cake can be stored in an airtight container at room temperature for up to 2 days. If you want to keep it longer, store it in the refrigerator for up to a week. Be sure to allow the cake to come to room temperature before serving for the best texture.
  3. Can I make this cake ahead of time? Absolutely! This cake is perfect for making ahead. In fact, it often tastes even better the next day as the flavors have time to meld together. Simply store it in the refrigerator and allow it to come to room temperature before serving.
  4. Can I freeze this cake? Yes, you can freeze this flourless cake. Wrap it tightly in plastic wrap and foil, and store it in the freezer for up to 2 months. To thaw, leave it at room temperature for a few hours or overnight in the refrigerator. This makes it a great option for preparing in advance for a special occasion or simply having a ready-to-serve dessert on hand.
  5. What can I use to decorate the cake? This cake can be decorated with a variety of toppings. Fresh fruit like berries, citrus slices, or kiwi complement the lightness of the cake beautifully. You can also drizzle melted chocolate or a dusting of powdered sugar for an elegant touch. Whipped cream or a scoop of ice cream can also make a delicious pairing.

Conclusion: A Simple Yet Satisfying Delight

There’s a quiet joy in making something that requires so little effort but delivers such a satisfying result. This flourless cake, with its light and airy texture, is a perfect example of how the simplest ingredients can come together to create something truly wonderful. It’s a cake that brings comfort, nostalgia, and a sense of home with every bite.

Whether you’re looking for an easy dessert to brighten your day or something special for a gathering, this flourless cake fits the bill. It’s a cake that invites creativity, whether you choose to enjoy it plain or add your personal touch with toppings and fillings. And as you serve it to your loved ones, you’ll be passing on more than just a recipe—you’ll be creating moments of joy, just as my family did when I first learned to bake this cake.

So, the next time you need a simple, elegant dessert, remember this flourless cake. It may just become your go-to treat for all the sweet moments in your life.

Print
clock clock iconcutlery cutlery iconflag flag iconfolder folder iconinstagram instagram iconpinterest pinterest iconfacebook facebook iconprint print iconsquares squares iconheart heart iconheart solid heart solid icon

Delightful and Simple Flourless Cake: A Daily Treat


  • Author: Paul
  • Total Time: 45 minutes
  • Yield: 810 servings 1x

Description

This flourless cake is light, airy, and incredibly easy to make. With just a few basic ingredients—eggs, yogurt, sugar, and cornstarch—it’s the perfect everyday dessert that delivers delicate sweetness and a soft, mousse-like texture.


Ingredients

Scale
  • 4 egg yolks
  • 400g of natural yoghurt
  • 40g of sugar
  • 50g of corn starch
  • 2g of baking powder
  • 4 egg whites
  • A pinch of salt
  • 40g of sugar (for the egg whites)

Instructions

  1. Preheat the oven to 350°F (175°C). Line a round cake pan with parchment paper, making sure it covers the bottom and sides.
  2. In a large mixing bowl, whisk together the egg yolks, natural yogurt, sugar, corn starch, and baking powder until smooth and well combined. Set aside.
  3. In a separate clean bowl, whisk the egg whites with a pinch of salt. Beat until soft peaks form. Gradually add in the remaining sugar and continue beating until stiff peaks form.
  4. Carefully fold the beaten egg whites into the egg yolk mixture. Use a gentle folding motion to avoid deflating the egg whites.
  5. Pour the batter into the prepared cake pan and smooth out the top. Bake for 30-35 minutes or until the cake is set and lightly golden on top.
  6. Let the cake cool in the pan for a few minutes, then transfer to a wire rack to cool completely. Once cooled, slice and serve.

Notes

  • If you prefer a richer texture, you can substitute the natural yogurt with sour cream or mascarpone cheese for a creamier result.
  • You can top the cake with fresh berries, whipped cream, or a dusting of powdered sugar to enhance the flavor.
  • This cake can be stored at room temperature for up to two days in an airtight container.
  • Prep Time: 10 minutes
  • Cook Time: 35 minutes
  • Category: Dessert
  • Method: Baking
  • Cuisine: European-inspired

Fluffy Custard Roll Cake: A Nostalgic Treat for All Occasions

Growing up, I often remember my grandmother making the most beautiful cakes, from decadent layered treats to light, airy rolls that seemed to melt in your mouth. One cake, in particular, always stood out: the delicate, fluffy custard roll cake. It wasn’t just a dessert; it was a moment of comfort and nostalgia that filled the room with sweetness and warmth. Whenever the cake was rolled out, it felt like home, like a reminder of simple joys.

As I’ve grown older, I’ve come to appreciate not just the flavors but also the effort and care that went into those homemade treats. And every time I bake this custard roll cake, I am transported back to those cherished moments in the kitchen with my grandmother. It’s not just a recipe; it’s a celebration of family, tradition, and the small, beautiful moments that make life sweet.

This custard roll cake is my way of keeping that memory alive. It’s easy to make, yet so satisfying. A perfect balance of sweetness and fluffiness, the cake can be enjoyed on its own or filled with a variety of sweet fillings like whipped cream, chocolate, or fruit. It’s the perfect recipe to recreate in your own kitchen, whether you’re making it for a special occasion or just to bring a little joy to your day.

The Magic of Cake: Why Custard Roll Cakes Are So Special

A custard roll cake is a dessert that combines the best of both worlds: light and airy sponge cake with a rich, creamy custard filling. This unique texture combination makes the cake feel indulgent, yet it remains light and not overly sweet. When properly executed, the sponge is soft and springy, while the custard provides a luxurious mouthfeel that contrasts perfectly with the fluffy cake.

The appeal of a roll cake lies not only in its lightness but also in the ease with which it can be prepared. Unlike layered cakes, which require careful stacking and frosting, a roll cake is straightforward. It’s rolled up after baking, creating a beautiful spiral of flavor. The beauty of the custard roll cake lies in its versatility as well – it can be customized with various fillings, including chocolate ganache, whipped cream, fruit preserves, or even a citrus curd.

Ingredients:

IngredientQuantity
Eggs2 (126g)
Allulose (or sugar)70g (7 Tbsp)
Salt1g (2 pinches)
Milk150ml
Cake flour (all-purpose flour)150g
Vegetable cooking oil10g (1 Tbsp)
Baking powder4g (1 tsp)

Directions:

  1. Preheat and prepare: Preheat your oven to 350°F (175°C). Line a baking tray with parchment paper, ensuring the edges are covered.
  2. Mix the wet ingredients: In a large bowl, whisk the eggs, allulose (or sugar), and salt together until the mixture is pale and fluffy. Gradually add the milk and vegetable oil, whisking until smooth.
  3. Sift and combine the dry ingredients: Sift together the cake flour and baking powder to ensure a light and airy texture. Gradually fold the dry ingredients into the wet mixture, being careful not to deflate the batter.
  4. Bake: Pour the batter into the prepared tray and spread evenly. Bake for 12-15 minutes, or until the cake is golden and a toothpick inserted in the center comes out clean.
  5. Cool and roll: Once baked, remove the cake from the oven and let it cool for a few minutes. Then, gently roll the cake in the parchment paper while it’s still warm, to help maintain its shape.
  6. Serve and enjoy: Allow the cake to cool completely before unrolling and adding your desired filling, such as whipped cream or custard, then roll it back up. Slice and enjoy a fluffy, sweet treat!

Nutrients (per serving, approx.):

NutrientAmount
Calories180-200 kcal
Protein5g
Carbohydrates30g
Fats7g
Fiber1g
Sugars10-15g

What Makes the Custard Roll Cake So Special?

The simplicity of this custard roll cake is what makes it such a beloved dessert. At its core, it’s a soft sponge cake that’s both comforting and decadent. The soft, airy texture of the cake is the result of careful folding and mixing, which incorporates air into the batter, ensuring a light, fluffy outcome. The addition of custard adds a layer of richness that balances the lightness of the cake perfectly.

The custard itself can be made with milk, eggs, sugar, and a touch of vanilla, creating a velvety smooth texture that complements the sponge’s fluffiness. This makes it an ideal dessert for those who love rich, creamy textures without the heaviness of a traditional custard pie or cake. The beauty of the custard roll cake lies in its ability to be both satisfying and light, offering the perfect ending to any meal or a delightful afternoon snack.

A Cake for Every Occasion

The custard roll cake is a fantastic dessert for any occasion, from casual gatherings to more formal celebrations. It’s the kind of dessert that doesn’t require intricate techniques or special tools, making it accessible for bakers of all skill levels. Whether you’re making it for a birthday party, a family gathering, or just as a treat for yourself, it’s sure to impress anyone who tries it.

What makes this cake even more special is its adaptability. You can easily experiment with different fillings depending on your preferences or the season. During the warmer months, a citrus-based custard with a hint of lemon or orange can offer a refreshing twist. Alternatively, you could fill it with chocolate custard or whipped cream and top it with fresh berries for a decadent dessert that feels like a celebration.

FAQs About the Custard Roll Cake

  1. Can I make the custard ahead of time? Yes, you can make the custard ahead of time! Simply prepare the custard, allow it to cool, and then store it in the refrigerator. When you’re ready to use it, bring it to room temperature or lightly reheat it before spreading it onto the cake.
  2. Can I freeze the custard roll cake? Yes, the cake can be frozen. After you’ve rolled the cake, wrap it tightly in plastic wrap and foil, then store it in the freezer for up to 3 months. To thaw, let it sit in the fridge overnight or leave it at room temperature for a few hours. It’s best enjoyed within a week of thawing for optimal freshness.
  3. Can I use a different filling? Absolutely! While custard is traditional, you can fill your roll cake with a variety of sweet fillings. Chocolate ganache, whipped cream, fruit preserves, or even a rich mascarpone cream work wonderfully. The versatility of the roll cake makes it easy to adapt to your preferences.
  4. What should I do if my cake cracks while rolling it? Don’t worry! If your cake cracks slightly while rolling, it’s not the end of the world. If the crack isn’t too severe, you can still roll it up, and the filling will hide most of the imperfections. However, if the cracks are extensive, you can try gently warming the cake and rolling it more slowly. If you’re concerned about cracking, you can even cut the cake into smaller rolls and serve them individually, which can be just as charming.
  5. Can I make this cake without eggs? Yes! For a vegan version of the custard roll cake, you can replace the eggs with egg replacers such as flaxseed meal or aquafaba (the liquid from a can of chickpeas). There are also plant-based custard recipes available that use non-dairy milk and cornstarch as thickening agents.
  6. What can I pair with this cake for a complete dessert experience? This cake pairs wonderfully with fresh fruit like strawberries, blueberries, or raspberries. It also complements a light cup of tea or coffee. For added richness, serve it with a scoop of vanilla ice cream or a drizzle of chocolate sauce.

Conclusion: A Recipe to Treasure

The custard roll cake is more than just a dessert; it’s a tradition, a memory, and a celebration of the simple joys of life. The beauty of this cake lies in its elegance and versatility. It’s the perfect treat to share with friends and family, a reminder that sometimes the best moments are those spent together, enjoying a delicious homemade dessert.

Whether you’re revisiting an old family recipe or making it for the first time, the custard roll cake brings something special to any occasion. It’s a recipe that will continue to be passed down from one generation to the next, bringing people together to share in the joy of baking and, of course, the pleasure of eating something made with love.

So, next time you’re looking for a dessert that’s both comforting and impressive, why not try making a custard roll cake? It might just become a new tradition in your own home.

Print
clock clock iconcutlery cutlery iconflag flag iconfolder folder iconinstagram instagram iconpinterest pinterest iconfacebook facebook iconprint print iconsquares squares iconheart heart iconheart solid heart solid icon

Fluffy Custard Roll Cake: A Nostalgic Treat for All Occasions


  • Author: Paul
  • Total Time: 25 minutes
  • Yield: 810 servings 1x

Description

This Fluffy Custard Roll Cake is the perfect balance of light, airy sponge and rich, velvety custard. A versatile dessert that’s simple to make yet delightful to eat, it can be enjoyed with a variety of fillings, from classic custard to whipped cream or fruit preserves.


Ingredients

Scale
  • 2 eggs (126g)
  • 70g (7 tbsp) Allulose (or sugar)
  • 1g Salt (2 pinches)
  • 150ml Milk
  • 150g Cake flour (all-purpose flour available)
  • 10g (1 tbsp) Vegetable cooking oil
  • 4g (1 tsp) Baking powder

Instructions

  1. Prepare the oven and baking tray: Preheat your oven to 350°F (175°C). Line a baking tray with parchment paper, making sure to cover the edges.
  2. Mix the wet ingredients: In a large mixing bowl, whisk together the eggs, allulose (or sugar), and salt until the mixture becomes pale and fluffy. Slowly add in the milk and vegetable oil, whisking until smooth.
  3. Sift the dry ingredients: Sift together the cake flour and baking powder to ensure that there are no lumps. Gradually fold the sifted flour mixture into the wet ingredients, taking care not to deflate the batter.
  4. Bake the cake: Pour the prepared batter into the lined tray and spread it out evenly. Bake in the preheated oven for 12-15 minutes, or until the cake is golden brown and a toothpick inserted into the center comes out clean.
  5. Roll the cake: Once baked, remove the cake from the oven and let it cool for a few minutes. Carefully roll the cake, along with the parchment paper, while it is still warm. Allow it to cool completely in the rolled position.
  6. Fill and serve: Once cooled, unroll the cake gently and spread your choice of filling (custard, whipped cream, fruit preserves, etc.) onto the cake. Carefully roll the cake back up, slice, and serve.

Notes

  • For added flavor, you can flavor the custard with vanilla, citrus zest, or a bit of cocoa powder for a chocolatey twist.
  • If you prefer a richer custard, you can use heavy cream instead of milk for a creamier filling.
  • This cake can be made a day ahead and stored in the fridge. Just make sure it is wrapped tightly to prevent it from drying out.
  • Prep Time: 10 minutes
  • Cook Time: 15 minutes
  • Category: Dessert
  • Method: Baking
  • Cuisine: European-inspired

A Hearty Dish from the Heart

It was a chilly winter afternoon, and I had just returned home from a long day. My mind was exhausted, but my body yearned for something simple, comforting, and nourishing. I opened my fridge, took stock of what was left—potatoes, eggs, some cheese, and a bit of leftover luncheon meat. As I looked at those humble ingredients, an idea began to take shape. I wanted a dish that would feel like a warm hug from the inside out, something familiar that could soothe both my hunger and my soul. What followed was a deliciously comforting, yet simple creation: a Potato and Egg Casserole. The combination of soft, tender potatoes, the richness of eggs, and the subtle saltiness of cheese and luncheon meat became a meal that would be the perfect end to a tiring day.

This dish isn’t just a recipe; it’s a reflection of the simplicity of home-cooked meals, the kind of food that ties us to memories, to family, and to the comforting moments when we need a little extra care. The beauty of this casserole lies in its flexibility—what started as an impromptu meal quickly became a household favorite. It became a dish I could make on any day, with ingredients I always had on hand. It’s the kind of recipe that doesn’t demand much time or expertise, yet yields something deeply satisfying.

Potatoes and Eggs: A Timeless Combination

The marriage of potatoes and eggs is one that has stood the test of time. Both ingredients are staples in households around the world, and together, they form a hearty base for countless dishes. The humble potato, versatile and comforting, pairs perfectly with eggs, adding richness and structure. Whether served scrambled, boiled, or in casseroles like this one, the two ingredients bring out the best in each other, creating a satisfying meal that can be enjoyed at any time of the day.

What makes potatoes so remarkable is their adaptability. They can be mashed, fried, baked, or even boiled, and they work well with almost anything—meat, cheese, vegetables, or herbs. When combined with eggs, potatoes become even more satisfying, as the eggs add richness and hold the dish together. In this recipe, the addition of cheese and luncheon meat gives the casserole an extra layer of flavor, while the paprika and black pepper provide a gentle kick.

Ingredients:

IngredientQuantity
Potatoes3, peeled and sliced
WaterAs needed
Plant-based oil30g
Salt5g (1 tsp), divided
Black pepperTo taste
Eggs4
Paprika10g (2 tsp)
Mozzarella cheese50g, shredded
Luncheon meat80g, diced
Green peas50g
Corn50g

Directions:

  1. Prepare the potatoes: Place the sliced potatoes in a pot and cover with water. Bring to a boil and cook for about 10-12 minutes, or until the potatoes are tender. Drain and set aside.
  2. Cook the vegetables: Heat the plant-based oil in a large pan over medium heat. Add the green peas and corn, and cook for 2-3 minutes, stirring occasionally. Season with 3g of salt and black pepper to taste.
  3. Prepare the egg mixture: In a separate bowl, beat the eggs with paprika, the remaining 2g of salt, and black pepper. Set aside.
  4. Assemble the casserole: Preheat your oven to 375°F (190°C). In a baking dish, layer the cooked potatoes, followed by the cooked vegetables and luncheon meat. Pour the egg mixture over the top, and sprinkle with shredded mozzarella cheese.
  5. Bake: Place the casserole in the oven and bake for 25-30 minutes, or until the eggs are set and the cheese is melted and golden brown.
  6. Serve: Let the casserole cool for a few minutes before slicing. Serve warm and enjoy a hearty, comforting meal!

Nutrients (per serving, approx.):

NutrientAmount
Calories250-300 kcal
Protein12-15 g
Carbohydrates30-35 g
Fats12-14 g
Fiber4-6 g
Sugars5-7 g

A Nutrient-Rich and Satisfying Meal

While this dish is comforting, it’s also a balanced and nutritious meal. Potatoes provide a rich source of carbohydrates, offering energy that sustains you throughout the day. They also contain fiber, vitamin C, and potassium, contributing to heart health and overall well-being. Eggs, on the other hand, are a high-quality protein source, providing essential amino acids that are vital for muscle repair and growth. Eggs also contain healthy fats and a variety of vitamins and minerals, such as vitamin B12 and choline, which support brain health and metabolism.

The addition of green peas and corn in the casserole enhances the dish’s nutrient profile, adding fiber, vitamins, and antioxidants. Mozzarella cheese contributes a dose of calcium and protein, while the luncheon meat adds a savory depth of flavor, making this casserole a well-rounded meal. It’s a dish that is both nourishing and filling, without being overly heavy.

Versatility: Customizing the Casserole

One of the most appealing aspects of this Potato and Egg Casserole is its versatility. You can easily customize it to suit your preferences or dietary needs. For a vegetarian version, simply omit the luncheon meat and add extra vegetables like bell peppers, spinach, or mushrooms. You could also use a different type of cheese, such as cheddar, gouda, or feta, to change the flavor profile.

If you’re looking to make the dish even heartier, consider adding cooked chicken or bacon for an extra protein boost. For a lighter version, you could substitute the plant-based oil with a lower-fat option or even use a non-stick spray to reduce the calorie content. The beauty of casseroles like this one is that they are adaptable and forgiving, allowing you to make them your own based on what you have available or what you’re in the mood for.

Frequently Asked Questions (FAQs)

1. Can I make this casserole ahead of time?

Yes! This casserole is perfect for meal prep. You can assemble the casserole up to a day in advance, cover it, and store it in the refrigerator. When you’re ready to bake, simply preheat your oven and bake as directed. If you prefer to freeze the casserole, you can wrap it tightly in plastic wrap and aluminum foil before freezing. When ready to eat, thaw it overnight in the refrigerator and then bake it as usual.

2. Can I use different vegetables in this casserole?

Absolutely! While this recipe calls for corn and green peas, feel free to substitute other vegetables like carrots, bell peppers, or spinach. You can even mix in some sautéed onions, garlic, or mushrooms to enhance the flavor. The more vegetables you add, the more nutrients your casserole will provide.

3. Can I use a different type of meat?

Yes, you can swap the luncheon meat for other types of meat like cooked sausage, turkey, ham, or even leftover roasted chicken. If you prefer a vegetarian casserole, you can skip the meat entirely or add extra plant-based proteins such as tofu or tempeh.

4. Is this casserole gluten-free?

Yes, this casserole is naturally gluten-free since it doesn’t contain any grains or gluten-containing ingredients. However, if you use a different type of cheese or meat that contains gluten, be sure to check the labels or opt for gluten-free versions.

5. How do I store leftovers?

Leftovers can be stored in an airtight container in the refrigerator for up to 3-4 days. To reheat, simply place the casserole in the oven or microwave until heated through. It can also be frozen for up to 3 months. Just be sure to let it cool completely before freezing.

6. Can I make this casserole dairy-free?

Yes! To make this casserole dairy-free, simply substitute the mozzarella cheese with a dairy-free cheese alternative. You can also use plant-based oil instead of butter and opt for non-dairy milk if needed.

Conclusion: A Comforting Meal for Every Occasion

The Potato and Egg Casserole is more than just a meal; it’s a reminder of the joy and warmth that a home-cooked dish can bring. It’s a dish that speaks to the power of simplicity, where a few humble ingredients come together to create something special. Whether you’re enjoying it on a busy weeknight, serving it to guests, or preparing it ahead of time for meal prep, this casserole is a reliable and comforting choice.

It’s versatile, nutritious, and most importantly, it’s a dish that can bring people together. In a world that often feels rushed and complicated, sometimes the best meals are the simplest ones—like this casserole. So, take a moment to savor the flavors, appreciate the ease, and know that you’re nourishing both your body and soul with each bite.

Print
clock clock iconcutlery cutlery iconflag flag iconfolder folder iconinstagram instagram iconpinterest pinterest iconfacebook facebook iconprint print iconsquares squares iconheart heart iconheart solid heart solid icon

A Hearty Dish from the Heart


  • Author: Paul
  • Total Time: 40 minutes
  • Yield: 46 servings 1x

Description

This Potato and Egg Casserole is a comforting, hearty dish that’s perfect for any meal of the day. With tender potatoes, rich eggs, and a savory filling of cheese, luncheon meat, and vegetables, it’s an easy-to-make meal that delivers on flavor and satisfaction.


Ingredients

Scale
  • 3 potatoes, peeled and sliced
  • Water (enough to cover the potatoes)
  • 30g plant-based oil (for greasing)
  • 5g salt (1 tsp), divided
  • Black pepper, to taste
  • 4 eggs
  • 10g paprika (2 tsp)
  • 50g mozzarella cheese, shredded
  • 80g luncheon meat, diced
  • 50g green peas
  • 50g corn

Instructions

  1. Prepare the potatoes: Boil the sliced potatoes in water until tender, about 10-12 minutes. Drain and set aside.
  2. Cook the vegetables: In a large pan, heat the plant-based oil. Add the green peas and corn and sauté for 2-3 minutes. Season with 3g of salt and black pepper.
  3. Make the egg mixture: In a bowl, beat the eggs with paprika, the remaining salt, and black pepper.
  4. Assemble the casserole: Preheat the oven to 375°F (190°C). Grease a baking dish and layer the cooked potatoes, sautéed vegetables, and luncheon meat. Pour the egg mixture over the top and sprinkle with shredded mozzarella cheese.
  5. Bake the casserole: Bake for 25-30 minutes or until the eggs are set and the cheese is golden and bubbly.
  6. Serve and enjoy: Let the casserole cool slightly before slicing and serving.

Notes

  • For a vegetarian version, omit the luncheon meat and add extra veggies such as bell peppers or mushrooms.
  • You can use any cheese you prefer, such as cheddar or gouda, for a different flavor profile.
  • This casserole can be made ahead of time and stored in the fridge for up to 2 days. It can also be frozen for up to 3 months.
  • Prep Time: 10 minutes
  • Cook Time: 30 minutes
  • Category: Main Dish
  • Method: Baking
  • Cuisine: Comfort Food

A Simple Dish with a Big Impact

It was a quiet afternoon when I first tried to recreate a dish I remembered from childhood. Growing up, my grandmother always had a garden full of vegetables, and zucchinis were a staple in the summer months. I’d spend hours with her, picking fresh produce, and one of the dishes that always made me feel at home was her stuffed zucchini. The combination of tender zucchini with a savory, vegetable-packed filling had an unmistakable comfort to it—one that stuck with me long after those summer days.

Years later, I found myself in my own kitchen, craving that same warmth and connection to the past. But as my lifestyle had evolved, so had my approach to food. I wanted to create something lighter, yet just as satisfying—something that combined the flavors of my childhood with a modern, healthier twist. That’s when I came up with the idea of zucchini boats, filled with a mixture of fresh veggies. It was the perfect way to honor my grandmother’s cooking while staying true to my current lifestyle. The end result was not only delicious but also incredibly nourishing. This dish became my go-to for busy evenings, a way to enjoy comfort food without the heaviness. Each bite reminded me of the simplicity and joy of sharing a meal with family, and I was reminded that sometimes, the most satisfying dishes are the ones that come from the heart.

The Beauty of Zucchini: A Versatile Vegetable

Zucchini, often considered a humble vegetable, is incredibly versatile. While it’s frequently seen in soups, stews, and salads, it also lends itself beautifully to baking, grilling, and stuffing. The zucchini boat concept is a great way to showcase this vegetable’s potential. Zucchini boats are light yet filling, and they serve as the perfect vessel for a wide variety of fillings. From savory vegetables to proteins, the possibilities are endless. But it’s the simplicity of this dish that makes it so special.

What makes zucchini so appealing is its mild flavor and tender texture when cooked. It absorbs the flavors of whatever ingredients it’s paired with, making it a blank canvas for creativity. In this recipe, the zucchini is hollowed out and stuffed with a mixture of grated vegetables, creating a meal that is both satisfying and nutritious.

Ingredients:

IngredientQuantity
For the Zucchini
Zucchini2
Vegetable oilFor greasing
SaltTo taste
Italian herbsTo taste
Smoked paprikaTo taste
Pepper mixtureTo taste
For the Filling
Onion1 medium, chopped
Carrot1, grated
Potato1, grated
Zucchini pulpFrom the 2 zucchinis, chopped
SaltTo taste

Directions:

  1. Preheat your oven to 375°F (190°C).
  2. Cut the zucchinis lengthwise and scoop out the pulp, leaving a boat-like shape. Set the pulp aside for the filling.
  3. Grease a baking tray with vegetable oil and arrange the zucchini halves on the tray.
  4. Season the zucchini boats with salt, Italian herbs, smoked paprika, and the pepper mixture.
  5. In a skillet, sauté the chopped onion in a bit of oil until softened. Add the grated carrot, potato, and zucchini pulp, and cook until the vegetables are tender and the mixture has thickened slightly. Season with salt.
  6. Spoon the vegetable mixture into the zucchini boats, packing the filling gently.
  7. Bake the stuffed zucchini for 25-30 minutes, or until the zucchini is tender and the filling is lightly browned.
  8. Serve hot and enjoy as a healthy, savory dish.

Nutrients (per serving, approx. 1 zucchini boat):

NutrientAmount
Calories150-180 kcal
Protein3-4 g
Carbohydrates18-20 g
Fats7-9 g
Fiber4-5 g
Sugars4-6 g

Health Benefits of Zucchini and Veggie Fillings

While this dish is simple to prepare, it packs a punch in terms of nutrition. Zucchini is a low-calorie vegetable that is rich in vitamins and minerals, particularly vitamin C, potassium, and antioxidants. It’s an excellent source of fiber, which supports healthy digestion and helps maintain steady blood sugar levels. The high water content of zucchini also makes it hydrating, adding a refreshing element to the dish.

The filling of grated carrot, potato, and onion is not only flavorful but also adds extra nutrients to the dish. Carrots are packed with beta-carotene, which is vital for eye health, while potatoes provide complex carbohydrates for energy. Onions are rich in sulfur compounds that promote healthy skin and immune function. Together, these vegetables create a wholesome combination that provides vitamins, minerals, and fiber.

Why This Dish Is Perfect for Every Occasion

Whether you’re looking for a healthy weeknight dinner, a satisfying side dish, or even a vegetarian option for a dinner party, these zucchini boats fit the bill. They’re incredibly versatile and can be customized to suit various dietary preferences. You can add protein to the filling—such as grilled chicken, ground turkey, or quinoa—or make it vegan by using plant-based alternatives. The zucchini boats are also gluten-free, making them suitable for those with dietary restrictions.

This dish is perfect for meal prep as well. You can prepare the boats ahead of time, store them in the refrigerator, and bake them when needed. The combination of fresh ingredients and make-ahead convenience makes it a go-to for busy families or anyone looking to enjoy a healthy, homemade meal without much fuss.

Frequently Asked Questions (FAQs)

1. Can I use other vegetables in the filling?

Absolutely! The beauty of zucchini boats lies in their versatility. While this recipe uses carrots, potatoes, and onions, you can easily swap them for other vegetables you enjoy or have on hand. Bell peppers, mushrooms, spinach, and eggplant are great options. The key is to balance the texture of the vegetables so the filling holds together well.

2. Can I make these zucchini boats ahead of time?

Yes, zucchini boats are perfect for meal prepping. You can prepare the boats and the filling ahead of time and store them in an airtight container in the refrigerator. When you’re ready to eat, simply stuff the zucchini and bake. You can also freeze them for up to 3 months. Just make sure to let them cool completely before freezing and wrap them tightly in plastic wrap and aluminum foil.

3. Can I add meat to the filling?

Yes, you can add ground meat to the filling if you prefer a heartier dish. Ground beef, turkey, or chicken are great options. Simply sauté the meat with the onions and other vegetables before stuffing the zucchini boats. For a more substantial meal, you could also add cheese to the filling or top the boats with a sprinkle of grated cheese before baking.

4. Are zucchini boats suitable for a low-carb or keto diet?

Yes, zucchini boats are naturally low in carbohydrates, making them a great option for those following a low-carb or keto diet. The zucchini itself is low in carbs, and the filling can be easily adjusted to meet your dietary needs. If you’re following a keto diet, you might consider adding some cheese or protein-rich ingredients like eggs or tofu to make the dish more filling.

5. How do I make the zucchini boats more flavorful?

To enhance the flavor of your zucchini boats, consider adding fresh herbs like basil, thyme, or oregano to the filling. You can also add garlic or a squeeze of lemon juice for extra flavor. For a bit of a spicy kick, try adding red pepper flakes or a dash of hot sauce to the filling. Don’t forget to season the zucchini boats with salt and pepper before baking to bring out the natural sweetness of the vegetable.

Conclusion: A Dish That Connects Us to the Simple Pleasures

Food has a unique way of connecting us to our past, to memories, and to the people we love. For me, this dish brings back the warmth and love of family meals shared around the table. It’s a reminder that we don’t need complicated recipes or expensive ingredients to create something nourishing and meaningful. Sometimes, the most satisfying meals are the ones that come from the heart—and that’s exactly what these zucchini boats represent.

Whether you’re making them for a family dinner, a special occasion, or just as a healthy snack, these zucchini boats with savory veggie filling are a testament to the power of simple ingredients done right. They offer a perfect balance of flavor, texture, and nutrition, making them a meal that’s both comforting and good for you. Give them a try, and you might just find yourself creating new memories of your own, one zucchini boat at a time.

Print
clock clock iconcutlery cutlery iconflag flag iconfolder folder iconinstagram instagram iconpinterest pinterest iconfacebook facebook iconprint print iconsquares squares iconheart heart iconheart solid heart solid icon

A Simple Dish with a Big Impact


  • Author: Paul
  • Total Time: 40 minutes
  • Yield: 46 servings 1x

Description

These Zucchini Boats with Savory Veggie Filling are a delicious and healthy dish that combines tender zucchini with a flavorful, vegetable-packed stuffing. Perfect for a light weeknight dinner or as a crowd-pleasing side dish, this recipe is easy to make, nutritious, and customizable to suit your tastes.


Ingredients

Scale
  • 2 zucchinis
  • Vegetable oil (for greasing)
  • Salt (to taste)
  • Italian herbs (to taste)
  • Smoked paprika (to taste)
  • Pepper mixture (to taste)
  • 1 medium onion, chopped
  • 1 carrot, grated
  • 1 potato, grated
  • Zucchini pulp (from the 2 zucchinis, chopped)
  • Salt (to taste)

Instructions

  1. Preheat your oven to 375°F (190°C).
  2. Cut the zucchinis in half lengthwise and scoop out the pulp, leaving the zucchini halves intact to form boats. Set the pulp aside.
  3. Grease a baking tray with vegetable oil and place the zucchini halves on it. Season with salt, Italian herbs, smoked paprika, and pepper mixture.
  4. In a pan, sauté the chopped onion in a little oil until softened. Add the grated carrot, potato, and the chopped zucchini pulp. Cook for about 5-7 minutes or until the vegetables are tender and the mixture has thickened slightly. Season with salt.
  5. Spoon the veggie mixture into the hollowed zucchini boats and press gently to pack the filling.
  6. Bake the zucchini boats for 25-30 minutes, or until the zucchini is tender and the filling is golden and lightly crispy.
  7. Serve hot and enjoy!

Notes

  • Feel free to customize the filling by adding your favorite vegetables, such as bell peppers, mushrooms, or spinach.
  • For a protein boost, you can add cooked chicken, turkey, or quinoa to the filling.
  • These zucchini boats can be made ahead and stored in the fridge for up to 2 days or frozen for up to 3 months. Just bake them when you’re ready to enjoy!
  • Prep Time: 10 minutes
  • Cook Time: 30 minutes
  • Category: Main Dish
  • Method: Baking
  • Cuisine: Comfort Food

The Journey to Simple, Wholesome Snacking

There’s something undeniably comforting about the idea of creating something simple and nourishing from just a few humble ingredients. I still remember the first time I decided to make my own energy bites. It was on one of those days when I was feeling a little overwhelmed—juggling work, family, and the usual hectic rhythm of life. I needed something to fuel me through the long hours, but I didn’t want to reach for something pre-packaged that would leave me feeling sluggish or unfulfilled.

I wanted something natural, quick, and, most importantly, something that I could feel good about. That’s when I stumbled upon a combination of dried apricots, oats, walnuts, and peanuts, and instantly, I knew I had found the perfect balance of flavors and energy. The result? A small, nutrient-dense bite of energy that not only satisfied my hunger but also brought a sense of accomplishment and joy. These energy bites became my go-to snack—fueling me through the busy days and offering a healthy alternative to the usual sugary snacks I had become so accustomed to.

Now, whenever I make these simple yet satisfying energy bites, it’s not just about getting a quick energy boost—it’s about taking a moment to create something wholesome, reminding myself that even the busiest days can be grounded by nourishing choices. This recipe is more than just a snack; it’s a reminder that health doesn’t have to be complicated, and it’s the little things that often have the most lasting impact.

Why Choose Energy Bites?

In a world where convenience often trumps health, energy bites offer the perfect solution. They’re portable, easy to make, and can be tailored to suit your specific dietary needs. Unlike many processed snacks that are loaded with preservatives, artificial sugars, and empty calories, these energy bites are made with wholesome ingredients that not only taste great but also provide lasting energy. The combination of dried fruits, nuts, and oats delivers fiber, healthy fats, and protein, which makes these bites an ideal snack to keep you feeling full and satisfied throughout the day.

These bites are also versatile and can be customized based on what you have on hand or your personal preferences. If you prefer almonds over walnuts, or if you’re not a fan of peanuts, you can easily swap them out for other nuts or seeds. They’re a great snack for those with dietary restrictions or those looking to make a healthier choice without sacrificing taste.

Ingredients:

IngredientQuantity
Dried apricots4-5 pieces, soaked in water
Oatmeal2 tablespoons
Walnuts50 g (about 1/2 cup), coarsely chopped
Peanuts100 g (about 3/4 cup)

Directions:

  1. Begin by soaking the dried apricots in water for at least 30 minutes. Drain and chop them into small pieces once softened.
  2. In a large mixing bowl, combine the soaked apricots, oatmeal, chopped walnuts, and peanuts.
  3. Stir the ingredients together until they are evenly mixed.
  4. Shape the mixture into small bite-sized balls, about 1 inch in diameter, and place them on a parchment-lined baking sheet.
  5. Chill the energy bites in the fridge for at least 30 minutes to allow them to firm up.
  6. Once chilled, serve or store in an airtight container in the fridge for up to a week.

Nutrients (per serving, approx. 1 bite):

NutrientAmount
Calories90-100 kcal
Protein3 g
Carbohydrates10 g
Fats5 g
Fiber1.5 g
Sugars4 g

The Health Benefits of Each Ingredient

While these energy bites are a simple recipe, each ingredient has its own array of health benefits that make them a valuable addition to your diet.

  • Dried Apricots: Dried apricots are a powerhouse of nutrients. They are rich in antioxidants, which help combat free radicals in the body, and they are an excellent source of vitamin A, which promotes healthy vision and skin. Additionally, dried apricots are high in fiber, which supports digestive health and helps maintain steady blood sugar levels.
  • Oatmeal: Oats are a fantastic source of whole grains, and they provide a steady release of energy. They are packed with soluble fiber, which helps lower cholesterol levels and keeps your heart healthy. Oats also promote fullness, making them a great option for curbing hunger between meals.
  • Walnuts: Walnuts are rich in omega-3 fatty acids, which are crucial for brain health and reducing inflammation in the body. They also provide antioxidants, including vitamin E, and are a good source of protein and fiber. Adding walnuts to your energy bites offers a crunchy texture and boosts the nutritional value.
  • Peanuts: Peanuts are an excellent source of protein, making them a great addition to any snack. They also contain heart-healthy fats, vitamins, and minerals such as magnesium and vitamin E. Peanuts can help stabilize blood sugar levels and provide long-lasting energy.

Together, these ingredients create a balanced snack that not only tastes great but provides the body with the nutrients it needs to stay energized throughout the day.

Frequently Asked Questions (FAQs)

1. Can I make these energy bites ahead of time?

Absolutely! These energy bites are perfect for meal prep. You can make them in advance and store them in an airtight container in the refrigerator for up to a week. If you’d like them to last even longer, you can freeze them. Simply place them in a freezer-safe bag or container, and they will keep for up to three months.

2. Are these energy bites suitable for children?

Yes, these energy bites are a great snack for children, as they provide a healthy mix of natural sugars, healthy fats, and protein. However, if you’re making them for younger children, be sure to cut them into smaller pieces to avoid any choking hazards. You can also swap the peanuts for another nut or seed if allergies are a concern.

3. Can I use other dried fruits instead of apricots?

Certainly! Dried apricots add a naturally sweet and tart flavor, but you can experiment with other dried fruits like raisins, cranberries, or even dried figs. Just be mindful of the sweetness level, as different fruits may affect the overall taste of the energy bites.

4. What can I substitute for the oats if I’m gluten-free?

If you’re looking for a gluten-free option, you can substitute the oats with gluten-free rolled oats or try using quinoa flakes, which have a similar texture. Both alternatives will still provide the fiber and energy-boosting benefits of the oats.

5. Can I add other ingredients to customize the flavor?

Yes, absolutely! These energy bites are highly customizable. You can add a dash of cinnamon, vanilla extract, or even cocoa powder for an extra flavor boost. You could also incorporate seeds such as chia or flaxseeds for added nutritional value.

6. How many energy bites should I eat in one sitting?

These energy bites are nutrient-dense, so it’s best to enjoy them in moderation. One or two bites should be enough to give you a quick energy boost without overloading on calories. If you’re using them as a pre-workout snack or part of a balanced meal, feel free to have a few more, but always listen to your body’s hunger cues.

The Versatility of Energy Bites: A Snack for Every Occasion

One of the most appealing aspects of these energy bites is their versatility. They’re perfect for on-the-go snacking, whether you’re heading out for a hike, need a pick-me-up during the workday, or are looking for a healthy after-school snack for your kids. They also make for an excellent addition to lunchboxes or serve as a satisfying post-workout snack to help your muscles recover.

If you’re hosting a gathering or party, these energy bites can be a hit among your guests as a healthier alternative to traditional sugary treats. Not only are they easy to prepare in large batches, but they’re also naturally sweet and delicious without the need for added sugars or refined ingredients.

Why These Energy Bites Are the Perfect Snack

We live in a world where healthy eating can sometimes feel overwhelming, especially when we’re constantly bombarded with the latest diet trends and fads. But these energy bites remind us that simple, whole foods are often the best choice. With just a few basic ingredients, you can create a snack that’s as nourishing as it is delicious.

These bites are a perfect blend of convenience, flavor, and nutrition. Whether you’re looking for a quick energy boost, a healthy snack to satisfy your sweet tooth, or a satisfying way to curb your hunger between meals, these energy bites deliver. Plus, they’re easy to customize, making them suitable for various dietary preferences and restrictions.

Conclusion: A Snack That Feeds the Soul

In the end, making energy bites isn’t just about satisfying hunger; it’s about taking the time to nourish your body with wholesome ingredients that fuel your day. These little bites are a reminder that even in the busiest moments, we can choose to prioritize health, even in the simplest of ways. So the next time you find yourself in need of a quick and nourishing snack, remember that a handful of dried apricots, oats, walnuts, and peanuts can be all it takes to recharge and keep going.

And as you enjoy each bite, know that you’re not just giving your body what it needs—you’re also honoring the small, everyday moments that help us feel grounded, healthy, and ready to face whatever comes our way.

Print
clock clock iconcutlery cutlery iconflag flag iconfolder folder iconinstagram instagram iconpinterest pinterest iconfacebook facebook iconprint print iconsquares squares iconheart heart iconheart solid heart solid icon

The Journey to Simple, Wholesome Snacking


  • Author: Paul
  • Total Time: 40 minutes
  • Yield: 1215 energy bites 1x

Description

These Supercharged Energy Bites are the perfect snack to fuel your day with wholesome, nutrient-packed ingredients. With a blend of dried apricots, oats, walnuts, and peanuts, these bite-sized treats are not only delicious but also provide a burst of energy when you need it most.


Ingredients

Scale
  • 45 dried apricots, soaked in water
  • 2 tablespoons oatmeal
  • 50 g (about 1/2 cup) walnuts, coarsely chopped
  • 100 g (about 3/4 cup) peanuts

Instructions

  1. Soak the apricots: Place the dried apricots in a bowl of warm water for at least 30 minutes to soften. Once soft, drain and chop them into small pieces.
  2. Combine ingredients: In a large bowl, mix the soaked apricots, oatmeal, chopped walnuts, and peanuts. Stir everything together until evenly combined.
  3. Shape the bites: Take a spoonful of the mixture and roll it into small, bite-sized balls (about 1 inch in diameter). Place them on a parchment-lined baking sheet or plate.
  4. Chill: Refrigerate the bites for at least 30 minutes to allow them to firm up.
  5. Serve and store: Once chilled, serve immediately or store in an airtight container in the refrigerator for up to a week.

Notes

  • For a nut-free version, replace the peanuts and walnuts with seeds like pumpkin seeds or sunflower seeds.
  • If you prefer a sweeter bite, you can drizzle honey or maple syrup into the mixture before rolling into balls.
  • These energy bites can be frozen for up to 3 months, making them perfect for meal prepping.
  • Prep Time: 10 minutes
  • Cook Time: 30 minutes
  • Category: Snack
  • Method: No-Bake
  • Cuisine: Healthy

Comfort in a Bowl: The Allure of Beef Stroganoff

There’s something deeply comforting about the classic dish of Beef Stroganoff. It brings to mind cozy nights spent at home, gathering around the table with loved ones. For me, this dish has always been a symbol of warmth, comfort, and a touch of indulgence. I remember the first time I had Beef Stroganoff at my grandmother’s house. She would make it on special occasions—family birthdays, holidays, and those quiet Sunday dinners. The rich sauce, the tender beef, and the smooth, creamy texture would melt in your mouth, leaving you feeling full and satisfied in a way only a hearty homemade meal could.

As a child, I didn’t understand the magic behind those flavors. It wasn’t until I began cooking on my own that I realized the true beauty of this dish. Beef Stroganoff isn’t just a meal; it’s an experience. The combination of beef, mushrooms, sour cream, and spices is timeless, yet it can be made in a modern, efficient way—without sacrificing the flavors and richness of the original.

In this fast-paced world, we often find ourselves searching for the perfect balance between quick and comforting meals. This Quick Beef Stroganoff Recipe aims to honor the traditional flavors of the dish while making it accessible to anyone, even those with limited time to cook. Whether you’re looking to recreate a cherished family memory or simply in need of a soul-warming meal after a long day, this recipe is your answer.

The Magic of Beef Stroganoff: A Brief History

Before diving into the recipe, let’s take a moment to appreciate the history of Beef Stroganoff. This dish is believed to have originated in Russia during the 19th century and was named after the Stroganov family, an aristocratic Russian family. The original recipe was far simpler than the version we know today, often consisting of tender beef cubes in a mustard and sour cream sauce. Over time, variations have developed across the globe, with many adding mushrooms, onions, and even brandy or wine to enhance the flavor profile.

In the United States, Beef Stroganoff became widely popular in the mid-20th century. It was often served over egg noodles, a tradition that remains strong today. The rich, creamy sauce made it a favorite for home cooks and was often featured in dinner parties and special occasions. Its enduring popularity is no surprise; the combination of tender beef, savory mushrooms, and silky sour cream is a perfect balance of flavors that appeals to nearly everyone.

Ingredients:

IngredientQuantity
Beef sirloin or tenderloin, cut into thin strips500g (1 lb)
Vegetable oil2 tablespoons
Onion, finely chopped1 onion
Garlic, minced2 cloves
Mushrooms, sliced200g (7 oz)
Dijon mustard1 teaspoon
Paprika1 teaspoon
Beef broth1/2 cup (120 ml)
Sour cream1/2 cup (120 ml)
All-purpose flour (optional)1 tablespoon
Salt and black pepperTo taste
Fresh parsley, chopped (for garnish)1 tablespoon
Butter1 tablespoon
Egg noodles, rice, or mashed potatoes300g (10 oz)

Instructions:

Step 1: Brown the Beef Start by heating 1 tablespoon of vegetable oil in a large skillet over medium-high heat. Add the thinly sliced beef to the pan in a single layer. Sear the beef on both sides for about 2-3 minutes, until it’s browned and cooked through. Remove the beef from the skillet and set it aside.

Step 2: Sauté the Aromatics In the same skillet, add the remaining tablespoon of vegetable oil. Lower the heat to medium and toss in the chopped onion and minced garlic. Sauté for 2-3 minutes until the onion becomes soft and translucent, releasing a lovely fragrance.

Step 3: Cook the Mushrooms Add the sliced mushrooms to the skillet and cook for another 5 minutes until the mushrooms release their juices and begin to soften. The earthy flavors of the mushrooms will meld with the garlic and onion, creating a delicious base for your sauce.

Step 4: Add the Mustard, Paprika, and Beef Broth Stir in the Dijon mustard and paprika, mixing well to coat the vegetables. Pour in the beef broth, stirring to deglaze the pan and bring up any caramelized bits from the bottom. Allow the broth to simmer for 3-4 minutes, letting the flavors combine and the sauce slightly reduce.

Step 5: Stir in the Sour Cream and Thickening Agent (Optional) Reduce the heat to low and stir in the sour cream, creating a creamy and smooth sauce. If you prefer a thicker sauce, you can add 1 tablespoon of all-purpose flour at this point. Stir the flour into the sauce and let it cook for another minute to thicken.

Step 6: Return the Beef to the Skillet Once the sauce has thickened to your liking, return the cooked beef to the pan. Stir to coat the beef in the creamy sauce and heat through for another 2 minutes. Taste and adjust the seasoning with salt and pepper, if needed.

Step 7: Serve and Garnish Serve the Beef Stroganoff hot, spooned over egg noodles, rice, or mashed potatoes. Sprinkle with freshly chopped parsley for a pop of color and a touch of freshness.

Nutritional Information (per serving):

NutrientAmount
Calories400 kcal
Protein35g
Fat25g
Carbohydrates12g
Fiber2g

Why This Recipe Works

One of the reasons Beef Stroganoff is such a beloved dish is its ability to be made with ease, even for novice cooks. The tender beef strips, sautéed onions, and mushrooms come together in a savory, creamy sauce that feels gourmet, but is actually quite simple to make. In fact, with just a few ingredients and a bit of time, you can transform a few humble components into a dish worthy of any occasion.

This Quick Beef Stroganoff recipe is designed for efficiency and flavor. Using lean cuts of beef like sirloin or tenderloin ensures tenderness without needing hours of cooking. The sauce, made with sour cream, beef broth, and a few key seasonings, comes together in minutes, while the beef and mushrooms simmer to perfection. The entire meal is ready in 30 minutes, making it perfect for a weeknight dinner when you’re craving something special without the fuss.

Frequently Asked Questions About Beef Stroganoff

1. What type of beef is best for Beef Stroganoff?

For the most tender results, it’s recommended to use lean cuts of beef such as sirloin or tenderloin. These cuts cook quickly and remain tender, which is essential for a successful Stroganoff. If you’re using a tougher cut, such as chuck, you may need to cook it longer to break down the muscle fibers and make it tender.

2. Can I make Beef Stroganoff ahead of time?

Yes, Beef Stroganoff can be made ahead of time and stored in the refrigerator for up to 3 days. To reheat, simply warm it gently over low heat on the stove, adding a splash of beef broth or water to loosen the sauce if needed. However, note that the noodles or rice should be cooked fresh to maintain their texture.

3. Can I make this dish without mushrooms?

While mushrooms are a key component in traditional Beef Stroganoff, you can make the dish without them if you’re not a fan or have dietary restrictions. You can substitute the mushrooms with other vegetables like bell peppers or zucchini, or simply leave them out and focus on the beef and sauce. The dish will still be delicious and satisfying.

4. Can I substitute sour cream with something else?

If you don’t have sour cream on hand or prefer a different flavor, you can substitute it with heavy cream or even Greek yogurt. Keep in mind that Greek yogurt will add a tangier flavor, while heavy cream will make the sauce richer and more indulgent.

5. Can I make a vegetarian version of Beef Stroganoff?

Yes, you can easily make a vegetarian version of Beef Stroganoff by replacing the beef with mushrooms or another plant-based protein like tofu. Use vegetable broth in place of beef broth and you’ll have a delicious vegetarian version of this classic dish.

The Best Way to Serve Beef Stroganoff

Beef Stroganoff is traditionally served with egg noodles, which soak up the rich sauce beautifully. However, there are many ways you can enjoy this dish:

  • Mashed Potatoes: The creamy sauce pairs wonderfully with mashed potatoes, providing a rich, hearty base.
  • Rice: A lighter option, rice is perfect for soaking up the sauce without overwhelming the dish.
  • Vegetables: Serve the Beef Stroganoff with a side of steamed vegetables, such as green beans or peas, to add a fresh contrast to the creamy sauce.
  • Bread: A crusty baguette or warm dinner rolls are great for mopping up any remaining sauce.

Tips for Perfect Beef Stroganoff

  • Don’t overcook the beef: The key to tender beef in Beef Stroganoff is not overcooking it. Sear the beef quickly on both sides, and once the sauce is added, just let it simmer briefly. This ensures the beef remains tender and juicy.
  • Use full-fat sour cream: For the creamiest, richest sauce, use full-fat sour cream. While lower-fat options work in a pinch, they may not provide the same luxurious texture.
  • Adjust the seasoning: Taste the sauce before serving and adjust the seasoning with salt, pepper, and perhaps a dash of Worcestershire sauce for added depth.

Conclusion: A Recipe That Brings Comfort and Joy

Beef Stroganoff is a timeless dish that brings warmth and joy to any meal. Whether you’re cooking for a special occasion or simply craving something comforting after a long day, this dish delivers on both flavor and ease. With its creamy sauce, tender beef, and a touch of indulgence, it’s no wonder this recipe has stood the test of time.

As I think back to the days when my grandmother made Beef Stroganoff, I realize that it’s not just about the ingredients or the method—it’s about the memories created around the table. Food has a unique way of bringing people together, and a meal like Beef Stroganoff provides not only nourishment but also a sense of connection, warmth, and love.

So next time you’re looking for a meal that’s both comforting and indulgent, turn to this Quick Beef Stroganoff recipe. It may not take long to prepare, but it’ll create memories that last a lifetime.

Print
clock clock iconcutlery cutlery iconflag flag iconfolder folder iconinstagram instagram iconpinterest pinterest iconfacebook facebook iconprint print iconsquares squares iconheart heart iconheart solid heart solid icon

Comfort in a Bowl: The Allure of Beef Stroganoff


  • Author: Paul
  • Total Time: 30 minutes
  • Yield: 46 servings 1x

Description

Beef Stroganoff is a classic comfort food that combines tender beef, earthy mushrooms, and a creamy, flavorful sauce. This recipe takes a traditional favorite and makes it ready in just 30 minutes, making it perfect for busy weeknights or special occasions when you want to impress with minimal effort. Served over egg noodles, rice, or mashed potatoes, this rich and savory dish is sure to become a family favorite.


Ingredients

Scale
  • 500g (1 lb) beef sirloin or tenderloin, cut into thin strips
  • 2 tablespoons vegetable oil
  • 1 onion, finely chopped
  • 2 cloves garlic, minced
  • 200g (7 oz) mushrooms, sliced
  • 1 teaspoon Dijon mustard
  • 1 teaspoon paprika
  • 1/2 cup (120 ml) beef broth
  • 1/2 cup (120 ml) sour cream
  • 1 tablespoon all-purpose flour (optional, for thickening)
  • Salt and black pepper, to taste
  • 1 tablespoon fresh parsley, chopped (for garnish)
  • 1 tablespoon butter
  • 300g (10 oz) egg noodles, rice, or mashed potatoes for serving

Instructions

  1. Prepare the Beef: In a large skillet, heat vegetable oil over medium-high heat. Add the beef strips, season with salt and black pepper, and cook for 3-4 minutes, until browned on all sides. Remove the beef from the skillet and set aside.
  2. Cook the Vegetables: In the same skillet, melt butter over medium heat. Add the chopped onion and minced garlic, cooking until softened, about 2-3 minutes. Add the sliced mushrooms and cook for an additional 5 minutes, until the mushrooms are tender and lightly browned.
  3. Prepare the Sauce: Stir in the Dijon mustard, paprika, and flour (if using). Cook for 1 minute to allow the flour to absorb the flavors. Gradually add the beef broth, stirring constantly to prevent lumps. Bring the mixture to a simmer and cook for 3-5 minutes, until the sauce begins to thicken.
  4. Combine and Finish: Return the beef to the skillet, stirring to combine. Reduce heat to low and add the sour cream, stirring until the sauce is smooth and creamy. Let the mixture simmer for another 2-3 minutes to warm through. Adjust seasoning with salt and pepper as needed.
  5. Serve: Serve the Beef Stroganoff over cooked egg noodles, rice, or mashed potatoes. Garnish with fresh chopped parsley for an added touch of color and flavor.

Notes

  • You can use other cuts of beef, such as flank steak or ribeye, but sirloin or tenderloin work best for tenderness.
  • If you prefer a thicker sauce, add the optional tablespoon of flour. If you like a thinner sauce, simply omit the flour or add more beef broth as needed.
  • For a lighter version, you can substitute the sour cream with Greek yogurt or heavy cream.
  • This dish pairs well with steamed vegetables or a simple green salad for added freshness.
  • Prep Time: 10 minutes
  • Cook Time: 20 minutes
  • Category: Main Dish
  • Method: Stovetop
  • Cuisine: Russian-inspired

High Protein Chicken Chow Mein Noodles Meal Prep: A Healthy, Satisfying, and Time-Saving Delight

I remember the days when meal planning felt like a never-ending chore, especially in the midst of balancing work, family, and personal goals. Between my full workdays and trying to maintain a healthy lifestyle, I often found myself skipping meals or reaching for unhealthy snacks. I knew that I needed something to fuel my body, but time was always the issue.

Then, one day, after a particularly exhausting week, I decided I needed to find a simple solution to my meal prepping woes. That’s when I stumbled upon a recipe that promised to be both healthy and easy to make: Chicken Chow Mein Noodles. The idea of a protein-packed stir-fry filled with colorful vegetables and lean chicken sounded like the perfect dish. Not only would it be a great way to fuel my body with essential nutrients, but it also aligned with my busy schedule—quick to make, satisfying, and easily adaptable for meal prep.

This High Protein Chicken Chow Mein Noodles Meal Prep recipe quickly became my go-to solution. It combines fresh, crunchy vegetables, high-protein chicken, and the flexibility of meal prep—all in one bowl. Now, I’m able to stay on top of my nutrition without sacrificing taste or convenience. If you’re like me and struggling to find time for healthy meals, this recipe is a game-changer.

Why This Recipe Works: A Healthier Take on Classic Comfort Food

1. Packed with Protein

Chicken breast, the star of this dish, is an excellent source of lean protein, which helps in muscle repair, growth, and maintaining a healthy metabolism. Whether you’re training for a fitness goal or just looking to maintain a balanced diet, protein is crucial. This recipe gives you a generous amount of protein, making it perfect for those seeking a muscle-building meal or a satisfying dish to fuel you through your day.

2. Loaded with Nutrients

The colorful vegetables—carrots, bell peppers, onions, and cabbage—are not only visually appealing but also rich in vitamins, minerals, and fiber. These veggies provide essential nutrients that support overall health, digestion, and immune function. Adding a variety of vegetables helps ensure you’re getting a well-rounded intake of nutrients, and they complement the chicken beautifully, creating a meal that’s as delicious as it is nutritious.

3. Meal Prep-Friendly

One of the best features of this dish is its ability to be prepped in advance. When I first tried meal prepping, I was skeptical about how well stir-fries would hold up after a few days in the fridge. To my surprise, this chicken chow mein maintains its flavor and texture even after several days. You can cook a batch of this dish at the start of the week and enjoy it for lunch or dinner throughout the week. It’s a great option for those looking to simplify their meal planning while still eating fresh and wholesome food.

4. Customizable to Your Preferences

Another fantastic thing about this recipe is its versatility. Whether you prefer adding more vegetables, adjusting the spice level, or swapping out the chicken for a vegetarian option like tofu, this recipe can be tailored to suit your dietary needs and preferences. You can also switch up the stir-fry sauce or serve it with your choice of noodles, rice, or even quinoa for extra variety. The adaptability makes it an easy choice for anyone, no matter their taste or lifestyle.

Ingredients

For the Stir-Fry:

IngredientAmount
Carrot, julienned1
Cabbage, shredded1/2 head
Capsicum (bell pepper), julienned1
Onion, slicedLess than 1/2
Chicken breast, thinly sliced1/2
Chopped garlic1 tsp

Directions:

  1. Prepare the Vegetables and Chicken
    Start by julienning the carrot, slicing the capsicum, and shredding the cabbage. Slice the onion thinly and prepare the chicken breast by cutting it into thin strips. Set everything aside in separate bowls.
  2. Cook the Chicken
    Heat a bit of oil in a wok or large skillet over medium-high heat. Add the sliced chicken breast and cook for about 4-5 minutes until it turns golden and is cooked through. Remove the chicken from the pan and set it aside.
  3. Stir-Fry the Vegetables
    In the same pan, add a little more oil if needed and sauté the garlic until fragrant. Add the julienned carrots, capsicum, and onion. Stir-fry for about 2-3 minutes until they begin to soften but still have a slight crunch.
  4. Combine and Serve
    Add the shredded cabbage to the pan and stir everything together. Once the cabbage begins to wilt, return the cooked chicken to the pan and toss everything together. Stir-fry for another minute or so until everything is evenly mixed.
  5. Meal Prep
    Divide the stir-fry into meal prep containers, or serve it over a bed of your favorite noodles or rice. You can drizzle soy sauce or your favorite stir-fry sauce on top for added flavor, if desired.

Nutrients (Per Serving, Approx.)

NutrientAmount
Calories250 kcal
Protein30 g
Fat9 g
Carbohydrates15 g
Sugars6 g
Fiber4 g
Sodium350 mg
Calcium6% DV

The Benefits of a High-Protein Diet

A high-protein diet offers numerous health benefits, especially for those leading active lifestyles. Protein is essential for building and repairing tissues, producing enzymes and hormones, and supporting a strong immune system. Incorporating more protein into your meals can also help keep you feeling fuller for longer, preventing those mid-afternoon cravings and reducing the chances of overeating.

By making this chicken chow mein your meal prep go-to, you’re setting yourself up for better energy levels, muscle recovery, and overall health. Not only will you stay full and satisfied, but you’ll also be nourishing your body with the building blocks it needs to thrive.

FAQs: All Your Questions Answered

Can I use a different protein instead of chicken?

Absolutely! If you prefer a vegetarian or different protein source, feel free to swap the chicken breast for tofu, tempeh, or even shrimp. For a more hearty option, ground turkey or lean beef can also work wonderfully. Just make sure to cook the protein thoroughly before adding the vegetables.

Can I freeze this recipe for later use?

Yes! This stir-fry can be frozen, making it a great option for batch cooking. Simply let the dish cool completely before storing it in airtight containers in the freezer. When you’re ready to eat, simply reheat in the microwave or on the stove. The vegetables may lose a little crunch upon freezing, but the flavors will still be delicious.

What vegetables can I add or substitute?

You can customize the vegetables based on what you have on hand or what you prefer. Broccoli, snow peas, spinach, or zucchini would be great additions. Just keep in mind that some vegetables may require different cooking times, so be sure to adjust accordingly to prevent them from overcooking.

How do I store leftovers?

Leftovers should be stored in an airtight container in the fridge for up to 4 days. The dish can also be portioned out into individual meal prep containers for easy access throughout the week.

Can I add noodles or rice to this recipe?

Definitely! If you prefer to serve your chicken stir-fry with noodles, choose your favorite type—egg noodles, rice noodles, or even whole wheat noodles. Alternatively, you can serve it over steamed rice or quinoa for a complete meal. The chicken and vegetable stir-fry will pair well with any of these options.

Conclusion: The Perfect Balance of Health, Flavor, and Convenience

This High Protein Chicken Chow Mein Noodles Meal Prep recipe is more than just a quick, easy, and healthy meal—it’s a solution to the challenges of eating well while managing a busy lifestyle. It provides the essential nutrients your body needs while being versatile enough to meet the demands of different diets and preferences.

Whether you’re prepping for a busy workweek or looking for a meal that’s as nutritious as it is satisfying, this recipe has got you covered. It’s a perfect blend of protein, vegetables, and flavor that will keep you full and energized throughout the day. Plus, with the convenience of meal prep, you’ll have the added benefit of time savings and less stress in the kitchen.

Give this recipe a try, and let it become a staple in your meal prep routine. The combination of freshness, nutrition, and ease makes it a meal you’ll want to repeat week after week. No more sacrificing taste for convenience—now, you can have both.

Print
clock clock iconcutlery cutlery iconflag flag iconfolder folder iconinstagram instagram iconpinterest pinterest iconfacebook facebook iconprint print iconsquares squares iconheart heart iconheart solid heart solid icon

High Protein Chicken Chow Mein Noodles Meal Prep: A Healthy, Satisfying, and Time-Saving Delight


  • Author: Paul
  • Total Time: 30 minutes
  • Yield: 46 servings 1x

Description

This High Protein Chicken Chow Mein Noodles Meal Prep is the perfect combination of lean protein, crisp vegetables, and savory flavors. It’s ideal for busy individuals looking to stay healthy and energized throughout the week. Packed with fresh ingredients like chicken, carrots, cabbage, and bell peppers, this dish provides the perfect balance of nutrients in a simple stir-fry that’s easy to prep, store, and enjoy.


Ingredients

Scale
  • 1 carrot, julienned
  • 1/2 cabbage, shredded
  • 1 capsicum (bell pepper), julienned
  • Less than half an onion, sliced
  • 1/2 chicken breast, thinly sliced
  • 1 tsp chopped garlic
  • 2 tbsp vegetable oil (for stir-frying)
  • Salt and pepper to taste
  • Soy sauce or stir-fry sauce (optional, for added flavor)

Instructions

  1. Prepare the Ingredients: Start by julienning the carrot, slicing the capsicum, and shredding the cabbage. Slice the onion thinly, and cut the chicken breast into thin strips. Set each ingredient aside.
  2. Cook the Chicken: Heat 1 tablespoon of vegetable oil in a wok or large skillet over medium-high heat. Add the sliced chicken and cook for 4-5 minutes, stirring occasionally until it turns golden and is cooked through. Remove the chicken from the pan and set it aside.
  3. Stir-Fry the Vegetables: In the same pan, add the remaining oil and sauté the chopped garlic for about 30 seconds until fragrant. Add the julienned carrots, bell pepper, and sliced onion. Stir-fry for about 2-3 minutes until the vegetables begin to soften but remain slightly crunchy.
  4. Add the Cabbage and Combine: Add the shredded cabbage to the pan and stir everything together. Stir-fry for another 1-2 minutes until the cabbage begins to soften.
  5. Reintroduce the Chicken and Serve: Return the cooked chicken to the pan and toss everything together. Continue to stir-fry for another minute to ensure everything is well combined and heated through. You can drizzle some soy sauce or your favorite stir-fry sauce for extra flavor if desired.
  6. Meal Prep: Divide the stir-fry into meal prep containers, or serve it over your choice of rice or noodles. Store it in the fridge for up to 4 days, or freeze for later use.

Notes

  • Protein Variations: Feel free to swap the chicken for other proteins like tofu, shrimp, or ground turkey, depending on your dietary preferences.
  • Sauce Options: Add soy sauce, oyster sauce, or your favorite stir-fry sauce for added flavor. If you’re watching your sodium intake, opt for low-sodium soy sauce.
  • Vegetable Variations: You can add other vegetables like broccoli, snow peas, or spinach to customize the recipe to your liking.
  • Prep Time: 15 minutes
  • Cook Time: 15 minutes
  • Category: Main Dish
  • Method: Stir Fry
  • Cuisine: Asian-Inspired