Ham and Cheese Puff Pastry Delight: A Comforting and Indulgent Treat

There are some dishes that instantly take you back to a warm, cozy kitchen filled with the sounds of laughter and the delicious aromas of food. This ham and cheese puff pastry is one of those dishes that immediately evokes feelings of comfort, nostalgia, and love. I remember the first time I made it—an evening when the weather was crisp and chilly, and I had just come home from a long day of work. I needed something simple yet indulgent, something that would satisfy my hunger and provide a sense of warmth and contentment.

I rummaged through the fridge, finding a few ingredients—potatoes, ham, cheese, and puff pastry. In just a few simple steps, I had transformed these ingredients into a golden, crispy, melt-in-your-mouth delight. It wasn’t just a meal; it was a moment of relaxation, a reminder that even the most ordinary ingredients could come together to create something extraordinary.

This recipe, with its layers of soft mashed potatoes, creamy cheeses, and savory ham, all wrapped in a flaky puff pastry, became an instant favorite in my home. It’s a versatile dish that can be enjoyed at any time of day: as a snack, a hearty lunch, or a light dinner. What’s more, it’s a crowd-pleaser—easy to prepare and always delicious.

The Magic of Puff Pastry: Why This Dish Works

Puff pastry is one of those ingredients that can instantly elevate a dish. While it may seem like a fancy component, it’s surprisingly easy to work with and makes a huge difference in texture and flavor. The delicate, buttery layers create a crispy, golden crust that contrasts beautifully with the creamy, savory filling inside. Whether you’re making savory pastries like this ham and cheese version or sweet treats, puff pastry adds a level of sophistication to any dish.

But what truly makes this dish shine is its filling. The combination of mashed potatoes, soft cheese, and Parmesan creates a rich, creamy base that complements the ham perfectly. The saltiness of the ham balances out the mild flavors of the potatoes and cheese, creating a harmonious blend of textures and tastes. Every bite is a satisfying experience, with the warmth of the filling contrasting against the crispness of the pastry. This is comfort food at its finest.

Ingredients:

IngredientQuantity
Potatoes (peeled)350 g (12 oz)
Soft Cheese (Stracchino, Cream Cheese, or Ricotta)150 g (5 oz)
Grated Parmesan Cheese30 g (1 oz) + extra for topping
Puff Pastry Sheets2 sheets (about 250 g each)
Ham (thinly sliced)100 g (3.5 oz)
Egg (beaten, for egg wash)1
Saltto taste
Black Pepperto taste

Directions:

  1. Prepare the Potatoes: Peel and boil the potatoes in salted water until soft, around 15 minutes. Once soft, drain and mash them until smooth. Allow them to cool completely.
  2. Prepare the Filling: In a large mixing bowl, combine the mashed potatoes with soft cheese and grated Parmesan. Stir well until the mixture is smooth and uniform. Add salt and black pepper to taste.
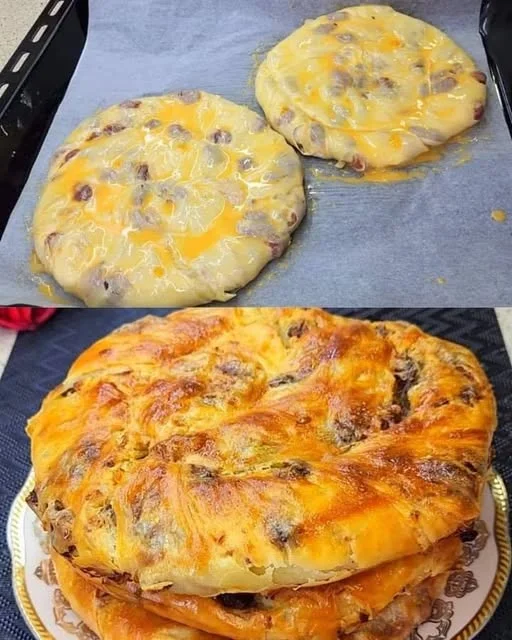
  3. Assemble the Pastry: Preheat the oven to 180°C (350°F). Roll out the puff pastry sheets on a flat surface. Spread a layer of the potato mixture evenly onto each pastry sheet, leaving about 1 cm (1/2 inch) on the edges. Place the thinly sliced ham over the potato mixture and sprinkle with extra grated Parmesan cheese.
  4. Roll and Seal the Pastry: Carefully roll up the pastry sheets, ensuring the filling is securely enclosed. Pinch the edges to seal them tightly to avoid any leakage during baking.
  5. Bake the Pastry: Transfer the rolled pastries to a baking sheet lined with parchment paper. Brush the top with the beaten egg to achieve a golden, crispy finish. Bake for 25-30 minutes or until the pastry is golden and puffed.
  6. Serve: Once baked, remove the pastries from the oven and allow them to cool slightly before serving. Slice into portions and serve warm.

Nutritional Information (per serving, approximate):

NutrientValue
Calories350 kcal
Protein9 g
Carbohydrates38 g
Fat20 g
Fiber3 g
Sodium350 mg

A Versatile and Customizable Dish

One of the things I love most about this recipe is how easily it can be customized to suit your taste preferences or dietary restrictions. For example, if you’re not a fan of ham, you can swap it out for other meats like turkey, chicken, or even bacon. Alternatively, if you’re vegetarian, you can load the pastry with extra cheese and vegetables such as spinach, mushrooms, or bell peppers.

The soft cheese in the filling is another area for creativity. While I’ve used ricotta, stracchino, and cream cheese in my version, you could experiment with other cheeses like goat cheese or mascarpone for a different flavor profile. The addition of grated Parmesan helps give the filling a sharper, more pronounced flavor, but feel free to use any cheese you like!

Perfect for Any Occasion

This ham and cheese puff pastry isn’t just for everyday meals—it’s a dish that can be served on special occasions as well. The flaky, golden crust and rich, creamy filling make it an impressive appetizer or side dish for dinner parties, holidays, or celebrations. Imagine serving it alongside a crisp green salad or pairing it with a glass of wine for a refined, yet easy-to-prepare, meal.

It’s also great for brunches or casual gatherings with friends and family. I’ve made this dish countless times for get-togethers, and it’s always a hit. People love the crispy texture and the comforting, cheesy filling. It’s also easy to make in bulk if you’re expecting a crowd, making it an excellent choice for larger meals.

Storing and Reheating Tips

If you happen to have any leftovers (which is unlikely!), this dish stores well in the refrigerator. Simply cover it tightly with plastic wrap or place it in an airtight container to keep it fresh. When you’re ready to enjoy it again, reheat it in the oven at 180°C (350°F) for about 10 minutes to crisp up the pastry. It will taste just as delicious as when it was freshly made.

For a quicker reheating method, you can microwave individual servings, but keep in mind that the pastry may not retain its crispiness. If you prefer, you can also freeze the ham and cheese puff pastry for up to three months. Just be sure to wrap it tightly in foil or plastic wrap before freezing. When you’re ready to bake it, you can either thaw it overnight in the fridge or bake it directly from frozen—just add a few extra minutes to the baking time.

Nutritional Information

Though this dish is indulgent, it can still fit into a balanced diet when enjoyed in moderation. The puff pastry provides a light crunch, while the potatoes and cheese offer a rich, satisfying base. The ham adds protein, making this a well-rounded meal that can be both filling and comforting. If you’re looking to reduce calories, you can substitute some of the cheese with low-fat alternatives or opt for a whole wheat puff pastry.

The versatility of this recipe also allows you to make it more nutritious by adding extra vegetables to the filling. Consider adding spinach, kale, or bell peppers for a boost of fiber and vitamins. You can even replace the potatoes with sweet potatoes for a slightly different flavor and additional nutrients.

FAQs

Can I make this dish ahead of time?
Yes, you can prepare the filling and assemble the puff pastries in advance. Simply cover them tightly with plastic wrap and refrigerate until you’re ready to bake. When you’re ready to cook them, just brush with the egg wash and bake as usual.

Can I use a different type of cheese?
Absolutely! While I’ve used soft cheeses like ricotta and stracchino, you can experiment with different cheeses to suit your taste. Cream cheese, mascarpone, or goat cheese all work wonderfully in this recipe.

Can I make this dish vegetarian?
Yes, simply omit the ham and load the pastry with extra vegetables like spinach, mushrooms, or bell peppers. You can also add more cheese to make the filling rich and creamy.

How long does this dish take to prepare?
The total time is about 45 minutes—15 minutes to prep and 30 minutes to bake. It’s a relatively quick and easy dish that can be made even on busy weeknights.

Conclusion: A Recipe to Remember

Whether you’re looking for a comforting snack, an impressive appetizer for a party, or a simple, satisfying meal for dinner, this ham and cheese puff pastry is the answer. With its buttery, flaky crust and savory filling, it’s a dish that will leave everyone at the table smiling.

This recipe is proof that even the simplest ingredients—potatoes, cheese, and ham—can come together to create something extraordinary. It’s a dish that’s not only easy to prepare but also flexible, allowing you to experiment with different flavors and fillings. I encourage you to try it and make it your own. As I’ve learned, the most memorable dishes are often the simplest ones, made with love and shared with those who matter most.

Enjoy this delicious, comforting treat with your loved ones, and let it bring warmth, happiness, and a little bit of magic to your table.

A Simple and Comforting Meal: Potato Sticks

There’s something magical about the simplest of meals that can take you back to your childhood. For me, potato sticks were more than just a snack; they were a bridge between the comfort of home and the joy of sharing a meal with family. The humble potato, when transformed into crispy, golden sticks, carries with it a sense of nostalgia. I remember the times when my grandmother would make these for us on lazy Sunday afternoons, and the kitchen would smell like warm, buttery goodness.

Her method was straightforward—no fancy techniques or ingredients, just potatoes, a bit of seasoning, and love. It was the kind of dish that didn’t require much preparation but always brought a sense of joy. As I began to experiment in my own kitchen, I realized how versatile and satisfying these potato sticks could be. Whether served as a snack, side dish, or appetizer, they quickly became a household favorite. I could also adjust the seasoning based on what I had on hand, making them customizable for different tastes. Over time, this dish became a comfort food staple in our home, reminding us that sometimes, the simplest meals are the ones that hold the most meaning.

Why Potato Sticks?

Potato sticks are a perfect balance of simplicity and flavor. While they may seem like a modest dish, the crispy texture and warm, tender inside create a delightful contrast that is universally loved. Whether you’re making them for an afternoon snack, a quick side dish to go with dinner, or something to serve at a party, potato sticks can easily be adapted to fit various occasions.

They’re versatile, too. You can modify the seasoning according to your preferences or dietary needs. Love spice? Add some chili flakes or paprika. Want to make them more flavorful? Incorporate fresh herbs like rosemary or thyme. The possibilities are endless, which is one of the many reasons this recipe remains so beloved.

But it’s not just about the flavor. There’s an emotional connection that comes with cooking and sharing these crispy delights. In a world where everyone seems to be in a rush, there’s something special about the simple, unhurried pleasure of biting into a perfectly cooked potato stick. The crunch, the warmth, the seasoning—it’s all wrapped up in a memory that transcends generations.

Ingredients

IngredientQuantity
Potatoes3
Fresh coriander, chopped1 bunch
Chili flakesTo taste
Eggs3
BreadcrumbsAs needed
SaltTo taste
Black pepperTo taste

Instructions:

  1. Prepare the Potatoes: Peel the potatoes and cut them into stick-like shapes. Make sure they are of even size to ensure uniform cooking.
  2. Boil the Potatoes: Place the potato sticks in a pot of water and bring it to a boil. Let the potatoes cook for about 5-7 minutes until slightly tender, but not fully cooked. Drain and set aside to cool down.
  3. Prepare the Coating: In a shallow bowl, beat the eggs with a pinch of salt and black pepper. In another bowl, combine breadcrumbs with chili flakes and chopped coriander. Mix the ingredients evenly to distribute the seasonings.
  4. Coat the Potato Sticks: Dip each cooled potato stick into the egg mixture, allowing any excess to drip off. Then, coat the potato stick thoroughly with the breadcrumb mixture.
  5. Fry the Potato Sticks: Heat a pan over medium heat and add some oil. Once hot, fry the coated potato sticks for 3-4 minutes on each side, or until golden and crispy. Remove them from the pan and place on a paper towel to drain excess oil.
  6. Serve and Enjoy: Serve the crispy potato sticks hot, optionally garnished with fresh coriander.

Nutritional Information (Per Serving)

NutrientAmount (approx.)
Calories220
Total Fat10g
Saturated Fat1.5g
Carbohydrates30g
Fiber3g
Sugars2g
Protein4g
Sodium250mg

FAQs About Potato Sticks

Q: Can I make potato sticks ahead of time?

Yes, you can! To make them ahead of time, you can prepare the potato sticks, coat them with the egg and breadcrumb mixture, and refrigerate them for up to 24 hours before frying. This makes them great for meal prep or for making a big batch ahead of time. Simply fry them when you’re ready to serve.

Q: Can I bake these potato sticks instead of frying them?

Yes, you can bake them to make them a bit lighter. Preheat your oven to 400°F (200°C), and place the coated potato sticks on a baking sheet lined with parchment paper. Drizzle them with olive oil and bake for 20-25 minutes, flipping halfway through. They may not be as crispy as the fried version, but they will still be delicious!

Q: What other seasonings can I use for these potato sticks?

While the basic seasoning of salt, pepper, and chili flakes works perfectly, you can experiment with other seasonings as well. Try using garlic powder, onion powder, smoked paprika, or even grated parmesan cheese for an extra savory touch. Fresh herbs like parsley, thyme, or rosemary also work beautifully with this dish.

Q: Can I make these potato sticks gluten-free?

Yes, you can make this recipe gluten-free by using gluten-free breadcrumbs or even crushed rice crackers as a substitute for regular breadcrumbs. Just ensure that your egg wash is free from any gluten-containing additives as well.

Q: How can I store leftover potato sticks?

If you have any leftover potato sticks, let them cool to room temperature and store them in an airtight container. They’ll last for up to 2 days in the refrigerator. To reheat them, place them on a baking sheet in a preheated oven at 350°F (175°C) for about 10-15 minutes or until crispy again. You can also reheat them in an air fryer for a few minutes.

A Dish for Every Occasion

Potato sticks are incredibly versatile and perfect for any occasion. They can be dressed up for a fancy dinner or kept casual for a weeknight meal. As a side dish, they pair wonderfully with just about anything, from roasted meats to fresh salads. Their crispy texture and savory flavor make them a great addition to almost any meal, and they’re a hit with both kids and adults.

You can also serve them as an appetizer. Whether you’re hosting a gathering or just having a few friends over for a casual evening, potato sticks are sure to please. Pair them with your favorite dips—ranch, ketchup, aioli, or even a spicy sriracha mayo—and you’ve got a snack that will disappear in no time.

The Emotional Value of Simple Meals

In our fast-paced world, it’s easy to overlook the power of simple meals. We often find ourselves rushing to prepare food, constantly seeking out new, trendy ingredients or complicated recipes. But there’s a certain comfort in going back to basics, like making potato sticks from scratch. These moments of slowing down and creating something from humble ingredients are where true connection and happiness lie.

For me, preparing and sharing these potato sticks brings back fond memories of family gatherings. It’s a reminder that even the simplest foods have the power to bring joy and create lasting memories. Sometimes, the most ordinary dishes are the ones that make us feel the most connected to our past, our traditions, and the people we love.

Conclusion: A Timeless Comfort Food

Potato sticks are more than just a tasty treat—they’re a reminder of the joys that come from simplicity. Whether you’re making them for a weeknight meal, a party snack, or a family gathering, these crispy, flavorful delights never fail to satisfy. The beauty of this dish is in its simplicity: potatoes, eggs, and a bit of seasoning come together to create something comforting and timeless.

By sharing this recipe, I hope to inspire you to embrace the simple joys of cooking. Sometimes, all it takes is a few basic ingredients and a little time to create something truly special. Whether you enjoy these potato sticks alone or share them with friends and family, they’re sure to bring a sense of warmth and happiness to your table, just as they have for me.

Lemon Biscuits: A Refreshing and Comforting Treat

As a child, I often found solace in the kitchen of my grandmother’s house, where the smell of fresh-baked goods wafted through the air. Every Sunday afternoon, no matter how busy life was, we gathered in her cozy kitchen for a ritual that had been passed down through generations—baking. The mix of flour, sugar, and butter created a comforting atmosphere that made everything feel right with the world. Her lemon biscuits, though simple in their ingredients, became the highlight of these baking sessions. The combination of the buttery dough with the refreshing tang of lemon created a harmonious balance that filled the house with warmth and joy.

Growing up, these lemon biscuits became more than just a treat; they were a symbol of connection and togetherness. As we enjoyed each bite, my grandmother would share stories from her childhood, and my mother would add her own tales of growing up in the same kitchen. The biscuits, with their crisp edges and tender interiors, were a canvas for memories and conversation.

In this modern world, where everything seems rushed, I still turn to this recipe when I need to recreate those moments of calm and connection. It’s funny how something as simple as a biscuit can bring so much comfort and nostalgia. Every time I bake these lemon biscuits, I can almost hear the laughter and feel the warmth of my grandmother’s kitchen, reminding me that, sometimes, the simplest things in life can make the biggest impact.

Why Lemon Biscuits are a Must-Try

Lemon biscuits may not be as famous as their chocolate chip counterparts, but they carry a unique charm that makes them stand out. The bright, citrusy flavor of lemon paired with the delicate, buttery texture of a biscuit is a combination that appeals to both the sweet and savory palate. These biscuits are perfect for any time of the day—whether you’re enjoying them with a cup of tea in the afternoon or serving them alongside a hearty meal. Their versatility is what makes them a timeless recipe.

Lemon is often associated with freshness and rejuvenation, making these biscuits not just a treat but also a mood-lifting experience. The burst of citrus flavor brings an instant sense of invigoration, while the soft, crumbly texture is pure comfort. Baking these biscuits is like creating a little moment of joy, something that brings you closer to the simplicity and beauty of life.

Ingredients for the Dough:

IngredientAmount
Butter80g (5.5 tbsp)
Sugar100g (1/2 cup)
Egg1 medium
Lemon Juice40g (4 tbsp)
Wheat Flour170g (1 1/3 cups, approximate)
Baking Powder1 tsp

Directions:

  1. Prepare the Dough: Preheat your oven to 180°C (350°F). In a large bowl, cream together the softened butter and sugar until light and fluffy. Add the egg and lemon juice, mixing until smooth and combined.
  2. Combine Dry Ingredients: In a separate bowl, sift the wheat flour and baking powder together to ensure they are well-mixed and there are no lumps. Gradually add the dry ingredients into the wet mixture, stirring until a dough forms.
  3. Shape the Biscuits: Roll the dough out onto a lightly floured surface to a thickness of about 1/2 inch. Using a round cookie cutter or a glass, cut the dough into biscuit shapes.
  4. Bake: Place the shaped biscuits onto a baking sheet lined with parchment paper. Bake for 12-15 minutes, or until the biscuits are golden brown on top.
  5. Cool and Serve: Let the biscuits cool on a wire rack for a few minutes before serving. Enjoy these soft, zesty lemon biscuits with your favorite tea or as a delightful snack!

Nutritional Information (per biscuit)

NutrientAmount
Calories150 kcal
Protein2g
Carbohydrates20g
Fiber1g
Sugars10g
Fat7g
Saturated Fat4g
Sodium50mg

FAQs: Common Questions About Lemon Biscuits

1. Can I make lemon biscuits ahead of time? Yes! You can prepare the dough in advance and store it in the refrigerator for up to 24 hours. This allows the flavors to meld together and makes it easy to bake fresh biscuits whenever you need them. Alternatively, you can bake them ahead of time, and they will keep well in an airtight container for up to three days.

2. Can I substitute the butter with something else? Yes, if you’re looking for a dairy-free option, you can substitute the butter with margarine or coconut oil. These substitutions will alter the flavor slightly, but they will still provide the necessary moisture and texture to the biscuits.

3. Can I use a different type of flour for this recipe? While all-purpose flour works best for this recipe, you can experiment with whole wheat flour for a heartier texture. Just keep in mind that the biscuits may be slightly denser. If you’re using gluten-free flour, be sure to use a blend that is specifically designed for baking to ensure the right texture.

4. Can I add other flavors to the biscuits? Absolutely! Lemon pairs wonderfully with various flavors. You can add a hint of vanilla for warmth or a dash of poppy seeds for a bit of crunch. If you prefer a more savory version, try adding fresh herbs like rosemary or thyme for a fragrant twist.

5. Are these biscuits suitable for a vegan diet? Yes, you can make this recipe vegan by substituting the egg with a flaxseed egg (1 tablespoon of ground flaxseed mixed with 3 tablespoons of water) and replacing the butter with a plant-based option like vegan margarine or coconut oil.

6. Can I freeze lemon biscuits? Yes, lemon biscuits freeze well. After baking, let them cool completely, then place them in a freezer-safe container or bag. They will last up to three months in the freezer. To reheat, simply thaw them at room temperature or warm them in the oven for a few minutes to restore their fresh-baked texture.

Baking Tips for Perfect Lemon Biscuits

Creating the perfect lemon biscuit is easier than you think, but a few key tips will help ensure the best results:

  1. Use Room Temperature Butter: For the best texture, make sure the butter is softened to room temperature before creaming it with the sugar. This will allow the mixture to become light and fluffy, giving your biscuits a soft, tender crumb.
  2. Don’t Overmix the Dough: When adding the dry ingredients to the wet mixture, be careful not to overmix. Overworking the dough can lead to tough biscuits. Mix until just combined, and you’ll get light, airy results.
  3. Chill the Dough: If you have the time, chill the dough for 15-30 minutes before baking. This helps the biscuits hold their shape during baking and results in a slightly flakier texture.
  4. Fresh Lemons Are Best: For the most vibrant lemon flavor, use fresh lemon juice and zest. The zest adds a fragrant, citrusy punch that enhances the overall flavor of the biscuits.
  5. Bake at the Right Temperature: Ensure your oven is preheated to 180°C (350°F) before baking the biscuits. This allows them to rise properly and bake evenly, giving them a golden brown finish.

Conclusion: A Timeless Recipe for Every Generation

Lemon biscuits are more than just a recipe—they are a gateway to creating memories, sharing traditions, and finding comfort in simplicity. Whether you’re baking them for a special occasion or just because you need a little pick-me-up, these biscuits will always remind you that the best things in life are often the simplest. They are the perfect balance of sweet, tangy, and buttery, and they offer a refreshing twist on a beloved classic.

As you bake and enjoy these biscuits, take a moment to reflect on the joy that comes with homemade treats. There’s something incredibly satisfying about knowing that with just a few simple ingredients, you’ve created something that can bring people together, evoke memories, and make any day feel a little brighter. And just like my grandmother’s kitchen, these lemon biscuits will always be a symbol of connection, comfort, and the beauty of sharing food with loved ones.

A Mediterranean Feast: The Story Behind the Flatbread Delight

Food is more than just nourishment; it’s a connection to culture, tradition, and memories. For me, Mediterranean cuisine holds a special place in my heart. I vividly recall the afternoons spent in my grandmother’s kitchen, where the scent of fresh herbs, warm pita bread, and the tangy yogurt-based sauces filled the air. As a child, I couldn’t have imagined a meal without that perfect balance of flavors—sweet, savory, salty, and tangy. It was more than just food; it was a celebration of life, shared with family and friends.

Over the years, I’ve found that one of the simplest yet most comforting meals I can create is the Mediterranean flatbread. It reminds me of those moments with my grandmother and transports me back to her kitchen every time I prepare it. This Mediterranean flatbread with tzatziki sauce has become a staple in my home, offering a delicious, nutritious, and easy-to-make meal for any occasion. Whether it’s a quick lunch, a light dinner, or a party appetizer, these flatbreads never fail to satisfy.

The combination of hummus, feta, olives, sun-dried tomatoes, and fresh veggies on a crisp flatbread, topped with homemade tzatziki, is a flavor explosion that captures the essence of Mediterranean cuisine. This dish is both vibrant and fulfilling, making it the perfect balance between healthy eating and indulgence.

Why This Mediterranean Flatbread is a Must-Try

One of the reasons I keep coming back to this Mediterranean flatbread recipe is its versatility. The ingredients can be mixed and matched depending on what you have on hand or what your taste buds are craving. The flatbread itself serves as a perfect base for a wide variety of toppings. The hummus adds a creamy texture, while the feta brings a tangy, salty bite. Kalamata olives and sun-dried tomatoes add depth, while the fresh vegetables bring balance, freshness, and a burst of color. Topped with a zesty tzatziki sauce, this meal encapsulates the best of Mediterranean flavors.

What makes this dish even more appealing is its simplicity. You don’t have to be a skilled chef to put it together. Whether you’re cooking for yourself or for a group, the process is straightforward and quick. It’s one of those recipes that can be easily customized, and once you make it once, you’ll find yourself returning to it time and time again.

Ingredients:

IngredientsQuantity
Flatbreads or naan2 pieces
Hummus1/2 cup
Feta cheese (crumbled)1/2 cup
Kalamata olives (sliced)1/4 cup
Sun-dried tomatoes (chopped)1/4 cup
Red onion (thinly sliced)1/4 cup
Fresh arugula1/2 cup
Cucumber (diced)1/4 cup
Cherry tomatoes (halved)1/4 cup
Dried oregano1/4 teaspoon
Red pepper flakes (optional)1/4 teaspoon
Olive oil1 tablespoon

For the Tzatziki Sauce:

IngredientsQuantity
Greek yogurt1/2 cup
Cucumber (finely grated and drained)1/4 cup
Garlic (minced)1 clove
Fresh dill (chopped)1 teaspoon
Lemon juice1 teaspoon
Salt and freshly ground black pepperTo taste

Directions:

  1. Prepare the Tzatziki Sauce:
    • In a small bowl, combine the Greek yogurt, grated cucumber, minced garlic, chopped fresh dill, and lemon juice.
    • Mix until smooth.
    • Season with salt and freshly ground black pepper to taste.
    • Refrigerate until ready to use.
  2. Assemble the Flatbreads:
    • Preheat the oven to 400°F (200°C).
    • Place the flatbreads on a baking sheet.
    • Brush each flatbread with olive oil.
    • Spread a layer of hummus evenly over each flatbread.
    • Top with crumbled feta cheese, sliced Kalamata olives, sun-dried tomatoes, and thinly sliced red onion.
    • Sprinkle with dried oregano and red pepper flakes if using.
  3. Bake:
    • Bake the flatbreads in the preheated oven for 10–12 minutes, or until the flatbreads are crispy and the toppings are heated through.
    • Remove from the oven and garnish with fresh arugula, diced cucumber, and halved cherry tomatoes.
  4. Serve:
    • Serve the Mediterranean flatbreads hot, drizzled with the freshly made tzatziki sauce on top or on the side for dipping.

Nutritional Information (Per Serving):

NutrientAmount
Calories350
Protein10g
Carbohydrates35g
Fiber5g
Fat20g
Saturated Fat5g
Cholesterol25mg
Sodium350mg
Vitamin A10%
Vitamin C15%
Calcium20%
Iron10%

The Power of Mediterranean Ingredients

The Mediterranean diet is known for its heart-healthy benefits, and this Mediterranean flatbread is no exception. The combination of ingredients not only brings bold, balanced flavors to the table but also provides a wealth of health benefits. Fresh vegetables like cucumber, arugula, and tomatoes offer vital vitamins and minerals, while hummus and tzatziki bring in the creaminess without the need for heavy, high-fat ingredients.

The use of olive oil—one of the key components of Mediterranean cuisine—is another major plus. Olive oil is packed with healthy fats that are good for your heart and skin. Paired with the antioxidants found in sun-dried tomatoes and the probiotics in Greek yogurt, this dish not only tastes good but also supports a healthy lifestyle.

FAQs

1. Can I make this recipe vegetarian or vegan?
Yes, absolutely! To make the Mediterranean flatbread vegan, simply substitute the feta cheese with a dairy-free alternative, and use a plant-based yogurt for the tzatziki sauce. You can also omit the feta cheese altogether if you prefer. The hummus base provides a nice creamy texture, and the veggies add plenty of flavor, making the flatbread delicious even without dairy.

2. Can I use store-bought flatbreads or naan?
Yes, store-bought flatbreads or naan are perfect for this recipe. While homemade flatbreads can be fun to make, using pre-made flatbreads saves time and still delivers great results. Choose a high-quality, fresh flatbread for the best flavor.

3. Can I make the tzatziki sauce ahead of time?
Definitely! In fact, the tzatziki sauce tastes even better after sitting for a few hours as the flavors have time to meld together. You can prepare the sauce a day or two in advance and store it in the refrigerator until you’re ready to use it. This makes it a great option for meal prep or parties.

4. What other toppings can I add to the flatbread?
The beauty of this recipe is its versatility! You can add a wide range of toppings based on your preferences. Some popular additions include roasted red peppers, grilled chicken or lamb, olives, or even a drizzle of balsamic glaze for extra depth of flavor. Feel free to experiment with different veggies, herbs, and cheeses to make it your own.

5. Can I make this gluten-free?
Yes! Simply substitute the flatbreads with gluten-free options. Many stores now offer gluten-free naan or flatbread, or you can make your own using gluten-free flour. The rest of the ingredients are naturally gluten-free, so the dish will remain suitable for those with gluten sensitivities.

6. How can I serve this Mediterranean flatbread for a crowd?
This flatbread recipe is great for parties or family gatherings. You can prepare a large batch of flatbreads and cut them into smaller pieces to serve as an appetizer or snack. Alternatively, you could create a flatbread bar where guests can customize their toppings, making it a fun and interactive meal.

Nutritional Benefits

This Mediterranean flatbread is not only delicious but also packed with health benefits. Here are some of the key nutritional highlights:

  • Rich in healthy fats: Olive oil, feta, and hummus provide a good amount of heart-healthy fats, which are important for maintaining cholesterol levels and supporting brain function.
  • High in fiber: Vegetables like cucumbers, arugula, and tomatoes, along with whole wheat flatbreads, offer a substantial amount of fiber, which aids in digestion and helps keep you feeling full.
  • Packed with antioxidants: Ingredients like sun-dried tomatoes, olives, and arugula are rich in antioxidants, which help combat oxidative stress and protect against chronic diseases.
  • A source of protein: The combination of hummus, feta, and yogurt provides a good amount of protein, making this meal satisfying and filling.
  • Low in refined sugars: This recipe is naturally sweetened with fresh ingredients, making it a healthier choice compared to many other flatbread and pizza options.

A Dish to Savor and Share

This Mediterranean flatbread is more than just a meal; it’s an experience. It’s about taking time to enjoy simple, wholesome ingredients while connecting with the flavors of the Mediterranean. Whether you’re enjoying it with a loved one at dinner or sharing it with friends at a gathering, this dish creates memories that are as rich and lasting as its flavors.

In conclusion, this Mediterranean flatbread with tzatziki sauce is a versatile, flavorful, and healthy option that will satisfy your cravings while supporting your well-being. It’s an easy-to-make dish that can be customized to your preferences, making it perfect for anyone looking to enjoy Mediterranean flavors in a convenient and delicious way. If you’re in search of a recipe that brings the best of the Mediterranean to your kitchen, look no further than this flatbread. It’s an instant favorite in my household, and I’m sure it will become one in yours as well.

So, why not give it a try? Let the Mediterranean inspire you to create something simple yet extraordinary. Enjoy the process, savor the flavors, and celebrate the joy of good food.

Zucchini is Tastier Than Meat: A Savory Vegetable Delight

Growing up, I always believed that for a meal to be truly satisfying, it needed to be packed with meat. A rich, juicy steak or a hearty roast chicken was the standard in my home. But over the years, I’ve discovered that vegetables can stand on their own as the star of a meal—no meat required. It all started on one particularly hectic weeknight when I had very little in the fridge but some leftover zucchinis, potatoes, and a few other vegetables. Faced with the challenge of creating a meal out of limited ingredients, I decided to try something bold: a dish where vegetables were not just the side dish but the star of the show.

To my surprise, the outcome was more than just acceptable—it was delicious! I ended up creating a dish that was not only satisfying but also packed with flavors that far exceeded my expectations. The zucchini became the hero of the meal, tender and flavorful, perfectly complemented by carrots and potatoes. The cheese added a creamy richness that made the whole dish melt in my mouth, and the semolina helped bring everything together with a golden, crispy exterior.

From that day forward, I started experimenting more with vegetables in ways I never had before. I quickly realized that zucchini, in particular, is more versatile and flavorful than I had ever given it credit for. And thus, the dish “Zucchini is Tastier Than Meat!” was born—something simple, nourishing, and utterly delicious. Whether you’re looking for a meatless meal or simply want to incorporate more vegetables into your diet, this dish is the perfect solution. It’s proof that sometimes, the simplest ingredients can create the most unforgettable meals.

Why Zucchini Is the Secret Ingredient

Zucchini often gets a bad rap as a bland vegetable that’s only good for salads or stir-fries. However, once you give zucchini a chance to shine in a hearty dish like this, you’ll quickly see that it can rival any meat-based recipe. Here’s why zucchini is the perfect addition to this dish:

  1. Neutral Flavor: Zucchini has a mild, slightly sweet flavor that allows it to absorb the other ingredients around it, making it an ideal base for creating complex and satisfying dishes.
  2. Texture: When cooked properly, zucchini becomes tender and soft, making it a great substitute for more substantial ingredients like meat. It’s also naturally low in calories and rich in fiber, making it a great choice for anyone looking to enjoy a healthier meal.
  3. Nutrient-Dense: Zucchini is packed with vitamins A and C, potassium, and folate. It’s a great addition to any meal because it not only boosts the flavor but also enhances the nutritional value of the dish.

The Power of Combining Zucchini with Other Vegetables

The beauty of this dish lies in the combination of zucchini with other vegetables such as carrots and potatoes. Carrots add a subtle sweetness and an extra crunch, while potatoes bring heartiness and satisfaction. Together, they create a well-rounded flavor profile that can stand up to any meat-based dish, all while remaining entirely plant-based.

By adding eggs and semolina, the dish takes on a slightly custardy texture inside, with a crispy outer layer that gives it a comforting, satisfying mouthfeel. The grated cheese melted throughout the dish adds richness, making it even more indulgent, while still keeping things relatively healthy. This combination of ingredients is what makes the dish so deliciously addictive—it hits all the right notes of flavor, texture, and nutrition.

Ingredients:

IngredientQuantity
Zucchini1
Carrot1
Potatoes2
Spring onionTo taste
Cheese (grated)100 grams (about 3.5 oz)
Eggs3
Semolina4 tablespoons
Salt and black pepperTo taste

Directions:

  1. Grate the Vegetables: Start by grating the zucchini, carrot, and potatoes into a large mixing bowl. Use a medium-sized grater to achieve the perfect texture.
  2. Remove Excess Moisture: Once grated, place the vegetables into a clean kitchen towel or cheesecloth and squeeze out any excess moisture. This helps prevent the mixture from becoming too watery during cooking.
  3. Combine the Ingredients: In the same bowl, add the eggs, semolina, salt, and black pepper. Mix everything thoroughly until well combined.
  4. Add the Cheese: Grate the cheese and stir it into the vegetable mixture. Feel free to use your favorite cheese—cheddar, mozzarella, or even a blend works great.
  5. Cook the Patties: Heat a non-stick skillet over medium heat and add a bit of oil or butter. Once the pan is hot, spoon the veggie mixture into the skillet, shaping it into small patties or one large flat pancake.
  6. Fry Until Golden: Cook the patties for about 4-5 minutes on each side or until golden brown and crispy. Make sure they are cooked through and the cheese has melted inside.
  7. Serve and Enjoy: Once done, remove from the skillet and serve hot. Garnish with chopped spring onions for a fresh touch.

Nutritional Information (per serving):

NutrientAmount
Calories200 kcal
Protein7g
Carbohydrates22g
Fat10g
Fiber4g
Sugars4g
Sodium200 mg

Health Benefits of This Dish

In a world full of quick, processed meals, it can be hard to find something that is both nutritious and satisfying. But this dish does just that. It’s a great way to enjoy comfort food without feeling sluggish afterward. Here are some of the health benefits you get from this meal:

  1. Rich in Fiber: Zucchini and potatoes are both excellent sources of fiber, which is essential for healthy digestion and overall gut health. Fiber also helps you feel fuller longer, making this dish a perfect option for a satisfying lunch or dinner.
  2. Packed with Nutrients: The carrots provide vitamin A, which is crucial for healthy skin and eyes, while the zucchini offers antioxidants and vitamin C, which helps to boost the immune system. Potatoes are a good source of potassium, helping to maintain healthy blood pressure levels.
  3. High in Protein: The eggs provide a solid amount of protein, which is vital for muscle repair and growth. Protein also helps to regulate your appetite, making you feel more satisfied after your meal.
  4. Low in Calories: If you’re looking to maintain or lose weight, this dish is a great option. Despite being filling, it’s low in calories, thanks to the nutrient-dense, vegetable-based ingredients.

The Versatility of the Dish

One of the best parts about this recipe is its versatility. It can be served in a variety of ways and can be easily adapted to suit your taste. Here are some variations you can try:

  • Vegan Version: To make this dish vegan, simply replace the eggs and cheese with plant-based alternatives. Vegan cheese and flax eggs work wonderfully as substitutes.
  • Add More Vegetables: You can throw in additional veggies like bell peppers, spinach, or even mushrooms to enhance the dish and add more nutritional value.
  • Herbs and Spices: Experiment with different herbs and spices to change the flavor profile. Thyme, oregano, or even chili flakes can elevate the dish to your preferred taste.
  • Grilled Option: Instead of cooking in a skillet, you can make small patties and grill them for a smoky flavor and crispier texture.

FAQs: Answering Your Burning Questions

1. Can I make this dish ahead of time?

Yes! This dish can be prepared ahead of time and stored in the refrigerator for up to 2-3 days. It also freezes well, so you can make a big batch and have leftovers for the week.

2. What kind of cheese should I use?

You can use any cheese you like, though cheddar, mozzarella, or a mild gouda are popular choices. If you’re looking for a dairy-free option, there are plenty of vegan cheeses available.

3. Can I add meat to this dish?

While the dish is designed to be meatless, you can absolutely add cooked ground meat if you prefer. Ground beef, turkey, or chicken would complement the flavors of this dish well.

4. How do I prevent the zucchini from being too watery?

To avoid excess moisture, be sure to grate the zucchini and then squeeze out the excess water using a clean kitchen towel or cheesecloth before mixing it with the other ingredients. This helps keep the dish from becoming soggy.

Conclusion: Why This Dish is a Keeper

“Zucchini is Tastier Than Meat!” isn’t just a catchy name; it’s a declaration of how versatile and delicious vegetables can be when treated with love and care. This dish proves that you don’t need meat to create a hearty, satisfying meal. Packed with flavor, rich in nutrients, and easy to make, this is a dish that can become a staple in your home.

Whether you’re looking to eat healthier, reduce your meat consumption, or simply try something new, this dish is the perfect choice. It’s a great way to enjoy a flavorful, filling meal without any of the heaviness that often comes with meat-based dishes. Give it a try, and you just might find that zucchini is the secret ingredient you’ve been missing all along!

A Wholesome Delight: Healthy Walnut and Oatmeal Dessert

There are some recipes that have a way of weaving themselves into the fabric of your life, becoming more than just a meal but a comforting ritual. This Healthy Walnut and Oatmeal Dessert is one such recipe for me. It was born on a rainy afternoon when I found myself rummaging through my pantry, searching for something satisfying yet wholesome. At the time, I had been focusing on clean eating, but like anyone, I still craved something sweet to round off my meal. That day, I stumbled upon the perfect combination of ingredients: oatmeal, walnuts, apples, and banana.

The first time I made this dessert, I wasn’t sure what to expect, but when I tasted it, I knew it was going to be something I’d come back to again and again. The natural sweetness from the banana and apples paired with the crunch of walnuts and the hearty oats created a perfect balance of flavors and textures. I was so impressed by how easy it was to make, and how it didn’t leave me feeling sluggish or guilty. From that point on, this walnut and oatmeal dessert became my go-to, not only as a dessert but also as a nourishing breakfast or snack.

What’s incredible about this recipe is how it’s more than just a simple treat—it’s a nourishing meal in disguise. You can feel good about enjoying it, knowing it’s packed with healthy fats, fiber, and natural sugars that leave you feeling satisfied without the crash that comes with most sugary desserts. Over the years, I’ve shared this recipe with friends and family, and it has become a beloved favorite. It’s simple to make, delicious, and most importantly, it reminds me that nourishing food doesn’t have to be complicated to be satisfying.

Why You’ll Love This Healthy Walnut and Oatmeal Dessert

There’s no shortage of dessert options out there, but what makes this walnut and oatmeal dessert stand out is how it brings together all the right ingredients for both flavor and nourishment. If you’re someone who wants to indulge without feeling guilty, this recipe is your answer. It’s easy to make, full of nutritious ingredients, and customizable to suit your taste. Plus, it doesn’t rely on refined sugars or overly processed ingredients to get its sweetness—it lets the natural flavors of the fruit shine.

Packed with Nutrition

The combination of oatmeal, walnuts, and fruits makes this dessert not just a treat, but a powerhouse of nutrition. Oatmeal is known for its high fiber content, particularly beta-glucan, which can help lower cholesterol levels and improve heart health. Walnuts are rich in omega-3 fatty acids, which are beneficial for brain function and heart health. Meanwhile, apples and bananas are packed with vitamins, minerals, and antioxidants that are essential for maintaining overall health.

What’s more, this dessert is naturally sweetened with fruits like banana and apple, so you won’t have to worry about consuming refined sugars. Instead, you’re getting a nutrient-dense treat that supports your health while still satisfying your sweet tooth.

Perfect for Any Time of Day

Whether you enjoy it as a sweet breakfast option, an afternoon snack, or a light dessert after dinner, this healthy walnut and oatmeal dessert is versatile enough to fit into any part of your day. It’s filling enough to start your morning off right or energize you during a mid-afternoon slump. When I first discovered this recipe, I was in search of something to help me maintain a balanced diet while not feeling deprived of sweet treats. Little did I know that this would become my daily go-to for a healthy dessert or snack!

Ingredients (Serves 4)

IngredientQuantity
Walnuts1/2 cup (50g)
Apples2
Eggs2
Banana1
Oatmeal1 ½ cups (150g)
Ground cinnamon1/2 teaspoon

Directions:

  1. Preheat the Oven: Start by preheating your oven to 180°C (350°F). Grease a baking dish or line it with parchment paper for easy cleanup.
  2. Prepare the Apples and Banana: Peel and chop the apples into small cubes. In a separate bowl, mash the banana until smooth.
  3. Mix the Wet Ingredients: In a large mixing bowl, whisk together the eggs and mashed banana. Add in the ground cinnamon and mix thoroughly until smooth.
  4. Combine with Dry Ingredients: Add the oatmeal and walnuts to the bowl with the wet ingredients. Stir everything together, making sure the oatmeal and walnuts are evenly coated with the egg and banana mixture.
  5. Add Apples: Gently fold in the chopped apples and ensure they are evenly distributed throughout the mixture.
  6. Bake: Transfer the mixture into your prepared baking dish, spreading it out evenly. Place it in the oven and bake for 25-30 minutes, or until the top is golden brown and a toothpick inserted into the center comes out clean.
  7. Serve and Enjoy: Allow the dessert to cool for a few minutes before slicing and serving. Enjoy warm or at room temperature for a healthy snack or dessert!

Nutrients (per serving):

NutrientAmount
Calories~250
Protein~6g
Carbohydrates~35g
Fat~12g
Fiber~5g
Sugar~12g

Commonly Asked Questions (FAQs)

Can I use other nuts instead of walnuts?

Yes, absolutely! While walnuts add a lovely crunch and rich flavor, you can easily swap them out for other nuts like almonds, pecans, or even cashews. Each nut brings its own unique flavor and texture, so feel free to experiment and see what you prefer.

Can I make this dessert gluten-free?

Yes, this recipe is naturally gluten-free if you use certified gluten-free oats. Make sure to check the label on the oatmeal package to ensure it’s certified as gluten-free, especially if you have a sensitivity to gluten.

Can I make this ahead of time?

Definitely! This dessert keeps well in the refrigerator for a few days, making it perfect for meal prep. You can prepare it in advance, store it in an airtight container, and enjoy it throughout the week.

Can I add a sweetener if I prefer a sweeter taste?

If you prefer a sweeter dessert, you can add a natural sweetener like honey, maple syrup, or stevia. Start with a small amount and adjust to your taste. Since this recipe already contains naturally sweet ingredients like banana and apple, it may not need much additional sweetness.

How can I make this dessert vegan?

To make this walnut and oatmeal dessert vegan, simply replace the eggs with a plant-based alternative such as flax eggs (1 tablespoon of ground flaxseed mixed with 3 tablespoons of water) or chia eggs. Additionally, swap out any dairy-based ingredients (if used) for non-dairy versions like almond milk or coconut milk.

How do I store leftovers?

Store any leftovers in an airtight container in the refrigerator for up to 4 days. If you want to keep it for longer, you can freeze individual portions in a freezer-safe container for up to 2 months. To reheat, simply microwave for 30 seconds to 1 minute or warm in the oven at a low temperature.

The Versatility of This Dessert

The beauty of this walnut and oatmeal dessert lies in its versatility. Not only can you modify the nuts and sweeteners, but you can also experiment with the fruits you include. While this recipe uses apples and bananas, feel free to add berries, pears, or even dried fruit like raisins or apricots. The oatmeal and walnut base is forgiving and lends itself to a wide variety of flavors, so you can make this dessert suit your preferences.

Another great variation is adding spices like nutmeg, ginger, or cloves for extra warmth, especially during the colder months. You can also top it with a dollop of Greek yogurt, a drizzle of honey, or a sprinkle of chia seeds for an extra boost of nutrients. Whether you keep it simple or get creative, this dessert will always deliver both taste and health benefits.

Conclusion: A Nourishing Dessert You Can Feel Good About

In a world where sweet treats often come with a heavy dose of refined sugar and artificial ingredients, finding a dessert that nourishes your body while still satisfying your cravings is a true win. This healthy walnut and oatmeal dessert is not just delicious but also packed with wholesome ingredients that leave you feeling satisfied and energized. Whether you’re trying to maintain a healthy lifestyle, eat cleaner, or just enjoy a comforting treat without guilt, this recipe has you covered.

It’s easy, customizable, and makes for a delightful dessert or snack any time of day. What started as a simple craving for something sweet has turned into a recipe I treasure—and one that I continue to make regularly. If you’re looking for a way to indulge without overindulging, this walnut and oatmeal dessert is the answer. Simple, nutritious, and oh-so-delicious, it’s a recipe you’ll come back to time and time again.

Try it out, share it with friends, and see how it quickly becomes one of your favorite go-to treats. Your body will thank you, and your taste buds will be more than satisfied!

Dinner in 10 Minutes with Zucchini! I Make It Every Day, Easy and Delicious!

There are some recipes that simply become part of your daily routine, and this zucchini boat dish is one of them for me. I remember the first time I stumbled upon this easy yet delicious idea, back when I was just starting to cook meals for myself. At the time, I was living alone in a small apartment, juggling a full-time job, and trying to make sure I ate well despite my busy schedule. Like many people, I often found myself reaching for something quick but uninspired, usually frozen dinners or something I could pop in the microwave.

Then, one evening, I was staring at the ingredients in my fridge, realizing that I had zucchini, minced veal, and cheese. These simple ingredients held so much promise. Inspired, I decided to make the most of what I had and create a meal that felt satisfying without spending hours in the kitchen. It wasn’t long before I discovered how versatile zucchini could be. The moment I tasted that first bite of the zucchini boats—soft, flavorful, with the perfect combination of savory veal, mushrooms, pineapple, and cheese—I knew I had found my new go-to dish.

Now, I make zucchini boats almost every day. They are quick to prepare, packed with nutrients, and full of flavor. This recipe has become my dependable go-to when I’m in a rush but still want something delicious and comforting. The simplicity of the ingredients and the speed of preparation make it perfect for hectic days. Whether you’re cooking for yourself or feeding the whole family, zucchini boats can be customized to suit your taste and dietary needs, making them an easy and versatile choice.

Why Zucchini Boats Are the Perfect Go-To Meal

As I’ve made these zucchini boats over the years, I’ve come to appreciate how versatile they are. You can easily switch up the ingredients to create your perfect version, and the recipe is incredibly forgiving. Whether you’re using veal, chicken, or even a vegetarian filling, zucchini boats work with almost anything you have in your kitchen.

Zucchini boats are a great way to enjoy a lighter, healthier dinner without compromising on flavor. Zucchini is naturally low in calories but high in nutrients, and when stuffed with a hearty filling like veal and mushrooms, it provides a balanced meal that’s rich in protein, fiber, and healthy fats. The addition of pineapple not only enhances the flavor with a touch of sweetness but also brings a refreshing contrast to the savory elements of the dish.

Not only are these zucchini boats packed with nutrients, but they are also incredibly satisfying. The softness of the zucchini, combined with the rich, flavorful filling and melted cheese, creates a perfect harmony of texture and taste. And let’s not forget the cheese—it’s hard to resist the gooey, melted goodness that brings the entire dish together. Every bite feels like a little moment of indulgence, even though it’s a healthy meal.

Ingredients (Serves 4)

For the Zucchini Boats:

IngredientQuantity
Zucchini2
Minced veal200g
Onion, finely chopped1
Garlic, minced1 clove
Mushrooms, chopped120g
Canned pineapple, diced120g
Cheese, grated100g
Cheese, for topping50g
Vegetable oil1 tablespoon
Salt, to tasteAs needed
Pepper, to tasteAs needed

Directions:

  1. Prepare the Zucchini: Preheat the oven to 180°C (350°F). Cut the zucchini in half lengthwise, then scoop out the center to create boat-like shapes. Set aside the scooped-out zucchini flesh for later use or discard.
  2. Cook the Filling: In a pan, heat the vegetable oil over medium heat. Add the chopped onion and minced garlic, sautéing until softened and fragrant. Add the minced veal and cook until browned, breaking it apart as it cooks. Season with salt and pepper.
  3. Add Mushrooms and Pineapple: Stir in the chopped mushrooms and diced canned pineapple. Cook for another 2-3 minutes until the mushrooms soften and release their moisture.
  4. Stuff the Zucchini Boats: Fill each zucchini half with the veal mixture. Top with grated cheese, then sprinkle with the remaining cheese for a golden, cheesy topping.
  5. Bake: Place the stuffed zucchini boats on a baking tray and bake for 10-12 minutes, or until the zucchini is tender and the cheese is melted and bubbly.
  6. Serve: Remove from the oven, let cool for a minute, and serve hot. Enjoy your quick and tasty zucchini boats!

Nutrients (per serving):

NutrientAmount
Calories350 kcal
Protein28g
Fat22g
Carbohydrates15g
Fiber3g
Sodium500mg

The Health Benefits of Zucchini and Other Ingredients

Zucchini is a nutritional powerhouse, providing a wealth of benefits in every bite. High in water content, zucchini helps keep you hydrated, and it’s a great source of vitamins and minerals, including vitamin C, vitamin A, folate, and potassium. It’s also rich in antioxidants, which help combat inflammation and oxidative stress, making zucchini a fantastic choice for supporting overall health.

In this recipe, zucchini is paired with minced veal, a great source of protein and iron. Protein is essential for muscle repair and growth, while iron is vital for maintaining healthy blood cells. Mushrooms add an earthy flavor and are a low-calorie, high-nutrient food that is packed with B vitamins, selenium, and antioxidants. Pineapple, known for its digestive benefits, contributes a tropical sweetness that balances the savory filling, while cheese adds richness and calcium, which is important for bone health.

This combination of zucchini, veal, mushrooms, pineapple, and cheese creates a well-rounded meal that can help boost your immunity, support digestive health, and provide sustained energy throughout the day.

FAQs About Zucchini Boats

  1. Can I use other types of meat for the filling?

Yes, absolutely! While veal is used in this recipe, you can easily substitute it with other ground meats like chicken, turkey, or beef. If you’re looking for a vegetarian version, consider using lentils, quinoa, or black beans as a protein-packed alternative.

  1. Can I make this recipe in advance?

Yes, zucchini boats can be made ahead of time. Prepare the zucchini boats and stuff them with the filling, but instead of baking them immediately, cover them and refrigerate for up to 24 hours. When you’re ready to eat, simply bake them as directed.

  1. Can I freeze zucchini boats?

Zucchini boats can be frozen for later use. Once assembled, cover them tightly with plastic wrap or foil and freeze. To bake, simply thaw them in the fridge overnight and bake as you would normally.

  1. Can I make zucchini boats without cheese?

Yes, you can omit the cheese if you prefer a dairy-free version. Alternatively, you can use a dairy-free cheese substitute or simply enjoy the flavor of the zucchini and filling without it.

  1. How can I make zucchini boats more flavorful?

Feel free to experiment with spices and herbs to add depth to the flavor of your zucchini boats. For instance, try adding Italian seasoning, thyme, or basil to the veal filling, or drizzle some balsamic glaze over the top for a tangy finish.

Conclusion: A Meal That Brings Comfort and Convenience

Zucchini boats are the ultimate combination of simplicity, flavor, and convenience. With minimal prep time and the flexibility to customize the filling, you can easily create a meal that satisfies your cravings without taking up too much of your time. From the savory veal and earthy mushrooms to the sweetness of pineapple and the gooey cheese topping, each bite is an explosion of flavor that will leave you wanting more.

This recipe has become my everyday favorite because of how quickly it comes together and how versatile it is. Whether you need a weeknight dinner, a meal prep solution, or a dish that everyone in the family will enjoy, zucchini boats check all the boxes. Plus, the fact that they’re so healthy, packed with nutrients, and easily adaptable to different tastes makes them a reliable go-to dish for any occasion.

So next time you’re in a rush but still want to enjoy a satisfying and nutritious meal, reach for the zucchini and give this recipe a try. It’s an easy, delicious, and healthful dinner that truly delivers—no matter how busy life gets.

Savory Beef and Mozzarella Tortilla Wraps: A Journey of Flavor and Simplicity

Sometimes, it’s the simplest recipes that bring the most comfort. I still remember the first time I made these savory beef and mozzarella tortilla wraps. It was a late evening after a busy day, and I needed something quick, yet satisfying. As I tossed together ground beef, garlic, and onions, the kitchen began to fill with the warm, comforting scents of home. I knew I wanted something easy to prepare, but still full of flavor—something that would fill the kitchen with the kind of warmth that only good food can bring.

As the beef browned and the cheese melted, I wrapped it all up in a warm tortilla, taking the first bite with a sense of contentment. The combination of the juicy, savory beef, the melty mozzarella, and the soft tortilla was a perfect bite of simplicity and comfort. From that day on, these savory wraps became a regular in my recipe rotation, one that I could rely on when I needed something quick but satisfying.

Cooking, at its heart, is about creating memories and finding joy in the process. This recipe, with its ease and rich flavor, has become my go-to comfort food, a dish that never fails to deliver both in taste and nostalgia. Whether you’re looking for a weeknight dinner or a snack that hits the spot, this simple yet satisfying dish has the power to create moments that linger long after the last bite.

The Power of Simplicity in Cooking

In today’s fast-paced world, we are often bombarded with complex recipes and intricate culinary techniques. It can feel overwhelming at times to navigate through endless ingredients and steps. However, the beauty of this savory beef and mozzarella tortilla wrap lies in its simplicity. It requires few ingredients, is quick to make, and delivers a satisfying meal in no time.

Simplicity in cooking has a magical way of connecting us to the roots of what food is meant to be: nourishment, comfort, and joy. The combination of basic ingredients—beef, cheese, and tortillas—doesn’t need any frills or complex techniques to shine. It allows you to focus on the essentials: creating something delicious with what you have on hand. Sometimes, the best meals come from the most straightforward recipes, reminding us that we don’t always need to overcomplicate things to enjoy great food.

Ingredients:

IngredientQuantity
Onion, chopped½ (75g)
Garlic, minced3 cloves (6g)
Ground beef7 ounces (200g)
Salt and black pepperTo taste
PaprikaA pinch
Olive oil1 tablespoon (15ml)
Parsley, chopped1 tablespoon (10g)
Tortillas2 (approx. 100g each)
Sliced mozzarella cheeseAmount to taste

Directions:

  1. Prepare the Filling: Heat olive oil in a skillet over medium heat. Add the chopped onion and minced garlic, sautéing for about 2-3 minutes until fragrant and softened.
  2. Cook the Ground Beef: Add the ground beef to the skillet. Break it apart with a spatula and cook until browned, about 5-7 minutes. Season with salt, black pepper, and a pinch of paprika.
  3. Assemble the Tortillas: Warm the tortillas in a separate pan for about 30 seconds on each side. Once warm, spoon the beef mixture evenly onto each tortilla.
  4. Add the Cheese: Top the beef with sliced mozzarella cheese, allowing it to melt slightly.
  5. Fold and Serve: Sprinkle with fresh chopped parsley and fold the tortillas in half. Serve hot and enjoy!

Nutritional Information:

NutrientAmount per Serving
Calories350 kcal
Protein23g
Carbohydrates25g
Fat20g
Fiber2g
Sodium600mg

The Versatility of Tortilla Wraps: Endless Possibilities

One of the best things about tortillas is their versatility. They can serve as a base for so many different fillings, whether you’re craving something savory, sweet, or even spicy. These savory beef and mozzarella tortilla wraps are just the beginning. You can easily customize them with your favorite vegetables, sauces, or seasonings to make them your own.

For instance, adding a handful of fresh spinach or sautéed peppers can bring a burst of freshness and color to the dish. If you prefer a bit more heat, you can drizzle some hot sauce or add a few slices of jalapeños to the wrap. You could even swap out the mozzarella for a different cheese like cheddar or gouda for a slightly different flavor profile. The possibilities are endless, and that’s what makes this recipe so adaptable to different tastes and preferences.

Whether you’re preparing a quick lunch, a snack for the family, or a simple dinner, tortilla wraps offer endless combinations that make every meal feel like a new experience.

A Balanced Meal in a Bite

In addition to its ease and adaptability, this savory beef and mozzarella tortilla wrap is a balanced meal in itself. The ground beef provides protein and iron, while the mozzarella cheese offers calcium and richness. The onions and garlic add depth of flavor and a touch of nutrition, while the parsley garnishes the dish with a bit of freshness.

Incorporating a variety of flavors and textures into your meals is essential for creating balanced dishes that are both nutritious and satisfying. While this wrap is simple, it’s also a perfect example of how you can create a well-rounded meal with minimal effort. The combination of savory beef, melted cheese, and fresh herbs creates a balanced, hearty bite, leaving you full and content.

FAQs: Everything You Need to Know

  1. Can I use a different type of meat for this recipe? Yes, you can easily substitute ground beef with other types of ground meat such as chicken, turkey, or lamb. Each type of meat will bring its own flavor and texture to the dish.
  2. Can I make these wraps ahead of time? While these wraps are best served fresh, you can prepare the beef filling ahead of time and store it in the fridge for up to 3 days. When you’re ready to serve, simply warm it up and assemble the wraps.
  3. Can I freeze the beef filling? Yes, the beef filling can be frozen for up to 3 months. Just make sure to store it in an airtight container or freezer bag. When you’re ready to use it, thaw it in the fridge overnight and reheat before serving.
  4. Can I use a different type of cheese? Absolutely! If you prefer a different cheese, try using cheddar, gouda, or even pepper jack for a spicier kick. Each cheese will give a unique flavor to the wraps.
  5. What type of tortillas should I use? You can use any type of tortilla you prefer, such as flour tortillas, whole wheat tortillas, or even gluten-free options. The choice of tortilla will slightly change the texture and flavor, but any will work well with the beef and cheese filling.

Conclusion: A Recipe to Savor and Share

The savory beef and mozzarella tortilla wrap is more than just a meal—it’s an experience. A simple yet satisfying dish that brings comfort, warmth, and flavor, this recipe is the kind that can quickly become a family favorite. It’s one of those meals that, while easy to prepare, has the power to evoke memories, spark creativity, and create new traditions around the dinner table.

Cooking is a journey, and sometimes the most rewarding dishes are the ones that bring you back to the basics. This savory wrap, with its tender beef, gooey cheese, and warm tortilla, is a reminder that food doesn’t need to be complicated to be extraordinary. It’s the little things—the ingredients we already have on hand, the simple techniques, and the love we put into it—that make all the difference.

As you savor each bite of this comforting wrap, know that you’re not just feeding your body; you’re creating moments to cherish, sharing a meal that brings people together, and embracing the magic of simplicity in the kitchen.

A Secret Recipe: Melt-in-Your-Mouth Beef Stew

There are certain dishes that have the power to transport us to a time and place filled with warmth and comfort. For me, this melt-in-your-mouth beef stew is one of those dishes. I remember the first time I tasted it – it was at a family gathering, during a cold winter afternoon. My grandmother had spent hours in the kitchen, letting the stew simmer slowly, filling the house with the most delicious aromas. It wasn’t just the tender, juicy beef that left an impression, but the way the flavors melded together, creating a dish that felt like a homecoming.

Over the years, I’ve made this stew countless times, each time adding my own twist but always preserving the same comforting flavors. The beauty of this dish lies in its simplicity. The beef, slowly cooked with aromatic herbs and spices, becomes so tender that it practically melts in your mouth. It’s the kind of meal that you look forward to, something that brings people together, fills the stomach, and warms the soul.

Making this stew has become a cherished ritual for me. When the weather turns chilly, I turn to this recipe to bring a sense of familiarity and comfort to my home. I’ve come to realize that food isn’t just about feeding our bodies; it’s about nurturing our spirits and creating memories around the table. This beef stew does just that—it’s not just a meal; it’s a story waiting to be shared.

The Origins of Beef Stew: A Comforting Classic

Stews, particularly beef stews, have long been a beloved staple in many cultures around the world. These one-pot meals, rich in flavor and history, have been passed down from generation to generation, evolving with the times but always remaining a symbol of nourishment and tradition. For centuries, stews have been the go-to dish for utilizing tougher cuts of meat, allowing them to become tender and flavorful through slow cooking. In the case of this melt-in-your-mouth beef stew, the beef is simmered to perfection, creating a dish that’s both hearty and indulgent.

The process of slowly cooking beef and vegetables in a broth allows the flavors to blend together, resulting in a savory and aromatic dish that fills the kitchen with the comforting scent of home. The use of ingredients such as paprika, bay leaves, and Italian herbs gives the stew a depth of flavor, while the addition of potatoes and carrots makes it a complete meal in itself. Over time, stews have become a symbol of comfort food—something you can count on to bring warmth on the coldest days.

This recipe, while based on traditional stews, carries with it the essence of family, love, and shared moments. It has been adapted and passed down through the generations, always bringing people together around the table.

Ingredients:

IngredientQuantity
Beef (preferably stewing beef or chuck)800g
ButterAs needed for sautéing and finishing
Onions, chopped3
Black pepper peasTo taste
Bay leaves2
Carrot, peeled and chopped1
Tomatoes, chopped3
Red pepper, chopped1
Yellow pepper, chopped1
Paprika1 teaspoon
Italian herbs1 teaspoon
Potatoes, peeled and choppedAs desired
Garlic, minced2 cloves
Green onion, choppedFor garnish
Fresh coriander, choppedFor garnish
Warm milk150-200 ml

Directions:

  1. Sear the Beef: In a large pot or Dutch oven, heat butter over medium-high heat. Add the beef in batches to sear, ensuring that all sides are browned. Once browned, remove the beef from the pot and set it aside.
  2. Sauté the Vegetables: In the same pot, add more butter as needed. Sauté the chopped onions, carrots, red and yellow peppers, and garlic for 5-7 minutes, or until the onions turn translucent and the vegetables soften slightly.
  3. Add Tomatoes and Spices: Stir in the chopped tomatoes along with the bay leaves, black pepper peas, paprika, and Italian herbs. Let the mixture cook for another 2-3 minutes, allowing the flavors to meld together.
  4. Simmer the Stew: Return the seared beef to the pot and add the potatoes. Pour in enough water to cover the ingredients, then bring the stew to a simmer. Lower the heat and let it cook for about 1.5 to 2 hours, or until the beef is tender and the flavors have melded.
  5. Finish with Milk: When the stew is ready, add 150-200 ml of warm milk to give it a creamy texture and enhance the flavors. Stir well and adjust seasoning if necessary.
  6. Garnish and Serve: Serve the stew hot, garnished with chopped green onions and fresh coriander for a fresh, herbal finish.

Nutritional Information (per serving):

NutrientAmount (per serving)
Calories350-400 kcal
Protein30g
Carbohydrates25g
Fat20g
Fiber5g
Sodium300mg

Why This Beef Stew Is So Special

What makes this beef stew stand out from the rest is the tender beef that melts in your mouth. Unlike some stews that can be heavy and greasy, this recipe focuses on achieving the perfect balance of flavor, richness, and lightness. The slow simmering process breaks down the beef, turning it into a juicy, melt-in-your-mouth delight. The use of fresh vegetables like carrots, peppers, and potatoes adds natural sweetness and texture, creating a balanced, hearty meal.

The magic of this stew also lies in the broth. Made with a combination of aromatic herbs, vegetables, and warm milk, the broth becomes rich and comforting without being overpowering. The paprika and Italian herbs provide a subtle yet distinct flavor, enhancing the natural sweetness of the vegetables and the savory depth of the beef. The addition of bay leaves and black pepper brings warmth, making each spoonful a soothing experience.

The Healing Power of Comfort Food

There’s something uniquely healing about comfort food, and this beef stew is the epitome of that feeling. Whether you’ve had a tough day or are looking to enjoy a cozy evening with family, there’s nothing quite like a hearty meal to lift your spirits. The act of cooking itself is therapeutic—chopping vegetables, searing the meat, and stirring the stew on the stove gives a sense of accomplishment and calm. But it’s when the stew is finally served, steaming in bowls, that the real magic happens.

For me, this stew has always been a reminder of the importance of family and tradition. Growing up, my family would gather around the dinner table, sharing stories and laughter as we savored dishes like this one. Even now, as I prepare it for my own loved ones, I feel a deep connection to my past and the generations of home cooks who have perfected this dish over the years.

Common Questions About Beef Stew

1. Can I use a different cut of meat? Yes, you can substitute other cuts of beef, such as brisket or chuck roast. Just be sure to allow extra time for the meat to become tender. The key is to choose a tougher cut of meat that benefits from slow cooking to break down the fibers and become tender.

2. Can I make this stew ahead of time? Absolutely! In fact, the stew often tastes even better the next day as the flavors continue to meld together. You can prepare the stew in advance and store it in the refrigerator for up to three days. Simply reheat on the stove when you’re ready to serve.

3. How can I make this stew more hearty? If you prefer a heartier stew, feel free to add more vegetables like peas, parsnips, or turnips. You can also serve the stew with crusty bread or over a bed of rice for an even more filling meal.

4. Is there a vegetarian version of this stew? Yes, you can make a vegetarian version of this stew by substituting the beef with plant-based protein or hearty vegetables like mushrooms, lentils, or seitan. The flavors will still be rich and comforting, even without the meat.

5. How do I store leftover stew? Leftover stew can be stored in an airtight container in the refrigerator for up to three days. If you’d like to keep it longer, you can freeze it for up to three months. Just make sure to let the stew cool completely before storing it.

Conclusion: A Stew Worth Sharing

As with all great comfort food, this melt-in-your-mouth beef stew is more than just a recipe—it’s an experience, a way of bringing people together and creating lasting memories. Whether it’s a family dinner, a gathering of friends, or a quiet night in, this stew will fill your home with warmth and love. The tender beef, rich broth, and aromatic spices combine to create a dish that feels like home in every bite.

Making this stew connects us to our past and allows us to create new memories around the dinner table. It’s a dish that has been passed down through generations, and with each pot we make, we continue the tradition. As you try this recipe, I hope it becomes as much of a staple in your home as it has in mine. After all, the best recipes are those that not only nourish the body but also feed the soul.

A Taste of Tradition and Comfort

There are certain dishes that have the power to transport us to a simpler time, evoking memories of cozy kitchens, family gatherings, and the warmth of a home-cooked meal. For me, one such dish is the savory meat pie. Growing up, I remember the joy of sitting at my grandmother’s table, eagerly awaiting the moment when she would present her famous meat pies, golden and crisp, fresh from the oven. She would always say that food, especially a hearty meal like this, had the power to bring people together—and I couldn’t agree more.

The combination of flaky dough and savory, well-seasoned meat filling was something special. It was a dish that felt like a warm embrace, comforting after a long day. Even now, as an adult, making meat pies brings me back to those cherished memories. They serve not only as a meal but as a reminder of the love and care that went into preparing food for the people you care about.

As I’ve recreated this recipe over the years, I’ve found that making these pies still holds that same magic. The act of gathering the ingredients, rolling the dough, and filling the pies feels like connecting to something timeless. It’s a comforting and satisfying ritual that fills my kitchen with warmth and fills my heart with the same love my grandmother shared.

This recipe is an adaptation of that family favorite, made for today’s busy life. While it may seem like a traditional, complex dish, it’s surprisingly simple to make, and the results are absolutely worth it. Whether you’re preparing these pies for a family dinner, a cozy evening with friends, or as a comforting treat to enjoy by yourself, they are sure to leave everyone feeling nourished and content.

The Appeal of Savory Meat Pies: A Global Favorite

Savory pies, filled with meats and vegetables, have been enjoyed by cultures around the world for centuries. From the British meat pie to the Middle Eastern kebab pie, the concept of a savory, hearty filling encased in pastry transcends borders. Each culture has put its own spin on this classic dish, using local spices, meats, and ingredients to create a unique version. While the concept may be global, there’s something uniquely comforting about a homemade meat pie, made with care and served fresh from the oven.

For me, savory meat pies are the embodiment of what comfort food should be: simple, satisfying, and capable of turning an ordinary day into something special. The process of preparing the filling, seasoning it just right, and encasing it in dough that bakes to a perfect golden brown is both therapeutic and rewarding. It’s a process that brings joy to both the cook and the diners, and the result is a meal that not only nourishes but also comforts the soul.

Ingredients (for 4 pies):

DoughQuantity
Water250 ml
Milk250 ml
Salt1 tsp
Flour800 g (added in two stages)
Baking powder1 tsp
FillingQuantity
Onions, chopped3
Ground meat (beef or lamb)400 g
Salt and spices to tasteAs desired
Egg WashQuantity
Egg1 (for brushing)

Directions:

  1. Prepare the Dough: In a large bowl, combine the water, milk, salt, and baking powder. Gradually add the flour in two stages, stirring well after each addition. Continue mixing until the dough comes together. Knead the dough until it becomes smooth and elastic. Cover the dough and set it aside to rest.
  2. Prepare the Filling: In a skillet over medium heat, sauté the chopped onions until soft and translucent. Add the ground meat and cook, breaking it apart as it browns. Season the mixture with salt and your choice of spices—cumin, black pepper, or paprika work wonderfully. Once the meat is fully cooked, remove from heat and let it cool slightly.
  3. Assemble the Pies: Preheat your oven to 180°C (350°F). Divide the dough into four equal portions. Roll each portion into a flat circle. Place a generous amount of the meat filling in the center of each circle. Fold the dough over the filling to form a half-moon shape and press the edges together to seal. Use a fork to crimp the edges for a decorative finish.
  4. Egg Wash: Beat the egg and lightly brush the top of each pie with the egg wash. This will give the pies a golden, glossy finish once baked.
  5. Bake: Place the assembled pies on a baking sheet lined with parchment paper. Bake in the preheated oven for 25-30 minutes, or until the dough is golden brown and crisp. Remove from the oven and let them cool slightly before serving.

Nutritional Information (Approximate per pie):

NutrientAmount
Calories350-400 kcal
Protein15-18 g
Carbohydrates40-45 g
Fat18-20 g
Fiber2-3 g
Sodium500 mg

Why This Meat Pie Recipe Works

What makes this recipe particularly appealing is its simplicity and versatility. Unlike many elaborate pie recipes that require multiple steps and complex techniques, this one is straightforward and can be adapted based on your tastes and the ingredients you have on hand. The dough comes together easily, and while there is a waiting period for the dough to rest, the filling comes together quickly on the stove, ensuring that you aren’t left feeling rushed or stressed in the kitchen.

The choice of ground meat is another reason this recipe is so versatile. While beef and lamb are classic options, you can easily substitute with other meats like pork, chicken, or turkey. Additionally, the spices can be adjusted to your preference—whether you enjoy a little extra kick from some chili or prefer a more mild, savory profile, you have the freedom to make this pie your own. The result is a savory, rich filling that balances perfectly with the tender, flaky crust.

FAQs: Common Questions About Savory Meat Pies

  1. Can I make the dough ahead of time? Yes, absolutely! You can prepare the dough a day ahead, wrap it tightly, and store it in the refrigerator. Let it rest at room temperature for about 15-20 minutes before rolling it out to make it easier to handle.
  2. Can I freeze the meat pies? Yes, these meat pies freeze wonderfully. You can either freeze them unbaked or baked. To freeze unbaked pies, place them on a baking sheet, and freeze them for about an hour before transferring them to an airtight container or freezer bag. To bake, simply brush them with the egg wash and bake from frozen, adding a few extra minutes to the baking time. If freezing baked pies, allow them to cool completely before wrapping them tightly for storage. Reheat them in the oven when ready to serve.
  3. What are some variations I can try for the filling? The filling is very versatile. You can mix up the spices based on your preferences, or add different vegetables like peas, carrots, or mushrooms to enhance the flavor. Some people also add a bit of cheese for extra richness. The key is to season the meat well to ensure that the filling is flavorful and juicy.
  4. Can I make these pies vegetarian? Yes, you can make these pies vegetarian by swapping the meat for a plant-based protein like lentils, mushrooms, or even a mix of beans and vegetables. Be sure to season it well to mimic the savory flavors of traditional meat pies.
  5. How do I prevent the dough from getting soggy? The key to preventing soggy dough is to make sure the filling is not too wet before adding it to the pie. Allow any excess liquid from the cooked meat and vegetables to evaporate or drain before using it in the filling. Additionally, be sure to brush the edges of the dough with egg wash before sealing the pies to create a barrier that helps prevent moisture from seeping in.

Conclusion: A Timeless Comfort Food for All Occasions

Savory meat pies are much more than just a meal—they are a symbol of home, tradition, and the love we put into the food we share with others. This recipe, adapted from my grandmother’s classic, brings together the same rich flavors and comforting textures but in a way that’s easy to recreate in any kitchen, no matter how busy life gets. The satisfaction of biting into a perfectly cooked pie, with a flaky crust and a juicy, flavorful filling, is unmatched.

As you prepare and enjoy these meat pies, I encourage you to take a moment to reflect on the memories and traditions that food brings into our lives. Whether it’s a dish passed down through generations, a new recipe you’re excited to try, or a simple meal made with love, food has a special way of connecting us to the people and moments that matter most.

So, gather your ingredients, roll out the dough, and fill your kitchen with the delightful aromas of homemade meat pies. Whether you’re cooking for a special occasion or a quiet family dinner, these pies are sure to make any meal memorable. And who knows, they might just become a new tradition in your own home.