Meatloaf Cupcakes with Mashed Potato Frosting: A Comfort Classic with a Whimsical Twist

The first time I made these meatloaf cupcakes was not for a fancy dinner or holiday party. It was for my son’s fourth birthday. He had never been fond of cake — a strange truth for a toddler — but he loved two things: mashed potatoes and meat. I still remember the way he stared at the little “cupcakes” on his plate, his eyes wide with curiosity, and how he tentatively took a bite before declaring, with potato still clinging to his cheek, “This is the best cake ever!”

That moment wasn’t just heartwarming — it was transformative. I realized that food isn’t just about recipes or ingredients. It’s about surprising someone with something familiar, shaped in an unexpected way. It’s about comfort, joy, playfulness — and, sometimes, making a child believe that dinner is dessert.

That simple experience inspired this recipe, and since then, Meatloaf Cupcakes with Mashed Potato Frosting have become a family staple, a dinner party conversation starter, and a dish that turns skeptics into believers with every bite.

Not Just Adorable — Functional, Too

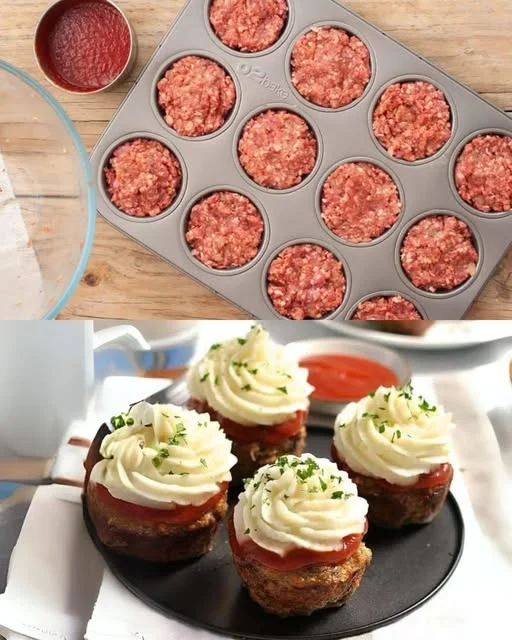
At first glance, this dish might seem like a novelty. After all, shaping meatloaf into cupcakes and “frosting” them with mashed potatoes isn’t exactly traditional. But don’t let the whimsical presentation fool you — this recipe has serious substance behind the style.

Each individual cupcake serves as a perfectly portioned meal, packed with protein and vegetables, and topped with creamy, comforting mashed potatoes. The cupcake shape isn’t just cute — it also makes them cook faster, hold their shape better, and serve more cleanly. No more uneven meatloaf slices falling apart on the plate.

They’re also fantastic for meal prepping or freezing. Once cooled, you can store them in airtight containers and reheat as needed. Whether you’re planning school lunches, busy weeknights, or freezer-friendly batch cooking, these little wonders make life easier and more delicious.

Ingredients

For the Meatloaf Cupcakes

IngredientAmount
Ground beef (beef mince)1 lb / 500g
Onion, grated (any variety)1 medium
Carrots, grated2 small
Garlic, minced2 cloves
Egg1 large
Breadcrumbs½ cup
Milk¼ cup
Worcestershire sauce1 tbsp
Tomato paste or ketchup2 tbsp
Salt1 tsp
Black pepper½ tsp
Dried oregano (optional)½ tsp

For the Mashed Potato Frosting

IngredientAmount
Potatoes (Yukon or Russet)1.5 lb / 700g
Butter2 tbsp
Milk or cream¼ cup
SaltTo taste
White pepper (optional)A pinch

Step-by-Step Directions

1. Preheat and Prep

Preheat your oven to 375°F (190°C). Lightly grease a 12-cup muffin tin or line with foil cupcake liners for easy removal.

2. Build the Meat Mixture

In a large bowl, combine the ground beef, grated onion, grated carrots, minced garlic, egg, breadcrumbs, milk, Worcestershire sauce, tomato paste, salt, pepper, and oregano. Mix thoroughly using your hands or a fork until just combined — avoid overmixing to keep the texture tender.

3. Fill the Muffin Tin

Divide the meat mixture evenly among the 12 muffin cups, pressing down gently to shape them like cupcakes.

4. Bake to Perfection

Place in the oven and bake for 20–25 minutes, or until the internal temperature reaches 160°F (71°C). Let them rest for 5 minutes before removing.

5. Whip Up the Frosting

While the meatloaf bakes, boil peeled and chopped potatoes in salted water until fork-tender (about 15–20 minutes). Drain and mash with butter, milk/cream, salt, and optional white pepper until smooth.

6. Frost the Cupcakes

Using a piping bag or spoon, frost each meatloaf cupcake with the mashed potatoes. Optional: broil for 2–3 minutes for a lightly golden top.

7. Serve and Impress

Garnish with chopped chives, paprika, or a drizzle of gravy. Serve warm — they’re hearty, fun, and packed with flavor.

Nutritional Snapshot per Cupcake (Approximate)

NutrientAmount
Calories180–220 kcal
Protein14g
Carbohydrates10g
Sugars2g
Fat12g
Saturated Fat4g
Fiber1.5g
Sodium280mg

Winning Over Picky Eaters and Grown-Up Palates Alike

One of the most delightful things about this recipe is its universal appeal. Kids adore the cupcake presentation and creamy “frosting,” especially if you give them a chance to pipe it on themselves. You’d be amazed how quickly vegetables like carrots and onions disappear when they’re tucked into a meatloaf muffin and topped with a swirl of potatoes.

Adults, meanwhile, appreciate the depth of flavor. Between the savory richness of the meat, the sweetness of grated carrots, and the tang of tomato paste or ketchup, every bite hits the comfort food trifecta: warm, flavorful, and deeply satisfying.

Want to elevate it further? You can infuse the mashed potatoes with roasted garlic, a touch of horseradish, or even shredded cheddar for extra decadence. Serve with a drizzle of gravy or a sprinkle of fresh herbs, and you’ve got a dish that’s as sophisticated as it is nostalgic.

The Perfect Party Platter or Potluck Star

Looking for a dish that makes an impression at gatherings? These meatloaf cupcakes are built for sharing. They’re easy to transport, don’t require cutting or utensils for serving, and hold up well at room temperature — making them ideal for potlucks, birthday parties, holiday buffets, or game-day spreads.

Because they’re already portioned, guests can grab one or two without hesitation. And because they’re unique, they always spark conversation. People can’t help but smile when they see “cupcakes” on a savory dinner table — and then they keep smiling after that first bite.

Flexible, Forgiving, and Full of Possibilities

Another beautiful thing about this recipe is how adaptable it is. Whether you’re working with dietary restrictions or just want to clean out the fridge, there’s a version of this dish that will work for you.

  • Gluten-free? Use gluten-free breadcrumbs or even rolled oats.
  • Low-carb? Try mashed cauliflower instead of potatoes.
  • Vegetarian? Use lentils, mushrooms, or plant-based meat alternatives. It works beautifully with the same flavor base.
  • Trying to sneak in more veggies? Shred zucchini, bell pepper, or even spinach right into the meat mixture — it all blends in seamlessly.

You can even swap the beef for turkey or chicken for a lighter version. It’s a forgiving recipe that welcomes experimentation.

Frequently Asked Questions

Can I make these ahead of time?

Absolutely. You can make the meatloaf mixture a day in advance and store it covered in the fridge. You can also bake the cupcakes and refrigerate them for up to 3 days. Just reheat them in the oven or microwave before serving. The mashed potato frosting can also be prepped ahead, though it’s best piped or added fresh.

Can I freeze Meatloaf Cupcakes?

Yes! These freeze wonderfully. Let them cool completely, then wrap individually or store in a freezer-safe container. They’ll keep for up to 3 months. To reheat, thaw overnight in the fridge and warm in a 350°F oven until heated through.

Do I need a muffin tin?

It’s highly recommended, as it helps shape and cook the meat evenly. A standard 12-cup muffin tin works best, though you can also use silicone liners or ramekins if needed. Just be sure to adjust baking time slightly depending on the size.

How do I make the mashed potato frosting look nice?

A piping bag with a star tip makes the mashed potatoes look beautifully swirled, just like real frosting. Don’t have one? A plastic sandwich bag with the corner snipped off works, too — or you can simply spoon the mash on top and smooth it with the back of a spoon for a rustic look.

Can I add cheese?

Yes, please do. Mixing a little shredded cheddar into the mashed potatoes gives them a richer, creamier flavor. You can also sprinkle grated cheese on top of the meatloaf before baking or add a cheesy surprise in the center of each cupcake.

What should I serve with these?

They pair wonderfully with a green salad, steamed veggies, or roasted Brussels sprouts. Since the meat and starch are already in the dish, you don’t need a lot — but a dollop of gravy or a tangy side like coleslaw really rounds out the meal.

How do I make them more festive?

Use food coloring in the mashed potatoes (for themed parties), add bacon bits on top, or drizzle with a balsamic reduction or herbed yogurt sauce. A small sprig of rosemary stuck in the mashed potatoes also gives them a “candle” look for special occasions.

Why This Recipe Matters

In a world where food often feels complicated, filtered, and styled within an inch of its life, Meatloaf Cupcakes bring things back to basics — but with a playful wink. They represent the very best kind of cooking: simple ingredients, nostalgic flavors, and the magic of unexpected presentation.

They remind us that joy doesn’t have to be elaborate. That creativity doesn’t mean complexity. And that the meals we remember aren’t always the ones from five-star restaurants, but the ones eaten with our hands, with laughter, around the kitchen table.

Whether you’re a busy parent trying to sneak vegetables past a picky eater, a college student looking for freezer-friendly meals, or a dinner host trying to break the ice, these cupcakes offer something for everyone. They’re familiar, but surprising. Practical, yet delightful. And most of all, they’re full of love.

In Closing: A Hug in Every Bite

Food is more than fuel — it’s memory, emotion, tradition, and sometimes, a bit of fun. Meatloaf Cupcakes with Mashed Potato Frosting may not be a recipe passed down through generations, but they’ve quickly carved out a spot in the hearts (and dinner tables) of those who try them.

They’re comfort food with a twist — a little quirky, a little clever, and a lot delicious.

So whether you’re making them for your kids, your friends, your partner, or just yourself after a long day, know this: you’re serving up something special. Something that will bring a smile, a moment of pause, and maybe even a story worth telling.

Because sometimes, the best kind of cupcake is the one that tastes like home.

The Fastest Puff Pastry Appetizer

The best recipes don’t always come from cookbooks or meticulously planned menus. Sometimes, they come from those chaotic, beautiful in-between moments — when you’re hosting on short notice, feeding unexpected guests, or simply craving something warm and flaky without the fuss.

That’s exactly how this puff pastry appetizer came to be.

It was late afternoon on a Saturday. The kitchen was a little messy, the kids were building a blanket fort in the living room, and I had friends texting to say they were dropping by in “just a bit.” I had no plans to cook. No elaborate platters or dips chilling in the fridge. I had puff pastry in the freezer, a few sausages from the breakfast we never finished, and an open jar of tomato sauce from the night before.

Out of necessity and instinct, I rolled out the pastry, spread a bit of tomato sauce, added a sausage, rolled it up, and sliced it into pinwheels. I wasn’t aiming for a masterpiece—just something warm, snackable, and a little satisfying. Twenty minutes later, the house smelled incredible. The rolls were golden, bubbling, and slightly crisp at the edges.

To my surprise, they disappeared faster than anything I had cooked in weeks.

Since then, this quick puff pastry appetizer has become my go-to solution for so many situations. Game nights, potlucks, brunches, lazy dinners, or simply those evenings when I want something comforting but don’t want to spend an hour in the kitchen.

It’s a reminder that sometimes, simplicity is the most delicious ingredient of all.

What Makes This Recipe So Special?

It’s easy to fall in love with any recipe that’s done in 30 minutes and requires almost no prep. But this appetizer goes beyond just being convenient. It’s a masterclass in flavor-to-effort ratio — a low-lift recipe that delivers huge results.

Here’s why it works so well:

  • Minimal ingredients: Just puff pastry, tomato sauce, and sausage — that’s it.
  • Maximum flavor: The buttery richness of the pastry, the tang of the tomato, and the savory sausage work together like magic.
  • Unbelievably fast: It takes longer for the oven to preheat than it does to prepare the dish.
  • Customizable: You can change up the filling to suit your taste, dietary needs, or what’s already in your fridge.
  • Always a crowd-pleaser: Whether served as a snack, side, or main, people love these crispy, golden bites.

It’s proof that food doesn’t have to be complicated to be memorable.

Ingredients

IngredientQuantity
Puff pastry700 g (25 oz), thawed if frozen
Tomato sauce60 g (2.1 oz)
Sausages400 g (14 oz), your favorite type

Directions

  1. Preheat your oven to 375°F (190°C). Line a baking tray with parchment paper.
  2. Roll out the puff pastry sheets on a floured surface if needed.
  3. Spread a thin layer of tomato sauce evenly over the pastry.
  4. Cut sausages to fit the length or width of the pastry sheet and place them on one edge.
  5. Roll the pastry tightly around the sausage, sealing the edges gently.
  6. Slice into bite-sized pieces or keep them as longer rolls.
  7. Place the rolls seam-side down on the baking tray. Optionally, brush with a beaten egg for shine.
  8. Bake for 20–25 minutes or until puffed and golden.
  9. Let cool slightly before serving. Best enjoyed warm.

Nutritional Information (Per Roll — Approx. 12–14 pieces)

NutrientAmount
Calories~210 kcal
Protein6 g
Carbohydrates14 g
Fat14 g
Saturated Fat5 g
Sodium320 mg

Frequently Asked Questions

Do I need to cook the sausages before using them in the pastry?
If you’re using fully cooked sausages (like smoked, pre-cooked, or breakfast-style links), there’s no need to pre-cook. If you’re using raw sausage or ground meat, it’s best to cook it first to ensure it’s safe to eat and doesn’t release too much moisture into the pastry during baking.

What type of sausage works best?
This recipe is very forgiving. You can use anything from smoky kielbasa and spicy chorizo to chicken sausage or even vegetarian options. Just choose a sausage with bold flavor and minimal moisture.

Can I use homemade pastry instead of store-bought puff pastry?
Of course! Homemade puff pastry or even rough puff works wonderfully if you have the time. But store-bought is ideal when speed is your priority.

Can I make this recipe vegetarian or vegan?
Yes. Use plant-based sausage alternatives and vegan puff pastry (many are naturally dairy-free). Swap tomato sauce for pesto, hummus, or roasted red pepper spread for more plant-based variety.

Can I freeze the rolls before baking?
Absolutely. These rolls freeze well both before and after baking. Just assemble them and freeze on a tray until firm, then transfer to a freezer-safe bag. Bake from frozen, adding an extra 5–10 minutes.

Can I serve them cold?
They’re best enjoyed warm, fresh out of the oven, but they’re still delicious at room temperature. For parties or potlucks, they hold up well even after a few hours.

Creative Variations to Try

Once you’ve mastered the basic version, there’s a world of flavor waiting inside that flaky puff pastry. Here are some of our favorite variations:

1. Cheesy Sausage Rolls

Add a sprinkle of shredded cheddar, mozzarella, or gouda over the tomato sauce before rolling. The cheese melts beautifully and adds depth.

2. Italian-Style Rolls

Use Italian sausage and replace the tomato sauce with marinara or pesto. Top with a touch of Parmesan before baking for an extra layer of flavor.

3. Spicy Kick

Add a swipe of hot sauce or spicy harissa under the sausage. For extra fire, sprinkle in crushed red pepper flakes or a slice of jalapeño.

4. Breakfast-Inspired

Use breakfast sausage and add a layer of scrambled egg and cheese. These are perfect for make-ahead brunches.

5. Vegetarian Delight

Use sautéed mushrooms, spinach, or caramelized onions as a filling. A touch of crumbled feta or goat cheese makes them irresistible.

Serving Ideas

This puff pastry appetizer is wonderfully flexible when it comes to serving. It can be casual or dressed up, depending on the occasion:

  • Game day snacks: Serve with a trio of dips — mustard, spicy ketchup, and ranch.
  • Party platters: Arrange on a board with olives, pickles, cheeses, and small sandwiches.
  • Brunch side: Pair with a green salad, soft-boiled eggs, or a fruit platter.
  • Quick lunch: Add a side of soup or a handful of greens, and you’ve got a complete meal.

Serve them fresh from the oven for the best texture, or reheat in the oven to restore that crispiness if making ahead.

Make-Ahead and Storage Tips

To store
Keep leftover baked rolls in an airtight container in the refrigerator for up to 3 days. Reheat in the oven at 350°F (175°C) for 5–8 minutes, or until heated through and crisp.

To freeze
Freeze baked or unbaked rolls on a tray first, then transfer to a freezer-safe container. They’ll keep for up to one month. Bake frozen rolls straight from the freezer — just extend baking time slightly.

To prepare ahead
Assemble the rolls in advance, cover, and refrigerate until you’re ready to bake. Perfect for stress-free entertaining or prepping for busy weekdays.

A Final Thought: Simplicity Wins Every Time

In a world where food can be complicated, curated, and sometimes overwhelming, there’s something refreshing about a recipe like this.

The Fastest Puff Pastry Appetizer isn’t trying to impress with dozens of ingredients or intricate technique. It’s not trying to be viral or trendy. It’s just trying to feed you — well, fast, and deliciously.

And that’s exactly what makes it powerful.

Whether you’re entertaining on the fly, solving the eternal snack dilemma, or just in the mood to bake something warm and comforting, this recipe is here to help. It’s the kind of dish that’s flexible, forgiving, and always welcomed — no matter the time of day or the number of guests.

So keep a sheet of puff pastry in the freezer. Keep your favorite sausage or veggie filling on hand. Because once you know how easy it is to make these, you’ll find yourself turning to them again and again.

And every time someone grabs one and says, “Wait, did you make these yourself?” — you’ll smile, nod, and maybe keep the secret of just how easy they really are.

Spinach and Feta Cheese Puff Pastry Rolls

Some recipes come from cookbooks, others from restaurants or far-off travels. And then there are those that find you in quiet, unexpected moments—moments that don’t ask for perfection, but instead invite simplicity, warmth, and nourishment.

That’s how these Spinach and Cheese Puff Pastry Rolls became a favorite in my home.

It started on a chilly weekend afternoon. I was staring into the fridge, trying to make use of a handful of lingering ingredients: a half-used tub of ricotta, a small bunch of wilting spinach, a leftover puff pastry sheet from a holiday bake, and a wedge of Parmesan I’d been grating over everything for weeks. I wasn’t planning on making anything fancy—just something to fill the house with warmth and the kitchen with the smell of something baking.

As I began mixing the filling—garlicky spinach, soft ricotta, melted cheese—I remembered the way my mother used to fold leftover greens into phyllo dough. Her version was less precise and more instinctive, but it always came out golden and flaky, with steam rising as you pulled it apart.

I rolled the pastry, brushed the top with an egg wash, and sprinkled it with sesame seeds the way she did. The scent that filled the kitchen as they baked was so deeply nostalgic I paused mid-cleanup just to breathe it in.

By the time they were out of the oven, puffed and golden, the family had gathered around without being called. We ate them standing up, pulling them apart with our hands. Not a single one made it to the table.

Since then, these rolls have become a regular fixture in my kitchen—not just for their flavor, but for the quiet joy they bring. They’re the kind of recipe that proves you don’t need complexity to create something meaningful. Just a few ingredients, a warm oven, and the willingness to nourish the ones you love.

Why These Rolls Work Every Time

Whether you’re cooking for a weekend brunch, prepping a lunchbox snack, or looking for a crowd-pleasing appetizer, these spinach and cheese rolls always deliver. Here’s what makes them so reliable—and irresistible:

  • Flaky, buttery layers: Puff pastry brings an unbeatable crispiness without any extra work.
  • Creamy, savory filling: The combination of ricotta, mozzarella, and Parmesan gives depth, richness, and the perfect melt.
  • Wholesome and flavorful: Packed with fresh spinach and garlic, it’s a delicious way to enjoy greens.
  • Versatile: Easily customizable with herbs, spices, or different cheeses.
  • Elegant yet easy: They look like bakery treats but require minimal effort.

They’re one of those rare recipes that hits all the marks: simple ingredients, big flavor, and endless possibilities.

Ingredients

IngredientQuantity
Fresh spinach300 g
Olive oil3 tablespoons
Garlic cloves, minced3
Egg (for filling)1
SaltTo taste
Black pepper, freshly ground½ teaspoon
Ricotta cheese250 g
Mozzarella cheese, shredded½ cup
Parmesan cheese, grated½ cup
Puff pastry sheet1 (thawed if frozen)
Egg + 1 tbsp milk (for egg wash)1 egg
Sesame seeds (optional)For sprinkling

Directions

  1. Prepare the Spinach Filling
    In a skillet over medium heat, add olive oil and sauté minced garlic for 30 seconds. Add chopped spinach and cook until wilted. Season with salt and pepper. Allow to cool slightly.
  2. Mix the Cheesy Filling
    In a large bowl, combine the cooked spinach with ricotta, mozzarella, Parmesan, and one beaten egg. Mix until fully combined.
  3. Assemble the Rolls
    Preheat oven to 375°F (190°C). Roll out the puff pastry sheet on a lightly floured surface. Spread the spinach-cheese filling evenly over the pastry, leaving a small border. Roll tightly into a log.
  4. Slice and Brush
    Slice the log into even rolls (about 1–1.5 inches thick). Place on a parchment-lined baking sheet. Brush the tops with egg wash and sprinkle with sesame seeds if desired.
  5. Bake Until Golden
    Bake for 20–25 minutes or until golden and puffed. Serve warm or at room temperature.

Nutritional Information (Per 1 roll, approx. based on 10 rolls)

NutrientAmount
Calories~180 kcal
Protein6 g
Carbohydrates14 g
Fat11 g
Saturated Fat4 g
Fiber1 g
Sodium220 mg

Frequently Asked Questions

Can I use frozen spinach instead of fresh?
Yes! Frozen spinach works just as well. Be sure to thaw and squeeze out as much moisture as possible before mixing it into the filling to prevent sogginess.

What can I use instead of ricotta cheese?
You can substitute with cottage cheese (drained slightly) or crumbled feta. For a richer taste, you could even use cream cheese, but it may make the filling slightly denser.

Can I prepare them in advance?
Absolutely. You can assemble the rolls and refrigerate them for a few hours before baking. Alternatively, freeze them unbaked and bake directly from frozen, adding a few extra minutes to the cooking time.

Do I have to use puff pastry?
Puff pastry gives the rolls their flaky texture, but you can use phyllo dough or even crescent dough if you prefer. The texture will be different, but still delicious.

Can I make these rolls vegetarian or add more veggies?
They are already vegetarian-friendly, but you can easily add finely chopped mushrooms, sautéed leeks, or grated zucchini (just be sure to remove excess moisture). Herbs like dill, parsley, or thyme also make excellent additions.

What if I don’t have sesame seeds?
No problem! The sesame seeds are optional and mainly add visual appeal and a slight nutty crunch. You can skip them or replace them with poppy seeds, everything bagel seasoning, or even grated cheese.

Serving Suggestions

These spinach and cheese rolls are as flexible in presentation as they are in preparation. Here are a few ways to enjoy them:

As an Appetizer

Serve them warm on a platter with a side of tangy yogurt dip, tzatziki, or spicy tomato sauce.

For Brunch or Breakfast

Pair with fresh fruit, a boiled egg, and coffee for a satisfying morning meal.

As a Side Dish

These rolls complement soups, especially creamy tomato, lentil, or vegetable chowder. They’re also great alongside a fresh green salad.

As a Snack or Picnic Item

Easy to pack and reheat, these rolls are perfect for picnics, potlucks, or on-the-go lunches.

Dressed Up for a Dinner Party

Slice them into bite-sized rounds, plate with microgreens or a balsamic glaze drizzle, and serve them as elegant hors d’oeuvres.

Variations to Try

This recipe is a canvas. Once you’ve made it once, you’ll see how easily it adapts to your taste and pantry:

1. Spinach and Feta Classic

Swap ricotta for crumbled feta and add a pinch of nutmeg for a more Mediterranean twist.

2. Spicy Spinach Rolls

Add a dash of crushed red pepper flakes or diced chili for heat lovers.

3. Mushroom and Herb

Mix in sautéed mushrooms and chopped thyme or rosemary for a woodsy, earthy flavor.

4. Sun-Dried Tomato and Basil

Add chopped sun-dried tomatoes and a handful of fresh basil to the filling for a vibrant Italian-inspired version.

5. Cheddar and Broccoli

Substitute spinach with finely chopped steamed broccoli and add shredded cheddar for a kid-friendly take.

Storage and Reheating Tips

Refrigerate
Store leftovers in an airtight container in the refrigerator for up to 3 days. Reheat in the oven at 350°F (175°C) for 5–7 minutes to restore crispiness.

Freeze Before Baking
Place unbaked rolls on a baking sheet, freeze until firm, then transfer to a freezer-safe bag. Bake from frozen, adding 5–10 extra minutes to the original bake time.

Freeze After Baking
Allow baked rolls to cool completely, wrap individually, and freeze for up to one month. Reheat in the oven, not microwave, for best texture.

A Final Thought: The Power of a Simple Roll

There’s something comforting about a pastry that doesn’t ask for much—no fancy tools, no complicated techniques, just a few honest ingredients rolled into something golden, flaky, and deeply satisfying.

These Spinach and Cheese Puff Pastry Rolls are more than just a snack. They’re a moment. A memory. A quiet celebration of cooking not to impress, but to nourish. They’re the kind of food you share with friends over coffee, tuck into lunchboxes with love, or eat over the sink because you just couldn’t wait.

And maybe, in a world that so often pushes us toward more—more complexity, more steps, more perfection—these little rolls remind us that sometimes, less really is more.

So the next time you need something quick, cozy, and a little bit special, let this recipe be your go-to. Your home will smell like something’s baking. Your table will be filled with smiles. And your heart? Full.

Cream-Filled Pastry Bites

When I think about comfort, I think about cream.

Not whipped cream from a can or store-bought fillings, but real, homemade custard — rich, warm, and silky. I think of my grandmother’s kitchen, where the air always smelled like vanilla and milk simmering gently on the stove. She had a way of making the simplest things feel like magic, and her cream-filled pastry bites were a perfect example.

She didn’t follow trends or fancy food blogs. Her recipes came from memory and instinct, passed down through generations, always measured with her eyes and heart. I remember watching her stir patiently as the custard thickened, never rushing, never letting it burn. I’d sit on a stool beside the counter, trying to steal a spoonful before it had cooled.

The pastry was never fussy. Sometimes it was folded puff dough, other times soft brioche or thin crepes — whatever she had on hand. But that filling? It was always the same. A velvety, egg-yolk-rich custard made from milk, starch, and just enough sweetness. Lightly flavored with a hint of vanilla or lemon zest, depending on her mood.

When she served them — still warm, slightly dusted with powdered sugar — it felt like a celebration, even on the most ordinary afternoons.

Years later, I still make this cream. I use it for pastry bites, tarts, cakes, or even as a dessert on its own. And every time I do, I feel like I’m preserving something special. Not just a recipe, but a memory. A tradition. A moment of calm in a busy world.

Why These Cream-Filled Pastry Bites Are Irresistible

In a world full of over-the-top desserts and elaborate presentations, this recipe stands out for its elegance and simplicity. It uses a few basic ingredients — things you likely have in your kitchen right now — yet delivers a luxurious, satisfying result.

Here’s what makes it so special:

  • The texture: Silky, smooth, and spoonable, the custard is both light and rich, melting beautifully into any pastry shell.
  • The flavor: Not overly sweet, with a delicate dairy richness and the option to add vanilla, citrus zest, or almond for variation.
  • The versatility: You can use this filling in so many ways — inside pastries, doughnuts, cakes, or simply in a cup with a spoon.
  • The ease: No special equipment needed. Just a saucepan, a whisk, and a few minutes on the stove.
  • The nostalgia: It brings back memories of simpler times and classic desserts, the kind passed down through generations.

Whether you’re hosting guests or just craving something homemade and comforting, this is the kind of treat that makes everyone feel at home.

Ingredients

IngredientQuantity
Milk300 ml
Egg yolks2
Starch (cornstarch or potato starch)30 g
Sugar (optional, for sweetness)2–3 tablespoons

Directions

  1. In a small saucepan, whisk the egg yolks with starch until smooth and lump-free.
  2. Slowly add the milk while whisking continuously to combine everything evenly.
  3. Place the saucepan over medium heat and cook the mixture, stirring constantly.
  4. Continue cooking until the mixture thickens to a smooth, custard-like consistency. This should take about 5–7 minutes.
  5. Remove from heat. Optional: Stir in sugar to taste or a drop of vanilla extract for extra flavor.
  6. Let the cream cool slightly before using as a filling for pastry bites, doughnuts, crepes, or cake layers.

Nutritional Information (Per Serving — approx. 1 of 4 servings)

NutrientAmount
Calories~110 kcal
Carbohydrates12 g
Sugars4–6 g (with sugar added)
Protein3 g
Fat5 g
Saturated Fat1.5 g

Frequently Asked Questions

Is this the same as pastry cream or custard?
Yes, it’s very similar to pastry cream (also known as crème pâtissière). It’s slightly lighter and can be adjusted in thickness depending on how you plan to use it. Some versions use more yolks or added butter, but this one is a classic, minimalist base that can be dressed up or down.

What kind of starch should I use?
Both cornstarch and potato starch work well. Cornstarch gives a more classic custard texture, while potato starch creates a slightly smoother, glossier finish. Choose whichever you have on hand.

Can I make it without eggs?
Egg yolks give the cream richness and help with thickening. If you need an egg-free version, you can replace them with an extra spoonful of starch and use plant-based milk, but the flavor and texture will be a bit different — more like pudding than custard.

Can I add flavorings?
Yes! You can stir in vanilla extract, lemon zest, almond extract, or even a splash of orange blossom water. Just add your flavoring after removing the custard from the heat for the best aroma.

Can I use it in cakes or other pastries?
Absolutely. This cream is perfect for layering in sponge cakes, filling choux pastry, spreading inside doughnuts, or piping into eclairs. It also works well in tart shells and layered desserts.

Can I make it ahead of time?
Yes. The cream can be made a day or two in advance and stored in the refrigerator. Place plastic wrap directly on the surface to prevent a skin from forming.

How long does it last in the fridge?
Stored properly in an airtight container, it will keep for up to 3 days. Beyond that, the texture may change and it’s best to prepare a fresh batch.

Can I freeze it?
Freezing is not recommended, as the starch-based custard may become watery or separate when thawed.

Creative Variations to Try

Once you’ve made the base recipe, you’ll quickly see how easy it is to personalize. Here are a few delicious twists you can experiment with:

1. Vanilla Bean Cream

Split a vanilla bean and simmer it with the milk. Remove the pod before adding the starch and yolks for a deep, aromatic flavor.

2. Citrus Custard

Add lemon or orange zest while cooking, then strain before chilling. This gives the cream a bright, fresh note — perfect for spring pastries.

3. Chocolate Custard

Whisk in a tablespoon of cocoa powder with the starch, or stir in melted dark chocolate at the end for a decadent twist.

4. Almond Cream

Replace a splash of milk with almond milk and add almond extract. Serve with puff pastry and toasted sliced almonds.

5. Espresso Cream

Dissolve a teaspoon of instant espresso in the milk for a coffee-flavored cream that pairs beautifully with dark chocolate or hazelnuts.

Serving Suggestions

This versatile cream pairs well with almost anything, but here are some favorite ways to enjoy it:

  • In puff pastry bites: Pipe the cream into small puff pastry squares or circles and chill until set. Dust with powdered sugar before serving.
  • In cream puffs or eclairs: Fill with a piping bag, then dip in chocolate glaze for a bakery-style finish.
  • As a tart filling: Pour into a prebaked tart shell and top with fresh berries or thinly sliced fruit.
  • In cake layers: Use as a middle layer for sponge cakes or roulades.
  • Served in a cup: Chill in individual ramekins and top with fruit compote or cookie crumbs for a minimalist dessert.

This cream is also lovely warm — spooned over pound cake, pancakes, or even French toast for a breakfast-meets-dessert moment.

Storage and Reheating Tips

To store:
Transfer the custard to a bowl and press plastic wrap directly onto the surface to prevent a skin from forming. Refrigerate for up to 3 days.

To reheat:
If you need to use it warm, gently heat over low on the stove while stirring constantly. Do not boil. Add a splash of milk if it thickens too much.

To prepare ahead:
Make the custard the day before and keep refrigerated until ready to use. Fill pastries just before serving for best texture.

A Final Note: The Joy of Simple Pleasures

There’s something timeless about recipes like this — simple ingredients, a few quiet minutes at the stove, and a creamy reward that tastes like it came from your favorite bakery.

Cream-Filled Pastry Bites are more than just a dessert. They’re an invitation to slow down, stir with care, and savor something made from scratch. They remind us that elegance doesn’t need to be elaborate and that comfort can come from the most humble of ingredients.

So whether you’re serving them at a special gathering, making a sweet surprise for your family, or enjoying a moment of peace at the end of a long day, this recipe will be ready for you. And each spoonful will carry a little bit of warmth — and maybe even a memory or two.

Eaten in 10 Minutes! Simple and Delicious Vegetable Dish with Ham

There are recipes you plan. You shop for them, prep for them, and carve out time to cook them. And then there are the ones that come together because life is moving too fast, your fridge is half-empty, and dinner needs to be on the table in under 30 minutes.

This vegetable and ham skillet dish falls into the second category — and it’s precisely why I love it.

I first made this during one of those weeks when everything felt a little overwhelming. Work was hectic, the kids were cranky, and the “what’s for dinner?” question felt more like a threat than a casual inquiry. I opened the fridge and saw the usual suspects: eggs, a carrot, half an onion, a bit of ham from lunchboxes, and a chunk of cheese.

My first thought? There’s not enough here to make anything. But necessity, as they say, is the mother of invention. I whisked the eggs, grated the carrot, added flour and cheese, seasoned it generously, tossed in the ham, and fried it like a veggie-packed frittata or savory pancake. It wasn’t fancy, but when I served it — hot and golden — everyone ate in silence, then asked for seconds.

That’s when I knew this dish was a keeper.

Since then, this recipe has become a weeknight lifesaver — quick, flexible, and surprisingly satisfying. It’s the kind of food that’s easy enough to cook with one eye on your toddler and hearty enough to fill a table of hungry eaters. And best of all, it’s ready in minutes.

Why This Dish Belongs in Your Weeknight Rotation

What makes this recipe so special isn’t just how easy it is — it’s how much flavor and comfort you get from such simple ingredients. It’s the kind of dish that gives you the joy of home cooking without the mess or stress.

Here’s why it works:

  • Quick & fuss-free: You can go from prep to plate in about 20 minutes.
  • Versatile: You can swap out or add whatever veggies or protein you have.
  • Kid-friendly: Mild flavors and a pancake-style presentation make it appealing to little ones.
  • Minimal cleanup: One bowl for mixing, one pan for frying — that’s it.
  • Budget-friendly: Uses basic, everyday staples most people already have on hand.

This is the recipe you’ll come back to after a long day, when delivery feels like too much and you just want something warm, savory, and homemade.

Ingredients

IngredientQuantity
Eggs4
SaltTo taste
PaprikaTo taste
Black pepperTo taste
Milk100 ml (½ cup)
Cheese (shredded)50 g (⅓ cup)
Flour130 g (1 cup)
Onion (finely chopped)1
Carrot (grated)1
Vegetable oilFor frying and greasing
Ham (optional add-in)100 g (sliced or chopped)

Directions

  1. In a large bowl, crack the eggs and beat lightly. Add salt, black pepper, and paprika to taste.
  2. Whisk in the milk until combined, then stir in the shredded cheese, chopped onion, and grated carrot.
  3. Add flour gradually and mix until a thick, pancake-like batter forms. Fold in chopped ham (if using).
  4. Heat a non-stick skillet with a little vegetable oil over medium heat.
  5. Spoon portions of the mixture into the skillet and spread slightly into round shapes.
  6. Fry until golden brown on one side (about 2–3 minutes), then flip and cook the other side. Repeat with remaining batter.
  7. Serve warm with sour cream, yogurt, or a simple green salad on the side.

Nutritional Information (Per Serving, based on 4 servings)

NutrientAmount
Calories~280 kcal
Protein12 g
Carbohydrates18 g
Fat16 g
Saturated Fat5 g
Fiber2 g
SodiumVaries by taste

Frequently Asked Questions

Can I make this dish vegetarian?
Absolutely. Just omit the ham or replace it with plant-based deli slices, sautéed mushrooms, or cooked lentils. The eggs and vegetables are flavorful enough to hold their own without the meat.

Is this similar to a frittata or omelet?
Yes and no. It has elements of both — the egg base and the pan-fried technique — but it includes flour, which gives it more structure and turns it into more of a savory pancake. It’s closer in texture to a Spanish tortilla or even a crustless quiche.

Can I bake it instead of frying?
Yes, you can pour the mixture into a greased baking dish or muffin tin and bake at 375°F (190°C) for about 20–25 minutes, or until set and golden on top. This is a great make-ahead option for brunches or packed lunches.

What other vegetables can I use?
This dish is incredibly flexible. Zucchini (grated and squeezed dry), bell peppers, spinach, or leftover roasted vegetables work beautifully. The only rule is to avoid very watery vegetables unless you sauté or drain them first.

Can I use other cheeses?
Yes. Any meltable cheese will work — mozzarella for mild creaminess, cheddar for a sharper flavor, or gouda for a buttery finish. You can even combine two types for a richer result.

How do I keep it from falling apart when flipping?
If you’re frying it like one large pancake or omelet, make sure to cook it slowly over medium heat and use a nonstick or well-oiled pan. You can also divide the batter into smaller pancakes, which are easier to flip and faster to cook.

Can I make this gluten-free?
Yes. Substitute the all-purpose flour with a gluten-free flour blend or even chickpea flour (which adds a nutty flavor and extra protein).

Delicious Variations to Try

Once you’ve mastered the base recipe, there are endless ways to make it your own. Here are a few flavor-packed ideas:

1. Mediterranean Style

Add chopped sun-dried tomatoes, crumbled feta, and a pinch of oregano.

2. Southwestern Kick

Mix in diced jalapeños, corn, black beans, and shredded pepper jack cheese.

3. Herb Garden Version

Add a handful of chopped fresh herbs like parsley, chives, dill, or basil for a light and aromatic twist.

4. Brunch Casserole

Pour the mixture into a greased baking dish, top with extra cheese and breadcrumbs, and bake until golden. Serve with sour cream and fresh greens.

5. Asian-Inspired

Swap ham for chopped cooked shrimp or tofu, add scallions, a touch of soy sauce, and sesame oil for a fusion twist.

Perfect Pairings and Serving Suggestions

This dish is a star on its own, but if you’re planning a full meal or want to round it out with sides, here are a few ideas:

  • Fresh green salad with lemon vinaigrette for a refreshing contrast
  • Yogurt or sour cream dip with herbs or garlic to drizzle or dollop on top
  • Roasted or grilled vegetables like zucchini, bell pepper, or cherry tomatoes
  • Toasted bread or pita for scooping up every last bite
  • Soup starter, such as tomato basil or lentil, for a cozy two-course meal

You can also slice it into wedges and pack it in lunchboxes — it’s just as tasty cold or at room temperature.

Storage and Reheating Tips

Refrigerate: Store leftovers in an airtight container in the refrigerator for up to 3 days.

Freeze: Let the dish cool completely, slice into portions, and freeze with parchment paper between layers. Reheat from frozen in the oven or microwave.

Reheat: For best texture, reheat on a skillet over low heat or in the oven at 325°F (165°C) until warmed through. Microwaving works too but may soften the edges.

A Final Thought: Simplicity is the Secret Ingredient

This recipe reminds me that food doesn’t need to be elaborate to be special. In fact, it’s often the humble, thrown-together dishes that become the ones we remember — not because they were complex, but because they were exactly what we needed in the moment.

Whether you’re cooking for your family, for yourself, or just trying to use up what’s in the fridge, this vegetable and ham skillet is here to deliver. It’s fast, flexible, and deeply comforting — a reminder that even on your busiest nights, a home-cooked meal is never too far out of reach.

It’s a dish I’ve made in chaotic kitchens and quiet ones, for loud dinners with kids and quiet lunches for one. And every single time, I find myself coming back to that first bite — golden, cheesy, and full of flavor — and thinking: This is what good food feels like.

Take Lemon and Make This Delicious Dessert

It all started with a single lemon.

I had just finished a long day that had been filled with more chaos than calm — deadlines missed, spilled coffee, and the ever-growing laundry mountain glaring at me from the hallway. My fridge was nearly empty, and I didn’t have the energy to bake or cook anything elaborate. But something in me still craved a little comfort — something sweet, simple, and made with love.

That’s when I noticed it: a lone lemon on the counter, bright and unapologetically yellow, as if it had been waiting patiently for this very moment.

I remembered a recipe my grandmother once made — something between a curd and a pudding. It had eggs, sugar, cornstarch, and lemon juice. That was it. I could almost hear her voice in my head: “You don’t need much to make something lovely.” I found myself smiling, cracking an egg into a saucepan, and whisking in sugar and lemon juice with the kind of quiet focus that only comes in these small, stolen moments.

A few minutes later, the kitchen was filled with the scent of citrus and warmth. I poured the thickened lemon mixture into a tiny bowl, let it cool, and took a spoonful. It was soft, silky, and bursting with lemon — the kind of taste that brightens your tongue and your mood at the same time.

That small dish of lemon dessert didn’t just satisfy my sweet tooth. It calmed me. It reminded me that comfort can come from the simplest ingredients, and that cooking — even just for yourself — can be an act of gentle self-care.

Now, this recipe has a permanent spot in my kitchen. I make it when I’m short on time but still want something beautiful. I make it when friends come over unexpectedly, or when I want to teach my kids that cooking doesn’t have to be complicated to be meaningful. I make it when I need a little reminder of sunshine on a cloudy day.

Why This Lemon Dessert Works

There are many lemon desserts out there — lemon bars, lemon cakes, lemon tarts — but this one is in a league of its own because of how effortlessly it comes together. You only need a handful of pantry staples, one lemon, and about 10 minutes of your time.

Here’s why it stands out:

  • It’s quick: From start to finish, you can be enjoying this dessert in under 30 minutes (including cooling time).
  • It’s made with basic ingredients: Egg, sugar, cornstarch, lemon — items many of us have on hand.
  • It’s light but satisfying: Perfect after a rich meal or as an afternoon treat that won’t weigh you down.
  • It tastes like sunshine: The bright lemon flavor is uplifting, refreshing, and just the right amount of sweet.
  • It’s versatile: Serve it warm or cold, plain or topped, in a bowl or layered in a trifle.

It’s a humble dish that surprises you with how elegant and satisfying it is. No oven required, no mixers, no stress — just a saucepan and a spoon.

Ingredients

IngredientQuantity
Egg1 large
Cornstarch2 tablespoons
Sugar3 tablespoons
Lemon juice (fresh)Juice of 1 lemon (about 2–3 tbsp)
Water1/2 cup (120 ml)
Lemon zest (optional)1/2 teaspoon

Directions

  1. In a small saucepan, whisk together the egg, sugar, and cornstarch until smooth.
  2. Add lemon juice, water, and zest (if using), whisking until fully combined.
  3. Place the saucepan over medium heat and cook, stirring constantly, until the mixture thickens to a pudding-like consistency. This should take 4–6 minutes.
  4. Once thickened, remove from heat. Pour into a small dish or individual serving cups.
  5. Let cool slightly, then chill in the refrigerator for at least 30 minutes.
  6. Serve cold with a sprinkle of lemon zest or a dollop of whipped cream if desired.

Nutritional Information (Per Serving — makes 2 small portions)

NutrientAmount
Calories~90 kcal
Carbohydrates15 g
Sugars12 g
Protein2 g
Fat2 g
Fiber0.2 g
Sodium20 mg

Frequently Asked Questions

Can I use bottled lemon juice instead of fresh?
Technically, yes — but fresh lemon juice gives a far superior flavor. The brightness and natural zestiness of fresh lemons are key to making this dessert shine.

Is it a custard, a curd, or a pudding?
It’s closest to a lemon pudding. Unlike a curd, which uses more egg yolks and butter, this dessert is a bit lighter and more straightforward. It’s creamier than a custard and a touch looser than traditional pudding.

Can I make this dessert ahead of time?
Absolutely. It keeps well in the refrigerator for up to three days. Just cover it tightly with plastic wrap or store in individual ramekins for easy serving.

Is this recipe gluten-free?
Yes, cornstarch is naturally gluten-free, so as long as your other ingredients are safe, this dessert is perfect for those avoiding gluten.

Can I double or triple the recipe?
Definitely. It scales easily. Just make sure to stir constantly and adjust the cooking time slightly if you’re working with a larger quantity.

Can I make it dairy-free?
This particular recipe doesn’t require milk or cream, so it’s naturally dairy-free. That said, you can also add a splash of coconut milk for an extra creamy twist if desired.

Can I use other citrus fruits?
Yes! You can substitute lime, orange, or even grapefruit for the lemon. Each one will bring a unique flavor. Lime is tart and tropical, orange is sweet and mellow, and grapefruit adds a slightly bitter edge.

Delicious Ways to Serve It

This dessert is lovely on its own, but you can also dress it up for special occasions or just for fun:

  • With Whipped Cream: A dollop of freshly whipped cream adds airy richness and balance.
  • With Berries: Fresh raspberries or blueberries pair beautifully with lemon.
  • In a Tart Shell: Pour into a baked tart crust, chill, and slice for an elegant treat.
  • Layered in Parfaits: Alternate layers of lemon dessert with crushed cookies and whipped cream in a glass.
  • Topped with Meringue: Add a spoonful of meringue and torch it for a lemon meringue effect.
  • Over Pound Cake: Drizzle warm or chilled lemon pudding over slices of cake for a quick twist on shortcake.

No matter how you serve it, this dessert always feels like something special.

Storage and Make-Ahead Tips

Refrigerate: Store leftovers in an airtight container or cover with plastic wrap directly on the surface to prevent a skin from forming. Chill for up to 3 days.

Freezing: Not recommended — the texture can become grainy or watery after thawing.

Make-ahead tip: You can prepare the dessert a day in advance and refrigerate it until needed. Stir gently before serving if any separation occurs.

Variations to Try

This simple base recipe can easily be turned into other delightful flavors. Here are a few ideas to inspire you:

1. Lemon-Lavender

Add a pinch of dried culinary lavender while cooking, then strain before chilling for a floral twist.

2. Lemon-Coconut Cream

Replace half the water with full-fat coconut milk for a tropical variation.

3. Lemon-Ginger

Add a small piece of fresh ginger during cooking and strain before chilling for a bright and spicy kick.

4. Honey Lemon Delight

Substitute part of the sugar with honey for a rounder, earthy sweetness.

5. Lemon-Rosewater

Add a few drops of rosewater for a Middle Eastern-inspired finish.

The best part? You can keep the same method but create a completely different flavor profile each time.

A Simple Reminder in a Small Bowl

We often think of dessert as something elaborate — the final flourish of a dinner party or the reward for a complicated recipe well executed. But sometimes, the most meaningful desserts are the simplest ones. The ones you make with one egg, a spoonful of sugar, and the juice of a lemon.

Take Lemon and Make This Delicious Dessert isn’t just a recipe — it’s a reminder that beauty can come from simplicity, that sweetness doesn’t have to be extravagant, and that sometimes, the smallest things can bring the greatest comfort.

So the next time you see a lemon sitting on your countertop, don’t overlook it. Don’t wait for the perfect occasion. Just grab a saucepan, whisk up something lovely, and take a moment to savor it.

Because dessert doesn’t have to be fancy to be special. It just has to be made with care — and maybe a little zest.

BEST WAY To Eat Spinach, Mushroom & Potato Purée Casserole

Some of the most cherished recipes don’t start in fancy kitchens or come from glossy cookbooks. They begin in quiet, ordinary moments—like a rainy Sunday afternoon when the fridge holds just a few tired vegetables, but your soul craves warmth. That’s exactly how this Spinach, Mushroom & Potato Purée Casserole came to life in my kitchen.

It was a cool, gray afternoon, the kind where you want something hearty and nourishing to fill the air with comforting smells. I opened my fridge to find a bunch of spinach that needed using, a few mushrooms, and a bowl of leftover mashed potatoes from the night before. Not quite enough of anything to make a full meal—but just enough of everything to create something unexpectedly special.

I started layering—the earthy sautéed mushrooms, the bright green spinach, and finally, that smooth potato purée enriched with butter and milk. It was simple, but as it baked and the flavors mingled, something beautiful happened. It smelled like home. It tasted like love.

That casserole didn’t just feed my family—it fed our spirits. It became one of those recipes I now return to again and again. It’s my answer to busy days, to budget weeks, and to those moments when only comfort food will do.

What Makes This Casserole a Must-Try?

There’s something timeless about casseroles. They’re layered, baked, and always more than the sum of their parts. This one, in particular, shines for a few key reasons:

  • Balanced flavors: The sweetness of the onions, the savoriness of mushrooms, the slight bitterness of wilted spinach, and the creaminess of the potato purée all complement each other beautifully.
  • Nutritionally satisfying: Packed with fiber, vitamins, and a balance of carbs and plant-based protein, it’s both filling and good for you.
  • Budget-friendly: Uses simple, accessible ingredients you likely already have in your pantry or fridge.
  • Customizable: You can adapt it with cheese, protein, or herbs to suit your preferences or dietary needs.
  • Comforting texture: The bottom is juicy and savory, while the top is creamy and smooth, with a lightly golden crust from baking.

It’s the kind of dish that doesn’t need fanfare. It speaks for itself the moment you take the first forkful.

Ingredients

For the Potato Purée:

IngredientQuantity
Potatoes (large)5
Butter2–3 tablespoons
Whole milkUp to 1 cup (as needed)
SaltTo taste

For the Spinach Mushroom Layer:

IngredientQuantity
Onion (large)1
Olive oil4 tablespoons
Fresh spinach500 g (about 1 lb)
Mushrooms (sliced)300 g (about ⅔ lb)
SaltTo taste
Black pepperTo taste
Red pepper flakesTo taste (optional, for heat)

Directions

  1. Prepare the Potato Purée
    Peel and boil the potatoes in salted water until fork-tender. Drain and mash them with butter, gradually adding milk until smooth and creamy. Season with salt to taste.
  2. Sauté the Vegetables
    In a large skillet, heat olive oil over medium heat. Sauté the chopped onion until soft and golden. Add mushrooms and cook until their liquid evaporates and they begin to brown. Add spinach and cook until wilted. Season with salt, black pepper, and red pepper flakes to taste. Remove from heat.
  3. Assemble the Casserole
    Preheat the oven to 375°F (190°C). In a lightly greased baking dish, spread the spinach-mushroom mixture as the base layer. Top with the creamy potato purée and smooth it evenly with a spatula.
  4. Bake
    Optional: Add a sprinkle of cheese or breadcrumbs on top for a golden finish. Bake uncovered for 20–25 minutes, or until the top is lightly browned.
  5. Serve Warm
    Let it cool slightly before slicing. Serve as a hearty main or a satisfying side dish.

Nutritional Information (Per Serving, Approx. 6 servings)

NutrientAmount
Calories~240 kcal
Carbohydrates25 g
Protein6 g
Fat13 g
Saturated Fat4 g
Fiber4 g
Sodium180 mg

Frequently Asked Questions

Can I use frozen spinach instead of fresh?
Yes, frozen spinach works perfectly. Just be sure to thaw it and squeeze out as much excess liquid as possible before sautéing to prevent the casserole from becoming watery.

What kind of potatoes are best for the purée?
Yukon Gold or Russet potatoes are ideal. Yukon Golds give a naturally buttery flavor and creamy texture, while Russets make for an ultra-smooth mash. Avoid waxy potatoes like red potatoes, as they don’t mash as well.

Can I use plant-based milk or butter?
Absolutely. This casserole can easily be made dairy-free by using olive oil or plant-based butter and unsweetened non-dairy milk like oat or soy. Just ensure the milk is neutral in flavor.

Can I add cheese?
Yes, cheese is a wonderful addition. Try mixing grated mozzarella, gouda, or sharp cheddar into the potato purée or sprinkle it on top before baking for a golden, bubbly finish.

What other vegetables work in this casserole?
You can substitute or add vegetables such as kale, chard, zucchini, or even roasted bell peppers. Just make sure they’re cooked down so the texture remains soft and cohesive.

Can I include a protein?
Definitely. For a heartier version, add cooked lentils, shredded chicken, or browned ground turkey or beef to the spinach-mushroom layer.

How long does it keep?
This casserole keeps well in the fridge for 3–4 days. It also freezes beautifully for up to 1 month. Let it cool completely before storing, and reheat in the oven for best results.

Creative Variations to Try

Once you’ve tried the original version, here are some fun and flavorful ways to tweak this casserole to suit your tastes or the season:

1. Cheesy Crust

Add a layer of shredded cheese over the top before baking. Parmesan, gruyère, or even feta can add an irresistible golden crust and flavor boost.

2. Spiced Up

Add a pinch of nutmeg to the potato layer or a dash of smoked paprika and cumin to the mushroom mixture for a smoky, earthy twist.

3. Vegan Mediterranean Version

Replace the butter and milk with olive oil and almond milk, add chopped olives, sun-dried tomatoes, and a handful of pine nuts to the spinach mixture.

4. Layered Cottage Pie Style

Add a layer of cooked lentils, mushrooms, and a splash of tomato paste at the bottom for a veggie take on shepherd’s pie.

5. Crunchy Topping

Sprinkle breadcrumbs tossed with olive oil and herbs over the top before baking for added texture.

Perfect Pairings and Serving Ideas

This casserole can stand proudly as a main dish or play a supporting role depending on your meal. Here are a few serving suggestions to complete your table:

  • As a main: Serve with a crisp green salad and lemon vinaigrette to brighten up the creamy richness. Add crusty bread or roasted carrots on the side.
  • As a side: Pair with roast chicken, grilled tofu, or baked salmon for a satisfying, well-rounded meal.
  • Brunch style: Add a poached or fried egg on top and serve it with avocado and roasted tomatoes.
  • Make it a bowl: Spoon warm casserole into a bowl and top with pickled onions or fresh herbs for a cozy lunch.

It also makes a great option for potlucks or meal trains—it reheats well and feels like a hug in food form.

Storage and Reheating Tips

Refrigerate: Let the casserole cool completely before transferring it to an airtight container. It will stay fresh in the refrigerator for up to 3–4 days.

Freeze: You can freeze the assembled casserole before baking or freeze leftovers. Wrap tightly and label. Thaw overnight in the fridge before reheating.

Reheat: For best results, reheat in the oven at 350°F (175°C) until warmed through (about 15–20 minutes). If you’re in a hurry, you can microwave individual portions, though the top may soften.

A Final Word: Why This Dish Will Always Have a Place in My Kitchen

This casserole is more than just a way to use up spinach and mushrooms or reinvent mashed potatoes—it’s a reminder of how much comfort you can create from very little. It’s not flashy. It’s not complicated. And that’s precisely what makes it so special.

It’s the dish I make when I want to feel grounded. The one I turn to when my fridge is uninspiring but I want to put something truly satisfying on the table. The one I bake when I want to slow down, breathe in the aroma of garlic and onion sizzling in olive oil, and let the oven do the rest.

It’s also the kind of dish that adapts to your life. Whether you’re cooking for one or feeding a family, whether you’re vegan, vegetarian, or just a lover of vegetables—this casserole welcomes everyone. It’s warm. It’s nourishing. It’s real.

So the next time you’re looking for something cozy, healthy-ish, and deeply satisfying, give this recipe a try. It might just become one of those quiet classics in your own kitchen, too—the kind you make without a recipe because your hands already know the way.

Mozzarella Onion Rings

It all started with a craving.

It was one of those golden summer afternoons — the kind that stretches on with soft light and the hum of cicadas in the background. We were sitting on the back porch, swapping stories and sipping lemonade, when the topic of snacks came up. Not just any snacks, but those unforgettable, guilty-pleasure kind you get at late-night diners or summer fairs. And someone said, “Remember onion rings?” And then someone else added, “Yeah, but imagine if they were filled with cheese.”

Something clicked in my head right at that moment. I’d had my fair share of onion rings and mozzarella sticks — but never both, together. Could that kind of indulgent, crispy, cheesy dream actually work in my home kitchen?

The answer, I would learn, is yes. A thousand times yes.

That night, I started experimenting. The first few rounds were messy and imperfect. Cheese leaked out. Breadcrumbs didn’t stick. But once I figured out the balance — the chill time before frying, the double-dip breading method — something magical happened. The moment I bit into that golden ring, with its crisp coating and molten center, I knew I had a new favorite recipe.

Now, Mozzarella Onion Rings have become a family tradition. We make them for movie nights, parties, and even as a casual weekend treat. They’re a conversation-starter, a show-stopper, and an instant crowd-pleaser.

What Makes Mozzarella Onion Rings So Special?

At first glance, this might seem like a novelty snack — a fun fusion of two classics. But there’s something deeply satisfying about the contrast in textures and flavors that keeps you coming back for more.

Here’s why this recipe stands out:

  • Crispy meets gooey: The outer coating is golden and crunchy, while the inside melts into a deliciously stretchy bite of cheese.
  • Savory onion flavor: The natural sweetness and sharpness of the onion pairs beautifully with the creaminess of mozzarella.
  • Perfect for dipping: From marinara to ranch to spicy aioli, these rings go with just about any sauce.
  • No fancy tools required: With a knife, a pan, and a bit of freezer space, anyone can pull this off at home.
  • Kid and adult approved: It’s the kind of snack that gets devoured — no leftovers, no questions asked.

Whether you’re cooking for a crowd or just treating yourself, Mozzarella Onion Rings strike the perfect balance between indulgent and homemade.

Ingredients

IngredientQuantity
Mozzarella cheese100 g
Onion1 large
All-purpose flour50 g
Bread crumbs100 g
Eggs2
Cooking oilFor frying

Directions

  1. Prep the Onion and Cheese
    Slice the onion into thick rings and separate the layers. Cut mozzarella into strips that fit neatly between two onion rings of similar size. Sandwich the cheese between onion rings and gently press to seal.
  2. Set Up Breading Station
    Prepare three shallow bowls: one with flour, one with beaten eggs, and one with bread crumbs.
  3. Bread the Rings
    Carefully coat each stuffed ring in flour, dip in the egg, then roll in bread crumbs. For extra crunch, repeat the egg and breadcrumb step once more.
  4. Chill Before Frying
    Place the breaded rings in the freezer for 20–30 minutes to help them firm up and prevent cheese from oozing out during frying.
  5. Fry Until Golden
    Heat oil in a deep skillet or saucepan over medium-high heat. Fry the onion rings in batches until golden and crispy (about 2–3 minutes per side). Remove and drain on paper towels.
  6. Serve Hot
    Enjoy while still warm and melty, paired with your favorite dipping sauce.

Nutritional Information (Per 1–2 rings, Approx. Based on 6 servings)

NutrientAmount
Calories~210 kcal
Protein7 g
Carbohydrates16 g
Fat13 g
Saturated Fat4.5 g
Fiber1 g
Sodium260 mg

Frequently Asked Questions

Do I have to freeze them before frying?
Yes — this step is crucial. Chilling the breaded rings helps them hold their shape and prevents the cheese from oozing out too quickly during frying. A 20–30 minute chill in the freezer makes a big difference.

What kind of onion is best for this recipe?
Large yellow or white onions work best. They’re mild enough to complement the cheese and hold up well during cooking. Look for onions with wide rings so they’re easier to stuff.

Can I use a different cheese?
Mozzarella is ideal because of its meltability and stretch. However, you can experiment with other semi-firm cheeses like Monterey Jack, provolone, or gouda. Just make sure they’re cut to fit snugly inside the onion rings.

What if I don’t have breadcrumbs?
Panko breadcrumbs are preferred for maximum crunch, but you can use regular breadcrumbs or even crushed crackers or cornflakes. If using finer crumbs, consider toasting them lightly first for better texture.

Can I bake these instead of frying?
Technically, yes — though the result will be less crispy. If baking, place the rings on a greased rack over a baking sheet and spray the tops with oil. Bake at 425°F (220°C) for about 20 minutes or until golden brown.

Can I use an air fryer?
Absolutely. Air frying works well and gives a nice crunch with less oil. Air fry at 375°F (190°C) for 8–10 minutes, flipping halfway through.

How do I keep the cheese from leaking out?
Make sure the mozzarella fits tightly inside the onion ring. Double-coating with egg and breadcrumbs adds an extra barrier. And again — don’t skip the freezing step.

Can I make them ahead of time?
Yes! Assemble and bread the rings, then freeze them in a single layer. Once frozen, transfer to a zip-top bag and store for up to one month. Fry from frozen — just add a minute or two to the cooking time.

Serving Ideas and Pairings

Mozzarella Onion Rings are a statement snack — one that deserves a place at every game night, casual gathering, or family weekend. Here are some creative ways to serve them:

1. Appetizer Platter

Serve them alongside chicken wings, sliders, or veggie sticks for a party platter everyone will love.

2. Movie Night Favorite

Stack them on a tray with dipping sauces in ramekins: classic marinara, smoky chipotle mayo, creamy ranch, or sweet chili sauce.

3. Mini Burger Toppers

Place a cheesy onion ring on top of a slider for the ultimate pub-style bite.

4. Late Night Craving Fix

Sometimes, these are all you need. Fry a small batch, grab a cold drink, and enjoy them straight from the paper towel.

Storage and Reheating Tips

Storing leftovers: If you somehow have any left (unlikely), store them in an airtight container in the fridge for up to 2 days. Lay parchment between layers to keep them from sticking.

Reheating: Reheat in the oven or air fryer to restore crispiness. Avoid microwaving — it tends to make the coating soggy and the cheese too runny.

Freezer prep: These freeze beautifully before frying. Once assembled and breaded, freeze in a single layer. You can fry them directly from frozen when ready.

Make It Your Own: Fun Variations

The beauty of this recipe is that it’s endlessly adaptable. Here are a few ideas for creative twists:

Spicy Mozzarella Rings

Add a pinch of cayenne or smoked paprika to the flour or breadcrumb coating. You can also mix in crushed red pepper flakes for heat lovers.

Italian Style

Add Italian seasoning or dried oregano to the breadcrumbs. Serve with warm marinara and a dusting of parmesan.

Buffalo-Style

Toss the finished rings in buffalo sauce and serve with blue cheese dressing for a bold, tangy twist.

Herbed Rings

Mix chopped fresh parsley, thyme, or basil into the breadcrumbs for added aroma and flavor.

Vegan-Friendly Option

Use vegan mozzarella and a plant-based egg substitute like aquafaba. Coat with dairy-free breadcrumbs and air fry for a satisfying plant-based treat.

A Snack That Brings People Together

Some recipes are more than food. They’re moments. Memories. A reason to pause and gather.

Mozzarella Onion Rings are one of those recipes. They bring joy — not just because they taste amazing (which they do), but because they invite you to share. To gather around the kitchen, take turns frying, and sneak one hot from the pan. To dip, to crunch, to laugh.

They’re snack food, yes. But they’re also celebration food. They’re “we made it through the week” food. They’re “look what I just learned to make” food.

And when you serve them, whether for two or twenty, you’re not just serving cheese and onions — you’re serving comfort, creativity, and connection.

So go ahead — stack them high, pass the sauce, and enjoy every bite.

How to Make Classic Sugar Cookies

Everyone remembers the first thing they ever baked. For some, it’s banana bread or cupcakes from a box mix. For me, it was these sugar cookies. Simple, unpretentious, and made with ingredients we always had in the kitchen.

I was ten years old, home on a quiet Saturday afternoon. The house was warm from the late sun streaming through the kitchen windows. My mom was folding laundry, and I was flipping through her handwritten recipe book—a faded notebook filled with smudges, crossed-out notes, and little hearts she drew in the margins.

I wanted to bake something on my own for the first time. Nothing fancy. Just something I could mix, shape, and proudly offer to the family without asking for help. That’s when I found the sugar cookie recipe. No butter. No electric mixer. Just egg, yogurt, oil, sugar, flour, and vanilla. It sounded so simple I almost doubted it would work.

But I followed the steps, clumsily measuring flour and sneaking a few licks of dough when no one was watching. I rolled it out with a drinking glass and used an old metal cutter shaped like a star. I sprinkled each cookie with a little extra sugar and watched through the oven door as they puffed up into golden rounds.

They weren’t the prettiest cookies—but they were mine. Soft, just sweet enough, and gently scented with vanilla. I still remember the smile on my mom’s face when she tried one. That feeling of pride and joy is something I’ve carried with me every time I’ve made them since.

Now, years later, I still bake these sugar cookies regularly. They’re the cookies I make when I want something quick, nostalgic, and comforting. They’re the cookies I make with my kids, letting them take over the mixing bowl and fight over the cookie cutters. They’re timeless. Unfussy. Familiar.

And sometimes, those are the best kind.

Why These Sugar Cookies Work Every Time

There are thousands of sugar cookie recipes out there. Some are crisp and thin. Others are cut-out cookies that need frosting. But this version is all about simplicity and texture—soft, tender, and slightly cakey, with a delicate sweetness that doesn’t overwhelm.

Here’s why these cookies are a staple in so many kitchens:

  • No butter required: Perfect when your fridge is empty or you’re baking on a whim.
  • Yogurt or kefir base: Adds moisture and tenderness, giving these cookies a slightly tangy note.
  • Mildly sweet: They’re not overly sugary, which makes them ideal for snacking or pairing with tea or coffee.
  • Easy for beginners: No mixer, no chilling time, no stress.
  • Customizable: The dough is neutral enough to take on added flavors or toppings.

This recipe is the baking equivalent of a warm blanket—soft, familiar, and something you’ll reach for again and again.

Ingredients

IngredientQuantity
Egg1 large
Yogurt or kefir150 ml (½ cup + 2 tablespoons)
Sugar2 tablespoons + extra for sprinkling
Vegetable oil70 ml (5 tablespoons)
Vanilla extract1 teaspoon
SaltTo taste
Baking powder1 teaspoon
All-purpose flour300–320 g (2½ cups)

Instructions

  1. In a medium mixing bowl, whisk together the egg, yogurt (or kefir), sugar, vegetable oil, vanilla extract, and a pinch of salt until fully combined.
  2. Add baking powder and begin incorporating the flour gradually. Stir or knead until you get a soft, non-sticky dough. You may need to adjust the amount of flour slightly depending on the moisture of your yogurt.
  3. Lightly flour your surface and roll out the dough to about ½ inch (1.2 cm) thickness.
  4. Cut out your desired shapes using cookie cutters and place the cookies on a parchment-lined baking tray.
  5. Sprinkle each cookie with a little sugar before baking for a golden, crackly top.
  6. Bake in a preheated oven at 350°F (175°C) for 10–12 minutes, or until the edges are just beginning to turn golden.
  7. Allow the cookies to cool on a wire rack. Serve warm or store at room temperature.

Nutritional Information (Per Cookie, Approx. 1 of 20)

NutrientAmount
Calories~95 kcal
Carbohydrates12 g
Sugars3 g
Protein2 g
Fat4.5 g
Saturated Fat0.5 g
Fiber0.3 g
Sodium30 mg

Frequently Asked Questions

Can I use butter instead of oil?
Yes, but it will change the texture. Oil keeps these cookies soft and tender. Butter will make them slightly crisper and richer. If substituting, use melted butter in equal measure.

Is it better to use yogurt or kefir?
Both work beautifully. Yogurt gives a slightly thicker, cake-like texture, while kefir creates a softer, more delicate crumb. Use whichever you have on hand.

Do I need to chill the dough?
No. The dough can be rolled out and cut immediately. However, if your kitchen is very warm, a quick 15-minute chill can help make it easier to work with.

What kind of flour is best?
All-purpose flour is perfect. If you want a lighter cookie, you can replace up to 20% of the flour with cake flour for a softer texture.

Can I make this recipe vegan?
Yes. Use plant-based yogurt or kefir, a flax egg (1 tablespoon ground flax + 3 tablespoons water), and neutral oil. The texture may be slightly different but still delicious.

Why are my cookies spreading too much?
If the dough is too soft, try adding a little extra flour. Humidity and brand variations can affect dough consistency. It should be soft but not sticky.

Can I decorate these cookies with frosting or icing?
You can, but they are soft and delicate, so light decorations like powdered sugar glaze or a drizzle of chocolate work best. They’re not designed to hold heavy royal icing.

Creative Variations to Try

Once you’ve mastered the base recipe, you’ll find plenty of ways to dress these cookies up or down:

1. Lemon Sugar Cookies

Add the zest of one lemon and a teaspoon of lemon juice to the dough. Sprinkle with lemon sugar before baking.

2. Cinnamon Sugar Twist

Mix cinnamon into the sugar you sprinkle on top before baking. You can also roll the dough balls in cinnamon sugar for a snickerdoodle-style cookie.

3. Almond or Orange Flavor

Swap vanilla extract for almond or orange extract for a bold twist.

4. Chocolate Dipped

Once cooled, dip half of each cookie into melted chocolate and let set on parchment paper.

5. Jam-Filled

Make thumbprint cookies by rolling the dough into balls, pressing a dent in the center, and filling with a bit of jam before baking.

Serving Suggestions

These cookies are perfect on their own, but you can turn them into something extra special depending on the occasion:

  • With afternoon tea: Serve alongside a pot of black or herbal tea. Their subtle flavor won’t overpower.
  • Holiday treat platter: Add colored sugar before baking or drizzle with white chocolate and festive sprinkles.
  • Kid-friendly baking day: Let kids choose cookie cutter shapes and help sprinkle the sugar on top.
  • Gift idea: Stack a dozen in a cellophane bag, tie with ribbon, and gift as a homemade surprise.

Because they’re so mild, they also pair beautifully with more intense flavors like hot chocolate, spiced cider, or espresso.

Storage and Make-Ahead Tips

Room Temperature: Store in an airtight container for up to 4 days. These cookies stay soft but may lose crisp edges if not sealed properly.

Refrigeration: Not necessary, but can extend freshness by another day or two.

Freezing Dough: The dough can be frozen for up to 1 month. Wrap tightly in plastic wrap and thaw in the refrigerator overnight before rolling and baking.

Freezing Baked Cookies: Cool completely, then freeze in layers with parchment paper between. Thaw at room temperature before serving.

A Final Thought: The Power of Simple Bakes

There are times when baking is about pushing boundaries—layered cakes, experimental flavors, precise techniques. But other times, it’s about returning to the basics. To the kind of recipe that doesn’t ask much of you but gives so much back.

These classic sugar cookies are just that. A recipe that requires only a few ingredients and a little time, but delivers warmth, softness, and that gentle sweetness we all crave. They’re the kind of cookies that remind us of grandparents, childhood kitchens, snow days, and handwritten recipe cards tucked in old books.

They’re not just cookies. They’re memory-makers. And the fact that you can whip them up in under an hour with what’s already in your kitchen? That’s just the icing on the (sugar) cookie.

So the next time your afternoon calls for something cozy and homemade, reach for this recipe. Bake a batch. Share them. Savor one while standing at the counter. Let the smell fill your kitchen. And pass the sweetness forward.

Pasta for the Whole Family in Minutes

It started with a half-used pack of spaghetti, a small piece of pork from the back of the freezer, and very little inspiration.

I was tired. It had been a long week—the kind where laundry piles up, emails go unanswered, and the idea of cooking feels more like a chore than a joy. My kids were already asking what was for dinner, and I could sense the slow spiral of takeout temptation taking hold.

But then I remembered something my grandmother used to say: “A full table isn’t about what you serve, it’s about how you serve it.”

So I reached for the pasta, softened the pork in a skillet, and started building a creamy, cheesy sauce with garlic, paprika, and whatever cheese was left in the fridge. I tossed it all together, finished it with a handful of fresh parsley and dill, and called everyone to the table.

And something happened. The mood changed.

We weren’t eating fast food in front of the TV. We were laughing. Talking about our day. My youngest had cheese on her chin, my oldest was asking for seconds, and my partner raised an eyebrow in surprise after the first bite—because despite the humble ingredients, the dish tasted incredible.

From that night on, this recipe has been more than just dinner. It’s been a solution, a comfort, and a reminder that even when life feels hectic, you can still put something warm and homemade on the table.

What Makes This Recipe So Special?

This dish doesn’t rely on exotic ingredients or complicated techniques. Its beauty lies in its simplicity. It’s quick, customizable, family-friendly, and deeply satisfying.

  • Spaghetti acts as the perfect canvas, soaking up the rich, velvety sauce.
  • Pork breast, thinly sliced and seared, adds heartiness without being heavy.
  • Garlic, paprika, and black pepper give it bold, aromatic flavor.
  • Cheese and milk create a creamy, comforting sauce that clings to every bite.
  • Fresh herbs bring brightness and balance.

The result is a dish that feels like it took hours to make but comes together in less than 30 minutes. It’s the kind of meal that turns a regular Tuesday into something memorable.

Hearty Ingredients for a Crowd-Pleasing Dish

IngredientQuantity
Spaghetti250 g
Pork breast (sliced)200 g
Garlic (minced)2 cloves
Olive oil1 tablespoon
Butter40 g
SaltTo taste
Black pepperTo taste
All-purpose flour1 tablespoon
Milk300 ml
Cheese (grated)100 g (cheddar or mozzarella)
Paprika1 teaspoon
Fresh parsley & dillFor garnish

How to Make This Family-Favorite Pasta

Step 1: Cook the Spaghetti

Bring a large pot of salted water to a boil. Add spaghetti and cook until al dente according to package instructions. Drain and set aside.

Step 2: Sear the Pork

In a large skillet, heat olive oil over medium-high heat. Add the sliced pork breast and cook until golden brown and cooked through. Season with salt, pepper, and paprika. Remove and set aside.

Step 3: Build the Sauce

In the same skillet, melt the butter. Add the minced garlic and sauté until fragrant. Stir in the flour and cook for 1 minute to create a roux.

Gradually whisk in the milk to form a smooth, creamy sauce. Reduce heat to low and stir in the grated cheese until melted and smooth.

Step 4: Combine and Serve

Return the cooked pork to the skillet, then add the drained spaghetti. Toss everything together until well coated in the creamy sauce.

Sprinkle with chopped parsley and dill before serving. Enjoy immediately while hot and melty.

Nutritional Breakdown (Per Serving, based on 3 servings)

NutrientAmount
Calories~590 kcal
Protein30 g
Carbohydrates50 g
Sugars6 g
Fat30 g
Saturated Fat14 g
Fiber2 g
Sodium420 mg

Frequently Asked Questions

Can I use a different type of pasta?
Absolutely. While spaghetti works beautifully here, you can swap in penne, fettuccine, or even short pastas like rigatoni or rotini. Just adjust cooking times accordingly and make sure the sauce coats the pasta well.

What cut of pork is best?
Pork breast is ideal because it’s tender and cooks quickly. However, you can also use pork loin, tenderloin, or even leftover roast pork sliced thin. Just avoid cuts that require long cooking times unless they’ve been pre-cooked.

Can I substitute the pork with another protein?
Yes. Chicken breast or thigh works well, as does ground meat like beef, turkey, or even sausage. For a pescatarian version, try shrimp. And for a vegetarian spin, sautéed mushrooms or tofu can stand in.

Is it possible to make this recipe gluten-free?
Of course. Simply use gluten-free pasta and substitute the flour with a gluten-free thickener such as cornstarch or a gluten-free flour blend. Be sure to check your cheese and seasonings for gluten as well.

Can I make it ahead of time?
This dish is best served fresh, but you can make the sauce and pork a few hours in advance and keep them warm. Cook the pasta fresh and toss everything together just before serving for the best texture.

Does it reheat well?
Yes. Store leftovers in an airtight container in the refrigerator for up to 3 days. Reheat gently on the stove or in the microwave, adding a splash of milk to loosen the sauce if needed.

Can I make this recipe without cheese?
Yes, but the cheese is key to the creamy texture and rich flavor. If you’re avoiding cheese for dietary reasons, you could use a plant-based cheese alternative or add a tablespoon of nutritional yeast for a subtle cheesy flavor.

Creative Variations

Once you’ve mastered the base version, this dish becomes a playground for creativity. Here are a few easy variations:

1. Spicy Kick

Add red chili flakes or diced fresh chilies to the garlic for some heat. Smoked paprika can also add a smoky warmth.

2. Mushroom Lover’s Version

Sauté mushrooms alongside the pork for an earthy, umami-rich variation. Button mushrooms, cremini, or even wild varieties work beautifully.

3. Lemon Herb Twist

Add a squeeze of fresh lemon juice and a bit of lemon zest before serving to brighten the sauce. Swap dill for thyme or basil for a more summery flavor.

4. Double Cheese Deluxe

Use a mix of cheeses for extra richness—cheddar for sharpness, mozzarella for meltiness, and a touch of parmesan for depth.

5. Bacon Upgrade

Add chopped cooked bacon or pancetta for a salty, smoky twist that kids and adults alike will love.

Serving Suggestions

This dish is so versatile that it can be dressed up or down depending on the occasion.

  • Weeknight Dinner: Serve with a simple green salad and crusty bread for a complete meal.
  • Brunch Table Favorite: Top with a poached or fried egg for a decadent brunch plate.
  • Family Gathering: Make a large batch and serve from a big platter with fresh herbs and extra cheese on the side.
  • Lunchbox Hero: Pack it in a thermos for a warm, satisfying lunch at school or the office.

Pair it with a glass of crisp white wine for adults, or a splash of sparkling water with lemon for a refreshing, kid-friendly drink.

Storage and Reheating Tips

Refrigerator: Store any leftovers in an airtight container for up to 3 days. Be sure to let it cool completely before sealing to prevent moisture buildup.

Freezer: While best fresh, this dish can be frozen. Freeze in individual portions for easy reheating. Defrost in the fridge overnight and warm on the stovetop with a bit of extra milk to refresh the sauce.

Reheating: Reheat in a pan over low heat, stirring gently and adding a bit of milk or cream to keep the sauce silky. You can also microwave in short bursts, stirring between each.

A Final Word: Pasta That Nourishes More Than Hunger

There’s something incredibly grounding about this dish. It doesn’t try to be fancy. It doesn’t come with a long shopping list or hours of prep. But it shows up when you need it most—on the days when your energy is low, your time is short, but your desire to feed the people you love remains strong.

Pasta for the Whole Family in Minutes isn’t just a catchy name. It’s a reminder that you can make something special with what you have. That a warm bowl of creamy spaghetti and tender pork can quiet the chaos, spark conversation, and bring everyone to the table—even if just for a few minutes.

So whether you’re cooking for toddlers or teenagers, roommates or relatives, or just yourself on a quiet evening, I hope this recipe becomes part of your kitchen story too. The kind of dish you turn to again and again—not because it’s trendy, but because it’s dependable, delicious, and made with love.