The Breakfast Sandwich That Saved My Morning: A Story of Simplicity and Comfort

There are mornings when everything seems to move in fast forward—your alarm goes off, you rush out of bed, and before you know it, you’re sprinting out the door. Whether you’ve overslept or simply misjudged how much time you had, these frantic mornings are all too familiar. I used to think that these mornings meant I’d have to skip breakfast or settle for something uninspiring. That is until I discovered the beauty of the breakfast sandwich.

One morning, in the midst of my chaos, I grabbed a few simple ingredients: eggs, bread, cheese, and sausage. With only 10 minutes to spare, I tossed them together in a skillet, and in a short amount of time, I had a hot, satisfying breakfast. It wasn’t just a meal—it was a lifesaver. It gave me the energy I needed to start my day on the right foot and reminded me that a good breakfast doesn’t have to be complicated.

That’s when I realized how powerful a simple meal could be. It’s not about fancy ingredients or intricate recipes. It’s about making something that nourishes you and gives you the strength to face the day. This breakfast sandwich became my go-to on busy mornings, and I’ve been making it ever since. Now, whenever I’m in a rush, I know I can count on it to get me through.

In this article, I’ll share the details of how you can create your very own “breakfast sandwich that saved my morning.” With just a few ingredients and a little bit of time, this sandwich can be your quick fix for those hectic mornings that demand simplicity and nourishment.

Why This Breakfast Sandwich is the Perfect Solution for Busy Mornings

Life often feels like it’s moving faster than we can keep up, especially during those early hours when you’re trying to get ready and out the door. One of the most common struggles I face is trying to find a breakfast that’s both quick and satisfying. A lot of mornings, I feel the pressure to choose between something that’s healthy or something that’s convenient. But this breakfast sandwich solves that problem by combining both elements into one delicious and fulfilling meal.

Here’s why this sandwich is perfect for those busy mornings:

  1. Quick Preparation:
    In just about 15 minutes, you can have a hot, satisfying breakfast in your hands. There’s no need for complicated steps or long cooking times, making it ideal for hectic mornings when you don’t have a lot of time to spare.
  2. Nutrient-Packed:
    The combination of eggs, cheese, and sausage offers protein, healthy fats, and a good amount of energy to help you power through your day. The bread gives you the carbs you need to feel full, and the cheese adds some extra flavor and creaminess. It’s a complete meal in just one sandwich.
  3. Customizable:
    One of the best things about this sandwich is how versatile it is. If you’re a vegetarian, you can easily swap out the sausage for veggies like spinach or mushrooms. Want to cut down on calories? You can use whole wheat bread and opt for a low-fat cheese option. You can make this sandwich your own based on your preferences and dietary needs.
  4. Satisfying:
    Not only does this sandwich provide a hearty breakfast, but it’s also comforting. There’s something about the crispy bread, melted cheese, and scrambled eggs that makes it feel like a warm hug on a cold morning. It’s filling, satisfying, and keeps you full until lunchtime.
  5. Accessible Ingredients:
    The ingredients for this sandwich are likely already in your kitchen, which means you don’t need to make an extra trip to the store. It’s a great option for busy mornings when you’re in a pinch and need something quick without sacrificing quality or taste.

Ingredients

IngredientQuantity
Bread6 slices
Cheese (sliced)12 slices
Sausage (sliced)6 slices
Eggs2
Milk½ cup
Grated Cheese100 grams

Instructions:

  1. Prepare the Eggs:
    Whisk together the eggs, milk, and a pinch of salt and pepper in a bowl. Set aside.
  2. Assemble the Sandwiches:
    Place 6 slices of bread on a flat surface. On each slice, layer one slice of sausage, two slices of cheese, and then top with another slice of bread to form sandwiches.
  3. Grill the Sandwiches:
    Heat a skillet or griddle over medium heat and add a small amount of butter or oil. Place the sandwiches on the skillet and cook for 3-4 minutes on each side until the bread is golden and crispy, and the cheese begins to melt.
  4. Scramble the Eggs:
    While the sandwiches are cooking, pour the egg mixture into a separate skillet over low-medium heat. Scramble gently, stirring occasionally until the eggs are fully cooked.
  5. Serve:
    Once the sandwiches are ready, remove them from the skillet. Top each sandwich with a generous portion of scrambled eggs and sprinkle with grated cheese. Serve warm.

How to Adapt This Recipe to Fit Your Preferences

While the basic breakfast sandwich recipe is already simple and adaptable, there are a few ways you can tweak it to suit your specific tastes or dietary needs:

  1. Vegetarian Version:
    If you prefer a vegetarian breakfast, you can easily replace the sausage with some sautéed mushrooms, spinach, or even some sliced avocado. These options will still provide you with a delicious and satisfying sandwich without compromising on flavor.
  2. Healthier Alternatives:
    To make this sandwich healthier, consider using whole grain bread, low-fat cheese, and lean turkey sausage or even plant-based sausage. These small changes can help reduce the overall calorie count and make it more nutritious without sacrificing flavor.
  3. Add More Veggies:
    If you want to increase the fiber and nutrient content, try adding more vegetables. Fresh spinach, tomatoes, or bell peppers make a great addition to this sandwich. You can sauté them with the eggs or simply add them raw for an extra crunch.
  4. Different Cheese Options:
    The type of cheese you use can dramatically change the flavor of the sandwich. Cheddar is a classic, but you could also use Swiss, mozzarella, or even a spicy pepper jack to add some heat. Feel free to experiment and see which cheese variety works best for you.
  5. Make It Spicy:
    If you enjoy a bit of spice, you can add some hot sauce, jalapeños, or a sprinkle of red pepper flakes to the sandwich. This will give it an extra kick and can be a fun way to switch up the flavors.

Nutritional Information (per serving)

NutrientAmount
Calories300-350 kcal
Protein15g
Carbohydrates25g
Fat18g
Saturated Fat7g
Fiber2g
Sodium500mg

Frequently Asked Questions (FAQs)

  1. Can I make this sandwich ahead of time?
    While this sandwich is best enjoyed fresh, you can prepare the ingredients ahead of time. For example, you can scramble the eggs in advance, and assemble the sandwiches in the fridge, ready to be heated. When you’re ready, just heat everything in a pan and toast the bread.
  2. Can I freeze these sandwiches?
    Yes! This breakfast sandwich is freezer-friendly. Assemble the sandwiches, but don’t cook them yet. Wrap them tightly in foil or plastic wrap and freeze. When you’re ready to eat, just pop it in the oven or microwave to reheat.
  3. Can I make this sandwich without eggs?
    If you’re allergic to eggs or prefer not to include them, you can substitute with a scrambled tofu mixture or just use the bread, sausage, and cheese as a base. The result will still be tasty, though it won’t have the same texture as eggs.
  4. How can I make this sandwich gluten-free?
    You can easily make this sandwich gluten-free by swapping the bread for a gluten-free variety. There are plenty of delicious gluten-free options available that will still hold up well in this recipe.

Conclusion: A Simple Meal That Keeps You Going

Some of the best meals are the simplest ones. This breakfast sandwich is a perfect example. It’s quick, satisfying, and customizable to fit your needs. Whether you’re running out the door, taking a moment to relax, or needing a quick refuel after a workout, this sandwich will keep you full and energized throughout the morning.

In the chaos of life, it’s nice to have a few go-to recipes that don’t require a lot of effort but still deliver great results. The breakfast sandwich that saved my morning is now my go-to for busy days, and I’m confident it can be yours too. With just a few ingredients and a little creativity, you can make something that fuels you for the day ahead, without adding more stress to an already hectic morning.

So the next time you’re pressed for time, reach for this breakfast sandwich recipe. It’s easy, delicious, and guaranteed to put a smile on your face as you head out the door.

Print
clock clock iconcutlery cutlery iconflag flag iconfolder folder iconinstagram instagram iconpinterest pinterest iconfacebook facebook iconprint print iconsquares squares iconheart heart iconheart solid heart solid icon

The Breakfast Sandwich That Saved My Morning: A Story of Simplicity and Comfort


  • Author: Paul
  • Total Time: 15 minutes
  • Yield: 46 servings 1x

Description

This easy-to-make breakfast sandwich combines the classic flavors of cheese, sausage, and eggs, offering a hearty and satisfying meal that will save you time during hectic mornings. It’s the perfect breakfast to fuel your day!


Ingredients

Scale
  • 6 Slices of Bread
  • 12 slices of Cheese
  • 6 Slices Sausage
  • 2 Eggs
  • ½ cup Milk
  • 100 grams Grated cheese

Instructions

  1. Prepare the eggs: In a bowl, whisk the eggs with the milk and a pinch of salt and pepper. Set aside.
  2. Assemble the sandwiches: Lay out 6 slices of bread on a clean surface. On each slice, place one slice of sausage, two slices of cheese, and another slice of bread.
  3. Cook the sandwiches: Heat a skillet or griddle over medium heat and add a little butter or oil. Place the sandwiches on the skillet and cook until the bread is golden brown and the cheese starts to melt, about 3-4 minutes per side.
  4. Scramble the eggs: While the sandwiches cook, pour the egg mixture into another skillet over low-medium heat and scramble gently until they are cooked through.
  5. Serve: Once the sandwiches are ready, remove them from the skillet. Top each with a generous amount of scrambled eggs and sprinkle with the grated cheese. Serve warm.

Notes

  • You can substitute the sausage for bacon or ham for a different flavor.
  • If you’re looking to cut down on calories, opt for whole wheat bread or a lighter cheese option.
  • Add some veggies like spinach or tomatoes to elevate the dish.
  • Prep Time: 5 minutes
  • Cook Time: 10 minutes
  • Category: Breakfast
  • Method: Grilling
  • Cuisine: American

A Simple Comfort from the Garden

When I was growing up, my grandmother’s kitchen was a sanctuary, the heart of our family. I can still remember the warm, earthy scent of roasting vegetables that would drift from the oven, a sign that another family meal was coming together. Among the array of dishes she’d create, one always stood out: her simple roasted eggplant. It was a humble dish, but the way the eggplant transformed in the oven, golden and caramelized, with every bite offering a combination of tender softness and savory richness, made it something special. It’s a recipe that’s been passed down through generations, and though the ingredients are modest, the flavors are anything but.

Eggplants have a unique ability to absorb the flavors around them, making them a perfect canvas for spices, herbs, and seasonings. For me, this particular eggplant recipe represents comfort, tradition, and the importance of simplicity in cooking. It’s a dish that reminds me of home, where food was not just about nourishment, but about love and family. And it’s a recipe I now share with others, knowing that it can evoke the same sense of warmth and joy in their homes.

Eggplant: A Versatile Gem in the Vegetable Kingdom

Eggplant, also known as aubergine in some parts of the world, has long been a staple in Mediterranean and Middle Eastern cuisine. Its versatility is what makes it such a beloved vegetable. Whether it’s being grilled, baked, or stuffed, eggplant can easily take on a variety of flavors, making it an essential ingredient in many dishes. While it can sometimes be seen as an unassuming vegetable, its rich, creamy texture and mild flavor are perfect for absorbing the aromas and seasonings that surround it.

In this recipe, we let the eggplant shine by keeping things simple, using only a few ingredients to enhance its natural flavor. The olive oil, garlic, and herbs used in this dish provide just the right balance of richness and freshness. It’s a dish that’s easy to prepare, but one that packs a punch in terms of flavor and satisfaction.

Ingredients

IngredientAmount
Eggplants2
Olive oilTo taste
Garlic3 cloves, minced
Fresh DillTo taste, chopped
SaltTo taste
Black PepperTo taste
Italian HerbsTo taste

Instructions:

  1. Preheat the oven: Start by preheating your oven to 400°F (200°C). This ensures it’s ready for the eggplant once prepped.
  2. Prepare the eggplant: Slice the eggplants into rounds about 1/2-inch thick. You can peel them if you prefer a smoother texture, but the skin adds a beautiful color and extra nutrients.
  3. Season the eggplant: Place the eggplant slices on a baking sheet lined with parchment paper. Drizzle olive oil generously over the slices and rub them in gently. Sprinkle salt, black pepper, and Italian herbs to taste, making sure every slice is well-seasoned.
  4. Garlic infusion: Mince the garlic cloves and sprinkle them over the eggplant. This will add a fragrant aroma and an extra layer of flavor.
  5. Bake: Pop the baking sheet in the oven for about 20-25 minutes, or until the eggplant becomes golden brown and soft in the middle.
  6. Garnish with dill: Once out of the oven, sprinkle freshly chopped dill over the eggplant slices. This gives it a fresh, herbal note that complements the richness of the olive oil and the earthiness of the eggplant.

Nutritional Information

NutrientPer Serving (Approx.)
Calories100-120 kcal
Fat7-8 g
Carbohydrates8-10 g
Fiber4-5 g
Protein1-2 g

Why This Eggplant Recipe Works

The secret to this recipe’s success lies in the balance of ingredients and the method of cooking. Eggplants can often turn mushy if not prepared properly, but when baked or roasted at the right temperature, they caramelize beautifully, becoming tender with a slightly smoky flavor. The olive oil provides a rich, smooth finish, while the garlic infuses the eggplant with depth and warmth. The combination of fresh dill and Italian herbs elevates the dish, giving it a fragrant, herbaceous touch that complements the eggplant’s natural earthiness.

Health Benefits of Eggplants

Eggplants are not only delicious but also packed with nutrients. They’re a great source of fiber, which aids digestion and promotes heart health. Rich in antioxidants like nasunin, found in the skin, eggplants help protect the body from free radical damage. They also contain vitamins like B6, vitamin C, and folate, which are important for overall health. With their low calorie content, eggplants are a fantastic addition to any diet, especially if you’re looking to maintain or lose weight while still enjoying flavorful meals.

A Perfect Side or Standalone Dish

One of the beautiful things about this eggplant recipe is its versatility. You can serve it as a side dish alongside your favorite protein, like grilled chicken or lamb, or even use it as the main event in a vegetarian meal. It pairs wonderfully with grains like quinoa, couscous, or rice, making it a complete and balanced dish. You could even throw it into a warm pita with some hummus and feta cheese for a Mediterranean-inspired wrap.

FAQ Section

  1. Can I use other herbs besides dill? Absolutely! While dill adds a lovely freshness to this dish, you can easily swap it out for other herbs like basil, oregano, or thyme. Each herb will bring its own distinct flavor profile, allowing you to customize the dish to your tastes.
  2. Can I grill the eggplant instead of baking it? Yes! Grilling eggplant adds a wonderful smoky flavor and texture. Just be sure to brush the slices with olive oil before placing them on the grill to prevent them from sticking.
  3. How do I make this dish vegan? This recipe is already vegan-friendly, as it doesn’t contain any animal products. However, if you want to add a vegan-friendly cheese alternative or drizzle some tahini on top, feel free to do so.
  4. Can I prepare this dish in advance? Yes, this dish is great for meal prep. You can roast the eggplant ahead of time and store it in the fridge for a few days. Simply reheat it in the oven or microwave before serving.
  5. What should I serve with roasted eggplant? Roasted eggplant pairs well with a variety of dishes. Try it with a refreshing cucumber salad, roasted chickpeas, or a grain salad like tabbouleh. It also works wonderfully alongside grilled meats or as part of a mezze platter with hummus and pita.

The Benefits of Simplicity in Cooking

In today’s world, we’re often bombarded with complex recipes and elaborate dishes, sometimes leading us to forget the joy of simple, home-cooked meals. This eggplant recipe serves as a reminder that food doesn’t have to be complicated to be delicious. With just a handful of ingredients and a little time in the oven, you can create a dish that’s not only nutritious but bursting with flavor. It’s proof that the best meals are often the simplest ones, prepared with love and a focus on fresh ingredients.

Conclusion: A Dish Worth Repeating

Whether you’re cooking for yourself, your family, or friends, this eggplant recipe is a surefire way to create something memorable. It’s a dish that brings out the natural beauty of the eggplant and enhances it with a few carefully chosen ingredients. It’s versatile, healthy, and easy to make, making it perfect for any occasion. So, the next time you’re in the kitchen and looking for a meal that’s both comforting and delicious, consider roasting up some eggplant—it’s simple, satisfying, and, most importantly, full of flavor.

Cooking this dish will not only give you a sense of accomplishment but also connect you to a tradition of cooking that’s been passed down through generations. It’s a reminder that even in the busiest of times, we can always find comfort in the kitchen, with a few simple ingredients and a lot of heart.

Print
clock clock iconcutlery cutlery iconflag flag iconfolder folder iconinstagram instagram iconpinterest pinterest iconfacebook facebook iconprint print iconsquares squares iconheart heart iconheart solid heart solid icon

A Simple Comfort from the Garden


  • Author: Paul
  • Total Time: 40 minutes
  • Yield: 46 servings 1x

Description

This roasted eggplant recipe is a perfect balance of savory and earthy flavors. With minimal ingredients, it brings out the natural sweetness of eggplant, enhanced with garlic, olive oil, and fresh herbs. Whether as a side dish or a main, it’s both healthy and satisfying.


Ingredients

Scale
  • 2 eggplants
  • Olive oil (for drizzling)
  • 3 cloves of garlic, minced
  • Fresh dill, finely chopped
  • Salt, to taste
  • Black pepper, to taste
  • Italian herbs (oregano, thyme, rosemary), to taste

Instructions

  1. Preheat your oven to 400°F (200°C).
  2. Cut the eggplants in half lengthwise and then slice them into wedges or rounds, depending on your preference.
  3. Place the eggplant slices on a baking sheet lined with parchment paper.
  4. Drizzle the eggplants with olive oil and sprinkle with minced garlic, salt, pepper, and Italian herbs.
  5. Toss the eggplant slices to coat them evenly with the seasonings and oil.
  6. Roast in the preheated oven for about 25-30 minutes, or until the eggplant is tender and golden brown, flipping halfway through for even cooking.
  7. Once cooked, remove from the oven and sprinkle with fresh dill before serving.

Notes

  • If you prefer a more intense flavor, you can let the eggplant slices sit with the olive oil and seasonings for 15-20 minutes before roasting.
  • For a smoky touch, you can grill the eggplant slices instead of roasting them.
  • This dish is perfect as a side, or you can enjoy it on its own as a light vegetarian meal.
  • Prep Time: 10 minutes
  • Cook Time: 30 minutes
  • Category: Side Dish
  • Method: Roasting
  • Cuisine: Mediterranean-inspired

Decadent Condensed Milk & Chocolate Nut Bars: A Sweet Indulgence for Every Occasion

When I think about comfort food, one of the first things that come to mind is my grandmother’s kitchen — a warm, inviting space filled with the smells of freshly baked treats, rich chocolate, and the soft, buttery scent of nuts being toasted. Growing up, my siblings and I would eagerly crowd around the kitchen table while she worked, eagerly awaiting the moment when we could dive into one of her delicious creations. Among her many masterpieces, there was one that always stood out: a simple yet indulgent chocolate nut dessert.

What made it so special wasn’t just the layers of crunchy nuts, silky chocolate, and creamy sweetness, but the love and care she put into each batch. It was a recipe she had perfected over the years, passed down from her mother, and later tweaked for her grandchildren. The joy we all felt when biting into those bars — rich, nutty, and absolutely indulgent — became a part of our family tradition. It was a treat that brought us together, made us smile, and reminded us of the importance of family and shared moments.

As I got older, life got busier, and I found myself spending less time in the kitchen. Yet, every now and then, I would crave that familiar treat. That’s when I decided to recreate my grandmother’s recipe, with a few modern twists. These Condensed Milk & Chocolate Nut Bars are my take on that childhood favorite, bringing together the creamy richness of sweetened condensed milk, the crunch of toasted nuts, and the decadence of dark chocolate, creating a simple yet luxurious treat for today’s busy world.

The Perfect Balance of Sweet, Nutty, and Chocolatey

What makes these bars so special is their balance of flavors and textures. The sweetened condensed milk gives them a creamy, melt-in-your-mouth base, while the dark chocolate adds a rich, slightly bitter contrast that enhances the sweetness of the milk. The nuts—pecans, peanuts, and hazelnuts—add the perfect crunch, bringing in a savory balance that prevents the dessert from feeling too rich. Together, they form a heavenly combination that’s both satisfying and indulgent.

These bars are also highly customizable, making them the perfect base for anyone to experiment with. Whether you prefer almonds, cashews, or even a mix of dried fruit, the recipe is versatile enough to allow you to play with the ingredients. The final result is always delicious and always a crowd-pleaser.

Ingredients:

IngredientAmount
Pecans (or walnuts)60g (2.1 oz)
Peanuts60g (2.1 oz)
Sweetened Condensed Milk380g (13.4 oz)
Sunflower Oil (for greasing)As needed
Hazelnuts15g (0.5 oz)
Dark Chocolate (unsweetened)100g (3.5 oz)
Kandurin/Golden Glitter (optional)As desired

Instructions:

  1. Prepare the nuts: Start by roughly chopping the pecans, peanuts, and hazelnuts. Toast them lightly in a dry pan over medium heat for about 5 minutes until aromatic and slightly crisp. Set aside to cool.
  2. Melt the chocolate: Break the dark chocolate into small pieces and place it in a heatproof bowl. Gently melt the chocolate in a double boiler or microwave, stirring until smooth and glossy.
  3. Combine condensed milk and nuts: In a large mixing bowl, pour in the sweetened condensed milk. Add the toasted pecans, peanuts, and hazelnuts, stirring to coat the nuts evenly with the condensed milk.
  4. Mix in melted chocolate: Pour the melted dark chocolate into the nut and condensed milk mixture. Stir thoroughly until all ingredients are evenly combined.
  5. Shape the mixture: Lightly grease a small baking pan or silicone mold with sunflower oil. Pour the mixture into the pan, spreading it evenly. Use a spatula to press it down gently.
  6. Chill and set: Refrigerate for at least 2 hours or until the mixture firms up completely. This will allow the bars to set into a fudgy, nutty chocolate treat.
  7. Optional golden finish: For a festive touch, sprinkle Kandurin or golden glitter on top of the dessert once it has set. This adds a beautiful, shimmering effect, perfect for special occasions.
  8. Serve and enjoy: Once chilled and set, cut into squares or bars and enjoy the rich, creamy, nutty goodness.

Nutrients:

NutrientPer Serving (1 bar)
Calories180 kcal
Total Fat12g
Saturated Fat2g
Carbohydrates15g
Sugars12g
Protein3g
Fiber2g
Sodium15mg

Why You Should Try This Recipe

1. Simplicity Meets Elegance

One of the things that sets this recipe apart is its simplicity. You don’t need a long list of ingredients or hours of preparation. With just a few pantry staples—sweetened condensed milk, dark chocolate, and a handful of nuts—you can create a treat that tastes like it came straight from a bakery. Whether you’re hosting a dinner party, attending a potluck, or simply craving something sweet, these bars are sure to impress.

2. Perfect for Any Occasion

These bars are incredibly versatile and can fit in any situation. They make the perfect holiday gift, a sweet addition to a picnic, or a simple dessert to enjoy with your family after dinner. Their rich, decadent flavor profile makes them a treat that will be loved by both adults and children alike. Whether you’re celebrating a special occasion or just need a quick sweet fix, these bars are a go-to dessert that never disappoints.

3. Make-Ahead and Easy to Store

Another fantastic feature of these condensed milk and chocolate nut bars is that they’re incredibly easy to store and keep. Unlike traditional baked goods, they don’t require any special storage techniques, and they stay fresh in an airtight container in the fridge for up to a week. This makes them the perfect dessert for those who love having something delicious on hand for whenever the craving strikes. And because they’re made without baking, they can be put together in no time, leaving you more time to enjoy your day.

4. Nutritious Twist with Healthy Nuts

While this dessert is indulgent, it also incorporates the goodness of healthy nuts. Pecans, hazelnuts, and peanuts not only bring in a crunchy texture, but they also add nutritional benefits, including healthy fats, fiber, and protein. By using these nuts, you’re adding an extra layer of nutrition to a treat that would otherwise be a bit more indulgent. Nuts are rich in antioxidants, vitamins, and minerals, making this dessert a bit more guilt-free. Pairing it with dark chocolate only increases its antioxidant content, making it a dessert that offers both flavor and a bit of nutritional value.

Frequently Asked Questions (FAQs)

Can I use different types of nuts?

Yes! This recipe is highly adaptable. You can replace the pecans, peanuts, and hazelnuts with any nuts you prefer, such as almonds, walnuts, or cashews. The key is to toast the nuts to enhance their flavor and provide a satisfying crunch in each bite.

Can I make this recipe without condensed milk?

Sweetened condensed milk is essential to the creamy texture of these bars. However, if you’re looking for a healthier alternative, you can try substituting it with coconut milk and maple syrup for a more natural, dairy-free version. Keep in mind that the texture may vary slightly, but it will still be delicious.

How long do these bars keep?

These bars stay fresh for up to a week if stored in an airtight container in the refrigerator. For longer storage, you can freeze them for up to 3 months. Just make sure to let them cool completely before storing.

Can I use milk chocolate instead of dark chocolate?

You absolutely can! If you prefer a sweeter bar, milk chocolate will work perfectly fine. Dark chocolate gives the bars a richer flavor and slightly bitter contrast to the sweetness, but if you’re looking for a more classic sweet chocolate taste, milk chocolate is a great option.

Can I add flavors like vanilla or coffee?

Yes, feel free to experiment with flavor additions! A splash of vanilla extract or a teaspoon of instant coffee can elevate the chocolate flavor, giving it a more complex, layered taste.

Can I make this recipe vegan?

To make this recipe vegan, substitute the sweetened condensed milk with a plant-based version or use coconut milk and maple syrup. Opt for dairy-free dark chocolate, and ensure the nuts are not roasted in butter.

Conclusion: A Treat that Brings Back Memories

This Condensed Milk & Chocolate Nut Bar recipe is more than just a delicious dessert; it’s a way to bring back the joy of sharing simple pleasures with loved ones. Whether it’s for a family gathering, a special event, or just a sweet treat on a quiet afternoon, these bars are the perfect choice. They remind me of my grandmother’s kitchen, of the love we shared over simple meals and treats.

Today, I’m proud to pass this recipe on, knowing it will continue to create moments of joy for those who try it. The beauty of this dessert lies in its simplicity and versatility—ingredients you likely already have in your pantry, but when combined, create something truly special. It’s the kind of dessert that brings people together, not just for the sweet taste, but for the memories and connections it fosters.

So the next time you’re looking for a dessert that’s both easy and indulgent, reach for this recipe. It’s a timeless treat that will surely become a new favorite in your kitchen, and like my grandmother’s, will one day be passed down as part of your family’s traditions.

Print
clock clock iconcutlery cutlery iconflag flag iconfolder folder iconinstagram instagram iconpinterest pinterest iconfacebook facebook iconprint print iconsquares squares iconheart heart iconheart solid heart solid icon

Decadent Condensed Milk & Chocolate Nut Bars: A Sweet Indulgence for Every Occasion


  • Author: Paul
  • Total Time: 2 hours 30 minutes
  • Yield: 12-15 servings

Description

This indulgent dessert brings together the richness of dark chocolate, the creamy sweetness of condensed milk, and a delightful mix of nuts, creating a treat that’s sure to satisfy your sweet tooth. With a touch of golden glitter for an extra dash of elegance, this recipe is perfect for special occasions or simply when you crave something extraordinary.


Ingredients

  • Pecans (or walnuts) – 60g (2.1 oz)
  • Peanuts – 60g (2.1 oz)
  • Sweetened Condensed Milk – 380g (13.4 oz)
  • Sunflower Oil – For greasing
  • Hazelnuts – 15g (0.5 oz)
  • Dark Chocolate – 100g (3.5 oz)
  • By Request: Kandurin/Golden Glitter (Food Coloring) – For a dazzling finish

Instructions

  1. Prepare the nuts: Begin by roughly chopping the pecans, peanuts, and hazelnuts. Toast them lightly in a dry pan over medium heat for about 5 minutes, ensuring they become aromatic and slightly crisp. Set aside to cool.
  2. Melt the chocolate: Break the dark chocolate into small pieces and place them in a heatproof bowl. Gently melt the chocolate either in a double boiler or in the microwave, stirring occasionally until smooth.
  3. Combine condensed milk and nuts: In a large mixing bowl, pour in the sweetened condensed milk. Add the toasted pecans, peanuts, and hazelnuts, mixing thoroughly to ensure all the nuts are coated with the condensed milk.
  4. Mix in melted chocolate: Pour the melted dark chocolate into the nut and condensed milk mixture. Stir well until everything is evenly combined and you have a rich, thick texture.
  5. Shape the mixture: Grease a small baking pan or a silicone mold with sunflower oil. Pour the mixture into the pan, spreading it out evenly. Use a spatula to press it down gently.
  6. Chill and set: Refrigerate the mixture for at least 2 hours or until it firms up completely. The dessert will set into a fudgy, nutty, chocolatey delight.
  7. Optional golden finish: For a special touch, sprinkle Kandurin (golden glitter) on top once the dessert has set. This adds a beautiful shimmering effect that’s perfect for festive occasions.
  8. Serve and enjoy: Once chilled, cut into squares or bars. Serve chilled and enjoy the delightful combination of creamy, nutty, and chocolate goodness.

Notes

  • Storage: Store any leftovers in an airtight container in the refrigerator for up to 1 week. These treats make for a great snack or dessert to keep on hand.
  • Customization: Feel free to substitute the pecans with other nuts such as almonds or cashews for a different flavor profile.
  • Golden Glitter: If you choose to use Kandurin or any edible glitter, ensure it is food-safe and made for consumption.
  • Prep Time: 15 minutes
  • Cook Time: 10 minutes
  • Category: Dessert
  • Method: No-Bake
  • Cuisine: International

The Comfort of Green Onion & Eggs: A Timeless Family Favorite

Food has a way of bringing people together, creating bonds that go beyond shared meals. There are those dishes that bring back memories of laughter-filled mornings, cozy afternoons, and dinners where everyone gathers around the table, sharing not just food but moments that last a lifetime. For me, the “Green Onion & Egg Delight” has always been one of those dishes—a warm, comforting recipe passed down from my grandmother, made from simple ingredients, yet packed with flavors that bring so much joy. It’s a recipe that holds a piece of my family’s history, shared over countless mornings when the aroma of sizzling eggs filled the house. This dish is more than just a meal; it’s a reminder of love, tradition, and the special connection that food can create between generations.

A Dish Built on Simplicity and Flavor

In today’s fast-paced world, where convenience often outweighs quality, it’s refreshing to return to the basics. The “Green Onion & Egg Delight” is a beautiful reminder of how simple ingredients, when combined thoughtfully, can create something that transcends the ordinary. Made with eggs, green onions, and a rich Greek yogurt batter, this dish provides a satisfying balance of protein and flavors. It’s versatile, customizable, and most importantly, it’s easy to make, making it the perfect addition to any meal plan. Whether you’re serving it for breakfast, lunch, or a light dinner, it’s a dish that never fails to impress.

The beauty of this recipe lies in its simplicity. Eggs, green onions, and cheese are ingredients most of us already have on hand, yet the results are anything but basic. The batter, made with Greek yogurt and rice flour, adds a unique texture and depth to the dish, while the green onions lend a fresh, sharp note that complements the creamy, cheesy filling. This dish isn’t just about filling your stomach—it’s about enjoying a moment of culinary bliss, savoring the flavors, and reconnecting with the act of cooking.

Perfect for Any Occasion

What makes this recipe so special is its versatility. You can serve it for a cozy weekend breakfast, a midday meal, or even as a light dinner paired with a side salad or roasted vegetables. The lightness of the dish makes it adaptable to any occasion, and it can easily be dressed up with extra ingredients. Want to add some protein? Try adding cooked chicken, bacon, or sausage to the filling. Looking for more flavor? Experiment with herbs and spices like thyme, oregano, or a pinch of smoked paprika. The possibilities are endless, allowing you to make this recipe your own.

The Nutritional Benefits: A Healthy Choice

In addition to being incredibly delicious, the “Green Onion & Egg Delight” is a nutritionally balanced meal. Eggs provide high-quality protein, while Greek yogurt adds probiotics, which are excellent for gut health. The green onions are a great source of vitamins A and C, as well as antioxidants. The addition of rice flour makes the batter gluten-free, making this dish a suitable option for those with gluten sensitivities. Furthermore, the dish is low in carbohydrates, making it a great choice for those following low-carb or ketogenic diets.

This recipe offers more than just flavor; it provides a nourishing meal that can easily fit into a healthy lifestyle. Whether you’re looking for a quick meal to fuel your day or a light dish that won’t leave you feeling sluggish, this recipe ticks all the boxes.

Ingredients

For the Filling:

IngredientQuantity
Eggs4
Green onion, chopped150 grams
Cheese, grated100 grams
SaltTo taste
Greek yogurt1 tablespoon

For the Batter:

IngredientQuantity
Eggs3
Greek yogurt250 grams
Rice flour100 grams
SaltTo taste
Baking powder1 teaspoon
Olive oilFor greasing

Directions:

  1. Prepare the Filling:
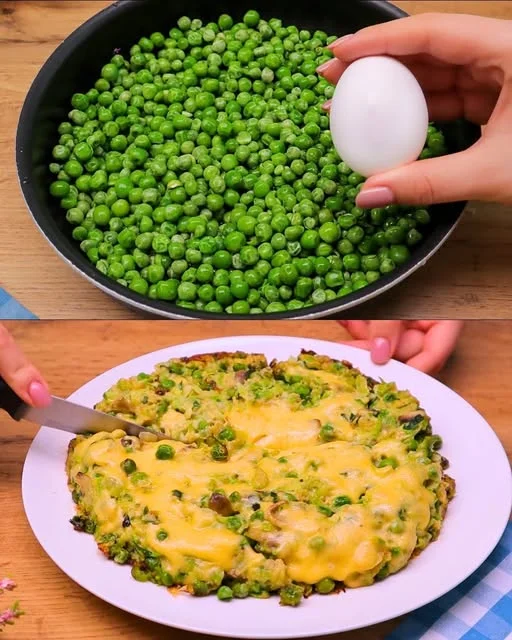
    • In a mixing bowl, beat 4 eggs with 1 tablespoon of Greek yogurt. Season with salt to taste.
    • Add the chopped green onion and grated cheese to the mixture. Stir to combine.
  2. Prepare the Batter:
    • In a separate bowl, beat 3 eggs with 250 grams of Greek yogurt. Add salt to taste, and stir in the rice flour and baking powder. Mix until smooth.
  3. Assemble the Dish:
    • Grease a baking dish or a pan with olive oil.
    • Pour the batter into the greased pan, spreading it evenly.
    • Carefully spoon the filling mixture on top of the batter, spreading it evenly.
  4. Bake:
    • Preheat the oven to 180°C (350°F) and bake for about 25-30 minutes or until the dish is set and golden on top.

Nutritional Information (Approximate):

NutrientValue
Calories250-300 kcal
Protein15 g
Carbohydrates12 g
Fat18 g
Fiber2 g

FAQs: Everything You Need to Know About the Green Onion & Egg Delight

Q: Can I use other types of flour instead of rice flour? A: Absolutely! While rice flour gives this dish a unique texture, you can substitute it with other flours such as almond flour or oat flour. Keep in mind that different flours may affect the final texture of the dish slightly, but they will still provide great results.

Q: Can I make this dish dairy-free? A: Yes, you can. To make the dish dairy-free, use a dairy-free yogurt (such as coconut or almond yogurt) and choose a non-dairy cheese option. There are many plant-based cheeses on the market that melt well and will give a similar flavor to traditional cheese.

Q: How can I make this dish spicier? A: If you enjoy a little heat, try adding a chopped chili or a pinch of cayenne pepper to the filling. You could also add a dash of hot sauce or a sprinkle of chili flakes to the batter for an extra kick.

Q: Can I prepare this dish ahead of time? A: Yes, you can! You can prepare the filling and batter the night before and store them separately in the refrigerator. When you’re ready to cook, simply assemble the dish and bake. This is a great time-saver for busy mornings or when you want to have a meal ready to go without spending much time in the kitchen.

Q: Can I freeze the Green Onion & Egg Delight? A: Yes, this dish can be frozen. To freeze, let the cooked dish cool completely, then wrap it tightly in plastic wrap or foil before placing it in an airtight container or freezer bag. It will keep for up to 2 months. To reheat, simply bake in the oven at a low temperature until warmed through.

A Dish for All Ages

One of the wonderful things about this recipe is how it appeals to all ages. From children to adults, everyone seems to love the combination of eggs, cheese, and green onions. It’s an easy way to introduce more vegetables into a child’s diet without them even realizing it, as the green onions blend in seamlessly with the other ingredients. For adults, it’s a comforting, nutritious dish that satisfies hunger without feeling too heavy.

This recipe is also a great option for those with dietary restrictions, as it can be easily modified to suit different needs. Whether you’re gluten-free, dairy-free, or following a low-carb diet, you can adjust the ingredients to meet your preferences without sacrificing flavor or texture. It’s the kind of recipe that’s easy to adapt, making it a go-to for anyone looking for a versatile and satisfying meal.

Conclusion: A Recipe Worth Passing Down

The “Green Onion & Egg Delight” is a true testament to the beauty of simple ingredients coming together to create something extraordinary. It’s a dish that reflects my own family’s values—finding joy in the small things and cherishing the moments spent together around the table. This recipe is not just about the food; it’s about the memories you create when you cook and share it with those you love.

It’s a recipe that has stood the test of time and continues to bring people together, whether it’s made for breakfast, lunch, or dinner. The balance of flavors, the ease of preparation, and the ability to customize it to your liking make it a dish that everyone will enjoy. I hope this recipe brings as much joy and comfort to your family as it has to mine.

This timeless recipe is more than just a meal—it’s a reminder that great things often come from the simplest of ingredients. The “Green Onion & Egg Delight” is a dish that you’ll want to make again and again, and I’m sure it will find a place in your recipe collection for years to come. Whether you’re cooking for a family dinner or preparing a quick meal for yourself, this dish is the perfect solution. Enjoy!

Print
clock clock iconcutlery cutlery iconflag flag iconfolder folder iconinstagram instagram iconpinterest pinterest iconfacebook facebook iconprint print iconsquares squares iconheart heart iconheart solid heart solid icon

The Comfort of Green Onion & Eggs: A Timeless Family Favorite


  • Author: Paul
  • Total Time: 45 minutes
  • Yield: 46 servings 1x

Description

This savory Green Onion & Egg Delight is a simple yet irresistible dish, packed with protein, flavor, and the goodness of fresh ingredients. With a light, fluffy batter made from Greek yogurt and rice flour, and a cheesy, flavorful filling of eggs, green onions, and Greek yogurt, this dish is perfect for breakfast, lunch, or dinner. Quick, healthy, and delicious, it’s bound to become a family favorite!


Ingredients

Scale

For the Filling:

  • 4 eggs
  • 150 grams of green onion, chopped
  • 100 grams of cheese, grated
  • Salt, to taste
  • 1 tablespoon of Greek yogurt

For the Batter:

  • 3 eggs
  • 250 grams of Greek yogurt
  • 100 grams of rice flour
  • Salt, to taste
  • 1 teaspoon of baking powder
  • Olive oil, for greasing

Instructions

  1. Prepare the filling: In a bowl, crack the 4 eggs and whisk them. Add in the chopped green onions, grated cheese, salt, and Greek yogurt. Mix well to combine until you get a smooth filling mixture.
  2. Make the batter: In another bowl, whisk together the remaining 3 eggs with the Greek yogurt. Gradually add in the rice flour, salt, and baking powder, stirring until the batter becomes smooth and well-combined.
  3. Cook the dish: Preheat your oven to 180°C (350°F). Grease a baking dish with olive oil. Pour the batter into the dish and evenly spread it out. Gently spoon the egg mixture with green onions and cheese on top of the batter, spreading it out evenly.
  4. Bake: Place the dish in the preheated oven and bake for about 30-35 minutes, or until the top is golden and a toothpick inserted in the center comes out clean.
  5. Serve: Once done, remove from the oven and let it cool for a few minutes. Slice and serve warm as a main dish or side.

Notes

  • Feel free to experiment with other vegetables like spinach, bell peppers, or mushrooms to add more flavor and texture to the dish.
  • For a richer taste, try using different types of cheese, such as feta, cheddar, or mozzarella.
  • The recipe can be made ahead of time. Simply prepare the filling and batter, store them separately in the refrigerator, and bake when you’re ready to serve.
  • Prep Time: 10 minutes
  • Cook Time: 35 minutes
  • Category: Main Dish
  • Method: Baking
  • Cuisine: Mediterranean-inspired

Introduction: A Family Favorite Passed Down Generations

It’s funny how the simplest meals often have the most lasting impact. Growing up, I remember my mother making ground beef and veggie filling on busy weeknights. She would cook the beef with onions, garlic, and a few other ingredients, and we’d have it with rice, pasta, or wrapped in a tortilla. It was simple, but it was always comforting. The flavors came together so effortlessly that it felt like a true reflection of the love and care she put into every meal. This dish, passed down through generations, is more than just food—it’s a reminder of the family gatherings and the conversations we shared around the dinner table.

Now, as an adult, I find myself making this same dish for my own family. There’s something magical about it—how such simple ingredients can come together to create something so satisfying. Whether you’re cooking for your family or friends, this filling recipe never disappoints. It’s versatile, easy to prepare, and packed with flavor. Let’s dive into why this dish is a keeper in any kitchen.

The Allure of Simple Ingredients: Why This Recipe Works

This Simple and Delicious Dinner Recipe combines everyday ingredients to create a meal that’s rich in flavor and texture. Ground beef is the star of the dish, offering a hearty, savory base that’s enhanced by the sweetness of onions and the slight crunch of grated carrots. Olive oil adds a rich, velvety smoothness to the mixture, while garlic powder and black pepper bring in the aromatic depth we all love in a savory meal.

The beauty of this recipe lies in its versatility. You can make it with whatever you have on hand. Switch up the seasonings to suit your taste, or add in extra veggies like bell peppers or peas. The carrot adds a natural sweetness, balancing out the richness of the beef, and can easily be swapped for zucchini or parsnips if desired. This makes it an adaptable recipe that fits various dietary preferences, all while being delicious.

Ingredients (For the Filling):

IngredientAmount
Olive oil1 tablespoon
Sweet onion1, chopped
Ground beef1 lb (450 g)
Salt and black pepperto taste
Garlic powder1/2 teaspoon
Carrot1, grated

Instructions:

  1. Heat the Oil: In a large skillet, heat 1 tablespoon of olive oil over medium heat.
  2. Sauté the Onion: Add the chopped sweet onion to the pan and sauté for 3-4 minutes, until it becomes soft and translucent.
  3. Cook the Ground Beef: Add the ground beef to the skillet. Break it up with a spoon and cook for 5-7 minutes, until browned and cooked through.
  4. Season: Add salt, black pepper, and garlic powder to the beef mixture. Stir to combine and adjust the seasoning to taste.
  5. Add Grated Carrot: Grate the carrot and add it to the skillet. Cook for an additional 3-4 minutes, allowing the carrot to soften and blend with the beef mixture.
  6. Serve and Enjoy: Once everything is well-cooked and seasoned, serve the savory filling over rice, in a wrap, or inside pastry for a delicious and hearty meal.

Nutritional Information (Per Serving):

NutrientAmount
Calories~350 kcal
Protein~30 g
Carbohydrates~10 g
Fat~22 g
Fiber~2 g

Frequently Asked Questions (FAQs)

1. Can I make this recipe vegetarian or vegan?

Yes, absolutely! For a vegetarian or vegan alternative, simply swap the ground beef for plant-based protein options like lentils, mushrooms, or a vegan meat substitute. The vegetables and seasonings still work wonderfully with these alternatives, providing a hearty and flavorful dish.

2. Can I freeze the filling?

Yes, this recipe freezes very well. After cooking, allow the filling to cool completely, then store it in an airtight container or freezer bag. It can be frozen for up to 3 months. When you’re ready to use it, thaw it in the fridge overnight and reheat in a pan before serving.

3. Can I use ground turkey or chicken instead of beef?

Definitely! Ground turkey or chicken are excellent substitutes for beef. They are lighter in flavor and fat, making them a great option for a leaner dish. Just be sure to adjust the seasonings a bit since turkey and chicken can have a milder flavor than beef.

4. How can I make this dish spicier?

If you like a bit of heat, you can add chili powder, cayenne pepper, or even fresh chopped jalapenos to the filling. A sprinkle of red pepper flakes also works wonders if you prefer just a touch of spice without overwhelming the flavors.

5. What can I serve this filling with?

The possibilities are endless! This savory filling works perfectly with rice, pasta, or mashed potatoes. It can also be used as a filling for tacos, wraps, or savory pies. You could even spoon it over a bed of leafy greens for a lighter, low-carb option.

How to Customize Your Ground Beef and Veggie Filling

One of the joys of this recipe is how easily it can be adjusted to your preferences or what you have available. Here are a few ways to get creative with the filling:

  1. Add More Vegetables: Feel free to throw in extra veggies to the mix. Diced bell peppers, peas, spinach, or mushrooms can add even more color and texture to the dish. Adding a handful of spinach just before serving will give you an extra burst of nutrients without compromising flavor.
  2. Swap the Protein: Ground beef isn’t your only option. If you want to make a lighter version, try ground turkey, chicken, or even plant-based meat alternatives. Each protein offers its own unique taste and texture, so don’t hesitate to experiment.
  3. Add Extra Spices: Garlic powder is an essential flavor in this dish, but you can play around with other spices as well. Cumin, paprika, or a dash of Worcestershire sauce can deepen the flavor profile. For an Asian twist, try adding ginger and soy sauce.
  4. Top it Off: If you’re feeling indulgent, top your cooked filling with melted cheese for a cheesy, comforting finish. You can also garnish with fresh herbs like parsley or cilantro for a burst of color and flavor.

The Importance of Simple Comfort Food

In a world full of complex recipes and trendy foods, there’s something deeply satisfying about returning to the basics. Simple dishes like this one evoke nostalgia and bring us back to a time when meals didn’t need to be complicated to be enjoyed. It’s this simplicity that allows the flavors to shine, and it’s what makes this recipe so universally loved.

The beauty of this dish also lies in its ability to feed a crowd without breaking the bank. Ground beef, a few vegetables, and some basic seasonings are all you need to create a meal that will satisfy even the hungriest of appetites. Whether you’re cooking for your family after a long day or preparing dinner for a special occasion, this dish is both affordable and delicious.

Conclusion: A Recipe to Hold Close

At the heart of this Simple and Delicious Dinner Recipe is the idea that food should nourish not only the body but also the soul. It’s a recipe rooted in the comfort of home-cooked meals that bring people together, create memories, and nourish the spirit. Whether you’re cooking for a family dinner or sharing a meal with friends, this recipe is a reminder of the power of simple, home-cooked food.

So, next time you find yourself wondering what to make for dinner, turn to this hearty filling. It’s a meal that, with its easy preparation and bold flavors, will surely become a go-to dish in your repertoire. Trust me—once you’ve made this once, it’ll be a recipe you return to again and again, creating new memories with each bite.

Print
clock clock iconcutlery cutlery iconflag flag iconfolder folder iconinstagram instagram iconpinterest pinterest iconfacebook facebook iconprint print iconsquares squares iconheart heart iconheart solid heart solid icon

Introduction: A Family Favorite Passed Down Generations


  • Author: Paul
  • Total Time: 25 minutes
  • Yield: 46 servings 1x

Description

This ground beef and veggie filling is a quick, hearty dish that can be served in many ways—from tacos to pasta to stuffed peppers. With a mix of savory ground beef, sweet onions, and grated carrots, it’s an easy dinner solution that packs a punch of flavor.


Ingredients

Scale
  • 1 tablespoon olive oil
  • 1 sweet onion, chopped
  • 1 lb (450 g) ground beef
  • Salt and black pepper to taste
  • 1/2 teaspoon garlic powder
  • 1 carrot, grated

Instructions

  1. Heat Olive Oil: In a large skillet, heat the olive oil over medium heat.
  2. Cook Onions: Add the chopped onion and sauté until softened and translucent, about 3-4 minutes.
  3. Add Ground Beef: Add the ground beef to the skillet, breaking it up with a spoon as it cooks. Season with salt, black pepper, and garlic powder.
  4. Cook Meat: Continue cooking until the beef is browned and fully cooked through, about 6-8 minutes.
  5. Add Grated Carrot: Stir in the grated carrot and cook for another 2-3 minutes, allowing the flavors to meld together.
  6. Taste and Adjust: Taste the filling and adjust the seasoning as needed with more salt, pepper, or garlic powder.

Notes

  • Storage: This filling can be stored in an airtight container in the fridge for up to 3 days. You can also freeze it for up to 3 months.
  • Versatility: Feel free to customize this recipe with extra vegetables like bell peppers, peas, or spinach. You can also use ground turkey or chicken for a lighter option.
  • Spicy Option: If you enjoy a bit of heat, add red pepper flakes, cayenne pepper, or fresh chopped chilies to the filling.
  • Prep Time: 10 minutes
  • Cook Time: 15 minutes
  • Category: Main Dish
  • Method: Stovetop
  • Cuisine: American Comfort Food

Yufka Cheese Pie: A Comforting Delight for Every Occasion

There are certain dishes that take you back to a time and place, filling you with nostalgia and warmth. The Yufka Cheese Pie is one of those dishes for me. Growing up, I would visit my grandmother’s house, where the scent of fresh, flaky pastries would greet me as I walked in. Yufka, a delicate pastry dough, would be laid out on the counter, filled with savory cheese and herbs, then baked to golden perfection. The warmth of the kitchen, the chatter around the table, and the joy of sharing a homemade meal with family are memories I hold dear.

Today, I want to share that experience with you through this recipe. The Yufka Cheese Pie is simple, yet incredibly satisfying. It’s the kind of dish that brings people together, whether you’re enjoying it on a quiet afternoon or sharing it with friends and family at a gathering. The crispy, buttery layers of yufka paired with the creamy cheese filling create a comforting experience that transcends time and place.

The Origins of Yufka: A Pastry of Tradition

The yufka dough, a cornerstone of many Mediterranean and Middle Eastern cuisines, is a type of unleavened flatbread that is paper-thin and delicate. It’s often used in a variety of savory and sweet dishes, from layered pies like this Yufka Cheese Pie to the famous baklava. Its origins trace back to the rich culinary traditions of Turkey, where yufka is considered an essential ingredient in many home-cooked meals.

The beauty of yufka lies in its simplicity. Unlike puff pastry, which is made by folding butter into dough, yufka is rolled out by hand, creating a thin sheet that can be layered with fillings. Its versatility makes it the perfect dough for everything from sweet baklava to savory pies like this one.

Ingredients:

IngredientAmount
Ready-rolled yufka sheets (or phyllo dough)2 sheets
Eggs2
Plain yogurt1 cup (250 g)
Salt4 g (about 1/2 tsp)
Vegetable oil1/4 cup (50 ml)
Parsley, finely chopped1/4 bunch
Grated white cheese1 cup (150 g)

Directions:

  1. Preheat the Oven: Start by preheating your oven to 180°C (350°F).
  2. Prepare the First Layer: Lay one sheet of yufka dough on a clean surface and brush it lightly with vegetable oil.
  3. Mix the Filling: In a mixing bowl, beat the eggs and combine them with yogurt, salt, chopped parsley, and grated cheese.
  4. Assemble the Pie: Spread half of the yogurt mixture evenly over the yufka sheet.
  5. Add the Second Layer: Place the second sheet of yufka on top, and repeat the process with the remaining yogurt mixture.
  6. Shape and Coat: Carefully fold in the edges to form a rectangular shape, then brush the top with oil to give it a golden, crispy finish.
  7. Bake the Pie: Place the pie in the oven and bake for 30-35 minutes or until the top is golden and crispy.

Nutritional Information (Per Serving):

NutrientValue
Calories250 kcal
Protein9 g
Fat18 g
Carbohydrates17 g
Fiber2 g

Why This Yufka Cheese Pie Will Become Your New Favorite Recipe

This Yufka Cheese Pie stands out not only for its rich, savory filling but also for how effortlessly it comes together. In just a few steps, you can have a delicious pie that is both comforting and sophisticated. It’s perfect for so many occasions: an easy dinner after a long day, a tasty lunch to pack for work, or even a dish to impress guests at a casual gathering.

What I love most about this recipe is how it takes something simple—like eggs, yogurt, and cheese—and turns them into something that feels special. The yufka dough, when baked, becomes crispy and golden, providing a satisfying crunch that contrasts beautifully with the creamy filling. The fresh parsley adds a burst of color and freshness, and the mild tanginess from the yogurt balances the richness of the cheese. Every bite is a little bit of heaven.

The Benefits of Homemade Pastry

When I first learned to make yufka at home, I was surprised by how easy it was and how much better it tasted than store-bought versions. There’s something incredibly rewarding about making your own dough, watching it come together, and then seeing it transform into a beautiful pie in the oven. The aroma that fills the kitchen while it bakes is enough to make anyone’s mouth water. Homemade yufka dough has a depth of flavor and texture that simply can’t be replicated by store-bought options, and it’s an experience worth trying.

If you’ve never made yufka before, don’t worry! It’s a forgiving dough, and even if your sheets aren’t perfect, the end result will still be delicious. If you’d like to save time, you can always use pre-made yufka or phyllo dough, which are both available in most grocery stores.

Frequently Asked Questions (FAQs)

1. Can I use phyllo dough instead of yufka for this recipe?

Yes! While yufka dough is traditional for this pie, phyllo dough is a great substitute and is more readily available. Just be sure to handle it gently, as it can dry out quickly. You may need to brush each layer with oil to prevent it from becoming too brittle.

2. Can I freeze this pie before baking it?

Absolutely! You can assemble the pie and freeze it for up to three months. Simply cover it with plastic wrap and foil, and when you’re ready to bake, remove it from the freezer and bake it from frozen. It may take an extra 10-15 minutes of baking time, so keep an eye on it until the top is golden and crispy.

3. Can I make this pie vegetarian?

Yes, this Yufka Cheese Pie is already vegetarian. The combination of eggs, yogurt, and cheese creates a rich, savory filling that is both satisfying and flavorful.

4. What other fillings can I add to this pie?

While cheese and parsley are the traditional filling for this pie, you can get creative with your ingredients! Consider adding sautéed spinach, mushrooms, or even ground meat if you want a heartier option. The possibilities are endless, and each variation will bring its own unique flavor to the dish.

5. Can I use non-dairy alternatives for the yogurt and cheese?

Yes! You can easily substitute plant-based yogurt and cheese for the dairy versions. Just make sure to choose options that have a similar texture and flavor to the original ingredients to maintain the integrity of the pie.

6. How long will leftovers keep?

Leftover Yufka Cheese Pie can be stored in an airtight container in the fridge for up to 3 days. Reheat it in the oven to restore its crispy texture.

The Versatility of Yufka Cheese Pie

This dish is incredibly versatile. It’s equally at home at a cozy dinner for two or as part of a larger spread at a family gathering. It can be served warm or at room temperature, making it a fantastic option for meal prep or potlucks. And because it’s made with simple, wholesome ingredients, it’s a recipe that you can feel good about serving to loved ones.

Serving Suggestions

This Yufka Cheese Pie pairs beautifully with a simple side salad, a dollop of yogurt, or a drizzle of olive oil and a sprinkle of fresh herbs. The pie itself is rich and flavorful, so lighter, refreshing sides work best to balance the meal.

Conclusion: A Slice of Comfort in Every Bite

The Yufka Cheese Pie is more than just a dish; it’s a piece of culinary heritage that has the power to bring people together. Whether you’re baking it for a family dinner, a casual gathering with friends, or just for yourself, it offers a comforting and satisfying experience that is both simple and extraordinary. The flaky, buttery layers of yufka, combined with the creamy cheese filling, create a dish that is as satisfying as it is delicious.

There’s something special about sharing a homemade meal, especially one that brings back memories of family and tradition. With this recipe, I hope you can create your own moments of warmth and connection, just like I have with my own family over the years. Whether it’s your first time making this pie or you’re a seasoned baker, I hope you enjoy the process and savor every bite. After all, cooking is about more than just following a recipe—it’s about creating something that makes you feel good and brings joy to your table.

Print
clock clock iconcutlery cutlery iconflag flag iconfolder folder iconinstagram instagram iconpinterest pinterest iconfacebook facebook iconprint print iconsquares squares iconheart heart iconheart solid heart solid icon

Yufka Cheese Pie: A Comforting Delight for Every Occasion


  • Author: Paul
  • Total Time: 45 minutes
  • Yield: 46 servings 1x

Description

This Yufka Cheese Pie is a perfect balance of crispy, flaky yufka dough and a creamy, savory cheese filling. With minimal ingredients and simple steps, it’s an easy recipe that’s full of flavor. Whether served as a snack, light lunch, or appetizer, this dish brings the warmth and comfort of Mediterranean flavors to your table.


Ingredients

Scale
  • 2 ready-rolled yufka sheets (or phyllo dough)
  • 2 eggs
  • 1 cup (250 g) plain yogurt
  • 4 g salt (about 1/2 tsp)
  • 1/4 cup (50 ml) vegetable oil
  • 1/4 bunch parsley, finely chopped
  • 1 cup (150 g) grated white cheese (like feta, mozzarella, or a mix)

Instructions

  1. Preheat the Oven: Preheat your oven to 180°C (350°F).
  2. Prepare the Yufka Layers: Place one sheet of yufka dough on a clean surface. Brush it lightly with vegetable oil.
  3. Mix the Filling: In a bowl, beat the eggs and mix them with yogurt, salt, parsley, and grated cheese until well combined.
  4. Assemble the Pie: Spread half of the yogurt mixture evenly over the first yufka sheet.
  5. Layer the Second Sheet: Lay the second sheet of yufka dough over the filling, then spread the remaining yogurt mixture on top.
  6. Shape and Coat: Fold the edges of the yufka dough inward to form a rectangular shape. Brush the top with more oil to achieve a golden, crispy finish.
  7. Bake: Place the pie in the preheated oven and bake for 30-35 minutes, or until the top is golden and the filling is set.

Notes

  • Yufka Substitutes: If you can’t find yufka dough, phyllo dough works as a great alternative. Make sure to brush each layer with oil to prevent it from becoming too dry.
  • Filling Variations: Feel free to add sautéed vegetables, such as spinach or mushrooms, or even cooked chicken or ground meat to the filling for a heartier pie.
  • Freezing Tip: You can assemble the pie and freeze it before baking. To bake from frozen, add an extra 10-15 minutes of baking time.
  • Storage: Leftovers can be stored in an airtight container in the fridge for up to 3 days. Reheat in the oven to restore the crispy texture.
  • Prep Time: 10 minutes
  • Cook Time: 35 minutes
  • Category: Dessert
  • Method: Baking
  • Cuisine: Mediterranean-inspired

The Ultimate Energy Boost: Super-Energy Dessert

There’s something deeply satisfying about knowing you’ve fueled your body with exactly what it needs. I remember a few years ago when I started paying more attention to how the food I consumed affected my energy levels. I was always chasing that mid-afternoon slump—one cup of coffee, then another, trying to keep my energy up while juggling work, family, and everything else life threw my way.

One day, I hit a turning point. I decided to shift my focus from quick energy fixes to nourishing my body with whole, nutrient-packed foods. I wanted energy that would last throughout the day, not just a sugar rush followed by a crash. I started experimenting with different snack recipes, aiming to create something that would sustain me without the usual aftereffects of processed snacks.

And that’s when I came up with this Super-Energy Dessert—a powerhouse of seeds, oats, nuts, and dark chocolate. I realized that with the right ingredients, I could have an indulgent treat that was as energizing as it was satisfying. It became my go-to snack for boosting energy levels naturally, without relying on artificial stimulants or processed sugars.

This dessert has now become a staple in my kitchen, and it’s my secret weapon when I need a quick energy pick-me-up during a busy day. Packed with healthy fats, protein, and fiber, it’s a sweet, guilt-free treat that will leave you feeling nourished and energized. Whether you’re an athlete looking for a pre-workout snack or someone who simply wants to stay energized throughout the day, this dessert is for you.

What Makes This Dessert So Energizing?

The key to the Super-Energy Dessert lies in its ingredients. Each component is carefully selected for its energy-boosting properties. Let’s take a deeper dive into what makes this dessert not only delicious but incredibly nourishing.

Nutrient-Dense Seeds:

This dessert is loaded with a variety of seeds—pumpkin seeds, sunflower seeds, and flaxseeds. Each of these small but mighty seeds is packed with protein, healthy fats, and fiber, which work together to provide sustained energy. Flaxseeds, for example, are rich in omega-3 fatty acids, which are known to support heart health and brain function, while pumpkin and sunflower seeds are excellent sources of magnesium, which helps regulate energy levels in the body.

Oats for Long-Lasting Fuel:

Oats are a well-known energy powerhouse. Rich in complex carbohydrates, oats provide a slow and steady release of energy. Unlike sugary snacks that cause spikes and crashes in blood sugar, oats keep you feeling full longer and provide lasting energy throughout the day. They also contain a variety of B-vitamins that are essential for turning food into fuel, helping your body efficiently use the energy from the food you eat.

Healthy Fats from Nuts:

Almonds and peanuts are featured prominently in this dessert, and for good reason. Both nuts are rich in healthy fats, which are crucial for maintaining sustained energy. These fats, particularly monounsaturated fats, help stabilize blood sugar levels, keeping your energy steady. In addition to healthy fats, almonds and peanuts also provide protein, which helps in muscle recovery and keeps you feeling satisfied for longer.

Dark Chocolate for a Sweet Kick:

Let’s not forget the star of the show—dark chocolate. It’s not only delicious but also offers an array of health benefits. Dark chocolate (with a cocoa content of 70% or more) contains antioxidants, known as flavonoids, which have been shown to support cardiovascular health. Moreover, the natural caffeine and theobromine in dark chocolate provide a gentle energy boost without the jitteriness that often accompanies coffee or energy drinks. It’s the perfect addition to this dessert for both taste and a healthy energy lift.

Natural Sweeteners for Balanced Energy:

Honey is used in this dessert as a natural sweetener, adding just the right amount of sweetness without the blood sugar spikes that come with refined sugar. Honey contains antioxidants and has been shown to have anti-inflammatory properties. It also offers a quick energy boost, but since it’s combined with fiber-rich oats and protein-rich nuts, it doesn’t cause the crash that sugary treats often do.

Ingredients:

IngredientAmount
Peanuts100 g / 3.5 ounces
Oat flakes200 g / 7 ounces
Pumpkin seeds30 g / 1 ounce
Sunflower seeds30 g / 1 ounce
Almonds40 g / 1.4 ounces
Flaxseeds1 tbsp.
Honey2 tbsp. (or a little more)
Dark chocolate (without sugar)50 g / 1.7 oz
Salt flakesA pinch

Directions:

  1. In a large bowl, combine the peanuts, oat flakes, pumpkin seeds, sunflower seeds, almonds, and flaxseeds.
  2. Drizzle honey over the mixture and stir until everything is evenly coated.
  3. Break the dark chocolate into small pieces and melt it in the microwave or over a double boiler.
  4. Once melted, pour the chocolate over the mixture and stir thoroughly to combine.
  5. Sprinkle a pinch of salt flakes over the mixture and give it one last stir.
  6. Spread the mixture evenly onto a baking sheet lined with parchment paper.
  7. Refrigerate for at least one hour to allow the dessert to firm up.
  8. Once set, break the mixture into small, bite-sized pieces and serve.

Nutritional Information (per serving):

NutrientAmount
CaloriesApprox. 250-300 kcal per serving (depending on portion size)
Fat15-20 g (healthy fats from seeds and nuts)
Protein7-8 g
Carbs25-30 g (mostly from oats and honey)
Fiber4-6 g
Sugar5-7 g (mostly natural from honey and chocolate)
SodiumMinimal (depending on salt flakes used)

How to Incorporate This Super-Energy Dessert Into Your Routine

One of the best things about this dessert is its versatility. It’s perfect for various occasions and can be enjoyed at different times of the day to provide the energy you need. Here are a few ideas on how to incorporate it into your routine:

Pre-Workout Fuel:

If you’re looking for a pre-workout snack, this dessert is an excellent choice. The combination of healthy fats, protein, and slow-digesting carbohydrates provides a steady release of energy that can help you power through your workout. The chocolate also gives you a little extra boost, making it a great snack before heading to the gym.

Midday Snack:

When the afternoon slump hits, having a batch of this dessert on hand can be a lifesaver. Instead of reaching for sugary snacks or another cup of coffee, grab a piece of this Super-Energy Dessert. The high protein and fiber content will keep you full and energized, helping you stay focused and productive.

Breakfast Boost:

Looking for a nutritious breakfast that doesn’t require a lot of preparation? This dessert can double as a quick breakfast option. Pair it with a cup of green tea or your favorite smoothie, and you’ve got yourself a nutrient-packed meal to start the day.

Post-Workout Recovery:

After a workout, it’s essential to replenish your body with a combination of protein and healthy fats. This dessert does just that, making it an ideal post-workout treat. It helps with muscle recovery and provides the energy needed to keep your body functioning at its best.

Frequently Asked Questions (FAQs)

1. Can I make this dessert vegan?

Yes, absolutely! To make this dessert vegan, simply swap out the honey for maple syrup or agave nectar. You can also use a dairy-free chocolate option if needed. The rest of the ingredients are naturally plant-based.

2. Can I substitute the oats with something else?

While oats are a key ingredient in this recipe, you can try substituting them with other whole grains, such as quinoa flakes or amaranth. However, oats are ideal because they provide a great texture and are rich in fiber, making them a beneficial part of the recipe.

3. How long will this dessert stay fresh?

Once made, the Super-Energy Dessert will stay fresh in an airtight container in the refrigerator for up to a week. It can also be frozen for up to two months, allowing you to enjoy it whenever you need a quick, energizing snack.

4. Can I use other nuts instead of almonds and peanuts?

Yes! You can substitute any nuts you like in this recipe. Cashews, walnuts, or pistachios would all work wonderfully. Just keep in mind that different nuts may slightly alter the flavor and texture, but the energy-boosting benefits will still be there.

5. Is this dessert suitable for people with gluten sensitivities?

Yes, this dessert is naturally gluten-free as long as you ensure that the oats you use are certified gluten-free. Some oats are processed in facilities that also handle gluten-containing grains, so it’s always a good idea to check the packaging if you need to avoid gluten.

Conclusion: The Power of a Simple Dessert

In a world where quick fixes often come at the cost of long-term health, the Super-Energy Dessert stands out as a nourishing, guilt-free option that provides lasting energy. Packed with wholesome ingredients like seeds, nuts, and oats, it’s not just a treat for the taste buds—it’s a treat for your body.

The best part is that you can enjoy it knowing that it’s nourishing your body with healthy fats, fiber, and protein, all while offering a delicious sweetness from natural sources like honey and dark chocolate. Whether you’re looking to fuel up before a workout, need a midday snack, or want a satisfying post-workout treat, this dessert is versatile, easy to make, and full of nutrients.

The Super-Energy Dessert is more than just a recipe; it’s a testament to the power of simple, nutrient-dense foods that can elevate your energy, support your health, and satisfy your cravings in the best possible way.

So, the next time you need a boost, skip the processed snacks and enjoy a bite of this delicious, energizing treat. Your body will thank you!

Print
clock clock iconcutlery cutlery iconflag flag iconfolder folder iconinstagram instagram iconpinterest pinterest iconfacebook facebook iconprint print iconsquares squares iconheart heart iconheart solid heart solid icon

The Ultimate Energy Boost: Super-Energy Dessert


  • Author: Paul
  • Total Time: 1 hour 20 minutes
  • Yield: 1215 bite-sized pieces 1x

Description

This Super-Energy Dessert is the perfect balance of sweet, savory, and healthy, packed with seeds, nuts, oats, and dark chocolate. Designed to fuel your body with essential nutrients, it’s ideal for anyone looking for a boost in energy without the crash that comes from sugary snacks.


Ingredients

Scale
  • 100 g peanuts
  • 200 g oat flakes
  • 30 g pumpkin seeds
  • 30 g sunflower seeds
  • 40 g almonds
  • 1 tbsp flaxseeds
  • 2 tbsp honey (or a little more)
  • 50 g dark chocolate (without sugar)
  • Pinch of salt flakes

Instructions

  1. Prepare the Dry Ingredients: In a large bowl, mix together the peanuts, oat flakes, pumpkin seeds, sunflower seeds, almonds, and flaxseeds.
  2. Sweeten with Honey: Drizzle the honey over the dry ingredients and stir to coat everything evenly. You may add a little extra honey depending on how sweet you want your dessert.
  3. Melt the Chocolate: Break the dark chocolate into small pieces and melt it either in the microwave or using a double boiler. Stir the melted chocolate until smooth.
  4. Combine Everything: Pour the melted chocolate over the oat and nut mixture. Stir everything together thoroughly to ensure it is all well-coated.
  5. Add Salt: Sprinkle a pinch of salt flakes over the mixture, enhancing the flavors and balancing the sweetness.
  6. Chill and Set: Line a baking sheet with parchment paper and spread the mixture evenly over it. Refrigerate for about an hour or until the dessert firms up and becomes easier to break into pieces.
  7. Serve: Once set, break the mixture into bite-sized pieces and enjoy your homemade, energy-boosting snack.

Notes

  • Storage: Store the Super-Energy Dessert in an airtight container in the fridge for up to a week.
  • Substitutes: You can substitute the nuts or seeds with other options depending on your preferences. For example, walnuts or cashews can replace almonds, and chia seeds can replace flaxseeds.
  • Vegan Option: Use maple syrup or agave nectar instead of honey for a vegan-friendly version.
  • Sweetness Level: Adjust the honey amount based on how sweet you like your desserts. If you prefer it less sweet, reduce the honey or even eliminate it altogether.
  • Prep Time: 15 minutes
  • Cook Time: 5 minutes
  • Category: Dessert
  • Method: No-Bake
  • Cuisine: Healthy

Garden to Table: The Pea and Zucchini Bake That Feeds More Than Hunger

I still remember the quiet rhythm of my mother’s knife against the cutting board, the way her fingers nimbly turned simple vegetables into something warm, familiar, and deeply comforting. We never called it a casserole. It was just “the veggie bake,” something she’d throw together when the fridge was half-full and the garden was overly generous with zucchini.

It wasn’t a flashy dish. No crusty top, no golden panko crumbs. Just zucchini, peas, whatever herbs she had on hand, and a handful of cheese whisked in with eggs. She never measured. She cooked by feel, by instinct. As a child, I didn’t realize how special that kind of cooking was — how much love lived in those spontaneous creations.

This Pea and Zucchini Bake is a gentle echo of those evenings in the kitchen, the scent of parsley in the air, and the warmth of something lovingly made. Over time, I’ve adapted it — adding mushrooms for umami, celery for crunch, oats for a bit more heartiness. But the soul of it remains untouched. It’s humble, wholesome, and deeply nourishing — not just for the body, but for the heart.

Why This Bake Belongs in Your Kitchen

Some recipes earn a place in your regular rotation because they’re easy. Others stick around because they feel like home. This one is both.

At its heart, this bake is a celebration of vegetables. It’s flexible, affordable, and endlessly adaptable. More importantly, it’s the kind of food that leaves you feeling satisfied — not heavy, not guilty, just quietly full and content.

1. Zucchini: The Humble Hero

Zucchini often plays a supporting role in cooking — it’s the filler, the extra green, the thing you sneak into muffins. But here, zucchini gets to shine. Grated finely and baked gently, it releases just enough moisture to keep the dish tender while soaking up the flavor of herbs and cheese.

Not to mention, zucchini is rich in vitamin C, potassium, and antioxidants. It’s low in calories but high in satisfaction, especially when paired with hearty companions like peas and oats.

2. Sweet Green Peas: Nature’s Bright Note

There’s a sweetness that only peas can bring — that little pop of flavor that lifts every bite. Whether you’re using fresh, frozen, or even leftover peas from last night’s dinner, they add color, texture, and a dose of plant-based protein.

Peas are high in fiber and contain important nutrients like folate and manganese. They also help to balance out the savory depth of cheese and mushrooms.

3. Eggs and Cheese: The Binding Soul

The combination of eggs and cheese holds this bake together without making it too dense. Eggs provide structure and protein, while cheese adds richness and umami. Whether you use a sharp cheddar, mild mozzarella, or a blend of what you have in the fridge, the result is a creamy, golden bake with just the right amount of indulgence.

Ingredients

IngredientAmount
Zucchini2, grated
Celery stems3, chopped
Mushrooms7, sliced
Frozen peas300 grams
Fresh parsleyChopped, to taste
Green onionsChopped, to taste
Cheese150 grams, grated
Oatmeal6 tablespoons
Eggs3

Directions

  1. Preheat your oven to 180°C (350°F) and lightly grease a baking dish.
  2. In a large bowl, combine grated zucchini, chopped celery, sliced mushrooms, peas, parsley, and green onions.
  3. Add the grated cheese and oatmeal.
  4. Beat the eggs and pour them into the bowl. Mix until everything is well combined.
  5. Season with salt and pepper if desired.
  6. Transfer the mixture to the prepared baking dish and spread evenly.
  7. Bake for 30–35 minutes or until the top is golden and the center is set.
  8. Let it rest for a few minutes before slicing. Serve warm or at room temperature.

Nutritional Info (Per Serving – Approx. 6 servings)

NutrientAmount (approx.)
Calories185 kcal
Protein9 g
Carbohydrates14 g
Dietary Fiber3 g
Sugars3 g
Fat10 g
Saturated Fat3.5 g
Sodium180 mg
Calcium120 mg

Versatility at Its Best

One of the best things about this recipe is how adaptable it is. Here are a few ideas for how you can make it your own:

  • Add-ins: Chopped red bell peppers, grated carrots, or even a handful of spinach can seamlessly join the mix.
  • Protein boost: Add cooked lentils or shredded chicken if you’re looking to make it more filling.
  • Dairy-free: Use plant-based cheese and swap the eggs with flax eggs or a chickpea flour mixture.
  • Grain swap: Instead of oats, try cooked quinoa, bulgur, or even brown rice.
  • Flavor kicks: A pinch of smoked paprika, a grating of nutmeg, or a crumble of feta can take this bake in a new direction.

Perfect for Any Occasion

This isn’t just a dinner recipe. It fits into your day wherever you need it:

  • Brunch: Serve it warm with a dollop of Greek yogurt and crusty bread.
  • Lunchbox: It’s great cold or at room temperature, so it’s lunch-friendly for work or school.
  • Light dinner: Pair it with a crisp salad and a lemon vinaigrette.
  • Make-ahead: Bake once, eat for days. It reheats beautifully.

It’s also naturally vegetarian, making it a fantastic centerpiece for meatless Mondays or when you’re feeding a mixed crowd.

Tips for Getting It Just Right

  • Grate and squeeze the zucchini: If your zucchinis are very watery, give them a gentle squeeze before mixing to avoid sogginess.
  • Don’t overmix: Just combine the ingredients until they come together — this keeps the texture tender.
  • Use a well-greased baking dish: Helps the bake release easily and gives you those golden edges.
  • Let it rest before slicing: It firms up slightly as it cools, making it easier to cut clean slices.

FAQs About the Pea and Zucchini Bake

Can I use fresh peas instead of frozen?
Absolutely. Just blanch them for 1–2 minutes in boiling water to soften slightly before adding.

Is this recipe gluten-free?
Yes — as long as you use certified gluten-free oats. It’s a great naturally gluten-free option without any special substitutions.

What type of cheese works best?
This recipe is forgiving. Cheddar, mozzarella, gouda, or a mild feta all work beautifully. You can even combine a couple for added depth.

Can I make it ahead of time?
Yes. You can prepare the mixture in the morning and bake it later. Or bake it fully and refrigerate — it reheats well in the oven or microwave.

Can it be frozen?
Yes. Bake it, let it cool, and then wrap slices individually. Thaw overnight in the fridge and reheat before serving.

What if I don’t have mushrooms?
You can leave them out or replace them with another veggie like finely chopped broccoli, spinach, or even sun-dried tomatoes.

How do I store leftovers?
Store in an airtight container in the fridge for up to 4–5 days. You can also freeze for up to 2 months.

Conclusion: A Recipe Rooted in Nourishment

The Pea and Zucchini Bake isn’t just a clever way to use up vegetables — it’s a reflection of how comforting and creative cooking can be. It’s the kind of dish you throw together with what you have, only to discover it’s exactly what you needed.

For me, it’s become a symbol of balance — between healthy and hearty, simple and satisfying, past and present. It reminds me of my mother’s quiet generosity, of cozy family dinners and the joy of turning the ordinary into something special.

I hope it finds a place in your home too — whether you’re cooking for your kids, packing lunch for the week, or simply nourishing yourself with something that tastes like care.

Print
clock clock iconcutlery cutlery iconflag flag iconfolder folder iconinstagram instagram iconpinterest pinterest iconfacebook facebook iconprint print iconsquares squares iconheart heart iconheart solid heart solid icon

Garden to Table: The Pea and Zucchini Bake That Feeds More Than Hunger


  • Author: Paul
  • Total Time: 45 minutes
  • Yield: 46 servings 1x

Description

This Pea and Zucchini Veggie Bake is a delightful, wholesome dish that brings together the best of fresh vegetables, cheese, and oats. Perfect for a light dinner or a satisfying lunch, it’s a colorful, nutrient-packed bake that’s easy to prepare and perfect for meal prep. It’s a savory, comforting dish your whole family will love.


Ingredients

Scale
  • 2 zucchinis, grated
  • 3 celery stems, chopped
  • 7 mushrooms, sliced
  • 300 grams frozen peas
  • Fresh parsley, chopped (to taste)
  • Fresh green onions, chopped (to taste)
  • 150 grams cheese, grated (cheddar, mozzarella, or your choice)
  • 6 tablespoons oatmeal
  • 3 eggs

Instructions

  1. Preheat your oven to 180°C (350°F) and grease a baking dish with a light coating of oil or butter.
  2. In a large bowl, combine the grated zucchini, chopped celery, sliced mushrooms, peas, parsley, and green onions.
  3. Add the grated cheese and oatmeal to the vegetable mixture and mix well.
  4. Beat the eggs in a separate bowl and then pour them into the vegetable mixture. Stir everything together until it’s evenly combined.
  5. Season with salt and pepper to taste.
  6. Transfer the mixture into your prepared baking dish and spread it out evenly.
  7. Bake for 30-35 minutes, or until the top is golden and the center is set.
  8. Remove from the oven and let it cool for a few minutes before slicing and serving.

Notes

  • Vegan Variation: You can make this dish vegan by using a plant-based cheese alternative and flax or chia eggs instead of regular eggs.
  • Storage: Leftovers can be stored in the fridge for up to 3 days and can be reheated in the oven or microwave. It also freezes well for up to 2 months.
  • Add-ins: Feel free to experiment with other vegetables like bell peppers, spinach, or carrots. You can also add a protein like cooked chicken or lentils for extra heartiness.
  • Gluten-Free Option: Use gluten-free oats or another gluten-free grain in place of regular oats for a gluten-free variation.
  • Prep Time: 10 minutes
  • Cook Time: 35 minutes
  • Category: Main Dish
  • Method: Baking
  • Cuisine: Vegetarian

Banana & Oatmeal Energy Bites: Wholesome Snacks for Heart and Home

Some recipes carry the comfort of memory. Not because they were passed down for generations, or scribbled in a grandmother’s notebook, but because they simply happened in a moment when you needed them most. This banana and oatmeal snack came to life one quiet morning when time was short, the kitchen was nearly bare, and I needed something nourishing to keep me going.

It wasn’t anything planned. A ripe banana, a cup of oats, some nuts in the back of the cupboard, and a spark of inspiration from a need for something natural — something real. I remember pressing the sticky mixture into bite-sized rounds and letting them chill while I cleaned up. They weren’t fancy, but the first bite brought such a sense of satisfaction. Sweet, chewy, slightly nutty, and bright with lemon — they were like energy packed into tiny, joyful rounds.

Since then, these bites have become a staple in my kitchen. They’ve been lunchbox saviors, post-yoga rewards, road trip companions, and thoughtful little gifts wrapped in parchment and string. They remind me that food doesn’t always have to be extravagant to be extraordinary. Sometimes, it’s the most humble recipes that stay with us the longest.

Why These Bites Are More Than Just a Snack

Energy bites have surged in popularity over the past decade, and for good reason. They offer a perfect blend of nutrients in a small, portable form. But this recipe — combining oatmeal, banana, walnuts, and seeds — brings something special to the table.

Let’s explore what makes them stand out.

1. A Natural Energy Boost

Unlike sugary granola bars or processed snacks, these bites rely on the natural sweetness of ripe banana and the slow-burning carbs in oats to give you sustainable energy. Oats are rich in soluble fiber, which helps regulate blood sugar levels and keeps hunger at bay. Bananas, on the other hand, provide quick-release glucose along with potassium and vitamin B6, supporting muscle function and brain health.

2. Heart-Healthy Fats

Walnuts and pumpkin seeds are known for their heart-protective benefits. They’re packed with omega-3 fatty acids, antioxidants, and magnesium — all crucial for maintaining a healthy cardiovascular system. A tablespoon of sesame seeds adds a subtle crunch along with calcium and iron.

These bites aren’t just tasty. They’re engineered by nature to fuel your body with kindness.

3. Perfect for All Ages

Whether you’re feeding toddlers or teenagers, active adults or aging parents, these bites check all the boxes. They’re soft and chewable, but dense and satisfying. You can even shape them into bars for easier packing in lunchboxes or picnic bags.

No added refined sugar, no gluten (if using certified oats), and no dairy — they fit most dietary needs and are endlessly adaptable.

Ingredients

IngredientAmount
Oatmeal1 cup
Walnuts1 cup
Vanilla sugar1 tablespoon
Sesame seeds1 tablespoon
Pumpkin seeds40 grams
Banana1, ripe
Lemon juiceA squeeze (to taste)

Directions

  1. In a food processor, combine the walnuts, oatmeal, sesame seeds, and pumpkin seeds. Pulse until the mixture becomes coarse and crumbly.
  2. Add the ripe banana, vanilla sugar, and a squeeze of lemon juice. Blend again until a sticky mixture forms.
  3. Scoop out small portions and roll them into bite-sized balls or flatten them into mini bars.
  4. Chill in the refrigerator for at least 30 minutes to firm up.
  5. Store in an airtight container in the fridge for up to 5 days.

Nutrient Breakdown (per serving, approx. 12 servings)

NutrientAmount (approx.)
Calories110 kcal
Protein3 g
Carbohydrates10 g
Dietary Fiber2 g
Sugars3 g (natural)
Fat7 g
Saturated Fat0.7 g
Sodium1 mg
Potassium110 mg

Ideas to Customize Your Bites

The basic formula is solid, but once you’ve made these a couple of times, you’ll be inspired to play. Here are a few variations to try:

  • Add spice: Cinnamon, cardamom, or ground ginger can add depth and warmth.
  • Chocolate twist: Mix in a few dark chocolate chips or cacao nibs for an indulgent flair.
  • Coconut dream: Roll the bites in unsweetened shredded coconut for added texture.
  • Nut-free version: Swap walnuts for sunflower seeds if you need an allergy-safe snack.
  • Protein punch: Add a scoop of unflavored or vanilla protein powder for an extra boost.

The possibilities are truly endless — all you need is one bowl, one ripe banana, and a bit of imagination.

Storage and Shelf Life

These bites are not just delicious — they’re practical. Once made, they store beautifully:

  • Refrigerator: Keep them in an airtight container for up to 5–7 days.
  • Freezer: Freeze on a tray, then store in a bag or container. They’ll last for up to 3 months. Just thaw for a few minutes before eating.

Whether you prep a batch on Sunday or make them fresh in the morning, they’ll be ready to grab whenever you need a pick-me-up.

Serving Suggestions

These bites are a snack at heart, but they can be more:

  • Pair with Greek yogurt and fruit for a light breakfast.
  • Enjoy with a cup of tea in the afternoon.
  • Crumble over smoothie bowls or porridge.
  • Take them on hikes or long car rides.
  • Use them as a post-workout recovery snack.

They’re also a thoughtful addition to care packages or new parent food baskets. A little love, packed with nutrients.

Frequently Asked Questions

Can I bake these bites instead of chilling them?

Yes, if you prefer a firmer, cookie-like texture, you can bake them at 180°C (350°F) for about 10–12 minutes. They’ll come out lightly golden and hold together well.

Can I use instant oats or steel-cut oats?

Rolled oats are best for this recipe, offering the perfect balance of chewiness and absorbency. Instant oats can be used in a pinch, but the texture will be softer. Steel-cut oats are not recommended unless pre-cooked.

What can I substitute for walnuts?

You can use almonds, pecans, sunflower seeds, or even tahini if you want a nut-free version. Just keep the same quantity for balance.

Can I make this recipe vegan?

It already is! No dairy, eggs, or animal products are used. Just make sure your vanilla sugar or added mix-ins (like chocolate chips) are plant-based.

How do I know when they’re chilled enough?

After about 30 minutes in the fridge, they should be firm to the touch. If you’re in a hurry, pop them in the freezer for 10–15 minutes.

Why This Recipe Belongs in Your Kitchen

In today’s fast-paced world, we often reach for convenience at the expense of health. But this recipe is a gentle reminder that you don’t have to choose between the two. With just a few pantry staples, a banana, and five minutes of effort, you can create something that feels indulgent and nourishing at the same time.

It’s about simplicity, yes. But also about intention — taking a moment to feed yourself something real.

Whether you’re making them with kids on a rainy afternoon, packing them into a work bag, or enjoying them solo with your morning coffee, these little bites have a way of grounding you. They’re more than just snacks. They’re a return to the kind of food that gives back.

Conclusion: Nourish, One Bite at a Time

Not every recipe needs a long story. But sometimes, the ones that show up unexpectedly — the ones you create out of what you already have — become part of your rhythm. These banana and oatmeal energy bites are one of those recipes.

They’re not complicated. They’re not fussy. But they are full of heart.

So next time you find yourself with a soft banana on the counter and a moment to spare, give this recipe a try. Shape them with your hands, chill them with love, and enjoy the kind of snack that feeds more than just hunger.

It feeds intention, comfort, and care — one bite at a time.

Print
clock clock iconcutlery cutlery iconflag flag iconfolder folder iconinstagram instagram iconpinterest pinterest iconfacebook facebook iconprint print iconsquares squares iconheart heart iconheart solid heart solid icon

Banana & Oatmeal Energy Bites: Wholesome Snacks for Heart and Home


  • Author: Paul
  • Total Time: 40 minutes
  • Yield: 12 bites 1x

Description

These no-bake banana and oatmeal bites are packed with wholesome ingredients like walnuts, seeds, and a hint of vanilla. Naturally sweet and delightfully chewy, they’re the perfect snack to fuel your day — whether you’re on the go or enjoying a quiet moment at home.


Ingredients

Scale
  • 1 cup oatmeal
  • 1 cup walnuts
  • 1 tablespoon vanilla sugar
  • 1 tablespoon sesame seeds
  • 40 grams pumpkin seeds
  • 1 ripe banana
  • A squeeze of lemon juice

Instructions

  1. Add the walnuts, oatmeal, sesame seeds, and pumpkin seeds to a food processor. Pulse until the mixture is crumbly.
  2. Add the banana, vanilla sugar, and a squeeze of lemon juice. Blend again until a sticky dough forms.
  3. Scoop small portions and roll into balls. Optionally, flatten them slightly into discs.
  4. Place in the refrigerator for at least 30 minutes to firm up.
  5. Store in an airtight container in the fridge for up to 5 days.

Notes

  • You can substitute other seeds (like chia or sunflower) for variety.
  • To make them vegan and sugar-free, replace vanilla sugar with pure vanilla extract and add a touch of maple syrup if more sweetness is desired.
  • Add a pinch of cinnamon or nutmeg for warmth and flavor variation.
  • Great for meal prep, school snacks, or as a healthier dessert option.
  • Prep Time: 10 minutes
  • Category: Snack
  • Method: No-Bake
  • Cuisine: International

Green & Glorious: A Pea and Zucchini Bake That Nourishes the Soul

There’s something deeply comforting about a warm oven dish coming together on a quiet afternoon — especially one that’s packed with green goodness and soft, savory aromas. This Pea and Zucchini Veggie Bake is more than just a healthy option. For me, it’s a nostalgic dish with roots in simplicity and the gentle creativity of home cooking.

I first made this bake during a summer visit to my grandmother’s house in the countryside. Her kitchen always had this effortless way of turning what was fresh and available into something that felt special. That particular day, her garden had overflowed with zucchinis, and the freezer was well-stocked with peas from earlier harvests. She didn’t believe in wasting anything. In her world, everything had potential.

She didn’t follow a recipe, of course. A bit of this, a handful of that, a few eggs to bind — and out came a golden, cheesy bake with steam rising as it hit the table. We ate it outdoors, birds chirping, with cool glasses of lemonade and simple joy. Since then, I’ve adapted that freeform spirit into this structured, flavorful dish — one that I come back to whenever I need nourishment that feels a little like a hug.

Why This Recipe Works for Every Table

This veggie bake is ideal for just about any meal. It’s incredibly versatile, nutrient-rich, and easy to make. Whether you’re feeding picky eaters, trying to eat more plant-based, or simply craving something warm and comforting, this recipe fits the moment.

Here’s why it shines:

1. It’s Flexible by Nature

The stars of this bake — zucchini, peas, and mushrooms — are common, easy-to-find ingredients. But the dish welcomes substitutions without compromising flavor. Swap peas for corn, add red bell peppers, or throw in chopped spinach for extra greens. It’s a recipe that allows creativity and accommodates seasonal produce beautifully.

2. It’s Packed with Plant-Based Nutrition

Zucchini provides hydration and fiber, while peas deliver plant protein and sweetness. Mushrooms bring umami and minerals, and oats work as a wholesome, gluten-friendly binding agent. With eggs and cheese for richness and protein, it’s a satisfying dish that won’t leave you missing meat.

3. Great for Make-Ahead and Meal Prep

This bake stores wonderfully and reheats even better. It’s perfect for meal planning, lunchboxes, brunch spreads, or a light dinner with soup or salad. It slices well and can be frozen in portions for busy weeks.

Ingredients

IngredientAmount
Zucchini, grated2
Celery stems, chopped3
Mushrooms, sliced7
Frozen peas300 grams
Fresh parsley, choppedAs desired
Green onions, choppedAs desired
Cheese, grated150 grams
Oatmeal6 tablespoons
Eggs3
Salt and pepperTo taste

Directions

  1. Preheat and Prep: Preheat your oven to 180°C (350°F). Lightly grease or line a baking dish.
  2. Mix the Vegetables: In a large bowl, combine the grated zucchini, chopped celery, sliced mushrooms, and peas.
  3. Add Fresh Flavor: Stir in chopped parsley and green onions for a burst of freshness.
  4. Bind the Mixture: Add the grated cheese, oatmeal, and eggs. Season generously with salt and pepper. Mix until fully combined.
  5. Bake to Perfection: Pour the mixture into the prepared dish and spread evenly. Bake for 30–35 minutes or until golden on top and firm in the center.
  6. Cool and Serve: Let it rest for a few minutes before slicing. Serve warm or at room temperature.

Nutrient Breakdown (per serving, serves approx. 6)

NutrientAmount (approx.)
Calories230–260 kcal
Protein12–14 g
Carbohydrates18–20 g
Fat12–14 g
Fiber4–5 g
CalciumModerate–High
IronModerate

The Appeal of Bakes: Simple, Yet So Nourishing

There’s something about baked dishes that feels inherently homey. A bake like this one doesn’t rely on fancy cooking techniques or complicated prep. It’s made in one bowl, poured into a dish, and cooked slowly until golden. That kind of effortlessness is exactly what makes it magical.

The texture is one of the highlights: soft and tender in the center with slightly crispy, cheesy edges. The oats give it a subtle bite, the cheese melts into creamy pockets, and the zucchini melts into the dish while keeping it moist and light.

Serving Suggestions: Elevate the Everyday

Here are a few favorite ways to serve your Pea and Zucchini Bake:

  • Brunch Boards: Cut the bake into small squares and serve with smoked salmon, avocado slices, and cherry tomatoes.
  • Light Dinners: Pair it with a tangy arugula or citrus-dressed salad and a glass of chilled white wine.
  • Lunchbox Hero: It travels well and tastes great cold or warm — perfect with a dollop of herbed yogurt or hummus.
  • Side Dish Upgrade: Serve it alongside grilled chicken, tofu skewers, or roasted vegetables for a well-rounded meal.

Storage and Reheating Tips

Once cooled, the bake can be refrigerated in an airtight container for up to 4 days. To reheat, place in a preheated oven at 180°C (350°F) for 10–12 minutes or until warmed through. You can also microwave individual portions, though the oven helps maintain its texture best.

If freezing, wrap portions individually. To reheat from frozen, thaw in the fridge overnight, then bake until heated thoroughly.

Frequently Asked Questions

Can I make this recipe dairy-free?

Yes, absolutely. Swap the cheese for a plant-based alternative or nutritional yeast. Use unsweetened plant-based milk in place of regular milk. The texture remains lovely with just a bit of tweaking.

Can I make it gluten-free?

Oats are naturally gluten-free, but make sure to use certified gluten-free oats to avoid cross-contamination. Also, avoid any flour-based additions or thickeners unless they are gluten-free.

What’s the best way to keep the bake from becoming soggy?

Make sure to squeeze out any excess moisture from the grated zucchini. You can use a clean tea towel or cheesecloth. Also, avoid using too much liquid — the eggs and cheese do the binding work perfectly.

Is this recipe kid-friendly?

Definitely. The soft texture and cheesy flavor are usually a big hit with children. If they’re picky about seeing greens, you can finely grate or chop the vegetables so they blend more invisibly into the bake.

Can I serve this cold?

Yes — it actually tastes delicious chilled or at room temperature. It makes a great picnic item or easy lunch straight from the fridge.

How do I make this richer or more indulgent?

You can add a splash of cream to the mixture, use a blend of cheeses (like mozzarella and sharp cheddar), or top with breadcrumbs and extra cheese before baking for a gratin-style finish.

Nutrition at a Glance

While specific nutritional values will vary based on the exact ingredients used, this bake is generally:

  • High in fiber thanks to peas, celery, and zucchini
  • A good source of protein from eggs, cheese, and peas
  • Low in added fat, depending on your choice of cheese and milk
  • Rich in vitamins A, C, and K from fresh vegetables
  • Great for supporting digestion and overall energy

Conclusion: A Dish That Brings Us Back to the Basics

This Pea and Zucchini Veggie Bake is more than just a recipe. It’s a reminder that the most wholesome meals are often the simplest. No heavy sauces, no long lists of ingredients — just fresh vegetables, a bit of binding, and the magic of the oven.

It’s the kind of dish you make when you want to feed the people you love something hearty and nourishing. It invites you to use what you have, to trust your taste, and to enjoy the quiet satisfaction of pulling something homemade and golden from the oven.

As you prepare this dish, maybe you’ll feel a little of what I did that summer in my grandmother’s garden kitchen — gratitude for simplicity, joy in creating, and peace in knowing that yes, vegetables can absolutely be the star of the plate.

Print
clock clock iconcutlery cutlery iconflag flag iconfolder folder iconinstagram instagram iconpinterest pinterest iconfacebook facebook iconprint print iconsquares squares iconheart heart iconheart solid heart solid icon

Green & Glorious: A Pea and Zucchini Bake That Nourishes the Soul


  • Author: Paul
  • Total Time: 50 minutes
  • Yield: 46 servings 1x

Description

A vibrant, savory bake loaded with zucchini, sweet peas, mushrooms, and herbs, bound together with eggs and cheese. This hearty, wholesome dish is easy to make, full of texture, and perfect for brunch, lunch, or a light dinner.


Ingredients

Scale
  • 2 zucchini, grated
  • 3 celery stems, chopped
  • 7 mushrooms, sliced
  • 300 grams frozen peas
  • Fresh parsley, chopped (as desired)
  • Fresh green onions, chopped (as desired)
  • 150 grams cheese, grated
  • 6 tablespoons oatmeal
  • 3 eggs
  • Salt and pepper, to taste
  • Oil or butter for greasing the baking dish

Instructions

  1. Preheat your oven to 180°C (350°F) and grease a baking dish with oil or butter.
  2. In a large bowl, mix the grated zucchini, chopped celery, sliced mushrooms, and peas.
  3. Add chopped parsley and green onions for fresh flavor.
  4. Stir in the grated cheese and oatmeal.
  5. Crack in the eggs, season with salt and pepper, and mix until fully combined.
  6. Pour the mixture into the prepared baking dish and spread evenly.
  7. Bake for 30–35 minutes, or until the top is golden and the center is set.
  8. Let cool for a few minutes before slicing. Serve warm or at room temperature.

Notes

  • For extra flavor, try adding garlic powder, smoked paprika, or a pinch of chili flakes.
  • You can use quick oats if you don’t have oatmeal.
  • This dish stores well in the fridge and can be reheated or enjoyed cold the next day.
  • Great as a main course with a salad or as a side with grilled protein.
  • Prep Time: 15 minutes
  • Cook Time: 35 minutes
  • Category: Main Dish
  • Method: Baking
  • Cuisine: Comfort Food