

There are certain dishes that take you back to a time and place, filling you with nostalgia and warmth. The Yufka Cheese Pie is one of those dishes for me. Growing up, I would visit my grandmother’s house, where the scent of fresh, flaky pastries would greet me as I walked in. Yufka, a delicate pastry dough, would be laid out on the counter, filled with savory cheese and herbs, then baked to golden perfection. The warmth of the kitchen, the chatter around the table, and the joy of sharing a homemade meal with family are memories I hold dear.
Today, I want to share that experience with you through this recipe. The Yufka Cheese Pie is simple, yet incredibly satisfying. It’s the kind of dish that brings people together, whether you’re enjoying it on a quiet afternoon or sharing it with friends and family at a gathering. The crispy, buttery layers of yufka paired with the creamy cheese filling create a comforting experience that transcends time and place.
The Origins of Yufka: A Pastry of Tradition
The yufka dough, a cornerstone of many Mediterranean and Middle Eastern cuisines, is a type of unleavened flatbread that is paper-thin and delicate. It’s often used in a variety of savory and sweet dishes, from layered pies like this Yufka Cheese Pie to the famous baklava. Its origins trace back to the rich culinary traditions of Turkey, where yufka is considered an essential ingredient in many home-cooked meals.
The beauty of yufka lies in its simplicity. Unlike puff pastry, which is made by folding butter into dough, yufka is rolled out by hand, creating a thin sheet that can be layered with fillings. Its versatility makes it the perfect dough for everything from sweet baklava to savory pies like this one.
Ingredients:
| Ingredient | Amount |
|---|---|
| Ready-rolled yufka sheets (or phyllo dough) | 2 sheets |
| Eggs | 2 |
| Plain yogurt | 1 cup (250 g) |
| Salt | 4 g (about 1/2 tsp) |
| Vegetable oil | 1/4 cup (50 ml) |
| Parsley, finely chopped | 1/4 bunch |
| Grated white cheese | 1 cup (150 g) |
Directions:
- Preheat the Oven: Start by preheating your oven to 180°C (350°F).
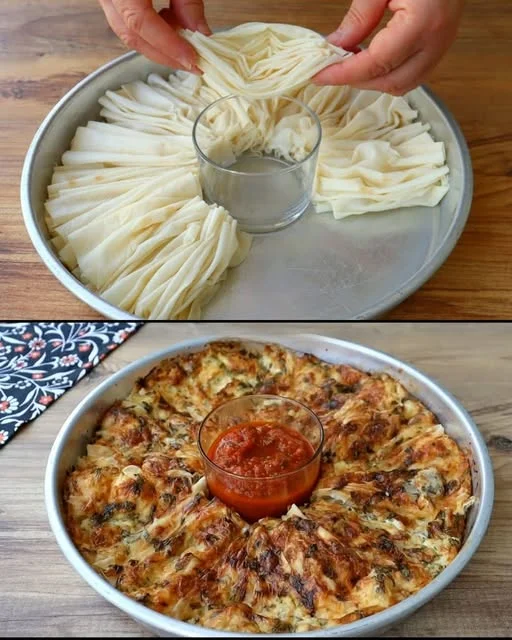
- Prepare the First Layer: Lay one sheet of yufka dough on a clean surface and brush it lightly with vegetable oil.
- Mix the Filling: In a mixing bowl, beat the eggs and combine them with yogurt, salt, chopped parsley, and grated cheese.
- Assemble the Pie: Spread half of the yogurt mixture evenly over the yufka sheet.
- Add the Second Layer: Place the second sheet of yufka on top, and repeat the process with the remaining yogurt mixture.
- Shape and Coat: Carefully fold in the edges to form a rectangular shape, then brush the top with oil to give it a golden, crispy finish.
- Bake the Pie: Place the pie in the oven and bake for 30-35 minutes or until the top is golden and crispy.
Nutritional Information (Per Serving):
| Nutrient | Value |
|---|---|
| Calories | 250 kcal |
| Protein | 9 g |
| Fat | 18 g |
| Carbohydrates | 17 g |
| Fiber | 2 g |
Why This Yufka Cheese Pie Will Become Your New Favorite Recipe
This Yufka Cheese Pie stands out not only for its rich, savory filling but also for how effortlessly it comes together. In just a few steps, you can have a delicious pie that is both comforting and sophisticated. It’s perfect for so many occasions: an easy dinner after a long day, a tasty lunch to pack for work, or even a dish to impress guests at a casual gathering.
What I love most about this recipe is how it takes something simple—like eggs, yogurt, and cheese—and turns them into something that feels special. The yufka dough, when baked, becomes crispy and golden, providing a satisfying crunch that contrasts beautifully with the creamy filling. The fresh parsley adds a burst of color and freshness, and the mild tanginess from the yogurt balances the richness of the cheese. Every bite is a little bit of heaven.
The Benefits of Homemade Pastry
When I first learned to make yufka at home, I was surprised by how easy it was and how much better it tasted than store-bought versions. There’s something incredibly rewarding about making your own dough, watching it come together, and then seeing it transform into a beautiful pie in the oven. The aroma that fills the kitchen while it bakes is enough to make anyone’s mouth water. Homemade yufka dough has a depth of flavor and texture that simply can’t be replicated by store-bought options, and it’s an experience worth trying.
If you’ve never made yufka before, don’t worry! It’s a forgiving dough, and even if your sheets aren’t perfect, the end result will still be delicious. If you’d like to save time, you can always use pre-made yufka or phyllo dough, which are both available in most grocery stores.
Frequently Asked Questions (FAQs)
1. Can I use phyllo dough instead of yufka for this recipe?
Yes! While yufka dough is traditional for this pie, phyllo dough is a great substitute and is more readily available. Just be sure to handle it gently, as it can dry out quickly. You may need to brush each layer with oil to prevent it from becoming too brittle.
2. Can I freeze this pie before baking it?
Absolutely! You can assemble the pie and freeze it for up to three months. Simply cover it with plastic wrap and foil, and when you’re ready to bake, remove it from the freezer and bake it from frozen. It may take an extra 10-15 minutes of baking time, so keep an eye on it until the top is golden and crispy.
3. Can I make this pie vegetarian?
Yes, this Yufka Cheese Pie is already vegetarian. The combination of eggs, yogurt, and cheese creates a rich, savory filling that is both satisfying and flavorful.
4. What other fillings can I add to this pie?
While cheese and parsley are the traditional filling for this pie, you can get creative with your ingredients! Consider adding sautéed spinach, mushrooms, or even ground meat if you want a heartier option. The possibilities are endless, and each variation will bring its own unique flavor to the dish.
5. Can I use non-dairy alternatives for the yogurt and cheese?
Yes! You can easily substitute plant-based yogurt and cheese for the dairy versions. Just make sure to choose options that have a similar texture and flavor to the original ingredients to maintain the integrity of the pie.
6. How long will leftovers keep?
Leftover Yufka Cheese Pie can be stored in an airtight container in the fridge for up to 3 days. Reheat it in the oven to restore its crispy texture.
The Versatility of Yufka Cheese Pie
This dish is incredibly versatile. It’s equally at home at a cozy dinner for two or as part of a larger spread at a family gathering. It can be served warm or at room temperature, making it a fantastic option for meal prep or potlucks. And because it’s made with simple, wholesome ingredients, it’s a recipe that you can feel good about serving to loved ones.
Serving Suggestions
This Yufka Cheese Pie pairs beautifully with a simple side salad, a dollop of yogurt, or a drizzle of olive oil and a sprinkle of fresh herbs. The pie itself is rich and flavorful, so lighter, refreshing sides work best to balance the meal.
Conclusion: A Slice of Comfort in Every Bite
The Yufka Cheese Pie is more than just a dish; it’s a piece of culinary heritage that has the power to bring people together. Whether you’re baking it for a family dinner, a casual gathering with friends, or just for yourself, it offers a comforting and satisfying experience that is both simple and extraordinary. The flaky, buttery layers of yufka, combined with the creamy cheese filling, create a dish that is as satisfying as it is delicious.
There’s something special about sharing a homemade meal, especially one that brings back memories of family and tradition. With this recipe, I hope you can create your own moments of warmth and connection, just like I have with my own family over the years. Whether it’s your first time making this pie or you’re a seasoned baker, I hope you enjoy the process and savor every bite. After all, cooking is about more than just following a recipe—it’s about creating something that makes you feel good and brings joy to your table.
Yufka Cheese Pie: A Comforting Delight for Every Occasion
Ingredients
Method
- Preheat the Oven: Preheat your oven to 180°C (350°F).
- Prepare the Yufka Layers: Place one sheet of yufka dough on a clean surface. Brush it lightly with vegetable oil.
- Mix the Filling: In a bowl, beat the eggs and mix them with yogurt, salt, parsley, and grated cheese until well combined.
- Assemble the Pie: Spread half of the yogurt mixture evenly over the first yufka sheet.
- Layer the Second Sheet: Lay the second sheet of yufka dough over the filling, then spread the remaining yogurt mixture on top.
- Shape and Coat: Fold the edges of the yufka dough inward to form a rectangular shape. Brush the top with more oil to achieve a golden, crispy finish.
- Bake: Place the pie in the preheated oven and bake for 30-35 minutes, or until the top is golden and the filling is set.
Notes
- Yufka Substitutes: If you can’t find yufka dough, phyllo dough works as a great alternative. Make sure to brush each layer with oil to prevent it from becoming too dry.
- Filling Variations: Feel free to add sautéed vegetables, such as spinach or mushrooms, or even cooked chicken or ground meat to the filling for a heartier pie.
- Freezing Tip: You can assemble the pie and freeze it before baking. To bake from frozen, add an extra 10-15 minutes of baking time.
- Storage: Leftovers can be stored in an airtight container in the fridge for up to 3 days. Reheat in the oven to restore the crispy texture.