Potato and Minced Meat Roll: A Neighborhood Envy

Get ready to wow everyone at the dinner table with this simple yet incredibly tasty Potato and Minced Meat Roll. It’s the perfect dish to make if you’ve got some potatoes and meat lying around. Trust us, this dish will disappear as soon as it hits the table!

What You Need:

For the Potato Base:

  • 3 large potatoes (about 900 grams)
  • 300 grams of cheddar cheese, grated
  • 2 tablespoons vegetable oil (about 20 ml)
  • 4 grams of salt

For the Meat Filling:

  • 500 grams of ground beef
  • 2 tablespoons vegetable oil (about 20 ml)
  • 1 onion, finely chopped
  • 3 green peppers, diced
  • 1 red pepper, diced
  • 3 cloves of garlic, minced
  • 2 tablespoons tomato sauce (about 25 grams)
  • 1 teaspoon tomato paste (about 20 grams)
  • A dash each of paprika, black pepper, cumin, thyme, and salt to taste
  • 3-4 sprigs of parsley, chopped

Let’s Make It:

  1. Prepare the Potatoes:
    • Start by peeling and grating the potatoes. Squeeze out any excess water.
    • Mix the grated potatoes with salt and 2 tablespoons of vegetable oil. Spread this mixture onto a baking tray lined with parchment paper, creating a thin, even layer.
    • Bake in a preheated oven at 200°C (about 400°F) for 20-25 minutes, or until the edges start to turn golden.
  2. Cook the Meat Filling:
    • While the potatoes are baking, heat 2 tablespoons of vegetable oil in a pan. Add the chopped onion, green and red peppers, and minced garlic. Sauté until they start to soften.
    • Add the ground beef to the pan, breaking it apart with a spoon. Cook until it’s no longer pink.
    • Stir in the tomato sauce, tomato paste, and your chosen spices. Cook for a few more minutes until everything is well combined. Finish by stirring in the chopped parsley.
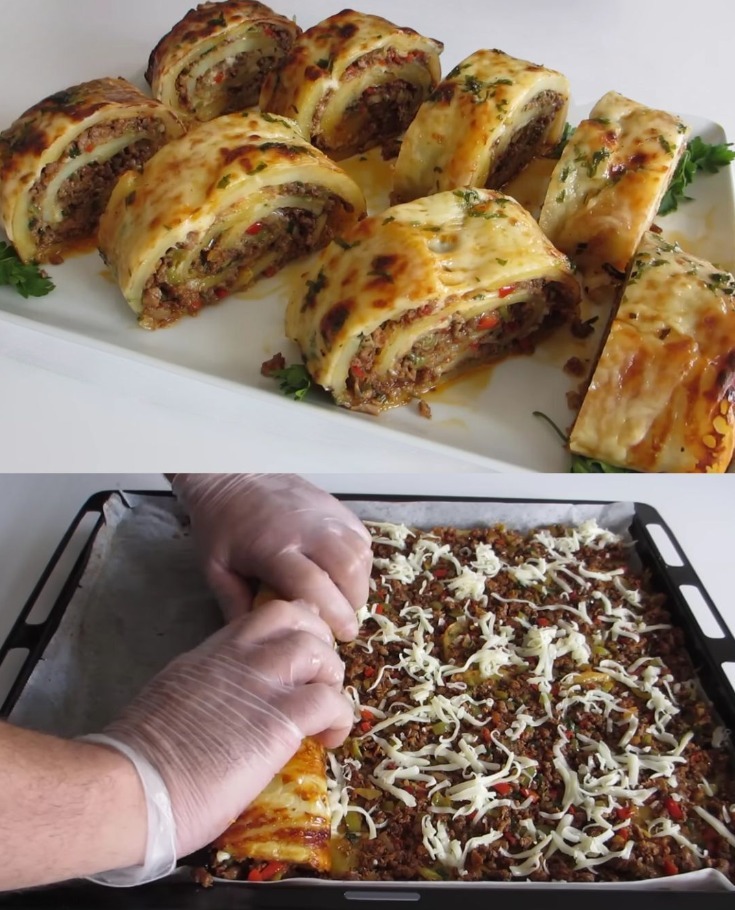
  3. Assemble the Roll:
    • Once the potato base is golden, remove it from the oven. Sprinkle the grated cheddar cheese over the hot potato layer. Then, evenly spread the meat filling on top.
    • Carefully roll up the potato layer from one end to the other, making sure the filling stays inside.
  4. Bake Again:
    • Place the roll back in the oven for another 10-15 minutes, or until the cheese inside has melted and the roll is firm.
  5. Serve:
    • Let the roll cool for a few minutes before slicing. Serve warm for a dinner that’s sure to make your neighbors jealous!

This Potato and Minced Meat Roll combines the comforting flavors of potatoes and cheese with a savory meat filling, all rolled up into one delicious dish. It’s easy to make and even easier to enjoy!

Easy Homemade Walnut Shrimp

Dive into making this sweet and creamy walnut shrimp right in your kitchen! It’s a delicious dish with crispy shrimp and candied walnuts, all tossed in a dreamy dressing. Here’s how to whip it up without any fuss.

What You’ll Need:

For the Candied Walnuts:

  • 1 cup raw walnuts
  • 4 tablespoons sugar
  • A tiny pinch of salt (1/8 teaspoon)
  • 4 tablespoons oil
  • 4 tablespoons water

For the Shrimp:

  • 14.7 oz (about 417g) of peeled shrimp (try to get size 16-20, which should give you around 23 pieces)
  • A little salt (1/4 teaspoon)
  • A little sugar (1/4 teaspoon)
  • A dash of white pepper powder (1/4 teaspoon)
  • 1/4 cup cornstarch (to coat the shrimp)

For the Dressing:

  • 1/4 cup mayonnaise
  • 1 tablespoon honey
  • 1/2 tablespoon condensed milk
  • 1 1/2 teaspoons lemon juice

Let’s Make It:

  1. Candy the Walnuts:
    • Heat the oil in a pan and add the walnuts, sugar, salt, and water. Cook over medium heat, stirring until the water evaporates and the walnuts get a shiny, sugary coating. Take them out and let them cool.
  2. Prep the Shrimp:
    • Season the shrimp with a little salt, sugar, and white pepper. Then, toss them in cornstarch until they’re all lightly coated.
  3. Cook the Shrimp:
    • In a clean pan, heat some oil over medium-high heat. Add the shrimp and fry until they’re golden and crispy. This shouldn’t take too long, just a few minutes. Remove them from the pan and drain any excess oil.
  4. Mix the Dressing:
    • In a bowl, whisk together the mayonnaise, honey, condensed milk, and lemon juice until smooth.
  5. Bring It All Together:
    • Toss the crispy shrimp and candied walnuts in the dressing until everything is nicely coated.
  6. Serve and Enjoy:
    • Serve your walnut shrimp while it’s fresh and enjoy the mix of textures and flavors!

This easy homemade walnut shrimp is perfect for a special dinner or when you’re craving something a little sweet and savory. Enjoy cooking and eating!

Easy Cheesy Garlic Bread

Make your own delicious cheesy garlic bread at home without any fuss! This no-knead recipe is super simple and perfect for a quick snack or as a side dish with your favorite meal. Here’s how to do it:

What You Need:

  • 1 loaf of French bread or a baguette
  • 1/2 cup of butter without salt, make sure it’s soft
  • 4 garlic cloves, make them really tiny (minced)
  • 1/4 cup of Parmesan cheese, grated
  • 1/4 cup of mozzarella cheese, shredded
  • 1 tablespoon of fresh parsley, chopped (this is just if you want)
  • A little bit of salt and pepper

Let’s Make Garlic Bread:

  1. Prep the Bread:
    • First, get your oven hot by turning it to 375°F (190°C). Take your bread and cut it in half lengthwise.
  2. Mix the Butter:
    • In a bowl, mix your soft butter with the tiny garlic pieces until it’s all smooth.
  3. Add Cheese and Season:
    • To your butter mix, add the Parmesan cheese, a bit of salt, and pepper. Mix it up again.
  4. Spread on Bread:
    • Take your butter and cheese mix and spread it all over the cut sides of your bread. Make sure it’s covered nicely.
  5. Add Mozzarella:
    • Sprinkle the shredded mozzarella cheese on top. If you like parsley, sprinkle that on too.
  6. Bake It:
    • Put your bread on a baking sheet and slide it into the oven. Let it bake for about 10 minutes. Then, if you want it really crispy, broil (grill) it for another 1-2 minutes until the cheese is bubbly and golden.
  7. Serve:
    • Take it out of the oven and let it cool just a bit. Cut it into pieces that are easy to grab.

And there you have it, super easy and tasty cheesy garlic bread! It’s perfect for dipping, eating by itself, or with any meal you love.

Yummy Banana and Cheese French Toast

Start your day with this super yummy breakfast! It’s a special French toast with bananas and cheese, sprinkled with cinnamon and drizzled with chocolate sauce. It’s sweet, cheesy, and so delicious!

You’ll Need:

  • 4 slices of your favorite bread
  • 2 bananas that are nice and ripe, cut into slices
  • 4 slices of any cheese you like
  • 2 eggs
  • 1/4 cup of milk
  • 1 teaspoon of cinnamon powder
  • Some butter for cooking

Let’s Make It:

  1. Get Ready:
    • First, grab a big bowl. Crack the eggs into it, pour in the milk, and add the cinnamon. Mix everything together really well.
  2. Banana and Cheese Time:
    • Take a slice of bread and lay some banana slices on it. Then, put a slice of cheese on top of the bananas. Cover it with another slice of bread to make a sandwich. Do the same with the rest of the bread, bananas, and cheese.
  3. Dip It:
    • Now, heat up a pan over medium heat and add a little butter.
    • While the butter is melting, dip your banana and cheese sandwiches in the egg mixture. Make sure both sides get nicely coated.
  4. Cook It:
    • Put the dipped sandwiches in the pan. Cook them until they’re golden brown and crispy, about 2-3 minutes on each side.
  5. Serve:
    • Once they’re cooked, put your French toast on a plate. You can add more yummy stuff if you want, like chocolate sauce or a sprinkle of cinnamon.

Enjoy your Banana and Cheese French Toast! It’s perfect for a sweet and satisfying breakfast.

Honey Butter Glazed Chicken and Rice Cake Feast

Dive into the comforting embrace of this Honey Butter Glazed Chicken and Rice Cake Feast, a dish that marries the succulence of chicken with the unique texture of rice cakes, all brought together by a heavenly honey butter sauce. This recipe is a celebration of flavors and textures, perfect for those looking to explore the delightful combination of savory and sweet.

Ingredients:

  • 250g (approximately 2 pieces) chicken breasts
  • Salt, to taste
  • Ground black pepper, to taste
  • 16g (about 2 tablespoons) all-purpose flour
  • 130g rice cakes (tteok, available at Asian markets)

Honey Butter Glaze (Ingredients not provided, so here’s a basic guideline):

  • 3 tablespoons honey
  • 2 tablespoons butter
  • 1 garlic clove, minced
  • 1 tablespoon soy sauce
  • 1 teaspoon sesame oil

Instructions:

  1. Prepare the Chicken:
    • Begin by cutting the chicken breasts into bite-sized pieces. Season them with salt and pepper to taste.
    • Dust the chicken pieces lightly with all-purpose flour, ensuring they are evenly coated. This will help to create a slightly crispy exterior when cooked.
  2. Cook the Rice Cake:
    • If the rice cakes are pre-packaged and hard, soak them in warm water for about 10-15 minutes until they become soft and chewy.
    • Drain the rice cakes and set them aside.
  3. Make the Honey Butter Glaze:
    • In a small saucepan, melt the butter over medium heat. Add the minced garlic and sauté until fragrant.
    • Stir in the honey, soy sauce, and sesame oil, mixing well until the ingredients are fully combined into a smooth glaze. Remove from heat.
  4. Cook the Chicken:
    • Heat a skillet over medium-high heat. Add the chicken pieces and cook until they are golden brown and fully cooked through.
    • Add the softened rice cakes to the skillet with the chicken, tossing to combine. Cook together for an additional 2-3 minutes.
  5. Combine with Glaze:
    • Pour the honey butter glaze over the chicken and rice cakes in the skillet. Toss everything together until the chicken and rice cakes are evenly coated in the glaze.
  6. Serve:
    • Transfer the honey butter chicken and rice cakes to a serving dish. Optionally, garnish with sesame seeds or sliced green onions for an extra touch of flavor and color.

Enjoy this Honey Butter Glazed Chicken and Rice Cake Feast as a delightful meal that’s sure to please both sweet and savory flavor enthusiasts. Perfect for a cozy dinner or as a unique dish to share with friends and family.

Garlic Honey Glazed Shrimp Stir-Fry

Delight in the sweet and savory harmony of this Garlic Honey Glazed Shrimp Stir-Fry, a simple yet elegant dish that combines succulent shrimp with the aromatic flavors of garlic and onions, all brought together by a luscious honey glaze. This recipe is perfect for a quick weeknight dinner or a special occasion, offering a burst of flavor in every bite.

Ingredients:

  • 1 pound (about 450g) shrimp, peeled and deveined
  • 3 cloves of garlic, finely minced
  • 1 small onion, sliced into thin rings
  • 2 tablespoons of honey
  • 2 tablespoons of soy sauce
  • 1 tablespoon of olive oil
  • Salt and freshly ground black pepper, to taste
  • Optional: Fresh green onions, chopped, for garnish

Instructions:

  1. Prepare the Shrimp:
    • Season the shrimp with a pinch of salt and pepper. Set aside while you prepare the other ingredients.
  2. Sauté the Aromatics:
    • Heat the olive oil in a large skillet or wok over medium heat. Add the minced garlic and sliced onions, sautéing until they become soft and fragrant, about 2-3 minutes. Be careful not to burn the garlic.
  3. Cook the Shrimp:
    • Increase the heat to medium-high. Add the seasoned shrimp to the skillet, spreading them out evenly. Cook for about 1-2 minutes on each side or until the shrimp turn pink and opaque.
  4. Add the Glaze:
    • Reduce the heat to medium. Drizzle the honey and soy sauce over the shrimp, stirring well to coat all the pieces evenly. Continue to cook for another 2 minutes, allowing the sauce to thicken slightly and glaze the shrimp.
  5. Final Touches:
    • Taste and adjust the seasoning with additional salt and pepper if needed. Remove from heat.
  6. Serve:
    • Transfer the Garlic Honey Glazed Shrimp Stir-Fry to a serving dish. If desired, sprinkle chopped green onions over the top for a burst of color and freshness.

Enjoy this delightful dish with steamed rice or noodles for a complete meal that’s sure to impress. The combination of honey and garlic not only adds depth to the shrimp but also creates a sauce that’s irresistibly tasty.

Crispy Shrimp and Sweet Potato Fritters

Dive into the crunch and flavor of these homemade crispy shrimp and sweet potato fritters, a delightful twist on the traditional Ukoy. This recipe combines the sweetness of shrimp with the earthy tones of sweet potato and the freshness of bean sprouts, all wrapped up in a golden, crispy batter. Perfect for snacks, appetizers, or a unique side dish, these fritters are sure to be a hit.

Ingredients:

  • 1 cup small shrimp, cleaned and deveined
  • 1 cup sweet potato, peeled and finely shredded
  • 1 cup fresh bean sprouts
  • 1/2 cup all-purpose flour
  • 1/2 cup cornstarch
  • 1 teaspoon baking powder
  • 1 teaspoon salt
  • 1/2 teaspoon freshly ground black pepper
  • 1/2 cup cold water
  • 1 large egg
  • 1/2 cup finely sliced green onions
  • 2 cloves garlic, finely minced
  • Cooking oil for deep frying

Instructions:

  1. Prepare the Batter:
    • In a large mixing bowl, whisk together the all-purpose flour, cornstarch, baking powder, salt, and black pepper.
    • Add the cold water and egg to the dry ingredients. Whisk until the batter is smooth and free of lumps.
  2. Combine the Fritter Ingredients:
    • To the batter, add the cleaned shrimp, shredded sweet potato, bean sprouts, chopped green onions, and minced garlic. Stir well to ensure all ingredients are evenly coated with the batter.
  3. Heat the Oil:
    • In a deep frying pan or skillet, heat enough oil over medium-high heat to deep fry the fritters. The oil is ready when a small amount of batter dropped into it sizzles and rises to the surface.
  4. Fry the Fritters:
    • Carefully spoon portions of the mixture into the hot oil, flattening them slightly to form patties. Do not overcrowd the pan to maintain the oil’s temperature and ensure even cooking.
    • Fry each fritter until golden brown and crispy, about 3-4 minutes per side. Adjust the heat as necessary to prevent burning.
  5. Drain and Serve:
    • Once cooked, remove the fritters from the oil and drain on paper towels to remove excess oil.
    • Serve hot, accompanied by a dipping sauce of your choice, such as a vinegar garlic dip or sweet chili sauce.

Enjoy your homemade Crispy Shrimp and Sweet Potato Fritters, a savory and satisfying treat that’s perfect for sharing with family and friends.

Chilled Fruit Custard Cups

Dive into the simplicity and delight of making a no-bake dessert that combines the creamy texture of custard with the fresh zest of mixed fruits, all layered with the crunch of crushed biscuits. These Chilled Fruit Custard Cups are a perfect treat for any occasion, requiring no oven, making them an ideal choice for a quick and delicious dessert.

Ingredients:

  • 2 cups of milk
  • 3 tablespoons of custard powder
  • 4 tablespoons of sugar (adjust according to your preference)
  • 1 teaspoon of vanilla extract
  • 1 cup of mixed fruits, chopped (use a combination of mangoes, strawberries, kiwi, bananas, or any fruits of your choice)
  • Crushed biscuits or cookies for the base layer
  • Whipped cream, for topping
  • Mint leaves, for an optional garnish

Instructions:

  1. Prepare the Custard:
    • In a small bowl, mix the custard powder with a quarter cup of milk to make a smooth paste.
    • Heat the remaining milk in a saucepan, and when it’s warm, add the sugar and vanilla extract, stirring until the sugar dissolves.
    • Pour the custard paste into the warm milk, whisking continuously to prevent lumps. Cook over medium heat until the mixture thickens. Then, remove from heat and let it cool slightly.
  2. Assemble the Cups:
    • Take your serving cups or glasses and create a base layer with crushed biscuits or cookies.
    • Spoon a layer of the prepared custard over the biscuit base.
    • Add a generous layer of mixed chopped fruits on top of the custard.
  3. Chill and Serve:
    • Repeat the layers until the cups are filled, finishing with a layer of custard.
    • Place the cups in the refrigerator to chill for at least an hour, allowing the flavors to meld together.
    • Just before serving, add a dollop of whipped cream to each cup and garnish with mint leaves if desired.

Enjoy your Chilled Fruit Custard Cups as a refreshing end to any meal or as a delightful snack to brighten up your day. This dessert is not only easy to make but also versatile, allowing you to customize the layers with your favorite fruits and cookies.

Quick & Healthy No-Bake Chocolate Almond Delight

Dive into a guilt-free indulgence with this no-bake dessert that rivals the classic Snickers in taste but leaves all the sugar behind! This recipe is a testament to how quick, easy, and delightful healthy eating can be. Perfect for vegans and anyone looking for a sweet treat without the added sugar, this dessert comes together in just 10 minutes and is ready to enjoy right away. Made with simple, wholesome ingredients, it’s a family-friendly recipe that’s sure to impress.

Ingredients:

  • 1 cup of pitted dates
  • 1 cup of raw almonds
  • 1/4 cup of unsweetened cocoa powder
  • 2 tablespoons of unsweetened natural peanut butter
  • 1/4 teaspoon of fine sea salt
  • Optional: Shredded unsweetened coconut, for garnish

Instructions:

  1. Blend the Base: In a food processor, combine the pitted dates and raw almonds. Pulse until the mixture reaches a coarse, sticky consistency. This forms the nutritious and flavorful base of your dessert.
  2. Add Flavor and Texture: To the mixture in the food processor, add the unsweetened cocoa powder, natural peanut butter, and sea salt. Pulse again until all the ingredients are well combined and the mixture sticks together when pressed between your fingers.
  3. Shape the Dessert: Take the mixture out of the food processor and press it into a lined square or rectangular dish. For individual servings, you can also roll the mixture into balls or shape it into bars according to your preference.
  4. Add Optional Toppings: If using, sprinkle shredded unsweetened coconut over the top for an extra layer of texture and flavor.
  5. Chill and Serve: While this dessert can be enjoyed immediately, chilling it for a few minutes can enhance its texture and flavor. Store in an airtight container in the refrigerator for a ready-to-eat treat anytime.

Enjoy this no-bake chocolate almond delight as a perfect end to your meal or a healthy snack to satisfy your sweet tooth without any of the guilt.

Homemade Chocolate & Walnut Delight Cake

Indulge in a homemade treat that will satisfy your craving for something rich and chocolatey. This Chocolate & Walnut Delight Cake combines the crunch of walnuts with the smooth texture of chocolate, enveloped in a layer of crumbly vanilla biscuits for a dessert that’s sure to be a crowd-pleaser.

Ingredients:

  • 300g of your favorite vanilla-flavored cookies, crushed
  • 150g chopped walnuts
  • 100g granulated white sugar
  • 80g unsweetened cocoa powder
  • 10g vanilla-flavored sugar (or 1 tsp vanilla extract)
  • 400ml whole milk
  • 100g unsalted butter
  • 200g high-quality dark chocolate, roughly chopped
  • 20ml neutral-tasting oil, such as canola or sunflower

Instructions:

  1. Start by lining a cake mold with plastic wrap or parchment paper for easy removal after the cake sets.
  2. In a large bowl, mix the crushed vanilla cookies with the chopped walnuts. Set this aside.
  3. Combine the milk, granulated sugar, cocoa powder, and vanilla sugar (or vanilla extract) in a saucepan. Heat the mixture on medium heat, stirring constantly until it is well-combined and the sugar has dissolved.
  4. Add the butter to the saucepan and continue stirring until the butter is completely melted and the mixture is smooth.
  5. Pour the warm chocolate mixture over the crushed cookies and walnuts, and mix well until every piece is coated.
  6. Transfer the mixture to the prepared cake mold, pressing down firmly to create an even layer.
  7. Melt the dark chocolate with the vegetable oil either in a double boiler or in the microwave, stirring frequently to ensure it’s smooth and glossy.
  8. Pour the melted chocolate over the cake base, spreading it evenly with a spatula to cover the entire surface.
  9. Refrigerate the cake for at least 4 hours, or until it is set and firm.
  10. Once set, remove the cake from the mold and peel away the plastic wrap or parchment paper.
  11. Slice and serve chilled for the best taste experience. Enjoy your sumptuous Chocolate & Walnut Delight Cake!

Chef’s Note: For an extra touch of elegance, consider adding a sprinkle of sea salt over the chocolate topping before it sets, or garnish with additional walnut pieces.