

There are certain dishes that instantly bring people together. Cheesy Skillet Garlic Bread is one of them. It’s the kind of bread that fills your kitchen with the comforting aroma of garlic and butter as it bakes to golden perfection. It’s warm, soft, and oozing with cheese, making it impossible to resist.
For me, garlic bread has always been a symbol of shared moments. Growing up, it was a staple at family dinners—whether alongside a bowl of spaghetti, paired with a hot bowl of soup, or simply enjoyed on its own, torn apart and devoured while still warm. My favorite part was always the cheese—melty, slightly crisp at the edges, and stretching with every bite.
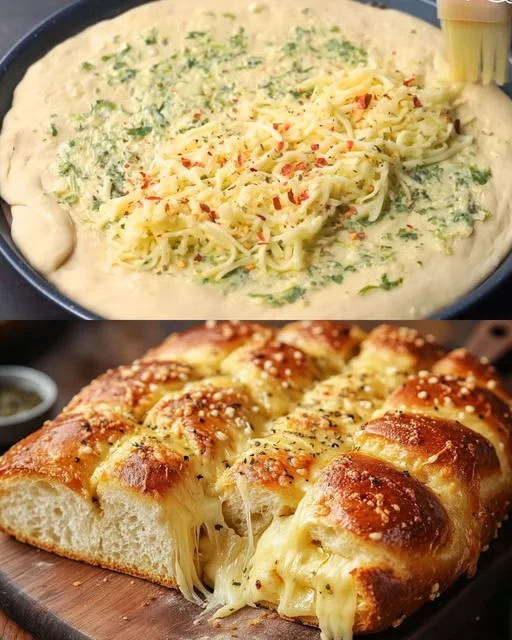
Now, I love making this skillet version, which takes the classic garlic bread to another level. The dough is soft and slightly chewy, with a rich garlic butter spread seeping into every bite. The mozzarella adds gooeyness, while the Parmesan brings a salty, nutty depth. Cooked in a skillet, it gets that perfect crisp bottom while staying incredibly soft on top.
Whether you’re making it as a side for dinner, a party appetizer, or a snack just because, this Cheesy Skillet Garlic Bread is guaranteed to disappear fast.
Why This Garlic Bread Stands Out
1. Soft, Fluffy, and Packed with Flavor
Unlike store-bought garlic bread, this homemade version has a soft, pillowy texture with a golden, crispy edge. The homemade dough is light and airy, and every bite is infused with garlicky, buttery goodness.
2. Made with Simple, Everyday Ingredients
This recipe requires basic pantry staples—flour, butter, milk, and yeast. There’s no need for fancy ingredients, yet the result is bakery-quality bread with rich flavors.
3. The Ultimate Comfort Food
Few things are as comforting as warm, cheesy bread straight from the oven. It’s perfect for indulging in on a cozy evening, pairing with your favorite meal, or sharing with loved ones.
4. Skillet-Baked for the Perfect Crust
Baking in a skillet ensures a beautifully crisp bottom while keeping the bread soft and fluffy inside. It’s the best way to achieve that homemade, rustic feel.
5. Versatile and Customizable
This garlic bread is delicious as is, but it’s also easy to customize. Add extra herbs, different cheeses, or even a drizzle of honey for a unique twist.
Ingredients
For the Dough
| Ingredient | Amount |
|---|---|
| Yeast | 1 teaspoon (3 g) |
| Sugar | 1 tablespoon (12 g) |
| Butter | 1 tablespoon (14 g) |
| Lukewarm Milk | ½ cup (110 ml) |
| All-Purpose Flour | 1 cup (120 g) |
| Salt | ¼ teaspoon (1.5 g) |
For the Topping
| Ingredient | Amount |
|---|---|
| Butter (melted) | 2 tablespoons |
| Garlic (minced) | 2 cloves |
| Dried Oregano | ½ teaspoon |
| Mozzarella Cheese | ½ cup, shredded |
| Parmesan Cheese | 2 tablespoons, grated |
| Fresh Parsley | Optional, for garnish |
Directions
- Activate the Yeast: In a bowl, mix the yeast, sugar, and lukewarm milk. Let it sit for 5–10 minutes until foamy.
- Prepare the Dough: Add flour, salt, and butter to the yeast mixture. Knead until the dough becomes smooth and elastic. Cover the bowl and let the dough rise for 1 hour or until it doubles in size.
- Make the Garlic Butter: In a small bowl, combine the melted butter, minced garlic, and dried oregano.
- Shape and Rest: Roll the dough into a round shape and place it in a greased skillet. Brush the dough with the garlic butter mixture and let it rest for 10 minutes.
- Add Cheese & Bake: Sprinkle mozzarella and Parmesan over the dough. Bake in a preheated oven at 375°F (190°C) for 18–20 minutes, or until golden brown and bubbling.
- Garnish & Serve: Sprinkle with fresh parsley if desired, slice, and serve warm.
Nutritional Information
| Nutrient | Amount per Serving |
|---|---|
| Calories | 180 kcal |
| Carbohydrates | 22 g |
| Protein | 6 g |
| Fat | 7 g |
| Fiber | 1 g |
| Sodium | 250 mg |
The Secret to Making the Best Garlic Bread
1. Kneading the Dough for the Perfect Texture
Proper kneading is key to creating a soft, elastic dough. It develops the gluten, ensuring the bread is light and chewy rather than dense. Knead for at least 8–10 minutes until smooth and slightly stretchy.
2. Letting the Dough Rise for Maximum Fluffiness
Allowing the dough to rise twice helps develop flavor and texture. The first rise gives the dough structure, while the second allows it to become extra fluffy before baking.
3. Using Fresh Garlic for Bold Flavor
While garlic powder works in a pinch, freshly minced garlic creates a more intense, aromatic taste. Mix it into the melted butter so that the flavors infuse throughout the bread.
4. Mixing Cheese for the Best Melt
Using a combination of mozzarella and Parmesan gives the best result. Mozzarella provides gooeyness, while Parmesan adds a salty, nutty punch.
5. Baking Until Golden and Crispy
Keep an eye on the bread while baking—it should be golden on top, crispy around the edges, and slightly puffed up in the center. Overbaking can dry it out, so remove it as soon as the cheese is melted and bubbly.
Serving Suggestions
1. Pair It with Pasta
Nothing complements a bowl of spaghetti, lasagna, or creamy Alfredo like warm, cheesy garlic bread. Use it to soak up the sauce for the ultimate comfort meal.
2. Dip It into Soup
This bread is perfect for dipping into tomato soup, minestrone, or creamy potato soup. The cheesy, garlicky flavor enhances every spoonful.
3. Serve as a Party Appetizer
Cut it into small squares or breadsticks for an easy-to-grab snack. Serve with marinara sauce or a cheesy dip for extra indulgence.
4. Enjoy It as a Snack on Its Own
Sometimes, all you need is a warm slice of garlic bread with a cup of tea or coffee. It’s simple, delicious, and satisfying.
5. Turn It into a Sandwich Base
Slice the bread in half and use it as a base for grilled cheese, turkey melts, or even a garlic bread pizza.
Frequently Asked Questions (FAQs)
1. Can I Use Store-Bought Dough Instead?
Yes! If you’re short on time, you can use store-bought pizza dough or refrigerated bread dough. Just roll it out, follow the same steps for adding butter and cheese, and bake as directed.
2. Can I Make This Without a Skillet?
Absolutely! If you don’t have a cast-iron skillet, you can use a baking sheet or round cake pan. The skillet adds extra crispiness, but the bread will still be delicious without it.
3. How Do I Store Leftovers?
- Refrigerator: Store in an airtight container for up to 3 days.
- Freezer: Wrap individual slices and freeze for up to 2 months. Reheat in the oven or toaster for best results.
4. Can I Add Extra Flavors?
Yes! Try these variations for a fun twist:
- Spicy Garlic Bread: Add red pepper flakes for a bit of heat.
- Herbed Garlic Bread: Mix in fresh basil, thyme, or rosemary.
- Four Cheese Garlic Bread: Use a blend of mozzarella, Parmesan, cheddar, and gouda.
5. How Can I Make It Vegan?
Replace the butter with olive oil and use dairy-free cheese for a vegan-friendly version. The texture will be slightly different but still delicious.
6. What If I Don’t Have Yeast?
You can make a quick yeast-free version by using self-rising flour instead of all-purpose flour and skipping the rising time. The result will be more like a biscuit bread but still tasty.
Conclusion – The Ultimate Homemade Garlic Bread
There’s something magical about making bread from scratch—watching the dough rise, smelling the garlic and butter as it bakes, and finally pulling apart a warm, cheesy slice. This Cheesy Skillet Garlic Bread is the kind of dish that brings people together, whether for a casual dinner, a holiday meal, or a late-night snack.
It’s simple yet indulgent, crispy yet soft, and loaded with garlic and cheese in every bite. If you love homemade bread but want something easy and satisfying, this recipe is a must-try.
So next time you’re craving something warm, cheesy, and delicious, skip the frozen garlic bread and make this homemade version instead. You’ll never look back!
Cheesy Skillet Garlic Bread – Buttery, Soft, and Irresistible
Ingredients
Method
- Activate the Yeast: In a bowl, combine yeast, sugar, and lukewarm milk. Stir and let sit for 5–10 minutes until foamy.
- Make the Dough: Add flour, salt, and butter to the yeast mixture. Knead until smooth and elastic. Cover and let it rise for 1 hour, or until doubled in size.
- Prepare the Topping: In a small bowl, mix the melted butter, minced garlic, and dried oregano.
- Shape and Rest: Roll out the dough into a round shape and place it in a greased skillet. Brush with the garlic butter mixture and let it rest for 10 minutes.
- Add Cheese & Bake: Sprinkle mozzarella and Parmesan cheese over the top. Bake in a preheated oven at 375°F (190°C) for 18–20 minutes, or until golden brown and bubbly.
- Garnish & Serve: Sprinkle with fresh parsley if desired, slice, and enjoy warm!
Notes
- Make it Extra Cheesy: Add a mix of cheeses like gouda or cheddar for a richer flavor.
- For a Crispier Crust: Bake an extra 5 minutes for a crunchier bottom.
- Storage & Reheating: Store leftovers in an airtight container for up to 3 days. Reheat in the oven for a fresh-baked taste.
- Perfect Pairings: Serve with pasta, soups, or as a snack with marinara sauce.