

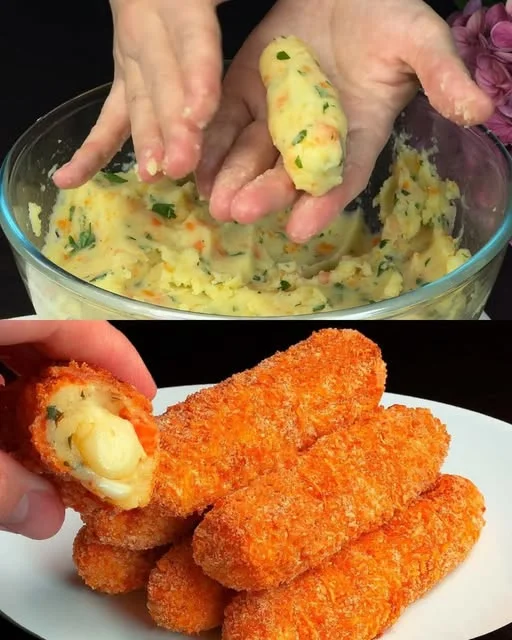
I’ve always believed that food is one of the greatest ways we pass down memories. Some recipes live in handwritten notebooks, others live in the heart—like this one. These cheesy veggie potato sticks were first made for my grandchildren during a weekend visit. I had a bowl of leftover mashed potatoes, a single carrot in the fridge, and half a block of cheese—not much, but just enough to create something special.
I didn’t want to fry anything. My goal was to make something delicious, healthy, and easy for little hands to hold. So I mixed everything together, shaped it into little sticks, and baked them. The house smelled warm and familiar. When I served them, the kids devoured every last piece. I didn’t expect them to love it so much—they even asked for more the next day.
Now it’s a recipe that lives on in our home and in theirs. It’s quick to make, gentle on ingredients, and always a hit. And every time I bake them, I remember that rainy afternoon, their laughter in the living room, and the joy of sharing something so simple yet satisfying.
Why These Baked Potato Sticks Are the Perfect Snack
1. No Frying, No Oil – Just Oven-Baked Goodness
So many potato-based snacks are deep-fried, greasy, and heavy. These sticks are baked—no frying, no oil splatters, no guilt. The texture remains crisp on the outside and soft on the inside, with all the flavor and none of the mess.
2. Kid-Friendly and Grandparent-Approved
This recipe is a wonderful way to get kids to eat veggies without fuss. The grated carrot disappears into the creamy potato mix, adding color, nutrition, and subtle sweetness. Even picky eaters enjoy them without complaint.
3. Simple Ingredients, Big Flavor
You don’t need anything fancy to make these sticks. Just potatoes, carrot, butter, cheese, herbs, and seasoning. It’s a budget-friendly recipe built from pantry staples and leftover produce.
4. Versatile and Easy to Customize
From the type of cheese to the herbs and veggies, you can tweak the ingredients to fit what you have on hand. It’s a fantastic base recipe that adapts to every season and palate.
5. Ideal for Meal Prep or Freezing
Shape and bake the sticks ahead of time, then reheat for lunchboxes, after-school snacks, or weeknight sides. They freeze well and can be popped in the oven anytime.
Ingredients
| Ingredient | Amount |
|---|---|
| Potatoes | 600 grams (about 4 medium) |
| Carrot, grated | 1 |
| Water | As needed for boiling |
| Butter | 2 tablespoons |
| Parsley, chopped | To taste |
| Any hard cheese or mozzarella | ½ cup, grated |
| Salt | To taste |
| Black pepper | To taste |
Directions
- Boil the Potatoes – Peel and chop the potatoes, then boil in salted water until tender. Drain and mash while still warm.
- Mix the Ingredients – Add grated carrot, butter, chopped parsley, grated cheese, salt, and black pepper to the mashed potatoes. Mix until fully combined.
- Shape the Sticks – Scoop portions of the mixture and shape into uniform sticks or logs.
- Bake – Place the sticks on a lined baking tray and bake at 375°F (190°C) for 20–25 minutes or until lightly golden and firm on the outside.
- Serve – Let cool slightly before serving. Perfect as a snack, side dish, or finger food for kids.
Nutritional Information (Per 2–3 Sticks – Approximate)
| Nutrient | Amount |
|---|---|
| Calories | 150–180 kcal |
| Carbohydrates | 20–25 g |
| Protein | 4–6 g |
| Fats | 6–8 g |
| Fiber | 2–3 g |
| Sodium | 200–300 mg |
Taste and Texture: What Makes Them So Addictive
The magic of these veggie potato sticks lies in their contrast of textures and comforting flavors.
- Soft and creamy inside – The mashed potatoes, melted cheese, and butter create a light, tender interior that melts in your mouth.
- Golden on the outside – A quick bake in the oven gives the sticks a firm, lightly crisp edge without frying.
- Savory and herby – The addition of parsley or herbs like oregano or thyme balances the richness and adds freshness.
- Cheesy and satisfying – You can use mozzarella for gooeyness or a hard cheese for a sharper bite. Either way, it brings warmth and depth.
They’re neutral enough to pair with dips or mains, yet flavorful enough to stand alone.
Ways to Serve These Potato Sticks
These sticks are more than just a side dish—they can play many roles on your plate. Here are a few ideas:
- As a main dish – Pair them with a green salad and a yogurt-based dip for a light, satisfying lunch.
- In lunchboxes – Pack a few cooled sticks with fruit and a boiled egg for a balanced school meal.
- For toddlers and kids – Soft, easy to hold, and mild in flavor, they’re perfect for tiny hands and developing taste buds.
- Party snacks – Serve on a platter with ketchup, hummus, sour cream, or garlic dip at family gatherings.
- With soup or stew – Use them like breadsticks for dipping into warm, hearty broths.
- As a post-school or late-night snack – Easy to reheat, comforting to eat.
Creative Variations to Try
Once you’ve made this recipe once, you’ll be eager to put your own spin on it. Here are some ways to elevate or change the flavor:
1. Switch Up the Cheese
Use sharp cheddar, parmesan, gouda, or even cream cheese for different levels of richness and melt.
2. Add More Vegetables
Grated zucchini (well-drained), spinach, or even mashed peas can be added to increase fiber and color.
3. Make Them Spicy
Add a pinch of chili flakes, paprika, or cumin to the mix if you want a little kick.
4. Make Them Gluten-Free
If the mixture is too soft, you can add a tablespoon of gluten-free flour or chickpea flour to help bind it.
5. Add a Crunchy Topping
Before baking, sprinkle breadcrumbs or crushed cornflakes over the sticks for a crispy top layer.
Meal Prep and Storage Tips
One of the best things about this recipe is how easy it is to prepare in advance and store for later use.
- Make ahead: Prepare the mixture, shape the sticks, and refrigerate for up to 24 hours before baking.
- Store leftovers: Keep baked sticks in an airtight container in the fridge for up to 3 days.
- Reheat: Warm in the oven or air fryer to restore their crispy exterior.
- Freeze: Lay shaped, unbaked sticks on a tray and freeze until solid. Transfer to a freezer bag and bake from frozen when needed.
Frequently Asked Questions (FAQs)
Can I use sweet potatoes instead of regular potatoes?
Yes! Sweet potatoes add a natural sweetness and are just as delicious. Keep in mind they’re softer, so the mixture might need a bit more cheese or flour for structure.
Can I make these dairy-free?
Absolutely. Use dairy-free butter and cheese alternatives. The result will still be creamy and flavorful.
How do I keep the sticks from falling apart?
Be sure to mash the potatoes thoroughly and avoid excess moisture. If needed, add a tablespoon of flour or breadcrumbs to bind everything together.
Are these good for baby-led weaning?
Yes, they’re soft, nutrient-rich, and easy for babies to grasp. Just be sure to omit salt and use a mild cheese if preparing for babies under 12 months.
Can I add protein to this recipe?
Yes. You can mix in finely shredded chicken, turkey, or tofu to make them more filling.
What dip pairs best with these?
They’re delicious with sour cream, garlic yogurt dip, ketchup, guacamole, or even tahini sauce.
Can I cook them in an air fryer?
Definitely. Air fry at 375°F (190°C) for 10–12 minutes, turning halfway, for an even crispier result without oil.
Conclusion: Simple Ingredients, Lasting Memories
These cheesy veggie potato sticks are a beautiful example of what home cooking should be—simple, nutritious, and full of love. Whether you’re cooking for kids, preparing a healthy snack for yourself, or just trying to make something tasty from what’s already in your fridge, this recipe delivers.
It brings comfort without compromise, joy without junk, and the kind of satisfaction that lingers long after the last bite. It reminds us that good food doesn’t need to be complicated—it just needs to be made with care.
So the next time you have a few potatoes and a little cheese on hand, skip the frying pan and bake these instead. Your kitchen will smell amazing, your family will be asking for more, and you’ll have a new go-to recipe that fits every occasion.
Because sometimes, the best food is the one that brings us together—stick by stick, bite by bite.
Cheesy Veggie Potato Sticks – The Healthier Comfort Snack Loved by All Ages
Ingredients
Method
- Peel, chop, and boil the potatoes in salted water until soft. Drain and mash.
- Add grated carrot, butter, chopped parsley, grated cheese, salt, and pepper. Mix until well combined.
- Form the mixture into stick or log shapes using your hands.
- Place the sticks on a parchment-lined baking tray.
- Bake in a preheated oven at 375°F (190°C) for 20–25 minutes, or until golden and slightly crispy on the edges.
- Let cool slightly before serving. Enjoy warm as a snack, lunchbox item, or light meal.
Notes
- Use sweet potatoes for a naturally sweet version.
- You can mix in other veggies like finely grated zucchini or spinach (squeeze out excess moisture first).
- Use cheddar, parmesan, or cream cheese as alternative cheese options.
- These freeze well—shape and freeze before baking for a make-ahead snack.
- Serve with yogurt dip, sour cream, or ketchup.