

There’s something magical about making homemade bread. It’s not just about the final product—it’s about the process. The gentle kneading, the slow rise, the anticipation as the aroma fills the kitchen. Every loaf tells a story.
I still remember the first time I made my own bread. It was a chilly afternoon, and I had just come across an old, handwritten recipe tucked inside my grandmother’s cookbook. The pages were stained from years of use, and the simple ingredients made it seem so easy.
With hesitant hands, I mixed the dough, unsure if it would rise properly. I watched impatiently as the yeast worked its magic, the dough slowly doubling in size like a small miracle happening right in my kitchen. When I pulled the loaf out of the oven, golden and crackling, I felt an overwhelming sense of accomplishment. The first warm slice, slathered with butter, tasted better than any bread I had ever bought. From that day on, homemade bread became a tradition in my home—one that brings comfort, warmth, and a connection to the past.
If you’ve never made your own bread, this recipe is the perfect place to start. It’s simple, foolproof, and requires only a few basic ingredients. Whether you’re a beginner or an experienced baker, this loaf will fill your kitchen with warmth and your home with the incredible smell of fresh bread.
Why You’ll Love This Recipe
- Simple and Beginner-Friendly – No fancy ingredients or equipment required—just a bowl, some flour, and a little patience.
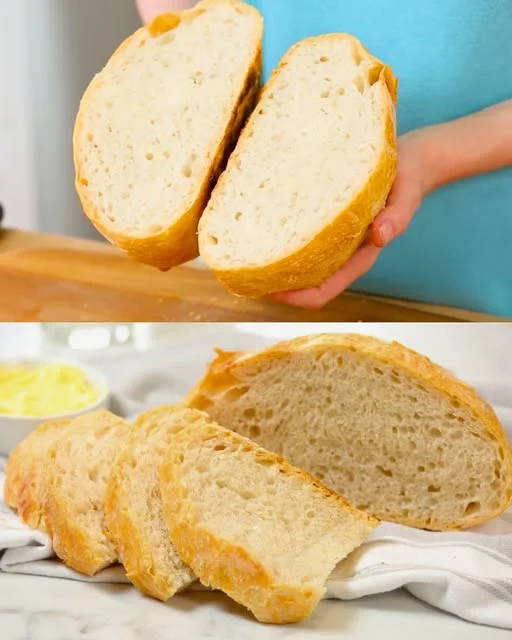
- Deliciously Soft with a Golden Crust – The perfect balance of a fluffy interior and a crisp, golden-brown exterior.
- Budget-Friendly – With just flour, water, yeast, salt, and sugar, you can make a homemade loaf for a fraction of the store-bought price.
- Versatile and Customizable – Add herbs, seeds, or cheese for your own unique twist.
- Deeply Satisfying – Few things compare to the feeling of pulling a warm loaf out of the oven, knowing you made it from scratch.
Ingredients
| Ingredient | Amount |
|---|---|
| Dry active yeast | ½ teaspoon |
| Warm water | 1 cup |
| Sugar | 1 teaspoon |
| All-purpose flour | 3 cups |
| Salt | 1½ teaspoons |
Directions
Step 1: Activate the Yeast
- In a small bowl, combine warm water, sugar, and dry yeast. Stir gently and let sit for 5-10 minutes until foamy.
Step 2: Make the Dough
- In a large mixing bowl, combine flour and salt.
- Pour in the activated yeast mixture and mix until a sticky dough forms.
Step 3: Knead and Rise
- Transfer the dough onto a floured surface and knead for 8-10 minutes until smooth and elastic.
- Place in a greased bowl, cover with a clean towel, and let rise in a warm place for 1-2 hours, or until doubled in size.
Step 4: Shape and Second Rise
- Punch down the dough, shape it into a loaf, and place it into a greased bread pan.
- Cover and let rise again for 30-45 minutes until puffy.
Step 5: Bake to Perfection
- Preheat the oven to 375°F (190°C).
- Bake for 30-35 minutes until golden brown and hollow-sounding when tapped.
- Let cool before slicing and enjoy!
Nutritional Information (Per Slice, Approximate)
| Nutrient | Amount |
|---|---|
| Calories | 120 kcal |
| Carbohydrates | 25g |
| Protein | 4g |
| Fat | 0.5g |
| Fiber | 1g |
The Secret to Perfect Homemade Bread
While bread-making may seem intimidating at first, it’s actually quite simple when you understand a few key principles.
1. The Importance of Yeast Activation
Yeast is the heart of any good bread. If it doesn’t activate properly, your dough won’t rise, resulting in a dense and tough loaf. The best way to ensure success is to dissolve yeast in warm water (about 110°F or 45°C) with a little sugar and let it sit until foamy. If there are no bubbles after 10 minutes, your yeast may be expired or the water may have been too hot or too cold.
2. Kneading for the Perfect Texture
Kneading is what develops the gluten in the dough, giving the bread its chewy, airy texture. It usually takes 8-10 minutes of kneading to achieve the right consistency. You’ll know it’s ready when the dough is smooth and elastic—if you press it with a finger, it should slowly bounce back.
3. The Magic of Proofing
Proofing (or rising) is when the yeast ferments and creates air pockets, making the bread light and fluffy. Let the dough rise in a warm, draft-free place for 1-2 hours, or until doubled in size. A second, shorter rise after shaping helps develop even more flavor and structure.
4. Baking at the Right Temperature
Bread needs high heat to develop that golden, crispy crust while keeping the inside soft. Baking at 375°F (190°C) for 30-35 minutes is ideal. You’ll know it’s done when the loaf sounds hollow when tapped on the bottom.
5. Cooling for the Best Texture
As tempting as it is to slice into fresh bread straight from the oven, allowing it to cool on a wire rack helps set the crumb and prevents it from becoming gummy. Waiting at least 20-30 minutes makes all the difference.
Fun Variations to Try
Once you’ve mastered the basic recipe, you can experiment with different flavors and add-ins to make the bread your own.
1. Herb and Garlic Bread
Mix in 1 teaspoon of dried oregano, thyme, and rosemary into the dough for a fragrant, flavorful loaf. Brush the crust with garlic butter after baking for an extra boost of flavor.
2. Cheese Bread
Add ½ cup of shredded cheddar or parmesan into the dough before kneading for a cheesy, savory twist.
3. Whole Wheat Variation
For a heartier and healthier loaf, substitute 1 cup of all-purpose flour with whole wheat flour. You may need to add a little extra water to maintain the dough’s softness.
4. Seeded Bread
Roll the dough in a mix of sesame seeds, sunflower seeds, and flaxseeds before baking for a crunchy, nutty crust.
5. Sweet Honey Bread
Replace the sugar with 2 tablespoons of honey for a subtly sweet, slightly softer loaf.
Frequently Asked Questions
1. Why didn’t my bread rise?
- The yeast may be expired or inactive. Always check for foam during activation.
- The water may have been too hot or too cold—stick to around 110°F (45°C).
- The dough may have been placed in a cold or drafty area. Try letting it rise in a warm spot, like inside the oven with the light on.
2. Can I make this bread without kneading?
Yes! You can make no-knead bread by mixing the ingredients and letting the dough rise overnight (8-12 hours). The long fermentation develops the gluten naturally, resulting in a rustic, airy loaf.
3. How do I store homemade bread?
Store in a paper bag or bread box at room temperature for 3-4 days. Avoid plastic bags, as they trap moisture and make the crust soggy. For longer storage, slice and freeze the bread in an airtight container.
4. Can I make this bread gluten-free?
Yes, but it requires a gluten-free flour blend that contains xanthan gum for structure. The texture will be slightly different, but still delicious.
5. How can I get a crispier crust?
- Bake with a small pan of water in the oven to create steam, which helps develop a crisp crust.
- Brush the loaf with water or milk before baking for extra crunch.
- Let the bread cool completely on a wire rack to maintain its crispiness.
Conclusion – A Loaf Worth Baking Again and Again
Homemade bread isn’t just about feeding yourself—it’s about creating something from scratch, slowing down, and enjoying the process. There’s an undeniable joy in kneading dough, watching it rise, and pulling a golden, fragrant loaf out of the oven.
Once you taste your own freshly baked bread, you’ll never look at store-bought bread the same way again. Whether you enjoy it warm with butter, as a sandwich, or toasted with jam, this recipe is a simple pleasure that never gets old.
So why not try it today? Your kitchen will smell incredible, your heart will feel full, and you might just discover a new love for baking.
Golden Crust Homemade Bread – The Simple Joy of Baking from Scratch
Ingredients
Method
- Activate the Yeast – In a small bowl, mix warm water, sugar, and yeast. Let sit for 5-10 minutes until foamy.
- Make the Dough – In a large mixing bowl, combine flour and salt. Pour in the yeast mixture and stir until a sticky dough forms.
- Knead and Let Rise – Transfer the dough to a floured surface and knead for 8-10 minutes until smooth. Place in a greased bowl, cover, and let rise for 1-2 hours or until doubled in size.
- Shape and Second Rise – Punch down the dough, shape it into a loaf, and place it in a greased bread pan. Cover and let rise for 30-45 minutes until puffy.
- Bake – Preheat oven to 375°F (190°C). Bake for 30-35 minutes until golden brown and hollow-sounding when tapped.
- Cool and Serve – Let the bread cool before slicing. Enjoy warm with butter or as the base for your favorite sandwich!
Notes
- Check your yeast – If it doesn’t foam during activation, it may be expired.
- Crispy crust tip – Brush with water before baking or place a pan of water in the oven.
- Storage – Store at room temperature for 3-4 days or freeze for up to 3 months.
- Make it your own – Add herbs, garlic, or seeds for extra flavor.