Crispy Parmesan Potato Bites: The Snack That Steals the Spotlight

There was a time when my family didn’t have much. We weren’t poor in spirit or love, but money was tight and meals had to stretch. Our tiny kitchen was always warm — partly from the old gas stove that clicked three times before it caught fire, and partly from the steady rhythm of meals made with care.

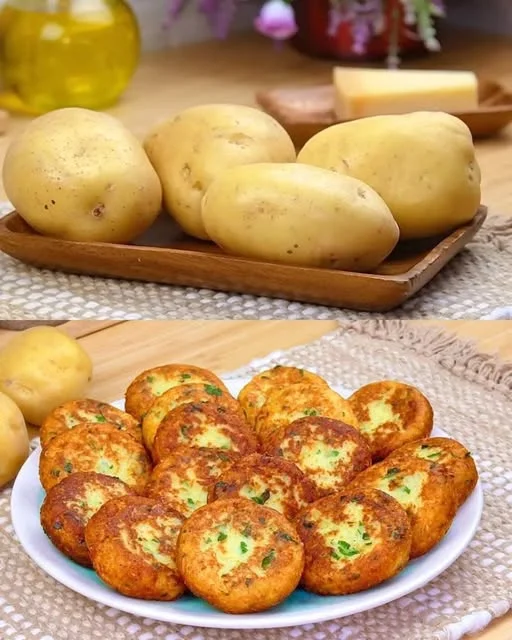
One evening, I remember standing on a wooden stool next to my grandmother as she shaped mashed potatoes into little patties. She called them “golden bites,” and while they were made with the simplest ingredients — leftover potatoes, a bit of cheese, breadcrumbs — they were magic. She’d fry them in a shallow pool of oil until they turned crisp and golden, and I’d steal one when she wasn’t looking.

Years later, that same smell drifted through my own kitchen when I recreated her recipe with a few upgrades: Parmesan cheese for richness, fresh parsley for brightness, and a good pinch of black pepper. And just like that, the past came back — golden, warm, and wrapped in crispy perfection.

These Crispy Parmesan Potato Bites are inspired by those early moments. They’re humble, homey, and unexpectedly elegant — a perfect reminder that some of the best things come from what we already have.

The Beauty of a Potato-Based Snack

Potatoes are more than a side dish — they’re comfort food in its purest form. Inexpensive, filling, and incredibly versatile, they can be boiled, mashed, fried, roasted, and still somehow surprise you with new textures and flavors.

What makes Crispy Parmesan Potato Bites stand out is how they elevate the everyday. This recipe turns basic ingredients into something that feels indulgent. The crispy breadcrumb coating gives way to a fluffy, cheesy center, laced with the salty depth of Parmesan and the freshness of chopped parsley. Every bite is savory and satisfying.

Why These Bites Work (and Keep Working)

There are a few reasons why this dish has become a go-to favorite in so many kitchens:

1. Minimal Ingredients, Maximum Flavor

The base is simple: mashed potatoes. But with the addition of Parmesan and fresh herbs, the flavor deepens significantly. These little bites are rich without being heavy, and you don’t need a long list of ingredients to make them shine.

2. Crowd-Friendly

They’re a hit with kids and adults alike. Perfect for party platters, family dinners, or snack boards, these bites disappear quickly — especially when served warm.

3. Easily Customizable

Want to add spice? Herbs? Garlic? Leftover cooked veggies? Go ahead. These bites are a blank canvas, eager to adapt to whatever you have on hand.

4. Make-Ahead Friendly

Prepare the mixture in advance and store it in the fridge, or even pre-shape the bites and freeze them before frying. This makes them an excellent option for entertaining or batch-cooking.

Ingredients

IngredientQuantity
Potatoes4 (medium-sized)
Breadcrumbs80 grams
Parmesan cheese (grated)100 grams
Parsley (finely chopped)To taste
Eggs2
SaltTo taste
Black pepperTo taste
Vegetable oilFor frying

Directions

  1. Peel and boil the potatoes until tender. Drain, then mash them until smooth. Let them cool slightly.
  2. In a large bowl, combine the mashed potatoes with grated Parmesan, chopped parsley, eggs, salt, and black pepper. Mix until fully combined.
  3. Shape the mixture into small balls or patties.
  4. Roll each ball in the breadcrumbs, pressing gently to coat evenly.
  5. Heat vegetable oil in a frying pan over medium heat. Fry the bites in batches until golden brown and crispy on all sides.
  6. Remove and drain on paper towels. Serve hot with your favorite dip or sauce.

Nutritional Snapshot (Per 3–4 Bites, Approximate)

NutrientAmount
Calories~280 kcal
Protein~9 g
Carbohydrates~25 g
Fat~15 g
Fiber~2 g
Sodium~320 mg

Versatile Serving Ideas

Though they shine on their own, these potato bites play well with others. Here are some pairing and serving suggestions:

  • With Dips: Garlic aioli, sour cream and chive dip, herbed yogurt, or marinara sauce work beautifully.
  • As a Side Dish: Serve alongside grilled chicken, roasted veggies, or even soup for a cozy, complete meal.
  • In a Wrap or Pita: Use them in a warm flatbread with fresh greens and sauce for a vegetarian sandwich.
  • On a Party Platter: These bites are finger-food perfection — serve them with toothpicks for easy sharing.

Tips for Golden Success

Even simple recipes benefit from a few smart techniques. Here’s how to get the most out of your Crispy Parmesan Potato Bites:

Use Starchy Potatoes

Russets or Yukon Golds work best. Their high starch content ensures the mixture binds well and the texture stays light.

Cool the Mashed Potatoes

Warm mash can make the mixture too soft to shape. Let it cool slightly before mixing in the cheese and egg.

Shape Evenly

Uniform balls or patties cook more evenly. Use a cookie scoop or tablespoon if needed.

Don’t Overcrowd the Pan

Give each bite space when frying. Crowding lowers the oil temperature and leads to soggy results instead of crispiness.

Drain Well

Place fried bites on a paper towel or wire rack to prevent them from getting greasy.

Tasty Variations to Try

These bites are perfect as-is, but if you’re feeling creative, try some of these variations:

Cheddar & Chive

Swap Parmesan for sharp cheddar and add finely chopped chives for a different flavor profile.

Spicy Kick

Add a pinch of chili flakes or smoked paprika to the mix for a subtle heat.

Herb Explosion

Use a mix of parsley, dill, and thyme to brighten up the flavor — perfect for spring gatherings.

Veggie-Loaded

Mix in cooked, finely chopped spinach, carrots, or peas for added nutrition and color.

Baked Version

If you’re avoiding frying, bake them at 200°C (400°F) for 20–25 minutes, flipping halfway through until golden and crisp.

Frequently Asked Questions (FAQs)

Can I make these ahead of time?

Yes! The uncooked bites can be shaped and stored in the fridge for up to 24 hours. They also freeze well before frying.

Can I bake them instead of frying?

Absolutely. While frying gives the best crunch, baking works too. Use a well-greased baking sheet and flip them once midway.

How do I keep them from falling apart while frying?

Make sure the mixture is well-chilled and not too wet. If needed, add more breadcrumbs or a bit of flour to firm it up.

Are these gluten-free?

They can be! Simply use gluten-free breadcrumbs. The rest of the ingredients are naturally gluten-free.

What’s the best oil for frying?

Use a neutral oil with a high smoke point, like vegetable, canola, or sunflower oil.

How do I reheat leftovers?

Reheat in an oven or air fryer to revive the crispness. Avoid microwaving, as it can make them soggy.

Can I use instant mashed potatoes?

Freshly mashed potatoes yield the best texture, but in a pinch, high-quality instant mash can work if made thick.

The Simple Joy of Cooking with What You Have

At its core, this recipe is a celebration of resourcefulness. It honors the kind of cooking that’s born from everyday ingredients, from leftovers, from quiet creativity. You don’t need a gourmet kitchen or fancy tools to make something delicious — just a handful of good ingredients and a bit of care.

The beauty of Crispy Parmesan Potato Bites is how they take what we already have and turn it into something worth sharing. They’re nostalgic yet fresh, comforting yet elegant. They’re a dish that says, “Welcome. I made this for you.”

Whether you serve them at a family dinner, bring them to a potluck, or make them just for yourself on a quiet afternoon, they offer more than flavor — they offer connection. To tradition. To memory. To the simple joy of golden bites that bring everyone back for more.

Final Thoughts: When Potatoes Become a Conversation

Sometimes, the best recipes don’t come from cookbooks — they come from lived moments, passed-down methods, and spontaneous creativity. This one is no different.

What began as a memory in a modest kitchen has become a staple in mine — and perhaps, now, in yours. These potato bites have a way of showing up in the right moments: when you need to feed many, when you need to feed yourself, when you need a little joy wrapped in something crispy and warm.

So the next time you’re staring at a few potatoes and wondering what to make, remember this recipe. Because when the pan sizzles and those golden bites appear, you’ll know: sometimes the simplest things are the most unforgettable.

Morning Melt Wraps: The 5-Minute Breakfast That Brings It All Together

It was one of those mornings — the kind where the alarm doesn’t go off, the kids can’t find their shoes, and the coffee somehow tastes weaker than water. I was halfway through a chaotic attempt to pack lunches and sign school forms when my youngest tugged at my sleeve and asked, “What’s for breakfast?”

I had minutes. No time for pancakes. No energy for smoothies. But I had eggs. Tortillas. Some cheese. And a handful of green onions hanging on in the crisper.

I whisked, I flipped, I folded. And then, something magical happened.

The silence. The kind that only comes when everyone at the table is busy eating — happily. That moment birthed what I now lovingly call Morning Melt Wraps: a 5-minute, cheesy, eggy solution that changed how I saw breakfast.

It’s not just a recipe. It’s a reminder that sometimes, the simplest things save the day — and become family favorites without trying.

Why This Recipe Wins the Morning

In today’s world of over-complicated recipes and over-scheduled mornings, the Morning Melt Wrap offers a powerful antidote: simplicity with soul. Here’s why it works, and why it’s worth adding to your regular rotation.

1. It’s Fast — Really Fast

Five minutes. That’s it. You can prep, cook, and serve this breakfast faster than your coffee brews. For those with packed mornings or limited patience before caffeine kicks in, this recipe is a dream.

2. It’s Made from Pantry Staples

Eggs, cheese, tortillas. These aren’t specialty store items — they’re the basics most households already have. Add a few green onions or leftover veggies, and you’ve got a balanced, flavorful meal with zero fuss.

3. It’s Satisfying Without Being Heavy

Thanks to the protein-rich eggs and melty mozzarella, one wrap delivers enough substance to keep you full without slowing you down. The tortilla crisps up beautifully for that handheld crunch, and the melted cheese ties everything together.

4. It’s Kid-Friendly (and Adult-Approved)

There’s a reason “cheese + eggs + carbs” is a classic combination. Kids love it, grownups crave it, and it’s endlessly flexible for picky eaters or curious palates alike.

Ingredients at a Glance

IngredientQuantity
Eggs4
SaltA pinch
Black PepperA pinch
Green Onion (chopped)To taste
Tortillas (23 cm)2
Mozzarella CheeseShredded, as needed

Directions: Fold, Flip, and Feast

  1. Crack the eggs into a bowl. Add salt, black pepper, and chopped green onions. Whisk until fully combined.
  2. Heat a non-stick skillet over medium heat. Pour in half the egg mixture, tilting the pan to spread it evenly into a thin layer.
  3. While the egg is still a bit soft on top, press one tortilla directly over the egg. Gently pat down.
  4. After 30–40 seconds, flip the entire wrap so the tortilla is now facing the skillet.
  5. Immediately sprinkle shredded mozzarella over the egg side. Let it melt as the tortilla toasts to a golden crisp.
  6. Fold in half like a quesadilla, press slightly, and remove from the pan.
  7. Repeat with the remaining ingredients. Serve warm, slice if desired, and enjoy immediately.

Nutritional Snapshot (Per Wrap, Approximate)

NutrientAmount
Calories~310 kcal
Protein~18 g
Carbohydrates~20 g
Fat~18 g
Fiber~1.5 g
Sodium~400 mg

The Nutritional Value Behind the Flavor

It’s easy to assume that anything with cheese and eggs wrapped in a tortilla can’t possibly be healthy — but these Morning Melt Wraps defy expectations. Here’s what makes them a smart choice:

  • Eggs: A powerhouse of protein, vitamins (like B12 and D), and healthy fats. They provide energy and help with focus — ideal for school or workdays.
  • Mozzarella: A good source of calcium and protein, and lower in fat than many other cheeses.
  • Whole Wheat or Low-Carb Tortillas: Easily customizable depending on your dietary preferences.
  • Green Onions: They add not only flavor but also vitamin K, antioxidants, and a gentle digestive boost.

You can keep the recipe balanced by avoiding excess oil and choosing your tortilla wisely (opt for whole grain or high-fiber options).

Creative Ways to Customize Your Wraps

The magic of this recipe is in its adaptability. With a basic structure in place, you can take it in countless directions. Here are some ideas:

Spicy Sunrise

Add chopped jalapeños or a drizzle of hot sauce before folding for a morning kick.

Garden Veggie

Sautéed mushrooms, bell peppers, spinach, or even leftover roasted veggies can be added into the egg mix.

The Protein Boost

Throw in diced ham, turkey, cooked sausage, or tofu crumbles for a more filling wrap.

Cheese Lovers’ Dream

Try cheddar, pepper jack, feta, or even goat cheese depending on your mood and what’s in the fridge.

Herb-Infused

Add fresh basil, dill, or parsley for a bright, fresh twist that livens up the whole wrap.

Helpful Tips for Morning Melt Success

Even the simplest recipes benefit from a few pro tips. Here’s how to make sure your wrap turns out perfectly every time:

Use a Non-Stick Pan

This makes flipping easier and ensures your eggs don’t stick. You want the wrap to lift cleanly and fold without resistance.

Don’t Overcook the Eggs

Let them stay slightly soft on top before placing the tortilla. This way, the egg bonds to the tortilla as it finishes cooking, creating a seamless layer.

Layer Cheese After the Flip

Sprinkle your cheese immediately after flipping so it melts just in time to fold.

Press Lightly When Folding

A gentle press helps seal the wrap and brings everything together, but don’t squash it flat — you want a warm, melty center.

Frequently Asked Questions

Can I make these ahead of time?

Yes, you can prep and cook them in advance, then reheat in a pan or toaster oven. However, they taste best fresh, when the cheese is still gooey and the tortilla crisp.

Can I freeze them?

Not recommended. Eggs and tortillas don’t freeze well together in this format. But if you want to freeze components like cooked eggs or sautéed veggies, you can.

What’s the best cheese to use?

Mozzarella melts beautifully and has a mild flavor that pairs with anything. Cheddar or pepper jack work well too. Use what you love!

Are these wraps gluten-free?

They can be! Just use a certified gluten-free tortilla. Everything else is naturally gluten-free.

Can I add more veggies?

Absolutely. Just make sure to sauté them first if they’re raw or high in moisture (like mushrooms or zucchini), so they don’t make the wrap soggy.

How do I store leftovers?

Store in an airtight container in the fridge for up to 2 days. Reheat in a dry skillet for best results — it’ll revive the crispness.

Why This Recipe Belongs in Your Back Pocket

Everyone has a handful of recipes they come back to — the no-fuss, always-good, feeds-everyone kind. Morning Melt Wraps is that recipe. It’s not trying to be gourmet or viral. It just wants to feed you, fast and well.

It’s the kind of breakfast that meets you where you are: half-awake, running late, or just craving something warm and familiar.

It doesn’t require measuring cups or timers. It doesn’t demand a grocery run. And somehow, it delivers every time.

You’ll come back to it not just because it’s easy, but because it brings a sense of comfort — the kind you can fold into a tortilla and hold in your hand.

Conclusion: Breakfast That Brings Us Home

We live in a world that’s always rushing — from meetings to school runs, from obligations to goals. But breakfast can be a moment of pause. A moment of nourishment. A moment of togetherness.

These wraps were born in a moment of chaos, but they’ve become a source of calm — a little ritual that grounds my mornings and connects me to the kitchen, to my kids, and to the quiet joy of simple food done right.

So the next time your day begins in a blur, remember this: a warm pan, a few eggs, and a folded tortilla can be enough to start things off on the right foot.

And sometimes, that’s all we need.

Savor the Simplicity: A Wholesome Tale of Oat Pancakes

I can still hear the gentle clatter of the wooden spoon hitting the bowl, and the slow hum of the kettle coming to a boil. Weekend mornings in my grandmother’s kitchen were slow and sacred. No rush, no phones, no plans — just the comforting ritual of preparing breakfast together.

She didn’t cook with recipes. She cooked with rhythm. And one of her lesser-known but most beloved breakfast dishes was something I came to call “savory oat cakes.” They weren’t sweet, syrup-laden pancakes. No — these were humble, hearty, and oddly elegant, made with oats, eggs, a splash of milk, and a sprinkling of parsley snipped fresh from her backyard garden.

As a child, I didn’t know the term “nourishing.” But I felt it.

Years later, I found myself craving that same kind of warmth — not from a sugar high, but from food that felt grounding. And so this version of Easy & Quick Oat Pancakes was born. A little modern, a little nostalgic, and endlessly comforting.

Why This Recipe Works So Well

These oat pancakes are far more than a quick fix for an empty stomach. They’re an intentional blend of ingredients that balance nutrition, texture, and flavor. Here’s why they deserve a place in your breakfast (or lunch, or dinner) rotation:

  • Oats: Rich in fiber and slow-burning carbs, oats offer a satisfying, hearty base that keeps you full longer.
  • Eggs: Providing structure and protein, eggs give the pancakes lift and richness without requiring flour.
  • Milk: A splash of milk softens the oats and creates a cohesive batter. Use dairy or plant-based depending on your preference.
  • Parsley: It adds freshness and a gentle herbal note that elevates the dish beyond the ordinary.

Together, these simple ingredients create a savory pancake that’s golden on the outside, tender in the middle, and full of real, earthy flavor.

Ingredients

IngredientQuantity
Oatmeal1 cup
Eggs2
Milk1 glass (240 ml)
Chopped Parsley2 tablespoons

Directions

  1. Soak the Oats
    In a medium bowl, combine the oatmeal and milk. Let it sit for about 5 minutes to allow the oats to soften and absorb the liquid.
  2. Mix It Up
    Add the eggs and chopped parsley into the soaked oats. Stir until everything is well incorporated. The batter should be thick but pourable.
  3. Heat and Cook
    Preheat a non-stick skillet or frying pan over medium heat. Lightly grease the pan with oil or butter if desired.
  4. Shape Your Pancakes
    Spoon the batter onto the hot skillet to form small pancakes. Cook for 2–3 minutes on each side or until golden brown and cooked through.
  5. Serve Hot
    Serve your oat pancakes warm, either as-is or topped with your favorite savory sides like yogurt, avocado slices, or soft cheese.

Nutritional Highlights (Per Serving: Approx. 2 Pancakes)

NutrientAmount
Calories~210 kcal
Protein~11 g
Carbohydrates~20 g
Fat~9 g
Fiber~3 g
Sodium~110 mg

Not Just for Breakfast

One of the best things about these oat pancakes is their versatility. While they certainly shine in the morning hours with a side of avocado or a dollop of yogurt, they’re equally at home as a light lunch, mid-afternoon snack, or even a wholesome dinner when topped with sautéed greens or an egg.

If you’re someone who leans toward savory rather than sweet, these pancakes may become your new go-to comfort food.

Health Benefits at a Glance

Let’s face it: “pancake” isn’t a word we usually associate with healthy eating. But in this case, the name doesn’t tell the full story. These oat pancakes are packed with nutrients that support a balanced lifestyle:

  • High Fiber: Thanks to the oats, they help support digestion and keep blood sugar levels steady.
  • Protein-Packed: Eggs bring a solid dose of protein to keep you fueled and satisfied.
  • Low in Sugar: Unlike traditional pancakes, these are naturally sugar-free.
  • Gluten-Free Friendly: Use certified gluten-free oats, and you’ve got a gluten-free meal that feels anything but restrictive.
  • Customizable for Any Diet: Whether you’re vegetarian, dairy-free, or simply health-conscious, this recipe adapts to your needs with ease.

Creative Variations Worth Trying

The simplicity of the base recipe means there’s plenty of room for customization. Here are a few ways to make this dish your own:

Cheesy Herb Oat Pancakes

Add grated Parmesan, cheddar, or crumbled feta to the batter. Try herbs like dill, basil, or chives for a flavor upgrade.

Spiced and Satisfying

Mix in a pinch of cumin, smoked paprika, or turmeric to give your pancakes a more global twist. Great with yogurt or chutney.

Add Veggies

Grated zucchini, chopped spinach, or shredded carrots work beautifully and add extra nutrition. Just be sure to squeeze out excess moisture.

Vegan Version

Use a plant-based milk and swap the eggs for flax eggs (1 tablespoon flaxseed meal + 3 tablespoons water per egg). Let the flax sit for 10 minutes before adding.

Mini Pancake Bites

Make them small for party appetizers or lunchbox additions. Serve with a dipping sauce like garlicky yogurt or tahini dressing.

Expert Tips for Perfect Pancakes

  • Soak the Oats: Letting the oats soak in milk for a few minutes softens them and helps bind the batter together.
  • Don’t Overmix: Mix until just combined. Over-stirring can make the pancakes dense.
  • Cook Low and Slow: Medium heat is best. Too hot, and the outside burns before the inside cooks.
  • Use a Non-Stick Pan: This makes flipping easier and reduces the need for excess oil.
  • Batch Cook and Freeze: These pancakes freeze well. Make extra, freeze in layers, and reheat in a toaster or skillet.

Common Mistakes to Avoid

Even a simple recipe can go sideways without the right approach. Avoid these common missteps:

  • Skipping the soak: Raw oats need time to absorb the milk, or your pancakes may be dry or crumbly.
  • Making the batter too thin: Unlike flour-based batters, oat-based ones should be thicker. Add a little more oats if it feels too runny.
  • Crowding the pan: Give each pancake room to cook evenly — they need space to breathe.
  • Not seasoning: While these are intentionally mild, a touch of salt or seasoning in the batter goes a long way in bringing out flavor.

Frequently Asked Questions

Can I make these pancakes ahead of time?

Yes! Store them in an airtight container in the fridge for up to 3 days. Reheat on the stovetop, in a toaster, or briefly in the oven.

Are these freezer-friendly?

Absolutely. Cool completely, then freeze in a single layer before transferring to a bag or container. Reheat as needed.

Can I use steel-cut oats or instant oats?

Rolled oats work best. Instant oats may become too mushy, and steel-cut oats will be too firm unless pre-cooked.

Is this recipe kid-friendly?

Very! They’re soft, flavorful, and easy to eat. You can also shape them into fun sizes or add cheese to appeal to picky eaters.

What toppings go best with savory oat pancakes?

Try avocado, plain yogurt, sautéed mushrooms, a poached egg, smoked salmon, or a drizzle of olive oil and lemon juice.

Can I make this in a waffle maker?

Yes, but be sure to grease it well. The batter will be thicker than traditional waffle batter, but it works beautifully with enough patience.

A Recipe Rooted in Nourishment

At the heart of this recipe is the idea that simple food can be the most powerful. There are no fancy techniques or obscure ingredients here — just everyday staples brought together with intention and care.

For me, these oat pancakes are more than a meal. They’re a way of slowing down, of honoring tradition while embracing modern health. They remind me of my grandmother’s quiet joy in cooking and the peace that comes from knowing exactly what’s in your food.

In a world that often pushes fast and flashy, this recipe invites you to rediscover the beauty of real, grounded nourishment — made in your own kitchen, with your own hands.

Final Thoughts: Celebrate the Everyday

We often overlook the everyday ingredients in our kitchens. But it’s those very ingredients — oats, eggs, milk, herbs — that have the power to nourish, heal, and connect us. Recipes like these remind us that you don’t need a lot to make something truly good.

So whether you’re cooking for yourself on a slow Sunday morning or whipping something up for your family after a long day, these Easy & Quick Oat Pancakes are here to support you — simple, wholesome, and full of heart.

Here’s to more meals that feel like home.

Golden Crunch Skewers: The Humble Potato’s Moment to Shine

There’s something about the smell of garlic and potatoes roasting in the oven that instantly transports me to my childhood kitchen—barefoot on cool tiles, the soft hum of the oven fan, and the golden hue of early evening light spilling through the window. My mother never made extravagant meals, but she made food that hugged you from the inside out. One of her secret weapons? Potatoes.

They were always there: boiled, mashed, roasted. But it was the crispy versions that really sang. Her roasted potatoes had the perfect crunch and warmth that made you feel safe, welcome, and loved.

The recipe I’m sharing with you today—Golden Crunch Skewers—is inspired by those memories. It’s a modern, playful twist on the classic roasted potato. Skewered for style, rolled in breadcrumbs for texture, and kissed with garlic and paprika for that subtle punch of flavor, this dish proves once again that you don’t need fancy ingredients to make magic.

Why This Recipe Works

Potatoes are one of the most adaptable, budget-friendly, and comforting ingredients you can cook with. When roasted, their natural starches caramelize and crisp up beautifully, especially when given a little help with olive oil and a breadcrumb coating.

The skewering step isn’t just for presentation—it helps ensure even cooking and a satisfying grab-and-go form that makes these ideal for parties, picnics, or casual family dinners. Plus, kids absolutely love food on sticks.

Breadcrumbs bring the crunch, while paprika adds warmth and depth. Garlic infuses each bite with aromatic richness. Simple, but deeply satisfying.

Ingredients

IngredientQuantity
Potatoes6 medium-sized, quartered and skewered
Garlic1–2 cloves, pressed
Olive Oil2 tbsp
SaltTo taste
Breadcrumbs100 g (1/2 cup)
Paprika1 tsp

Step-by-Step Directions

  1. Prep the Potatoes
    Wash and quarter the potatoes. Thread them onto skewers (metal or wooden). If using wooden skewers, soak them in water for 30 minutes to prevent burning.
  2. Flavor Fusion
    In a bowl, combine the pressed garlic, olive oil, and a pinch of salt. Toss the skewered potatoes in the mixture until evenly coated.
  3. Crispy Coat
    In a shallow dish, mix the breadcrumbs and paprika. Roll each skewer in the breadcrumb mixture, pressing gently so it sticks.
  4. Bake to Golden Perfection
    Place skewers on a parchment-lined baking sheet. Bake in a preheated oven at 200°C (400°F) for 25–30 minutes, flipping halfway through, until golden brown and crisp.
  5. Serve & Savor
    Let them cool slightly, then serve hot with your favorite dip or sauce.

Nutritional Snapshot (Per Serving, Approx. 1 Skewer)

NutrientAmount
Calories~130 kcal
Carbohydrates~18 g
Protein~2.5 g
Fat~5.5 g
Fiber~2 g
Sodium~180 mg

A Love Letter to Simplicity

This recipe is a beautiful reminder that food doesn’t have to be complicated to be special. In fact, it’s the simplicity here that allows each element to shine: the creamy center of the potato, the crisp breadcrumb shell, and the subtle hum of seasoning that rounds out the flavor.

You can whip up these skewers on a weeknight with whatever’s in your pantry, or dress them up for a gathering with dips and garnishes. Either way, they bring people together—just like the food from my childhood did.

Tips for Potato Perfection

If you want to take your Golden Crunch Skewers from good to unforgettable, here are a few tips to keep in mind:

1. Choose the Right Potatoes

Waxy potatoes like Yukon Gold or red potatoes hold their shape well and are ideal for skewering. If you prefer fluffier insides, go for russets—but handle them carefully as they can break apart more easily after boiling.

2. Pre-boil for Creamy Centers

Lightly boiling the potatoes before roasting ensures a soft, creamy center and cuts down on oven time. Just be careful not to overcook them, or they’ll fall apart on the skewer.

3. Press the Breadcrumbs Firmly

After coating, press the breadcrumbs gently into the surface of the potatoes to help them adhere. You can also spritz the skewers lightly with oil before baking to enhance the crunch.

4. Don’t Skip the Flip

Turn your skewers halfway through baking. This promotes even browning and prevents one side from getting soggy.

5. Elevate with a Dip

While these are incredible on their own, pairing them with a dip like garlic aioli, herbed yogurt, or spicy ketchup can turn them into a true appetizer experience.

Tasty Variations to Try

Golden Crunch Skewers are a canvas just waiting to be painted. Try one of these riffs to change things up:

Spicy Kick

Add chili flakes or cayenne pepper to the breadcrumb mix for heat lovers.

Cheesy Twist

Toss in some finely grated Parmesan or Pecorino to the coating for an extra savory crunch.

Herb-Infused

Mix dried rosemary, thyme, or Italian seasoning into the breadcrumbs for a fragrant boost.

Sweet & Smoky

Use smoked paprika and a touch of brown sugar for a deeper, more complex flavor profile.

Vegan-Friendly

This recipe is naturally vegan as long as your breadcrumbs are plant-based. You can also use nutritional yeast for a cheesy flavor without dairy.

Frequently Asked Questions

Can I make these ahead of time?

Absolutely. You can prepare the skewers a few hours in advance and refrigerate them on a tray. When ready, just bake them fresh. If you need to reheat leftovers, pop them back in a hot oven for 10–12 minutes to revive the crunch.

Can I use sweet potatoes instead?

Yes! Sweet potatoes work beautifully, though they may need a little longer to bake and are softer in texture. Keep an eye on them so they don’t overcook and fall off the skewer.

Are these freezer-friendly?

You can freeze the parboiled, breadcrumb-coated skewers before baking. When ready, bake them straight from frozen at 200°C (400°F) for 35–40 minutes, flipping once.

What if I don’t have skewers?

No worries! You can still roast the quartered potatoes on a baking sheet and follow the same coating and seasoning steps. Just call them “Golden Crunch Bites” instead.

How do I make them gluten-free?

Simply use gluten-free breadcrumbs. The result is just as delicious and satisfying.

What kind of dips go best with this?

Try classic garlic aioli, sriracha mayo, tahini-lemon sauce, or even ranch dressing. These potatoes are incredibly versatile and pair well with most savory flavors.

Why You’ll Come Back to This Recipe Again and Again

At first glance, these skewers might seem like a simple side dish—but they’re so much more than that. They’re crispy, comforting, and deeply satisfying. They’re a way to bring people together, to create food memories around the dinner table or kitchen island. They’re kid-friendly, budget-friendly, and endlessly flexible.

There’s a special kind of joy in feeding the people you love with something you made from scratch, especially when it’s as crowd-pleasing as this. Whether you’re cooking for one, four, or fourteen, Golden Crunch Skewers are a guaranteed win.

Final Thoughts: Celebrating the Magic of the Everyday

It’s easy to get caught up in the idea that great food needs exotic ingredients or complicated techniques. But this recipe stands as a reminder that some of the most soul-satisfying dishes come from the most unassuming ingredients.

Potatoes, garlic, breadcrumbs—nothing fancy. But when handled with care and creativity, they become something special. They become a reason to gather, a source of comfort, a bite full of warmth and nostalgia.

So the next time you find yourself staring at a bag of potatoes and wondering what to make, remember this recipe. Let it fill your kitchen with warmth, your table with laughter, and your belly with joy.

From my family to yours—happy cooking.

Post-Holiday Comfort: The Pancake Trick Everyone Should Know

It was the day after Christmas. The guests were gone, the dishes were done, and all that remained in the fridge were half-used ingredients and leftover wrapping paper. The kitchen, once buzzing with holiday energy, had gone quiet. I stood at the counter with exactly two eggs, a small bag of flour, and not much else.

I wasn’t planning to cook — certainly not to impress anyone. But the winter wind outside and the familiar hush of the post-holiday lull made me crave something warm, quick, and filling. Something that smelled like comfort.

That’s when I remembered an old trick my grandmother used to show me when I was a child. She called it “poor cakes” — a humble mix of flour, eggs, and salt, pan-fried into little golden rounds. Sometimes she added milk, sometimes not. Sometimes they were topped with jam, sometimes just eaten plain out of the pan. They weren’t fancy, but they were ours.

I made them that day, not expecting much. But as I flipped the first cake and watched it rise just slightly, browning at the edges, something clicked. The kitchen began to feel warm again. These simple, rustic skillet cakes brought the joy of the holidays back into the house — without any of the stress.

Now, I make them every year after Christmas. They’ve become a quiet tradition in my home — a reminder that sometimes the best meals come from the most ordinary things.

Why These Simple Skillet Cakes Are Worth Making Again and Again

In a world of over-the-top desserts and time-consuming meals, this recipe is a breath of fresh air. It doesn’t rely on sugar, butter, or even baking powder. It doesn’t require special tools. It’s what many would call peasant food — but I call it genius.

These skillet cakes are lightly crisp on the outside, tender on the inside, and endlessly customizable. Think of them like a cross between pancakes and flatbreads — humble in ingredients but surprisingly satisfying in flavor and texture.

Here’s why they deserve a spot in your recipe rotation:

  • Made with 3–4 pantry staples
    You likely already have everything you need to make them, even after a holiday grocery haul.
  • Quick and easy to prepare
    From mixing to serving, you can make a batch in under 15 minutes.
  • Versatile and crowd-pleasing
    Serve them sweet or savory, dressed up or down — they suit every taste.
  • A great way to reduce waste
    Use leftover milk, jam, cheese, or even herbs to give them new life.

Ingredients

IngredientQuantity
Flour1 bowl (~150 g)
Eggs2
Milk50–100 ml (optional)
SaltA pinch

Directions

  1. In a mixing bowl, beat the eggs with a pinch of salt until well blended.
  2. Gradually add the flour, mixing until a thick batter forms.
  3. Add milk a little at a time, only if needed, to loosen the batter to a pourable consistency (similar to thick pancake batter).
  4. Heat a lightly oiled skillet or non-stick pan over medium heat.
  5. Spoon small amounts of batter into the pan to form individual cakes.
  6. Cook for 2–3 minutes on each side until golden brown and fully cooked through.
  7. Serve warm. These can be enjoyed with sweet toppings like honey or jam, or savory with cheese, herbs, or sour cream.

Nutritional Information (Per Piece – Approx. 8 Small Cakes)

NutrientAmount (Approx.)
Calories~110 kcal
Carbohydrates~14 g
Protein~4 g
Fat~4 g
Saturated Fat~1 g
Fiber~0.5 g
Sodium~80 mg

Serving Ideas for Every Appetite

These skillet cakes are incredibly versatile — think of them as a blank canvas ready for your favorite toppings or fillings. Here are just a few ways to serve them:

Sweet Options

  • Spread with fruit preserves or jam
  • Drizzle with honey or maple syrup
  • Dust with powdered sugar and a squeeze of lemon
  • Top with fresh berries and whipped cream

Savory Options

  • Spread with cream cheese and herbs
  • Top with scrambled eggs and cheese
  • Serve with sour cream and smoked salmon
  • Add sautéed mushrooms and garlic butter

These cakes also make great substitutes for flatbreads, wraps, or even sandwich bread in a pinch. Cut them into wedges, use them as a base for mini pizzas, or pack them as an easy travel snack.

Variations to Try

Though the base recipe is as simple as it gets, there are plenty of ways to make it your own:

Add Herbs or Spices

Mix fresh or dried herbs (like parsley, dill, oregano) into the batter for a savory twist. A pinch of black pepper, cumin, or paprika adds depth.

Cheese It Up

Fold in shredded cheese like cheddar, mozzarella, or parmesan. It will melt slightly and create golden cheesy spots as the cakes cook.

Make It Fluffier

Add ½ teaspoon of baking powder for a slightly lighter, airier texture — though traditional versions often skip it.

Make It Dairy-Free

Skip the milk entirely (as the recipe allows) or use plant-based milk like oat, almond, or soy. The result is still beautifully tender.

Gluten-Free Option

Use a gluten-free flour blend. The texture might be slightly different, but the results will still be delicious.

Frequently Asked Questions

Can I make these without milk?

Yes! Milk is entirely optional in this recipe. It helps thin the batter slightly and adds a touch of richness, but water works just fine — or you can skip it entirely for a thicker, more rustic dough.

What kind of flour works best?

All-purpose flour is ideal for a balanced texture. You can experiment with whole wheat flour for more fiber and a heartier flavor, but you may need to add a little extra liquid.

Do I need to use oil or butter in the pan?

Yes, a light amount of oil or butter prevents sticking and helps give the cakes a beautiful golden crust. Use neutral oils like sunflower, canola, or a knob of butter for flavor.

How thick should the batter be?

The consistency should be thicker than pancake batter but still scoopable. Think: somewhere between muffin batter and soft dough. You can adjust with milk as needed.

How long do they keep?

These cakes are best served fresh, but they keep well in the fridge for 2–3 days. Reheat in a dry skillet or toaster oven to restore their crisp edges.

Can I freeze them?

Yes. Let them cool completely, then freeze in a single layer before storing in an airtight container. To reheat, toast them directly from frozen in a pan or oven.

Can I make the batter in advance?

You can mix the batter and let it rest in the fridge for a few hours. Bring it back to room temperature and give it a quick stir before cooking.

Tips for Success

  • Whisk the eggs well before adding the flour for a smoother batter.
  • Don’t overcrowd the pan — give the cakes space to spread and flip easily.
  • Cook on medium heat — too high, and they’ll brown before the inside cooks; too low, and they’ll turn out pale and doughy.
  • Wipe the pan between batches if needed to avoid burnt bits or sticking.

Conclusion: A Post-Holiday Tradition Worth Keeping

Sometimes, the recipes we remember most aren’t the grandest ones. They’re not frosted, filled, or flambéed. They’re the ones we turn to when things quiet down — when the guests are gone, the fridge is half-empty, and we just want something warm and comforting in our hands.

These simple skillet cakes may not win awards, but they win hearts. They remind us that cooking doesn’t have to be complicated to be meaningful. With just flour, eggs, and salt, you can make something that feels like a small victory — something that brings you back to center after the whirlwind of the holidays.

So when December turns into January and the world slows down again, try making these. Let the sizzle of batter in the pan warm your kitchen. Let the scent of golden crust carry you back to childhood, or forward to something new.

Few people know this trick, but once you do — once you make these — they just might become your new favorite way to start the year.

The Sweetest Shortcut: Apple Puff Pastry That Tastes Like Home

It started on a rainy afternoon. The kind where the sky stays grey, the air smells of soaked sidewalks, and everything feels a little heavier. I had nothing in the pantry except two apples that were beginning to bruise and a sheet of puff pastry I’d forgotten in the freezer. I wasn’t planning on baking, but there’s something about the sound of rain and the need for comfort that sends you searching for sweetness.

I peeled the apples, tossed them in cinnamon and sugar, and wrapped them in pastry. No measuring, no fuss. In the oven, the aroma bloomed — sweet apples, butter, spice — and in twenty minutes, I had something that reminded me of the little hand pies my grandmother used to make when I was a child. Only this time, they weren’t slow-baked for hours. They were born out of necessity, and still, they carried the same warmth.

That day, I realized something simple: you don’t need a full pantry, fancy tools, or a pastry degree to make dessert feel like a hug. Sometimes, all you need is puff pastry and two apples.

Why This Dessert Works Every Time

There are recipes that surprise you with complexity, and there are recipes that surprise you with how incredibly little they ask of you. This is the latter — minimal effort, maximum reward. It’s what I call a “rescue dessert”: something you can whip up when:

  • You forgot you had guests coming.
  • You want something homemade without the mess.
  • You have leftover fruit that’s about to go bad.
  • You just need a little joy in the form of something warm and sweet.

This apple puff pastry recipe fits every one of those needs. It’s fast, flexible, and so rewarding. Whether you’re a seasoned baker or someone who usually avoids the kitchen, this dessert will become your go-to. Why? Because it works. Every. Single. Time.

Ingredients

IngredientQuantity
Puff Pastry500 g (store-bought or homemade)
Apples2 large, peeled, cored, and thinly sliced
Sugar3 tablespoons
Cinnamon1 teaspoon
Butter2 tablespoons, melted
Egg1, beaten (for egg wash)
Powdered sugar (optional)For dusting after baking

Directions

  1. Preheat the Oven
    Set your oven to 400°F (200°C) and line a baking tray with parchment paper.
  2. Prepare the Pastry
    Roll out the puff pastry on a floured surface to about 1/8-inch thick. You can make one large pastry or cut it into smaller rectangles for individual servings.
  3. Mix the Filling
    In a bowl, combine the apple slices with sugar, cinnamon, and melted butter. Toss until evenly coated.
  4. Assemble
    Layer the apple mixture on one half of the pastry. Fold over the pastry to enclose the filling, or place another piece of pastry on top to form a pocket.
  5. Seal and Finish
    Press the edges with a fork to seal. Brush the tops with beaten egg to create a golden, glossy finish.
  6. Bake
    Place in the oven and bake for 15–20 minutes, or until the pastry is puffed and golden brown.
  7. Serve
    Let cool slightly, dust with powdered sugar if desired, and enjoy warm.

Nutritional Information (Per Serving — Approx. 6 Servings)

NutrientAmount (Approx.)
Calories~280 kcal
Carbohydrates~32 g
Sugars~10 g
Protein~4 g
Fat~15 g
Saturated Fat~5 g
Fiber~2 g
Sodium~100 mg

The Magic Behind the Simplicity

At first glance, the ingredients are almost too simple. Puff pastry. Apples. Sugar. Cinnamon. Butter. And yet, when you put them together — roll them up, fold them over, or layer them in rustic stacks — you get something that feels like it took far more effort than it actually did.

Puff pastry is a gift to every home cook. Flaky, golden, buttery, and elegant, it transforms anything it touches. And apples? They’re nature’s dessert. Sweet, tart, soft, and juicy when cooked — apples pair beautifully with pastry’s richness, creating that timeless balance of flavors and textures.

Serving Suggestions: From Casual Cravings to Impressive Plates

One of the best things about this dessert is how versatile it is. Here are a few ways to enjoy or elevate it:

Serve it fresh out of the oven

There’s nothing better than breaking into that first bite while the pastry is still warm and crisp. A little powdered sugar on top goes a long way.

Add a scoop of vanilla ice cream

The classic combo: hot pastry meets cold cream. Let the ice cream melt slightly into the layers — it’s dessert bliss.

Drizzle with caramel or honey

For a richer finish, drizzle a bit of salted caramel or a spoon of warm honey over the top.

Make it brunch-friendly

Cut the pastry into small squares, top with apples, and bake open-faced. They’ll look like bakery tarts but come together in no time.

Serve with tea or coffee

These apple pastries pair beautifully with black tea, chai, or coffee. It’s the kind of snack that turns an ordinary afternoon into something a little special.

Creative Variations: One Recipe, Many Possibilities

Though the original version only uses apples and puff pastry, the beauty of this dessert lies in its adaptability. Here are a few inspired twists:

Add nuts

Sprinkle chopped walnuts, pecans, or almonds over the apples before baking for extra crunch.

Try pears instead

Use thinly sliced ripe pears for a softer, more delicate variation. Pairs well with cardamom or vanilla.

Make it spiced

Add nutmeg, allspice, or clove to the cinnamon-sugar mix for a holiday-season flavor profile.

Cheese it up

Yes — adding a touch of brie or cream cheese under the apple filling brings a rich, tangy contrast that’s hard to resist.

Go savory-sweet

Use only a hint of sugar and pair the apples with sharp cheddar or blue cheese. It’s an unexpected but delicious flavor combo.

Frequently Asked Questions

Can I use frozen puff pastry?

Absolutely. In fact, store-bought frozen puff pastry is exactly what makes this recipe so quick and easy. Just make sure to thaw it according to package directions before using.

What type of apples work best?

Firm apples like Granny Smith, Honeycrisp, or Fuji hold their shape well and provide a good balance of tart and sweet. You can also mix varieties for added complexity.

Can I make this ahead of time?

Yes! You can assemble the pastries and store them in the fridge for a few hours before baking. Just brush with egg wash right before they go into the oven.

Can I reheat leftovers?

Definitely. These reheat best in the oven or toaster oven at 300°F (150°C) for 5–7 minutes. Avoid the microwave if you want to keep that flaky crust.

Can I make this sugar-free?

You can use a sugar substitute like monk fruit, coconut sugar, or simply omit it if your apples are naturally sweet enough.

Is it okay to skip the egg wash?

Yes, but the egg wash gives the pastry a beautiful golden shine and helps it crisp. If you don’t eat eggs, use milk or a dairy-free milk alternative instead.

Can I freeze them after baking?

Yes. Let them cool completely, then freeze in an airtight container. Reheat in the oven to crisp them back up — they’ll be almost as good as fresh.

Pro Tips for Bakery-Style Results

  • Keep your puff pastry cold before working with it. If it gets too warm, it won’t puff as nicely in the oven.
  • Slice apples thinly and evenly so they cook through quickly and evenly during baking.
  • Don’t overload with filling — less is more when it comes to puff pastry. Overfilling can cause leaks and soggy bottoms.
  • Use parchment paper on your baking tray for easy cleanup and to prevent sticking.
  • Let it rest for 5 minutes after baking before serving — the pastry sets slightly and becomes easier to handle.

Conclusion: A Recipe That Delivers More Than Dessert

This puff pastry and apple dessert is more than just a quick fix. It’s a reminder that even the simplest things can bring joy — that dessert doesn’t have to be extravagant to feel special. It’s what you make when time is short but your heart is full. It’s what you bake when you want to show someone you care, without needing perfection or precision.

The smell of cinnamon. The sound of pastry crackling under a fork. The warmth of baked apples. These are the small luxuries that turn ordinary afternoons into soft, sweet moments.

Whether you’re making it for a dinner party, a solo treat, or a last-minute dessert when everything else has gone wrong — this recipe will never let you down. And who knows? Maybe one rainy afternoon, you’ll find yourself in the same spot I was, holding two apples and a sheet of puff pastry… and the day will get a little better because of it.

The Humble Star of the Kitchen: Cabbage with Egg

I still remember the first time I smelled cabbage cooking in my grandmother’s kitchen. It was late afternoon in spring — that kind of weather where the windows are open just enough to let in a breeze and the sound of clinking utensils echoes across the tiled walls.

There was a simplicity to her cooking that fascinated me as a child. While the neighbors were fussing over roasts and stews, Grandma was pulling magic out of the most unassuming ingredients. That day, she made a dish that forever redefined what comfort meant to me: cabbage with egg. No meat, no exotic spice, just cabbage, onion, and eggs — yet the taste was so rich, so complete, that I swore off meat for the rest of the week.

She called it “the peasant’s luxury.” And I’ve come to believe that she was right. Food doesn’t have to be expensive to be indulgent, nor complicated to be good. Some of the most satisfying meals are the ones born from necessity — built around what you already have in your kitchen.

That’s exactly what this dish represents. It’s homey, filling, incredibly nourishing, and yet so simple that it often surprises people. A dish made with just cabbage and eggs has no right being this good — but it is. And once you try it, you’ll understand why this humble combination is secretly the star of Eastern European kitchens, wartime recipe books, and now, maybe even your modern kitchen too.

Why Cabbage and Egg Works So Well Together

At first glance, the ingredients sound almost too modest: cabbage, onions, eggs, and a splash of oil. But in the pan, something happens — the cabbage softens into delicate, slightly sweet ribbons; the onions caramelize into golden flavor bombs; and the eggs come in to tie everything together like a golden lace.

Here’s why this combination is so satisfying:

  • Textural contrast: You get a blend of soft, almost buttery cabbage with bits of egg that are tender and fluffy, with the occasional crisp edge from pan-frying.
  • Nutrient-dense and high in fiber: Cabbage is a nutritional powerhouse packed with fiber, vitamins C and K, while eggs provide protein and healthy fats.
  • Naturally low-carb and gluten-free: It fits into various diets — from keto to vegetarian — without feeling like a compromise.
  • Budget-friendly: With just a few pantry staples, you can create a meal that feels hearty and complete.

Ingredients

IngredientQuantity
Chicken eggs (boiled)3–4 eggs
WaterEnough to boil the eggs
Young cabbageAbout 3 cups, finely chopped
Olive oil2 tablespoons (for sautéing)
Onions2 medium, finely chopped
Chicken eggs (raw)3 eggs (for batter)
Sugar1 small spoon
SaltTo taste
Black pepperTo taste
Fresh herbs (optional)For garnish (dill or parsley)

Directions

  1. Boil the Eggs
    Place 3–4 eggs in a pot of cold water. Bring to a boil, then simmer for 10 minutes. Once cooked, cool under cold water, peel, and chop. Set aside.
  2. Sauté the Onion
    In a large skillet, heat the olive oil over medium heat. Add chopped onions and cook for 5–7 minutes until golden and soft.
  3. Cook the Cabbage
    Add the chopped cabbage to the pan. Season with salt, pepper, and sugar. Stir and cook uncovered for about 10–12 minutes, or until the cabbage becomes tender and lightly caramelized.
  4. Add the Egg Batter
    In a bowl, whisk 3 raw eggs. Pour them over the cabbage-onion mixture. Stir continuously for 2–3 minutes until the eggs are fully cooked and gently bind everything together.
  5. Combine and Finish
    Add the chopped hard-boiled eggs and fold them gently into the cooked mixture. Let it all warm through, then remove from heat.
  6. Serve It Up
    Garnish with chopped fresh herbs if desired. Enjoy hot, warm, or even chilled — it’s delicious any way you serve it.

Nutritional Breakdown (Per Serving – approx. 4 servings)

NutrientAmount (Approx.)
Calories~220 kcal
Protein~10 g
Carbohydrates~12 g
Sugars~5 g
Fat~14 g
Saturated Fat~3 g
Fiber~4 g
Sodium~150 mg
Vitamin C~40 mg
Iron~1.5 mg

Cabbage With Egg: More Than Just a Side Dish

While many think of cabbage as a supporting character — something that goes under a pork roast or floats in a soup — this recipe flips the narrative. Here, cabbage takes center stage.

And it’s not just a filler. In fact, many people who try this dish end up eating it in place of meat, which is where the phrase “tastier than meat” truly earns its weight.

The savory depth of sautéed onions paired with the silkiness of cooked cabbage gives it a umami quality you wouldn’t expect from vegetables. The eggs bring it all together, not just texturally but in taste. The result is a dish that checks all the boxes of a comfort meal: warm, deeply flavorful, protein-rich, and filling.

Serving Ideas: Keep It Simple or Dress It Up

Serve it as-is

Honestly, it doesn’t need much. A big spoonful of this warm cabbage-egg dish and a slice of rye or sourdough bread is a meal in itself.

Use it as a filling

It makes a fantastic stuffing for wraps, savory crepes, or even puff pastry if you’re looking to make turnovers or savory pockets.

Pair with grains

Serve it over barley, brown rice, or quinoa for a balanced vegetarian meal.

Cold or hot, it works both ways

One of the charms of this recipe is how good it is cold — straight from the fridge, it makes for an ideal snack or lunchbox filler.

Ways to Make It Your Own

This dish may be minimalist at its core, but it leaves plenty of room for creativity. Here are a few variations and customizations you might enjoy:

Add shredded carrots

For sweetness and color, toss in some grated carrot when sautéing the onions.

Spice it up

A pinch of chili flakes or smoked paprika can add depth and heat.

Cheese, please

A sprinkle of grated cheese toward the end of cooking — like parmesan, feta, or cheddar — can give the dish a creamy or tangy upgrade.

Boost the herbs

Fresh dill, parsley, chives, or thyme can be added before serving for brightness.

Use red cabbage

If you only have red cabbage on hand, go for it! It’ll give the dish a deeper hue and slightly earthier flavor.

Frequently Asked Questions

Is this dish vegetarian?

Yes, it’s 100% vegetarian. It contains no meat or meat by-products and can be adapted to suit a lacto-vegetarian diet if you decide to add cheese.

Can I make this recipe ahead of time?

Absolutely. It stores very well. You can prepare it in advance and keep it in the refrigerator for up to 4 days. It tastes great reheated or served cold.

What kind of cabbage works best?

Young green cabbage is ideal because it cooks down quickly and has a tender, sweet flavor. Savoy cabbage also works beautifully. Avoid using hard, mature cabbages unless you plan to cook them longer.

Can I use leftover cooked cabbage?

Yes, if you have pre-cooked cabbage, simply skip the sautéing step and jump straight to combining it with the onions and eggs.

Can I freeze it?

It can be frozen, but the texture may change slightly upon thawing — cabbage tends to release more water. For best results, freeze in small portions and reheat in a pan to help evaporate any excess moisture.

Is this dish suitable for a low-carb or keto diet?

Yes! It’s naturally low in carbohydrates and high in fiber and protein, making it a fantastic fit for low-carb lifestyles.

Cooking Tips from the Old World

  • Don’t rush the onions: Let them caramelize slowly over medium heat — this builds the foundational flavor.
  • Salt in layers: Season the onions, then the cabbage, then the eggs — this brings more dimension to the overall taste.
  • Use a wide skillet: A larger surface area means better browning and quicker cooking.
  • Let the egg set: After adding the beaten eggs, let them sit for a moment before stirring. This gives you nice pockets of soft egg rather than a scramble.
  • Go for the golden edge: Don’t be afraid to let the cabbage crisp just a little — those browned bits are pure flavor.

Conclusion: A Recipe That Grounds and Nourishes

At its heart, Cabbage with Egg is more than a recipe — it’s a reminder. A reminder that nourishment doesn’t always need a long list of ingredients, or a fancy cooking technique, or a lot of time. Sometimes, it’s the humble things — the everyday vegetables, the familiar eggs, the soft crackle of oil in a pan — that feed us most deeply.

This dish speaks to old traditions and modern needs alike. It’s affordable, adaptable, and immensely satisfying. Whether you’re cooking for one, feeding a family, or looking for a vegetarian meal that won’t leave you hungry an hour later, this dish delivers.

Most of all, it carries with it the spirit of simplicity — the kind our grandmothers knew well. That good food comes from care, not complexity. That a little cabbage and a few eggs, when treated right, can taste like something far more luxurious.

So next time you’re tempted to dismiss cabbage as plain or boring, remember this dish. Cook it slow, season it well, and let it show you what it’s capable of.

Morning Magic in a Roll: The Story Behind Strawberry Cream Rolls

It was the summer I turned eight when I discovered how magical mornings could be. My grandmother had this uncanny way of turning even the simplest ingredients into something unforgettable. One morning, while I was still wiping sleep from my eyes, she handed me a warm little roll. It was golden, crisp on the outside, soft and creamy inside — and filled with ripe strawberries she had picked at dawn from the garden.

That moment — sitting barefoot on the kitchen counter, sunlight peeking through the curtains, sticky fingers from cream and fruit — has lived with me ever since. It wasn’t a complicated breakfast. It wasn’t an elaborate brunch. It was simple, fast, and made with love. That roll, she said, was “quicker than buns, better than toast, and a little hug for your belly.”

Today, those strawberry cream rolls are still my go-to whenever I want something warm, sweet, and made in a flash. In a world of on-the-go breakfasts and forgotten mornings, these little rolls are a reminder of what breakfast should be — nourishing, joyful, and a little indulgent.

Why Strawberry Cream Rolls Work for Real Life

Let’s face it — mornings are chaotic. Whether you’re rushing to school drop-off, dodging emails before 9 a.m., or just trying to get out the door without forgetting your keys, breakfast often takes a back seat.

That’s where Strawberry Cream Rolls come in — soft sandwich bread filled with lightly sweetened cream cheese and fresh strawberries, rolled up and pan-fried until golden. They’re fast, satisfying, and just fancy enough to make a weekday morning feel special.

Here’s why they’re worth keeping in your breakfast arsenal:

  • Ready in 5 Minutes: Yes, really. From fridge to plate in under 10 minutes.
  • No baking, no special tools: If you have a pan and a spatula, you’re all set.
  • Kid-approved: Sweet enough to feel like a treat, wholesome enough for parents to say yes.
  • Endlessly customizable: Swap fruits, add spices, or go savory — more on that below.

Ingredients

IngredientQuantity
Soft sandwich bread4 slices (crusts removed)
Fresh strawberries½ cup (chopped)
Cream cheese100 g (softened)
Honey or maple syrup1–2 teaspoons (optional, to taste)
Butter1 tablespoon (for frying)
Powdered sugarFor dusting (optional)

Directions

  1. Flatten the Bread
    Use a rolling pin to flatten each slice of sandwich bread into a thin sheet.
  2. Make the Cream Filling
    In a bowl, mix softened cream cheese with honey or maple syrup. Spread a generous layer on each slice of flattened bread.
  3. Add the Berries
    Sprinkle chopped strawberries over the cream cheese layer.
  4. Roll It Up
    Gently roll each slice into a tight log, sealing the edge with a little cream cheese if needed.
  5. Pan-Fry to Perfection
    Heat butter in a non-stick pan over medium heat. Place the rolls seam-side down and cook, turning occasionally, until golden brown on all sides (about 2–3 minutes total).
  6. Dust and Serve
    Remove from heat, dust with powdered sugar if desired, and serve warm. Best enjoyed fresh!

Nutritional (Per Roll, Approx.)

NutrientAmount
Calories~160 kcal
Protein~3 g
Carbohydrates~17 g
Sugars~5 g
Fat~9 g
Saturated Fat~4 g
Fiber~1 g
Sodium~130 mg
Calcium~40 mg

The Breakfast Hybrid You Didn’t Know You Needed

These rolls are a beautiful hybrid of several breakfast favorites:

  • Like French toast, they’re crisp on the outside and soft inside.
  • Like filled crepes, they hold sweet, creamy fillings.
  • Like stuffed pancakes, they deliver layers of flavor in every bite.
  • And like grilled sandwiches, they’re hot, melty, and oh-so-satisfying.

But unlike any of those, they take almost no time, use basic pantry ingredients, and require zero baking skills. They’re the kind of thing you can make half-asleep, and still feel proud to serve.

Serving Ideas That Elevate the Experience

These rolls are fantastic on their own, but with a few thoughtful additions, they can become the centerpiece of a breakfast spread or an elegant brunch bite.

Simple Add-ons

  • Dust with powdered sugar: Adds a bakery-style touch.
  • Serve with fresh berries: A handful of blueberries or raspberries on the side brings color and tang.
  • Drizzle with honey or maple syrup: Especially good if you prefer a sweeter version.
  • Add a scoop of Greek yogurt: Protein boost and creaminess on the side.

Pairing with Beverages

  • Perfect with a latte or hot cocoa for cozy mornings.
  • Serve with cold brew or iced matcha for warmer days.
  • Herbal teas like chamomile or mint work beautifully to complement the creaminess.

Creative Variations for Every Craving

While strawberries and cream cheese are a classic combo, these rolls are endlessly adaptable. Here are some twists that have worked beautifully in our kitchen:

Fruit Swaps

  • Banana & peanut butter: A sweet-salty favorite.
  • Apples & cinnamon: Use thinly sliced apples with a dash of cinnamon sugar.
  • Blueberries & lemon zest: Tangy and refreshing.

Sweet Spread Options

  • Nutella or chocolate spread: For those indulgent weekend mornings.
  • Almond butter & maple syrup: Rich and nutty with just the right sweetness.
  • Mascarpone with honey: Italian-inspired elegance.

Savory Ideas

  • Cream cheese and smoked salmon: Yes, it works — think of it as a mini rolled bagel.
  • Scrambled egg and cheddar: A handheld breakfast sandwich.
  • Avocado and chili flakes: Simple, creamy, with a spicy kick.

Pro Tips for the Perfect Roll Every Time

Use Soft, Fresh Bread

Day-old or dry bread won’t roll smoothly and might tear. Use fresh, soft sandwich bread and remove the crusts for easy rolling.

Flatten Evenly

Use a rolling pin (or a drinking glass if that’s what you have) to press the bread flat. This helps the bread roll tightly and hold its shape when cooking.

Don’t Overstuff

Too much filling will cause the roll to burst or leak. Spread evenly and keep it light — the heat will naturally soften and meld the ingredients together.

Use Medium Heat

Cooking on high might burn the bread before the inside warms up. Medium heat gives you a golden crust and warm, gooey center.

Seal the Edge

Use a dab of cream cheese or press firmly to make sure the roll stays closed during frying.

Frequently Asked Questions

Can I make these ahead of time?

Yes! You can prep and assemble the rolls the night before, store them wrapped in plastic or an airtight container, and fry them in the morning. For an even quicker option, cook them fully and reheat in a pan or toaster oven.

Can I bake them instead of pan-frying?

Absolutely. Place them on a parchment-lined tray and bake at 375°F (190°C) for about 10–12 minutes, flipping once halfway through. They won’t be as crisp as pan-fried, but still delicious.

Is there a dairy-free option?

Yes — use a plant-based cream cheese alternative and vegan butter for frying. You can also use mashed avocado or coconut yogurt as filling bases.

Can I make this gluten-free?

You can use gluten-free sandwich bread. Just make sure it’s soft and pliable enough to roll — you may need to warm it slightly to make it more flexible.

What kind of strawberries work best?

Fresh strawberries are ideal, chopped small so they don’t break through the bread. Frozen strawberries are too wet unless thawed and patted dry thoroughly.

Can I freeze these rolls?

They’re best fresh, but you can freeze cooked rolls and reheat in a toaster oven or skillet. Just don’t refreeze if using frozen strawberries initially.

Why These Rolls Are More Than Just Breakfast

Sometimes the best recipes aren’t just recipes — they’re routines, rhythms, rituals. These strawberry cream rolls aren’t just a quick fix; they’re a reminder that even the busiest mornings deserve a little joy.

They’re made of things we usually take for granted: a slice of bread, a spoon of cream cheese, a few berries. But when those come together in a warm roll, pan-toasted and handed over with love, something ordinary becomes something memorable.

This recipe has traveled with me — from childhood kitchens to college dorm rooms, to hectic adult mornings when time is short and comfort is needed. And every time I make them, I hear my grandmother’s voice in the back of my mind: “Five minutes, and the day gets sweeter.”

Conclusion: A Roll Worth Repeating

In a world where breakfast is often skipped, rushed, or reduced to something packaged, Strawberry Cream Rolls bring us back to the table. They’re fast enough for real life, but sweet enough to make mornings feel special again.

Whether you’re making them for your kids, your partner, or yourself, they’re a small, delicious way to start the day with intention. Not every meal needs to be a masterpiece — sometimes, it just needs to be warm, real, and shared.

So tomorrow morning, give yourself five minutes. Flatten the bread, roll the cream, tuck in the berries, and sizzle something simple — something beautiful.

Because breakfast should feel like this: soft, warm, and just a little magical.

Heirloom Health: The Story and Simplicity of Grandma’s Quick Lentil Bread

When I was a child, mornings at my grandmother’s house were unlike any other. Before the sun was up, her kitchen was already awake — filled with the sound of clinking ceramic bowls, the whiff of something savory baking, and the kind of warmth you don’t get from an oven alone. She didn’t own a toaster. She didn’t need one. What she had was better — a flat stone plate over a flame where she cooked her beloved lentil bread.

It wasn’t made from flour. It wasn’t leavened with yeast or filled with cheese or eggs. It was humble, rustic, and incredibly nourishing — the kind of food that fills your belly and soul in equal measure. She called it the quick bread — a simple mixture of soaked lentils, oil, spices, and her secret ingredient: psyllium husk, something she swore made all things “stick together just right.”

That bread became more than food in our family. It was the scent of weekends. It was what she made when we felt sick, when times were tight, or when we came home with heavy hearts and tired feet. And today, decades later, I still make her lentil bread. I’ve modernized it slightly — a touch of baking powder, a sprinkle of sesame on top — but the essence is still hers. Uncomplicated. Unapologetically healthy. And deeply comforting.

This article is an ode to that bread and the kind of cooking that connects generations — food that heals, sustains, and remembers.

Why This Lentil Bread Belongs in Your Kitchen

We live in an age where food has become both complicated and commodified. But sometimes, the best things are the simplest. This lentil bread is a return to roots — minimal ingredients, maximum nutrition, and deeply satisfying in both texture and flavor.

Here’s why you’ll want to keep this recipe on rotation:

  • Gluten-Free, Flour-Free, Egg-Free: A dream for those with dietary restrictions, and a delight for those simply seeking cleaner eating.
  • Packed with Plant Protein: Lentils are a powerhouse of protein, fiber, and essential minerals, making this bread a smart way to fuel your day.
  • Quick and Easy to Make: No kneading, no rising time, and no fancy equipment required.
  • Versatile: Enjoy it plain, toasted, with hummus, avocado, nut butter, or even as a base for mini sandwiches.
  • Meal Prep Friendly: It stores well and tastes just as good the next day, if not better.

Ingredients at a Glance

IngredientQuantity
Lentils140 g
WaterEnough to soak the lentils overnight, plus 100 ml for blending
Olive oil30 ml
SaltTo taste
Psyllium husk30 g
Ground coriander1 tsp
Baking powder5 g
Vegetable oilFor greasing your hands
Black sesame seedsFor topping

Simple Steps to Nourish Your Morning

  1. Soak the Lentils
    Place the lentils in a bowl and cover them with water. Soak overnight or for at least 8 hours. Drain and rinse well.
  2. Blend into Batter
    Add the soaked lentils to a blender or food processor with 100 ml of fresh water, olive oil, and salt. Blend until smooth and creamy.
  3. Add the Dry Mix
    Transfer the blended lentil mixture to a bowl. Stir in psyllium husk, ground coriander, and baking powder. Mix well and let sit for 10 minutes — this allows the psyllium to absorb moisture and bind the dough.
  4. Shape the Dough
    Lightly grease your hands with vegetable oil. Form the mixture into a round or oval loaf, or divide into small rolls.
  5. Top and Bake
    Sprinkle the top with black sesame seeds. Bake in a preheated oven at 375°F (190°C) for 35–45 minutes, or until firm and golden brown on the outside.
  6. Cool and Slice
    Allow the bread to cool for at least 10 minutes before slicing. Best enjoyed warm or toasted!

Nutritional Highlights (per slice, approx. 8 slices)

NutrientAmount (approx.)
Calories~120 kcal
Protein~5 g
Carbohydrates~12 g
Fiber~6 g
Fat~5 g
Saturated Fat~0.5 g
SodiumVaries (based on salt used)
Iron~1.2 mg
Magnesium~35 mg

The Secret Ingredient: Psyllium Husk

If you’ve never used psyllium husk before, you might be wondering what role it plays in this bread. Think of it as nature’s gluten substitute. When mixed with liquid, psyllium husk forms a gel-like texture that helps bind the ingredients and give structure to the bread — essential when you’re not using flour or eggs.

Not only is it a functional binder, but psyllium is also excellent for digestive health. It’s high in soluble fiber, which supports healthy gut function and can help regulate blood sugar levels. This humble seed husk does double duty — both structurally and nutritionally.

Topping It Off: The Magic of Black Sesame Seeds

The finishing touch on this bread — black sesame seeds — isn’t just for looks. These little seeds add a subtle nutty flavor and a boost of antioxidants, calcium, and healthy fats. In many cultures, black sesame seeds symbolize longevity and nourishment. Grandma didn’t just toss them on top for fun; she believed in their value, their quiet power.

Serving Ideas for Every Meal

What makes this bread so special is its flexibility. Whether you’re crafting a slow weekend breakfast or need a quick snack between Zoom calls, it fits.

Morning Fuel

Serve it warm with a smear of avocado, crushed tomatoes with olive oil, or even a soft plant-based spread.

Midday Pick-Me-Up

Slice thin and toast it. Add hummus, sliced cucumbers, and a sprinkle of za’atar for a quick sandwich alternative.

Dinner Companion

Use it as a side for soups, stews, or lentil curries — its dense, earthy texture holds up well with bold flavors.

Snack Time

Pair it with nut butter and sliced bananas for a sweet-savory balance that satisfies.

How to Store and Reheat

Room Temperature

Let the bread cool completely and store it in an airtight container or wrapped in parchment paper for up to 2 days.

Refrigeration

Store in the fridge for up to 5 days. To revive its texture, pop it in the toaster or oven for a few minutes before serving.

Freezing

This bread freezes beautifully. Slice it first, freeze the slices individually, and toast straight from the freezer whenever needed.

Frequently Asked Questions

Can I use red lentils instead of green or brown?

Red lentils tend to become mushier when soaked and blended, which might affect the final structure. Green or brown lentils are best for this recipe due to their firmer consistency.

Is psyllium husk essential?

Yes — it’s key to the texture and binding. If you skip it, the bread may not hold together well. However, in a pinch, you can experiment with ground flaxseed or chia seeds (though the texture may differ).

Can I add herbs or spices?

Absolutely. This recipe is a perfect blank canvas. Try adding cumin, paprika, rosemary, thyme, or even a dash of turmeric for added complexity and wellness benefits.

Can I make this into rolls or flatbread?

Yes! Shape the dough into smaller portions and reduce baking time accordingly. Flattening it into rounds can turn this into a quick flatbread alternative for wraps or personal pizzas.

Is it okay to skip the sesame seeds?

Yes — they’re optional. You can leave them off entirely or substitute with white sesame seeds, poppy seeds, or sunflower seeds.

What kind of oil should I use?

Olive oil is preferred for its flavor and health benefits, but any neutral vegetable oil can work in a pinch.

Tips for the Perfect Loaf

  • Soaking Time Matters: Soak the lentils overnight or for at least 8 hours. This not only softens them for blending but also improves digestibility.
  • Let the Batter Rest: After mixing in the psyllium husk, allow the mixture to rest for 10–15 minutes. This gives the binding agent time to activate and firm up.
  • Grease Lightly: Greasing your hands with a touch of oil before shaping the dough makes it easier to handle.
  • Don’t Overbake: You want the crust to be firm and golden, but not too dry. Keep an eye on it during the last 10 minutes of baking.

Nutritional Benefits: A Bread That Loves You Back

This isn’t just a “healthier” bread. It’s actually good for you. Every bite delivers plant-based protein, complex carbs, and fiber. It’s gluten-free, dairy-free, and egg-free, which makes it perfect for people with food sensitivities or those exploring more inclusive ways of eating.

  • Rich in Fiber – Supports digestion and fullness.
  • Low Glycemic Index – Lentils release energy slowly, helping to stabilize blood sugar.
  • Gut-Friendly – Thanks to the psyllium and natural prebiotics in lentils.
  • Protein-Packed – Keeps you full and supports muscle repair and energy.

Conclusion: A Recipe to Remember, a Ritual to Repeat

In a world overflowing with superfoods, supplements, and fast fixes, Grandma’s quick lentil bread reminds us of something deeper — that nourishment is not only about nutrients, but about history, ritual, and love. It’s about honoring the hands that cooked before us and feeding the ones we hold dear today.

This recipe is more than plant-based. It’s place-based. It belongs in the home, in the morning light, on a shared table.

So go ahead — soak your lentils, stir with care, and bake a loaf that’s as meaningful as it is wholesome. Whether you’re new to lentil bread or returning to it like an old friend, this simple, beautiful recipe is sure to become a timeless favorite.

Comfort in a Casserole Dish: The Soul of Creamy Chicken and Broccoli Pasta Bake

There are some recipes that feel less like food and more like stories — chapters of life written in aromas, textures, and the warmth of a shared meal. For me, this creamy chicken and broccoli pasta bake isn’t just a dish, it’s the story of Sunday evenings in my grandmother’s kitchen.

After a long week of school and errands, her house became our sanctuary. You could always tell what was for dinner before even walking in — the earthy scent of mushrooms, the sweet caramelized onion, the rich cream bubbling around crispy chicken and tender pasta. My sister and I would sit at the counter, legs swinging, waiting for that golden top to emerge from the oven. It was cozy, comforting, and healing in ways only food can be.

This recipe is an homage to those moments — a blend of flavor and feeling, humble ingredients transformed into something more.

Why This Dish Stands Out

In a world of quick-fix dinners and delivery apps, the creamy chicken and broccoli pasta bake is a return to the kind of cooking that nourishes on every level. It’s not fancy. It’s not trendy. But it is deeply satisfying.

Here’s why this recipe continues to resonate with home cooks everywhere:

  • Balanced richness: The dish delivers creamy indulgence without feeling too heavy, thanks to the balance of tender broccoli and savory mushrooms.
  • One-dish simplicity: A true kitchen hero, it brings protein, vegetables, and carbs into one hearty bake — easy to prepare, easier to love.
  • Family-friendly: Kids devour it, picky eaters come back for seconds, and adults appreciate the elevated flavors.
  • Make-ahead magic: It can be prepped ahead, stored, and reheated without losing its soul — perfect for busy families or weeknight meals.

Ingredients

IngredientQuantity
Pasta8 oz (250 g)
Broccoli1 head (about 2 cups, florets separated)
Chicken fillets2 (about 400 g, diced)
Salt1 teaspoon
Black pepper1 teaspoon
Butter2 tablespoons (for frying)
Onion1 medium, finely chopped
Mushrooms8 (about 200 g), sliced
Garlic3 cloves, minced
Cream2 cups (500 ml)
Parmesan cheese3 oz (90 g), grated
Nutmeg1 teaspoon
Olive oil1 teaspoon (for greasing)
Mozzarella cheese1 small package (150 g, shredded)
Fresh parsley1 bunch (2 tablespoons, chopped)

Directions

  1. Boil & Blanch
    Cook pasta in salted boiling water until al dente. In the final 2 minutes, add the broccoli florets. Drain and set aside.
  2. Sauté Symphony
    In a large skillet, melt butter over medium heat. Add diced chicken and season with salt and pepper. Cook until golden and cooked through. Remove and set aside.
  3. Aromatics in Action
    In the same skillet, add a bit more butter if needed. Sauté onions until translucent. Add mushrooms and garlic; cook until softened and fragrant.
  4. Creamy Crescendo
    Return chicken to skillet. Pour in cream, stir in grated Parmesan, nutmeg, and let simmer for 3–4 minutes until slightly thickened.
  5. Combine & Compose
    Add cooked pasta and broccoli to the creamy sauce. Stir well to coat everything evenly.
  6. Baked to Brilliance
    Preheat oven to 375°F (190°C). Lightly grease a baking dish with olive oil. Pour the creamy pasta mixture into the dish.
  7. Cheese Finale
    Top with shredded mozzarella. Bake for 20 minutes, or until bubbly and golden on top.
  8. Garnish & Serve
    Sprinkle with fresh chopped parsley before serving. Best enjoyed warm!

Nutritional Breakdown (per serving, approx. 6 servings)

NutrientAmount
Calories~520 kcal
Protein~30 g
Carbohydrates~35 g
Fats~30 g
Saturated Fat~15 g
Fiber~3 g
Sodium~550 mg
Calcium~180 mg
Vitamin C~35 mg

Tips for Elevating Your Bake

While this dish is straightforward, there are little tricks to make it even better:

1. Don’t Overcook the Pasta

Cook it until just al dente, since it’ll continue to cook in the oven. Overcooked pasta turns mushy fast in creamy bakes.

2. Roast the Broccoli

If you want a deeper flavor and slight crispness, toss the broccoli florets in a bit of olive oil, salt, and pepper, and roast them at 425°F (220°C) for 10–15 minutes before adding to the mix.

3. Use Freshly Grated Cheese

Pre-shredded cheese is convenient but often contains anti-caking agents that prevent smooth melting. Grating fresh Parmesan and mozzarella adds flavor and creaminess.

4. Add a Crunchy Topping

A sprinkle of breadcrumbs mixed with olive oil or butter before baking creates a lovely, golden crust. Try panko for extra texture.

5. Season in Layers

Don’t wait until the cream sauce to season. Season the chicken, then the mushrooms, then the sauce — it makes a difference.

Serving Suggestions: Make It a Meal

While the bake is satisfying on its own, it pairs beautifully with:

  • Garlic bread: Crunchy edges and soft middle — the perfect dipper for the sauce.
  • Simple green salad: Toss arugula or spinach with lemon vinaigrette for a light contrast.
  • White wine: A crisp Chardonnay or Sauvignon Blanc cuts through the richness nicely.

Want a cozier vibe? Serve it with soup — a tomato basil or creamy cauliflower pairs particularly well.

Variations to Fit Every Table

One of the joys of this bake is how flexible it is. Whether you’re adapting for dietary needs or just using what you have, here are a few crowd-tested variations:

For Vegetarians

Skip the chicken and double the mushrooms. Add a handful of spinach or some sun-dried tomatoes for extra flair.

Low-Carb Option

Use spiralized zucchini or cauliflower instead of pasta. You’ll get a lighter bake that still satisfies.

Vegan Take

Substitute the cream with unsweetened coconut cream or cashew cream, and use plant-based cheeses. Replace chicken with tofu or lentils.

Add Spice

If your household enjoys a bit of heat, toss in some red pepper flakes or chopped jalapeños to the sauce.

Different Proteins

Try shredded rotisserie chicken for speed, or swap in turkey, ham, or even sausage for a flavor twist.

Storage and Make-Ahead Tips

This pasta bake makes excellent leftovers — some even argue it tastes better the next day.

Refrigeration

Store tightly covered in the refrigerator for up to 4 days. To reheat, cover with foil and warm in the oven at 350°F (175°C) until hot, or microwave individual portions.

Freezing

Freeze in an airtight container or tightly wrapped baking dish. It can be frozen before or after baking:

  • Before baking: Assemble the dish, let it cool, and freeze. When ready, thaw overnight in the fridge and bake as directed.
  • After baking: Let it cool completely before freezing. Thaw and reheat with foil to avoid drying out.

Nutritional Considerations

While this isn’t a “light” recipe, it’s surprisingly well-balanced for comfort food:

  • Protein-rich: Thanks to chicken, cream, and cheese.
  • Vegetable-packed: Broccoli and mushrooms bring fiber, vitamins, and antioxidants.
  • Flexible portions: Serve with lighter sides or smaller servings to suit your needs.

Want to cut calories? Use light cream or substitute some of the cream with chicken broth. Reduce cheese quantities slightly and amp up the veggies.

Frequently Asked Questions

Can I use frozen broccoli?

Yes! Just thaw it and squeeze out excess moisture before using to prevent a watery bake.

Can I make this dish gluten-free?

Absolutely. Use your favorite gluten-free pasta and check that the cream and cheeses are gluten-free. Gluten-free breadcrumbs can be used for a topping.

What type of cream is best?

Heavy cream yields the richest flavor, but half-and-half works too. For a lighter option, mix milk with a bit of cornstarch to mimic the thickness of cream.

Can I prepare it ahead of time?

Definitely. You can assemble the entire dish up to 24 hours ahead and refrigerate it before baking. Let it come to room temperature for about 20 minutes before placing in the oven.

How do I keep the sauce from breaking or curdling?

Use medium-low heat when making the cream sauce and stir consistently. Don’t let it boil. Adding cheese gradually helps maintain a smooth consistency.

Conclusion: A Dish That Tells a Story

In a time where speed often trumps soul, this creamy chicken and broccoli pasta bake is a quiet act of resistance — a reminder that some things are worth the extra few minutes. It’s not about culinary perfection. It’s about connection, comfort, and coming back to the table with people you love.

Whether you’re pulling it fresh from the oven for a family gathering or reheating a portion at the office for a little mid-week joy, this dish has a way of making you feel held.

It’s food that remembers where it came from — and welcomes everyone in.

Stay Connected

Get recipes via email: