There are few foods that tap into childhood nostalgia quite like pizza. Growing up, Friday nights were always “pizza night” in our house — a tradition that started with my parents working long hours all week and wanting to create something fun and low-effort for dinner. While some nights we ordered in, more often than not, we made it ourselves. But not the kind you might expect.
Instead of a big, doughy pie, my mom introduced us to mini pizzas — quick, clever creations using whatever base we had on hand. Sometimes it was English muffins. Other times, flatbread or even leftover sandwich buns. And the toppings? Whatever was in the fridge. But my favorite, the one that stuck with me long after I grew up and started cooking for myself, was her version with sausage, ketchup, onion, and a generous handful of cheese.
That was the blueprint for this Mini Sausage Pizza recipe — the one I now make with my own kids, or quickly assemble for guests when I need a foolproof appetizer. It’s flexible, fast, and deeply satisfying. The sausage gives it heartiness, the sauce adds tang, and the cheese? Well, it melts everything together — literally and emotionally.
Why Mini Sausage Pizzas Are a Go-To Favorite
What makes these mini pizzas so lovable isn’t just their flavor — though that’s certainly a win — but how effortlessly they fit into real life. They’re quick to prepare, endlessly adaptable, and kid-approved (which, let’s face it, is often the hardest hurdle). They work as after-school snacks, lunchbox fillers, weeknight dinners, or party bites.
And unlike full-size pizzas that need time to rise or specialty dough, these mini versions can be made using everyday items you already have in your pantry or freezer. Puff pastry, English muffins, pita rounds — they all work beautifully as a base.
Let’s break down why this recipe stands out:
1. Minimal Prep, Maximum Flavor
There’s no dough to roll, no yeast to activate. Just a quick assembly of ingredients and into the oven they go.
2. Customizable for Any Occasion
While sausage is the star here, the beauty of this recipe is how easily you can swap, add, or modify the toppings. Want it spicy? Add jalapeños. Need it vegetarian? Swap in sautéed mushrooms or grilled zucchini.
3. Perfect Portions
Mini pizzas mean built-in portion control. They’re great for feeding a crowd or just making enough for yourself without worrying about leftovers.
4. Loved by All Ages
From toddlers to teens to picky adults, the combination of sausage, cheese, and a tangy base hits the spot every time.
Ingredients
Ingredient
Quantity
Sausage (diced)
180 g (6 oz)
Ketchup
6 tablespoons
Mayonnaise (optional)
To taste
Onion (finely chopped)
½ medium
Cheese (grated)
100–120 g (1 cup)
Mini pizza bases*
As needed
Directions
Prep the Bases Arrange your mini pizza rounds on a parchment-lined baking tray. Preheat your oven to 400°F (200°C).
Spread the Sauce In a small bowl, mix ketchup with a little mayonnaise (optional) to create a creamy base. Spread about 1 tablespoon of sauce on each pizza base.
Add Toppings Sprinkle finely chopped onion over each round, then add diced sausage. Finish with a generous layer of grated cheese.
Bake Until Golden Bake in the preheated oven for 10–12 minutes, or until the cheese is melted and bubbling, and the edges are golden and crisp.
Serve and Enjoy Let the pizzas cool slightly before serving. Enjoy warm — perfect for snacking, school lunches, or party platters.
Nutritional Snapshot (Per Mini Pizza – Approximate)
Nutrient
Amount
Calories
~180 kcal
Protein
~8 g
Carbohydrates
~15 g
Fat
~10 g
Fiber
~1 g
Sodium
~360 mg
When to Serve Mini Sausage Pizzas
Think of these mini pizzas as your culinary wildcard — they fit just about anywhere:
Weeknight Dinners: When time is short and hunger is high, these come together fast with no fuss.
Lunchbox Solution: Pack them up for school or work — they taste great warm or at room temp.
Game Day Snacks: Serve on a platter with toothpicks for easy, mess-free bites.
Potlucks and Parties: They’re finger-friendly and universally appealing.
DIY Pizza Night: Set up a mini pizza bar with different toppings and let everyone customize their own.
Tips for the Perfect Mini Pizza Every Time
Mini pizzas are simple, but here are a few pro tips to make them even better:
Use a Crisp Base
Whatever bread or dough you use, make sure it’s sturdy enough to hold toppings and doesn’t get soggy. Toasting the base lightly before assembling can help create a crispier bottom.
Pre-Cook the Sausage
Always cook and dice the sausage before using it as a topping. This ensures even cooking and prevents excess grease from soaking into the base.
Don’t Overload
It’s tempting to pile on the toppings, but less is more. Too much can lead to soggy centers or undercooked cheese.
Cheese Matters
Use a cheese that melts well. Mozzarella is the classic, but cheddar, provolone, or a blend can elevate the flavor.
Bake Hot and Fast
A high-temperature bake (around 400°F / 200°C) helps crisp the edges and melt the cheese quickly, keeping the center from getting too soft.
Creative Variations to Try
Once you’ve mastered the basic sausage version, it’s time to get creative. Here are some of the most-loved variations:
Pepperoni & Bell Pepper
A classic pizza flavor with the sweetness of peppers to balance the salty meat.
Spicy BBQ Chicken
Swap ketchup for barbecue sauce and top with cooked chicken, red onion, and a pinch of chili flakes.
Veggie Supreme
Layer sautéed mushrooms, zucchini, spinach, and a sprinkle of feta.
Breakfast Pizza
Use a scrambled egg base, sausage, and cheese for a protein-packed morning version.
Mediterranean Style
Top with olives, tomatoes, feta, and oregano for a Greek-inspired twist.
Frequently Asked Questions
Can I make these in advance?
Yes! Assemble them up to a day in advance and refrigerate. Bake fresh when ready to serve. You can also freeze them before baking and bake straight from frozen, adding 3–5 extra minutes.
What’s the best base to use?
English muffins, pita bread, naan, puff pastry, or pre-made mini pizza crusts all work well. Choose based on what you have and the texture you want.
Is it okay to use raw sausage?
No — always cook the sausage before using it on the pizzas. Raw sausage won’t fully cook in the short baking time and may release too much grease.
Can I make it dairy-free?
Yes, just use a dairy-free cheese substitute that melts well. You can also skip the cheese entirely and load up on flavorful veggies and herbs.
How do I store leftovers?
Store cooled mini pizzas in an airtight container in the refrigerator for up to 3 days. Reheat in the oven or toaster oven for best results — the microwave can make the base soggy.
Can I turn this into a full-size pizza?
Definitely. Just scale up the ingredients and use a full-sized pizza crust. You’ll need to adjust the baking time accordingly (typically 12–15 minutes for a full pizza at 450°F / 230°C).
What if I want to make it vegetarian?
Swap the sausage for plant-based sausage, sautéed mushrooms, or grilled veggies like zucchini, peppers, and eggplant.
A Pizza That’s More Than a Snack
There’s something beautiful about recipes that are both nostalgic and flexible — that remind us of home but also invite creativity. These Mini Sausage Pizzas are one of those rare dishes. They carry memories of after-school snacks, sleepovers, and casual family dinners, but they also adapt effortlessly to grown-up tastes and gourmet cravings.
Whether you’re making them for your kids, your guests, or just yourself after a long day, they deliver more than flavor — they bring ease, comfort, and a little bit of fun to your kitchen.
They’re a reminder that food doesn’t have to be fancy to be meaningful — and that sometimes, the best dishes are the ones that fit in the palm of your hand.
Final Thoughts: Simple Food, Big Smiles
In a world full of complicated recipes and time-consuming meals, it’s refreshing to return to something simple. Something joyful. Something like Mini Sausage Pizzas — quick to make, satisfying to eat, and easy to share.
These little bites of comfort are perfect for any day, any occasion, and any mood. They’re proof that a great recipe doesn’t need to be extravagant. It just needs to be made with love… and maybe a little extra cheese.
So preheat your oven, grab your ingredients, and let the magic happen — one mini pizza at a time.
Introduction to High-Protein Turkey Stuffed Sweet Potatoes
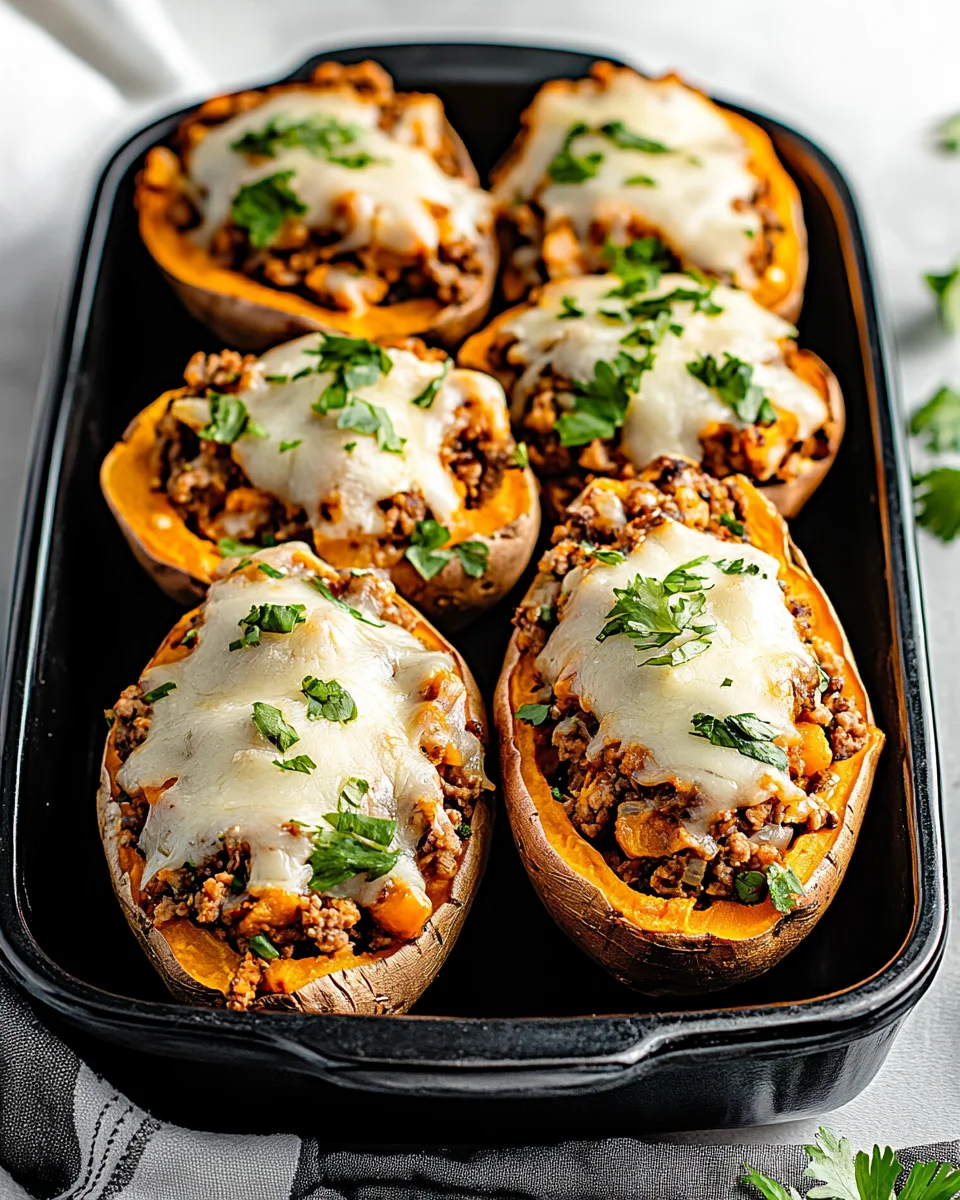
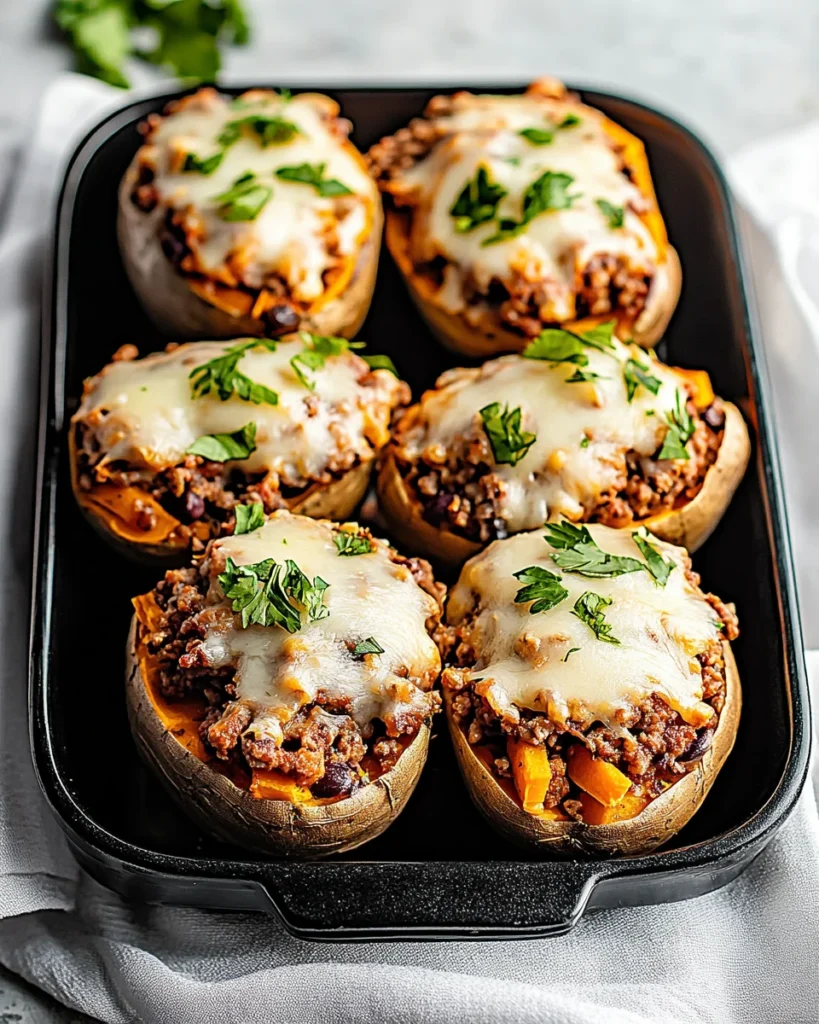
Are you looking for a delicious and nutritious meal that’s easy to prepare? Look no further! High-Protein Turkey Stuffed Sweet Potatoes are the perfect solution. This dish combines the natural sweetness of sweet potatoes with the savory flavors of ground turkey, making it a delightful option for lunch or dinner.
Not only are these stuffed sweet potatoes tasty, but they are also packed with protein. Each serving contains about 30 grams of protein, which is essential for muscle repair and growth. Plus, sweet potatoes are rich in vitamins and minerals, providing a healthy dose of nutrients.
Whether you’re a busy parent, a student, or just someone who loves good food, this recipe is designed for you. It’s simple, quick, and can be customized to suit your taste. You can add your favorite spices or toppings to make it your own. Plus, it’s a great way to sneak in some veggies!
In this article, we’ll guide you through the ingredients, preparation steps, and even some variations to keep your meals exciting. So, roll up your sleeves and get ready to enjoy a wholesome dish that’s sure to please everyone at the table!
Ingredients for High-Protein Turkey Stuffed Sweet Potatoes
To create these delightful High-Protein Turkey Stuffed Sweet Potatoes, you’ll need a few simple ingredients. Each component plays a vital role in delivering flavor and nutrition. Here’s what you’ll need:
2 medium sweet potatoes (about 1 pound total)
1 tablespoon olive oil
1 pound ground turkey
1 small onion, diced
2 cloves garlic, minced
1 teaspoon chili powder
1 teaspoon cumin
1/2 teaspoon paprika
Salt and pepper to taste
1 cup black beans, drained and rinsed
1 cup corn (fresh, frozen, or canned)
1/2 cup shredded cheese (cheddar or your choice)
2 tablespoons fresh cilantro, chopped (optional)
Sour cream or Greek yogurt for serving (optional)
These ingredients come together to create a hearty meal that’s not only satisfying but also packed with protein. The sweet potatoes provide a natural sweetness, while the ground turkey adds a savory touch. Black beans and corn contribute fiber and additional nutrients, making this dish a well-rounded option.
Feel free to adjust the spices according to your taste. If you like it spicy, consider adding some diced jalapeños to the turkey mixture. This recipe is versatile, allowing you to swap out ingredients based on what you have on hand. Now that you have your ingredients ready, let’s move on to the preparation steps!
Preparation of High-Protein Turkey Stuffed Sweet Potatoes
Now that you have gathered all your ingredients, it’s time to dive into the preparation of your High-Protein Turkey Stuffed Sweet Potatoes. This process is straightforward and will have your kitchen smelling amazing in no time. Let’s break it down step by step!
Step 1: Preparing the Sweet Potatoes
First, preheat your oven to 400°F. This temperature is perfect for roasting sweet potatoes. While the oven heats up, take your medium sweet potatoes and poke holes in them using a fork. This step is crucial as it allows steam to escape while they bake. Place the sweet potatoes on a baking sheet and pop them into the oven. Bake for about 45-50 minutes, or until they are tender. You can check their doneness by inserting a fork; it should slide in easily.
Step 2: Cooking the Turkey Filling
While the sweet potatoes are baking, it’s time to prepare the turkey filling. Heat 1 tablespoon of olive oil in a large skillet over medium heat. Once the oil is hot, add the diced onion. Sauté the onion for about 3-4 minutes until it becomes soft and translucent. Next, add the minced garlic and cook for an additional minute. The aroma will be delightful!
Now, add the pound of ground turkey to the skillet. Use a spoon to break it up as it cooks. Stir occasionally, cooking until the turkey is browned and fully cooked, which should take about 6-8 minutes. Don’t forget to season it with chili powder, cumin, paprika, salt, and pepper. Mix everything well to ensure the flavors meld together.
Step 3: Combining Ingredients
Once the turkey is cooked, it’s time to add the black beans and corn. Stir these ingredients into the skillet, mixing until everything is heated through, which should take about 2-3 minutes. This combination not only adds flavor but also boosts the protein content of your dish. The beans and corn provide a nice texture and additional nutrients.
Step 4: Stuffing the Sweet Potatoes
After the sweet potatoes are done baking, remove them from the oven and let them cool for a few minutes. Carefully cut each sweet potato in half lengthwise. Use a spoon to scoop out a small portion of the flesh, creating a cavity for the filling. Be gentle to avoid breaking the skin!
Now, fill each sweet potato half with the turkey mixture. Make sure to pack it in well, so each bite is full of flavor. Top each stuffed sweet potato with shredded cheese. This will melt beautifully in the oven and add a creamy texture to your dish.
Step 5: Baking the Stuffed Sweet Potatoes
Return the stuffed sweet potatoes to the oven for an additional 5-7 minutes. This step allows the cheese to melt and become bubbly. Once they are ready, take them out of the oven and let them cool slightly. Garnish with fresh cilantro if desired, and serve with a dollop of sour cream or Greek yogurt for an extra creamy touch.
And there you have it! Your High-Protein Turkey Stuffed Sweet Potatoes are ready to be enjoyed. This meal is not only nutritious but also visually appealing, making it perfect for family dinners or meal prep for the week.
Variation of High-Protein Turkey Stuffed Sweet Potatoes
One of the best things about High-Protein Turkey Stuffed Sweet Potatoes is their versatility. You can easily switch up the ingredients to suit your taste or dietary needs. Let’s explore some alternative protein options and different flavor profiles to keep your meals exciting!
Alternative Protein Options
If you’re not a fan of ground turkey or simply want to try something different, there are plenty of alternative protein options available. Here are a few ideas:
Ground Chicken: This is a leaner option that still provides a great source of protein. It has a mild flavor that pairs well with the spices.
Ground Beef: For a heartier taste, ground beef is an excellent choice. Opt for lean cuts to keep the dish healthier.
Plant-Based Crumbles: If you prefer a vegetarian option, consider using plant-based meat substitutes. They offer a similar texture and protein content.
Quinoa: For a completely different twist, try using cooked quinoa. It’s packed with protein and adds a nutty flavor to the dish.
These alternatives allow you to customize your stuffed sweet potatoes based on your dietary preferences. Each option brings its unique flavor and texture, making your meal even more enjoyable!
Different Flavor Profiles
Changing the flavor profile of your High-Protein Turkey Stuffed Sweet Potatoes can make a world of difference. Here are some ideas to inspire your culinary creativity:
Mexican-Inspired: Add diced jalapeños, corn salsa, and top with avocado for a fresh twist. You can also use taco seasoning instead of the spices listed.
Italian Flair: Mix in Italian herbs like oregano and basil. Use marinara sauce instead of the spices, and top with mozzarella cheese.
Asian Fusion: Incorporate soy sauce, ginger, and sesame oil into the turkey mixture. Top with green onions and serve with a drizzle of sriracha for heat.
BBQ Style: Mix in your favorite BBQ sauce with the turkey. Top with coleslaw for a crunchy texture and a tangy flavor.
These variations not only keep your meals interesting but also allow you to explore different cuisines. Feel free to mix and match ingredients to create your perfect High-Protein Turkey Stuffed Sweet Potatoes!
Cooking Note for High-Protein Turkey Stuffed Sweet Potatoes
When preparing High-Protein Turkey Stuffed Sweet Potatoes, there are a few cooking notes to keep in mind. These tips will help ensure that your dish turns out perfectly every time. Let’s dive into some essential points to consider!
First, selecting the right sweet potatoes is crucial. Look for medium-sized sweet potatoes that are firm and free from blemishes. The skin should be smooth, as this indicates freshness. If you can, choose organic sweet potatoes for a more natural flavor and fewer pesticides.
Next, when baking the sweet potatoes, make sure to poke enough holes in them. This step is vital as it allows steam to escape, preventing the potatoes from bursting in the oven. If you forget this step, you might end up with a messy kitchen!
While cooking the ground turkey, ensure it is cooked thoroughly. The internal temperature should reach 165°F to guarantee it’s safe to eat. Using a meat thermometer can help you check this easily. Also, breaking up the turkey into smaller pieces while cooking will help it brown evenly and absorb the spices better.
For the filling, feel free to adjust the spices according to your taste preferences. If you enjoy a bit of heat, consider adding more chili powder or even some cayenne pepper. On the other hand, if you prefer milder flavors, you can reduce the spices or omit them altogether.
Lastly, when stuffing the sweet potatoes, don’t be afraid to pack the filling in tightly. This ensures that every bite is flavorful and satisfying. If you have leftover filling, it can be served on the side or used in other dishes, like salads or wraps.
By keeping these cooking notes in mind, you’ll create delicious High-Protein Turkey Stuffed Sweet Potatoes that are sure to impress your family and friends. Happy cooking!
Serving Suggestions for High-Protein Turkey Stuffed Sweet Potatoes
Once your High-Protein Turkey Stuffed Sweet Potatoes are ready, it’s time to think about how to serve them. This dish is not only filling but also visually appealing, making it perfect for any occasion. Here are some serving suggestions to elevate your meal experience!
Garnish with Fresh Herbs: A sprinkle of fresh cilantro or parsley adds a pop of color and freshness. It enhances the flavor and makes the dish look more inviting.
Pair with a Side Salad: A light salad with mixed greens, cherry tomatoes, and a simple vinaigrette complements the stuffed sweet potatoes beautifully. The crispness of the salad balances the softness of the sweet potatoes.
Serve with Dipping Sauces: Consider offering a variety of sauces on the side. Options like salsa, guacamole, or a zesty yogurt sauce can add an extra layer of flavor.
Top with Avocado: Sliced or diced avocado adds creaminess and healthy fats. It pairs wonderfully with the spices in the turkey filling.
Include a Grain: For a heartier meal, serve the stuffed sweet potatoes alongside a grain like quinoa or brown rice. This adds more texture and makes the meal even more filling.
These serving suggestions not only enhance the presentation but also allow you to customize the meal to your liking. Whether you’re hosting a dinner party or enjoying a cozy night in, these ideas will make your High-Protein Turkey Stuffed Sweet Potatoes shine on the table!
Tips for Perfect High-Protein Turkey Stuffed Sweet Potatoes
Creating the perfect High-Protein Turkey Stuffed Sweet Potatoes is all about attention to detail. With a few simple tips, you can elevate your dish and ensure it turns out delicious every time. Here are some helpful suggestions to keep in mind:
Choose the Right Sweet Potatoes: Opt for medium-sized sweet potatoes that are firm and smooth. This ensures even cooking and a delightful texture.
Don’t Skip the Poking: Remember to poke holes in the sweet potatoes before baking. This step prevents them from bursting and helps them cook evenly.
Season Generously: When cooking the turkey, don’t be shy with the spices. A well-seasoned filling makes all the difference in flavor. Taste as you go to find the perfect balance.
Mix in Extra Veggies: For added nutrition, consider mixing in chopped bell peppers, spinach, or zucchini into the turkey filling. This boosts the fiber content and adds more color to your dish.
Let Them Rest: After baking, allow the stuffed sweet potatoes to rest for a few minutes. This helps the flavors meld together and makes them easier to handle.
Experiment with Toppings: Get creative with your toppings! Try different cheeses, nuts, or seeds for added crunch. You can also drizzle with hot sauce or balsamic glaze for a flavor kick.
Store Leftovers Properly: If you have leftovers, store them in an airtight container in the fridge. They can be reheated in the oven or microwave for a quick meal later.
By following these tips, you’ll create High-Protein Turkey Stuffed Sweet Potatoes that are not only tasty but also visually appealing. Enjoy the process and feel free to make this recipe your own!
Breakdown of Time for High-Protein Turkey Stuffed Sweet Potatoes
Understanding the time commitment for preparing High-Protein Turkey Stuffed Sweet Potatoes can help you plan your cooking session better. Here’s a simple breakdown of the time needed for each step, so you can enjoy this delicious meal without any stress!
Prep Time
The prep time for this recipe is approximately 15-20 minutes. During this time, you will gather all your ingredients, wash the sweet potatoes, and chop the onion and garlic. This step is essential as it sets the stage for a smooth cooking process. Having everything ready will make your cooking experience more enjoyable!
Cooking Time
The cooking time is about 50-60 minutes. This includes:
45-50 minutes for baking the sweet potatoes until they are tender.
6-8 minutes for cooking the ground turkey and mixing in the other ingredients.
5-7 minutes for baking the stuffed sweet potatoes with cheese until melted.
While the sweet potatoes are baking, you can prepare the turkey filling, making the most of your time in the kitchen.
Total Time
In total, you can expect to spend about 1 hour and 15-20 minutes from start to finish. This includes both prep and cooking time. It’s a manageable timeframe for a nutritious and satisfying meal that serves four people. Plus, the delicious aroma wafting through your kitchen will make it all worth it!
With this time breakdown, you can easily fit this recipe into your busy schedule. Enjoy the process and the delightful flavors of your High-Protein Turkey Stuffed Sweet Potatoes!
Nutritional Information for High-Protein Turkey Stuffed Sweet Potatoes
Understanding the nutritional content of your meals is essential for maintaining a balanced diet. High-Protein Turkey Stuffed Sweet Potatoes not only taste great but also provide a wealth of nutrients. Let’s break down the key nutritional components of this delicious dish!
Calories
Each serving of High-Protein Turkey Stuffed Sweet Potatoes contains approximately 350 calories. This makes it a satisfying meal option without being overly heavy. The combination of sweet potatoes, ground turkey, and other ingredients ensures that you’re getting a nutritious meal that can fit into various dietary plans.
Protein Content
One of the standout features of this dish is its impressive protein content. Each serving provides about 30 grams of protein. This high-protein content is beneficial for muscle repair and growth, making it an excellent choice for active individuals or anyone looking to increase their protein intake. The ground turkey and black beans contribute significantly to this protein boost, ensuring you feel full and satisfied.
Sodium Levels
When it comes to sodium, each serving contains around 600 milligrams. This level is reasonable for a meal, but it’s always a good idea to monitor your sodium intake, especially if you’re watching your salt consumption. You can reduce sodium levels by using low-sodium black beans and adjusting the amount of salt you add during cooking. This way, you can enjoy your High-Protein Turkey Stuffed Sweet Potatoes while keeping your health goals in mind.
In summary, High-Protein Turkey Stuffed Sweet Potatoes are not only delicious but also packed with essential nutrients. With a balanced calorie count, high protein content, and manageable sodium levels, this dish is a fantastic addition to your meal rotation. Enjoy the benefits of a nutritious meal that’s easy to prepare and full of flavor!
FAQs about High-Protein Turkey Stuffed Sweet Potatoes
Can I use ground chicken instead of turkey?
Absolutely! Ground chicken is a great alternative to turkey. It has a similar texture and flavor, making it an excellent substitute. Just like ground turkey, ground chicken is lean and packed with protein. You can follow the same cooking instructions, and you’ll still end up with delicious High-Protein Stuffed Sweet Potatoes!
How can I make this recipe vegetarian?
Making this recipe vegetarian is easy! Simply replace the ground turkey with plant-based crumbles or cooked lentils. Both options provide a good source of protein and will absorb the spices beautifully. You can also add more vegetables, like diced bell peppers or mushrooms, to enhance the flavor and texture. This way, you can enjoy a hearty and nutritious meal without any meat!
What are the best toppings for stuffed sweet potatoes?
There are so many delicious toppings you can add to your stuffed sweet potatoes! Here are some popular options:
Avocado: Sliced or diced avocado adds creaminess and healthy fats.
Sour Cream or Greek Yogurt: A dollop of sour cream or Greek yogurt adds a tangy flavor.
Fresh Herbs: Chopped cilantro, parsley, or green onions brighten up the dish.
Hot Sauce: A drizzle of your favorite hot sauce can add a spicy kick.
Cheese: Additional shredded cheese, like feta or mozzarella, can enhance the flavor.
Feel free to mix and match these toppings to create your perfect stuffed sweet potato!
Can I prepare these in advance?
Yes, you can prepare High-Protein Turkey Stuffed Sweet Potatoes in advance! You can cook the sweet potatoes and the turkey filling ahead of time. Store them separately in airtight containers in the fridge. When you’re ready to eat, simply stuff the sweet potatoes and bake them with cheese until melted. This makes for a quick and easy meal option during busy days!
Conclusion on High-Protein Turkey Stuffed Sweet Potatoes
In conclusion, High-Protein Turkey Stuffed Sweet Potatoes are a fantastic meal option that combines nutrition, flavor, and versatility. This dish not only satisfies your taste buds but also provides a healthy dose of protein, making it perfect for anyone looking to maintain a balanced diet. With each serving containing around 30 grams of protein, you can feel good about fueling your body with wholesome ingredients.
Throughout this article, we’ve explored the simple preparation steps, variations, and serving suggestions that make this recipe a winner in any kitchen. Whether you’re cooking for yourself, your family, or hosting friends, these stuffed sweet potatoes are sure to impress. The combination of sweet potatoes, ground turkey, black beans, and corn creates a delightful medley of flavors and textures that everyone will love.
Moreover, the flexibility of this recipe allows you to customize it to your liking. From alternative protein options to different flavor profiles, the possibilities are endless. You can easily adapt the ingredients based on what you have on hand or your personal preferences, ensuring that every meal is unique and exciting.
So, why not give High-Protein Turkey Stuffed Sweet Potatoes a try? They are not only easy to make but also a great way to enjoy a nutritious meal that doesn’t compromise on taste. With just a little effort, you can create a dish that is both satisfying and nourishing. Happy cooking, and enjoy your delicious stuffed sweet potatoes!
There’s something grounding about chopping vegetables while rain taps softly on the window. That’s exactly how this recipe came to life — not in the middle of a grand celebration, but on a quiet evening when the fridge was half-full and the craving for comfort was louder than the thunder outside.
I had two chicken fillets thawing, a handful of mushrooms, some tomatoes on the edge of ripeness, and a tub of sour cream begging to be used. I wasn’t sure what I was making, but I knew I wanted something baked, something creamy, something layered — something that would make the house smell like a warm hug.
What emerged from the oven 40 minutes later was exactly that. This Juicy Chicken Fillet with Vegetables wasn’t just dinner. It was satisfaction, comfort, and balance in one dish — tender chicken, earthy mushrooms, juicy tomatoes, all tucked under a golden layer of cheese, bound by a simple creamy sauce.
Since that rainy evening, this dish has earned a regular spot on our table. It’s easy enough for weeknights, but special enough for guests. And every time I make it, I remember how sometimes the best meals come from quiet moments, humble ingredients, and a little bit of instinct.
Why This Dish Works So Well
The secret to this recipe’s success is in its harmony. Every layer brings its own note to the symphony of flavors, and yet nothing overwhelms.
1. Juicy, Flavorful Chicken
Boneless chicken fillets are the star here. They stay tender by baking gently under a layer of vegetables and sauce, locking in moisture. Whether you use breasts or thighs, the result is always juicy and satisfying.
2. Fresh, Balanced Vegetables
Tomatoes add brightness and a hint of acidity that cuts through the creaminess. Mushrooms bring depth, umami, and texture. Onions melt into the sauce, adding sweetness and richness that tie everything together.
3. A Creamy Sauce That Feels Light
The sour cream-based sauce might sound indulgent, but it’s actually quite balanced. Slightly tangy, subtly thickened with a touch of flour, it envelops the chicken and vegetables without feeling heavy.
4. Cheese That Brings It All Home
What’s a baked dish without a bubbling layer of cheese on top? It adds a salty, crispy contrast to the soft layers underneath — a golden finish that makes this dish unforgettable.
Ingredients
Ingredient
Quantity
Chicken fillet
2 pcs (700 g)
Champignons (mushrooms)
250 g, sliced
Tomatoes
2 pcs, sliced
Onion
1 pc, finely chopped
Sour cream
150 ml
Flour
0.5 tablespoon
Cheese
100 g, grated
Parsley
For garnish
Directions
Preheat the Oven Set your oven to 375°F (190°C) and lightly grease a baking dish.
Prepare the Chicken Cut chicken fillets into medium slices or leave whole. Season with salt and pepper to taste, then place into the baking dish.
Sauté the Vegetables In a skillet, sauté the onion and mushrooms in a little oil until soft and golden. Spread this mixture over the chicken.
Layer the Tomatoes Place sliced tomatoes over the mushrooms and onions.
Make the Sauce In a bowl, mix sour cream with flour until smooth. Pour this sauce evenly over the vegetables and chicken.
Top with Cheese Sprinkle grated cheese over the entire dish.
Bake to Perfection Bake for 30–35 minutes, or until the chicken is cooked through and the top is golden and bubbling.
Garnish and Serve Let rest for a few minutes, then garnish with fresh parsley before serving. Pair with rice, mashed potatoes, or fresh bread.
Nutritional (Per Serving – Approx. 4 servings)
Nutrient
Amount
Calories
~420 kcal
Protein
~35 g
Carbohydrates
~8 g
Fat
~25 g
Fiber
~2 g
Sodium
~280 mg
When to Serve This Chicken and Vegetable Bake
The beauty of this dish lies in its flexibility. It fits into many meal moments with ease:
Weeknight dinners: Simple enough to prepare in under an hour.
Dinner parties: It bakes beautifully in a casserole dish and presents like a gourmet meal.
Meal prep: Reheats well and can be portioned for lunches or dinners throughout the week.
Family gatherings: A crowd-pleaser that suits all ages and dietary needs with minor tweaks.
Serve it with mashed potatoes, rice, crusty bread, or even just a fresh green salad for a balanced meal.
Popular Variations and Creative Twists
The core of this recipe is easy to adapt based on your tastes, what’s in season, or what’s in your fridge.
1. Spinach and Bell Pepper Boost
Add a layer of fresh spinach leaves or sliced bell peppers for extra color and nutrients.
2. Herb-Infused Cream
Stir fresh or dried herbs (like thyme, tarragon, or dill) into the sour cream sauce for extra aroma and depth.
3. Add Heat
Craving a spicy twist? Add a pinch of chili flakes to the sauce or layer in thinly sliced jalapeños.
4. Make It Mediterranean
Use feta instead of melting cheese, and sprinkle with olives and oregano before baking.
5. Turn It Vegetarian
Swap the chicken for slices of eggplant or zucchini. Use the same layers, sauce, and bake time for a satisfying vegetarian meal.
Tips for the Best Results
Even a simple recipe can be elevated with the right techniques. Here are a few tips to make sure your Juicy Chicken Fillet with Vegetables comes out perfect every time:
Use Similar Thickness for Chicken
If using whole fillets, pound them slightly to an even thickness to ensure even cooking.
Sauté the Vegetables First
Sautéing the mushrooms and onions before baking draws out their moisture and enhances their flavor. This prevents a watery bake and ensures a concentrated, rich taste.
Don’t Skip the Sauce
The sour cream and flour sauce binds everything together. Without it, the dish risks being dry or unevenly cooked.
Let It Rest
After baking, allow the dish to sit for 5–10 minutes before serving. This helps the sauce settle and makes slicing easier.
Cheese Wisely
Use a cheese that melts well and complements the dish — mozzarella, cheddar, or gouda are all great choices. For more flavor, combine two cheeses.
Frequently Asked Questions
Can I prepare this dish ahead of time?
Yes! You can assemble it in the baking dish, cover, and refrigerate for up to 24 hours. Bake directly from the fridge, adding a few extra minutes to the baking time.
Can I use frozen chicken?
It’s best to thaw the chicken fully before using it in this recipe to ensure even cooking and prevent excess water in the dish.
What vegetables can I substitute?
You can use zucchini, bell peppers, baby spinach, eggplant, or even broccoli florets. Just be mindful of their moisture content and sauté them first if needed.
Is there a dairy-free alternative to sour cream?
Yes, use a plant-based sour cream or full-fat coconut yogurt for a dairy-free version. Be sure to season it well, as these alternatives can be slightly sweeter.
Can I use Greek yogurt instead of sour cream?
Absolutely. Greek yogurt will result in a slightly tangier sauce, but it’s a great substitute and adds more protein.
What’s the best way to store leftovers?
Store in an airtight container in the fridge for up to 3 days. Reheat in the oven or microwave until hot. The flavors often deepen the next day, making it even better!
Can I freeze this dish?
Yes. Allow it to cool completely, then wrap tightly in foil or transfer to a freezer-safe container. Freeze for up to 2 months. Thaw overnight in the fridge before reheating.
A Dish That Feels Like Home
In every family, there are recipes that become part of the rhythm of life. Dishes that don’t need a special occasion but somehow turn everyday meals into something worth remembering.
Juicy Chicken Fillet with Vegetables is one of those recipes.
It’s the kind of meal that doesn’t shout for attention — it simply fills the room with a warm aroma, invites everyone to the table, and delivers a few moments of quiet satisfaction. It nourishes, not just with protein and vitamins, but with that rare kind of comfort only a home-cooked meal can provide.
It’s forgiving, flexible, and just fancy enough to make you feel like you’ve created something special. And perhaps that’s what cooking is really about — not perfection, but presence.
Final Thoughts: More Than Just a Casserole
We often think of recipes in terms of ingredients and steps, but the best ones carry stories, too. This dish started as a way to use what I had — a moment of quiet improvisation on a rainy evening — and it became something I now share with others whenever I want to offer more than food.
If you’re looking for a meal that’s cozy, customizable, and reliably delicious, this Juicy Chicken Fillet with Vegetables is a perfect choice. It’s easy to love, easy to share, and always worth the minimal prep.
Whether you’re cooking for family, hosting a guest, or feeding your own soul after a long day, this dish delivers something essential: warmth on a plate.
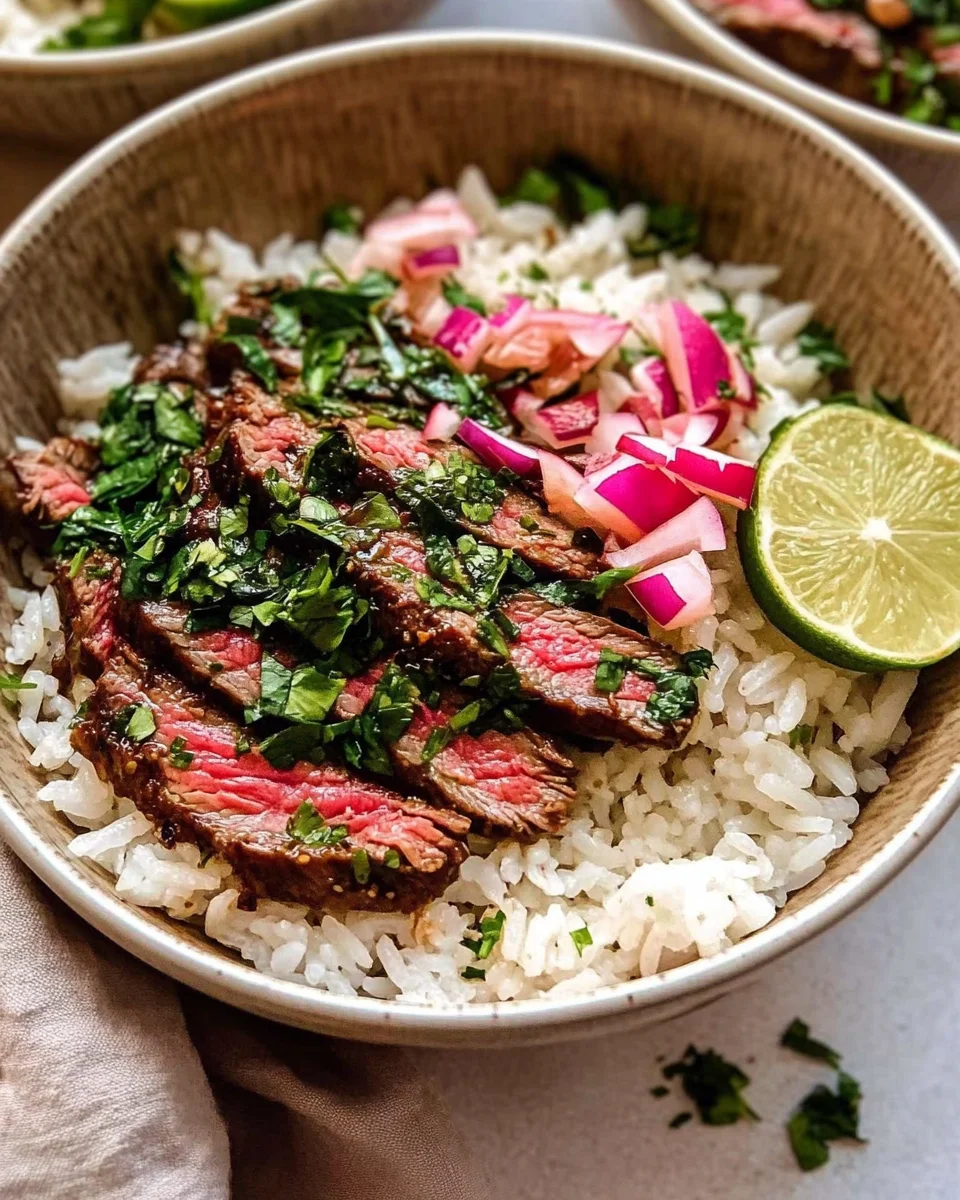
Skirt steak rice bowls are a delicious and satisfying meal that combines tender skirt steak with a variety of fresh ingredients. This dish features juicy, marinated skirt steak served over a bed of fluffy white rice. Topped with vibrant vegetables like cherry tomatoes, avocado, corn, and black beans, these bowls are not only colorful but also packed with flavor. The addition of lime juice and fresh cilantro adds a zesty touch, making each bite a delightful experience.
Why You Should Try Skirt Steak Rice Bowls
There are many reasons to try skirt steak rice bowls. First, they are incredibly easy to prepare, making them perfect for busy weeknights or casual gatherings. The combination of protein, healthy fats, and carbohydrates ensures a balanced meal that keeps you full and satisfied. Plus, skirt steak is known for its rich flavor and tenderness, which elevates the dish to a whole new level.
Moreover, these rice bowls are highly customizable. You can easily swap out ingredients based on your preferences or dietary needs. Whether you want to add some spice with jalapeños or switch to quinoa for a healthier grain option, the possibilities are endless. This versatility makes skirt steak rice bowls a fantastic choice for everyone, from meat lovers to health-conscious eaters.
In summary, if you’re looking for a quick, tasty, and nutritious meal, skirt steak rice bowls are a must-try. They bring together a variety of flavors and textures, making every bite a delightful surprise. So, gather your ingredients and get ready to enjoy this scrumptious dish!
Ingredients for Skirt Steak Rice Bowls
To create delicious skirt steak rice bowls, you’ll need a variety of fresh ingredients. Here’s a complete list to help you gather everything you need:
1 pound skirt steak: This cut of meat is flavorful and tender, perfect for grilling.
1 tablespoon olive oil: This helps to marinate the steak and adds a rich flavor.
1 teaspoon garlic powder: For a savory kick that enhances the meat’s taste.
1 teaspoon onion powder: Adds depth and sweetness to the marinade.
1 teaspoon smoked paprika: Gives a smoky flavor that complements the steak beautifully.
Salt and pepper to taste: Essential for seasoning the steak to your liking.
2 cups cooked white rice: The base of the bowl, providing a hearty foundation.
1 cup cherry tomatoes, halved: Adds freshness and a burst of color.
1 avocado, sliced: Creamy and nutritious, it balances the dish.
1 cup corn: Fresh or frozen, it adds sweetness and crunch.
1 cup black beans: Packed with protein and fiber, they make the meal more filling.
1 lime, cut into wedges: For a zesty squeeze that brightens the flavors.
Fresh cilantro: A garnish that adds a pop of color and freshness.
With these ingredients, you’re well on your way to creating a delightful meal. Each component plays a role in making the skirt steak rice bowls not only tasty but also visually appealing. So, gather your ingredients and get ready to cook!
Preparation of Skirt Steak Rice Bowls
Step 1: Marinating the Skirt Steak
Marinating the skirt steak is a crucial step that enhances its flavor. Start by mixing the olive oil, garlic powder, onion powder, smoked paprika, salt, and pepper in a small bowl. This mixture will create a delicious rub for the steak. Once combined, generously coat the skirt steak with the marinade. Make sure to cover all sides for maximum flavor. For best results, let the steak marinate for at least 30 minutes. If you have more time, marinating it for a few hours or overnight in the refrigerator will deepen the flavors even more.
Step 2: Cooking the Skirt Steak
Once your steak is marinated, it’s time to cook it! Preheat your grill or grill pan over medium-high heat. When the grill is hot, place the skirt steak on it. Cook for about 4-5 minutes on each side for a medium-rare finish. If you prefer your steak more well-done, simply extend the cooking time. Remember, the key is to cook it until it reaches your desired doneness. After cooking, remove the steak from the grill and let it rest for about 5 minutes. This resting period allows the juices to redistribute, ensuring a juicy and tender steak.
Step 3: Preparing the Rice
While the steak is resting, you can prepare the rice. If you haven’t done so already, cook 2 cups of white rice according to the package instructions. Typically, this involves rinsing the rice, adding it to boiling water, and letting it simmer until tender. Once cooked, fluff the rice with a fork to separate the grains. This fluffy rice will serve as the perfect base for your skirt steak rice bowls, soaking up all the delicious flavors from the toppings.
Step 4: Assembling the Skirt Steak Rice Bowls
Now comes the fun part—assembling your skirt steak rice bowls! Start by placing a generous scoop of the cooked rice in each serving bowl. Next, slice the rested skirt steak against the grain into thin strips and layer it on top of the rice. Then, add the halved cherry tomatoes, sliced avocado, corn, and black beans. Each ingredient adds its unique flavor and texture, making the bowl visually appealing and delicious. Finally, squeeze fresh lime juice over the top and garnish with chopped cilantro. Your skirt steak rice bowls are now ready to be enjoyed!
Variation of Skirt Steak Rice Bowls
Different Marinades for Skirt Steak Rice Bowls
While the original marinade for skirt steak rice bowls is delicious, experimenting with different marinades can elevate your dish even further. Here are a few ideas to consider:
Teriyaki Marinade: Combine soy sauce, honey, ginger, and garlic for a sweet and savory twist. This Asian-inspired marinade pairs wonderfully with the steak.
Cilantro-Lime Marinade: Blend fresh cilantro, lime juice, olive oil, and garlic for a refreshing flavor. This marinade adds a zesty kick that complements the other ingredients.
Spicy Chipotle Marinade: Mix chipotle peppers in adobo sauce with lime juice and cumin for a smoky and spicy flavor. This option is perfect for those who enjoy a bit of heat.
BBQ Marinade: Use your favorite barbecue sauce mixed with apple cider vinegar for a tangy and sweet flavor. This marinade gives the steak a delicious charred taste.
Feel free to let your creativity shine! Marinating the skirt steak in different flavors can transform your rice bowls into a whole new experience. Just remember to marinate for at least 30 minutes to allow the flavors to penetrate the meat.
Alternative Ingredients for Skirt Steak Rice Bowls
If you’re looking to switch things up, consider using alternative ingredients in your skirt steak rice bowls. Here are some tasty options:
Grains: Instead of white rice, try quinoa, brown rice, or cauliflower rice for a healthier option. Each grain brings its unique texture and flavor.
Vegetables: Add roasted bell peppers, sautéed zucchini, or grilled asparagus for extra nutrition and flavor. These veggies can enhance the color and taste of your bowls.
Beans: Swap black beans for pinto beans or chickpeas. Each type of bean adds a different taste and texture, making your meal more interesting.
Cheese: Sprinkle some crumbled feta or shredded cheddar on top for a creamy finish. Cheese can add richness and depth to your dish.
By mixing and matching these alternative ingredients, you can create a skirt steak rice bowl that suits your taste preferences and dietary needs. The possibilities are endless, so don’t hesitate to get creative!
Cooking Note for Skirt Steak Rice Bowls
When preparing skirt steak rice bowls, there are a few important cooking notes to keep in mind. These tips will help ensure that your dish turns out perfectly every time.
First, always choose high-quality skirt steak. Look for meat that is bright red with good marbling. This marbling is essential as it adds flavor and tenderness to the steak. If possible, ask your butcher for a fresh cut. A well-prepared steak will make a significant difference in the overall taste of your rice bowls.
Next, don’t skip the resting period after cooking the steak. Allowing the meat to rest for about 5 minutes is crucial. This step helps the juices redistribute throughout the steak, making it more tender and juicy. If you cut into the steak too soon, you risk losing those flavorful juices, resulting in a drier bite.
Additionally, when slicing the skirt steak, always cut against the grain. This technique shortens the muscle fibers, making each bite more tender. If you’re unsure which way the grain runs, take a moment to observe the lines in the meat. Cutting against the grain will enhance the overall texture of your dish.
Lastly, feel free to adjust the cooking time based on your preference for doneness. Skirt steak is best enjoyed medium-rare, but if you prefer it more well-done, simply extend the cooking time by a minute or two on each side. Just keep an eye on it to avoid overcooking.
By following these cooking notes, you’ll create skirt steak rice bowls that are not only delicious but also visually appealing. Enjoy the process and savor the delightful flavors that come together in this fantastic dish!
Serving Suggestions for Skirt Steak Rice Bowls
Toppings to Enhance Your Skirt Steak Rice Bowls
To take your skirt steak rice bowls to the next level, consider adding some delicious toppings. These extras can enhance the flavor and texture of your dish, making it even more enjoyable. Here are some tasty topping ideas:
Fresh Salsa: A vibrant salsa made with diced tomatoes, onions, cilantro, and jalapeños can add a refreshing kick. The acidity from the tomatoes brightens the flavors of the steak.
Guacamole: Creamy guacamole is a perfect addition. It adds richness and pairs beautifully with the other ingredients in the bowl.
Feta Cheese: Crumbled feta cheese adds a salty and tangy flavor. It complements the steak and fresh veggies nicely.
Hot Sauce: For those who love heat, a drizzle of your favorite hot sauce can spice things up. It adds an exciting kick that elevates the entire dish.
Chopped Green Onions: Sprinkle some chopped green onions on top for a mild onion flavor and a pop of color. They add a nice crunch and freshness.
Feel free to mix and match these toppings based on your preferences. Each one brings its unique flavor profile, allowing you to customize your skirt steak rice bowls to your liking. The right toppings can transform a simple meal into a gourmet experience!
Side Dishes That Pair Well with Skirt Steak Rice Bowls
While skirt steak rice bowls are a complete meal on their own, serving them with complementary side dishes can enhance your dining experience. Here are some side dishes that pair wonderfully with this dish:
Grilled Vegetables: A medley of grilled vegetables, such as zucchini, bell peppers, and asparagus, adds color and nutrition. The smoky flavor from grilling complements the steak perfectly.
Mexican Street Corn: This dish, known as elote, features corn on the cob slathered in mayo, cheese, and spices. It’s a deliciously sweet and savory side that pairs well with the rice bowls.
Simple Green Salad: A light salad with mixed greens, cucumbers, and a citrus vinaigrette can balance the richness of the steak. It adds freshness and crunch to your meal.
Chips and Salsa: Serve some tortilla chips with fresh salsa as a fun appetizer. This crunchy side is always a hit and sets the tone for a festive meal.
Refried Beans: Creamy refried beans are a classic side that adds extra protein and fiber. They pair well with the flavors of the skirt steak and rice.
By adding these side dishes, you can create a well-rounded meal that is both satisfying and delicious. Enjoy the combination of flavors and textures as you savor your skirt steak rice bowls!
Tips for Perfect Skirt Steak Rice Bowls
Creating the perfect skirt steak rice bowls is all about attention to detail. Here are some helpful tips to ensure your dish turns out delicious every time:
Choose the Right Cut: Skirt steak is known for its flavor, but make sure to select a fresh cut. Look for bright red meat with good marbling. This marbling adds juiciness and tenderness, making your rice bowls even more enjoyable.
Marinate for Flavor: Don’t rush the marinating process. Allow the skirt steak to marinate for at least 30 minutes, or even better, a few hours. This step infuses the meat with flavor, making each bite more delicious.
Preheat Your Grill: Always preheat your grill or grill pan before cooking. A hot grill ensures a nice sear on the steak, locking in juices and enhancing the flavor. This step is crucial for achieving that perfect char.
Rest the Steak: After cooking, let the steak rest for about 5 minutes. This resting period allows the juices to redistribute throughout the meat, resulting in a more tender and juicy steak.
Slice Against the Grain: When it’s time to slice the steak, always cut against the grain. This technique shortens the muscle fibers, making the meat easier to chew and enhancing the overall texture of your dish.
Customize Your Bowls: Feel free to get creative with your toppings and ingredients. Add your favorite vegetables, grains, or sauces to make the dish your own. The versatility of skirt steak rice bowls allows for endless combinations!
Serve Fresh: For the best experience, serve your skirt steak rice bowls immediately after assembling. This ensures that the ingredients are fresh and vibrant, making each bite a delightful experience.
By following these tips, you’ll be well on your way to creating skirt steak rice bowls that are not only tasty but also visually appealing. Enjoy the process and savor the delicious flavors that come together in this fantastic dish!
Breakdown of Time for Skirt Steak Rice Bowls
Prep Time
Preparing skirt steak rice bowls is quick and easy. The prep time mainly involves marinating the skirt steak and cooking the rice. You should expect to spend about 10-15 minutes gathering your ingredients and mixing the marinade. If you choose to marinate the steak for a longer period, you can set it aside for at least 30 minutes or even overnight for deeper flavor. Overall, the prep time can range from 10 minutes to several hours, depending on how long you decide to marinate the steak.
Cooking Time
The cooking time for skirt steak rice bowls is relatively short. Once your grill is preheated, cooking the skirt steak takes about 8-10 minutes total—4-5 minutes on each side for a medium-rare finish. While the steak is resting, you can cook the rice if you haven’t done so already. Cooking the rice typically takes around 15-20 minutes. Therefore, the total cooking time for the entire dish is approximately 20-30 minutes, making it a great option for a quick weeknight meal.
Total Time
When you combine both prep and cooking times, the total time to make skirt steak rice bowls can vary. If you marinate the steak for 30 minutes, the total time will be around 40-45 minutes. However, if you decide to marinate the steak overnight, you can have the dish ready in about 30-35 minutes on the day of cooking. This flexibility allows you to enjoy a delicious meal without spending hours in the kitchen!
Nutritional Information for Skirt Steak Rice Bowls
Calories in Skirt Steak Rice Bowls
When it comes to enjoying skirt steak rice bowls, understanding the calorie content is essential. Each serving of this delicious dish contains approximately 550 calories. This calorie count includes the skirt steak, rice, and all the fresh toppings. It’s a satisfying meal that provides energy without being overly heavy. If you’re watching your calorie intake, you can adjust the portion sizes or swap out certain ingredients to create a lighter version.
Protein Content in Skirt Steak Rice Bowls
Protein is a vital nutrient, and skirt steak rice bowls deliver a good amount. Each serving contains about 30 grams of protein, thanks to the skirt steak and black beans. Protein is essential for muscle repair and growth, making this dish a great option for active individuals. If you want to boost the protein content even further, consider adding extra beans or a sprinkle of cheese on top. This way, you can enjoy a hearty meal that supports your nutritional needs.
Sodium Levels in Skirt Steak Rice Bowls
Monitoring sodium intake is important for maintaining a healthy diet. Each serving of skirt steak rice bowls has a sodium level that can vary based on the seasoning and ingredients used. On average, you can expect around 600-800 mg of sodium per serving. To keep sodium levels in check, consider using low-sodium options for ingredients like black beans and any sauces. Additionally, you can control the amount of salt added during cooking. This way, you can enjoy your meal while being mindful of your sodium intake.
FAQs About Skirt Steak Rice Bowls
Can I use other cuts of meat for Skirt Steak Rice Bowls?
Absolutely! While skirt steak is a popular choice due to its flavor and tenderness, you can use other cuts of meat for your rice bowls. Flank steak, sirloin, or even chicken breast can work well. Just remember that cooking times may vary depending on the cut you choose. For instance, chicken will need to be cooked thoroughly, while flank steak may require similar cooking times to skirt steak. Feel free to experiment with different meats to find your favorite combination!
What type of rice is best for Skirt Steak Rice Bowls?
White rice is the traditional choice for skirt steak rice bowls, but you have plenty of options! Brown rice offers a nuttier flavor and more fiber, making it a healthier alternative. Quinoa is another great option, as it is high in protein and gluten-free. If you’re looking for a low-carb choice, cauliflower rice can be a fantastic substitute. Ultimately, the best type of rice depends on your personal preference and dietary needs. Choose what you enjoy most!
How can I make Skirt Steak Rice Bowls gluten-free?
Making skirt steak rice bowls gluten-free is quite simple! Start by ensuring that all your ingredients are gluten-free. Most fresh vegetables, rice, and beans are naturally gluten-free. However, be cautious with marinades and sauces, as they may contain gluten. Opt for gluten-free soy sauce or tamari if you’re using a marinade. Additionally, check labels on any packaged ingredients to ensure they meet gluten-free standards. With these adjustments, you can enjoy a delicious gluten-free meal!
Can I prepare Skirt Steak Rice Bowls in advance?
Yes, you can prepare skirt steak rice bowls in advance! To do this, cook the rice and marinate the steak ahead of time. You can store the cooked rice in an airtight container in the refrigerator for up to 4 days. For the steak, marinate it and keep it in the fridge until you’re ready to cook. When you’re ready to serve, simply grill the steak, slice it, and assemble your bowls with the prepped ingredients. This makes for a quick and easy meal on busy days!
Conclusion on Skirt Steak Rice Bowls
In conclusion, skirt steak rice bowls are a delightful and versatile meal option that brings together a variety of flavors and textures. With their tender skirt steak, fluffy rice, and vibrant toppings, these bowls are not only visually appealing but also packed with nutrition. Whether you’re preparing a quick weeknight dinner or hosting a casual gathering, skirt steak rice bowls are sure to impress your family and friends.
The beauty of this dish lies in its adaptability. You can easily customize the ingredients to suit your taste preferences or dietary needs. From experimenting with different marinades to swapping out grains and toppings, the possibilities are endless. This flexibility allows you to create a unique bowl every time you make it, keeping your meals exciting and fresh.
Moreover, the nutritional benefits of skirt steak rice bowls make them a smart choice for anyone looking to enjoy a balanced meal. With a good source of protein, healthy fats, and carbohydrates, these bowls provide the energy you need to power through your day. Plus, the addition of fresh vegetables ensures that you’re getting essential vitamins and minerals.
So, why not give skirt steak rice bowls a try? Gather your ingredients, follow the simple steps, and enjoy a delicious meal that is sure to satisfy. Whether you’re a seasoned cook or a beginner in the kitchen, this dish is approachable and rewarding. Embrace the flavors, get creative with your toppings, and savor every bite of your homemade skirt steak rice bowls!
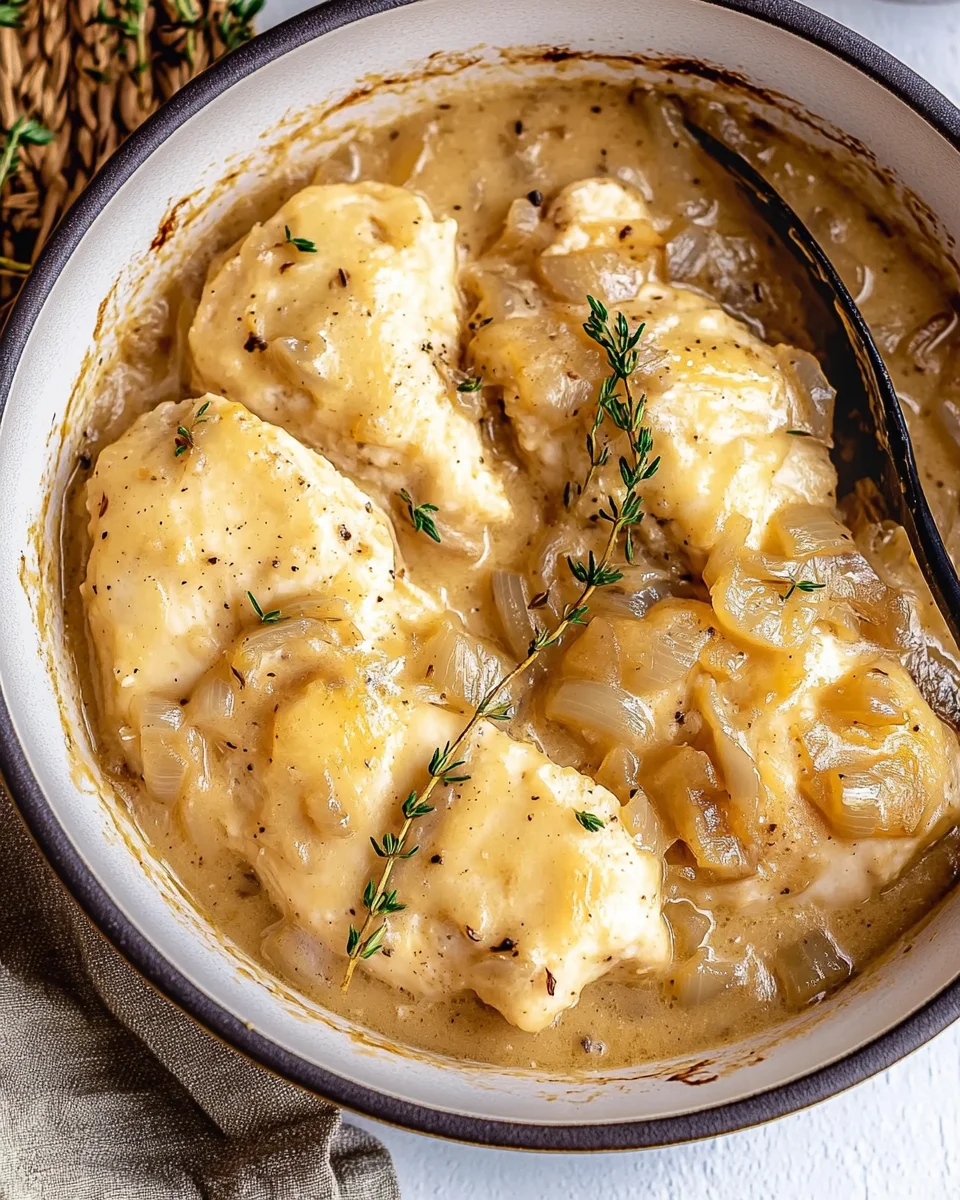
Are you looking for a comforting and delicious meal that’s easy to prepare? Look no further than the French Onion Chicken Bake Recipe! This dish combines the rich flavors of caramelized onions and savory chicken, topped with gooey cheese. It’s a delightful twist on the classic French onion soup, making it perfect for family dinners or gatherings with friends.
The beauty of this recipe lies in its simplicity. With just a handful of ingredients, you can create a hearty meal that will impress everyone at the table. The chicken is tender and juicy, while the onions add a sweet and savory depth. Plus, the melted Gruyère and Parmesan cheeses create a deliciously cheesy topping that brings everything together.
Not only is this dish satisfying, but it also offers a great balance of protein and flavor. Whether you’re a seasoned cook or a beginner in the kitchen, this French Onion Chicken Bake Recipe is straightforward and rewarding. So, roll up your sleeves and get ready to enjoy a meal that’s sure to become a family favorite!
Ingredients for French Onion Chicken Bake Recipe
To create the mouthwatering French Onion Chicken Bake Recipe, you’ll need a selection of fresh ingredients. Each component plays a vital role in building the rich flavors that make this dish so special. Here’s what you’ll need:
2 pounds boneless, skinless chicken breasts: This is the main protein source, providing a hearty base for the dish.
2 tablespoons olive oil: Used for searing the chicken and sautéing the onions, adding a lovely richness.
1 teaspoon salt: Essential for seasoning the chicken and enhancing the overall flavor.
1/2 teaspoon black pepper: Adds a subtle kick to the dish.
1 large onion, thinly sliced: The star of the show! Caramelized onions bring sweetness and depth.
2 cloves garlic, minced: Garlic adds a fragrant aroma and complements the onions beautifully.
1 cup beef broth: This adds moisture and a savory base for the sauce.
1 tablespoon Worcestershire sauce: A splash of this sauce enhances the umami flavor.
1 teaspoon dried thyme: This herb adds an earthy note that pairs well with the other ingredients.
1 cup shredded Gruyère cheese: This cheese melts beautifully, creating a creamy topping.
1/2 cup grated Parmesan cheese: Adds a sharp, nutty flavor that complements the Gruyère.
Fresh parsley, chopped (for garnish): A sprinkle of parsley adds a pop of color and freshness.
With these ingredients on hand, you’re well on your way to creating a delicious French Onion Chicken Bake. Each item contributes to the overall taste, making it a dish that’s sure to please everyone at your table. So gather your ingredients and let’s get cooking!
Preparation of French Onion Chicken Bake Recipe
Now that you have all your ingredients ready, it’s time to dive into the preparation of the French Onion Chicken Bake Recipe. This process is straightforward and will have your kitchen smelling amazing in no time. Let’s break it down step by step!
Step 1: Preheat the Oven
First things first, preheat your oven to 375°F (190°C). This step is crucial as it ensures that your dish cooks evenly. While the oven heats up, you can focus on preparing the chicken and onions.
Step 2: Prepare the Chicken
Next, take your boneless, skinless chicken breasts and season them with salt and black pepper. This simple seasoning enhances the chicken’s natural flavor. In a large oven-safe skillet, heat 2 tablespoons of olive oil over medium heat. Once the oil is hot, add the seasoned chicken breasts. Sear them for about 4-5 minutes on each side until they turn golden brown. This step locks in the juices, making the chicken tender and flavorful. After searing, remove the chicken from the skillet and set it aside on a plate.
Step 3: Sauté the Onions
In the same skillet, add the thinly sliced onion. Cook the onions for about 10-12 minutes, stirring occasionally. You want them to become caramelized and golden brown. This process brings out their natural sweetness, which is key to the dish’s flavor. Once the onions are beautifully caramelized, add 2 cloves of minced garlic and cook for an additional minute. The garlic will add a lovely aroma to your dish.
Step 4: Assemble the Dish
Now it’s time to bring everything together! Pour in 1 cup of beef broth and 1 tablespoon of Worcestershire sauce into the skillet. Make sure to scrape the bottom of the skillet to release any browned bits, as they add extra flavor. Stir in 1 teaspoon of dried thyme for an earthy touch. Return the seared chicken to the skillet, spooning some of the onion mixture over the top. Finally, sprinkle 1 cup of shredded Gruyère cheese and 1/2 cup of grated Parmesan cheese evenly over the chicken. This cheesy topping is what makes this dish so irresistible!
Step 5: Bake the Chicken
With everything assembled, it’s time to bake! Transfer the skillet to your preheated oven and bake for 25-30 minutes. You’ll know it’s done when the chicken is cooked through and the cheese is bubbly and golden. Once baked, remove the skillet from the oven and let it rest for a few minutes. This resting time allows the juices to redistribute, ensuring each bite is juicy and flavorful.
And there you have it! Your French Onion Chicken Bake is ready to be garnished and served. The combination of flavors and textures will surely delight your taste buds!
Variation of French Onion Chicken Bake Recipe
While the classic French Onion Chicken Bake Recipe is delicious as is, there are plenty of ways to switch things up! Whether you want to try different ingredients or explore various cooking methods, these variations can add a unique twist to your meal. Let’s dive into some alternative ingredients and cooking methods that can enhance your dish.
Alternative Ingredients
Sometimes, you might not have all the ingredients on hand, or you may want to try something new. Here are some alternative ingredients you can use:
Chicken Thighs: For a juicier option, consider using skinless chicken thighs instead of breasts. They add more flavor and tenderness.
Vegetable Broth: If you prefer a lighter dish, swap beef broth for vegetable broth. This change keeps the dish flavorful while making it vegetarian-friendly.
Different Cheeses: Feel free to experiment with other cheeses! Cheddar, mozzarella, or even blue cheese can create a different flavor profile.
Fresh Herbs: Instead of dried thyme, try using fresh herbs like rosemary or parsley for a burst of freshness.
Mushrooms: Adding sliced mushrooms can enhance the umami flavor and add a nice texture to the dish.
These alternative ingredients can help you customize the French Onion Chicken Bake Recipe to suit your taste preferences or dietary needs.
Different Cooking Methods
In addition to changing ingredients, you can also explore different cooking methods to prepare your French Onion Chicken Bake. Here are a few options:
Slow Cooker: For a hands-off approach, use a slow cooker. Simply layer the ingredients in the slow cooker and cook on low for 6-8 hours. This method allows the flavors to meld beautifully.
Instant Pot: If you’re short on time, the Instant Pot is a great option. Sauté the onions and chicken in the pot, then add the broth and cook on high pressure for about 10 minutes.
Grill: For a smoky flavor, grill the chicken instead of baking it. After grilling, top it with the onion mixture and cheese, then place it under the broiler for a few minutes to melt the cheese.
These cooking methods can add variety to your meal prep and make the French Onion Chicken Bake Recipe even more enjoyable. So, don’t hesitate to get creative in the kitchen!
Cooking Note for French Onion Chicken Bake Recipe
When preparing the French Onion Chicken Bake Recipe, there are a few important cooking notes to keep in mind. These tips will help ensure that your dish turns out perfectly every time, enhancing both flavor and texture.
First, the choice of chicken is crucial. While boneless, skinless chicken breasts are the traditional choice, using chicken thighs can add extra moisture and flavor. Thighs tend to be juicier, making them a great option if you prefer a richer taste.
Next, the caramelization of the onions is key to achieving that sweet, rich flavor. Be patient while sautéing them. Stir occasionally, but allow them to sit for a bit to develop that beautiful golden color. If you find the onions are browning too quickly, lower the heat to prevent burning.
Another important note is to scrape the bottom of the skillet when adding the beef broth. This step releases the flavorful browned bits stuck to the pan, which adds depth to your sauce. Don’t skip this step, as it’s where much of the flavor comes from!
When it comes to cheese, feel free to mix and match. Gruyère and Parmesan are fantastic, but you can also try adding mozzarella for extra stretchiness or a sprinkle of goat cheese for a tangy twist. Just remember to keep an eye on the cheese while baking to prevent it from burning.
Lastly, let the dish rest for a few minutes after baking. This resting period allows the juices to redistribute throughout the chicken, ensuring each bite is juicy and flavorful. It also makes serving easier, as the dish will hold together better.
By following these cooking notes, you’ll elevate your French Onion Chicken Bake Recipe to new heights, making it a dish that everyone will love!
Serving Suggestions for French Onion Chicken Bake Recipe
Once your French Onion Chicken Bake is ready, it’s time to think about how to serve it! This dish is not only delicious but also versatile, making it easy to pair with various sides and accompaniments. Here are some serving suggestions to elevate your meal:
Crusty Bread: Serve the chicken bake with a side of crusty French bread or a baguette. This is perfect for soaking up the flavorful sauce and caramelized onions.
Green Salad: A fresh green salad with mixed greens, cherry tomatoes, and a light vinaigrette can balance the richness of the dish. The crispness of the salad adds a refreshing contrast.
Roasted Vegetables: Pair the chicken bake with roasted vegetables like carrots, zucchini, or Brussels sprouts. The caramelized flavors of the veggies complement the dish beautifully.
Mashed Potatoes: For a heartier meal, serve the French Onion Chicken Bake over creamy mashed potatoes. The potatoes will soak up the savory sauce, making each bite delightful.
Rice or Quinoa: If you prefer a lighter option, consider serving the chicken over a bed of rice or quinoa. This adds a nutritious element while keeping the focus on the chicken and cheese.
Don’t forget to garnish your dish with freshly chopped parsley before serving! This adds a pop of color and a hint of freshness that brightens up the plate. With these serving suggestions, your French Onion Chicken Bake will be a hit at any dinner table!
Tips for Perfecting Your French Onion Chicken Bake Recipe
To make your French Onion Chicken Bake Recipe truly exceptional, consider these helpful tips. Each suggestion is designed to enhance the flavors and textures of your dish, ensuring that every bite is a delight. Let’s explore how to perfect this comforting meal!
First, always use fresh ingredients. Fresh onions, garlic, and herbs will elevate the taste of your dish. Fresh ingredients have more flavor and aroma, making your French Onion Chicken Bake even more delicious.
Next, don’t rush the caramelization of the onions. Take your time to cook them slowly over medium heat. This process can take about 10-12 minutes, but it’s worth the wait. Properly caramelized onions add a sweet and rich flavor that is essential to the dish.
When seasoning the chicken, be generous with salt and pepper. This step is crucial for enhancing the chicken’s natural flavors. You can also add a pinch of smoked paprika for a subtle smokiness that complements the dish beautifully.
For a creamier texture, consider adding a splash of heavy cream to the beef broth before pouring it into the skillet. This addition will create a luscious sauce that pairs perfectly with the chicken and cheese.
Another tip is to let the cheese melt properly. If you want a beautifully golden and bubbly cheese topping, broil the dish for the last few minutes of baking. Just keep a close eye on it to prevent burning!
Lastly, don’t forget to let the dish rest after baking. This resting time allows the flavors to meld and the juices to redistribute, making each serving juicy and flavorful. It also makes it easier to serve, as the dish will hold its shape better.
By following these tips, you’ll be well on your way to creating a French Onion Chicken Bake that’s not only delicious but also memorable. Enjoy the process and savor the delightful flavors!
Breakdown of Time for French Onion Chicken Bake Recipe
Understanding the time commitment for the French Onion Chicken Bake Recipe can help you plan your cooking session effectively. Here’s a detailed breakdown of the time required for preparation and cooking, ensuring you can enjoy this delicious dish without any surprises!
Prep Time
The prep time for this recipe is approximately 15-20 minutes. During this time, you will gather all your ingredients, season the chicken, and slice the onions and garlic. Having everything ready before you start cooking will make the process smoother and more enjoyable.
Cooking Time
Once you’ve prepped your ingredients, the cooking time will take about 30-35 minutes. This includes searing the chicken, caramelizing the onions, and baking the dish in the oven. The combination of these steps ensures that the chicken is juicy and the flavors meld beautifully.
Total Time
In total, you can expect to spend around 50-55 minutes from start to finish. This includes both prep and cooking time. With this efficient timeline, you can have a hearty and flavorful meal ready to serve in less than an hour!
Now that you have a clear understanding of the time involved, you can confidently prepare your French Onion Chicken Bake Recipe. Enjoy the cooking process and the delightful aromas that will fill your kitchen!
Nutritional Information for French Onion Chicken Bake Recipe
Understanding the nutritional information of the French Onion Chicken Bake Recipe is essential for those who are mindful of their dietary intake. This dish not only satisfies your taste buds but also provides a good balance of nutrients. Let’s break down the key nutritional components per serving.
Calories
Each serving of the French Onion Chicken Bake contains approximately 450 calories. This calorie count makes it a hearty meal option without being overly indulgent. The combination of chicken, cheese, and onions contributes to the overall caloric content, providing energy for your day.
Protein
One of the standout features of this dish is its high protein content. Each serving offers about 45 grams of protein. This makes it an excellent choice for those looking to increase their protein intake, whether for muscle building or simply to feel fuller for longer. The chicken is the primary source of protein, ensuring you get a nutritious meal.
Sodium
When it comes to sodium, each serving contains around 800 milligrams. While this is a reasonable amount for a savory dish, it’s important to be mindful if you are watching your sodium intake. You can reduce the sodium content by using low-sodium beef broth or adjusting the amount of Worcestershire sauce used in the recipe. This way, you can enjoy the flavors without compromising your dietary needs.
Overall, the French Onion Chicken Bake Recipe is a well-rounded meal that provides a good mix of calories, protein, and flavor. By being aware of the nutritional information, you can enjoy this dish while keeping your health goals in mind!
FAQs about French Onion Chicken Bake Recipe
Can I use different types of cheese in the French Onion Chicken Bake Recipe?
Absolutely! While Gruyère and Parmesan are the traditional choices, you can experiment with various cheeses to suit your taste. Cheddar cheese adds a sharp flavor, while mozzarella provides a gooey texture. If you’re feeling adventurous, try blue cheese for a bold twist. Just remember to choose cheeses that melt well for the best results!
How can I make the French Onion Chicken Bake Recipe healthier?
There are several ways to lighten up the French Onion Chicken Bake Recipe without sacrificing flavor. First, consider using skinless chicken thighs instead of breasts for added moisture and flavor. You can also substitute the beef broth with low-sodium vegetable broth to reduce sodium content. Additionally, using less cheese or opting for lower-fat cheese varieties can help cut calories. Finally, serve the dish with a side of steamed vegetables or a fresh salad to increase the nutritional value of your meal.
What side dishes pair well with the French Onion Chicken Bake Recipe?
This dish is versatile and pairs well with a variety of side dishes. For a classic touch, serve it with crusty French bread or a baguette to soak up the delicious sauce. A fresh green salad with a light vinaigrette adds a refreshing contrast to the rich flavors. Roasted vegetables, such as carrots or Brussels sprouts, complement the dish beautifully. If you’re looking for something heartier, creamy mashed potatoes or rice can be excellent choices to round out your meal.
Can I prepare the French Onion Chicken Bake Recipe in advance?
Yes, you can prepare the French Onion Chicken Bake Recipe in advance! To do this, follow the recipe up to the baking step. Once you’ve assembled the dish, cover it tightly and store it in the refrigerator for up to 24 hours. When you’re ready to bake, simply preheat the oven and bake as directed. You may need to add a few extra minutes to the cooking time if the dish is cold from the fridge. This makes it a great option for meal prep or entertaining!
Conclusion on French Onion Chicken Bake Recipe
In conclusion, the French Onion Chicken Bake Recipe is a delightful dish that brings together the comforting flavors of caramelized onions, tender chicken, and rich cheeses. It’s a perfect meal for any occasion, whether it’s a cozy family dinner or a gathering with friends. The simplicity of the recipe, combined with its delicious taste, makes it a go-to choice for both novice and experienced cooks alike.
As you’ve seen, this recipe is versatile, allowing for various ingredient substitutions and cooking methods. You can easily tailor it to suit your preferences or dietary needs. Whether you choose to use chicken thighs for added juiciness or experiment with different cheeses, the possibilities are endless!
Moreover, the nutritional benefits of this dish, including its high protein content and satisfying flavors, make it a wholesome option for your meal planning. With just a little preparation and attention to detail, you can create a dish that not only tastes amazing but also nourishes your body.
So, gather your ingredients, follow the steps, and enjoy the process of making this French Onion Chicken Bake. Your kitchen will be filled with mouthwatering aromas, and your family and friends will surely be impressed. Happy cooking!
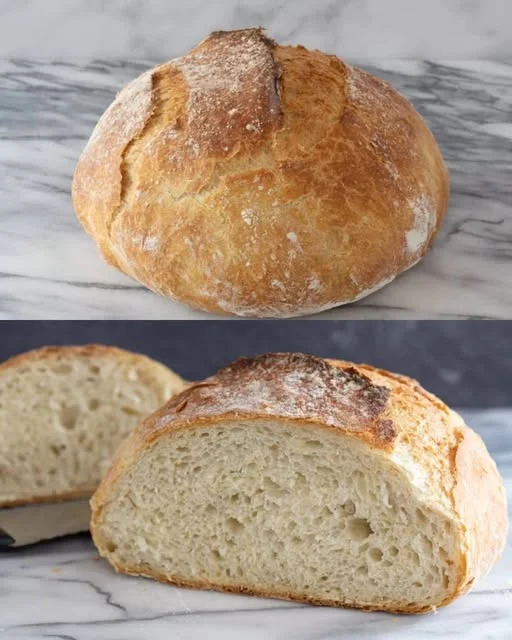
Some of the best memories in my kitchen have come not from the fanciest dishes, but from the humblest — like a loaf of bread, rising slowly on the counter, filling the room with warmth and promise.
I remember the first time I baked bread on my own. I was home from college for winter break, eager to prove I could make something from scratch. With flour dusting the countertops and yeast blooming quietly in warm water, I stood in front of my mom’s old oven like a nervous apprentice. It wasn’t perfect — the crust too thick, the inside a bit dense — but I’ll never forget the pride I felt slicing into that loaf and watching steam curl upward.
Years later, with a family of my own and a never-ending list of daily tasks, I craved the comfort of homemade bread but rarely had the time for it. That’s when I discovered the beauty of the Instant Pot — a device that had already earned its place on my counter for soups, stews, and rice, now stepped into a new role: bread proofer.
This Instant Pot Bread Recipe is a testament to modern kitchen hacks meeting timeless tradition. It takes the guesswork out of proofing, speeds up the process, and brings fresh-baked bread within reach — even on a Tuesday. It doesn’t replace the joy of slow, artisanal loaves, but it makes the magic of baking accessible on any schedule.
Why Make Bread in an Instant Pot?
You might be asking: Isn’t bread all about the oven? Yes and no. The Instant Pot doesn’t bake the bread — but it creates the perfect environment for it to rise faster, more evenly, and with consistent warmth that’s hard to replicate on a cold kitchen counter.
Here’s what makes this method a game-changer:
Reliable proofing: The “Yogurt” function on the Instant Pot offers a steady low temperature that helps the yeast thrive, especially in cooler months.
Time-saving: Traditional dough rising can take hours. The Instant Pot cuts it down significantly without sacrificing flavor or texture.
Beginner-friendly: This recipe is incredibly forgiving and doesn’t require advanced techniques or tools.
No stand mixer required: While you can use one, this dough is easy to knead by hand if you prefer.
Ingredients
Ingredient
Quantity
All-purpose flour
3¼ cups (390 grams)
Instant or active dry yeast
1¼ teaspoons
Salt
1¼ teaspoons
Warm water (100–110°F / 38–43°C)
1¼ cups
Sugar (optional, to activate yeast)
1 teaspoon
Directions
Combine & Knead In a large mixing bowl, combine warm water, yeast, and sugar (if using). Let sit for 5 minutes until foamy (for active dry yeast). Add flour and salt, and mix until a shaggy dough forms. Knead by hand or with a stand mixer for 8–10 minutes until smooth and elastic. Add extra flour if needed to reduce stickiness.
Proof in the Instant Pot Lightly grease the inner pot of your Instant Pot. Place the dough inside. Cover with a glass lid or plate (do not use the pressure-sealing lid). Set the Instant Pot to the “Yogurt” function on Low for 1 hour. Dough should double in size.
Shape & Rest Remove dough, gently punch it down, and shape into a round or oval loaf. Place on a parchment-lined baking sheet or in a greased oven-safe pan.
Final Rise & Bake Let the dough rest at room temperature for 20–30 minutes while preheating your oven to 450°F (230°C). Bake for 25–30 minutes until the crust is golden brown and the loaf sounds hollow when tapped on the bottom.
Cool & Serve Transfer bread to a wire rack to cool completely before slicing. Enjoy fresh with butter, soup, or as a sandwich base.
Nutritional Snapshot (Per Slice — based on 12 slices)
Nutrient
Amount
Calories
~140 kcal
Carbohydrates
~28 g
Protein
~4 g
Fat
~0.5 g
Fiber
~1 g
Sodium
~200 mg
The Texture: Chewy, Soft, and Just Right
The result? A loaf that’s soft on the inside, lightly chewy, and sturdy enough for sandwiches or toast. If you finish it with a quick bake in a hot oven, you’ll also get that golden, satisfying crust that crackles just a bit when you slice through.
What makes this bread stand out is its versatility. It’s neutral and dependable — a bread that can go savory or sweet depending on what you pair it with. Toast it for breakfast with a smear of jam, dip it into a hearty soup, or use it as the base for an epic grilled cheese.
The Joy of a Homemade Loaf
There’s something inherently rewarding about baking bread from scratch. The process invites you to slow down, even just a little. Kneading the dough becomes a quiet meditation. Watching it rise becomes a small triumph. And pulling it from the oven, golden and fragrant, is nothing short of magic.
Unlike store-bought loaves, homemade bread gives you full control — no preservatives, no mystery ingredients, just flour, yeast, water, and salt. It’s proof (pun intended) that you don’t need much to make something nourishing and beautiful.
When to Make Instant Pot Bread
Busy weekday evenings: Need bread for dinner, but forgot to grab a loaf? This comes together quickly with ingredients you likely have on hand.
Weekend baking projects: Involve kids or friends in the process — it’s hands-on, fun, and incredibly rewarding.
Holiday meals: A homemade loaf adds a thoughtful, homemade touch to any gathering or holiday table.
Meal prep days: Make a loaf and slice it for toast, sandwiches, or soup pairings throughout the week.
Ways to Customize Your Loaf
Once you’ve nailed the basic version, the possibilities are endless:
Whole Wheat Version
Swap out half the all-purpose flour for whole wheat flour. Add a splash more water if needed, as whole wheat tends to absorb more moisture.
Herb-Infused Bread
Mix dried herbs (like rosemary, thyme, or Italian seasoning) into the dough before the first rise for a savory, aromatic loaf.
Garlic & Parmesan
Fold in minced garlic and a sprinkle of grated Parmesan cheese for a bold, flavor-packed variation.
Honey Oat
Add a tablespoon of honey to the water and sprinkle oats on top before baking for a hearty, slightly sweet twist.
Cinnamon Raisin
Stir in cinnamon and raisins for a breakfast-ready version. Serve warm with butter or honey.
Tips for a Perfect Instant Pot Bread Experience
Even the simplest recipes benefit from technique. Here’s how to elevate your bread:
Use the “Yogurt” Setting
This is the perfect low-temp function for proofing dough. If your model doesn’t have it, use the “Keep Warm” function — but only for 10–15 minutes at a time, checking that the dough doesn’t get too warm.
Let It Cool
It’s tempting to slice the bread immediately, but letting it cool helps set the crumb and prevents it from turning gummy.
Don’t Skip the Final Bake
The Instant Pot only helps with proofing. The oven is still essential for creating that golden crust and fully cooking the bread.
Adjust Based on Humidity
If your dough feels too sticky, add a little flour. Too dry? Add a few drops of water. The dough should be soft and slightly tacky, but not clingy.
Frequently Asked Questions
Can I bake the bread in the Instant Pot?
The Instant Pot isn’t designed to bake traditional bread. While some people use the “Bake” or “Cake” function, the results are more steamed than baked. For best texture, transfer your proofed dough to the oven for a proper bake.
Can I freeze the dough or baked bread?
Yes. You can freeze the dough after the first rise or freeze fully baked slices. Wrap tightly in plastic wrap or foil and store in a freezer-safe bag.
What if I don’t have a “Yogurt” setting?
You can still proof dough by using the “Keep Warm” function for 10 minutes, then turning it off and leaving the dough inside for 30–45 minutes. Or simply proof the dough in a warm, draft-free corner of your kitchen.
Can I make it gluten-free?
This recipe is designed for all-purpose wheat flour. Gluten-free bread requires a different ratio of ingredients and often a binder like xanthan gum. Use a dedicated gluten-free bread recipe for best results.
What flour substitutes can I use?
Try bread flour for a chewier crumb or mix in whole wheat for a heartier texture. Spelt, rye, and oat flour can be used in small amounts combined with AP flour for flavor variation.
How long does the bread stay fresh?
Stored in an airtight container at room temperature, the bread will stay fresh for about 2–3 days. Avoid the fridge, which dries it out faster. For longer storage, freeze slices and toast as needed.
A Loaf That Feels Like Home
At its core, this recipe is more than just instructions — it’s an invitation. To slow down. To connect. To bring something beautiful out of a few basic ingredients.
Instant Pot Bread bridges the gap between modern convenience and timeless tradition. It’s for the beginner baker just dipping their toes into homemade bread, and for the seasoned cook who wants a reliable, fast recipe in their back pocket.
And most importantly, it’s for anyone who wants to make something from scratch and share it — one slice at a time.
Final Thoughts: The Comfort of a Fresh Loaf
Bread has always held a special place in kitchens around the world. It’s a symbol of nourishment, comfort, and home. And while the idea of baking your own bread might seem intimidating, this recipe proves it doesn’t have to be.
With your Instant Pot as a helper and a bit of flour on your hands, you’re just a couple of hours away from something truly satisfying — a homemade loaf that tastes like effort and feels like love.
So tie on your apron, warm up some water, and let the aroma of fresh bread fill your kitchen. Your next favorite tradition might be rising right now.
Linguine with clams is a classic Italian dish that hails from the coastal regions of Italy, particularly in the area of Naples. This delightful recipe showcases the fresh flavors of the sea, combining tender linguine pasta with succulent clams. The dish is often prepared with simple ingredients, allowing the natural taste of the clams to shine through. Traditionally, it is known as “Linguine alle Vongole,” which translates to linguine with clams. Over the years, it has gained popularity worldwide, becoming a staple in Italian restaurants and home kitchens alike.
Why You Should Try This Linguine with Clams Recipe
If you’re looking for a quick yet impressive meal, this linguine with clams recipe is perfect for you. Not only is it easy to prepare, but it also brings a taste of the ocean right to your table. The combination of garlic, white wine, and fresh clams creates a rich and flavorful sauce that clings beautifully to the pasta. Plus, it’s a great way to introduce seafood into your diet, providing essential nutrients like protein and omega-3 fatty acids. Whether you’re hosting a dinner party or enjoying a cozy night in, this dish is sure to impress your guests and satisfy your taste buds.
Ingredients for Linguine with Clams Recipe
To create a delicious linguine with clams recipe, you’ll need a few fresh ingredients that come together to make a delightful meal. Here’s what you’ll need:
8 ounces linguine pasta
2 tablespoons olive oil
4 cloves garlic, minced
1/2 teaspoon red pepper flakes (adjust to taste)
1 cup dry white wine
2 pounds fresh clams, scrubbed and rinsed
1/4 cup fresh parsley, chopped
1 tablespoon lemon juice
Salt and pepper to taste
Grated Parmesan cheese (optional, for serving)
These ingredients are not only simple but also readily available at most grocery stores. The fresh clams are the star of the dish, providing a briny flavor that pairs perfectly with the linguine. The garlic and red pepper flakes add a nice kick, while the white wine creates a rich sauce that enhances the overall taste. Don’t forget the parsley and lemon juice, as they add freshness and brightness to the dish. If you want to elevate your meal, consider adding a sprinkle of grated Parmesan cheese on top before serving.
Now that you have your ingredients ready, let’s move on to the step-by-step preparation of this delightful linguine with clams recipe!
Step-by-Step Preparation of Linguine with Clams Recipe
Step 1: Preparing the Clams
Before you start cooking, it’s essential to prepare the clams properly. First, scrub the clams under cold running water. This helps remove any sand or grit. You can use a brush to clean the shells thoroughly. After scrubbing, soak the clams in a bowl of cold water for about 20 minutes. This allows them to expel any remaining sand. Once they’ve soaked, rinse them again under cold water. Discard any clams that are open and do not close when tapped. These clams are not fresh and should not be used.
Step 2: Cooking the Linguine
Next, it’s time to cook the linguine. Bring a large pot of salted water to a rolling boil. The salt enhances the pasta’s flavor. Add the linguine and cook according to the package instructions until it reaches an al dente texture. This usually takes about 8-10 minutes. Remember to stir occasionally to prevent sticking. Once cooked, reserve 1/2 cup of the pasta water, then drain the linguine in a colander. Set it aside while you prepare the sauce.
Step 3: Making the Sauce
Now, let’s create the flavorful sauce. In a large skillet, heat 2 tablespoons of olive oil over medium heat. Once the oil is hot, add the minced garlic and red pepper flakes. Sauté for about 1 minute until the garlic becomes fragrant, but be careful not to let it burn. Next, pour in 1 cup of dry white wine. Bring the mixture to a simmer and let it cook for 2-3 minutes. This helps to reduce the wine slightly, intensifying the flavor.
Step 4: Combining Linguine and Clams
After the sauce has simmered, it’s time to add the clams. Carefully place the prepared clams into the skillet and cover it with a lid. Cook for about 5-7 minutes, or until the clams have opened. Discard any clams that remain closed. Once the clams are ready, stir in the cooked linguine, along with the reserved pasta water, chopped parsley, lemon juice, salt, and pepper. Toss everything together gently until well combined and heated through. Your delicious linguine with clams is now ready to serve!
Variation of Linguine with Clams Recipe
Alternative Ingredients for a Unique Twist
If you’re looking to switch things up, there are plenty of alternative ingredients you can use in your linguine with clams recipe. For instance, consider adding a splash of cream to the sauce for a richer flavor. This will create a delightful creamy sauce that pairs beautifully with the clams. You can also experiment with different types of seafood. Shrimp or scallops can be great substitutes for clams, offering a different texture and taste. If you want a bit more zest, try adding sun-dried tomatoes or artichoke hearts. These ingredients can add a burst of flavor and color to your dish.
Another fun twist is to incorporate different herbs. Instead of parsley, you might use basil or cilantro for a fresh, aromatic touch. You can also play with spices; a pinch of saffron can elevate the dish to a whole new level. Just remember to adjust the cooking time slightly if you’re using larger seafood, ensuring everything is cooked perfectly. With these variations, your linguine with clams recipe can become a new favorite every time you make it!
Vegetarian Options for Linguine with Clams Recipe
For those who prefer a vegetarian option, you can still enjoy a delicious linguine dish without clams. One popular alternative is to use mushrooms, particularly shiitake or portobello, which can mimic the umami flavor of clams. Simply sauté the mushrooms in olive oil until they are tender and add them to your sauce. You can also use zucchini noodles or whole wheat linguine for a healthier twist.
Another great option is to create a vegetable-based sauce. Consider using roasted red peppers blended with garlic and olive oil for a vibrant sauce. You can also add seasonal vegetables like asparagus or spinach for added nutrition and flavor. These vegetarian variations not only maintain the essence of the original dish but also provide a fresh and exciting take on linguine with clams. Enjoy experimenting with these options to find your perfect vegetarian version!
Cooking Note for Linguine with Clams Recipe
When preparing your linguine with clams recipe, there are a few important cooking notes to keep in mind. First, always choose fresh clams for the best flavor. Fresh clams should have a clean, ocean-like smell and should be tightly closed. If any clams are open, give them a gentle tap. If they do not close, discard them as they are not fresh.
Another key point is to avoid overcooking the clams. They should only be cooked until they open, which usually takes about 5-7 minutes. Overcooked clams can become tough and chewy, detracting from the overall dish. If you’re unsure, it’s better to err on the side of caution and check them frequently.
Additionally, the reserved pasta water is a secret weapon in this recipe. It contains starch from the pasta, which helps to thicken the sauce and allows it to cling better to the linguine. If your sauce seems too dry, add a little more reserved pasta water until you reach your desired consistency.
Lastly, remember that the flavors of this dish improve with a little time. Allowing the linguine and clams to sit together for a minute before serving can help the pasta absorb the delicious sauce. This small step can elevate your dish, making it even more enjoyable. With these cooking notes in mind, you’re well on your way to creating a perfect linguine with clams recipe!
Serving Suggestions for Linguine with Clams Recipe
Pairing Wines with Linguine with Clams Recipe
When it comes to enjoying your linguine with clams recipe, the right wine can elevate your dining experience. A crisp, dry white wine is the perfect companion for this dish. Consider a Sauvignon Blanc or a Pinot Grigio. These wines have bright acidity that complements the briny flavor of the clams beautifully. If you prefer something a bit richer, a Chardonnay can also work well, especially if it’s unoaked. The creamy texture of the wine pairs nicely with the garlic and olive oil in the sauce.
For those who enjoy a bit of sparkle, a dry Prosecco can add a festive touch to your meal. The bubbles cleanse the palate and enhance the overall flavors of the dish. Remember to serve your wine chilled, as this will enhance its refreshing qualities. Pour a glass, sit back, and enjoy the delightful combination of flavors in your linguine with clams recipe!
Side Dishes to Complement Your Meal
To round out your meal, consider serving some delicious side dishes alongside your linguine with clams recipe. A simple green salad is always a great choice. Toss together mixed greens, cherry tomatoes, and a light vinaigrette for a refreshing contrast to the rich pasta. You can also add slices of avocado or nuts for extra texture and flavor.
Another excellent side is garlic bread. The buttery, garlicky goodness of the bread pairs perfectly with the linguine, allowing you to soak up any leftover sauce. If you’re looking for something a bit heartier, roasted vegetables like asparagus or zucchini can add a colorful and nutritious element to your meal.
Lastly, consider serving a light soup, such as a tomato basil or a minestrone, as a starter. This will warm up your guests and set the stage for the main course. With these side dishes, your linguine with clams recipe will shine even brighter, creating a well-rounded and satisfying dining experience.
Tips for Perfecting Your Linguine with Clams Recipe
Common Mistakes to Avoid
When making your linguine with clams recipe, avoiding common mistakes can make a big difference in the final dish. One frequent error is overcooking the pasta. Always cook the linguine until it’s al dente, as it will continue to cook when mixed with the sauce. If you overcook it, the pasta can become mushy and lose its texture.
Another mistake is not cleaning the clams properly. Skipping the scrubbing and soaking steps can lead to sandy clams, which can ruin your dish. Always ensure that your clams are fresh and clean before cooking. Discard any that do not open during cooking, as they are not safe to eat.
Additionally, be cautious with the amount of salt you add. Since clams are naturally salty, you may not need as much salt in your dish. Taste as you go to ensure the flavors are balanced. Lastly, avoid rushing the cooking process. Allowing the clams to open slowly in the wine creates a more flavorful sauce. Patience is key to achieving the best results!
Enhancing Flavor in Your Linguine with Clams Recipe
To take your linguine with clams recipe to the next level, consider a few flavor-enhancing tips. First, using high-quality olive oil can significantly impact the taste. A good extra virgin olive oil adds richness and depth to the dish. You can also experiment with different types of garlic. Fresh garlic is always best, but roasted garlic can add a sweet, mellow flavor.
Another way to enhance flavor is by adding fresh herbs. While parsley is traditional, you can also try basil or thyme for a unique twist. A sprinkle of red pepper flakes adds a nice kick, but adjust the amount to suit your taste. For a touch of brightness, consider adding a splash of lemon juice or zest just before serving. This will brighten the dish and enhance the overall flavor profile.
Lastly, don’t forget about the power of freshly grated cheese. A sprinkle of Parmesan cheese can add a savory note that complements the clams beautifully. Just remember to serve it on the side, as not everyone may want cheese with their seafood. With these tips, your linguine with clams recipe will be bursting with flavor and sure to impress!
Breakdown of Time for Linguine with Clams Recipe
Prep Time
Preparing your linguine with clams recipe is a breeze! The prep time typically takes about 20 minutes. This includes cleaning the clams, chopping the garlic and parsley, and measuring out your ingredients. Taking the time to prepare everything beforehand will make the cooking process smoother and more enjoyable. Remember, fresh clams need a little extra attention, so don’t rush this step!
Cooking Time
The cooking time for this delicious dish is around 15-20 minutes. First, you’ll cook the linguine for about 8-10 minutes until it’s al dente. While the pasta is cooking, you can prepare the sauce, which takes about 5-7 minutes. Finally, combining the linguine and clams will take an additional 2-3 minutes. This quick cooking time makes linguine with clams a fantastic option for a weeknight dinner or a last-minute gathering!
Total Time
In total, you can expect to spend about 35-40 minutes from start to finish when making your linguine with clams recipe. This includes both prep and cooking time. With such a short time commitment, you can enjoy a restaurant-quality meal right at home. So gather your ingredients, and get ready to impress your family and friends with this delightful dish!
Nutritional Information for Linguine with Clams Recipe
Calories
When it comes to enjoying your linguine with clams recipe, understanding the calorie content is essential. Each serving of this delightful dish contains approximately 450 calories. This makes it a satisfying meal that won’t weigh you down. The balance of pasta, clams, and olive oil provides a hearty yet healthy option for lunch or dinner. If you’re watching your calorie intake, consider adjusting portion sizes or pairing it with lighter side dishes.
Protein Content
Protein is an important part of any meal, and this linguine with clams recipe delivers! Each serving contains about 20 grams of protein. The clams are a fantastic source of lean protein, which is essential for muscle repair and overall health. Combining the clams with linguine not only makes for a delicious dish but also helps you meet your daily protein needs. This makes it a great option for those looking to maintain a balanced diet.
Sodium Levels
When preparing your linguine with clams recipe, it’s important to be mindful of sodium levels. Each serving contains around 800 milligrams of sodium. This is primarily due to the natural saltiness of the clams and any added salt during cooking. If you’re watching your sodium intake, consider using low-sodium broth or reducing the amount of added salt. Additionally, rinsing the clams thoroughly can help minimize excess sodium. Enjoying this dish in moderation can help you maintain a healthy diet while still indulging in its delicious flavors.
FAQs about Linguine with Clams Recipe
Can I use frozen clams for this recipe?
Yes, you can use frozen clams for your linguine with clams recipe! However, it’s important to thaw them properly before cooking. Place the frozen clams in the refrigerator overnight or run them under cold water for a quicker thaw. Keep in mind that frozen clams may not have the same fresh taste as live clams, but they can still work well in this dish. Just ensure they are fully cooked and opened during the cooking process.
What type of linguine is best for this dish?
For the best results, use traditional semolina linguine for your linguine with clams recipe. This type of pasta has a firm texture that holds up well against the sauce. You can also opt for whole wheat linguine for a healthier option, which adds a nutty flavor. If you’re looking for a gluten-free alternative, consider using gluten-free linguine made from rice or corn. Each type will provide a slightly different taste and texture, so choose one that suits your preference!
How can I make this recipe gluten-free?
Making your linguine with clams recipe gluten-free is simple! Just substitute traditional linguine with a gluten-free pasta option. There are many varieties available, such as rice, corn, or quinoa-based pasta. Be sure to check the cooking instructions on the package, as gluten-free pasta may require different cooking times. Additionally, ensure that all other ingredients, like the wine and seasonings, are gluten-free. With these adjustments, you can enjoy a delicious gluten-free version of this classic dish!
Can I prepare the sauce in advance?
Absolutely! You can prepare the sauce for your linguine with clams recipe in advance. Simply follow the steps for making the sauce, but stop before adding the clams. Allow the sauce to cool, then store it in an airtight container in the refrigerator for up to 2 days. When you’re ready to serve, reheat the sauce in a skillet, add the clams, and continue cooking until they open. This makes it a convenient option for busy weeknights or when hosting guests!
Conclusion on Linguine with Clams Recipe
In conclusion, the linguine with clams recipe is a delightful dish that brings the taste of the sea right to your kitchen. With its simple ingredients and quick preparation, it’s perfect for both busy weeknights and special occasions. The combination of fresh clams, garlic, and white wine creates a rich and flavorful sauce that pairs beautifully with the tender linguine. Plus, it’s a fantastic way to introduce seafood into your diet, offering numerous health benefits.
Whether you choose to stick to the classic recipe or experiment with variations, this dish is sure to impress. From adding a splash of cream for richness to substituting clams with shrimp or even creating a vegetarian version, the possibilities are endless. Remember to pay attention to the cooking notes and tips provided to ensure your dish turns out perfectly every time.
As you gather around the table to enjoy your linguine with clams, take a moment to appreciate the flavors and the joy of sharing a meal with loved ones. This recipe not only nourishes the body but also creates lasting memories. So, roll up your sleeves, gather your ingredients, and dive into the wonderful world of linguine with clams. Bon appétit!
Growing up in a big family meant two things were always guaranteed: noise and food. Dinnertime was the daily moment that pulled everyone together, no matter how chaotic the rest of the day had been. And while we all had our favorites, nothing made the table fall into that rare moment of silence like a bubbling tray of spaghetti casserole.
I still remember the first time my mom served it. It wasn’t a holiday or birthday — it was just a regular Tuesday. She had leftover spaghetti, a half-used jar of tomato sauce, some cooked ground beef, and a generous handful of cheese. With little time and a hungry crowd on her hands, she layered everything in a casserole dish, sprinkled cheese on top, and threw it in the oven.
Twenty minutes later, we had something magical. The noodles were coated in savory sauce, the cheese was golden and bubbling, and the smell alone had us all running to the table. That was the night “Tuesday Casserole” became a tradition — the kind that comforts, feeds, and stretches just enough to serve a crowd.
This Easy Cheesy Spaghetti Casserole is a modern, slightly polished version of that memory. It’s still deeply comforting and unbelievably simple, but with just the right tweaks to make it feel like something special — even if it’s just Tuesday.
Why This Spaghetti Casserole Is Worth Adding to Your Rotation
Comfort food isn’t always about complexity. Often, it’s the simple, nostalgic dishes that leave the biggest impression — and this casserole is the perfect example. Here’s why it works so well:
1. Familiar Flavors, Elevated
This dish brings together beloved pantry staples: pasta, ground meat, tomato sauce, and cheese. But baking them together gives it a whole new texture and depth. The top is golden and crisp, while the inside stays creamy, saucy, and rich.
2. It’s a One-Dish Wonder
There’s something so satisfying about a meal that comes together in one dish. Less mess. Less fuss. Everything — protein, carbs, and flavor — is baked together and served hot with minimal cleanup.
3. Incredibly Kid-Friendly
If you’re cooking for picky eaters or looking to please a family crowd, this casserole is your best friend. There’s no unfamiliar spice, texture, or component to scare anyone away. Just cheesy, saucy, pasta goodness.
4. Make-Ahead Magic
This casserole can be prepped ahead and baked when needed — perfect for busy weeknights or feeding guests. It also freezes beautifully, making it a lifesaver for batch cooking or meal prep.
Ingredients
Ingredient
Quantity
Spaghetti
200 g (7 oz)
Minced meat (beef or blend)
400 g (14 oz)
Onion, finely chopped
1
Garlic, minced (optional)
2 cloves
Crushed tomatoes or tomato sauce
400 g (14 oz)
Dried oregano
1 teaspoon
Salt
1 teaspoon (to taste)
Black pepper
½ teaspoon
Shredded mozzarella cheese
150 g (1½ cups)
Grated Parmesan cheese
50 g (½ cup)
Olive oil
1 tablespoon
Fresh basil or parsley
Optional, for garnish
Directions
Cook the Pasta Boil the spaghetti in salted water until just al dente. Drain and set aside.
Sauté the Aromatics In a skillet, heat olive oil over medium heat. Add the chopped onion and cook until translucent. Stir in the garlic and cook for 1 more minute.
Brown the Meat Add the minced meat to the pan and cook until fully browned, breaking it apart as it cooks. Season with salt, pepper, and oregano.
Add the Tomato Base Pour in the crushed tomatoes or sauce. Stir and simmer for 5–10 minutes to thicken and build flavor. Adjust seasoning if needed.
Mix and Assemble Preheat oven to 375°F (190°C). Combine the spaghetti and meat sauce in a large bowl. Transfer to a greased baking dish.
Top with Cheese Sprinkle mozzarella over the pasta, followed by Parmesan cheese for extra depth and crunch.
Bake Until Bubbling Bake for 20–25 minutes or until the top is golden and the cheese is melted. Let rest for 5 minutes, garnish with herbs if using, and serve hot.
Nutritional Snapshot (Per Serving – Based on 6 Servings)
Nutrient
Amount
Calories
~420 kcal
Protein
~24 g
Carbohydrates
~32 g
Fat
~22 g
Fiber
~3 g
Sodium
~580 mg
The Power of Baked Pasta
Baked pasta dishes are a beloved tradition in many cultures for a reason. They take what’s already delicious — pasta and sauce — and add a whole new layer of indulgence with melted cheese, crispy corners, and a warm, cohesive bake.
What makes spaghetti work particularly well in this recipe is its texture. The long noodles soak up the sauce and absorb flavor throughout. When baked, they soften slightly, binding together beautifully under the cheese. Each slice holds together, making it easy to serve and even easier to eat.
How and When to Serve It
Easy Cheesy Spaghetti Casserole is versatile. Here are some great ways to incorporate it into your meal planning:
Weeknight Dinner Hero – Quick enough for busy nights, hearty enough to stand on its own.
Meal Prep Favorite – Make a big batch, freeze individual portions, and reheat as needed.
Potluck Star – It’s portable, easy to slice and serve, and always a hit with a crowd.
Cozy Weekend Comfort – Add a side salad and some garlic bread for a restaurant-style comfort meal at home.
Simple Variations to Suit Every Taste
The beauty of this dish lies in its flexibility. Here are some popular variations you can try:
Vegetarian Version
Swap the meat for sautéed mushrooms, zucchini, or spinach. Add lentils or plant-based crumbles for protein.
Spicy Kick
Add chili flakes or chopped jalapeños to the sauce. Use spicy sausage instead of ground beef for extra heat.
Creamy Twist
Stir in a spoonful of ricotta or cream cheese to the sauce for a creamier filling. You can also add a béchamel layer for a richer dish.
More Veggies
Include finely chopped bell peppers, carrots, or celery in the sauce for a hidden veggie boost — great for feeding picky eaters.
Cheese Lovers’ Dream
Layer the top with a blend of mozzarella, cheddar, provolone, and Parmesan for extra gooey and golden goodness.
Tips for a Perfect Casserole Every Time
Even the simplest recipes benefit from thoughtful technique. Here are some expert tips:
Use Al Dente Pasta
Since the pasta continues to cook in the oven, slightly undercooking it helps avoid a mushy texture.
Season Generously
Taste your sauce before combining it with the pasta. Baked dishes can dull flavors, so be bold with your seasoning.
Let It Rest
After baking, let the casserole sit for 5–10 minutes before slicing. This helps it firm up and makes serving easier.
Grease the Dish
To prevent sticking and help the edges crisp, lightly grease your baking dish before assembling the casserole.
Top It Right
Finish with a sprinkle of Parmesan or breadcrumbs for a golden, slightly crunchy topping.
Frequently Asked Questions
Can I make this casserole ahead of time?
Yes! Assemble it up to a day in advance, cover it, and refrigerate. When ready, bake as directed, adding 5–10 minutes to the cooking time if coming straight from the fridge.
Can I freeze it?
Absolutely. Freeze before or after baking. If freezing before, thaw in the fridge overnight and then bake. If freezing after, reheat in the oven covered with foil to preserve moisture.
Can I use a different type of pasta?
Yes, though spaghetti gives a traditional texture. Penne, fusilli, or rigatoni also work well. Just be sure to cook any pasta to al dente before baking.
What kind of meat works best?
Ground beef is classic, but you can use pork, turkey, sausage, or even a blend. Just make sure it’s fully cooked and seasoned before adding to the sauce.
How do I store leftovers?
Store in an airtight container in the fridge for up to 3–4 days. Reheat in the oven or microwave. For best texture, cover with foil when reheating.
Can I make it gluten-free?
Yes. Use gluten-free pasta and ensure your sauce and cheese are certified gluten-free. The recipe itself adapts very well to gluten-free alternatives.
Can I use jarred pasta sauce?
Definitely. While a homemade sauce offers more control over flavor, a good-quality store-bought sauce makes this recipe even easier.
Comfort Food That Keeps Giving
There are recipes we try once and forget. Then there are the ones we return to again and again — not because they’re fancy or impressive, but because they make us feel something.
This Easy Cheesy Spaghetti Casserole is one of those recipes.
It’s not trying to be complicated. It doesn’t require obscure ingredients or hours of prep. But it brings people to the table. It makes them stay for seconds. And it fills the kitchen with that unmistakable smell of something warm, cheesy, and bubbling — something that feels like home.
Whether it’s Tuesday night with the kids, a cozy Sunday dinner, or a freezer meal for a hectic week ahead, this dish is ready to rise to the occasion.
Final Thoughts: When Simplicity Feels Like a Hug
In the world of food, it’s easy to chase novelty. But sometimes, what we really crave is familiarity. A dish that makes us feel grounded. That feeds more than hunger. That reminds us that a few ingredients, baked with care, can go a long way.
Easy Cheesy Spaghetti Casserole may be simple, but it’s never boring. It’s warm, welcoming, and always enough to bring everyone to the table — no invitations needed.
The sound of crackling pastry still reminds me of Sunday mornings in my grandmother’s kitchen. She didn’t need a clock — her day moved by instinct, and so did her baking. Before anyone was fully awake, she was already folding paper-thin sheets of filo dough, layering them with creamy cheese, and brushing them gently with butter. I’d sit at the edge of the kitchen table, watching as she moved with quiet confidence. No measuring cups. No written recipes. Just a rhythm passed down through generations.
Her cheese pie was something between a meal and a memory — warm, flaky, and filled with flavor that lingered long after the last bite. When it came out of the oven, golden and bubbling, the entire household would gather. It was the kind of food that brought people to the table without needing to be called. We’d eat it hot, with glasses of yogurt or tea, tearing off corners of crisp pastry and scooping up the rich, savory filling.
Years later, I recreated it with my own touch — adding crème fraîche for a creamier texture and adjusting the layers for even more crispness. The result? A recipe that still feels like home, but polished enough for brunch tables, dinner parties, or comforting weeknight meals.
Why Baked Cheese Pie with Filo Is a Timeless Favorite
This dish, known in various forms across Balkan, Mediterranean, and Middle Eastern kitchens, is more than just a savory pie — it’s a study in contrasts and balance. Crisp on the outside, creamy on the inside, rich yet never heavy. It’s built from simple ingredients, yet the result feels elevated, even luxurious.
Here’s what makes it special:
1. The Magic of Filo Dough
Filo (or phyllo) dough is unlike any other pastry. Its paper-thin layers bake into shattering crispness, offering lightness and texture without overwhelming the filling. It turns the pie into something that feels almost weightless — like it’s wrapped in lace that happens to be golden and edible.
2. A Creamy, Savory Filling
Cottage cheese, eggs, and crème fraîche create a rich yet balanced filling that’s smooth, protein-packed, and deeply satisfying. It’s seasoned simply, allowing the dairy’s natural flavors to shine.
3. Incredible Versatility
Whether you’re serving it for breakfast, lunch, or dinner, this cheese pie fits right in. It’s just as good warm from the oven as it is cold from the fridge, making it a great make-ahead dish for entertaining or meal prep.
Ingredients
Ingredient
Quantity
Cottage cheese
500 g (2 cups)
Eggs
3
Crème fraîche
2 tablespoons (30 g)
Salt
To taste
Filo dough sheets
400 g (14 oz)
Melted butter
100 g (½ cup)
Egg (for basting)
1
Directions
Preheat and Prep Preheat your oven to 375°F (190°C). Grease or line a medium baking dish.
Make the Filling In a large bowl, mix cottage cheese, eggs, crème fraîche, and salt. Stir until well combined and creamy.
Layer the Filo Place one filo sheet in the dish and brush lightly with melted butter. Repeat, layering 4–5 sheets this way.
Add Filling Layers Spoon a portion of the cheese mixture over the layered dough. Add 2 more filo sheets (buttered), then more filling. Repeat until all filling is used, finishing with several buttered filo sheets on top.
Seal and Baste Tuck or trim the edges of the top layers. Whisk the remaining egg and brush it over the top for shine and color.
Bake to Perfection Bake for 35–40 minutes, or until golden brown and crisp. Let cool slightly before slicing and serving.
Nutritional Snapshot (Per Slice, Approximate – based on 8 servings)
Nutrient
Amount
Calories
~290 kcal
Protein
~11 g
Carbohydrates
~16 g
Fat
~18 g
Saturated Fat
~10 g
Sodium
~280 mg
When and How to Serve This Dish
Baked Cheese Pie isn’t just a recipe — it’s an occasion. Here are some perfect ways to enjoy it:
Weekend Brunch: Pair it with a side salad or sliced cucumbers and tomatoes. Add a cup of black tea or fresh juice for a well-rounded meal.
Holiday Breakfast: Serve as part of a larger spread with olives, boiled eggs, and smoked meats or fish.
Potluck Favorite: It travels well, holds its shape, and can be served at room temperature.
Quick Dinner: Serve with a bowl of soup or roasted vegetables for a comforting weeknight dinner.
Snack or Appetizer: Cut into small squares and serve warm or chilled with a creamy herb dip.
Tips for Perfecting Your Cheese Pie
Even the most straightforward recipes benefit from attention to detail. Here’s how to make your Baked Cheese Pie flawless every time:
1. Use Good-Quality Filo
Filo dough dries out quickly and tears easily. Keep it covered with a damp cloth while working, and don’t worry if a few sheets rip — the layers will hide imperfections.
2. Butter Generously
Each sheet should be lightly brushed with melted butter. This creates those beautiful, golden, flaky layers. Don’t skip this step — it makes all the difference.
3. Don’t Overstuff
It can be tempting to add too much filling, but less is more when working with filo. A thinner layer allows for even baking and keeps the texture balanced.
4. Let It Rest Before Slicing
When the pie comes out of the oven, give it a few minutes to set. This prevents the filling from spilling out and keeps the layers intact when sliced.
Popular Variations to Try
Once you master the basic version, feel free to play with flavors and additions:
Spinach & Cheese
Add sautéed spinach or chard to the filling for a twist on Greek spanakopita.
Herbed Version
Mix in chopped dill, parsley, or mint for a fresh, aromatic upgrade.
Spicy Kick
Add a pinch of chili flakes or a dash of harissa for subtle heat.
Rich & Smoky
Incorporate grated smoked cheese or crumbled feta for deeper flavor.
Mini Cheese Rolls
Instead of layering the whole pie, roll small amounts of filling into individual filo rolls — perfect for parties and lunchboxes.
Frequently Asked Questions
Can I use a different cheese instead of cottage cheese?
Yes. You can substitute with ricotta, feta, or a combination of soft cheeses. Just be sure to balance moisture — some cheeses may require draining or blotting to avoid a soggy pie.
Can I make this dish ahead of time?
Absolutely. You can assemble the pie the night before, refrigerate it covered, and bake it fresh the next day. Alternatively, bake it fully, then reheat slices as needed.
How do I store leftovers?
Store in an airtight container in the refrigerator for up to 3 days. Reheat in the oven or a toaster oven to retain the crisp texture.
Can I freeze it?
Yes. It’s best to freeze the assembled, unbaked pie. Wrap it tightly, freeze, then bake straight from frozen — just add 10–15 extra minutes to the baking time.
Is there a gluten-free version?
While traditional filo is made with wheat, there are some gluten-free filo options available in specialty stores. Alternatively, consider using gluten-free pastry dough and adapt the baking time accordingly.
What’s the best way to get ultra-crispy layers?
Brush each filo layer with melted butter and don’t skip the top basting with egg. Also, bake until the top is deeply golden — underbaking can lead to a chewy rather than crisp crust.
What if my filo tears while layering?
Don’t worry. Layer as usual. The multiple sheets will cover any tears, and once baked, no one will notice. Filo is forgiving.
A Dish That Bridges Generations and Kitchens
There’s something deeply comforting about recipes like this one — not just because of their flavor, but because of their history. In homes across cultures, filo-wrapped pies have been baked and shared at tables for centuries. They remind us that food isn’t just about sustenance. It’s about ritual, memory, and care.
Baked Cheese Pie with Filo Dough may appear simple, but it’s a dish that tells a story. It speaks of early mornings, quiet kitchens, and hands working with love. It brings together richness and lightness, texture and flavor, tradition and creativity — all in a single bite.
Final Thoughts: A Pie Worth Making, Again and Again
In a world full of fast food and fleeting trends, there’s something grounding about a dish like this. It asks for your attention. Your time. A little patience. And in return, it offers something honest and deeply satisfying.
Whether you’re making this pie to reconnect with your roots, introduce your guests to something new, or simply enjoy a homemade moment, it delivers. Crisp. Warm. Comforting.
It’s not just a recipe — it’s a reminder of how beautiful the simple things can be.
Some desserts come from cookbooks. Others come from memories.
Growing up, dessert wasn’t an everyday thing in my family. It was something we reserved for weekends, special visits, or moments that simply needed celebrating. But there was one treat that always stood out — tiny, buttery tartlets filled with smooth, fragrant vanilla pudding. My mother didn’t make them often, but when she did, the whole kitchen seemed to glow a little warmer. It was usually a Saturday afternoon, the sun flooding in through the curtains, soft jazz playing in the background, and the smell of baked pastry floating through the house.
I used to perch at the edge of the kitchen counter, watching the magic unfold. She’d roll out the dough with calm precision, press it gently into little molds, and stir the pudding with care, never rushing. I didn’t realize it then, but what she was really making wasn’t just dessert — it was stillness, intention, and something worth slowing down for.
Today, when I make Vanilla Pudding Tartlets, I’m not just baking. I’m revisiting that sacred quiet. These little pastries are tender, creamy, and just sweet enough to feel indulgent without being overwhelming. They’re the kind of dessert that whispers rather than shouts — humble in appearance but utterly satisfying in flavor and texture.
Why Vanilla Pudding Tartlets Are a Dessert Worth Knowing
Vanilla often gets underestimated. In a world filled with triple-chocolate everything and flashy flavors, it’s easy to overlook the subtle strength of this classic. But when done well — especially in a smooth, luxurious pudding nestled inside a crisp, buttery shell — vanilla is irresistible.
Here’s what makes Vanilla Pudding Tartlets such a gem in the world of desserts:
1. Timeless Appeal
These tartlets feel both classic and modern. They hold the elegance of a patisserie treat and the coziness of a homemade dessert.
2. Simple Yet Sophisticated
The ingredients are humble — butter, flour, milk, eggs, sugar, vanilla — but the final result tastes like something much more refined.
3. Perfect for Every Occasion
They’re just the right size for a tea party, dessert platter, baby shower, or a quiet evening when you want a treat without the guilt of an oversized slice.
4. Make-Ahead Friendly
You can bake the shells and prepare the pudding in advance. Assemble when you’re ready to serve, making them ideal for entertaining.
Ingredients
For the Tartlet Shells
Ingredient
Quantity
All-purpose flour
1 ½ cups
Unsalted butter (cold, cubed)
½ cup
Powdered sugar
¼ cup
Egg yolk
1
Cold water
1–2 tablespoons
Salt
A pinch
For the Vanilla Pudding Filling
Ingredient
Quantity
Whole milk
2 cups
Granulated sugar
½ cup
Cornstarch
3 tablespoons
Egg yolks
2
Unsalted butter
1 tablespoon
Pure vanilla extract
1 ½ teaspoons
Salt
A pinch
Directions
Prepare the Tartlet Shells Combine flour, powdered sugar, and salt in a mixing bowl. Cut in the cold butter until the mixture resembles coarse crumbs. Add egg yolk and cold water gradually, mixing just until the dough forms. Wrap and refrigerate for 30 minutes. Roll out the chilled dough and cut circles to fit your mini tartlet pans. Press the dough into the pans and trim the edges. Prick the bottoms with a fork. Bake at 175°C (350°F) for 12–15 minutes or until lightly golden. Let cool completely.
Make the Vanilla Pudding In a saucepan, whisk together the sugar, cornstarch, and salt. Gradually pour in the milk while whisking continuously. Cook over medium heat, stirring constantly, until the mixture thickens. Remove from heat and quickly whisk in the egg yolks, tempering carefully. Return to heat briefly to cook through. Remove from heat again and stir in butter and vanilla extract. Let the pudding cool slightly before using.
Assemble the Tartlets Spoon or pipe the cooled pudding into the tartlet shells. Smooth the tops. Chill in the refrigerator for at least 1 hour, or until set. Optional: garnish with berries, shaved chocolate, or a dusting of powdered sugar before serving.
Nutritional Snapshot (Per Tartlet, Approximate)
Nutrient
Amount
Calories
~220 kcal
Protein
~3 g
Carbohydrates
~28 g
Fat
~11 g
Sugar
~13 g
Fiber
~0.5 g
Sodium
~60 mg
What Makes a Great Vanilla Pudding Tartlet?
The secret lies in balance — of flavor, texture, and form. The best tartlets have:
A crisp, golden crust that holds its shape without being dry or too dense.
A silky vanilla pudding filling that’s rich, not runny — and infused with real vanilla, not artificial extract.
A slightly chilled finish, which allows the pudding to set perfectly while making each bite refreshing and smooth.
Serving Suggestions to Elevate the Experience
While they’re exquisite on their own, you can dress them up in many ways:
Top with fresh berries like raspberries, strawberries, or blueberries for a pop of color and acidity.
Add shaved chocolate, toasted coconut, or a dusting of cinnamon to complement the vanilla.
Drizzle with caramel or berry compote for a gourmet dessert plate.
Pipe a swirl of whipped cream on top for a classic, cloudlike finish.
These tartlets also shine as part of a dessert board, served alongside fruit, nuts, macarons, or biscotti.
Tips for Tartlet Success
Even the simplest recipe can turn exceptional with a few thoughtful techniques. Here are some tips to make your Vanilla Pudding Tartlets bakery-worthy:
Chill Your Dough
Once you’ve made the tartlet dough, refrigerate it for at least 30 minutes. This helps it firm up and reduces shrinking while baking.
Don’t Skip Blind Baking
Pre-bake the tart shells before adding the pudding. This ensures a crisp base that won’t go soggy when filled.
Use Real Vanilla
Whether it’s vanilla bean paste or high-quality extract, using real vanilla makes a huge difference in flavor. If you have a vanilla pod, scrape the seeds into the milk before cooking the pudding for an extra depth of aroma.
Temper the Egg Yolks Carefully
When making pudding, it’s essential to add the hot milk to the egg yolks gradually to prevent curdling. This step ensures your pudding stays silky and lump-free.
Let Everything Cool Before Assembling
Both the tart shells and the pudding should be cooled before assembling. Warm pudding can make the crust soggy, and warm crusts can cause condensation on the pudding’s surface.
Creative Variations to Try
Once you’ve mastered the classic version, you can explore other variations to keep things interesting:
Chocolate Swirl Tartlets
Add a small spoonful of melted dark chocolate into each shell before the pudding, or swirl a ribbon of chocolate ganache through the vanilla layer.
Citrus Zest Twist
Grate lemon or orange zest into the pudding for a bright, fresh flavor.
Coffee Cream Tartlets
Infuse the milk with instant coffee or espresso powder for a coffee-kissed custard.
Tropical Vibes
Top your tartlets with slices of mango, kiwi, or passionfruit for a bright, exotic feel.
Nut Crust Base
Replace part of the flour in the crust with almond meal or ground hazelnuts for a deeper, nuttier shell.
Frequently Asked Questions
Can I use store-bought tart shells?
Yes! While homemade shells have a buttery depth that’s hard to beat, using pre-made shells is a great shortcut if you’re short on time.
Can I make these tartlets in advance?
Absolutely. You can bake and store the tart shells up to 2 days in advance. The pudding can also be made ahead and refrigerated. Assemble the tartlets on the day you plan to serve them.
How long do they keep in the fridge?
Once assembled, they’re best enjoyed within 2 days. After that, the crust may begin to soften.
Can I freeze them?
The tartlet shells can be frozen (baked or unbaked). However, freezing the assembled tartlets with pudding is not recommended, as the texture of the custard may change upon thawing.
Can I make them dairy-free?
Yes. Use plant-based milk (like almond or oat) for the pudding and vegan butter or coconut oil in the crust. Be sure to use dairy-free alternatives for any garnishes as well.
Can I serve them warm?
These tartlets are best served chilled or at room temperature. Warm pudding may not hold its shape and can make the crust soggy.
What size tartlets does this recipe make?
It typically yields 8–10 mini tartlets, depending on the size of your tart pans. You can also use one large tart pan and slice to serve.
A Dessert That Speaks Softly and Lingers Sweetly
We often think desserts need to be bold, dramatic, or drenched in chocolate to win people over. But Vanilla Pudding Tartlets prove otherwise. They’re gentle, quiet — a little whisper of sweetness in a noisy world. They don’t overwhelm; they invite.
They carry with them a sense of nostalgia, a return to simpler pleasures, and a reminder that sometimes the most delightful moments are the ones you can hold in the palm of your hand — soft, golden, and filled with something sweet.
So whether you’re sharing them at a gathering, gifting them to a friend, or enjoying one with a cup of tea in solitude, these tartlets are a tribute to the kind of dessert that doesn’t need to be loud to be unforgettable.