

There’s something special about the smell of fresh bread baking in the oven. It fills the kitchen with warmth, wrapping you in a sense of comfort and nostalgia. Growing up, I spent many afternoons watching my grandmother make homemade bread, her hands dusted with flour as she effortlessly kneaded dough on the countertop. She never used recipes—just instinct, tradition, and a love for feeding her family.
As much as I admired her skill, I always felt intimidated by bread-making. The idea of kneading dough for long periods, waiting for multiple rises, and hoping for the perfect texture seemed overwhelming. It wasn’t until I discovered no-knead bread that everything changed.
This No-Knead Italian Panini Bread is one of my favorite recipes because it captures everything I love about homemade bread—fluffy on the inside, slightly crisp on the outside, and full of flavor—without requiring hours of effort. Whether you’re new to baking or simply looking for an easy bread recipe, this one will quickly become a staple in your kitchen.
Perfect for panini sandwiches, this rustic Italian loaf has just the right balance of chewiness and lightness. It’s simple, foolproof, and delicious—exactly how homemade bread should be.
Why You’ll Love This No-Knead Panini Bread
1. No Kneading Required
Traditional bread recipes require a long kneading process to develop gluten, which gives bread its texture. But this recipe relies on time, not effort, allowing the dough to ferment and develop structure naturally. Just mix the ingredients, let the dough rise, and bake!
2. Perfect for Panini Sandwiches
This bread has the ideal texture for panini—it’s sturdy enough to hold all your favorite fillings without falling apart, yet soft enough to create that perfect crispy-on-the-outside, gooey-on-the-inside sandwich when grilled.
3. Simple Ingredients, Incredible Flavor
Made with basic pantry staples like flour, yeast, salt, and olive oil, this bread has a wonderfully rustic taste. The optional Italian seasoning and honey add an extra depth of flavor, making it even more irresistible.
4. Beginner-Friendly
If you’ve never made bread before, this is a great place to start. Since there’s no kneading involved, there’s very little room for error. It’s a low-stress, high-reward recipe!
5. Versatile and Customizable
While this bread is fantastic for panini, it’s also great for dipping in soups, slicing for bruschetta, or simply enjoying warm with a drizzle of olive oil and balsamic vinegar.
Ingredients
| Ingredient | Quantity |
|---|---|
| All-purpose flour | 3 1/2 cups (440g) |
| Salt | 1 teaspoon |
| Sugar | 1/2 teaspoon |
| Active dry yeast | 2 teaspoons |
| Warm water (about 110°F/45°C) | 1 1/2 cups (360ml) |
| Olive oil | 2 tablespoons |
| Honey or sugar (optional) | 1 tablespoon |
| Italian seasoning (optional) | 1 teaspoon |
Directions
- Activate the Yeast – In a bowl, mix warm water, yeast, and sugar. Let it sit for 5–10 minutes until foamy.
- Mix the Dough – In a large bowl, combine flour, salt, and Italian seasoning (if using). Add the yeast mixture, olive oil, and honey. Stir until a sticky dough forms.
- First Rise – Cover the bowl with a clean towel and let the dough rise in a warm place for 1–2 hours, or until doubled in size.
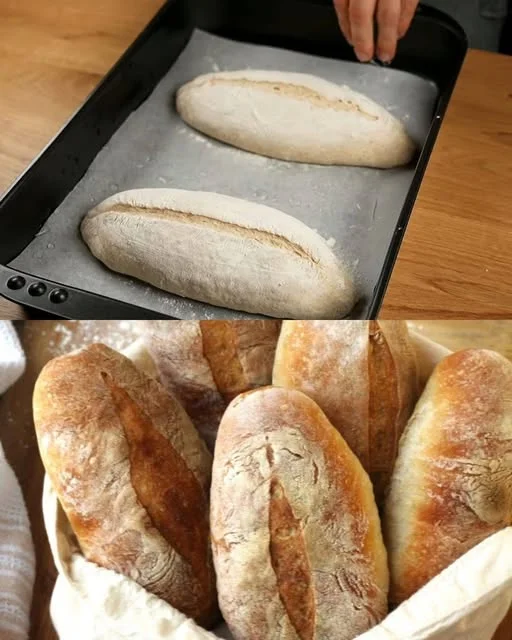
- Shape the Dough – Lightly flour a surface and shape the dough into a rectangle. Transfer it to a parchment-lined baking sheet.
- Second Rise – Cover again and let it rest for 30 minutes. Preheat the oven to 400°F (200°C).
- Bake – Bake for 20–25 minutes until golden brown and hollow-sounding when tapped.
- Cool and Serve – Let the bread cool before slicing. Enjoy with your favorite panini fillings!
Nutritional Information (Per Serving – 1 Slice)
| Nutrient | Amount |
|---|---|
| Calories | 180 kcal |
| Carbohydrates | 35 g |
| Protein | 5 g |
| Fat | 3 g |
| Saturated Fat | 0.5 g |
| Fiber | 1.5 g |
| Sugar | 2 g |
| Sodium | 180 mg |
The Secret to No-Knead Bread: Time and Hydration
One of the key principles behind no-knead bread is high hydration. The dough is wetter than traditional bread dough, which helps create a chewy, airy crumb. The other secret? Time. Instead of kneading, the gluten forms naturally as the dough rests.
The first rise allows the yeast to slowly ferment, developing rich, complex flavors. This fermentation process also improves the texture, making the bread lighter and more flavorful than a quick-rise dough.
If you’ve ever wondered why bakery bread has that signature crisp crust and tender inside, it’s because of this slow fermentation process. And the best part? This recipe lets you achieve bakery-quality bread at home with minimal effort.
Best Ways to Enjoy No-Knead Panini Bread
This bread is wonderfully versatile. Here are some of the best ways to use it:
1. Classic Panini Sandwiches
Grill it with prosciutto, fresh mozzarella, and basil for an authentic Italian panini, or go for a heartier filling with roast beef, caramelized onions, and provolone.
2. Garlic Bread
Slice, spread with garlic butter, and toast in the oven for an easy, flavorful side dish.
3. Bruschetta
Top with diced tomatoes, basil, and balsamic glaze for a light and refreshing appetizer.
4. Dipping Bread
Serve warm with olive oil and balsamic vinegar, or alongside a bowl of soup.
5. Breakfast Toast
Top with avocado, eggs, or ricotta and honey for a delicious breakfast.
FAQs: Everything You Need to Know
Q: Can I make this bread ahead of time?
Yes! This bread stays fresh for 2–3 days at room temperature when stored in an airtight container. If you want to keep it longer, store it in the fridge or freeze it.
Q: How do I store leftovers?
- Room temperature: Keep in a bread bag or airtight container for up to 3 days.
- Refrigerator: Wrap in plastic or foil and store for up to a week.
- Freezer: Slice and freeze in a zip-top bag for up to 3 months.
Q: Can I use whole wheat flour instead of all-purpose flour?
Yes, but whole wheat flour absorbs more liquid, so you may need to add a bit more water. The bread will also be denser than if made with all-purpose flour.
Q: What if my dough doesn’t rise?
- Make sure your yeast is fresh—expired yeast won’t activate properly.
- Ensure your water is warm, not hot (about 110°F or 45°C). If it’s too hot, it can kill the yeast.
- Let the dough rise in a warm place (like near a sunny window or on top of the fridge).
Q: How can I make the crust extra crispy?
Bake with a pan of water in the oven or spray the oven with water before baking—this creates steam, which helps develop a crispier crust.
Q: Can I add herbs, cheese, or other flavors to the dough?
Absolutely! Try adding:
- Parmesan or Asiago cheese for extra savory depth
- Garlic powder or roasted garlic for a more aromatic bread
- Rosemary, thyme, or basil for an herby twist
Why This Recipe Belongs in Your Kitchen
There’s something incredibly rewarding about making homemade bread. The simplicity of mixing a few ingredients, watching the dough rise, and pulling a golden loaf from the oven is a deeply satisfying experience.
This No-Knead Italian Panini Bread is perfect for beginners and seasoned bakers alike. It eliminates the stress of kneading, proving that making homemade bread doesn’t have to be complicated.
Whether you’re using it for panini sandwiches, bruschetta, or simply enjoying a slice with olive oil, this bread will quickly become a household favorite. It’s a reminder that sometimes, the most delicious things in life are also the simplest.
So go ahead, give it a try—your kitchen will smell amazing, your sandwiches will never be the same, and you’ll have a fresh, homemade loaf to enjoy with every meal.
Rustic No-Knead Italian Panini Bread – Simple, Flavorful, and Perfect for Sandwiches
Ingredients
Method
- In a small bowl, combine warm water, yeast, and sugar. Stir and let sit for 5–10 minutes until foamy.
- In a large mixing bowl, whisk together flour, salt, and Italian seasoning (if using).
- Pour in the yeast mixture, olive oil, and honey (if using). Stir with a spoon or spatula until a sticky dough forms.
- Cover the bowl with a clean towel and let the dough rise in a warm place for 1–2 hours, or until doubled in size.
- Lightly flour a work surface and gently shape the dough into a rectangle or oval. Transfer to a parchment-lined baking sheet.
- Cover again and let it rise for another 30 minutes. Meanwhile, preheat the oven to 400°F (200°C).
- Bake for 20–25 minutes or until the bread is golden brown and sounds hollow when tapped.
- Let the bread cool completely before slicing and serving.
Notes
- For extra flavor, brush the top of the bread with olive oil before baking.
- To make the crust crispier, place a small pan of water in the oven while baking to create steam.
- If you prefer a softer texture, wrap the warm bread in a kitchen towel after baking.
- This bread stores well at room temperature for up to 3 days or can be frozen for longer storage.