

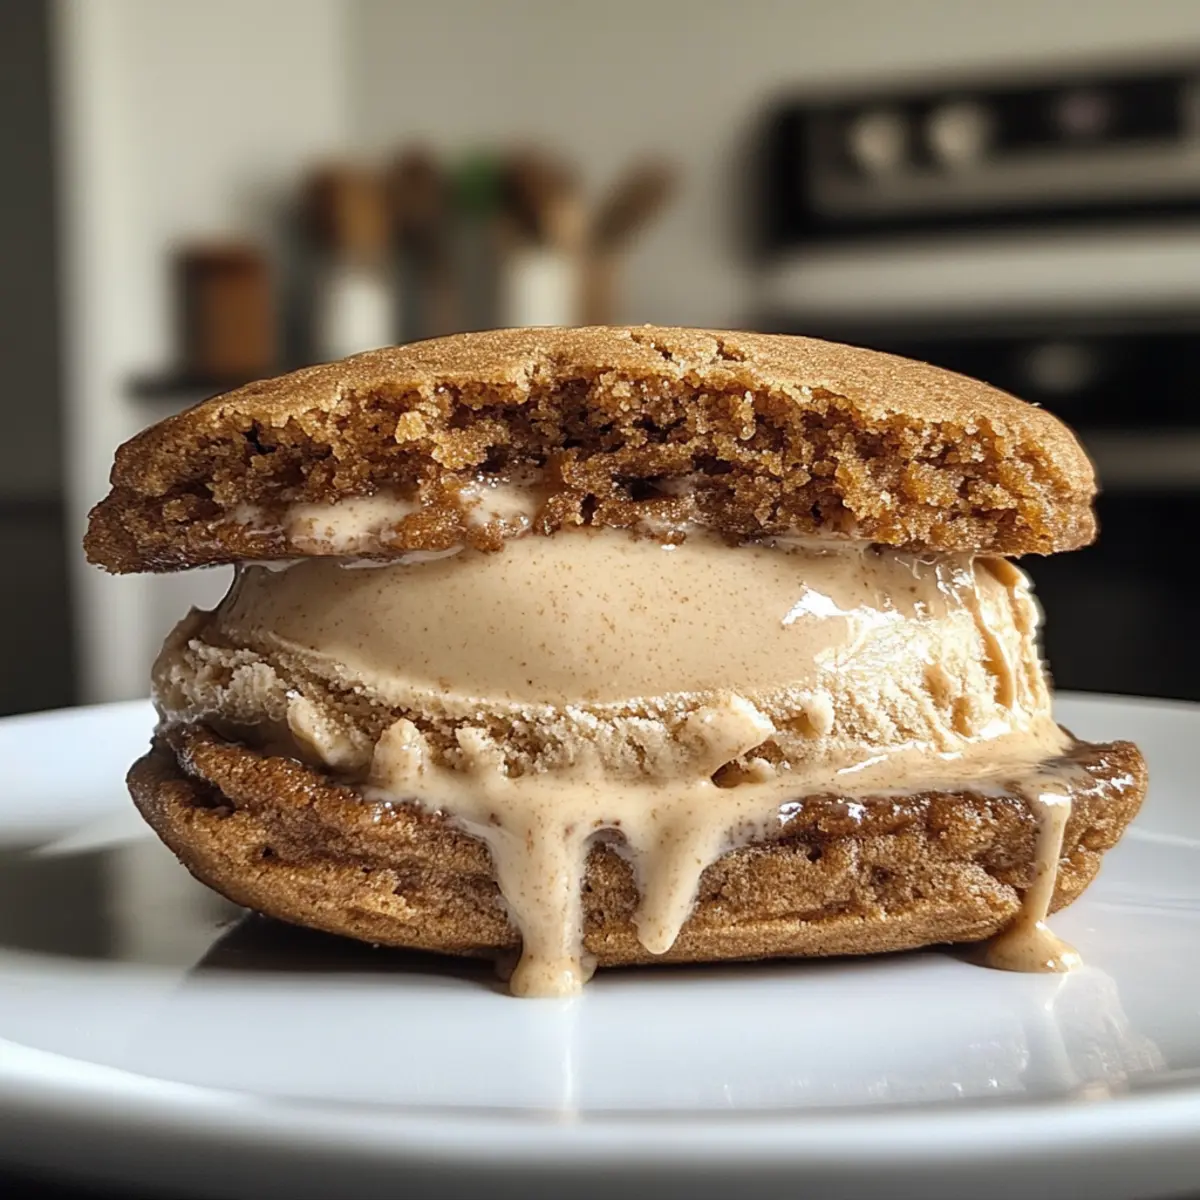
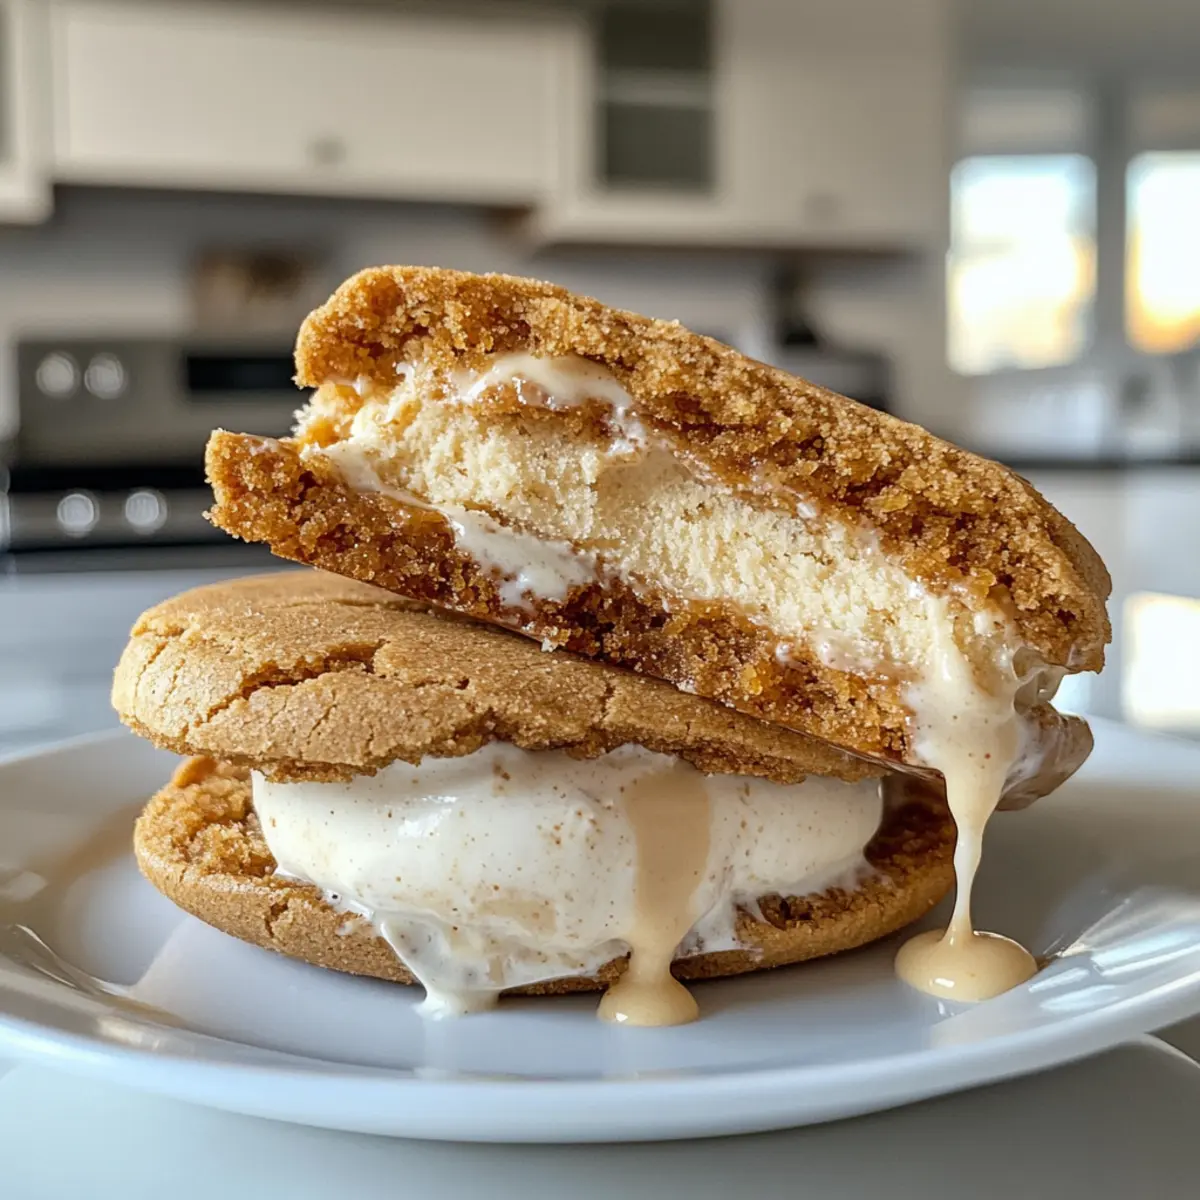
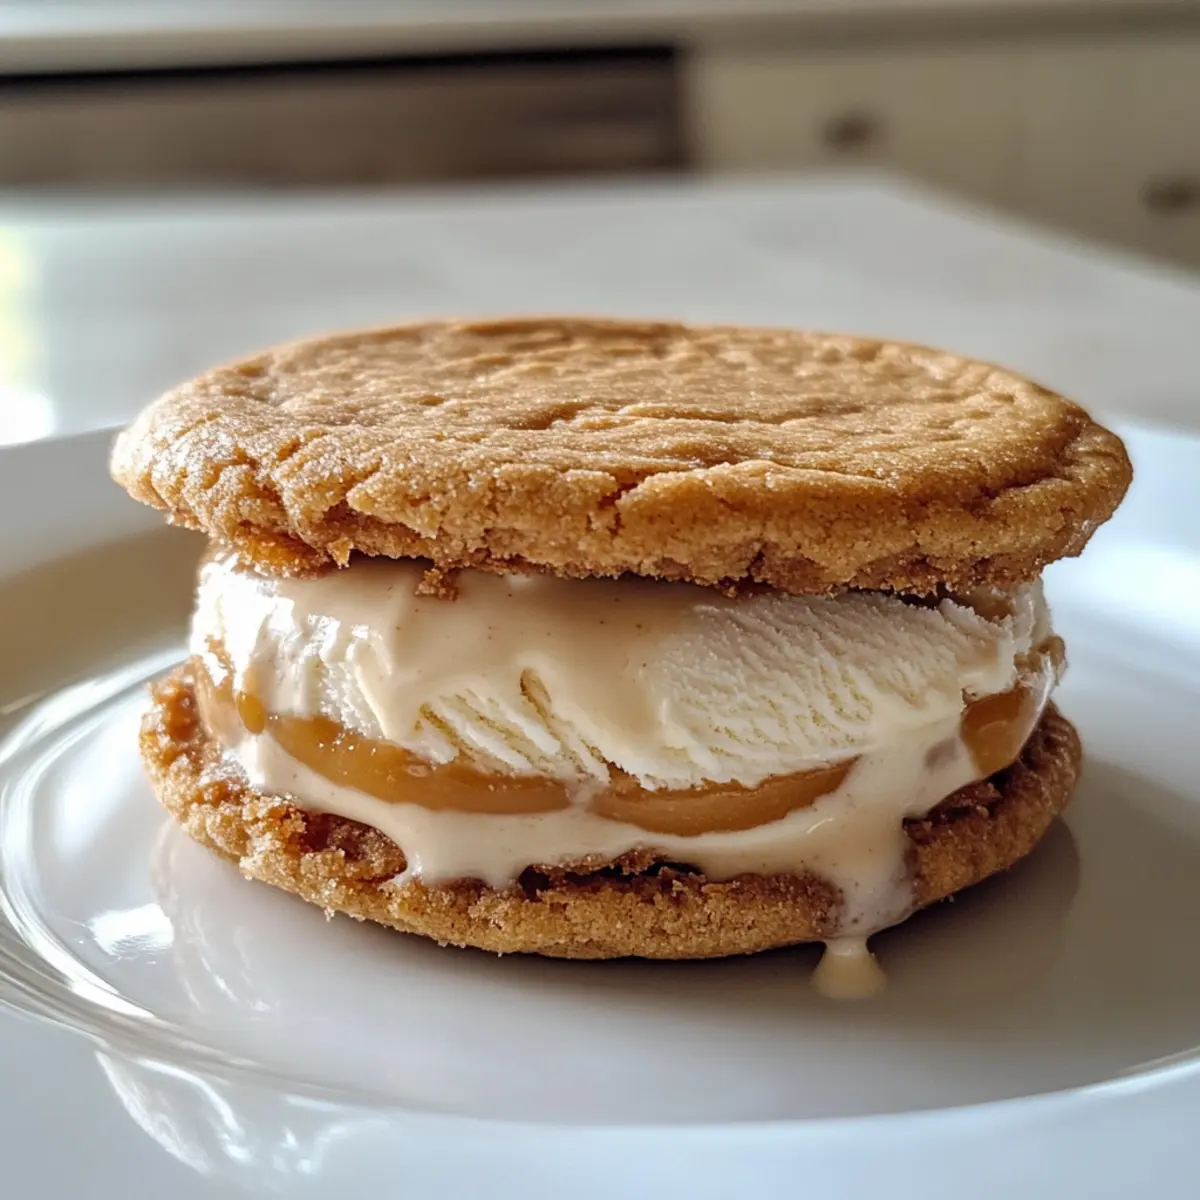
As I stood in my kitchen, the warm, sugary aroma of baking cookies enveloped me like a comforting hug, instantly transporting me to lazy summer days. There’s nothing like bringing together salted brown sugar cookies with a scoop of creamy butterscotch ice cream to make the perfect salted brown sugar butterscotch ice cream sandwiches. These delightful treats are not just easy to whip up, thanks to a simple no-churn ice cream method, but they’re also a blissful balance of chewy and crisp, making them a summer crowd-pleaser. Whether you’re hosting a backyard barbecue or simply craving something sweet, these ice cream sandwiches are sure to impress. Are you ready to turn your kitchen into a little slice of summer bliss?
Why You’ll Adore These Ice Cream Sandwiches?
Irresistible Flavor: The combination of salty and sweet in the salted brown sugar cookies pairs perfectly with the creamy butterscotch ice cream, creating a flavor explosion that you won’t be able to resist.
Easy No-Churn Method: No need for an ice cream maker! This no-churn butterscotch ice cream comes together effortlessly, making it an incredibly user-friendly treat for both novice and experienced bakers.
Chewy Delight: Enjoy the satisfying chewiness of the cookies, enhanced by the richness of brown sugar, making each bite a perfect pleasure.
Perfect for Any Gathering: Whether it’s a summer picnic or a cozy family night, these sandwiches are sure to be a hit, leaving everyone raving about your culinary skills.
Customizable Fun: Feel free to mix things up! Add chocolate chips or nuts for an exciting twist to your ice cream sandwiches. Why not check out our Blueberry Cream Cheese for another delightful dessert option?
Dive into your own summer bliss with these delicious, chewy salted brown sugar butterscotch ice cream sandwiches!
Salted Brown Sugar Butterscotch Ice Cream Sandwiches Ingredients
For the Cookies
- All-Purpose Flour – Provides structure; substitute with a gluten-free flour mix for gluten-free sandwiches.
- Bread Flour – Adds chewiness and strength; can be replaced with all-purpose flour if necessary.
- Baking Soda – Helps the cookies rise; no substitutions recommended for this essential ingredient.
- Salt – Enhances overall flavor; use kosher or sea salt for the best taste.
- Butter (softened) – Provides moisture and flavor; unsalted butter is preferred, but margarine works in a pinch.
- Brown Sugar – Contributes to chewiness and rich flavor; light or dark brown sugar will work.
- Eggs – Binds the ingredients together and adds moisture; best to avoid egg substitutes for desired texture.
- Vanilla Extract – Enhances the flavor; pure vanilla extract is recommended to amplify the overall taste.
For the Ice Cream
- Heavy Cream – Creates a rich, creamy base; partially substitute with milk for a lighter texture if desired.
- Sweetened Condensed Milk – Provides sweetness and creaminess; no direct substitutes for consistent texture.
- Butterscotch Chips – Adds flavor and texture; consider chopped chocolate or chocolate chips as alternatives for a different flavor profile.
- Coarse Salt – For garnish; enhances the flavor of the salted brown sugar cookies.
Now that you have all the delightful ingredients at your fingertips, it’s time to embark on this sweet adventure and create your own salted brown sugar butterscotch ice cream sandwiches!
Step‑by‑Step Instructions for Salted Brown Sugar Butterscotch Ice Cream Sandwiches
Step 1: Preheat Oven
Begin by preheating your oven to 350°F (175°C). While the oven is warming up, prepare two baking sheets by lining them with parchment paper to prevent the cookies from sticking. This little step ensures that your salted brown sugar cookies will bake evenly and slide off easily once they’re ready.
Step 2: Mix Dry Ingredients
In a medium bowl, whisk together the all-purpose flour, bread flour, baking soda, and salt until well combined. This mixture is the foundation of your cookies, and ensuring everything is evenly incorporated will lead to perfectly textured salted brown sugar butterscotch ice cream sandwiches. Set this bowl aside while you work on the wet ingredients.
Step 3: Cream Butter and Sugars
In a large mixing bowl, beat the softened butter and both sugars together with an electric mixer on medium speed until fluffy and light in color. This should take about 2-3 minutes. Next, add in the eggs and vanilla extract, mixing until you achieve a smooth and creamy consistency. The sweetness of the sugars combined with the buttery aroma will fill your kitchen with a delightful scent.
Step 4: Combine Mixtures
Gradually add the dry flour mixture to the creamed butter and sugars, mixing slowly until just combined. Be careful not to overmix, as you want to keep that chewy texture for your salted brown sugar cookies. The dough should come together beautifully, smelling heavenly as you prepare to form your cookies.
Step 5: Form Cookies
Using a cookie scoop or tablespoon, drop rounded dough onto your prepared baking sheets, ensuring each scoop is spaced at least 2 inches apart to allow for spreading. You should aim for about 12 cookies per sheet. The dough might look a bit rough, but that’s perfectly normal; it contributes to the rustic charm of your salted brown sugar butterscotch ice cream sandwiches.
Step 6: Bake
Place the baking sheets in the preheated oven and bake for 8-10 minutes. Keep an eye on them; the edges should be golden while the centers remain slightly soft and chewy. As soon as you take them out, sprinkle a bit of coarse salt on top to enhance the flavor. Allow the cookies to cool on the baking sheets for a few minutes before transferring them to a wire rack to cool completely.
Step 7: Whip Cream
While the cookies cool, in a clean separate bowl, whip the heavy cream using an electric mixer on high speed until stiff peaks form, about 3-5 minutes. This step is crucial for the creamy texture of your ice cream. It should hold its shape well, giving your butterscotch ice cream a rich and velvety mouthfeel.
Step 8: Prepare Ice Cream
Carefully fold the sweetened condensed milk, vanilla extract, and a pinch of salt into the whipped cream until fully combined. Finally, gently mix in the melted butterscotch chips, ensuring they are evenly distributed throughout. This no-churn method means no ice cream maker is needed, making it simpler to create the creamy filling for your salted brown sugar butterscotch ice cream sandwiches.
Step 9: Freeze Ice Cream
Spread the ice cream mixture evenly into lined cake pans or a large container and freeze until solid, approximately 2 hours. The mixture will harden beautifully, providing a dreamy butterscotch layer between your chewy cookies. Make sure to cover it well to prevent ice crystals from forming during freezing.
Step 10: Assemble Sandwiches
Once the ice cream is fully frozen, use a cookie cutter or round glass to cut out ice cream rounds. Quickly place one round between two of your cooled salted brown sugar cookies, gently pressing down to make a delightful sandwich. Wrap each ice cream sandwich in plastic wrap and freeze them immediately to maintain their shape and keep them cold for your friends and family to enjoy later.
How to Store and Freeze Salted Brown Sugar Butterscotch Ice Cream Sandwiches
Fridge: Ice cream sandwiches are best stored in the freezer, but if you plan to eat them within 1-2 days, you can keep them in the fridge. Ensure they are well-wrapped to maintain freshness.
Freezer: Wrap each salted brown sugar butterscotch ice cream sandwich tightly in plastic wrap or place them in airtight containers. They can be stored in the freezer for up to 2-3 weeks, ensuring they’re still delicious when you’re ready to indulge.
Reheating: If you prefer a softer texture, let the sandwiches sit at room temperature for about 5-10 minutes before enjoying. This will allow the ice cream to soften slightly while keeping the cookies perfectly chewy.
Stacking: When freezing multiple sandwiches, consider freezing them in a single layer on a baking sheet before stacking them in an airtight container. This helps maintain their shape and prevents sticking.
Expert Tips for Salted Brown Sugar Butterscotch Ice Cream Sandwiches
-
Avoid Overbaking: Keep a close eye on your cookies! Overbaking can lead to a crunchier texture, diminishing the lovely chewiness ideal for sandwiches.
-
Use Quality Ingredients: Choose high-quality butterscotch chips and pure vanilla extract for the best flavor. Fresh ingredients make all the difference in your salted brown sugar butterscotch ice cream sandwiches.
-
Layer Smartly: When assembling sandwiches, work quickly with the ice cream to prevent it from melting. This helps you maintain a neat and delicious treat!
-
Chill the Dough: If you’re in a warm environment, chill the cookie dough for about 30 minutes before baking. This helps maintain the cookie shape and texture.
-
Storage Tips: Wrap ice cream sandwiches well to prevent freezer burn. For freshness, freeze them in a single layer before stacking to help retain that chewy cookie and creamy ice cream combo.
What to Serve with Salted Brown Sugar Butterscotch Ice Cream Sandwiches
Elevate your summer gatherings with delightful accompaniments that perfectly balance the sweetness of these ice cream sandwiches.
-
Fresh Berries: The tartness of strawberries or raspberries adds a vibrant contrast, enhancing the overall flavor experience.
-
Chocolate Sauce: Drizzle over your sandwich for an indulgent twist that complements the butterscotch beautifully. The smooth, rich chocolate brings an extra layer of sweetness that will leave you craving more.
-
Toasted Nuts: Chopped pecans or walnuts add a delightful crunch and earthiness, pairing well with the soft, creamy texture of the sandwich.
-
Mint Leaves: A fresh touch that brightens the palate! The coolness of mint cuts through the richness, providing a refreshing finish.
-
Iced Coffee: A chilled beverage with a hint of sweetness enhances the dessert experience like no other, making for a cozy pairing on warm days.
-
Coconut Gelato: A tropical twist! The creamy coconut flavor pairs perfectly with the butterscotch, creating a dreamy flavor fusion.
-
Lemon Sorbet: The zesty, citrusy notes cleanse the palate and provide the perfect refreshing contrast to the rich cookies and cake.
-
Fudge Brownies: For chocolate lovers, pairing this delight creates a decadent dessert spread that’s utterly irresistible, softening the sweetness of the ice cream sandwiches.
Make Ahead Options
These Salted Brown Sugar Butterscotch Ice Cream Sandwiches are perfect for meal prep enthusiasts! You can prepare the cookie dough up to 24 hours in advance by wrapping it tightly in plastic wrap and refrigerating it until you’re ready to bake—this not only saves time but also allows the flavors to deepen. Additionally, the butterscotch ice cream can be made and frozen up to 3 days ahead of time; just be sure to cover it well to prevent ice crystals. When you’re ready to complete your sandwiches, simply bake the cookies, let them cool completely, and assemble them with the pre-made ice cream for a delightful treat that’s just as delicious as fresh!
Salted Brown Sugar Butterscotch Ice Cream Sandwiches Variations
Feel free to get creative with these delicious ice cream sandwiches, enhancing your experience with delightful twists and substitutions!
- Gluten-Free: Substitute all-purpose flour with a gluten-free flour mix to enjoy the same chewy texture without gluten.
- Nutty Delight: Fold in crushed pecans or walnuts into the cookie dough for a rich, nutty flavor. They bring a delightful crunch to your otherwise soft cookies.
- Chocolate Lovers: Swap butterscotch chips for chocolate chips to create a classic chocolate-dipped version that’s sure to please every lover of chocolate.
- Flavor Infusion: Experiment with flavored extracts like almond or maple instead of vanilla for an exciting twist on the overall flavor of your ice cream.
- Crunchy Add-ins: Add crushed graham crackers or toffee bits into the ice cream for a delightful texture contrast that elevates every bite. Crunchy surprises are always a delight!
- Caramel Swirls: Drizzle homemade caramel sauce into the whipped cream before freezing for a rich, decadent experience that complements the butterscotch perfectly.
- Seasonal Spices: Incorporate a pinch of cinnamon or nutmeg into the cookie dough for a warm spice that echoes cozy autumn flavors, enhancing the sweetness beautifully.
- Coconut Cream: For a tropical twist, substitute some of the heavy cream with coconut cream for a dreamy coconut-flavored ice cream filling that’s a delightful change of pace.
These variations not only ensure you have fun in the kitchen but also allow for a personal touch to your Salted Brown Sugar Butterscotch Ice Cream Sandwiches. Enjoy experimenting!
Salted Brown Sugar Butterscotch Ice Cream Sandwiches Recipe FAQs
What type of flour should I use for the best cookie texture?
It’s essential to use a combination of all-purpose flour and bread flour to achieve that perfect chewy texture. The bread flour adds strength to the cookies, while the all-purpose flour provides structure. If you’re looking for a gluten-free option, a gluten-free flour mix can be used to replace the all-purpose flour.
How should I store leftover ice cream sandwiches?
To keep your salted brown sugar butterscotch ice cream sandwiches fresh, wrap each sandwich tightly in plastic wrap or store them in an airtight container. They can be kept in the freezer for up to 2-3 weeks. For the best experience, freeze them in a single layer before stacking to prevent them from sticking together.
Can I freeze the ice cream separately, and how?
Absolutely! To freeze the no-churn butterscotch ice cream, spread the mixture into lined cake pans or a large container. Make sure to cover it tightly to prevent ice crystals from forming. Freeze until solid, which typically takes about 2 hours. Once frozen, you can use it for various treats beyond just sandwiches!
What if my cookies come out too hard or crispy?
If your cookies turn out too hard, it’s likely because they were overbaked. Keep an eye on them while they bake; they should be golden on the edges but still soft in the center. For future batches, consider reducing the baking time by a minute or two. If you notice the dough is too dry, you might want to add a tablespoon of milk or a little extra butter next time to keep your cookies chewy.
Are there any dietary considerations I should keep in mind?
Yes! Be mindful of allergies, as this recipe contains common allergens like eggs and dairy. For a lighter version, you can partially substitute the heavy cream with milk. If gluten is a dietary concern, remember to use a gluten-free flour mix to maintain the integrity of the cookie while still enjoying these delicious salted brown sugar butterscotch ice cream sandwiches!
Can I add other mix-ins to the ice cream?
Very! You can customize your butterscotch ice cream by adding mix-ins like crushed nuts, chocolate chips, or toffee bits. Simply fold these extras into the ice cream mixture before freezing it. This will not only enhance the texture but also create a unique flavor profile that you and your loved ones will enjoy!
Salted Brown Sugar Butterscotch Ice Cream Sandwiches Bliss
Ingredients
Equipment
Method
- Preheat your oven to 350°F (175°C) and prepare baking sheets lined with parchment paper.
- Whisk together all-purpose flour, bread flour, baking soda, and salt in a medium bowl.
- Cream the softened butter and both sugars until fluffy. Add eggs and vanilla extract until creamy.
- Gradually mix in the dry ingredients until just combined, avoiding overmixing.
- Drop rounded dough onto prepared sheets, spaced 2 inches apart, aiming for about 12 cookies per sheet.
- Bake for 8-10 minutes until golden on edges, soft in center; sprinkle with coarse salt and cool.
- Whip heavy cream until stiff peaks form, about 3-5 minutes.
- Fold sweetened condensed milk, vanilla, and a pinch of salt into whipped cream. Mix in melted butterscotch chips.
- Spread ice cream mix into containers and freeze until solid, about 2 hours.
- Cut out ice cream rounds and sandwich between cooled cookies. Wrap and freeze sandwiches.