

There’s something incredibly comforting about the smell of freshly baked bread. It takes me back to my childhood when my grandmother would knead dough in the kitchen every weekend. The warmth of the oven, the soft rise of the dough, and the crackling sound of the crust as it cooled on the countertop—it all felt like home. I remember sitting at the kitchen table, eagerly waiting for that first slice, slathered in butter, with the faintest hint of sweetness.
Homemade bread, in its simplest form, offers an unparalleled level of comfort and satisfaction. It’s the kind of recipe that doesn’t just fill your stomach—it fills your heart. The process itself is a simple yet transformative one, as raw ingredients come together to create something magical. Whether you’re a beginner or an experienced baker, there’s something profoundly rewarding about making bread from scratch.
In today’s fast-paced world, it’s easy to forget the joy of taking a few basic ingredients and turning them into something extraordinary. Baking your own bread is an act of love, patience, and a little bit of magic. And when you slice into that loaf, the feeling of accomplishment is enough to make it all worth it.
This easy homemade bread recipe is designed for those who crave the satisfaction of fresh, soft bread without the complicated steps that often come with advanced baking techniques. It’s approachable, simple, and incredibly rewarding. Let’s dive into why making bread at home is more than just a culinary task—it’s an experience that brings joy and memories to life.
Why Homemade Bread Is a Game-Changer
Freshness at Its Best
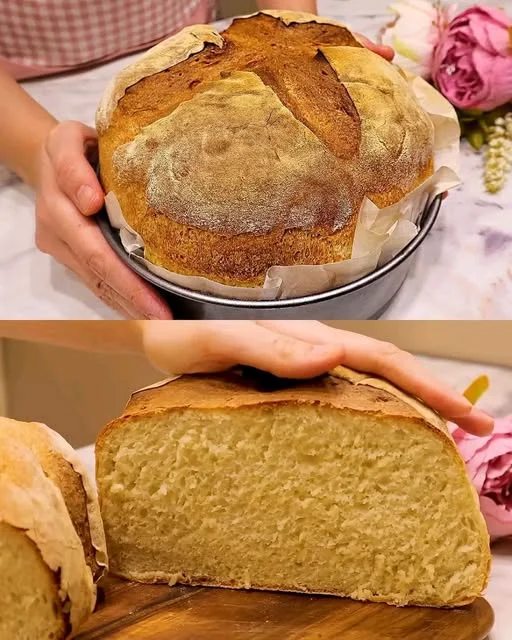
There’s something distinctly different about the taste of bread made fresh from your kitchen. Store-bought bread often contains preservatives and additives that affect both the texture and flavor. When you make bread at home, you have control over the quality of ingredients, ensuring that you’re getting the best flavors possible. The freshness of bread straight out of the oven is incomparable, and the satisfaction of knowing you made it yourself is an added bonus.
The Art of Patience and Crafting
Baking bread is a beautiful exercise in patience. It teaches you the value of waiting and gives you a tangible reward for your efforts. Watching the dough rise and transform over time is almost meditative. The process encourages mindfulness, allowing you to engage with the simple act of creation. It’s a reminder that sometimes, the best things in life take a little time to develop.
Simple Ingredients, Profound Results
What makes this homemade bread so special is that it uses just a handful of ingredients—things you likely already have in your pantry. Flour, yeast, water, sugar, and oil come together to create a loaf that’s soft, warm, and perfect for any meal. It’s a testament to the fact that even the simplest ingredients can yield something extraordinary. With the right technique and a little bit of patience, you can create a loaf of bread that is far more satisfying than anything you’ll find on the supermarket shelf.
Ingredients
| Ingredient | Amount |
|---|---|
| Warm water | 375 ml (1½ cups) |
| Sugar | ½ tablespoon (7 g) |
| Dry yeast | 7 g (about 2¼ teaspoons) |
| Flour | 500 g (4 cups), plus extra for dusting |
| Salt | 1 teaspoon (6 g) |
| Sunflower oil | 2 tablespoons (30 ml) |
Instructions
- Activate the Yeast: In a small bowl, combine warm water and sugar. Sprinkle dry yeast over the water and let it sit for about 5-10 minutes, until the yeast becomes frothy and bubbly.
- Prepare the Dough: In a large mixing bowl, combine the flour and salt. Make a well in the center and pour in the activated yeast mixture along with the sunflower oil. Stir until the dough begins to form.
- Knead the Dough: Transfer the dough onto a lightly floured surface and knead for about 8-10 minutes, until the dough becomes smooth and elastic. If the dough feels too sticky, add a little extra flour as needed.
- Let the Dough Rise: Place the kneaded dough in a greased bowl and cover with a damp cloth. Let it rise in a warm place for about 1 to 1.5 hours, or until the dough has doubled in size.
- Shape the Loaf: Once the dough has risen, punch it down gently to release the air. Shape it into a loaf by folding the edges inwards and rolling it up. Place the shaped dough into a greased loaf pan.
- Second Rise: Cover the loaf pan with a damp cloth and allow the dough to rise for another 30-45 minutes until it has risen slightly above the edge of the pan.
- Bake: Preheat your oven to 375°F (190°C). Bake the loaf for 25-30 minutes or until the top is golden brown, and the loaf sounds hollow when tapped on the bottom.
- Cool and Serve: Once baked, remove the bread from the oven and let it cool on a wire rack before slicing. Enjoy with butter, jam, or any topping of your choice!
Nutritional Information (per serving, based on 10 slices)
| Nutrient | Amount |
|---|---|
| Calories | 120 kcal |
| Carbohydrates | 24 g |
| Protein | 3 g |
| Fat | 2 g |
| Fiber | 1 g |
| Sodium | 150 mg |
FAQs About Homemade Bread
1. Why does my bread dough not rise?
The most common reason for dough not rising is inactive yeast. Be sure that your yeast is fresh, and test it by dissolving it in warm water with a bit of sugar. If it doesn’t foam after a few minutes, it may be expired, and you’ll need to use fresh yeast. Also, make sure the dough is kept in a warm place, as cold temperatures can slow down or stop the rising process.
2. Can I make this bread recipe in a bread machine?
Yes! If you prefer using a bread machine, you can still follow this recipe. Simply add the ingredients to the bread machine in the order specified by the machine’s manufacturer and select the basic or white bread setting. The bread machine will take care of the kneading and rising for you. Once it’s done, you’ll have a freshly baked loaf.
3. Can I add extra flavorings or herbs to this bread?
Absolutely! This recipe serves as a great base for customization. Feel free to add herbs like rosemary or thyme, a handful of shredded cheese, or even a sprinkle of garlic powder to the dough before kneading. You can also incorporate spices such as cinnamon or nutmeg for a sweet variation.
4. How can I store homemade bread?
Once your bread has cooled, store it in an airtight container or a plastic bag to keep it fresh for several days. If you’re not planning to finish it within a few days, you can also freeze it. To freeze, slice the bread and wrap it tightly in plastic wrap or foil before placing it in a freezer-safe bag. When you’re ready to eat it, simply toast the slices directly from the freezer.
5. What if I don’t have sunflower oil?
You can substitute sunflower oil with any neutral oil, such as vegetable oil, canola oil, or even olive oil (though olive oil may impart a stronger flavor). If you’re looking for a dairy option, melted butter can also work well, giving the bread a richer flavor.
The Benefits of Baking Your Own Bread
A Therapeutic Experience
In our increasingly fast-paced world, baking bread is a rare opportunity to slow down. It’s a process that encourages you to focus on the present moment. As you mix, knead, and shape the dough, you become fully immersed in the task at hand. The repetitive motions can be soothing, providing a welcome respite from daily stresses. The end result, a warm loaf, serves as a reminder that taking your time can lead to great rewards.
A Connection to the Past
Baking bread has deep historical roots. It’s one of the oldest forms of cooking, predating even written history. Many cultures have their own unique bread-making traditions that have been passed down through generations. By baking bread yourself, you’re not only reconnecting with a craft that’s been around for centuries, but you’re also creating your own food memories that can be passed down.
Building Confidence in the Kitchen
If you’ve ever been intimidated by the thought of baking from scratch, this recipe is a perfect starting point. Bread-making doesn’t need to be complicated or daunting. With the right ingredients and a bit of patience, anyone can create delicious, fresh bread. Once you master this simple recipe, you’ll gain confidence to experiment with more complex baking projects, expanding your culinary skills.
Conclusion: Bread, More Than Just a Meal
Baking bread at home is more than just making something to eat—it’s an experience that nourishes the body and soul. There’s a sense of accomplishment that comes with preparing a dish from scratch, knowing you’ve turned simple ingredients into something special. Whether you’re making it for a family gathering, as part of a cozy dinner, or just because you enjoy the process, homemade bread is always a good choice.
This easy homemade bread recipe is a perfect introduction to the world of baking, but it’s also flexible enough for seasoned bakers to get creative. From adding herbs and spices to experimenting with different types of flour, the possibilities are endless. Each loaf becomes a reflection of your personality and creativity.
Next time you’re in the kitchen, try this bread recipe. It might just become a staple in your household—a warm, comforting symbol of home and tradition. And who knows? Maybe one day you’ll be passing down your bread-baking knowledge to the next generation, just like my grandmother did with me.
The Joy of Homemade Bread: A Tradition That Brings Comfort
Ingredients
Method
- Activate the Yeast: In a small bowl, dissolve the sugar in warm water. Sprinkle the yeast over the water and let it sit for about 5-10 minutes. The mixture should become frothy as the yeast activates.
- Prepare the Dough: In a large mixing bowl, combine the flour and salt. Create a well in the center and pour in the yeast mixture along with the sunflower oil. Stir the ingredients together until they begin to form a dough.
- Knead the Dough: Transfer the dough to a lightly floured surface. Knead it for about 8-10 minutes, until the dough becomes smooth and elastic. Add more flour as needed to prevent sticking.
- First Rise: Place the kneaded dough into a greased bowl and cover it with a damp cloth. Let the dough rise in a warm place for about 1 to 1.5 hours, or until it has doubled in size.
- Shape the Dough: Once the dough has risen, punch it down gently to release the air. Shape the dough into a loaf by folding the edges inwards and rolling it into a log shape. Place the shaped dough into a greased loaf pan.
- Second Rise: Cover the loaf with a damp cloth and let it rise for another 30-45 minutes, or until it has risen slightly above the edge of the pan.
- Bake the Bread: Preheat the oven to 375°F (190°C). Bake the loaf for 25-30 minutes, or until the bread is golden brown on top and sounds hollow when tapped on the bottom.
- Cool and Slice: Remove the bread from the oven and allow it to cool on a wire rack before slicing. Enjoy warm with your favorite spread or topping.
Notes
- Storage: Store the bread in an airtight container or plastic bag to keep it fresh for up to 4 days. If you want to keep it longer, you can freeze it by slicing it first and wrapping it in plastic wrap before placing it in a freezer-safe bag.
- Optional Additions: Feel free to customize the recipe by adding herbs, spices, or even shredded cheese to the dough before baking. Rosemary, garlic, or cheddar cheese are great choices to elevate the flavor of the bread.
- Troubleshooting: If your bread doesn’t rise as expected, it could be due to the yeast being inactive. Always check the expiration date on your yeast or test it with warm water and sugar before starting.