

I still remember the first time I tried to bake bread. I had romanticized the idea of making a fresh, golden loaf from scratch, imagining the smell filling my kitchen, the satisfying crackle of the crust, and the warm, pillowy interior. What I didn’t expect was the hours of kneading, waiting, and hoping that my dough would actually rise. After several failed attempts and one particularly tough, rock-like loaf, I almost gave up on homemade bread altogether.
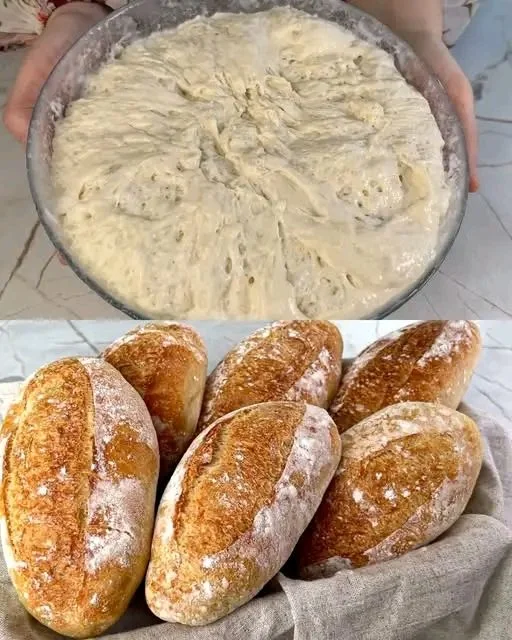
That was until I discovered this no-knead bread recipe. It was almost too good to be true—just mix, let it rise, and bake. No kneading, no complicated steps, and yet, the result was exactly what I had been dreaming of: a beautifully golden crust with a soft and airy inside.
Since then, this recipe has become a staple in my kitchen. I can prepare it with minimal effort, and it never fails to impress. The best part? It works for everyone—whether you’re an experienced baker or someone who’s never touched a bag of flour before. If you’ve ever wanted to bake your own bread but felt intimidated, this is the perfect place to start.
Why You’ll Love This No-Knead Bread Recipe
1. No Kneading Required – Just Mix and Wait
Traditional bread-making requires a lot of kneading to develop gluten, but this recipe does all the work for you. Time and hydration do the job, resulting in a soft and airy texture without the effort.
2. Perfect Crusty Exterior with a Soft, Chewy Interior
The combination of a long rise and a high baking temperature creates a crispy, golden crust while keeping the inside light and fluffy.
3. Uses Simple, Everyday Ingredients
You don’t need any fancy ingredients or expensive tools—just flour, water, yeast, and sugar. Chances are, you already have everything you need in your kitchen.
4. Beginner-Friendly and Foolproof
Even if you’ve never baked bread before, this recipe is nearly impossible to mess up. Just follow a few simple steps, and you’ll have a bakery-quality loaf with minimal effort.
5. Versatile – Use It for Any Meal
This bread pairs perfectly with soups, sandwiches, butter and jam, or even as a side for dinner. You can also customize it by adding herbs, seeds, or cheese for different flavors.
Ingredients
| Ingredient | Quantity |
|---|---|
| Sugar | 1 tbsp |
| Dry Yeast | 1 tsp |
| Lukewarm Water | 250 ml (1 cup) |
| Flour | 450 g (about 3 1/2 cups) |
Directions
- Activate the Yeast:
- In a large mixing bowl, dissolve the sugar and dry yeast in lukewarm water. Let it sit for 5–10 minutes until foamy.
- Mix the Dough:
- Gradually add the flour to the yeast mixture, stirring with a spoon or spatula until a sticky dough forms.
- Let It Rise:
- Cover the bowl with a clean cloth and let the dough rise at room temperature for 1.5 to 2 hours, or until doubled in size.
- Shape and Rest:
- Lightly flour a surface, transfer the dough, and shape it into a ball. Let it rest for another 30 minutes.
- Bake to Perfection:
- Preheat the oven to 220°C (430°F). Place a baking dish with water at the bottom rack to create steam.
- Transfer the dough onto a parchment-lined baking sheet and bake for 25–30 minutes until golden brown and crusty.
- Cool and Enjoy:
- Let the bread cool before slicing. Enjoy warm with butter or your favorite spreads!
Nutritional Information (Per Serving, Approximate)
| Nutrient | Amount per Serving |
|---|---|
| Calories | ~150 kcal |
| Protein | ~4 g |
| Carbohydrates | ~30 g |
| Fats | ~0.5 g |
| Fiber | ~1 g |
Frequently Asked Questions (FAQs)
1. Do I Really Not Need to Knead the Dough?
Yes! The secret to this bread’s success is a long resting period, which allows the gluten to develop naturally. No kneading is necessary, making this one of the easiest bread recipes out there.
2. What Kind of Flour Works Best?
All-purpose flour works well, but if you want a slightly chewier texture, you can use bread flour. You can also try whole wheat flour, but you may need to adjust the water content slightly since whole wheat absorbs more liquid.
3. How Do I Know If the Dough Has Risen Enough?
The dough should double in size and appear bubbly. If you gently press it with your finger and it slowly springs back, it’s ready. If it stays indented, let it rise a bit longer.
4. Can I Make This Bread Without Sugar?
Yes, but the sugar helps to activate the yeast and gives the bread a slightly better rise and a more balanced flavor. If you prefer, you can substitute it with honey or maple syrup.
5. How Can I Make the Crust Extra Crispy?
Placing a pan of water in the oven while baking creates steam, which helps develop a crispier crust. Alternatively, you can spritz the dough with a little water before baking.
6. Can I Add Extra Ingredients for More Flavor?
Absolutely! You can mix in herbs like rosemary or thyme, shredded cheese, or even seeds like sesame or sunflower seeds to enhance the flavor.
7. How Do I Store Leftover Bread?
Store your bread in a paper bag or a cloth-covered container at room temperature for up to 2 days. If you want it to last longer, wrap it tightly and store it in the refrigerator for up to a week.
8. Can I Freeze This Bread?
Yes! Let the bread cool completely, then wrap it tightly in plastic wrap and place it in a freezer bag. It will keep for up to 3 months. To enjoy, let it thaw at room temperature and warm it in the oven for a few minutes.
9. What’s the Best Way to Serve This Bread?
- For breakfast: Toasted with butter and jam
- For lunch: As sandwich bread with your favorite fillings
- For dinner: As a side with soups, stews, or pasta
- For snacks: Dipped in olive oil and balsamic vinegar
Tips for the Best No-Knead Bread
1. Use Lukewarm Water
The water should be warm but not hot (about 100–110°F or 38–43°C). If it’s too hot, it can kill the yeast; if it’s too cold, the yeast won’t activate properly.
2. Let the Dough Rest in a Warm Place
Yeast thrives in warm environments. If your kitchen is too cold, place the dough in a slightly warm oven (turned off) or near a sunny window.
3. Don’t Rush the Rising Process
Letting the dough rise for at least 1.5 to 2 hours gives the best texture and flavor. If you have more time, letting it rise even longer (overnight in the fridge) can result in an even deeper flavor.
4. Use a Dutch Oven for the Best Results
If you have a Dutch oven, baking the bread inside it creates a steam-filled environment that results in an incredibly crispy crust. Simply preheat the Dutch oven before placing the dough inside.
5. Score the Dough for a Bakery-Style Look
Before baking, use a sharp knife or razor blade to make a few shallow cuts on the top of the dough. This helps the bread expand properly while baking.
Serving Ideas – How to Enjoy This Bread
1. Classic Butter and Honey
A simple spread of butter with a drizzle of honey makes for a perfect, comforting treat.
2. Avocado Toast
Top slices with mashed avocado, cherry tomatoes, and a sprinkle of sea salt for a nutritious breakfast.
3. Grilled Cheese Sandwich
This bread makes the ultimate crispy, melty grilled cheese sandwich. Pair it with tomato soup for a cozy meal.
4. Bruschetta
Toast the bread, rub it with garlic, and top with fresh tomatoes, basil, and olive oil for a fresh appetizer.
5. Homemade Garlic Bread
Brush slices with garlic butter and bake until golden for a delicious side dish.
Conclusion – A Bread Recipe You’ll Want to Make Again and Again
If you’ve ever been intimidated by bread-making, this no-knead recipe is the perfect place to start. It’s easy, requires minimal effort, and delivers a loaf that tastes just as good (if not better) than what you’d buy at a bakery.
There’s something incredibly satisfying about pulling a fresh loaf out of the oven, hearing the crisp crackle of the crust, and enjoying a warm, homemade slice. Whether you’re a beginner or a seasoned baker, this recipe is a must-try.
So the next time you’re thinking about buying bread, stop—try this recipe instead. You’ll be amazed at how simple and delicious homemade bread can be!
Don’t Bake Bread Until You’ve Seen This Recipe! No-Knead Perfect Bread
Ingredients
Method
- In a large bowl, mix the lukewarm water, sugar, and dry yeast. Let it sit for 5–10 minutes until foamy.
- Gradually add the flour, stirring with a spoon until a sticky dough forms.
- Cover the bowl with a clean kitchen towel and let the dough rise in a warm place for 1.5 to 2 hours, or until doubled in size.
- Lightly flour a surface, transfer the dough, and shape it into a ball. Let it rest for another 30 minutes.
- Preheat the oven to 220°C (430°F). Place a dish of water on the bottom rack for extra steam.
- Transfer the dough onto a parchment-lined baking sheet and bake for 25–30 minutes until golden brown.
- Allow the bread to cool before slicing. Serve fresh with butter, dips, or as a sandwich base!
Notes
- For an extra crispy crust, bake the bread in a preheated Dutch oven with the lid on for the first 20 minutes, then uncover for the last 10 minutes.
- Whole wheat flour can be used, but it may require a little extra water.
- Store leftovers in a bread bag or wrapped in a towel to maintain freshness.
- You can freeze the bread for up to 3 months—just slice it before freezing for easy use.