

There’s something special about baking desserts that remind us of home. I still remember the first time I made vanilla pudding tartlets with my grandmother. She was the kind of baker who never used exact measurements but somehow always knew how much of each ingredient was just right. I would watch in awe as she mixed the dough with ease, rolled it out perfectly, and filled each delicate tartlet with silky vanilla pudding.
The best part was decorating them. She would set out bowls of fresh fruit, chocolate shavings, and powdered sugar, letting me get creative with each tartlet. Some had a simple dusting of cocoa, others were topped with bright red berries, and a few had a drizzle of honey. No matter how they were decorated, they always tasted incredible—sweet, buttery, and filled with the rich warmth of vanilla.
Now, every time I bake these tartlets, I’m reminded of those afternoons in my grandmother’s kitchen. The smell of buttery pastry and vanilla pudding fills the air, bringing a sense of comfort and nostalgia. This recipe is simple enough for beginners but elegant enough to impress at any gathering. Whether you make them for a special occasion or just a personal treat, these tartlets are guaranteed to bring joy with every bite.
Why You’ll Love These Vanilla Pudding Tartlets
1. Simple Yet Elegant
These tartlets may look fancy, but they are incredibly easy to make. With a buttery, flaky crust and a smooth vanilla pudding filling, they strike the perfect balance between simplicity and sophistication.
2. Perfect for Any Occasion
Whether it’s a holiday, a birthday, or a casual tea-time treat, these tartlets fit right in. They’re great for serving at gatherings because they are individually portioned and easy to eat.
3. Buttery, Crisp Crust with a Creamy Center
The contrast between the crisp pastry and the smooth vanilla pudding makes these tartlets irresistible. Every bite is rich, delicate, and full of flavor.
4. Versatile and Customizable
While vanilla pudding is a classic filling, you can easily switch things up by adding chocolate, fruit, caramel, or even coffee flavors.
5. A Great Make-Ahead Dessert
You can prepare the tartlet crusts in advance and fill them just before serving. This makes them perfect for stress-free entertaining.
Ingredients
For the Crust:
| Ingredient | Quantity |
|---|---|
| Egg | 1 |
| Sugar | 50 g |
| Vanilla sugar | 5 g |
| Salt | Pinch |
| Butter | 100 g (softened) |
| Flour | 180 g |
Directions
Step 1: Prepare the Dough
- In a bowl, whisk together the egg, sugar, vanilla sugar, and salt.
- Add the softened butter and mix until smooth.
- Gradually incorporate the flour and knead gently until a soft dough forms.
- Wrap the dough in plastic wrap and refrigerate for 30 minutes.
Step 2: Shape the Tartlets
- Preheat the oven to 180°C (350°F).
- Roll out the chilled dough and cut it into circles to fit your tartlet molds.
- Press the dough into the molds and trim any excess edges.
Step 3: Bake the Crust
- Prick the base of each tartlet with a fork to prevent puffing.
- Bake for 12–15 minutes or until the edges are golden brown.
- Let them cool completely before adding the filling.
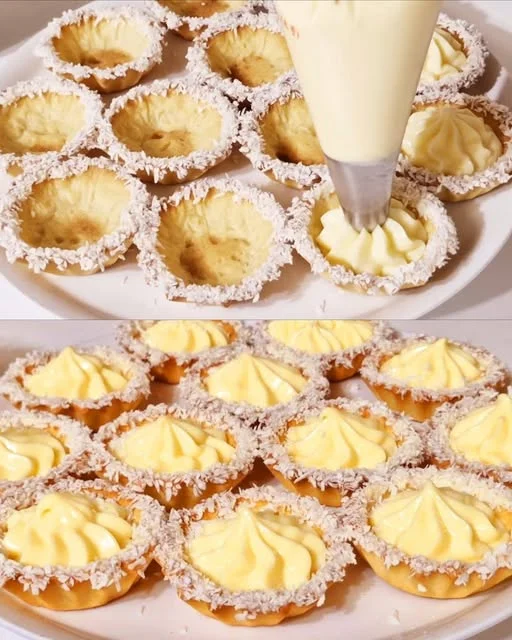
Step 4: Fill and Garnish
- Fill each tartlet with vanilla pudding or custard cream.
- Refrigerate for at least an hour to set.
- Decorate with fresh fruit, whipped cream, or a sprinkle of cocoa powder before serving.
Nutritional Information (Per Tartlet, Approximate)
| Nutrient | Amount per Serving |
|---|---|
| Calories | ~180 kcal |
| Protein | ~3 g |
| Carbohydrates | ~20 g |
| Fats | ~10 g |
| Fiber | ~1 g |
Frequently Asked Questions
1. Can I Use Store-Bought Pastry Dough?
Yes! If you’re short on time, you can use store-bought shortcrust pastry. However, homemade dough gives a richer, more buttery flavor.
2. What’s the Best Way to Ensure the Crust Stays Crisp?
To prevent a soggy crust, make sure to:
- Bake the crust until golden brown before filling.
- Let it cool completely before adding the vanilla pudding.
- If desired, brush a thin layer of melted chocolate inside the crust to create a barrier.
3. Can I Make the Pudding Ahead of Time?
Absolutely! You can prepare the vanilla pudding a day in advance and store it in the fridge. Just give it a quick stir before filling the tartlets.
4. What Can I Use Instead of Vanilla Pudding?
If you want to try something different, you can fill the tartlets with:
- Chocolate ganache
- Lemon curd
- Caramel cream
- Fresh fruit with whipped cream
5. How Should I Store These Tartlets?
- Unfilled tart shells: Store in an airtight container at room temperature for up to 3 days.
- Filled tartlets: Keep them in the refrigerator and consume within 2 days for the best texture and flavor.
6. Can I Freeze These Tartlets?
Yes! The tartlet shells freeze well. Just bake them, let them cool completely, and store in an airtight container in the freezer for up to a month. Fill them after thawing for the best results.
7. Can I Make a Larger Tart Instead of Small Tartlets?
Definitely! You can press the dough into a standard tart pan and bake as a single large tart. Just increase the baking time slightly to ensure the crust is fully cooked before adding the filling.
Tips for Making the Perfect Vanilla Pudding Tartlets
1. Chill the Dough for a Flakier Crust
Refrigerating the dough before rolling it out helps prevent shrinkage and makes it easier to work with. It also creates a more delicate, crisp texture.
2. Don’t Overwork the Dough
When mixing and rolling the dough, handle it as little as possible to keep it tender. Overworking can result in a tough crust.
3. Let the Pudding Cool Slightly Before Filling
If the vanilla pudding is too hot, it can make the tartlet crusts soggy. Let it cool slightly before spooning it into the shells.
4. Use Fresh Vanilla for the Best Flavor
If you want the richest, most aromatic pudding, use fresh vanilla bean or high-quality vanilla extract instead of artificial vanilla flavoring.
5. Get Creative with Toppings
Top your tartlets with:
- Fresh berries for a fruity contrast
- Grated chocolate or cocoa powder for a rich touch
- A drizzle of caramel or honey for extra indulgence
- Toasted nuts for added crunch
Serving Ideas – How to Enjoy These Tartlets
1. Classic Style
Serve them as they are, with a simple dusting of powdered sugar or a few chocolate shavings.
2. With a Cup of Tea or Coffee
The rich vanilla and buttery crust pair beautifully with a warm cup of tea, coffee, or espresso.
3. As a Fancy Dessert Platter
Arrange different flavors of tartlets (vanilla, chocolate, lemon) on a platter for an elegant dessert display at parties.
4. With Ice Cream
A scoop of vanilla or caramel ice cream on the side takes these tartlets to another level.
5. For Special Occasions
Make them extra special by serving with gold leaf accents, edible flowers, or intricate chocolate decorations.
Conclusion – A Dessert That’s Always a Hit
Vanilla pudding tartlets are one of those desserts that never go out of style. They are simple to make yet always feel indulgent, making them perfect for both everyday treats and special celebrations.
What I love most about this recipe is its versatility—you can keep it classic or experiment with different flavors and toppings. No matter how you serve them, they are guaranteed to be a crowd-pleaser.
So, if you’ve been looking for an easy, elegant, and utterly delicious dessert, give these vanilla pudding tartlets a try. They might just become one of your favorite sweet treats, just like they did for me!
Vanilla Pudding Tartlets – The Perfect Bite-Sized Dessert
Ingredients
Method
- In a mixing bowl, whisk together the egg, sugar, vanilla sugar, and a pinch of salt.
- Add the softened butter and mix until smooth.
- Gradually add the flour, kneading gently until a soft dough forms.
- Wrap the dough in plastic wrap and refrigerate for 30 minutes.
- Preheat the oven to 180°C (350°F).
- Roll out the chilled dough and cut it into circles to fit your tartlet molds.
- Press the dough into the molds and trim any excess edges.
- Prick the bases with a fork and bake for 12–15 minutes until golden brown.
- Let them cool completely before adding the filling.
- Spoon vanilla pudding or custard cream into the cooled tartlet shells.
- Smooth the tops and refrigerate for at least 1 hour to set.
- Decorate with fresh fruit, whipped cream, chocolate shavings, or a sprinkle of cocoa powder.
- Serve chilled and enjoy!
Notes
- For a flakier crust, chill the dough before rolling it out.
- If using store-bought vanilla pudding, choose a high-quality brand for the best flavor.
- Tartlet shells can be made in advance and stored in an airtight container for up to 3 days.
- These tartlets taste even better after chilling for a few hours, allowing the flavors to meld.