

There’s something deeply comforting about the smell of freshly baked bread wafting through the kitchen. For me, it’s not just the warmth that fills the room, but the memories attached to the process itself. I remember the first time I decided to make sourdough bread from scratch. I was feeling a little disconnected from the world, longing for something authentic and deeply rooted in tradition. As I mixed the ingredients, kneaded the dough, and watched it rise, I felt a sense of connection not only to the bread but also to generations of bakers who had made this same bread for centuries. Each stretch of the dough felt like a meditation, a moment to focus on something tangible, something nourishing.
Making sourdough isn’t just about the bread; it’s about the process, the patience, and the connection to something bigger than ourselves. It’s about using ingredients that are simple yet magical, allowing nature to do much of the hard work. As the dough rises, so does our appreciation for the art of baking. For me, baking sourdough is a journey—one that takes time, effort, and love, but rewards you with the kind of bread that can transform an ordinary meal into something extraordinary.
The Beauty of Sourdough: Why It’s Worth the Effort
Sourdough bread is unique because it’s made using a naturally fermented starter rather than store-bought yeast. This starter, which is a mixture of flour and water that captures wild yeast and bacteria from the air, transforms into the magical leavening agent that makes sourdough so distinctive. The natural fermentation process is what gives sourdough its signature tangy flavor and chewy texture.
While making sourdough bread may seem intimidating at first glance, it’s actually a wonderfully rewarding process. Once you learn the rhythm of caring for your starter and understand how to knead and shape the dough, you’ll begin to appreciate the subtle art of sourdough. The end result is a loaf with a rich, complex flavor profile and a crispy, golden crust that’s simply irresistible.
Ingredients
| Ingredient | Quantity |
|---|---|
| Fresh Sourdough Starter | 200g (1 cup) |
| Wheat Flour | 600g (5 cups) |
| All-Purpose or Bread Flour | 400g (3¼ cups) |
Directions:
- Prepare the Dough
In a large bowl, combine the fresh sourdough starter, wheat flour, and all-purpose flour. Slowly add water (about 400ml), stirring to form a rough dough. Knead the dough on a floured surface for 10-15 minutes until it becomes smooth and elastic. - First Rise
Place the dough in a lightly oiled bowl, cover with a damp cloth, and let it rise at room temperature for 4-6 hours, or until doubled in size. - Shape the Dough
Once the dough has risen, turn it out onto a floured surface. Gently deflate the dough and shape it into a round or oval loaf, depending on your preference. - Second Rise
Transfer the shaped dough to a lightly floured proofing basket or bowl. Cover and let it rise for another 2-3 hours, or until it has noticeably puffed up. - Preheat the Oven
Preheat your oven to 475°F (245°C) with a Dutch oven or baking stone inside. - Bake the Bread
Once the oven is hot, carefully transfer the dough to the preheated Dutch oven or baking stone. Cover with the lid or a baking dish and bake for 30 minutes. After 30 minutes, remove the cover and continue baking for another 15-20 minutes, or until the bread is golden brown and sounds hollow when tapped on the bottom. - Cool and Enjoy
Let the bread cool on a wire rack for at least 30 minutes before slicing.
Nutritional Information (per serving, based on 12 servings):
| Nutrient | Amount per serving |
|---|---|
| Calories | 150 kcal |
| Protein | 5g |
| Carbohydrates | 30g |
| Fiber | 2g |
| Fat | 0.5g |
| Sodium | 5mg |
Understanding the Science Behind Sourdough
What makes sourdough bread stand out from other types of bread is its leavening process, which relies on wild yeast and lactic acid bacteria present in the environment. The fermentation process is slow, allowing the natural yeasts to rise and the bacteria to create lactic acid, which gives sourdough its signature tang.
The wild yeast in the sourdough starter is very different from the commercial yeast typically used in quick-rise breads. Wild yeast works more slowly, producing smaller bubbles that create the dense, chewy texture sourdough is known for. This is why sourdough bread often takes longer to rise and bake than other bread types. However, the flavor and texture are well worth the wait.
Tips for Perfect Sourdough Every Time
If you’re new to sourdough, there are a few things you can do to ensure that your loaf turns out just right.
- Patience is Key
The first thing you need to understand about sourdough bread is that it takes time. Sourdough is a slow fermenting bread, and the dough needs to rise and develop over several hours. Don’t rush the process—allowing the dough the time it needs to rise and ferment will result in a better flavor and texture. - Use a Mature Sourdough Starter
Your starter is the heart and soul of your sourdough bread, and a mature starter will give you better results. Make sure your starter is active and bubbly before using it in your bread recipe. Feed it regularly with fresh flour and water, and it will reward you with delicious, tangy bread. - Don’t Skip the Stretch and Fold
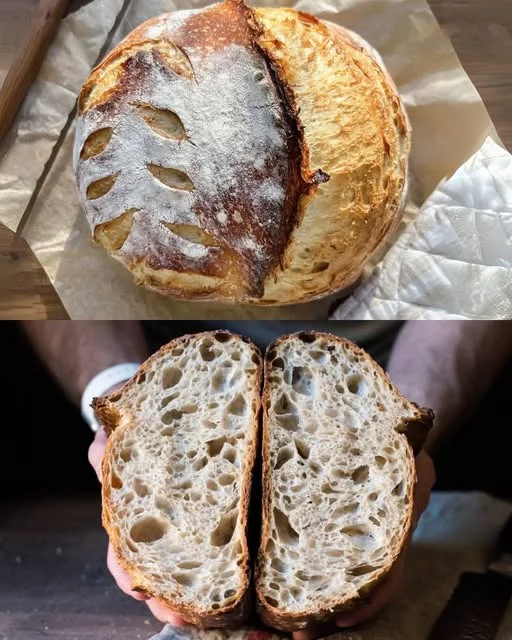
One of the keys to achieving the perfect sourdough texture is developing gluten properly. During the bulk fermentation phase, you’ll need to periodically stretch and fold the dough. This helps to strengthen the gluten and ensures that the dough rises evenly. It also contributes to the beautiful open crumb that sourdough is known for. - Master the Art of Scoring
Scoring the dough just before baking helps it rise evenly and allows you to control the way the bread expands in the oven. It also creates a beautiful pattern on the top of the loaf. Use a sharp knife or a bread lame to make a few shallow cuts on the surface of the dough before baking. - Don’t Forget the Steam
Sourdough loves steam. When baking, steam helps create the crispy, golden crust that everyone loves. If you’re baking your sourdough in a Dutch oven, the lid traps steam, giving you the perfect environment for a crunchy, rustic crust. If you’re baking it on a baking stone, consider adding a pan of hot water to the oven to create steam.
Frequently Asked Questions (FAQs)
1. How long does it take to make sourdough bread?
Making sourdough bread from scratch generally takes between 24 and 48 hours, depending on the environment and the fermentation process. The actual hands-on time is relatively short, but the dough requires several hours to rise and develop flavor. Be prepared for a slow, intentional process—this isn’t a recipe you’ll want to rush.
2. How can I make my sourdough starter more active?
If your sourdough starter isn’t as bubbly as you’d like, it may need more frequent feedings or warmer conditions. Try feeding it once a day and keeping it in a warm, draft-free place. If your starter is sluggish, consider increasing the amount of flour and water you feed it, or leave it in a warmer spot in your kitchen.
3. Can I use all-purpose flour instead of bread flour for sourdough?
Yes, you can use all-purpose flour in place of bread flour, although bread flour has a higher protein content, which contributes to a stronger gluten structure and a chewier texture in the finished loaf. If you use all-purpose flour, you may need to adjust the hydration level of the dough slightly, as all-purpose flour absorbs less water than bread flour.
4. Can I make sourdough without a Dutch oven?
Yes, a Dutch oven is great for trapping steam and producing a crisp, golden crust, but it’s not essential. If you don’t have one, you can bake sourdough on a baking stone or even a regular baking sheet. Just be sure to add steam to the oven—either by spraying water into the oven or placing a pan of hot water on the bottom rack.
5. Why is my sourdough bread dense and heavy?
A dense sourdough loaf can be caused by several factors, including under-fermentation, insufficient gluten development, or using too little starter. Make sure you allow enough time for the dough to rise and develop flavor. Additionally, make sure you are stretching and folding the dough during the bulk fermentation phase to build strength in the gluten.
Sourdough Troubleshooting: Common Mistakes and How to Fix Them
Even the most experienced bakers face challenges when making sourdough, but that’s part of the beauty of it. With a little patience and practice, you’ll learn how to solve any issues that arise.
- Problem: Flat or misshapen loaf
Solution: Make sure your dough is well-shaped before the final rise. If your dough is too slack, try adding a little more flour during the mixing phase and be sure to knead it properly to develop the gluten. If your loaf is spreading too much during baking, you may need to reduce the hydration of the dough or increase the flour content slightly. - Problem: Sourdough lacks flavor
Solution: The flavor of your sourdough comes from the fermentation process. If you’re not getting a tangy flavor, your dough may not have fermented long enough. Try allowing the dough to rise for a longer period during the bulk fermentation stage, or use a more active starter. - Problem: Crust is too thick or hard
Solution: A thick, hard crust can happen if your oven is too hot or the dough is over-baked. Ensure your oven is properly preheated, and consider covering the bread with foil in the final stage of baking to prevent over-browning.
Conclusion: The Reward of Slow, Intentional Baking
Sourdough bread is more than just a recipe—it’s an experience, a journey through time and tradition. It’s a process that rewards patience, practice, and a little bit of love. With each loaf, you’ll become more attuned to the art of bread-making and more connected to the generations of bakers who have passed down their knowledge. Whether it’s for a special occasion or simply to enjoy with a bowl of soup, sourdough bread has the power to elevate any meal.
As you embark on your own sourdough journey, remember that perfection comes with time. Each loaf will teach you something new about the process, and with each bake, you’ll get closer to mastering the craft. The joy of sourdough lies not only in the end result but in the act of creating something from scratch, using simple ingredients and your own hands. And that, perhaps, is the most rewarding part of all.
A Slice of Home: The Magic of Homemade Sourdough Bread
Ingredients
Method
- Combine Ingredients: In a large mixing bowl, combine the sourdough starter with the wheat flour and all-purpose flour. Gradually add the water, mixing until a rough dough forms.
- Knead the Dough: Transfer the dough to a floured surface and knead it for about 10-15 minutes until it becomes smooth and elastic. The dough should be slightly tacky but not too sticky.
- First Rise: Place the dough in an oiled bowl, cover it with a damp cloth, and let it rise for 4-6 hours at room temperature, or until it doubles in size.
- Shape the Dough: Once the dough has risen, gently punch it down and transfer it to a floured surface. Shape it into a round or oval loaf, depending on your preference.
- Second Rise: Place the shaped dough into a proofing basket or bowl, cover, and let it rise for another 2-3 hours, until the dough puffs up.
- Preheat the Oven: Preheat your oven to 475°F (245°C) with a Dutch oven or baking stone inside for at least 30 minutes.
- Bake the Bread: Carefully transfer the dough to the preheated Dutch oven or stone. Cover with a lid or baking dish and bake for 30 minutes. Then, remove the cover and continue baking for another 15-20 minutes, until the loaf is golden brown with a crisp crust.
- Cool and Slice: Let the bread cool on a wire rack for at least 30 minutes before slicing to allow the flavors to fully develop.
Notes
- Sourdough Starter: Make sure your sourdough starter is bubbly and well-fed before use. A mature starter gives better results.
- Steam is Key: For a crispy crust, create steam in the oven by baking the bread inside a covered Dutch oven or by adding a pan of hot water to the oven.
- Let It Rest: Allow your bread to cool completely before slicing to preserve the texture and flavor.