Crispy Potato & Ham Skillet Cake – A Quick and Hearty Delight

Few dishes strike the perfect balance between simplicity, comfort, and flavor like this Crispy Potato & Ham Skillet Cake. With just a handful of ingredients—potatoes, ham, cheese, and flour—this dish transforms into a golden, crispy delight with a soft, cheesy interior. It’s a one-pan meal that’s quick to make and packed with satisfying flavors.

Whether you’re looking for a hearty breakfast, a quick lunch, or a comforting dinner, this dish is a fantastic option. The crispy edges, the savory ham, and the melty cheese come together to create a dish that is both simple and incredibly delicious. It’s also a great way to use up leftover ingredients and requires minimal effort in the kitchen.

In this article, we’ll explore why this potato skillet cake is a must-try, the key ingredients and their benefits, variations to suit different tastes, expert cooking tips, and answers to frequently asked questions.

Why This Potato Skillet Cake Is a Must-Try

1. Simple Ingredients, Incredible Flavor

This dish proves that you don’t need complicated ingredients to create something delicious. Potatoes, ham, cheese, and a few pantry staples come together to form a dish that is crispy on the outside, soft on the inside, and full of flavor.

2. Quick and Easy – Ready in Under 30 Minutes

One of the best things about this recipe is how fast it comes together. Unlike traditional potato dishes that require boiling or baking for long periods, this skillet cake is ready in just 25 minutes—perfect for busy weekdays.

3. A Versatile Meal for Any Time of Day

This dish is incredibly versatile:

  • Breakfast: Serve with eggs for a filling morning meal.
  • Lunch: Pair with a side salad for a well-rounded meal.
  • Dinner: Serve as a hearty main course or a side dish with grilled meats or vegetables.

4. A Crispy, Cheesy, and Satisfying Texture

The combination of crispy potatoes, melted cheese, and savory ham makes every bite incredibly satisfying. The outside develops a perfect golden crust, while the inside remains fluffy and flavorful.

5. Perfect for Using Leftovers

This dish is a great way to use up leftover ham, cheese, or cooked potatoes. You can easily substitute ingredients based on what you have in your fridge.

Ingredients

IngredientQuantity
Potatoes (diced)3 medium (about 4 cups)
Mortadella or ham (chopped)100–150g (3.5–5 oz)
Egg1
Flour150g (1.2 cups)
PepperA pinch
Vegetable oil1 tbsp
Cheese slicesAs desired
Fresh greens (for serving)To taste

Directions

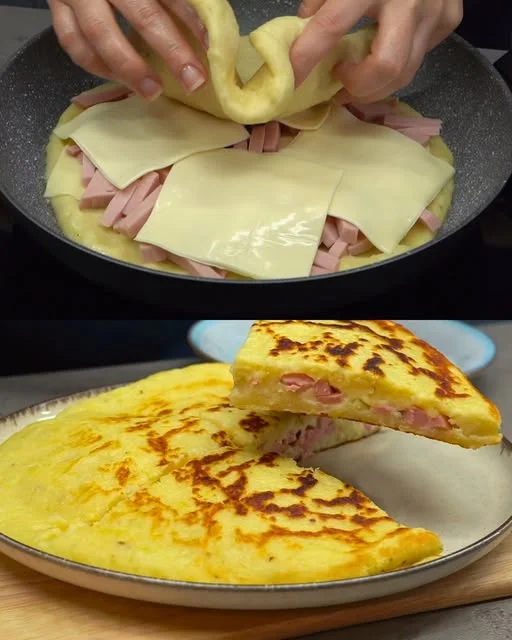
Step 1: Prepare the Potato Mixture

  1. Peel and dice the potatoes, then grate or mash them into a bowl.
  2. Add the chopped ham, egg, flour, and a pinch of pepper. Mix well until combined.

Step 2: Shape & Cook

  1. Heat 1 tablespoon of vegetable oil in a non-stick pan over medium heat.
  2. Spread the potato mixture evenly into the pan, pressing it down gently.
  3. Cook for 5–7 minutes on one side until golden brown. Flip carefully and cook for another 5 minutes.

Step 3: Add Cheese & Serve

  1. Place cheese slices on top of the cooked potato cake and let them melt.
  2. Remove from heat and serve hot with fresh greens on the side.

Nutritional Information (Per Serving, Approx.)

NutrientAmount
Calories320 kcal
Protein12g
Carbohydrates40g
Fat12g
Fiber4g
Sodium450mg

Key Ingredients & Their Benefits

1. Potatoes – The Star of the Dish

Potatoes are a nutrient-dense and versatile ingredient that form the base of this dish. They are:

  • Rich in fiber, which supports digestion.
  • A great source of potassium, helping maintain heart health.
  • Naturally gluten-free, making this dish easy to adapt for dietary preferences.

2. Ham (or Mortadella) – A Savory Boost

Ham adds a rich, smoky flavor that enhances the dish. If using mortadella, it brings a slightly softer, buttery texture. Both options add:

  • Protein, which helps keep you full.
  • A salty contrast to the mild potatoes.

3. Cheese – The Melty, Gooey Factor

The cheese brings a rich, creamy element to the dish, balancing the crispy potatoes with a smooth texture. Depending on the type of cheese used, it can add:

  • A sharp, tangy taste (cheddar, gouda, or parmesan).
  • A milder, creamier texture (mozzarella or provolone).

4. Flour – The Binding Agent

A small amount of flour helps hold the potato cake together, giving it structure and stability as it crisps in the pan.

5. Egg – Adds Moisture & Structure

Egg helps bind the ingredients, ensuring the potato cake holds its shape while frying. It also adds:

  • Protein, for a more satisfying meal.
  • A fluffy texture, keeping the interior from being too dense.

6. Fresh Greens – A Refreshing Contrast

Serving this dish with fresh parsley, arugula, or mixed greens adds a refreshing contrast to the rich, crispy flavors.

Popular Variations to Try

1. Vegetarian Potato Cake

For a meat-free version, swap the ham for:

  • Sautéed mushrooms for an earthy flavor.
  • Grated zucchini or carrots for added freshness.
  • Diced bell peppers or spinach for a nutritious boost.

2. Spicy Potato Cake

If you love bold flavors, add:

  • Chili flakes or hot paprika to the batter for a spicy kick.
  • Chorizo or spicy sausage instead of ham for extra heat.

3. Extra Crispy Version

For an ultra-crispy crust:

  • Cook the potato cake over low heat for a longer time to develop a golden crust.
  • Use a cast-iron skillet for better heat distribution.
  • Add panko breadcrumbs to the mixture for an extra crunch.

4. Low-Carb & Gluten-Free Option

  • Replace the flour with almond flour or gluten-free flour.
  • Use cooked and mashed cauliflower instead of potatoes for a low-carb version.

Expert Tips for the Perfect Potato Cake

1. Remove Excess Moisture from Potatoes

To get a crispy, golden crust, make sure to pat dry the grated or diced potatoes before mixing. Excess moisture can make the cake too soft.

2. Don’t Overcrowd the Pan

When frying, make sure the potato cake has enough space to crisp up properly. If necessary, cook in batches to maintain even heat.

3. Flip Carefully for an Even Cook

Use a large spatula or plate-flipping method to turn the potato cake without breaking it. Let the first side develop a firm, crispy crust before attempting to flip.

4. Season Well

Since potatoes can be bland on their own, generously season with salt, pepper, and your favorite herbs for maximum flavor.

5. Serve Immediately

For the best crispy texture, enjoy the potato cake hot out of the pan.

Frequently Asked Questions (FAQs)

1. Can I Make This Ahead of Time?

Yes! You can prepare the mixture ahead and store it in the fridge for up to 24 hours before frying.

2. Can I Bake Instead of Fry?

Absolutely. To bake:

  • Preheat the oven to 400°F (200°C).
  • Spread the mixture on a lined baking sheet and bake for 20–25 minutes, flipping halfway through.

3. Can I Freeze It?

Yes! Shape the potato cakes, place them on a tray, and freeze. Once frozen, transfer them to a freezer bag. Cook directly from frozen, adding a few extra minutes to the cooking time.

4. What’s the Best Cheese for This Dish?

  • Mozzarella for mild creaminess.
  • Cheddar for a sharp, tangy taste.
  • Parmesan for extra savory depth.

5. What Can I Serve with It?

  • A fresh salad for contrast.
  • A fried or poached egg on top for a complete meal.
  • A dollop of sour cream or Greek yogurt for added creaminess.

Conclusion: A Must-Try Crispy Potato Delight

The Crispy Potato & Ham Skillet Cake is a quick, flavorful, and satisfying dish that proves you don’t need complex ingredients to create something amazing. With crunchy edges, a cheesy filling, and smoky ham, it’s a recipe you’ll return to again and again.

Whether you’re looking for a hearty breakfast, an easy lunch, or a comforting dinner, this dish is versatile, customizable, and incredibly delicious. Try it today and enjoy a crispy, cheesy potato dish that will become a new favorite in your kitchen!

Amal

Crispy Potato & Ham Skillet Cake – A Quick and Hearty Delight

Turn simple ingredients into a crispy, golden potato cake with this quick and hearty recipe! Made with shredded potatoes, ham, cheese, and a touch of seasoning, this one-pan delight is crispy on the outside, soft and cheesy on the inside, and perfect for breakfast, lunch, or dinner. Serve with fresh greens or a dollop of sour cream for an easy, satisfying meal in under 30 minutes!
Prep Time 10 minutes
Cook Time 15 minutes
Total Time 25 minutes
Servings: 4 servings
Course: Breakfast
Cuisine: European

Ingredients
  

  • 3 medium-sized potatoes about 4 cups diced
  • 100 to 150 grams 3.5 to 5 oz mortadella or ham, chopped
  • 1 egg
  • 150 grams 1.2 cups flour
  • A pinch of pepper
  • 1 tablespoon vegetable oil
  • Cheese slices as desired
  • Fresh greens for serving

Method
 

  1. 1. Prepare the Potato MixturePeel and grate the potatoes, then squeeze out excess moisture. In a bowl, mix the grated potatoes with chopped ham, egg, flour, and a pinch of pepper.
  2. 2. Cook the Potato CakeHeat vegetable oil in a non-stick skillet over medium heat. Spread the potato mixture evenly in the pan and press it down lightly. Cook for 5–7 minutes until golden brown on one side, then carefully flip and cook for another 5 minutes.
  3. 3. Add Cheese & Finish CookingPlace cheese slices on top, cover the pan, and let the cheese melt for 1–2 minutes.
  4. 4. Serve & EnjoyRemove from heat, slice, and serve with fresh greens or a dipping sauce of your choice.

Notes

  • Extra Crispy Texture: Let the potatoes sit in cold water for 10 minutes before grating, then dry well.
  • Meat-Free Version: Swap ham for mushrooms or bell peppers.
  • Cheese Options: Try cheddar, mozzarella, or gouda for different flavors.
  • Serving Suggestions: Enjoy with sour cream, yogurt, or a side salad.
  • Storage Tips: Store leftovers in an airtight container for up to 2 days, reheating in a skillet for best results.

Decadent Chocolate & Caramel Delight – The Dessert Everyone Is Talking About

Few desserts have the power to captivate chocolate lovers quite like this Decadent Chocolate & Caramel Delight. Combining the richness of cocoa, the sweetness of caramel, the crunch of peanuts, and the smoothness of whipped cream, this dessert is an irresistible indulgence. It’s soft, creamy, and layered with textures, making every bite a luxurious experience.

What makes this dessert truly special is its balance of flavors and contrasts—the deep, slightly bitter cocoa pairs beautifully with the caramelized sweetness of boiled condensed milk, while the crunch from peanuts and almond flakes adds a delightful bite. Dark and white chocolate drizzles enhance the richness, while the touch of brewed coffee gives it a subtle depth.

This is a dessert designed to impress. Whether you’re serving it at a family gathering, making it for a special occasion, or simply treating yourself, this recipe is easy to make yet sophisticated in taste. In this article, we’ll explore why this chocolate delight is so loved, its key ingredients, creative variations, expert tips, and frequently asked questions to help you perfect it every time.

Why This Chocolate Dessert Stands Out

1. A Perfect Balance of Textures

The magic of this dessert lies in its contrast of textures—a moist cocoa-infused base, a smooth caramel layer, crunchy peanuts, airy whipped cream, and rich chocolate drizzles. Each layer brings a new sensation, making it a multi-dimensional dessert that keeps you coming back for more.

2. Rich, Indulgent Flavor with a Hint of Coffee

Chocolate desserts are often sweet, but this one has an added depth from brewed coffee. The slight bitterness from the coffee enhances the chocolate’s natural richness, creating a dessert that is complex yet balanced.

3. An Elegant Yet Easy-To-Make Dessert

Despite its sophisticated appearance and gourmet flavors, this dessert is surprisingly simple to prepare. With a few basic ingredients and easy-to-follow steps, you can create a bakery-quality treat at home.

4. Perfect for Any Occasion

Whether you’re hosting a dinner party, celebrating a birthday, or craving a late-night treat, this dessert is versatile and always a hit. It’s indulgent enough for special occasions yet simple enough for an everyday chocolate fix.

5. Highly Customizable

This recipe is easy to adapt to different preferences. From nuts to chocolates, from coffee-infused layers to fruit toppings, you can modify it to create your perfect dessert experience.

Ingredients

IngredientQuantity
Eggs3 large
Sugar100g
Vanilla sugar10g
Milk150ml
Flour120g
Cocoa powder40g
Baking powder7g
Boiled condensed milk200g
Peanuts100g
White chocolate100g
Coffee (brewed)50ml
Whipped cream200ml
Almond flakes30g
Dark chocolate100g
Oil50ml

Directions

Step 1: Prepare the Chocolate Base

  1. Preheat the oven to 350°F (180°C) and grease a baking dish.
  2. In a bowl, whisk together eggs, sugar, and vanilla sugar until light and fluffy.
  3. Add milk and oil, mixing well.
  4. Sift in flour, cocoa powder, and baking powder, and gently fold to combine.
  5. Pour into the baking dish and bake for 20–25 minutes.

Step 2: Prepare the Filling & Toppings

  1. Once cooled, brush the cake with brewed coffee for extra richness.
  2. Spread boiled condensed milk evenly over the cake.
  3. Sprinkle chopped peanuts over the caramel layer.

Step 3: Decorate with Chocolate & Cream

  1. Melt white and dark chocolate separately, then drizzle over the dessert.
  2. Spread whipped cream on top for a light, airy texture.
  3. Finish with almond flakes and extra peanuts for crunch.

Step 4: Chill & Serve

  1. Let the dessert chill in the fridge for at least 30 minutes before slicing.
  2. Serve and enjoy this decadent chocolate caramel masterpiece!

Nutritional Information (Per Serving, Approx.)

NutrientAmount
Calories320 kcal
Protein6g
Carbohydrates40g
Fat15g
Fiber2g
Sugar28g
Sodium120mg

Key Ingredients & Their Roles

Each ingredient in this dessert plays a crucial role in achieving the perfect balance of flavor and texture. Here’s a closer look at what makes this recipe shine:

1. Cocoa & Dark Chocolate – The Heart of the Dessert

  • Cocoa powder gives the base its deep, chocolatey flavor.
  • Dark chocolate drizzle adds an intense richness, complementing the sweetness of the caramel.
  • The combination creates a deep, velvety taste that chocolate lovers adore.

2. Boiled Condensed Milk – The Sweet Caramel Layer

  • This is the star of the filling, adding a rich, creamy sweetness that enhances the overall dessert.
  • When spread over the chocolate base, it creates a silky contrast to the dense cocoa layers.

3. Peanuts – A Nutty Crunch

  • Peanuts provide a crunchy element that cuts through the creamy textures.
  • Their light saltiness balances the sweetness of the condensed milk and chocolate.

4. Whipped Cream – The Airy Component

  • The light, fluffy whipped cream on top softens the richness of the chocolate layers.
  • It adds a refreshing contrast, preventing the dessert from feeling too heavy.

5. White Chocolate – A Sweet & Creamy Contrast

  • The white chocolate drizzle adds a touch of vanilla-like sweetness that balances the darker chocolate notes.
  • It also creates a beautiful visual contrast against the layers.

6. Brewed Coffee – The Secret Flavor Booster

  • A splash of coffee enhances the depth of chocolate without making it taste like coffee.
  • It amplifies the richness while keeping the sweetness in check.

7. Almond Flakes – A Delicate Finishing Touch

  • These add a subtle crunch and nutty aroma.
  • They enhance the presentation, making the dessert look even more elegant.

Popular Variations to Try

1. Double Chocolate Delight

For an extra chocolatey experience, mix chocolate chips into the batter and use chocolate whipped cream instead of regular whipped cream.

2. Nut-Free Version

Skip the peanuts and almond flakes and replace them with cookie crumbs or shredded coconut for a nut-free alternative.

3. Mocha Infusion

Increase the coffee element by adding espresso powder to the cocoa base and mixing some coffee extract into the whipped cream.

4. Salted Caramel Twist

Drizzle homemade salted caramel sauce over the dessert instead of boiled condensed milk for a more intense caramel flavor.

5. Fruit-Infused Chocolate Dessert

For a fresh twist, add sliced strawberries, raspberries, or banana layers between the chocolate base and caramel layer.

Expert Tips for the Best Chocolate & Caramel Dessert

1. Use High-Quality Chocolate

The better the chocolate, the richer the flavor. Use premium dark chocolate and high-quality cocoa powder for the best results.

2. Don’t Overmix the Batter

Overmixing can result in a dense, tough cake base. Gently fold the ingredients together until just combined.

3. Chill for the Best Texture

Letting the dessert chill for at least 30 minutes before serving helps the flavors meld together and makes slicing easier.

4. Balance the Sweetness

Since condensed milk and white chocolate are naturally sweet, adjust the sugar content in the base if needed to maintain balance.

5. Add the Whipped Cream Just Before Serving

For the lightest and fluffiest texture, add whipped cream at the last moment so it stays fresh and airy.

Frequently Asked Questions (FAQs)

1. Can I Make This Dessert in Advance?

Yes! It actually tastes better after chilling for a few hours. Store it in the fridge for up to 3 days before serving.

2. How Do I Store Leftovers?

Keep leftovers covered in the fridge for up to 3 days. If freezing, store in an airtight container for up to 2 months (without whipped cream).

3. Can I Use a Different Type of Nut?

Absolutely! Try hazelnuts, walnuts, or pecans for a different crunch.

4. Is There a Way to Make It Less Sweet?

  • Reduce the sugar in the chocolate base.
  • Use dark chocolate with at least 70% cocoa.
  • Add a pinch of sea salt to enhance flavor without additional sweetness.

5. Can I Make It Gluten-Free?

Yes! Use a gluten-free flour blend for the base, ensuring all ingredients are gluten-free.

Conclusion: The Ultimate Chocolate Dessert Experience

This Decadent Chocolate & Caramel Delight is more than just a dessert—it’s an experience. Every bite is a blend of soft, crunchy, creamy, and rich flavors, making it a must-try for chocolate lovers.

With its simple preparation, elegant presentation, and irresistible taste, this dessert is perfect for any occasion, whether it’s a family gathering, a romantic treat, or a personal indulgence.

Amal

Decadent Chocolate & Caramel Delight – The Dessert Everyone Is Talking About

Indulge in the ultimate chocolate and caramel dessert that everyone is raving about! This rich and velvety treat features a moist cocoa-infused base, a luscious layer of boiled condensed milk, crunchy peanuts, and smooth white and dark chocolate drizzles. Topped with whipped cream and almond flakes, this dessert is the perfect balance of sweet, creamy, and crunchy—an irresistible delight for any occasion!
Prep Time 20 minutes
Cook Time 25 minutes
Total Time 45 minutes
Servings: 8 –10 servings
Course: Dessert
Cuisine: International

Ingredients
  

  • 3 eggs
  • 100 g sugar
  • 10 g vanilla sugar
  • 150 ml milk
  • 120 g flour
  • 40 g cocoa powder
  • 7 g baking powder
  • 200 g boiled condensed milk
  • 100 g peanuts
  • 100 g white chocolate
  • 50 ml brewed coffee
  • 200 ml whipped cream
  • 30 g almond flakes
  • 100 g dark chocolate
  • 50 ml vegetable oil
  • Extra peanuts for garnish

Method
 

  1. 1. Prepare the Chocolate Base: Preheat the oven to 350°F (180°C). In a bowl, whisk together eggs, sugar, and vanilla sugar until light and fluffy. Add milk and vegetable oil, mixing well. Sift in flour, cocoa powder, and baking powder, and gently fold to combine. Pour into a greased baking dish and bake for 20–25 minutes.
  2. 2. Layer with Caramel & Peanuts: Once cooled, brush the cake with brewed coffee for added depth. Spread a layer of boiled condensed milk evenly over the top. Sprinkle chopped peanuts for a crunchy texture.
  3. 3. Add Chocolate & Cream Toppings: Melt white and dark chocolate separately. Drizzle both over the dessert for a visually appealing contrast. Spread a layer of whipped cream on top and garnish with almond flakes and extra peanuts.
  4. 4. Chill & Serve: Refrigerate for at least 30 minutes before slicing. Serve and enjoy this decadent, chocolatey masterpiece!

Notes

  • Make it Less Sweet: Use dark chocolate with 70% cocoa or reduce the sugar slightly.
  • Nut-Free Option: Replace peanuts and almonds with cookie crumbs or coconut flakes.
  • Extra Chocolatey: Add a chocolate ganache layer before the caramel for an even richer taste.
  • Storage Tips: Store in the fridge for up to 3 days or freeze (without whipped cream) for up to 2 months.

Creamy Zucchini & Eggplant Ratatouille: A Meatless Mediterranean Treasure

Few dishes celebrate the beauty of fresh vegetables and simple ingredients as elegantly as ratatouille. Traditionally a rustic French dish, ratatouille brings together seasonal vegetables, herbs, and slow-cooked flavors to create a satisfying and nourishing meal. This version of Creamy Zucchini & Eggplant Ratatouille takes the classic recipe and enhances it with a silky cream sauce and melted Parmesan, making it an indulgent yet wholesome dish.

Unlike the traditional ratatouille that relies solely on tomatoes and olive oil, this recipe offers a creamy, cheesy variation that brings out the natural sweetness of zucchini, eggplant, and other vegetables. The result is a rich, comforting, and deeply flavorful dish that works as a vegetarian main course or a hearty side dish.

In this article, we will explore what makes this dish special, the benefits of its key ingredients, popular variations, frequently asked questions, and expert cooking tips to ensure you achieve the perfect creamy ratatouille every time.

Why This Zucchini & Eggplant Ratatouille Stands Out

1. A Luxurious Creamy Twist on a Classic Dish

While traditional ratatouille is known for its light, summery flavors, this version introduces milk cream and Parmesan cheese, giving it a velvety texture and a deep umami taste. The combination of fresh vegetables with a creamy base results in a dish that is both comforting and elegant.

2. A True Celebration of Seasonal Vegetables

This recipe highlights the best of late summer and early autumn produce, making it an excellent way to use up fresh zucchini, eggplant, bell peppers, and tomatoes. The layered textures and natural sweetness of these vegetables shine through, creating a dish that is hearty yet light.

3. Naturally Meat-Free Yet Satisfying

Many meatless meals struggle to feel filling, but this vegetarian ratatouille is packed with fiber, protein, and healthy fats, making it a nutrient-rich, satisfying option. The creamy texture, cheesy topping, and rich flavors ensure that even those who typically prefer meat-based dishes will love this comforting meal.

4. Versatile for Any Occasion

This dish can be served in many ways, including:

  • As a main course with crusty bread or rice
  • As a side dish to complement roasted meats or fish
  • As a pasta sauce for a creamy vegetable twist on classic pasta dishes
  • As a brunch dish with eggs and toast

5. Perfect for Meal Prep & Leftovers

One of the best things about this ratatouille is that it tastes even better the next day. The flavors continue to develop as it sits, making it a great dish for meal prepping or making ahead for gatherings.

Ingredients

IngredientQuantity
Zucchini2 small
Eggplant2 small
SaltTo taste
Onion (chopped)1
Vegetable oilFor frying
Garlic (minced)3 cloves
Carrot (sliced)1
Bell pepper (sliced)1 (red, yellow, or orange)
Tomatoes (diced)3
Mushrooms (sliced)7
Milk cream (or low-fat cream)350ml
Ground black pepperTo taste
Fresh parsley (chopped)For garnish
Parmesan cheese (grated)200g

Directions

Step 1: Prepare the Vegetables

Cut the zucchini and eggplant into thin slices, sprinkle with salt, and let them sit for 10 minutes to remove excess moisture. Pat dry with a paper towel.

Step 2: Sauté the Aromatics

In a large pan, heat vegetable oil over medium heat. Sauté the onion, garlic, and carrot until soft and fragrant.

Step 3: Cook the Vegetables

Add the bell pepper, tomatoes, and mushrooms to the pan, cooking for 5–7 minutes until softened. Season with salt and black pepper.

Step 4: Simmer in Cream

Pour in the milk cream and stir well. Let the mixture simmer for 5 minutes to blend the flavors.

Step 5: Layer & Bake

Preheat the oven to 375°F (190°C). In a greased baking dish, layer the zucchini and eggplant slices, then pour the creamy vegetable mixture over them. Sprinkle grated Parmesan cheese on top.

Step 6: Bake to Perfection

Bake for 20 minutes, or until the cheese is golden and bubbly.

Step 7: Garnish & Serve

Remove from the oven, sprinkle with fresh parsley, and serve warm. Enjoy!

Nutritional Information (Per Serving, Approx.)

NutrientAmount
Calories280 kcal
Protein10g
Carbohydrates18g
Fat18g
Fiber4g
Sugar6g
Sodium400mg

The Key Ingredients & Their Benefits

1. Zucchini – A Light & Versatile Base

Zucchini is a low-calorie, nutrient-rich vegetable packed with fiber, vitamin C, and potassium. It absorbs flavors beautifully and adds a subtle sweetness that pairs well with the cream sauce.

2. Eggplant – The Heartiness Factor

Eggplant adds a meaty texture to the dish while soaking up the flavors of the sauce. It’s rich in antioxidants, fiber, and essential minerals that support overall health.

3. Bell Peppers – A Sweet & Smoky Addition

Bell peppers bring a touch of sweetness and a vibrant color to the dish. They are an excellent source of vitamin C, beta-carotene, and antioxidants that promote a strong immune system.

4. Tomatoes – A Natural Umami Booster

Fresh tomatoes add a mild acidity and depth to balance out the creaminess of the sauce. Tomatoes are packed with lycopene, an antioxidant that supports heart health.

5. Mushrooms – Earthy & Savory

Mushrooms provide a rich umami flavor, enhancing the dish’s depth. They are also a great source of B vitamins and plant-based protein, making the dish even more satisfying.

6. Cream – The Silky Element

Milk cream (or a low-fat alternative) brings a smooth, velvety texture to the dish. It balances the acidity of the tomatoes and enhances the natural flavors of the vegetables.

7. Parmesan Cheese – The Umami Kick

Parmesan adds a salty, nutty complexity that perfectly complements the vegetables. Its sharpness cuts through the richness of the cream, creating a beautifully balanced dish.

8. Garlic & Onion – The Flavor Foundations

Garlic and onion form the aromatic base of this dish, infusing it with layers of warmth and depth. They also provide immune-boosting properties.

9. Herbs & Spices – The Final Touch

Fresh parsley, black pepper, and a hint of paprika elevate the dish with freshness and warmth, tying together all the flavors.

Popular Variations to Try

1. Vegan Creamy Ratatouille

  • Swap milk cream for coconut cream or cashew cream.
  • Use nutritional yeast instead of Parmesan for a dairy-free cheesy flavor.

2. Spicy Mediterranean Twist

  • Add a pinch of red pepper flakes or cayenne pepper for a bit of heat.
  • Stir in a handful of olives or capers for a briny contrast.

3. Protein-Packed Version

  • Mix in chickpeas or white beans for added plant-based protein.
  • Serve over quinoa or lentils for an even heartier dish.

4. Low-Carb & Keto Option

  • Use heavy cream instead of milk cream for fewer carbs.
  • Skip the carrots and substitute extra mushrooms or spinach.

Frequently Asked Questions (FAQs)

1. Can I Make This Ratatouille in Advance?

Yes! This dish stores well and tastes even better the next day. Refrigerate in an airtight container for up to 3 days and reheat before serving.

2. Can I Freeze Creamy Ratatouille?

Yes, but the texture may change slightly due to the cream. To freeze, place in an airtight container for up to 2 months. Thaw in the fridge overnight before reheating.

3. What’s the Best Way to Serve This Dish?

  • As a main dish with toasted bread or pasta
  • As a side dish alongside roasted meats or fish
  • Over rice, quinoa, or polenta for a heartier meal

4. Can I Use Different Cheeses?

Absolutely! Try gruyère, gouda, or feta for a different flavor profile.

5. Can I Make It Without Cream?

Yes! You can replace the cream with:

  • Greek yogurt for a tangy twist
  • Blended silken tofu for a dairy-free creamy texture
  • Coconut milk for a vegan version

Conclusion: A Comforting, Meatless Masterpiece

This Creamy Zucchini & Eggplant Ratatouille is more than just a vegetable dish—it’s a celebration of flavors, textures, and wholesome ingredients. Whether you’re looking for a meatless weeknight dinner, an elegant side dish, or a comforting homemade meal, this ratatouille delivers.

With endless variations and simple preparation, it’s a versatile, satisfying, and unforgettable dish that brings out the best in seasonal vegetables. Try it today and discover why this creamy, cheesy version of ratatouille is a must-have recipe for any home cook!

Amal

Creamy Zucchini & Eggplant Ratatouille: A Meatless Mediterranean Treasure

This Creamy Zucchini & Eggplant Ratatouille is a rich, comforting, and flavor-packed dish that transforms simple vegetables into a luxurious meal. A twist on the classic French recipe, this version features zucchini, eggplant, bell peppers, and mushrooms simmered in a creamy sauce, topped with Parmesan cheese, and baked to golden perfection. It’s an elegant yet easy-to-make dish, perfect as a vegetarian main course or a hearty side dish.
Prep Time 15 minutes
Cook Time 30 minutes
Total Time 45 minutes
Servings: 4 –6 servings
Course: Main Dish
Cuisine: Mediterranean

Ingredients
  

  • 2 small zucchini sliced
  • 2 small eggplants sliced
  • Salt to taste
  • 1 onion chopped
  • Vegetable oil for frying
  • 3 cloves garlic minced
  • 1 carrot sliced
  • 1 bell pepper red, yellow, or orange, sliced
  • 3 tomatoes diced
  • 7 mushrooms sliced
  • 350 ml milk cream or low-fat cream for a lighter option
  • Ground black pepper to taste
  • Fresh parsley chopped (for garnish)
  • 200 grams Parmesan cheese grated

Method
 

  1. 1. Prepare the VegetablesSprinkle the sliced zucchini and eggplant with salt and let them sit for 10 minutes. Pat dry to remove excess moisture.
  2. 2. Sauté the AromaticsIn a large pan, heat vegetable oil over medium heat. Sauté the onion, garlic, and carrot until soft and fragrant.
  3. 3. Cook the VegetablesAdd the bell pepper, tomatoes, and mushrooms to the pan. Cook for 5–7 minutes until softened. Season with salt and black pepper.
  4. 4. Simmer in CreamPour in the milk cream and stir well. Let the mixture simmer for 5 minutes to blend the flavors.
  5. 5. Layer & BakePreheat the oven to 375°F (190°C). In a greased baking dish, layer the zucchini and eggplant slices. Pour the creamy vegetable mixture over them. Sprinkle the grated Parmesan cheese on top.
  6. 6. Bake Until GoldenBake for 20 minutes, or until the cheese is golden and bubbly.
  7. 7. Garnish & ServeRemove from the oven, sprinkle with fresh parsley, and serve warm. Enjoy!

Notes

  • Make it Vegan: Swap milk cream for coconut cream and use nutritional yeast instead of Parmesan.
  • Boost the Flavor: Add red pepper flakes or smoked paprika for a spicy kick.
  • Protein Additions: Mix in chickpeas or white beans for added protein.
  • Best Served With: Crusty bread, pasta, rice, or quinoa for a complete meal.
  • Storage Tips: Store leftovers in an airtight container for up to 3 days. Reheat in the oven at 350°F (175°C) for 10 minutes.

Cheesy Bacon Puff Pastry Snails: A Flaky, Savory Delight

If you’re looking for a crowd-pleasing appetizer that’s easy to make yet irresistibly delicious, these Cheesy Bacon Puff Pastry Snails are the perfect choice. Combining the flakiness of puff pastry, the smokiness of bacon, the richness of Parmesan cheese, and the tanginess of tomato sauce, these golden-brown, spiral-shaped bites are a true treat.

With minimal preparation and baking in under 20 minutes, these pastries are ideal for parties, family gatherings, or even as a quick snack. They are also incredibly versatile—you can adjust the ingredients to suit your taste, making them spicier, cheesier, or even vegetarian.

In this article, we will explore why these puff pastry snails are a must-try, their key ingredients and benefits, variations to suit different preferences, and some expert tips to ensure your pastries come out perfect every time.

Why You’ll Love These Cheesy Bacon Puff Pastry Snails

1. Flaky, Crispy, and Buttery Texture

One of the best things about these pastries is the contrast between the crispy, flaky layers of puff pastry and the soft, cheesy, and smoky filling. As the pastry bakes, it puffs up beautifully, creating golden layers that melt in your mouth.

2. Quick & Easy to Prepare

Unlike complex pastries that require hours of kneading and proofing, this recipe is straightforward and beginner-friendly. Store-bought puff pastry eliminates the need for dough preparation, and the filling comes together in minutes. Just roll, spread, slice, and bake!

3. A Perfect Balance of Flavors

The savory bacon, the nutty Parmesan, the mild sweetness of tomato sauce, and the warmth of paprika and black pepper create a balanced and delicious combination of flavors. Every bite is packed with richness, smokiness, and a slight crunch from the crisped bacon pieces.

4. Great for Any Occasion

These puff pastry snails are perfect for:

  • Holiday appetizers
  • Game nights and movie snacks
  • Breakfast or brunch additions
  • Quick party finger food
  • On-the-go savory snacks

5. Completely Customizable

One of the best things about this recipe is its versatility. You can modify the ingredients to suit different tastes and dietary preferences. Whether you want to add spicy flavors, swap bacon for vegetables, or try different cheeses, there’s plenty of room for creativity.

Ingredients

IngredientQuantity
Puff pastry800g
Tomato sauce100g
Bacon (diced)200g
Spring onion (chopped)100g
Parmesan cheese (grated)100g
Salt5g
Black pepper5g
Sweet paprika5g
Egg (beaten, for brushing)1

Directions

Step 1: Prepare the Filling

In a bowl, mix the diced bacon, chopped spring onions, grated Parmesan, salt, black pepper, and sweet paprika.

Step 2: Roll & Spread

Roll out the puff pastry on a lightly floured surface. Spread a thin layer of tomato sauce over the surface, then evenly distribute the bacon mixture on top.

Step 3: Roll & Slice

Carefully roll the pastry into a tight log. Slice into 1-inch thick rounds to form spiral-shaped pinwheels.

Step 4: Egg Wash & Bake

Place the pastry rounds onto a lined baking sheet. Brush each one with the beaten egg to give them a golden shine.

Step 5: Bake to Perfection

Preheat the oven to 375°F (190°C) and bake for 18–20 minutes, or until golden brown and crispy.

Step 6: Serve & Enjoy

Let them cool slightly before serving. Enjoy warm as a snack, appetizer, or party food!

Nutritional Information (Per Serving, Approx.)

NutrientAmount
Calories280 kcal
Protein8g
Carbohydrates22g
Fat18g
Fiber1g
Sugar2g
Sodium400mg

The Key Ingredients and Their Benefits

Puff Pastry – The Buttery, Flaky Base

Puff pastry is the foundation of this recipe, creating a crispy, golden-brown crust. Using pre-made puff pastry saves time while still delivering a professional-level pastry texture. It’s light, airy, and adds a delicate crunch to every bite.

Bacon – The Smoky, Savory Element

Bacon provides richness, umami, and a crispy bite. Its slightly salty, smoky flavor pairs wonderfully with the creamy cheese and tangy tomato sauce. For a leaner version, you can use turkey bacon or prosciutto.

Parmesan Cheese – A Touch of Sharpness

Parmesan cheese brings a nutty, sharp, and slightly salty flavor to the filling. It melts into the layers of the pastry, giving a rich, creamy texture that enhances the overall taste.

Tomato Sauce – The Flavor Connector

Tomato sauce adds a mild sweetness and slight acidity, helping to balance the richness of the bacon and cheese. It also helps keep the pastry from becoming too dry while adding depth to the flavor profile.

Spring Onion – A Fresh and Mild Bite

Chopped spring onions add a slight crunch and a mild, fresh onion flavor that complements the richness of the bacon and cheese.

Spices – The Flavor Boosters

Salt, black pepper, and sweet paprika work together to enhance the other ingredients. Paprika, in particular, adds a warm, slightly smoky undertone that elevates the taste of the bacon and cheese.

Popular Variations of This Recipe

1. Spicy Cheesy Bacon Puff Pastry Snails

For those who love a little heat, try adding:

  • ½ teaspoon red pepper flakes
  • A drizzle of hot sauce in the filling
  • Chopped jalapeños or chili flakes

2. Extra Cheesy Version

To make these pastries even cheesier, try adding:

  • Mozzarella cheese for a gooey texture
  • Gouda or Swiss cheese for a richer, buttery flavor
  • Cream cheese spread for a creamy, tangy bite

3. Vegetarian Puff Pastry Snails

Replace bacon with:

  • Sautéed mushrooms for an earthy flavor
  • Sun-dried tomatoes and olives for a Mediterranean twist
  • Spinach and feta cheese for a Greek-inspired variation

4. Sweet & Savory Twist

For a unique sweet-savory flavor, add a drizzle of honey or a sprinkle of caramelized onions into the filling before rolling.

5. Gluten-Free Option

For a gluten-free version, use gluten-free puff pastry, available in many stores, and ensure all other ingredients are gluten-free.

Expert Tips for the Perfect Puff Pastry Snails

1. Keep the Puff Pastry Cold

Puff pastry is easier to work with when chilled. If it becomes too soft, place it in the fridge for a few minutes before rolling and slicing.

2. Use a Sharp Knife for Slicing

A sharp knife or a serrated blade ensures clean, even cuts without squishing the dough.

3. Avoid Overloading with Filling

While it’s tempting to add extra cheese and bacon, too much filling can cause the pastries to leak and become soggy.

4. Brush with Egg Wash for a Golden Finish

Brushing the pastries with a beaten egg before baking gives them a beautiful golden-brown shine and a crispy texture.

5. Bake Until Perfectly Golden

Bake at a high temperature (375°F/190°C) until deep golden brown to ensure a crispy, flaky texture.

Frequently Asked Questions (FAQs)

1. Can I Make These in Advance?

Yes! You can prepare them ahead of time and store them in the fridge before baking. Alternatively, freeze unbaked snails and bake them straight from the freezer when needed.

2. How Do I Store Leftovers?

Store leftovers in an airtight container at room temperature for 1–2 days or in the fridge for up to 3 days.

3. Can I Freeze Them?

Yes! Freeze unbaked or baked pastries for up to 3 months. To reheat, bake at 350°F (175°C) for 10 minutes until crispy.

4. Can I Use Different Types of Cheese?

Absolutely! Try cheddar, gouda, Swiss, or feta for different flavor variations.

5. How Can I Make These Healthier?

Use whole-wheat puff pastry, turkey bacon, and low-fat cheese to make a lighter version.

Conclusion: A Must-Try Savory Pastry

These Cheesy Bacon Puff Pastry Snails are flaky, crispy, cheesy, and loaded with bold flavors. They are the perfect snack, party appetizer, or brunch addition, offering a delicious combination of textures and tastes.

With easy preparation, simple ingredients, and endless variations, this recipe is a must-try for home cooks of all levels. Whether you enjoy them fresh out of the oven or save them for later, these golden-brown spirals will quickly become a favorite in your kitchen!

Amal

Cheesy Bacon Puff Pastry Snails: A Flaky, Savory Delight

These Cheesy Bacon Puff Pastry Snails are the perfect combination of flaky puff pastry, crispy bacon, melted Parmesan, and a touch of tomato sauce. With a golden, buttery crust and a savory, cheesy filling, these bite-sized delights are perfect for appetizers, snacks, or party treats. Easy to make and baked to perfection, they’ll be a hit at any gathering!
Prep Time 15 minutes
Cook Time 20 minutes
Total Time 35 minutes
Servings: 12 –16 puff pastry snails
Course: Snack
Cuisine: International

Ingredients
  

  • 800 g puff pastry
  • 100 g tomato sauce
  • 200 g bacon diced
  • 100 g spring onion chopped
  • 100 g Parmesan cheese grated
  • 5 g salt
  • 5 g black pepper
  • 5 g sweet paprika
  • 1 egg beaten (for brushing)

Method
 

  1. 1. Prepare the Filling: In a bowl, mix the diced bacon, chopped spring onions, grated Parmesan, salt, black pepper, and sweet paprika.
  2. 2. Roll Out the Pastry: Roll out the puff pastry on a lightly floured surface into a large rectangle. Spread a thin layer of tomato sauce evenly over the surface.
  3. 3. Add the Filling & Roll: Sprinkle the bacon mixture evenly over the pastry. Carefully roll it into a tight log.
  4. 4. Slice the Snails: Using a sharp knife, cut the rolled pastry into 1-inch thick slices to form spiral-shaped snails.
  5. 5. Brush with Egg Wash: Place the pastry rounds on a lined baking sheet. Brush the tops with the beaten egg for a golden finish.
  6. 6. Bake to Perfection: Preheat the oven to 375°F (190°C) and bake for 18–20 minutes, or until golden brown and crispy.
  7. 7. Cool & Serve: Let them cool slightly before serving. Enjoy warm!

Notes

  • Make it Spicy: Add red pepper flakes or chili powder for extra heat.
  • Vegetarian Option: Substitute bacon with sautéed mushrooms or sun-dried tomatoes.
  • Extra Cheesy: Mix in shredded mozzarella for a gooier texture.
  • Storage Tips: Store in an airtight container for up to 3 days. Reheat in the oven at 350°F (175°C) for 5–7 minutes to retain crispiness.

Soft & Chewy Oatmeal Apple Cookies: A Deliciously Wholesome Treat

There’s something comforting about the combination of oats and apples—a pairing that brings warmth, nostalgia, and wholesome goodness to every bite. These Soft & Chewy Oatmeal Apple Cookies capture that magic, offering a naturally sweet, slightly spiced, and satisfying treat that’s perfect for breakfast, snacks, or dessert.

Unlike store-bought cookies that are often loaded with artificial ingredients and excessive sugar, these homemade oatmeal apple cookies are simple, nutritious, and easy to make. They require minimal ingredients and are ready in just 25 minutes, making them a fantastic option for busy mornings, meal prepping, or an afternoon pick-me-up.

In this article, we’ll explore what makes these cookies special, the health benefits of their key ingredients, creative variations, and answer frequently asked questions to help you perfect this recipe.

Why These Oatmeal Apple Cookies Stand Out

1. A Perfect Balance of Softness & Chewiness

These cookies are soft and chewy, with just the right amount of texture from the oats and apples. The moisture from the apples keeps them tender, while the oats provide a hearty, satisfying bite. Unlike traditional cookies that are either too crisp or overly dense, these strike a perfect balance between light and substantial.

2. A Naturally Sweet, Wholesome Snack

By incorporating fresh apples, these cookies have a natural sweetness that allows you to use less refined sugar. This makes them a great alternative to sugar-heavy baked goods, ideal for those looking for a healthier snack option.

3. Quick, Easy & Beginner-Friendly

With a one-bowl method and no special equipment needed, this recipe is perfect for beginners and experienced bakers alike. The ingredients are common pantry staples, so you can whip up a batch whenever you have extra apples on hand.

4. A Versatile Recipe for Every Occasion

These cookies can be enjoyed anytime—as a breakfast cookie, an afternoon snack, a healthy dessert, or even post-workout fuel. They’re also great for kids’ lunchboxes, as they offer a nutritious energy boost without artificial additives.

5. A Base for Endless Variations

This recipe is highly customizable, allowing you to experiment with different flavors, mix-ins, and substitutions to suit your preferences. Whether you like spices, nuts, chocolate, or a crunchier texture, there’s a way to personalize these cookies to your taste.

Ingredients

IngredientQuantity
Oatmeal110g (1 1/4 cups)
Butter (melted)60g (1/4 cup)
Egg1
Sugar50g (1/4 cup)
Apple (grated or finely chopped)1
Flour50g (1/3 cup + 1 tbsp)
Baking powder1/2 teaspoon
Cinnamon (optional)1/2 teaspoon
Vanilla extract (optional)1 teaspoon

Directions

Step 1: Prepare the Dough

In a mixing bowl, whisk the egg and sugar together until slightly frothy. Stir in the melted butter and mix well.

Step 2: Add Dry Ingredients

Sift in the flour, baking powder, and cinnamon. Add the oatmeal and grated apple, stirring until fully combined. If using vanilla extract, mix it in as well.

Step 3: Shape the Cookies

Scoop spoonfuls of the dough onto a parchment-lined baking sheet, flattening them slightly.

Step 4: Bake to Perfection

Preheat your oven to 350°F (180°C) and bake for 12–15 minutes, or until golden brown and firm to the touch.

Step 5: Cool & Enjoy

Let the cookies cool on a wire rack before serving. Enjoy them fresh, with a cup of tea, or as a quick snack!

Nutritional Information (Per Cookie)

NutrientAmount (Approx.)
Calories100 kcal
Protein2g
Carbohydrates14g
Fat4g
Fiber1.5g
Sugar5g
Sodium30mg

Health Benefits of Key Ingredients

Oatmeal: A Nutrient-Packed Superfood

Oats are one of the healthiest whole grains you can eat. They are rich in:

  • Fiber, which aids digestion and keeps you full longer
  • Beta-glucan, a type of soluble fiber that helps lower cholesterol levels
  • Complex carbohydrates, providing sustained energy without blood sugar spikes
  • Antioxidants, which help reduce inflammation in the body

Apples: A Naturally Sweet & Nutritious Addition

Apples are packed with vitamins, fiber, and antioxidants, making them a great natural sweetener in baked goods. They:

  • Provide pectin, a type of fiber that supports gut health
  • Contain vitamin C, which boosts the immune system
  • Add moisture to the cookies, reducing the need for excess butter or oil

Eggs: A Source of High-Quality Protein

Eggs help bind the ingredients together while adding:

  • Protein, essential for muscle repair and overall body function
  • Healthy fats, which contribute to a rich, satisfying texture
  • Choline, an important nutrient for brain health

Butter (or Alternatives): The Flavor Enhancer

While butter adds a rich flavor and soft texture, you can also use coconut oil or vegetable oil for a dairy-free version. These provide:

  • Healthy fats, which support brain and heart health
  • A moist and tender crumb, ensuring soft cookies

Flour: The Structural Component

A small amount of flour is used to hold everything together, but you can swap it for whole wheat flour or gluten-free flour for different variations.

Popular Variations to Try

1. Cinnamon-Spiced Apple Oatmeal Cookies

Add ½ teaspoon of cinnamon to the dough for a warm, spiced flavor that pairs perfectly with apples.

2. Nutty Crunch Version

Mix in chopped walnuts, pecans, or almonds for a crunchier texture and a dose of healthy fats and protein.

3. Chocolate Chip Apple Oat Cookies

For a more indulgent twist, fold in dark chocolate chips or white chocolate chunks before baking.

4. Dairy-Free & Vegan Adaptation

Swap the butter for coconut oil, and replace the egg with a flaxseed or chia seed egg (1 tablespoon ground flaxseed + 3 tablespoons water).

5. Gluten-Free Option

Use certified gluten-free oats and substitute the flour with almond flour or a gluten-free blend.

6. Maple & Honey Sweetened Cookies

Instead of sugar, use pure maple syrup or honey for a more natural sweetness

Frequently Asked Questions (FAQs)

1. Can I make these cookies without butter?

Yes! You can replace butter with coconut oil, vegetable oil, or even applesauce for a lower-fat version.

2. How do I store these cookies?

Store them in an airtight container at room temperature for up to 4 days. For longer storage, keep them in the fridge for up to 7 days, or freeze for up to 2 months.

3. Can I use instant oats instead of rolled oats?

Yes, but keep in mind that instant oats absorb more moisture and may result in a slightly different texture. Rolled oats provide the best chewiness.

4. Can I make these cookies without eggs?

Absolutely! You can replace the egg with:

  • 1 flax egg (1 tbsp ground flaxseed + 3 tbsp water)
  • ½ mashed banana
  • ¼ cup unsweetened applesauce

5. Why are my cookies too dry?

If your cookies turn out dry, it could be due to too much flour or overbaking. To prevent this:

  • Measure flour correctly using the spoon-and-level method
  • Check the cookies a minute before the suggested baking time

6. Can I make the dough ahead of time?

Yes! The dough can be refrigerated for up to 24 hours before baking. Just let it sit at room temperature for a few minutes before shaping and baking.

Conclusion: A Must-Try Oatmeal Cookie Recipe

These Soft & Chewy Oatmeal Apple Cookies are proof that simple ingredients can create something truly delicious. They offer the perfect balance of sweetness, texture, and warmth, making them a treat you’ll want to bake over and over again.

Whether you enjoy them fresh out of the oven, pack them for a quick snack, or customize them to your liking, these cookies will become a staple in your kitchen. Try them today and enjoy a homemade treat that’s both wholesome and satisfying!

Amal

Soft & Chewy Oatmeal Apple Cookies: A Deliciously Wholesome Treat

These Soft & Chewy Oatmeal Apple Cookies are the perfect balance of warm spices, tender apples, and hearty oats. Naturally sweet and full of flavor, they make a wholesome snack, a quick breakfast, or a light dessert. With minimal ingredients and a quick baking time, these cookies are an easy way to enjoy a homemade treat in no time!
Prep Time 10 minutes
Cook Time 15 minutes
Total Time 25 minutes
Servings: 12 –15 cookies
Course: Dessert
Cuisine: International

Ingredients
  

  • 110 g 1 1/4 cups oatmeal
  • 60 g 1/4 cup butter, melted
  • 1 egg
  • 50 g 1/4 cup sugar
  • 1 apple grated or finely chopped
  • 50 g 1/3 cup + 1 tablespoon flour
  • 1/2 teaspoon baking powder
  • 1/2 teaspoon cinnamon optional
  • 1 teaspoon vanilla extract optional

Method
 

  1. 1. Prepare the Dough: In a mixing bowl, whisk the egg and sugar together until smooth. Stir in the melted butter and vanilla extract (if using).
  2. 2. Add Dry Ingredients: Sift in the flour, baking powder, and cinnamon. Add the oatmeal and grated apple, mixing until fully combined into a soft dough.
  3. 3. Shape the Cookies: Scoop spoonfuls of dough onto a parchment-lined baking sheet, flattening them slightly.
  4. 4. Bake to Perfection: Preheat the oven to 350°F (180°C) and bake for 12–15 minutes, or until the cookies are golden brown and set.
  5. 5. Cool & Enjoy: Let the cookies cool on a wire rack before serving. Enjoy them with tea, coffee, or as a quick snack!

Notes

  • For Extra Flavor: Add chopped nuts, raisins, or a handful of chocolate chips.
  • Gluten-Free Option: Use almond flour or a gluten-free blend instead of regular flour.
  • Dairy-Free Alternative: Swap butter for coconut oil.
  • Storage Tips: Keep cookies in an airtight container for up to 4 days, or freeze for up to 2 months.

Quick & Easy No-Butter Cookies: A Perfect Everyday Treat

There’s something undeniably comforting about homemade cookies, but not everyone has the time—or the ingredients—to whip up a traditional batch with butter and a long list of steps. Enter these Quick & Easy No-Butter Cookies, a game-changer for cookie lovers who want a light, delicious treat without waiting for butter to soften or using complicated techniques.

These cookies are made with basic pantry staples and take only a few minutes to prepare. They have a light texture, a hint of vanilla sweetness, and just the right balance between crisp and soft. Since they’re made with vegetable oil instead of butter, they’re naturally lower in saturated fat, making them a great alternative for those looking for a lighter option.

Perfect for busy mornings, afternoon snacks, or a last-minute sweet craving, these cookies will quickly become a favorite in your kitchen.

Why You’ll Love These No-Butter Cookies

1. Quick & Easy – Ready in Just 15 Minutes

Unlike traditional cookies that require softened butter and chilling time, these no-butter cookies come together in a matter of minutes. The simple dough requires no special equipment, and you don’t have to wait for anything to rest or rise. Just mix, shape, and bake!

2. Made with Simple, Everyday Ingredients

One of the best parts about this recipe is that it requires basic pantry staples—eggs, flour, sugar, vegetable oil, and a few other common ingredients. If you ever find yourself craving cookies but don’t have butter on hand, this recipe is the perfect solution.

3. A Healthier Alternative to Traditional Cookies

Since these cookies use vegetable oil instead of butter, they have a lower saturated fat content, making them a lighter option. They also contain cornstarch, which helps create a soft, melt-in-your-mouth texture without the need for extra fat.

4. Perfect for Everyday Snacking

These cookies are not overly sweet, making them ideal for daily snacking. They pair wonderfully with coffee, tea, or a glass of milk, and they can be enjoyed at breakfast, as an afternoon treat, or even as a light dessert after dinner.

5. Completely Customizable

While this is a basic vanilla sugar cookie recipe, it’s easy to modify by adding extra flavors, toppings, or mix-ins. You can create endless variations by incorporating cocoa powder, spices, or different types of sugar.

Ingredients

IngredientQuantity
Eggs2 pcs
Powdered sugar100g
Vanilla sugar10g
Vegetable oil100g
Baking powder7g
Cornstarch50g
Flour300g

Directions

Step 1: Prepare the Dough

In a mixing bowl, whisk together the eggs, powdered sugar, and vanilla sugar until smooth. Add the vegetable oil and mix well.

Step 2: Add Dry Ingredients

Sift in the baking powder, cornstarch, and flour gradually, stirring continuously until a soft, non-sticky dough forms.

Step 3: Shape the Cookies

Take small portions of dough and roll them into balls. Flatten them slightly and place them on a baking sheet lined with parchment paper.

Step 4: Bake the Cookies

Preheat your oven to 350°F (180°C). Bake for 10–12 minutes, or until the edges turn slightly golden.

Step 5: Cool & Serve

Let the cookies cool on a wire rack before serving. Enjoy them with tea, coffee, or as a quick snack!

Nutritional Information (Per Cookie)

NutrientAmount (Approx.)
Calories110 kcal
Protein2g
Carbohydrates15g
Fat5g
Sugar6g
Fiber0.5g
Sodium50mg

The Role of Each Ingredient in This Recipe

Every ingredient in this recipe plays a specific role in ensuring the cookies come out perfectly textured and flavorful. Let’s take a closer look at how they contribute to the final result.

Eggs – The Binding Agent

Eggs act as the glue that holds the cookie dough together. They provide structure, moisture, and richness, ensuring the cookies don’t turn out too dry or crumbly.

Powdered Sugar – Lightness & Sweetness

Unlike granulated sugar, powdered sugar dissolves more easily into the dough, giving these cookies a lighter texture. It also helps create a delicate sweetness that isn’t overpowering.

Vegetable Oil – A Butter Substitute

Instead of using butter, this recipe relies on vegetable oil, which keeps the cookies moist and tender. Since oil is already in liquid form, it allows the dough to come together quickly without needing extra steps.

Cornstarch – The Secret to Softness

Cornstarch is often used in baking to create a tender, delicate texture. In these cookies, it helps keep them soft while also preventing them from becoming overly dense.

Flour – The Structural Base

Flour provides the foundation of the cookies, giving them structure and allowing them to hold their shape while baking. The amount of flour used determines whether the cookies are chewy, crispy, or fluffy.

Baking Powder – Light and Fluffy Texture

Baking powder acts as a leavening agent, helping the cookies puff up slightly as they bake. This results in a light, airy texture rather than a dense, heavy cookie.

Vanilla Sugar – Flavor Boost

Vanilla sugar enhances the sweet, aromatic flavor of the cookies, giving them a delicious bakery-style taste. If you don’t have vanilla sugar, you can substitute it with a small amount of vanilla extract.

Ways to Customize These No-Butter Cookies

One of the best things about these cookies is how easy they are to customize. With just a few adjustments, you can create different variations to match your cravings.

1. Chocolate Lovers’ Version

  • Add 2 tablespoons of cocoa powder to the dough for a rich chocolate flavor.
  • Sprinkle chocolate chips or chunks into the batter before baking.
  • Drizzle melted chocolate over the cooled cookies for an extra indulgence.

2. Citrus Twist

  • Add grated lemon, orange, or lime zest to the dough for a fresh, zesty flavor.
  • Replace vanilla sugar with lemon extract for a citrus-forward taste.

3. Spiced Cookies

  • Mix in cinnamon, nutmeg, or ginger for a warm, comforting cookie.
  • Sprinkle a bit of brown sugar and cinnamon on top before baking.

4. Nutty Crunch

  • Add finely chopped nuts like almonds, walnuts, or hazelnuts to the dough.
  • Roll the cookies in crushed nuts before baking for an extra crunchy coating.

5. Sugar-Dusted Classic

  • Before baking, roll each cookie in powdered sugar for a soft, melt-in-your-mouth finish.

Frequently Asked Questions (FAQs)

1. Can I use olive oil instead of vegetable oil?

Yes, but keep in mind that olive oil has a stronger flavor than vegetable oil. If you want to substitute, use light or mild olive oil to avoid overpowering the cookies.

2. Can I make these cookies gluten-free?

Absolutely! Simply replace the all-purpose flour with a gluten-free baking blend. Keep in mind that gluten-free doughs can sometimes be more delicate, so handle them gently.

3. How do I store these cookies?

Store the cookies in an airtight container at room temperature for up to 5 days. If you want to keep them longer, they can be frozen for up to 3 months.

4. Can I use granulated sugar instead of powdered sugar?

Yes, but the texture may be slightly different. Powdered sugar dissolves more easily, creating a smoother cookie. If you only have granulated sugar, you can blend it in a food processor to make it finer.

5. Why did my cookies turn out too dry?

If your cookies are dry, it may be due to too much flour. Be sure to measure accurately and avoid packing the flour into the measuring cup. You can also try adding a bit more oil or an extra egg yolk for extra moisture.

Conclusion: A Simple Yet Satisfying Treat

These Quick & Easy No-Butter Cookies prove that delicious homemade treats don’t have to be complicated. With just a few basic ingredients and no butter required, they come together in minutes and deliver a light, flavorful bite that’s perfect for everyday snacking.

Whether you keep them plain, dust them with sugar, or customize them with your favorite add-ins, these cookies are a fantastic go-to recipe whenever you need something sweet without the hassle. Try them today and discover just how easy and delicious homemade cookies can be!

Amal

Quick & Easy No-Butter Cookies: A Perfect Everyday Treat

Craving cookies but don’t have butter? These Quick & Easy No-Butter Cookies are the perfect solution! Made with simple pantry staples, they are light, slightly crisp, and ready in just 15 minutes. Whether you need a quick snack or a sweet treat for guests, these cookies are easy to make and delicious every time.
Prep Time 5 minutes
Cook Time 10 minutes
Total Time 15 minutes
Servings: 12 –15 cookies
Course: Dessert
Cuisine: International

Ingredients
  

  • 2 eggs
  • 100 g powdered sugar
  • 10 g vanilla sugar
  • 100 g vegetable oil
  • 7 g baking powder
  • 50 g cornstarch
  • 300 g flour

Method
 

  1. 1. Prepare the Dough: In a mixing bowl, whisk together the eggs, powdered sugar, and vanilla sugar until smooth. Add the vegetable oil and mix until well combined.
  2. 2. Add Dry Ingredients: Sift in the baking powder, cornstarch, and flour gradually, mixing until a soft, non-sticky dough forms.
  3. 3. Shape the Cookies: Roll small portions of dough into balls, then slightly flatten them. Place them on a parchment-lined baking sheet, leaving some space between each cookie.
  4. 4. Bake the Cookies: Preheat your oven to 350°F (180°C) and bake for 10–12 minutes, or until the edges turn lightly golden.
  5. 5. Cool & Serve: Let the cookies cool on a wire rack before serving. Enjoy them with coffee, tea, or as a quick snack!

Notes

  • Make It Healthier: Use whole wheat flour for a fiber boost.
  • Add Flavor: Mix in cinnamon, lemon zest, or cocoa powder for extra variety.
  • Gluten-Free Option: Substitute all-purpose flour with a gluten-free baking blend.
  • Storage Tips: Store in an airtight container for up to 5 days or freeze for up to 3 months.

Cheesy Broccoli & Potato Bake: The Ultimate Comforting Dish

When it comes to comfort food, few dishes deliver the same satisfaction as a Cheesy Broccoli & Potato Bake. This dish combines two of the most loved vegetables—tender potatoes and vibrant broccoli—with a rich, creamy cheese sauce that coats every bite. The result is a baked dish that is both wholesome and indulgent, making it the perfect addition to family dinners, potlucks, or holiday spreads.

Whether you’re looking for a hearty side dish or a satisfying vegetarian main course, this recipe fits the bill. It’s easy to prepare, made with simple, everyday ingredients, and can be customized to suit different tastes and dietary preferences.

In this article, we’ll explore why this dish is a must-try, its nutritional benefits, popular variations, and answer some frequently asked questions to help you perfect your Cheesy Broccoli & Potato Bake every time.

Why This Cheesy Broccoli & Potato Bake Is So Special

1. A Perfect Balance of Flavors and Textures

This dish brings together creamy, cheesy, crispy, and tender textures all in one bite. The potatoes provide a soft, starchy base, the broccoli adds a slight crunch and fresh flavor, and the cheese sauce binds everything together with a silky, indulgent finish. When baked, the dish develops a golden, bubbly top that makes it irresistible.

2. A Versatile Dish for Any Occasion

One of the best things about this recipe is its versatility. It can be served as a side dish for roasted meats, poultry, or fish, or enjoyed on its own as a vegetarian main course. It works well for weeknight dinners, holiday feasts, or meal prep, making it a go-to recipe for any occasion.

3. Packed with Nutrients

Despite its rich taste, this dish is surprisingly nutritious. Broccoli is a superfood, packed with fiber, vitamins, and antioxidants that support digestion and immune health. Potatoes provide complex carbohydrates and potassium, which help keep energy levels steady. And the cheese and milk add a boost of protein and calcium, making this a well-balanced meal.

4. Easy to Customize

This recipe serves as a base for endless variations. You can add proteins, switch up the cheeses, or even include extra vegetables. Whether you like it spicy, extra cheesy, or with a crispy topping, this dish can be tailored to your liking.

5. Simple, Budget-Friendly Ingredients

Everything in this recipe is affordable and easy to find. You likely have most of these ingredients in your kitchen already, making this an excellent go-to dish when you need something comforting without requiring a trip to the store.

Ingredients

IngredientQuantity
Broccoli1 large head, cut into florets
Potatoes500g (17.6 oz), peeled and diced
Salt2 teaspoons, divided
Butter55g (2 tablespoons)
Flour50g (2 tablespoons)
Milk2 cups (500 ml)
Cheddar cheese (shredded)1 cup (100g)
Garlic powder½ teaspoon
Black pepper½ teaspoon
Paprika½ teaspoon

Directions

Step 1: Preheat & Prepare the Vegetables

Preheat your oven to 375°F (190°C). Bring a pot of salted water to a boil. Add the diced potatoes and cook for 5 minutes, then add the broccoli florets and cook for another 3 minutes. Drain and set aside.

Step 2: Make the Cheese Sauce

In a saucepan, melt the butter over medium heat. Stir in the flour and cook for 1–2 minutes until lightly golden. Gradually add the milk, whisking continuously until smooth. Cook until the sauce thickens. Stir in the shredded cheddar cheese, garlic powder, black pepper, and paprika.

Step 3: Assemble & Bake

Place the cooked potatoes and broccoli in a greased baking dish. Pour the cheese sauce evenly over the vegetables. Toss gently to coat. Bake for 25 minutes until golden and bubbly.

Step 4: Serve & Enjoy

Let the bake cool slightly before serving. Enjoy as a side dish or a hearty vegetarian meal.

Nutritional Information (Per Serving)

NutrientAmount (Approx.)
Calories280 kcal
Protein10g
Carbohydrates35g
Fat12g
Fiber4g
Sugar6g
Sodium500mg

Nutritional Benefits of Key Ingredients

Broccoli: A Nutrient-Packed Superfood

Broccoli is one of the healthiest vegetables you can eat. It’s rich in:

  • Fiber, which supports digestion and gut health
  • Vitamin C, which boosts the immune system
  • Vitamin K, essential for bone health
  • Antioxidants, which help reduce inflammation and promote overall well-being

Potatoes: A Great Source of Energy

Potatoes often get a bad reputation, but they are actually a fantastic source of essential nutrients:

  • Potassium, which helps regulate blood pressure
  • Vitamin B6, which supports brain function
  • Complex carbohydrates, which provide long-lasting energy

Using potatoes in this bake gives it heft and substance, making it a satisfying dish that keeps you full for longer.

Cheese: A Source of Calcium and Flavor

Cheese is more than just a flavor booster—it’s also packed with calcium, protein, and healthy fats that are essential for strong bones and muscles. Different cheeses bring different flavors, allowing you to customize the dish to your liking.

Milk: The Secret to a Velvety Sauce

Milk serves as the base of the cheese sauce, helping to create that creamy, smooth texture. It also provides:

  • Calcium, which supports bone strength
  • Vitamin D, essential for immune health
  • Protein, which helps build and repair tissues

Popular Variations to Try

1. Extra Cheesy Version

If you love extra cheese, try adding a combination of cheddar, gouda, and parmesan for a richer, more intense flavor. You can also sprinkle extra cheese on top before baking for a golden, bubbly crust.

2. Protein-Packed Addition

For those looking to add protein, mix in cooked chicken, crumbled bacon, or diced ham before baking. This turns the dish into a hearty main course that is both filling and flavorful.

3. Crunchy Topping Option

To add an extra crispy texture, sprinkle the top with breadcrumbs or crushed crackers before baking. A drizzle of melted butter over the topping helps create a beautifully golden and crunchy crust.

4. Low-Carb/Keto Version

If you want a lower-carb option, replace the potatoes with cauliflower. The dish will still be creamy and cheesy but with fewer carbohydrates, making it perfect for keto-friendly diets.

5. Spicy Kick

Add a kick of spice by mixing in chopped jalapeños, red pepper flakes, or a dash of hot sauce into the cheese sauce. This is great for those who enjoy bold, fiery flavors.

FAQs: Everything You Need to Know

1. Can I Make This Dish Ahead of Time?

Yes! You can assemble the dish ahead of time and store it in the refrigerator for up to 24 hours before baking. This makes it perfect for meal prep or holiday planning.

2. How Do I Store Leftovers?

Store leftovers in an airtight container in the refrigerator for up to 3 days. To reheat, warm in the oven at 350°F (175°C) for about 10 minutes or microwave in short intervals.

3. Can I Freeze This Dish?

Yes! Allow the dish to cool completely before wrapping it tightly in plastic wrap and aluminum foil. Freeze for up to 2 months. When ready to eat, thaw overnight in the fridge and reheat in the oven.

4. What Are the Best Cheese Options?

While cheddar is a classic choice, you can experiment with parmesan, mozzarella, gouda, or gruyère for different flavors and textures.

5. Can I Use Sweet Potatoes Instead of Regular Potatoes?

Absolutely! Sweet potatoes add a slightly sweet, earthy flavor and an extra dose of vitamins and fiber, making this dish even more nutritious.

6. How Do I Prevent the Sauce from Becoming Lumpy?

To ensure a smooth and creamy cheese sauce, whisk the milk gradually into the flour and butter mixture, stirring constantly. Add the cheese slowly, stirring until melted and combined.

Conclusion: A Must-Try Comfort Dish

The Cheesy Broccoli & Potato Bake is the perfect combination of wholesome vegetables, creamy cheese sauce, and comforting flavors. Whether you serve it as a side dish for family dinners or enjoy it as a main course on its own, it’s guaranteed to be a crowd-pleaser.

With simple ingredients, easy preparation, and endless variations, this dish is a must-have in your recipe collection. Try it today and discover why it’s the ultimate comfort food that never disappoints!

Amal

Cheesy Broccoli & Potato Bake: The Ultimate Comforting Dish

This Cheesy Broccoli & Potato Bake is the ultimate comfort dish, packed with tender potatoes, crisp broccoli, and a creamy, cheesy sauce. Baked to golden perfection, this dish makes a delicious side or a hearty vegetarian main course. Perfect for family dinners, potlucks, or holiday gatherings, it’s easy to make and bursting with flavor.
Prep Time 15 minutes
Cook Time 35 minutes
Total Time 50 minutes
Servings: 4 –6 servings
Course: Main Dish
Cuisine: International

Ingredients
  

  • 1 large head of broccoli cut into florets
  • 500 g 17.6 oz potatoes, peeled and diced
  • 2 teaspoons salt divided
  • 55 g 2 tablespoons butter
  • 50 g 2 tablespoons flour
  • 2 cups 500ml milk
  • 1 cup 100g shredded cheddar cheese
  • ½ teaspoon garlic powder
  • ½ teaspoon black pepper
  • ½ teaspoon paprika

Method
 

  1. 1. Preheat & Prepare the Vegetables: Preheat the oven to 375°F (190°C). Bring a large pot of salted water to a boil. Add the diced potatoes and cook for 5 minutes, then add the broccoli florets and cook for an additional 3 minutes. Drain and set aside.
  2. 2. Make the Cheese Sauce: In a saucepan over medium heat, melt the butter. Stir in the flour and cook for 1–2 minutes until lightly golden. Gradually whisk in the milk, stirring constantly until the mixture thickens. Remove from heat and stir in the shredded cheddar cheese, garlic powder, black pepper, and paprika.
  3. 3. Assemble the Bake: Place the cooked potatoes and broccoli in a greased baking dish. Pour the cheese sauce evenly over the vegetables and gently mix to coat.
  4. 4. Bake Until Golden: Transfer the dish to the oven and bake for 25 minutes, or until the top is bubbly and golden brown.
  5. 5. Serve & Enjoy: Let the bake cool for a few minutes before serving. Enjoy it as a side dish or a stand-alone meal!

Notes

  • Make it Extra Crispy: Add breadcrumbs or grated Parmesan on top before baking.
  • Add Protein: Mix in cooked chicken, turkey, or tofu for a more filling dish.
  • Low-Carb Option: Swap potatoes for cauliflower to reduce the carbs.
  • Dairy-Free Alternative: Use plant-based milk, butter, and cheese for a vegan-friendly version.
  • Storage Tips: Store leftovers in an airtight container in the fridge for up to 3 days. Reheat in the oven at 350°F (175°C) for 10 minutes.

Savory Ham & Cheese Crustless Quiche: A Light Yet Satisfying Dish

Few dishes strike the perfect balance between being light yet satisfying, simple yet elegant, and easy yet flavorful like the Savory Ham & Cheese Crustless Quiche. This dish is a staple in many kitchens because of its versatility, rich taste, and effortless preparation. Unlike traditional quiches, which require a pastry crust, this version eliminates the extra carbohydrates while still delivering the creamy, custard-like texture that makes quiche so irresistible.

Perfect for breakfast, brunch, or even a light dinner, this quiche is packed with fluffy eggs, savory ham, melty cheese, and a touch of parmesan for added depth of flavor. It’s an excellent choice for those following a low-carb, keto, or gluten-free diet, and it can be customized in countless ways to suit different preferences.

Whether you’re preparing a meal for guests, looking for an easy meal prep option, or simply want a delicious homemade dish with minimal effort, this crustless quiche is a must-try. In this article, we’ll explore why it’s such a great recipe, its nutritional benefits, different variations, and some frequently asked questions to help you master the dish.

Why This Crustless Quiche Stands Out

1. A Low-Carb Alternative to Traditional Quiche

Traditional quiches include a buttery, flaky crust, which, while delicious, adds extra calories and carbohydrates. By removing the crust, this version becomes a lighter, lower-carb option, making it perfect for those on a keto or gluten-free diet. The result is a dish that’s just as satisfying but without the heaviness of a pastry base.

2. Incredibly Easy to Make

This recipe is practically foolproof. No rolling dough, no blind baking, and no complicated steps—just whisk, pour, and bake. It requires minimal prep time and can be thrown together in minutes, making it ideal for busy mornings or last-minute meals.

3. Great for Meal Prep

One of the best things about this quiche is that it stores well and reheats beautifully. It can be made ahead of time, stored in the fridge for several days, and quickly reheated for a grab-and-go breakfast or lunch. This makes it a fantastic meal prep option for those who like to plan their meals in advance.

4. Packed with Protein and Flavor

With eggs, ham, and cheese as its primary ingredients, this quiche is loaded with high-quality protein, keeping you full and energized for hours. The combination of cheddar and parmesan gives it a rich, cheesy flavor, while the ham adds a savory, slightly smoky taste that complements the eggs perfectly.

5. Completely Customizable

This quiche serves as a blank canvas, allowing you to get creative with different ingredients. You can add vegetables, swap out the cheese, or use different meats to suit your taste. Whether you prefer a classic ham and cheese version or want to experiment with new flavors, the possibilities are endless.

Ingredients

IngredientQuantity
Eggs6 large
Milk (or half-and-half)1 cup (240ml)
Sour cream (optional)1/4 cup (60ml)
Cheddar cheese (shredded)1 cup (100g)
Diced ham1 cup (100g)
Parmesan cheese (grated)1/4 cup (25g)
Diced onion1/2 cup (50g)
Salt½ teaspoon
Black pepper¼ teaspoon
Butter (for greasing)1 teaspoon

Directions

Step 1: Preheat & Prepare

Preheat your oven to 375°F (190°C). Grease a 9-inch pie dish or baking dish with butter to prevent sticking.

Step 2: Mix the Egg Base

In a large mixing bowl, whisk together the eggs, milk (or half-and-half), sour cream (if using), salt, and black pepper until smooth.

Step 3: Add the Fillings

Stir in the diced ham, diced onion, shredded cheddar, and grated Parmesan until evenly combined.

Step 4: Bake the Quiche

Pour the mixture into the greased baking dish and spread it out evenly. Bake for 25–30 minutes, or until the center is set and the top is lightly golden.

Step 5: Serve & Enjoy

Let the quiche cool for a few minutes before slicing. Serve warm and enjoy on its own or with a fresh salad for a complete meal.

Nutritional Information (Per Serving)

NutrientAmount (Approx.)
Calories250 kcal
Protein18g
Carbohydrates4g
Fat18g
Fiber0.5g
Sugar2g
Sodium450mg

Nutritional Benefits of Key Ingredients

Eggs: A Nutrient-Dense Superfood

Eggs are one of the most nutrient-dense foods available, packed with high-quality protein, healthy fats, vitamins, and minerals. They are an excellent source of vitamin B12, choline, and selenium, which support brain function, metabolism, and immune health. Eggs also contain lutein and zeaxanthin, which promote good eye health.

Ham: A Lean Protein Option

Ham is a great source of protein, essential for muscle growth and repair. It also provides important nutrients like iron, zinc, and B vitamins. If you’re looking for a leaner option, choose low-sodium or uncured ham to reduce added preservatives and sodium intake.

Cheddar and Parmesan Cheese: A Boost of Calcium and Flavor

Cheddar cheese adds a rich, creamy texture, while parmesan provides a slightly nutty, salty depth of flavor. Both cheeses are high in calcium, which is essential for strong bones and teeth. They also contribute protein and healthy fats, making the quiche more satisfying.

Onions: A Natural Flavor Enhancer

Onions not only add a subtle sweetness to the dish but are also rich in antioxidants and fiber, which help support digestion and reduce inflammation.

Milk or Half-and-Half: Creamy and Light

Using milk or half-and-half gives the quiche its light, custard-like texture. Half-and-half will result in a creamier, richer quiche, while milk keeps it slightly lighter and lower in fat.

Variations to Try

1. Vegetarian Version

If you prefer a meat-free version, simply leave out the ham and add sautéed mushrooms, spinach, roasted bell peppers, or zucchini.

2. Spicy Kick

For those who enjoy a little heat, add chopped jalapeños, a pinch of red pepper flakes, or a dash of hot sauce to the egg mixture.

3. Mediterranean-Inspired

Swap the cheddar for feta cheese, and add cherry tomatoes, olives, and fresh basil for a Mediterranean twist.

4. Low-Calorie Option

To make the quiche even lighter, use skim milk instead of half-and-half, and reduce the amount of cheese slightly.

5. Mini Quiches for On-the-Go

Instead of baking in a pie dish, divide the mixture into muffin tins and bake for individual-sized mini quiches—perfect for meal prepping or packed lunches.

Frequently Asked Questions (FAQs)

1. Can I Make This Quiche Ahead of Time?

Yes! This quiche can be prepared in advance, stored in the fridge for up to 4 days, and reheated when needed. It’s great for meal prep and quick breakfasts.

2. How Do I Store Leftovers?

Store leftovers in an airtight container in the refrigerator for up to 4 days. Reheat in the oven at 300°F (150°C) for about 10 minutes or in the microwave for 1–2 minutes.

3. Can I Freeze This Quiche?

Yes! Allow the quiche to cool completely, then wrap it tightly in plastic wrap and aluminum foil. Freeze for up to 3 months. When ready to eat, thaw in the refrigerator overnight and reheat in the oven.

4. What Can I Serve with This Quiche?

This quiche pairs well with:

  • A fresh green salad with a light vinaigrette
  • Roasted vegetables like asparagus or Brussels sprouts
  • A side of fresh fruit for a balanced meal

5. Can I Use Different Types of Cheese?

Absolutely! While cheddar and parmesan work great, you can also try Swiss, feta, gouda, or pepper jack for a unique flavor.

Conclusion: A Delicious and Effortless Dish for Any Occasion

The Savory Ham & Cheese Crustless Quiche is an easy, delicious, and versatile recipe that fits into any meal plan. Whether you’re making it for brunch with friends, a quick weekday breakfast, or a light dinner, it’s guaranteed to impress.

With its fluffy texture, rich cheesy flavor, and protein-packed goodness, this quiche is satisfying while still being light enough to enjoy anytime. Plus, with countless variations and customizations, you can make it your own.

Try this crustless quiche today, and discover why it’s a timeless favorite that belongs in every home cook’s recipe collection.

Amal

Savory Ham & Cheese Crustless Quiche: A Light Yet Satisfying Dish

This Savory Ham & Cheese Crustless Quiche is light, fluffy, and packed with rich flavors. Made without a crust, it’s naturally low in carbs while still delivering the creamy, cheesy goodness of a classic quiche. Perfect for breakfast, brunch, or a quick dinner, this dish is easy to prepare, reheats beautifully, and is completely customizable to your taste. Serve it warm for a comforting and satisfying meal!
Prep Time 10 minutes
Cook Time 30 minutes
Total Time 40 minutes
Servings: 4 –6 servings
Course: Breakfast
Cuisine: French-inspired

Ingredients
  

  • 6 large eggs
  • 1 cup 240ml milk (or half-and-half for a richer texture)
  • ¼ cup 60ml sour cream (optional for extra creaminess)
  • 1 cup 100g shredded cheddar cheese
  • 1 cup 100g diced ham
  • ¼ cup 25g grated Parmesan cheese
  • ½ cup 50g diced onion
  • ½ teaspoon salt
  • ¼ teaspoon black pepper
  • 1 teaspoon butter for greasing

Method
 

  1. 1. Preheat the Oven: Preheat your oven to 375°F (190°C). Grease a 9-inch pie dish or baking dish with butter to prevent sticking.
  2. 2. Prepare the Egg Mixture: In a large mixing bowl, whisk together the eggs, milk (or half-and-half), sour cream (if using), salt, and black pepper until smooth and well combined.
  3. 3. Add the Fillings: Stir in the diced ham, diced onion, shredded cheddar cheese, and grated Parmesan cheese until evenly distributed.
  4. 4. Pour and Bake: Pour the mixture into the greased baking dish and spread it evenly. Bake for 25–30 minutes, or until the quiche is golden brown and the center is set.
  5. 5. Let Cool & Serve: Allow the quiche to cool for a few minutes before slicing. Serve warm and enjoy!

Notes

  • Make it Dairy-Free: Swap milk for almond milk or oat milk and use dairy-free cheese.
  • Add Vegetables: Sautéed spinach, mushrooms, or roasted bell peppers make great additions.
  • Make it Spicy: Add red pepper flakes or diced jalapeños for a kick.
  • Storage & Reheating: Store leftovers in an airtight container in the fridge for up to 4 days. Reheat in the oven at 300°F (150°C) for 10 minutes or in the microwave for 1–2 minutes.

Cheesy Tortilla Egg Skillet: A Quick and Satisfying Meal

Fast, flavorful, and made with simple ingredients, the Cheesy Tortilla Egg Skillet is the ultimate go-to meal when you need something delicious in minutes. With just one tortilla, eggs, mozzarella, fresh tomatoes, and green onions, you can create a dish that is crispy on the outside, cheesy on the inside, and packed with savory goodness.

Unlike traditional omelets or breakfast wraps, this recipe combines the best of both worlds. The eggs serve as a rich and fluffy base, while the tortilla creates a crispy, golden crust. The addition of melted mozzarella and fresh vegetables brings out a balanced combination of flavors that work well for breakfast, lunch, or even a light dinner.

Whether you’re cooking for yourself, preparing a quick meal for the family, or looking for a creative way to enjoy tortillas and eggs, this dish is a must-try. It’s easy, budget-friendly, and highly customizable, making it a staple for busy mornings and weeknights alike.

Why This Cheesy Tortilla Egg Skillet Stands Out

1. Minimal Ingredients, Maximum Flavor

One of the biggest advantages of this recipe is its simplicity. Using just a handful of basic ingredients—many of which you probably already have in your kitchen—you can create a satisfying meal that feels gourmet. The key is in the balance of textures: crispy tortilla, soft eggs, and melty cheese all working together in perfect harmony.

2. Ready in Just 15 Minutes

Unlike complicated breakfast recipes that require multiple steps and a long list of ingredients, this dish comes together in just 15 minutes. It’s perfect for those mornings when you’re short on time but still want something homemade and nourishing.

3. A Versatile Anytime Meal

While this dish is commonly enjoyed as a hearty breakfast, it also makes for a quick lunch, dinner, or even a late-night snack. It pairs well with a side salad, avocado slices, or a cup of soup, making it a well-rounded meal at any time of the day.

4. Highly Customizable to Suit Your Taste

One of the best aspects of this dish is its versatility. You can tweak the recipe to suit your preferences by adding different cheeses, vegetables, or proteins. Whether you want a spicy kick with chili flakes, a Mediterranean twist with feta and olives, or a protein boost with shredded chicken, the possibilities are endless.

Ingredients

IngredientQuantity
Tortilla1
Eggs3
SaltTo taste
Black pepperTo taste
Oregano½ teaspoon
Tomato (sliced)1
Mozzarella (grated)80g (about ¾ cup)
Green onions (chopped)2 stalks

Directions

Step 1: Prepare the Egg Mixture

  1. In a bowl, beat the eggs with salt, black pepper, and oregano.

Step 2: Cook the Eggs

  1. Heat a non-stick pan over medium heat. Pour the egg mixture into the pan, covering the surface evenly.
  2. Let it cook for about 1–2 minutes until it begins to set.

Step 3: Add the Tortilla & Toppings

  1. Place the tortilla directly on top of the eggs while they are still slightly wet. Gently press it down.
  2. Flip the tortilla so the egg side is now facing up.

Step 4: Add Cheese & Vegetables

  1. Sprinkle mozzarella, then add tomato slices and green onions evenly over the surface.

Step 5: Cook Until Crispy

  1. Cover the pan with a lid and cook for another 3–4 minutes, allowing the cheese to melt and the tortilla to crisp up.

Step 6: Serve & Enjoy

  1. Remove from the pan, slice into wedges, and serve immediately!

Nutritional Information (Per Serving)

NutrientAmount (Approx.)
Calories380 kcal
Protein22g
Carbohydrates30g
Fat18g
Fiber3g
Sugar4g
Sodium550mg

Nutritional Benefits of the Key Ingredients

This dish isn’t just quick and delicious—it’s also packed with nutrients. Here’s how the main ingredients contribute to a balanced meal:

Eggs: A Protein Powerhouse

Eggs are an excellent source of high-quality protein, providing essential amino acids that help build and repair tissues. They are also rich in vitamin B12, choline, and healthy fats, which support brain function and energy levels.

Tortilla: A Good Source of Carbohydrates

The tortilla in this dish serves as a great source of carbohydrates, providing the energy needed to fuel your body. For a healthier option, you can use whole wheat tortillas for added fiber and nutrients.

Mozzarella Cheese: A Calcium-Rich Addition

Mozzarella is lower in fat compared to other cheeses while still offering a creamy, melt-in-your-mouth texture. It is a great source of calcium, protein, and essential vitamins that contribute to bone health and muscle function.

Tomatoes: A Natural Antioxidant Boost

Tomatoes are rich in vitamin C, potassium, and lycopene, a powerful antioxidant that supports heart health and reduces inflammation. Their natural acidity balances the richness of the cheese, adding a refreshing touch to the dish.

Green Onions: A Flavor Enhancer with Health Benefits

Green onions provide a mild yet savory flavor while offering essential nutrients like vitamin K, vitamin C, and fiber. They also contain antioxidants that support immune health.

Popular Variations to Try

1. Spicy Mexican-Inspired Version

For a bold and flavorful twist, add jalapeños, a sprinkle of chili flakes, and crumbled queso fresco. Serve with a dollop of guacamole or salsa for extra heat and freshness.

2. Mediterranean Style

Swap the mozzarella for crumbled feta cheese and add chopped black olives, sun-dried tomatoes, and fresh basil. This version offers a light, tangy flavor profile inspired by Mediterranean cuisine.

3. High-Protein Boost

To make this dish even more protein-rich, add some shredded chicken, turkey, or smoked salmon. This turns the meal into a more filling and satisfying option, perfect for post-workout recovery.

4. Low-Carb and Keto-Friendly Alternative

If you’re following a low-carb or keto diet, replace the tortilla with a thin layer of almond flour flatbread or use a cheese-based crust instead. This keeps the dish low in carbs while maintaining the delicious cheesy and eggy texture.

5. Vegan-Friendly Adaptation

For a dairy-free and egg-free version, replace the eggs with a mixture of chickpea flour and water (also known as a vegan omelet). Use dairy-free cheese and add sautéed mushrooms, spinach, or avocado for a plant-based alternative.

Frequently Asked Questions (FAQs)

1. Can I Use a Different Type of Cheese?

Yes! While mozzarella provides a mild and creamy melt, you can experiment with cheddar, gouda, feta, or pepper jack for different flavors and textures.

2. How Can I Make the Tortilla Extra Crispy?

To achieve an ultra-crispy tortilla, cook it over medium-low heat for a few extra minutes with a lid on. This allows the cheese to fully melt while the tortilla firms up without burning.

3. Can I Make This Dish Ahead of Time?

Yes! You can prepare the egg mixture in advance and store it in the fridge for up to 24 hours. When ready to eat, simply cook the eggs and tortilla fresh for the best texture and flavor.

4. What Are the Best Side Dishes to Serve With This?

This dish pairs well with:

  • A fresh green salad with a light vinaigrette
  • Avocado slices or guacamole for a creamy contrast
  • Greek yogurt or sour cream as a tangy dipping sauce
  • A smoothie or fresh juice for a complete breakfast meal

5. Can I Bake This Instead of Cooking on a Stovetop?

Yes! You can bake the dish in the oven at 375°F (190°C) for 10–12 minutes or until the cheese is fully melted and the tortilla is crispy.

6. Can I Use Corn Tortillas Instead of Flour Tortillas?

Flour tortillas work best for this dish because they crisp up beautifully while remaining pliable. However, if you prefer corn tortillas, you can still use them, but expect a slightly firmer texture.

Conclusion: A Must-Try Recipe for Busy Days

The Cheesy Tortilla Egg Skillet is a game-changer when it comes to quick, easy, and satisfying meals. Whether you need a fast breakfast, a light lunch, or a simple dinner, this recipe has you covered. Its versatility allows you to experiment with flavors, toppings, and protein sources, making it suitable for everyone.

With minimal prep time, simple ingredients, and a short cooking process, this dish is perfect for those who want something homemade without the hassle. Try it today and discover why this one-tortilla recipe is tastier than pizza and incredibly delicious at any time of day!

Amal

Cheesy Tortilla Egg Skillet: A Quick and Satisfying Meal

With just one tortilla, eggs, and a handful of simple ingredients, this Cheesy Tortilla Egg Skillet is the perfect quick and delicious meal. Crispy on the outside, cheesy and flavorful on the inside, this dish comes together in just 15 minutes, making it ideal for breakfast, lunch, or dinner. Whether you’re looking for a hearty start to your day or a light yet satisfying meal, this recipe delivers on both taste and convenience.
Prep Time 5 minutes
Cook Time 10 minutes
Total Time 15 minutes
Servings: 1 serving
Course: Lunch
Cuisine: International

Ingredients
  

  • 1 tortilla
  • 3 eggs
  • Salt to taste
  • Black pepper to taste
  • ½ teaspoon oregano
  • 1 tomato sliced
  • 80 g about ¾ cup mozzarella cheese, shredded
  • 2 green onions chopped

Method
 

  1. 1. Prepare the Egg Mixture: In a bowl, beat the eggs with salt, black pepper, and oregano until well combined.
  2. 2. Cook the Eggs: Heat a non-stick pan over medium heat and pour in the egg mixture, ensuring it covers the entire pan. Let it cook for 1–2 minutes until it starts to set.
  3. 3. Add the Tortilla: Place the tortilla directly on top of the eggs while they are still slightly wet. Gently press it down to stick to the eggs. After 30 seconds, carefully flip the tortilla so the egg side is facing up.
  4. 4. Add the Toppings: Sprinkle the shredded mozzarella cheese over the surface, then add the sliced tomatoes and chopped green onions evenly across the tortilla.
  5. 5. Cook Until Golden and Crispy: Cover the pan with a lid and cook for 3–4 minutes until the cheese melts and the tortilla becomes crispy.
  6. 6. Serve & Enjoy: Remove from the pan, slice into wedges, and serve immediately. Enjoy it on its own or with your favorite dipping sauce.

Notes

  • Make it Spicy: Add red pepper flakes or a drizzle of hot sauce for an extra kick.
  • Add More Protein: Toss in some shredded chicken, turkey, or crispy bacon.
  • Healthier Option: Use a whole wheat tortilla and reduce the cheese for a lighter version.
  • Dairy-Free Alternative: Swap mozzarella for a plant-based cheese alternative or omit the cheese altogether.
  • Storage Tip: Best enjoyed fresh, but you can refrigerate leftovers and reheat in a pan for a crispy texture.

Crispy Cheesy Chicken & Potato Patties: A Flavorful and Satisfying Dish

Few dishes strike the perfect balance between crispy, cheesy, and savory like Crispy Cheesy Chicken & Potato Patties. These golden-brown delights combine the heartiness of chicken, the comforting texture of potatoes, and the indulgence of melted cheddar and mozzarella. Whether served as a main course, a side dish, or a satisfying snack, these patties offer a rich flavor and a crunchy exterior that keeps you coming back for more.

This recipe is a versatile favorite, appealing to both adults and kids alike. It’s perfect for a quick weeknight meal, a weekend gathering, or even as a meal prep option for busy days. With simple, everyday ingredients and a straightforward cooking method, anyone can master these patties at home.

In this article, we’ll explore what makes these chicken and potato patties special, their nutritional benefits, variations to suit different tastes and diets, and frequently asked questions to help you perfect the recipe.

Why These Chicken & Potato Patties Stand Out

1. A Perfectly Crispy and Cheesy Texture

The combination of grated potatoes and cheese gives these patties an irresistible texture. The starch from the potatoes creates a crispy crust when pan-fried, while the melted cheddar and mozzarella add a gooey, cheesy center. The result? A contrast of crunchy and creamy in every bite.

2. A Protein-Packed, Wholesome Meal

These patties aren’t just about great taste—they’re also packed with protein from the chicken, making them a satisfying and nutritious meal. The potatoes add natural carbohydrates, keeping you energized, while the cheese brings in healthy fats and calcium for a well-rounded dish.

3. An Easy and Budget-Friendly Dish

With just a handful of ingredients—many of which you probably already have in your kitchen—this recipe is both economical and convenient. Chicken, potatoes, eggs, cheese, and basic seasonings are all you need to create a restaurant-quality meal at home.

4. Customizable for Different Diets

One of the best aspects of this recipe is its versatility. Whether you prefer a healthier, gluten-free, or vegetarian alternative, there are countless ways to tweak the ingredients while still achieving the same delicious results.

Ingredients

For the Patties

IngredientQuantity
Potatoes (peeled & grated)3 medium
Chicken fillet (finely chopped or minced)300g
Eggs3
All-purpose flour3 tablespoons
Bell peppers (chopped)3 (any colors)
Onions (finely chopped)2
Fresh parsley (chopped)1 tablespoon
Cheddar cheese (shredded)100g
Mozzarella cheese (shredded)100g
Garlic powder1 teaspoon
Paprika1 teaspoon
Black pepper½ teaspoon
Salt½ teaspoon
Olive oil (for frying)2 tablespoons

Directions

Step 1: Prepare the Ingredients

  • Peel and grate the potatoes, then squeeze out excess moisture using a clean kitchen towel or paper towel.
  • Finely chop or mince the chicken fillet.

Step 2: Mix the Pattie Mixture

  • In a large bowl, combine the grated potatoes, minced chicken, eggs, flour, bell peppers, onions, and parsley.
  • Add the cheddar and mozzarella cheese, along with the garlic powder, paprika, salt, and black pepper.
  • Mix everything thoroughly until well combined.

Step 3: Shape the Patties

  • Take a small portion of the mixture and shape it into a patty. Repeat with the rest of the mixture.

Step 4: Fry the Patties

  • Heat olive oil in a large pan over medium heat.
  • Place the patties in the pan, making sure not to overcrowd them.
  • Fry each side for 3–4 minutes, or until golden brown and crispy.
  • Transfer to a plate lined with paper towels to remove excess oil.

Step 5: Serve & Enjoy

  • Serve hot with sour cream, garlic sauce, or your favorite dip. Enjoy!

Nutritional Information (Per Serving)

NutrientAmount (Approx.)
Calories320 kcal
Protein22g
Carbohydrates25g
Fat15g
Fiber3g
Sugar4g
Sodium450mg

Nutritional Benefits of the Key Ingredients

Chicken: A Lean Protein Powerhouse

Chicken is an excellent source of lean protein, essential for muscle growth, tissue repair, and immune function. It’s also packed with B vitamins, which help with energy production and brain function. Using chicken in this recipe keeps the patties light yet satisfying.

Potatoes: A Natural Source of Energy

Potatoes often get a bad reputation, but they are actually a great source of fiber, vitamins, and minerals. They provide complex carbohydrates, which offer sustained energy without causing blood sugar spikes. Potatoes are also rich in vitamin C, potassium, and antioxidants.

Cheddar and Mozzarella: A Creamy, Calcium-Rich Addition

Cheese adds depth of flavor and richness to these patties. Both cheddar and mozzarella are excellent sources of calcium, protein, and essential fats. Mozzarella, in particular, has a mild, creamy taste that perfectly complements the stronger, sharper notes of cheddar.

Bell Peppers and Onions: A Burst of Flavor and Nutrients

Bell peppers add a pop of color and a subtle sweetness to the patties. They are loaded with vitamin C, which supports immune health and collagen production. Onions enhance the savory profile while providing antioxidants and anti-inflammatory benefits.

Eggs and Flour: The Binding Agents

Eggs play a crucial role in holding the patties together while adding extra protein. Flour helps create structure, ensuring the patties don’t fall apart while cooking. Both ingredients contribute to the patties’ firm yet tender texture.

Popular Variations to Try

1. Healthier Baked Version

Instead of frying, you can bake the patties in the oven at 400°F (200°C) for about 25 minutes, flipping halfway through. This method reduces oil usage while still achieving a crispy exterior.

2. Gluten-Free Alternative

To make these patties gluten-free, replace the all-purpose flour with almond flour, chickpea flour, or gluten-free breadcrumbs. These alternatives work just as well to bind the ingredients while adding a slightly different texture.

3. Spicy Kick Variation

If you enjoy a little heat, add a pinch of red pepper flakes, cayenne pepper, or diced jalapeños to the mixture. This will give the patties a spicy, bold flavor without overpowering the cheesy goodness.

4. Dairy-Free Option

For a dairy-free version, omit the cheese or use dairy-free alternatives like nutritional yeast or plant-based cheese. The patties will still be flavorful, with the added bonus of being lighter.

5. Vegetarian Twist

To make a vegetarian version, replace the chicken with grated zucchini, mashed chickpeas, or tofu. This substitution creates a different but equally delicious patty while maintaining the crispy texture.

FAQs: Everything You Need to Know About These Patties

1. Can I Make the Mixture Ahead of Time?

Yes! You can prepare the patty mixture in advance and store it in the refrigerator for up to 24 hours before frying. This makes it a great option for meal prep or quick dinners.

2. How Do I Prevent the Patties from Falling Apart?

If the patties are too crumbly, add an extra egg or a bit more flour to help bind them together. Make sure the potatoes are well-drained before mixing them in, as excess moisture can cause the patties to break apart.

3. What’s the Best Way to Store Leftovers?

Store cooked patties in an airtight container in the refrigerator for up to four days. To reheat, place them in a pan over medium heat or warm them in the oven to retain their crispiness.

4. Can I Freeze These Patties?

Yes! You can freeze the uncooked patties on a baking sheet until firm, then transfer them to a freezer-safe bag. When ready to cook, simply thaw them in the refrigerator overnight and fry as usual.

5. What Are the Best Dipping Sauces to Serve with These Patties?

These patties pair well with a variety of dips, including garlic yogurt sauce, ranch dressing, honey mustard, spicy aioli, or classic ketchup. The dipping sauce can enhance the flavor and add an extra layer of deliciousness.

6. Can I Use Other Types of Meat?

Absolutely! Ground turkey or minced beef can be used instead of chicken for a different flavor profile. Just keep in mind that the cooking time may vary slightly depending on the type of meat used.

7. How Can I Make the Patties Extra Crispy?

For an even crispier texture, coat the patties with a light layer of breadcrumbs before frying. Panko breadcrumbs work especially well to add crunch without making them too heavy.

Conclusion: A Must-Try Recipe for Any Occasion

Crispy, cheesy, and incredibly flavorful, these Chicken & Potato Patties are a fantastic addition to any meal. Whether you’re making them for a family dinner, a party appetizer, or meal prepping for the week, they offer both convenience and indulgence in one dish.

Their versatility makes them a great fit for various dietary preferences, and with a few simple adjustments, they can be adapted to suit different tastes. With their golden-brown crust, tender center, and rich cheesy goodness, these patties prove that simple ingredients can create something truly delicious.

Try making them today, and enjoy a crispy, comforting dish that will quickly become a household favorite!

Amal

Crispy Cheesy Chicken & Potato Patties: A Flavorful and Satisfying Dish

These Crispy Cheesy Chicken & Potato Patties are packed with juicy chicken, tender potatoes, and melty cheddar and mozzarella, all pan-fried to golden perfection. With a crunchy exterior and a rich, cheesy center, these patties make the perfect appetizer, side dish, or light main course. Easy to prepare and incredibly flavorful, they’re a must-try for any cheese and chicken lover!
Prep Time 20 minutes
Cook Time 20 minutes
Total Time 40 minutes
Servings: 4 –6 servings
Course: Main Dish
Cuisine: International

Ingredients
  

  • 3 medium potatoes peeled and grated
  • 300 g chicken fillet finely chopped or minced
  • 3 eggs
  • 3 tablespoons all-purpose flour
  • 3 bell peppers chopped (choose your preferred colors)
  • 2 onions finely chopped
  • 1 tablespoon fresh parsley chopped
  • 100 g cheddar cheese shredded
  • 100 g mozzarella cheese shredded
  • 1 teaspoon garlic powder
  • 1 teaspoon paprika
  • ½ teaspoon black pepper
  • ½ teaspoon salt
  • 2 tablespoons olive oil for frying

Method
 

  1. 1. Prepare the Ingredients: Peel and grate the potatoes, then squeeze out any excess moisture using a clean kitchen towel. Finely chop or mince the chicken fillet.
  2. 2. Mix the Patty Mixture: In a large bowl, combine the grated potatoes, minced chicken, eggs, flour, bell peppers, onions, and parsley. Add the cheddar and mozzarella cheese, garlic powder, paprika, salt, and black pepper. Mix well until fully combined.
  3. 3. Shape the Patties: Take a small portion of the mixture and shape it into a round patty. Repeat with the remaining mixture.
  4. 4. Cook the Patties: Heat olive oil in a large pan over medium heat. Place the patties in the pan without overcrowding them. Fry each side for 3–4 minutes, or until golden brown and crispy. Remove from the pan and drain excess oil on a paper towel.
  5. 5. Serve & Enjoy: Serve warm with your favorite dipping sauce, such as garlic yogurt sauce, ranch dressing, or spicy aioli.

Notes

  • For a Healthier Option: Bake the patties at 400°F (200°C) for 25 minutes, flipping halfway through for a crispier, oil-free version.
  • Make it Gluten-Free: Swap the all-purpose flour for almond flour or gluten-free breadcrumbs.
  • Add More Flavor: Sprinkle in some grated Parmesan or fresh herbs like dill or basil for a richer taste.
  • Storage: Store leftovers in an airtight container in the refrigerator for up to 4 days or freeze for up to 3 months. Reheat in a pan or oven to maintain crispiness.
  • Serving Suggestions: Enjoy with a fresh salad, roasted vegetables, or as a filling for sandwiches or wraps.