Decadent S’mores Brownie Bliss

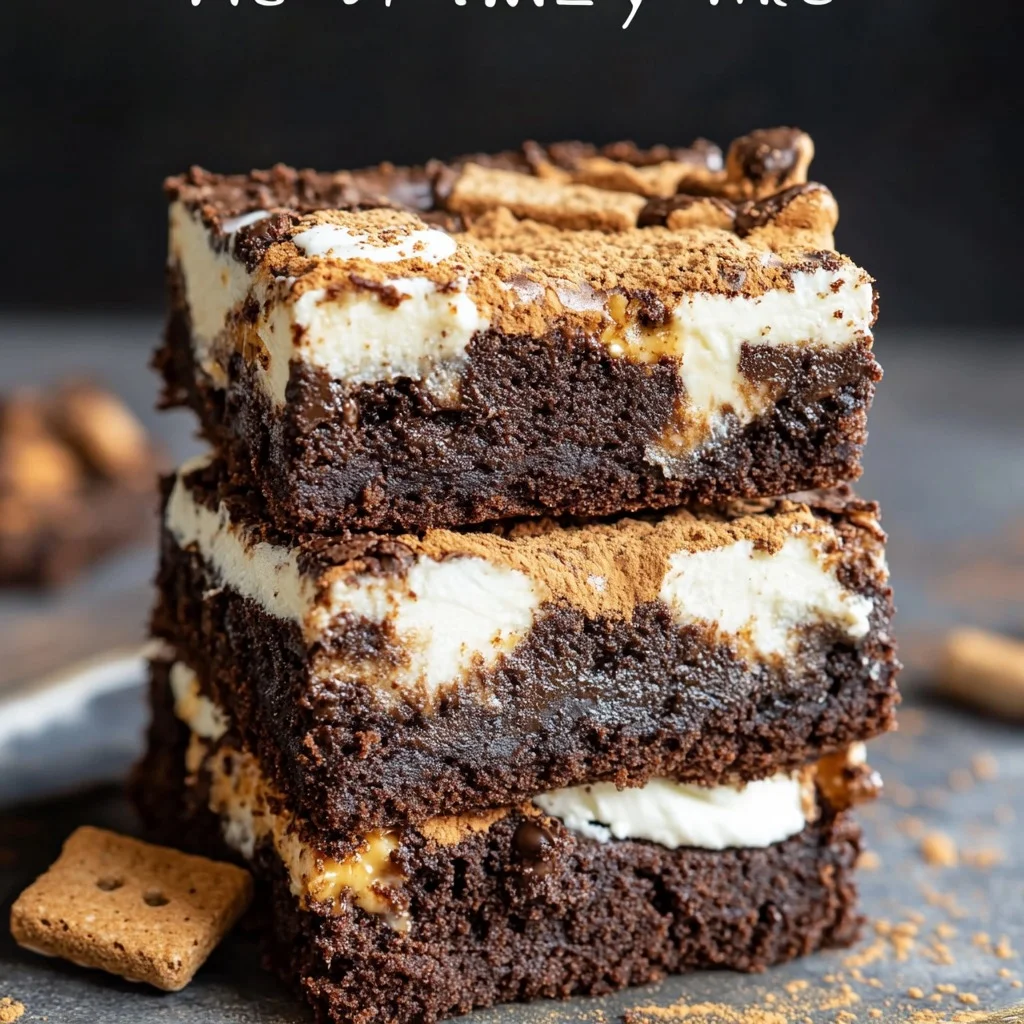
Take your favorite campfire treat to the next level with these Decadent S’mores Brownie Bliss bars. Combining the nostalgic flavors of gooey marshmallows, crispy graham crackers, and rich chocolate, this dessert is a show-stopping twist on the classic s’mores. Perfectly layered and bursting with indulgent flavors, these brownies are the ultimate crowd-pleaser for any gathering, party, or even a cozy night at home. Let’s turn your kitchen into a s’mores-making paradise—no campfire required!

Ingredients

Refrigerated :

  • 2 large eggs

Baking & Spices :

  • 1/2 cup all-purpose flour
  • 1/4 teaspoon baking powder
  • 1/2 cup bittersweet chocolate chips
  • 1/2 cup unsweetened cocoa powder
  • 2 tablespoons granulated sugar
  • 1 cup sugar
  • 1/2 teaspoon salt
  • 1 teaspoon vanilla extract

Oils & Vinegars :

  • 1/2 cup vegetable oil

Snacks :

  • 12 full-size graham crackers

Dairy :

  • 6 tablespoons unsalted butter

Desserts :

  • 2 heaping cups mini marshmallows

Instructions

  1. Preheat and Prep: Preheat your oven to 350°F (175°C). Line a 9×13-inch baking pan with parchment paper, leaving an overhang for easy removal. Grease lightly.
  2. Prepare Graham Cracker Base: Arrange the full-size graham crackers in a single layer on the bottom of the pan, breaking them as needed to fit.
  3. Make the Brownie Batter: In a mixing bowl, whisk together the cocoa powder, sugar, vegetable oil, and melted butter until smooth. Add the eggs and vanilla extract, mixing until combined. Sift in the flour, baking powder, and salt. Stir until the batter is smooth and no lumps remain. Fold in the bittersweet chocolate chips for extra bursts of chocolate.
  4. Layer the Brownies: Pour the brownie batter evenly over the graham cracker layer, smoothing the top with a spatula.
  5. Bake the Brownies: Place the pan in the oven and bake for 25–30 minutes, or until a toothpick inserted into the center comes out with a few moist crumbs.
  6. Add Marshmallow Topping: Remove the brownies from the oven and quickly scatter the mini marshmallows evenly over the top. Turn on your oven’s broiler setting and return the pan to the oven for 1–2 minutes, just until the marshmallows are golden and toasted. Keep a close eye to prevent burning.
  7. Cool and Serve: Allow the brownies to cool completely in the pan. Use the parchment overhang to lift the brownies out and place them on a cutting board. Slice into squares and enjoy!

Conclusion

These Decadent S’mores Brownie Bliss bars bring the magic of campfire s’mores right into your kitchen. With layers of crispy graham crackers, rich brownie, and perfectly toasted marshmallows, every bite is a heavenly combination of textures and flavors. Easy to prepare and endlessly delicious, they’ll quickly become your go-to dessert for any occasion. Enjoy these sweet, chocolatey treats with family and friends, or savor them all to yourself. Happy baking!

Decadent S’mores Brownie Bliss

Rich and fudgy brownies layered with crispygraham crackers and gooey marshmallows to create the ultimate S'mores Brownieexperience.
Prep Time 15 minutes
Cook Time 35 minutes
Total Time 50 minutes
Servings: 12 brownies
Course: Dessert
Cuisine: American
Calories: 200

Ingredients
  

  • 2 large eggs
  • 1/2 cup all-purpose flour
  • 1/4 teaspoon baking powder
  • 1/2 cup bittersweet chocolate chips
  • 1/2 cup unsweetened cocoa powder
  • 2 tablespoons granulated sugar
  • 1 cup sugar
  • 1/2 teaspoon salt
  • 1 teaspoon vanilla extract
  • 1/2 cup vegetable oil
  • 12 full-size graham crackers
  • 6 tablespoons unsalted butter
  • 2 heaping cups mini marshmallows

Method
 

  1. Preheat and Prep: Preheat your oven to 350°F (175°C). Line a 9×13-inch baking pan with parchment paper, leaving an overhang for easy removal. Grease lightly.
  2. Prepare Graham Cracker Base: Arrange the full-size graham crackers in a single layer on the bottom of the pan, breaking them as needed to fit.
  3. Make the Brownie Batter: In a mixing bowl, whisk together the cocoa powder, sugar, vegetable oil, and melted butter until smooth. Add the eggs and vanilla extract, mixing until combined. Sift in the flour, baking powder, and salt. Stir until the batter is smooth and no lumps remain. Fold in the bittersweet chocolate chips for extra bursts of chocolate.
  4. Layer the Brownies: Pour the brownie batter evenly over the graham cracker layer, smoothing the top with a spatula.
  5. Bake the Brownies: Place the pan in the oven and bake for 25–30 minutes, or until a toothpick inserted into the center comes out with a few moist crumbs.
  6. Add Marshmallow Topping: Remove the brownies from the oven and quickly scatter the mini marshmallows evenly over the top. Turn on your oven’s broiler setting and return the pan to the oven for 1–2 minutes, just until the marshmallows are golden and toasted. Keep a close eye to prevent burning.
  7. Cool and Serve: Allow the brownies to cool completely in the pan. Use the parchment overhang to lift the brownies out and place them on a cutting board. Slice into squares and enjoy!

Creamy Peanut Butter Banana Bliss Smoothie

Start your day with this nutritious and creamy Peanut Butter Banana Bliss Smoothie. Packed with protein, calcium, and potassium, this smoothie is the perfect combination of flavors and nutrients to energize your morning or fuel your afternoon snack break. With just a few simple ingredients and five minutes of your time, you’ll have a delightful drink that’s as tasty as it is wholesome. Whether you’re rushing out the door or enjoying a slow morning, this smoothie is a quick, healthy, and satisfying option.

Ingredients

  • 1/2 cup milk of choice (almond, oat, dairy, etc.)
  • 1/2 cup Greek yogurt (plain or vanilla)
  • 1/2 banana (fresh or frozen)
  • 1 tablespoon peanut butter (creamy or crunchy)
  • Optional: 1 teaspoon honey for extra sweetness

Instructions

  1. Prepare the Ingredients: Slice the banana if using fresh, or use frozen chunks for a thicker smoothie. Measure out the Greek yogurt, milk, and peanut butter.
  2. Combine in Blender: Add all ingredients to a blender, starting with the milk to ensure a smooth blend.
  3. Blend Until Creamy: Blend on high for about 30-60 seconds, or until the mixture is smooth and creamy. Add more milk if you prefer a thinner consistency.
  4. Taste and Adjust: Taste the smoothie and, if desired, add the optional honey for extra sweetness. Blend again briefly to combine.
  5. Serve and Enjoy: Pour the smoothie into a glass and enjoy immediately. You can garnish with a sprinkle of cinnamon, a drizzle of peanut butter, or even a few banana slices for extra flair.

Conclusion

This Peanut Butter Banana Bliss Smoothie is proof that delicious and healthy can go hand-in-hand. With its creamy texture and balanced flavors, it’s a recipe you’ll want to keep on repeat. Perfect for busy mornings, post-workout recovery, or a quick snack, this smoothie is not only quick to make but also highly versatile. Customize it with your favorite milk or add-ins, and sip your way to satisfaction. Enjoy your creamy bliss in every sip!

Creamy Peanut Butter Banana Bliss Smoothie

A creamy and delicious Peanut Butter Banana BlissSmoothie that combines Greek yogurt, peanut butter, and banana for aprotein-packed, nutrient-rich treat. Perfect for breakfast or as a snack.
Prep Time 5 minutes
Total Time 5 minutes
Servings: 1
Course: Breakfast
Cuisine: American
Calories: 250

Ingredients
  

  • 1/2 cup milk of choice almond, oat, dairy, etc.
  • 1/2 cup Greek yogurt plain or vanilla
  • 1/2 banana fresh or frozen
  • 1 tablespoon peanut butter creamy or crunchy
  • Optional: 1 teaspoon honey for extra sweetness

Method
 

  1. Prepare the Ingredients: Slice the banana if using fresh, or use frozen chunks for a thicker smoothie. Measure out the Greek yogurt, milk, and peanut butter.
  2. Combine in Blender: Add all ingredients to a blender, starting with the milk to ensure a smooth blend.
  3. Blend Until Creamy: Blend on high for about 30-60 seconds, or until the mixture is smooth and creamy. Add more milk if you prefer a thinner consistency.
  4. Taste and Adjust: Taste the smoothie and, if desired, add the optional honey for extra sweetness. Blend again briefly to combine.
  5. Serve and Enjoy: Pour the smoothie into a glass and enjoy immediately. You can garnish with a sprinkle of cinnamon, a drizzle of peanut butter, or even a few banana slices for extra flair.

Street Corn Chicken Rice Bowl: A Flavorful Fiesta in a Bowl

Looking for a dinner that’s packed with bold flavors, textures, and a bit of heat? This Street Corn Chicken Rice Bowl is a culinary celebration inspired by the beloved Mexican street corn (elote). Tender, spiced chicken thighs are paired with a creamy, zesty street corn topping and served over fluffy rice. This dish is not only satisfying but also quick and easy to assemble, making it a great option for weeknight meals or even meal prep. One bite, and you’ll be transported to a lively street food market!

Ingredients

For the Chicken:

  • 4 chicken thighs, boneless and skinless
  • 1 tbsp lime juice
  • 1 tbsp avocado oil
  • 1 tsp chili powder
  • ½ tsp garlic powder
  • ½ tsp salt
  • ¼ tsp black pepper

For the Street Corn Topping:

  • 1 cup sweet corn kernels (grilled, if possible – frozen works too)
  • ¼ cup thinly sliced red onion
  • ½ cup sour cream
  • 2 tbsp mayonnaise
  • ½ cup Cotija cheese, crumbled (plus extra for garnish)
  • 1 tsp chili powder
  • Salt and pepper, to taste
  • 1 lime, cut into wedges

For the Rice and Assembly:

  • 3 cups cooked rice
  • Fresh cilantro, for garnish

Instructions

  1. Marinate the Chicken : In a bowl, combine lime juice, avocado oil, chili powder, garlic powder, salt, and pepper. Add the chicken thighs, tossing to coat evenly. Let marinate for 10-15 minutes while preparing other ingredients.
  2. Cook the Chicken : Heat a large skillet over medium-high heat. Add the marinated chicken and cook for 4-5 minutes per side, or until the chicken is cooked through and golden brown. Remove from heat and let rest for a few minutes before slicing into strips.
  3. Prepare the Corn : If using frozen corn, thaw and dry it well. Grill the corn kernels in a skillet or on a grill until lightly charred, or use them as-is for convenience.
  4. Combine Ingredients : In a bowl, mix the grilled corn with red onion, sour cream, mayonnaise, Cotija cheese, and chili powder. Season with salt and pepper to taste. Squeeze a little lime juice into the mixture for extra zing.
  5. Prepare the Rice : Divide the cooked rice evenly into serving bowls.
  6. Top with Chicken and Corn : Arrange the sliced chicken thighs over the rice, then generously spoon the street corn topping over the chicken.
  7. Garnish and Serve : Garnish with fresh cilantro and additional Cotija cheese. Serve with lime wedges on the side for an extra burst of flavor.

Conclusion

This Street Corn Chicken Rice Bowl is a true crowd-pleaser, combining smoky, spiced chicken with the creamy and tangy street corn topping, all served over a bed of fluffy rice. It’s colorful, nutritious, and packed with flavor in every bite. Whether you’re feeding the family or meal prepping for the week, this bowl is guaranteed to be a hit. Try it once, and it’ll become a staple in your recipe collection!

Street Corn Chicken Rice Bowl: A Flavorful Fiesta in a Bowl

The Street Corn Chicken Rice Bowl is a vibrant mealfeaturing spiced chicken, creamy street corn, and fluffy rice, garnished withCotija cheese and cilantro for a perfect balance of flavors and textures.
Prep Time 15 minutes
Cook Time 20 minutes
Total Time 35 minutes
Servings: 4 bowls
Course: Main Course
Cuisine: Mexican-inspired
Calories: 450

Ingredients
  

For the Chicken:
  • 4 chicken thighs boneless and skinless
  • 1 tbsp lime juice
  • 1 tbsp avocado oil
  • 1 tsp chili powder
  • ½ tsp garlic powder
  • ½ tsp salt
  • ¼ tsp black pepper
For the Street Corn Topping:
  • 1 cup sweet corn kernels grilled, if possible – frozen works too
  • ¼ cup thinly sliced red onion
  • ½ cup sour cream
  • 2 tbsp mayonnaise
  • ½ cup Cotija cheese crumbled (plus extra for garnish)
  • 1 tsp chili powder
  • Salt and pepper to taste
  • 1 lime cut into wedges
For the Rice and Assembly:
  • 3 cups cooked rice
  • Fresh cilantro for garnish

Method
 

  1. Marinate the Chicken : In a bowl, combine lime juice, avocado oil, chili powder, garlic powder, salt, and pepper. Add the chicken thighs, tossing to coat evenly. Let marinate for 10-15 minutes while preparing other ingredients.
  2. Cook the Chicken : Heat a large skillet over medium-high heat. Add the marinated chicken and cook for 4-5 minutes per side, or until the chicken is cooked through and golden brown. Remove from heat and let rest for a few minutes before slicing into strips.
  3. Prepare the Corn : If using frozen corn, thaw and dry it well. Grill the corn kernels in a skillet or on a grill until lightly charred, or use them as-is for convenience.
  4. Combine Ingredients : In a bowl, mix the grilled corn with red onion, sour cream, mayonnaise, Cotija cheese, and chili powder. Season with salt and pepper to taste. Squeeze a little lime juice into the mixture for extra zing.
  5. Prepare the Rice : Divide the cooked rice evenly into serving bowls.
  6. Top with Chicken and Corn : Arrange the sliced chicken thighs over the rice, then generously spoon the street corn topping over the chicken.
  7. Garnish and Serve : Garnish with fresh cilantro and additional Cotija cheese. Serve with lime wedges on the side for an extra burst of flavor.

Decadent Dulce de Leche Cheesecake Bars: A Sweet Treat

Looking for the perfect dessert that combines creamy richness with a caramel twist? These Dulce de Leche Cheesecake Bars are the answer to your sweet cravings. With a buttery graham cracker crust, a silky cheesecake layer, and a luscious dulce de leche topping, every bite is pure indulgence. Perfect for gatherings, celebrations, or just a treat-yourself moment, these bars are surprisingly easy to make and deliver bakery-level flavor right from your kitchen!

Ingredients

Refrigerated

  • 3 large eggs

Condiments

  • 1 1/4 cups dulce de leche

Baking & Spices

  • 1/4 tsp ground cinnamon
  • Fleur de sel, for garnish
  • 18 tbsp sugar
  • 2 tsp vanilla extract

Oils & Vinegars

  • Nonstick spray

Snacks

  • 2 1/4 cups graham crackers, finely ground

Dairy

  • 10 tbsp butter, melted
  • 3 (8-ounce) packages cream cheese, softened
  • 3 tbsp heavy whipping cream

Instructions

  1. Prepare the Crust : Preheat the oven to 350°F (175°C). Line a 9×13-inch baking dish with parchment paper and lightly coat with nonstick spray. In a mixing bowl, combine the finely ground graham crackers, 6 tablespoons of sugar, 1/4 teaspoon cinnamon, and melted butter. Mix until the crumbs are evenly moistened. Press the mixture firmly into the bottom of the prepared baking dish to form an even crust. Bake for 10 minutes, then set aside to cool.
  2. Make the Cheesecake Filling : In a large bowl, beat the softened cream cheese and remaining 12 tablespoons of sugar using an electric mixer until smooth and creamy. Add the eggs, one at a time, mixing well after each addition. Stir in the vanilla extract and heavy whipping cream until fully incorporated.
  3. Assemble and Bake : Pour the cheesecake filling over the pre-baked crust, spreading it evenly. Drop dollops of 1/2 cup of dulce de leche on top of the cheesecake layer and swirl it gently with a knife for a marbled effect. Bake for 30-35 minutes, or until the center is set and slightly jiggles when shaken.
  4. Cool and Add Topping : Let the cheesecake cool completely at room temperature, then refrigerate for at least 4 hours (preferably overnight). Before serving, spread the remaining dulce de leche evenly over the top. Sprinkle with fleur de sel for a hint of salty contrast.
  5. Slice and Serve : Using a sharp knife, cut the chilled cheesecake into bars. Serve chilled and enjoy the creamy, caramelized goodness!

Conclusion

These Dulce de Leche Cheesecake Bars are the perfect combination of buttery, creamy, and sweet. The rich flavors of dulce de leche and the light touch of fleur de sel make this dessert truly unforgettable. Whether you’re hosting a dinner party or just treating yourself to something special, these cheesecake bars are guaranteed to impress. Simple to make and indulgent to eat, they’ll quickly become a go-to recipe for all your dessert needs!

Decadent Dulce de Leche Cheesecake Bars: A Sweet Treat

Dulce de Leche Cheesecake Bars are a rich,indulgent dessert with a graham cracker crust, creamy cheesecake filling, and asweet dulce de leche topping.
Prep Time 20 minutes
Cook Time 35 minutes
Resting Time 6 hours
Total Time 6 hours 55 minutes
Servings: 16 Bars
Course: Dessert
Cuisine: American
Calories: 300

Ingredients
  

Refrigerated :
  • 3 large eggs
Condiments :
  • 1 1/4 cups dulce de leche
Baking & Spices :
  • 1/4 tsp ground cinnamon
  • Fleur de sel for garnish
  • 18 tbsp sugar
  • 2 tsp vanilla extract
Oils & Vinegars :
  • Nonstick spray
Snacks :
  • 2 1/4 cups graham crackers finely ground
Dairy :
  • 10 tbsp butter melted
  • 3 8-ounce packages cream cheese, softened
  • 3 tbsp heavy whipping cream

Method
 

  1. Prepare the Crust : Preheat the oven to 350°F (175°C). Line a 9×13-inch baking dish with parchment paper and lightly coat with nonstick spray. In a mixing bowl, combine the finely ground graham crackers, 6 tablespoons of sugar, 1/4 teaspoon cinnamon, and melted butter. Mix until the crumbs are evenly moistened. Press the mixture firmly into the bottom of the prepared baking dish to form an even crust. Bake for 10 minutes, then set aside to cool.
  2. Make the Cheesecake Filling : In a large bowl, beat the softened cream cheese and remaining 12 tablespoons of sugar using an electric mixer until smooth and creamy. Add the eggs, one at a time, mixing well after each addition. Stir in the vanilla extract and heavy whipping cream until fully incorporated.
  3. Assemble and Bake : Pour the cheesecake filling over the pre-baked crust, spreading it evenly. Drop dollops of 1/2 cup of dulce de leche on top of the cheesecake layer and swirl it gently with a knife for a marbled effect. Bake for 30-35 minutes, or until the center is set and slightly jiggles when shaken.
  4. Cool and Add Topping : Let the cheesecake cool completely at room temperature, then refrigerate for at least 4 hours (preferably overnight). Before serving, spread the remaining dulce de leche evenly over the top. Sprinkle with fleur de sel for a hint of salty contrast.
  5. Slice and Serve : Using a sharp knife, cut the chilled cheesecake into bars. Serve chilled and enjoy the creamy, caramelized goodness!

Fluffy Breakfast Pigs in a Blanket: A Morning Delight

Start your day with a delightful twist on a classic favorite! These Breakfast Pigs in a Blanket combine savory breakfast sausage links with a light, fluffy homemade blanket of pancake dough. Perfectly sweetened with a hint of vanilla and sugar, these bite-sized morning treats are ideal for brunch, on-the-go breakfasts, or even a fun family activity. This recipe brings together simple pantry ingredients to create a comforting and delicious meal that will leave everyone asking for more.

Ingredients

Meat

  • 12 breakfast sausage links, cooked

Refrigerated

  • 1 large egg
  • 1 tsp vanilla extract

Baking & Spices

  • 1 1/2 cups all-purpose flour
  • 4 tsp baking powder
  • 2 tbsp granulated sugar
  • 1/2 tsp fine sea salt

Dairy

  • 4 tbsp unsalted butter, melted
  • 1 1/3 cups buttermilk

Instructions

  1. Prepare the Pancake Batter : In a large bowl, whisk together the all-purpose flour, baking powder, sugar, and sea salt. In a separate bowl, whisk the buttermilk, egg, vanilla extract, and melted butter until combined. Gradually add the wet ingredients to the dry ingredients, mixing until smooth and lump-free.
  2. Preheat and Prep : Preheat a non-stick skillet or griddle over medium heat and grease lightly with butter or cooking spray. Allow the batter to rest for 5 minutes while the skillet heats up.
  3. Cook the Sausages : If not already cooked, brown the breakfast sausage links in the skillet until fully cooked through. Remove and set aside.
  4. Wrap the Sausages : Pour a small scoop of batter onto the skillet, forming a rectangle slightly larger than the sausage link. Quickly place a sausage link in the center of the batter before it sets. Use a spatula to gently fold the batter around the sausage as it cooks, creating a “blanket.” Flip carefully and cook until golden brown on both sides. Repeat with the remaining sausages and batter.
  5. Serve Warm : Serve your Breakfast Pigs in a Blanket warm with a drizzle of maple syrup, a dusting of powdered sugar, or your favorite breakfast sides.

Conclusion

Why settle for ordinary pancakes or plain sausages when you can combine them into a delightful, portable breakfast? These Breakfast Pigs in a Blanket are a perfect fusion of sweet and savory that will please kids and adults alike. Made with pantry staples and fresh sausages, this recipe is as satisfying to make as it is to eat. Whether for a family breakfast or a brunch gathering, this dish is sure to brighten everyone’s morning!

Fluffy Breakfast Pigs in a Blanket: A Morning Delight

Fluffy Breakfast Pigs in a Blanket are savorysausage links wrapped in a light, sweet homemade pancake batter, making themthe perfect morning treat for breakfast or brunch!
Prep Time 10 minutes
Cook Time 20 minutes
Total Time 30 minutes
Servings: 12
Course: Breakfast
Cuisine: American
Calories: 250

Ingredients
  

  • 12 breakfast sausage links cooked
  • 1 large egg
  • 1 tsp vanilla extract
  • 1 1/2 cups all-purpose flour
  • 4 tsp baking powder
  • 2 tbsp granulated sugar
  • 1/2 tsp fine sea salt
  • 4 tbsp unsalted butter melted
  • 1 1/3 cups buttermilk

Method
 

  1. Prepare the Pancake Batter : In a large bowl, whisk together the all-purpose flour, baking powder, sugar, and sea salt. In a separate bowl, whisk the buttermilk, egg, vanilla extract, and melted butter until combined. Gradually add the wet ingredients to the dry ingredients, mixing until smooth and lump-free.
  2. Preheat and Prep : Preheat a non-stick skillet or griddle over medium heat and grease lightly with butter or cooking spray. Allow the batter to rest for 5 minutes while the skillet heats up.
  3. Cook the Sausages : If not already cooked, brown the breakfast sausage links in the skillet until fully cooked through. Remove and set aside.
  4. Wrap the Sausages : Pour a small scoop of batter onto the skillet, forming a rectangle slightly larger than the sausage link. Quickly place a sausage link in the center of the batter before it sets. Use a spatula to gently fold the batter around the sausage as it cooks, creating a “blanket.” Flip carefully and cook until golden brown on both sides. Repeat with the remaining sausages and batter.
  5. Serve Warm : Serve your Breakfast Pigs in a Blanket warm with a drizzle of maple syrup, a dusting of powdered sugar, or your favorite breakfast sides.

Cheesy Garlic Bliss Bombs: A Decadent Burger Delight

Imagine biting into a golden, flaky crust, only to uncover a savory, cheesy, and garlicky burst of flavor. These Cheesy Garlic Bliss Bombs take the humble cheeseburger to a whole new level by combining tender beef, creamy Parmesan, sharp cheddar, and aromatic garlic into a self-contained snack. Perfect for parties, quick dinners, or game nights, these bombs are a fun and creative twist on your everyday burger. Quick to make and budget-friendly, they’ll leave everyone asking for seconds (or thirds)!

Ingredients

  • 1 lb ground beef
  • 2 cloves garlic, minced
  • 1/2 cup Parmesan cheese, diced
  • 1 cup cheddar cheese, cubed
  • 1 can (16.3 oz) biscuit dough (e.g., Pillsbury Grands)
  • 2 tbsp butter, melted
  • 1 tbsp parsley, chopped (optional for garnish)

Instructions

  1. Prepare the Beef Filling : In a skillet over medium heat, cook the ground beef until browned, breaking it into crumbles. Drain excess grease. Add minced garlic and sauté for 1-2 minutes until fragrant. Remove from heat and let the mixture cool slightly.
  2. Assemble the Bombs : Flatten each biscuit dough piece into a 4-inch circle. Place a small spoonful of the beef mixture in the center of each circle. Add one cube of cheddar cheese and a small piece of diced Parmesan to the center. Fold the dough around the filling, pinching edges tightly to seal. Roll gently into a ball.
  3. Bake to Perfection : Preheat the oven to 375°F (190°C). Place the prepared balls seam-side down on a baking sheet lined with parchment paper. Brush each bomb with melted butter and sprinkle with chopped parsley for extra flavor.
  4. Bake and Serve : Bake for 15-18 minutes or until golden brown and puffed. Let cool slightly before serving. Enjoy the cheesy, garlicky goodness with your favorite dipping sauces like marinara, ranch, or BBQ sauce!

Conclusion

With minimal prep and maximum flavor, these Cheesy Garlic Bliss Bombs are sure to become a new family favorite. Whether you’re hosting a party, feeding picky eaters, or just treating yourself, these bombs are a surefire hit. Every bite offers a perfect balance of crispy dough, juicy beef, and gooey cheese. So, roll up your sleeves and enjoy this playful take on comfort food that’s as easy to make as it is to devour!

Cheesy Garlic Bliss Bombs: A Decadent Burger Delight

Cheesy Garlic Bliss Bombs are a fun, handheld twiston a cheeseburger, featuring ground beef, garlic, Parmesan, cheddar, andbiscuit dough, baked to golden perfection. Perfect for snacking or mealtime!
Prep Time 15 minutes
Cook Time 20 minutes
Total Time 35 minutes
Servings: 8
Course: Snack
Cuisine: American
Calories: 300

Ingredients
  

  • 1 lb ground beef
  • 2 cloves garlic minced
  • 1/2 cup Parmesan cheese diced
  • 1 cup cheddar cheese cubed
  • 1 can 16.3 oz biscuit dough (e.g., Pillsbury Grands)
  • 2 tbsp butter melted
  • 1 tbsp parsley chopped (optional for garnish)

Method
 

  1. Prepare the Beef Filling : In a skillet over medium heat, cook the ground beef until browned, breaking it into crumbles. Drain excess grease. Add minced garlic and sauté for 1-2 minutes until fragrant. Remove from heat and let the mixture cool slightly.
  2. Assemble the Bombs : Flatten each biscuit dough piece into a 4-inch circle. Place a small spoonful of the beef mixture in the center of each circle. Add one cube of cheddar cheese and a small piece of diced Parmesan to the center. Fold the dough around the filling, pinching edges tightly to seal. Roll gently into a ball.
  3. Bake to Perfection : Preheat the oven to 375°F (190°C). Place the prepared balls seam-side down on a baking sheet lined with parchment paper. Brush each bomb with melted butter and sprinkle with chopped parsley for extra flavor.
  4. Bake and Serve : Bake for 15-18 minutes or until golden brown and puffed. Let cool slightly before serving. Enjoy the cheesy, garlicky goodness with your favorite dipping sauces like marinara, ranch, or BBQ sauce!

White Chocolate Raspberry Cookies: A Sweet and Tangy Treat

If you’re a fan of the classic flavor combination of white chocolate and raspberries, you’re in for a treat! These White Chocolate Raspberry Cookies are a delightful blend of sweet and tangy flavors with a soft and chewy texture. Bursting with freeze-dried raspberries, creamy white chocolate chips, and a hint of raspberry jam, these cookies are perfect for special occasions or a simple indulgent snack.

Ingredients:

  • 1⅔ cups (210g) all-purpose flour
  • 1 teaspoon baking powder (preferably aluminum-free)
  • ½ teaspoon baking soda
  • ¼ teaspoon salt
  • ½ cup (113g) unsalted butter, softened to cool room temperature
  • ¼ cup (55g) packed light brown sugar (fresh and soft)
  • ½ cup (100g) granulated sugar
  • 1 large egg (cold, straight from the fridge)
  • ¾ teaspoon pure vanilla extract
  • ¼ teaspoon almond extract
  • 1 cup freeze-dried raspberries
  • ⅔ cup (110g) white chocolate chips or chunks
  • ¼ cup (80g) raspberry jam

Instructions:

  1. Prepare the Dry Ingredients : In a medium-sized mixing bowl, whisk together the all-purpose flour, baking powder, baking soda, and salt. Set aside.
  2. Cream the Butter and Sugars : In a large bowl, use a hand or stand mixer to beat the softened butter, brown sugar, and granulated sugar together until light and fluffy (about 2–3 minutes).
  3. Add the Wet Ingredients : Mix in the cold egg, vanilla extract, and almond extract until fully combined. The mixture may look slightly curdled, but that’s normal.
  4. Combine Wet and Dry Ingredients : Gradually add the dry ingredients to the wet ingredients and mix on low speed until just combined. Do not overmix.
  5. Fold in the Mix-ins : Gently fold in the freeze-dried raspberries and white chocolate chips, being careful not to crush the raspberries too much. Chill the dough in the refrigerator for at least 30 minutes to allow the flavors to develop and prevent spreading during baking.
  6. Shape the Cookies : Preheat the oven to 350°F (175°C) and line a baking sheet with parchment paper. Scoop about 1.5 tablespoons of dough for each cookie and place it on the baking sheet, leaving about 2 inches of space between each cookie. Using a small spoon, create a shallow well in the center of each cookie and fill it with a small dollop of raspberry jam.
  7. Bake : Bake the cookies for 10–12 minutes or until the edges are lightly golden but the centers still look slightly underbaked. Remove from the oven and let the cookies cool on the baking sheet for 5 minutes before transferring them to a wire rack to cool completely.

Conclusion:

These White Chocolate Raspberry Cookies are a heavenly blend of flavors and textures. The tartness of the freeze-dried raspberries balances perfectly with the sweetness of the white chocolate, while the raspberry jam adds a delicious fruity burst. Whether you’re baking for friends, family, or yourself, these cookies are sure to impress!

White Chocolate Raspberry Cookies: A Sweet and Tangy Treat

Soft and chewy White Chocolate Raspberry Cookiesfeaturing freeze-dried raspberries, white chocolate chunks, and a swirl ofraspberry jam for a burst of flavor in every bite.
Prep Time 15 minutes
Cook Time 35 minutes
Total Time 50 minutes
Servings: 18 cookies
Course: Dessert
Cuisine: American
Calories: 150

Ingredients
  

  • 1⅔ cups 210g all-purpose flour
  • 1 teaspoon baking powder preferably aluminum-free
  • ½ teaspoon baking soda
  • ¼ teaspoon salt
  • ½ cup 113g unsalted butter, softened to cool room temperature
  • ¼ cup 55g packed light brown sugar (fresh and soft)
  • ½ cup 100g granulated sugar
  • 1 large egg cold, straight from the fridge
  • ¾ teaspoon pure vanilla extract
  • ¼ teaspoon almond extract
  • 1 cup freeze-dried raspberries
  • cup 110g white chocolate chips or chunks
  • ¼ cup 80g raspberry jam

Method
 

  1. Prepare the Dry Ingredients : In a medium-sized mixing bowl, whisk together the all-purpose flour, baking powder, baking soda, and salt. Set aside.
  2. Cream the Butter and Sugars : In a large bowl, use a hand or stand mixer to beat the softened butter, brown sugar, and granulated sugar together until light and fluffy (about 2–3 minutes).
  3. Add the Wet Ingredients : Mix in the cold egg, vanilla extract, and almond extract until fully combined. The mixture may look slightly curdled, but that’s normal.
  4. Combine Wet and Dry Ingredients : Gradually add the dry ingredients to the wet ingredients and mix on low speed until just combined. Do not overmix.
  5. Fold in the Mix-ins : Gently fold in the freeze-dried raspberries and white chocolate chips, being careful not to crush the raspberries too much. Chill the dough in the refrigerator for at least 30 minutes to allow the flavors to develop and prevent spreading during baking.
  6. Shape the Cookies : Preheat the oven to 350°F (175°C) and line a baking sheet with parchment paper. Scoop about 1.5 tablespoons of dough for each cookie and place it on the baking sheet, leaving about 2 inches of space between each cookie. Using a small spoon, create a shallow well in the center of each cookie and fill it with a small dollop of raspberry jam.
  7. Bake : Bake the cookies for 10–12 minutes or until the edges are lightly golden but the centers still look slightly underbaked. Remove from the oven and let the cookies cool on the baking sheet for 5 minutes before transferring them to a wire rack to cool completely.

Oven-Fried Southern Hot Honey Popcorn Chicken

Indulge in the ultimate comfort food with this Oven-Fried Southern Hot Honey Popcorn Chicken. This crispy, flavorful dish is a healthier take on the classic deep-fried popcorn chicken. Coated in crunchy corn flakes and seasoned with a fiery blend of spices, it’s finished with a drizzle of sweet and spicy hot honey sauce for the perfect balance of flavors. Perfect for family dinners, game nights, or as a party appetizer, this recipe is sure to impress!

Ingredients:

  • 2 lbs boneless chicken breasts, cut into bite-sized pieces
  • 4 cloves garlic, minced
  • 1/2 tsp chili flakes
  • 1/2 tsp onion powder
  • 1 egg
  • 1 1/4 cups corn flakes, crushed
  • 3 tbsp honey
  • 2 tbsp flour
  • 1 1/2 tsp smoked paprika
  • 1 tsp chili powder
  • 1 tsp cayenne pepper
  • Kosher salt and black pepper, to taste
  • Extra virgin olive oil (for baking)
  • 6 tbsp salted butter, melted

Instructions:

  1. Prep the Chicken : Preheat your oven to 400°F (200°C) and line a baking sheet with parchment paper. Spray the parchment with olive oil for added crispiness. In a large bowl, toss the bite-sized chicken pieces with 1/2 tsp onion powder, 1/2 tsp chili flakes, and a pinch of salt and pepper. Let it sit for 5 minutes to absorb the seasoning.
  2. Make the Breading : In a shallow bowl, whisk the egg with 1 tbsp of water. In a separate bowl, combine the crushed corn flakes, 1 1/2 tsp smoked paprika, 1 tsp chili powder, 1 tsp cayenne pepper, 2 tbsp flour, and a pinch of salt and pepper.
  3. Coat the Chicken : Dip each piece of chicken into the egg mixture, then roll it in the cornflake mixture, ensuring it’s evenly coated. Place the coated chicken pieces on the prepared baking sheet, leaving space between each piece.
  4. Bake the Chicken : Lightly spray or drizzle the coated chicken with olive oil to help it crisp up in the oven. Bake for 18–22 minutes, flipping the chicken halfway through, until golden brown and cooked through.
  5. Make the Hot Honey : In a small saucepan over low heat, combine 3 tbsp honey, 6 tbsp melted butter, 1 tsp cayenne pepper, and the minced garlic. Stir until well combined and warmed through. Remove from heat and drizzle the hot honey mixture over the baked popcorn chicken.
  6. Serve and Enjoy : Garnish with a sprinkle of chili flakes for extra heat if desired. Serve the hot honey popcorn chicken with your favorite dipping sauces or alongside a fresh salad for a complete meal.

Conclusion:

This Oven-Fried Southern Hot Honey Popcorn Chicken is a deliciously crispy and spicy dish that’s baked, not fried, making it a healthier choice without sacrificing flavor. The combination of the crunchy coating and the sweet, spicy hot honey drizzle is irresistibly good. Perfect as a snack, appetizer, or main course, this recipe is sure to become a family favorite.

Oven-Fried Southern Hot Honey Popcorn Chicken

Crispy oven-fried popcorn chicken coated in a spicyseasoning blend and drizzled with sweet and spicy hot honey for a flavor-packeddish that’s perfect for any occasion.
Prep Time 20 minutes
Cook Time 20 minutes
Total Time 40 minutes
Servings: 6
Course: Main Course
Cuisine: Southern-inspired
Calories: 350

Ingredients
  

  • 2 lbs boneless chicken breasts cut into bite-sized pieces
  • 4 cloves garlic minced
  • 1/2 tsp chili flakes
  • 1/2 tsp onion powder
  • 1 egg
  • 1 1/4 cups corn flakes crushed
  • 3 tbsp honey
  • 2 tbsp flour
  • 1 1/2 tsp smoked paprika
  • 1 tsp chili powder
  • 1 tsp cayenne pepper
  • Kosher salt and black pepper to taste
  • Extra virgin olive oil for baking
  • 6 tbsp salted butter melted

Method
 

  1. Prep the Chicken : Preheat your oven to 400°F (200°C) and line a baking sheet with parchment paper. Spray the parchment with olive oil for added crispiness. In a large bowl, toss the bite-sized chicken pieces with 1/2 tsp onion powder, 1/2 tsp chili flakes, and a pinch of salt and pepper. Let it sit for 5 minutes to absorb the seasoning.
  2. Make the Breading : In a shallow bowl, whisk the egg with 1 tbsp of water. In a separate bowl, combine the crushed corn flakes, 1 1/2 tsp smoked paprika, 1 tsp chili powder, 1 tsp cayenne pepper, 2 tbsp flour, and a pinch of salt and pepper.
  3. Coat the Chicken : Dip each piece of chicken into the egg mixture, then roll it in the cornflake mixture, ensuring it’s evenly coated. Place the coated chicken pieces on the prepared baking sheet, leaving space between each piece.
  4. Bake the Chicken : Lightly spray or drizzle the coated chicken with olive oil to help it crisp up in the oven. Bake for 18–22 minutes, flipping the chicken halfway through, until golden brown and cooked through.
  5. Make the Hot Honey : In a small saucepan over low heat, combine 3 tbsp honey, 6 tbsp melted butter, 1 tsp cayenne pepper, and the minced garlic. Stir until well combined and warmed through. Remove from heat and drizzle the hot honey mixture over the baked popcorn chicken.
  6. Serve and Enjoy : Garnish with a sprinkle of chili flakes for extra heat if desired. Serve the hot honey popcorn chicken with your favorite dipping sauces or alongside a fresh salad for a complete meal.

Keto Stir Fry: A Quick and Healthy Low-Carb Recipe

Enjoy a quick, healthy, and keto-friendly meal with this delicious stir fry recipe. Packed with tender chicken, fresh vegetables, and a savory low-carb sauce, this dish is a perfect combination of flavor and nutrition. Whether you’re following a ketogenic lifestyle or just looking for a light, satisfying dinner option, this recipe has you covered. Ready in just 30 minutes, it’s the ultimate weeknight meal for busy schedules!

Ingredients:

  • 1 pound chicken breast, chopped
  • 1 tablespoon almond flour or coconut flour (for coating)
  • 1 tablespoon oil (avocado or olive oil recommended)
  • 2 cloves garlic, minced
  • 1/2 inch ginger, minced
  • 1 small onion, chopped
  • 1 head broccoli, chopped
  • 1 large bell pepper, chopped
  • 1 batch keto stir fry sauce (store-bought or homemade)
  • 1 teaspoon sesame oil
  • 2 tablespoons chili sauce (optional, for heat)

Instructions:

  1. Prep the Chicken : Coat the chopped chicken breast with almond flour or coconut flour. This helps give the chicken a light crust and enhances the stir fry texture. Heat 1 tablespoon of oil in a large skillet or wok over medium-high heat. Add the chicken to the skillet and cook for 5–7 minutes, stirring occasionally, until golden brown and cooked through. Remove the chicken and set aside.
  2. Cook the Vegetables : In the same skillet, add a little more oil if needed, and sauté the minced garlic and ginger for 30 seconds until fragrant. Add the chopped onion, broccoli, and bell pepper to the skillet. Stir fry for 4–5 minutes until the vegetables are tender yet still crisp.
  3. Make the Sauce : If making your own keto stir fry sauce, combine soy sauce or tamari, rice vinegar, a low-carb sweetener, and water in a bowl. Add the sauce to the skillet with the vegetables, along with the cooked chicken. Stir in the sesame oil and chili sauce (if desired) for an extra kick of heat.
  4. Combine and Serve : Toss everything together in the skillet, ensuring the sauce coats the chicken and vegetables evenly. Cook for another 2–3 minutes until the sauce thickens slightly. Serve hot as is, or over cauliflower rice for a complete keto-friendly meal.

Conclusion:

This Keto Stir Fry is a versatile and satisfying dish that fits perfectly into a low-carb lifestyle. With tender chicken, vibrant vegetables, and a delicious sauce, it’s a quick and healthy dinner that you can easily customize to your taste. Serve it for lunch or dinner and enjoy a flavorful, guilt-free meal!

Keto Stir Fry: A Quick and Healthy Low-Carb Recipe

A flavorful Keto Stir Fry featuring tender chicken,crisp vegetables, and a savory low-carb sauce. Perfect for a quick and healthydinner option.
Prep Time 10 minutes
Cook Time 15 minutes
Total Time 25 minutes
Servings: 4
Course: Main Course
Cuisine: Asian-inspired
Calories: 350

Ingredients
  

  • 1 pound chicken breast chopped
  • 1 tablespoon almond flour or coconut flour for coating
  • 1 tablespoon oil avocado or olive oil recommended
  • 2 cloves garlic minced
  • 1/2 inch ginger minced
  • 1 small onion chopped
  • 1 head broccoli chopped
  • 1 large bell pepper chopped
  • 1 batch keto stir fry sauce store-bought or homemade
  • 1 teaspoon sesame oil
  • 2 tablespoons chili sauce optional, for heat

Method
 

  1. Prep the Chicken : Coat the chopped chicken breast with almond flour or coconut flour. This helps give the chicken a light crust and enhances the stir fry texture. Heat 1 tablespoon of oil in a large skillet or wok over medium-high heat. Add the chicken to the skillet and cook for 5–7 minutes, stirring occasionally, until golden brown and cooked through. Remove the chicken and set aside.
  2. Cook the Vegetables : In the same skillet, add a little more oil if needed, and sauté the minced garlic and ginger for 30 seconds until fragrant. Add the chopped onion, broccoli, and bell pepper to the skillet. Stir fry for 4–5 minutes until the vegetables are tender yet still crisp.
  3. Make the Sauce : If making your own keto stir fry sauce, combine soy sauce or tamari, rice vinegar, a low-carb sweetener, and water in a bowl. Add the sauce to the skillet with the vegetables, along with the cooked chicken. Stir in the sesame oil and chili sauce (if desired) for an extra kick of heat.
  4. Combine and Serve : Toss everything together in the skillet, ensuring the sauce coats the chicken and vegetables evenly. Cook for another 2–3 minutes until the sauce thickens slightly. Serve hot as is, or over cauliflower rice for a complete keto-friendly meal.

Delightful Lemon Blueberry Shortbread Mousse Cake Recipe

Indulge in the perfect combination of tangy lemon and sweet blueberry flavors with this Lemon Blueberry Shortbread Mousse Cake. This dessert brings together a buttery shortbread crust, a creamy lemon mousse, and a vibrant blueberry topping to create a treat that’s as beautiful as it is delicious. Whether you’re hosting a summer party or just treating yourself, this no-bake dessert is guaranteed to impress everyone.

Ingredients:

Produce :

  • 2 cups fresh blueberries
  • Zest of 2 lemons

Condiments :

  • 9/16 cup fresh lemon juice

Baking & Spices :

  • 3/4 cup granulated sugar
  • 1/2 cup powdered sugar
  • 1 pinch of salt

Dairy :

  • 1/2 cup unsalted butter
  • 8 oz cream cheese
  • 1 cup heavy cream

Desserts :

  • 1 tbsp powdered gelatin

Liquids :

  • 2 tbsp water

Instructions:

  1. Prepare the Shortbread Crust : In a bowl, combine 1/2 cup of unsalted butter, 1/4 cup powdered sugar, and a pinch of salt. Mix until smooth. Gradually add 1 cup of flour and knead into a dough. Press the dough into a greased 9-inch springform pan to form an even layer. Chill the crust in the refrigerator for 20 minutes.
  2. Make the Lemon Mousse : In a small bowl, combine 1 tbsp of gelatin powder with 2 tbsp of water. Let it bloom for 5 minutes. Heat the gelatin mixture over low heat until fully dissolved. Set aside to cool slightly. In a mixing bowl, beat the cream cheese, 1/2 cup powdered sugar, and lemon zest until smooth. Gradually add 9/16 cup of fresh lemon juice and the dissolved gelatin. Mix well. In another bowl, whip 1 cup of heavy cream until stiff peaks form, then gently fold it into the lemon mixture.
  3. Prepare the Blueberry Topping : In a saucepan, combine 2 cups of fresh blueberries, 3/4 cup granulated sugar, and 2 tbsp of water. Cook over medium heat until the blueberries soften and the mixture thickens. Let the mixture cool to room temperature.
  4. Assemble the Cake : Spread the lemon mousse evenly over the shortbread crust. Pour the cooled blueberry mixture on top of the mousse layer, spreading it out evenly. Refrigerate the cake for at least 4 hours or overnight to set.
  5. Serve and Enjoy : Carefully remove the cake from the springform pan. Garnish with additional lemon zest and fresh blueberries if desired. Slice and serve chilled. Enjoy the refreshing combination of lemon and blueberry in every bite!

Conclusion:

This Lemon Blueberry Shortbread Mousse Cake is a delightful dessert that offers a balance of tangy, sweet, and creamy flavors with every bite. The simple preparation process makes it a perfect recipe for both experienced bakers and beginners. Serve it at your next gathering or enjoy it as a special treat for yourself—you’ll find it hard to resist!

Delightful Lemon Blueberry Shortbread Mousse Cake Recipe

A luscious Lemon Blueberry Shortbread Mousse Cakelayered with a buttery crust, creamy lemon mousse, and a fresh blueberrytopping, perfect for any occasion.
Prep Time 30 minutes
Cook Time 10 minutes
Resting Time 4 hours
Total Time 4 hours 40 minutes
Servings: 8
Course: Dessert
Cuisine: American
Calories: 280

Ingredients
  

Produce :
  • 2 cups fresh blueberries
  • Zest of 2 lemons
Condiments :
  • 9/16 cup fresh lemon juice
Baking & Spices :
  • 3/4 cup granulated sugar
  • 1/2 cup powdered sugar
  • 1 pinch of salt
Dairy :
  • 1/2 cup unsalted butter
  • 8 oz cream cheese
  • 1 cup heavy cream
Desserts :
  • 1 tbsp powdered gelatin
Liquids :
  • 2 tbsp water

Method
 

  1. Prepare the Shortbread Crust : In a bowl, combine 1/2 cup of unsalted butter, 1/4 cup powdered sugar, and a pinch of salt. Mix until smooth. Gradually add 1 cup of flour and knead into a dough. Press the dough into a greased 9-inch springform pan to form an even layer. Chill the crust in the refrigerator for 20 minutes.
  2. Make the Lemon Mousse : In a small bowl, combine 1 tbsp of gelatin powder with 2 tbsp of water. Let it bloom for 5 minutes. Heat the gelatin mixture over low heat until fully dissolved. Set aside to cool slightly. In a mixing bowl, beat the cream cheese, 1/2 cup powdered sugar, and lemon zest until smooth. Gradually add 9/16 cup of fresh lemon juice and the dissolved gelatin. Mix well. In another bowl, whip 1 cup of heavy cream until stiff peaks form, then gently fold it into the lemon mixture.
  3. Prepare the Blueberry Topping : In a saucepan, combine 2 cups of fresh blueberries, 3/4 cup granulated sugar, and 2 tbsp of water. Cook over medium heat until the blueberries soften and the mixture thickens. Let the mixture cool to room temperature.
  4. Assemble the Cake : Spread the lemon mousse evenly over the shortbread crust. Pour the cooled blueberry mixture on top of the mousse layer, spreading it out evenly. Refrigerate the cake for at least 4 hours or overnight to set.
  5. Serve and Enjoy : Carefully remove the cake from the springform pan. Garnish with additional lemon zest and fresh blueberries if desired. Slice and serve chilled. Enjoy the refreshing combination of lemon and blueberry in every bite!