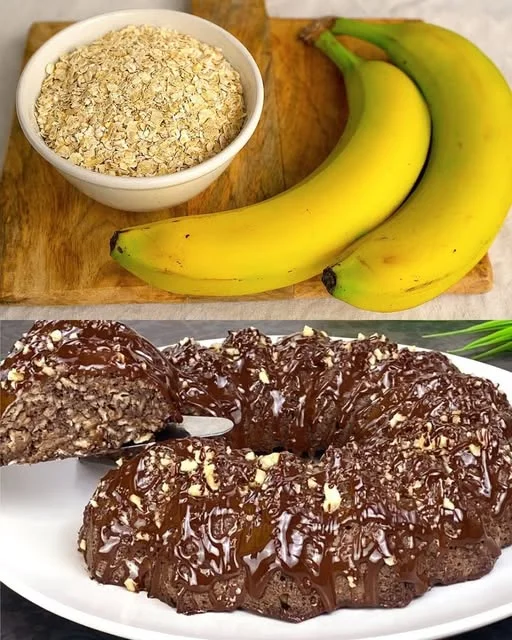
Decadent Oatmeal Banana Brownies – A Guilt-Free Indulgence

The kitchen has always been a sanctuary for me. Growing up, my grandmother used to invite me into her kitchen to help her bake, teaching me not just how to cook, but how to appreciate the love and care that went into making food. It was during one of those cherished afternoons that I learned the power of simple ingredients coming together to create something extraordinary. Over the years, I have reimagined those recipes to align with my healthier lifestyle. The desire to enjoy comfort food without compromising my wellness goals led me to create this oatmeal banana brownie recipe – a recipe that combines the richness of bananas, the heartiness of oats, and the satisfying crunch of walnuts, all while keeping it light and low in calories.

What started as a personal experiment to create a healthier dessert has evolved into one of my favorite go-to recipes. These oatmeal banana brownies are not just a treat; they are a reminder that indulgence doesn’t have to be packed with guilt. Whether you’re watching your weight or just looking for a healthier alternative to traditional brownies, this recipe is perfect for anyone who loves to satisfy their sweet tooth without sacrificing their health goals.

Why This Recipe Works: A Perfect Balance of Taste and Nutrition

At the heart of this recipe is the perfect balance of wholesome ingredients. Unlike many traditional brownies that rely on butter, sugar, and refined flour, these brownies are crafted from ingredients that nourish your body. Oatmeal serves as the base, providing fiber that supports digestion and helps keep you feeling full for longer. Bananas not only contribute natural sweetness but also offer potassium and vitamins that boost energy and maintain healthy blood pressure.

The addition of walnuts adds a satisfying crunch while providing healthy fats, protein, and omega-3 fatty acids, making these brownies a much better choice than the typical dessert. When combined with cocoa powder and a hint of vanilla extract, the result is a decadent treat that won’t leave you feeling sluggish or guilty.

What’s more, these brownies are easy to make, require no special equipment, and can be enjoyed fresh or stored for later use. Whether you’re looking for an energy boost after a workout, a quick snack, or a dessert to satisfy your cravings, these brownies check all the boxes.

Ingredients:

IngredientQuantity
Oatmeal150g (5 ounces)
Milk150ml (5 fl oz)
Eggs2
Bananas (mashed)2
Vanilla extract1 teaspoon
Sugar-free cocoa powder20g (0.7 ounces)
Baking powder5g (0.18 ounces)
Salt1 pinch
Vegetable oil (for greasing)As needed
Walnuts (chopped)30g (1 ounce)

Instructions:

  1. Preheat your oven to 180°C (350°F) and lightly grease a baking pan with vegetable oil.
  2. In a large bowl, mix together the mashed bananas, eggs, vanilla extract, and milk until smooth.
  3. Add in the oatmeal, sugar-free cocoa powder, baking powder, and salt. Stir until the mixture is well combined.
  4. Fold in the chopped walnuts for a delightful crunch.
  5. Pour the batter into the prepared baking pan and spread it evenly.
  6. Bake for 25-30 minutes, or until a toothpick inserted into the center comes out clean.
  7. Let the brownies cool completely before cutting them into squares. Enjoy these guilt-free treats!

Nutritional Information (per serving):

NutrientAmount
Calories150 kcal
Carbs20g
Protein4g
Fat6g
Fiber3g
Sugar6g

Health Benefits of Oatmeal Banana Brownies

Oatmeal is the star ingredient in this recipe, and for good reason. Not only is it a great source of fiber, but it also has numerous health benefits, including lowering cholesterol, supporting heart health, and stabilizing blood sugar levels. The oats in this recipe act as a binder, holding the brownies together without the need for any refined flour. This makes the brownies naturally gluten-free (as long as you use certified gluten-free oats) and an ideal choice for anyone with dietary restrictions.

Bananas, another key ingredient, are packed with potassium, which is essential for heart and muscle function. They also provide an energy boost, making these brownies perfect for a mid-afternoon snack. With only a touch of sugar from the cocoa powder and the bananas themselves, these brownies are not overly sweet, keeping your blood sugar levels balanced.

Additionally, walnuts provide healthy fats that promote brain health and reduce inflammation, making these brownies a great choice for overall wellness. The cocoa powder, while adding that rich, chocolatey flavor, also provides antioxidants that help fight free radicals and support heart health.

Frequently Asked Questions (FAQs)

Can I make these brownies vegan?

Yes, this recipe can easily be adapted to a vegan version by substituting the eggs with a flax egg (1 tablespoon ground flaxseed mixed with 3 tablespoons water) and using a non-dairy milk such as almond or oat milk. The rest of the ingredients are already plant-based, making this a great option for those following a vegan diet.

Can I use another type of nut instead of walnuts?

Absolutely! Walnuts provide a rich texture and taste, but if you’re not a fan or if you have an allergy, you can substitute them with almonds, pecans, or even cashews. Just chop them finely to ensure they mix well into the batter.

How long will these brownies stay fresh?

These brownies can be stored in an airtight container at room temperature for up to three days. If you want to keep them for a longer period, they can be frozen. Just wrap them individually in plastic wrap and store them in a freezer-safe container for up to a month.

Can I add other ingredients to customize the recipe?

Of course! These brownies are versatile and can be customized in many ways. You could add dried fruit, such as raisins or cranberries, or even incorporate a spoonful of peanut butter for extra flavor. Adding a sprinkle of cinnamon or a pinch of sea salt on top before baking can also elevate the taste.

Are these brownies suitable for weight loss?

Yes, this recipe is great for those looking to maintain a healthy diet while still enjoying a dessert. The high fiber content from the oats and bananas helps to curb cravings, and the use of wholesome ingredients ensures that you’re nourishing your body while indulging your sweet tooth. However, moderation is key, and these brownies should be part of a balanced diet.

Can I use ripe bananas for this recipe?

Ripe bananas are actually ideal for this recipe! The more ripe your bananas, the sweeter your brownies will naturally be. Plus, the soft texture of ripe bananas will blend better into the batter, making the brownies moist and flavorful.

How to Make These Brownies Even Healthier

While this recipe is already a healthier alternative to traditional brownies, there are a few tweaks you can make to further boost its nutritional value.

  1. Add protein powder: For an extra protein boost, you can add a scoop of your favorite protein powder to the batter. This will help keep you feeling fuller for longer and provide an extra nutritional punch.
  2. Use almond flour: If you’re looking to make the recipe even lower in carbs, substitute half of the oats with almond flour. This will reduce the carbohydrate content while adding healthy fats.
  3. Sweeten naturally: Instead of using sugar-free cocoa powder, you could opt for a natural sweetener like stevia or maple syrup. Just keep in mind that this will alter the texture slightly, so you might need to adjust the amount of flour or oats.

A Recipe for Any Occasion

Whether you’re trying to eat cleaner, lose weight, or simply want a healthier alternative to a traditional dessert, these oatmeal banana brownies are a perfect solution. They make an excellent snack for busy afternoons, a delicious breakfast when you’re craving something sweet, or a great post-workout treat. With minimal ingredients and a simple process, these brownies are both practical and satisfying.

I often make these brownies on a lazy Sunday afternoon, when I want something indulgent but don’t want to overdo it with sugar and calories. They remind me of the joy that comes from simple, homemade treats, and how nourishing food can be both satisfying and healthy.

Conclusion: A Delicious, Guilt-Free Treat

This oatmeal banana brownie recipe is more than just a healthy dessert – it’s a testament to the fact that you don’t need to sacrifice taste for health. By using simple, wholesome ingredients like bananas, oatmeal, and walnuts, you can create a treat that is both delicious and nutritious. Whether you’re baking for yourself or for friends and family, these brownies are sure to be a hit. They are the perfect example of how healthy eating can be simple, fun, and most importantly, satisfying.

So, the next time you’re craving something sweet, reach for these oatmeal banana brownies – your body will thank you, and your taste buds will be delighted.
Amal

Decadent Oatmeal Banana Brownies – A Guilt-Free Indulgence

These guilt-free oatmeal banana brownies are a healthy yet delicious way to satisfy your sweet tooth. Made with simple ingredients like ripe bananas, oatmeal, and walnuts, these brownies offer a perfect balance of sweetness, fiber, and healthy fats—without the excess sugar or calories. Ideal for a mid-afternoon snack or a light dessert!
Prep Time 10 minutes
Cook Time 30 minutes
Total Time 40 minutes
Servings: 12 servings
Course: Dessert
Cuisine: Healthy

Ingredients
  

  • 150 g 5 ounces oatmeal
  • 150 ml 5 fl oz milk (use any plant-based milk for a dairy-free version)
  • 2 eggs
  • 2 bananas mashed
  • 1 teaspoon vanilla extract
  • 20 g 0.7 ounces sugar-free cocoa powder
  • 5 g 0.18 ounces baking powder
  • 1 pinch of salt
  • Vegetable oil for greasing
  • 30 g 1 ounce walnuts, chopped

Method
 

  1. Preheat your oven to 180°C (350°F) and lightly grease a baking pan with vegetable oil.
  2. In a large bowl, mash the bananas and then add the eggs, vanilla extract, and milk. Mix until smooth.
  3. Add the oatmeal, sugar-free cocoa powder, baking powder, and a pinch of salt to the bowl. Stir until well combined.
  4. Fold in the chopped walnuts for added crunch and texture.
  5. Pour the batter into the prepared baking pan, spreading it evenly with a spatula.
  6. Bake for 25-30 minutes, or until a toothpick inserted into the center comes out clean.
  7. Allow the brownies to cool completely before cutting into squares and serving.

Notes

  • Storage: These brownies stay fresh for up to 3 days in an airtight container at room temperature. They can also be frozen for up to a month if wrapped individually in plastic wrap.
  • Customizing: Feel free to add dried fruits like cranberries or raisins, or even a sprinkle of cinnamon or nutmeg for extra flavor. For a chocolatey twist, mix in some dark chocolate chips or cocoa nibs.
  • Vegan Option: To make these brownies vegan, replace the eggs with flax eggs (1 tablespoon ground flaxseed + 3 tablespoons water) and use plant-based milk such as almond or oat milk.

The Comfort of a Hearty Breakfast: A Family Tradition

There are moments in life that stay with you—simple moments, unpretentious yet profound. For me, one of those moments is breakfast with my family. Growing up, our mornings weren’t just about filling our stomachs—they were about connection. It was in the quiet, early hours of the morning, before the rush of the day began, that we sat together, shared stories, and set the tone for the rest of the day. My mother’s kitchen was always filled with warmth, both from the stove and the heart.

One of my fondest memories from those mornings is my mother’s breakfast scramble—a recipe she passed down to me and my siblings. Simple, nourishing, and quick, it was the perfect way to start our busy days. Even today, I still make this dish whenever I want to recreate that sense of comfort and togetherness.

There’s something so special about cooking a dish that’s been handed down through generations. It’s not just about the ingredients or the method—it’s about the love and memories that come with it. Each time I make the Easy Breakfast Scramble, I think of those mornings spent with my family, laughing and talking over scrambled eggs and sausage. The smell of the sizzling vegetables and eggs fills my kitchen, bringing back those cherished moments. And in that quiet, peaceful time of the morning, I’m reminded of the importance of slowing down and savoring life’s simplest joys.

Now, as I prepare this dish for my own children, I find myself sharing those same stories with them—about how their grandmother used to make this dish for us every weekend, and how we would all gather around the table, energized and ready for whatever the day would bring.

Why This Breakfast Scramble is the Perfect Start to Your Day

The Beauty of Simplicity

In the age of elaborate breakfast trends and Instagram-worthy dishes, it’s easy to forget the joy that can be found in the simplest of recipes. This Easy Breakfast Scramble doesn’t require fancy ingredients or complicated techniques—yet it’s full of flavor and nourishment. It’s a reminder that sometimes the best meals are the ones that are the easiest to prepare, with no need for intricate steps or hard-to-find ingredients.

At its core, this dish is a celebration of everyday ingredients. Eggs, vegetables, and a bit of sausage come together to form a filling and balanced meal. This simplicity is precisely what makes the scramble so comforting. It’s the kind of dish you can whip up in under 20 minutes, even on the busiest mornings, and still feel satisfied.

Moreover, the combination of ingredients is not only delicious but also nutritious. Eggs are packed with protein, carrots add a healthy dose of fiber, and chicken sausage provides a lean source of meat. The addition of milk makes the scramble creamy and smooth, creating a satisfying texture. This dish offers the perfect balance of macronutrients to keep you energized throughout the morning.

For me, cooking this breakfast is also a time to slow down. When I’m in the kitchen, cooking with my hands and being present in the moment, I’m reminded of what truly matters. It’s not about perfection—it’s about sharing something wholesome and simple with those I love.

Ingredients

IngredientAmount
Eggs6
Medium carrot, grated1
Onion, finely chopped1/2
Chicken sausage, sliced1
Milk4 tbsp
Scallion, choppedTo taste
Olive oilAs needed
Salt1/4 tsp
Black pepper1/4 tsp

Directions:

  1. Prep the Ingredients: Grate the carrot, finely chop the onion and scallion, and slice the chicken sausage.
  2. Cook the Sausage: Heat a drizzle of olive oil in a large skillet over medium heat. Add the chicken sausage slices and cook until browned and slightly crispy, about 4-5 minutes. Remove from the pan and set aside.
  3. Sauté the Vegetables: In the same skillet, add a bit more olive oil if necessary. Sauté the onion and grated carrot for 2-3 minutes, until softened.
  4. Make the Egg Mixture: In a bowl, whisk together the eggs, milk, salt, and black pepper until fully combined.
  5. Cook the Scramble: Pour the egg mixture into the skillet with the vegetables. Allow it to set for a moment, then gently stir to scramble the eggs. Add the cooked chicken sausage and scallions, and continue cooking until the eggs are fully set.
  6. Serve: Once the scramble is cooked through and fluffy, serve immediately, garnished with additional scallions if desired.

Nutritional Information (Per Serving – based on 4 servings):

NutrientAmount
Calories~220 kcal
Carbohydrates~8 g
Protein~18 g
Fat~15 g
Saturated Fat~4 g
Fiber~1 g
Sodium~300 mg

The Versatility of the Easy Breakfast Scramble

While this Easy Breakfast Scramble is perfect as is, one of the things I love most about it is its versatility. You can easily modify it to suit your preferences or use up leftovers from the fridge. Want to add a bit of spice? Throw in some chili flakes or chopped bell peppers. If you have a few extra mushrooms or spinach on hand, toss them in for added flavor and nutrition. The possibilities are endless!

For those who follow a vegetarian or vegan diet, this recipe can be adapted by replacing the chicken sausage with plant-based sausage or omitting it entirely. The eggs can be substituted with tofu or a vegan egg scramble for a plant-based version that’s just as satisfying.

You can also play with the cheese. While this recipe doesn’t call for cheese, adding a sprinkle of shredded cheddar or feta can elevate the flavor even more. Or, if you prefer something lighter, try adding a dollop of Greek yogurt for a creamy, tangy finish.

The Easy Breakfast Scramble can be served with a side of whole-grain toast or avocado slices for a well-rounded meal. It’s also a great base for meal prepping—make a large batch of the scramble and store it in the fridge for quick, ready-to-eat breakfasts during the week.

Frequently Asked Questions (FAQs)

Can I make this dish ahead of time?

Yes, you can! This dish can be prepared in advance and stored in the refrigerator for up to 3 days. Simply heat it up in the microwave or on the stovetop when you’re ready to eat. It’s a great option for meal prep on a busy week.

What type of sausage should I use for the scramble?

I recommend using chicken sausage for a leaner option, but you can use any type of sausage you prefer. Turkey sausage, pork sausage, or even vegetarian sausages are all excellent substitutes.

Can I use a non-dairy milk in this recipe?

Yes, absolutely! You can replace the milk with any non-dairy milk you prefer, such as almond milk, soy milk, or oat milk. The recipe will still be delicious and creamy.

How can I make this scramble spicier?

If you enjoy a bit of heat, try adding chopped jalapeños, chili flakes, or hot sauce to the scramble. These will add the perfect amount of spice without overpowering the other flavors.

Can I freeze this scramble?

While it’s best enjoyed fresh, you can freeze the cooked scramble for up to a month. Just make sure to cool it completely before transferring it to an airtight container. To reheat, simply warm it up in the microwave or on the stove, adding a bit of extra milk to maintain the creamy texture.

What can I serve with this breakfast scramble?

This scramble pairs perfectly with toast, avocado, or a side of fresh fruit. You can also serve it with roasted potatoes or a light salad for a more substantial meal.

Conclusion: The Power of Simple Ingredients and Shared Moments

In today’s fast-paced world, we often forget the value of simplicity. But recipes like the Easy Breakfast Scramble remind us that there is beauty in the basics. It’s about taking a few humble ingredients and turning them into something nourishing, comforting, and enjoyable.

The best meals are often the ones that bring us together. This breakfast scramble is not just about the food—it’s about the moments spent around the table, sharing stories and enjoying each other’s company. It’s about finding joy in the simple things and making memories that will last a lifetime.

As I continue to make this dish for my family, I can only hope that they, too, will cherish these mornings and the love that goes into every bite. Because at the end of the day, it’s not the complexity of the recipe that matters—it’s the love, tradition, and shared experiences that make it truly special.

Let this Easy Breakfast Scramble be a reminder to slow down, savor the moment, and appreciate the beauty of a simple, delicious meal. Whether you’re cooking for your family or yourself, this dish will bring comfort and warmth to your mornings for years to come.

Amal

The Comfort of a Hearty Breakfast: A Family Tradition

Start your day on the right note with this Easy Breakfast Scramble, packed with protein, vegetables, and savory chicken sausage. A satisfying and quick dish that combines eggs, grated carrot, and onion, all cooked together for a fluffy and flavorful meal. Perfect for busy mornings or a relaxed weekend brunch!
Prep Time 10 minutes
Cook Time 10 minutes
Total Time 20 minutes
Servings: 4 –6 servings
Course: Breakfast
Cuisine: American

Ingredients
  

  • 6 eggs
  • 1 medium carrot grated
  • 1/2 onion finely chopped
  • 1 chicken sausage sliced
  • 4 tbsp milk
  • Scallion chopped (to taste)
  • Olive oil for cooking
  • 1/4 tsp salt
  • 1/4 tsp black pepper

Method
 

  1. Prepare the Ingredients: Grate the carrot, finely chop the onion and scallion, and slice the chicken sausage into thin rounds.
  2. Cook the Sausage: Heat olive oil in a large skillet over medium heat. Add the sliced chicken sausage and cook for about 4-5 minutes, or until golden and crispy. Remove the sausage from the pan and set aside.
  3. Sauté the Vegetables: In the same skillet, add a little more olive oil and sauté the chopped onion and grated carrot for 2-3 minutes until they soften.
  4. Make the Egg Mixture: In a bowl, whisk together the eggs, milk, salt, and black pepper until well combined.
  5. Cook the Scramble: Pour the egg mixture into the skillet with the sautéed vegetables. Let it set for a few seconds before gently stirring. Continue to cook, stirring occasionally, until the eggs are fully set but still creamy.
  6. Add the Sausage and Scallions: Stir in the cooked chicken sausage and chopped scallions. Cook for another 1-2 minutes, then remove from heat.
  7. Serve: Serve the scramble immediately with your favorite toast or fresh avocado on the side. Enjoy!

Notes

  • You can customize this recipe by adding other vegetables like bell peppers, spinach, or mushrooms for extra flavor and nutrition.
  • For a dairy-free version, swap out the milk for a non-dairy alternative and omit the milk-based components.
  • If you prefer a spicy kick, add some chili flakes or hot sauce to the egg mixture.
  • This scramble can be stored in the fridge for up to 3 days. Reheat in the microwave or on the stovetop when ready to enjoy.

The Heart of the Kitchen: A Family Tradition of Puff Pastry Rolls

There are some recipes that, no matter how simple or humble, carry with them deep emotional connections. For me, one such recipe is puff pastry rolls—an unforgettable treat that has become synonymous with family gatherings, celebrations, and comfort food.

As a child, I would spend countless hours in my grandmother’s kitchen, fascinated by the way she could effortlessly transform a few simple ingredients into something extraordinary. It was in her kitchen that I first learned the magic of puff pastry. The process seemed almost like a secret, passed down through generations. The buttery layers of puff pastry, the rich, creamy filling, and the golden, crisp exterior always had a way of making us feel welcome and cherished.

My grandmother wasn’t a chef in the traditional sense. She wasn’t known for creating elaborate dishes. But what she did best was creating warmth and joy through food. The aroma of freshly baked puff pastry rolls, with their cheesy goodness filling the air, is a memory that has stayed with me. Every time I bake them, I am reminded of those moments spent in her kitchen—of the laughter, the love, and the deep connection that food can create.

As I bake these rolls today, I find myself thinking of the family gatherings where these little pastries graced our table, creating moments of togetherness. Every bite was a celebration, a reminder that the simplest things—like sharing a warm meal—can bring us closer.

Now, I’m passing down this recipe to my own children, hoping they will carry on the tradition. Each puff pastry roll represents more than just a snack or an appetizer. It’s a piece of my heart and a legacy that continues to bring warmth to our home.

The Allure of Puff Pastry Rolls: Why These Little Bites Are So Special

Puff pastry rolls are a timeless treat that have been enjoyed by families for generations. Their versatility, combined with their rich flavor, makes them a go-to snack for a variety of occasions. Whether you’re hosting a family gathering, preparing for a holiday meal, or simply craving something savory, puff pastry rolls are the perfect choice.

The beauty of these rolls lies in the perfect balance of textures. The pastry itself is light, flaky, and golden brown, offering a satisfying crunch with each bite. Meanwhile, the creamy cheese filling provides a rich, smooth contrast that melts in your mouth. With just a few ingredients, these rolls manage to deliver complex flavors, making them a favorite among both adults and children.

One of the reasons I love this recipe is its simplicity. There’s no need for fancy tools or complicated techniques. The ingredients are easy to find, and the preparation is straightforward. Yet, despite its simplicity, the result is nothing short of extraordinary. Puff pastry rolls are elegant enough to serve at a dinner party yet comforting enough to enjoy on a quiet evening at home.

What sets this recipe apart from others is its balance of flavors. The combination of cream cheese, feta cheese, and pressed cheese creates a savory, tangy filling that perfectly complements the buttery pastry. The garlic adds just a hint of warmth and depth, while the fresh parsley brightens the dish, making it as visually appealing as it is delicious.

For me, baking these puff pastry rolls brings a sense of nostalgia. As I mix the ingredients and roll out the pastry, I can almost hear my grandmother’s laughter in the background. It’s as though the process of making these rolls has become a way to honor her memory and share the love she once shared with us.

Ingredients

IngredientAmount
Puff pastry600g (21.16 oz)
Cream cheese300g (10.6 oz)
Garlic, minced2 cloves
Feta cheese, crumbled200g (7 oz)
Pressed cheese, grated100g (3.5 oz)
Parsley, chopped20g (0.7 oz)
Egg, beaten1
Pressed cheese, grated (for topping)50g (1.76 oz)

Directions:

  1. Preheat and Prepare: Preheat your oven to 375°F (190°C). Line a baking sheet with parchment paper for easy cleanup.
  2. Make the Filling: In a large mixing bowl, combine the cream cheese, minced garlic, crumbled feta cheese, grated pressed cheese, and chopped parsley. Stir until the mixture is well combined and creamy.
  3. Roll the Pastry: On a lightly floured surface, roll out the puff pastry into a large rectangle. Cut the pastry into even strips, about 2 inches wide.
  4. Fill and Fold: Place a generous spoonful of the cheese mixture on each strip of pastry. Carefully roll each strip into a tight cylinder, sealing the edges by pinching them together.
  5. Brush with Egg: Brush the tops of each roll with the beaten egg for a golden finish when baked.
  6. Add Cheese Topping: Sprinkle the rolls with the remaining grated pressed cheese for an extra cheesy crust.
  7. Bake: Arrange the rolls on the prepared baking sheet, leaving space between them. Bake for 15-20 minutes or until they are golden brown and puffed up.
  8. Cool and Serve: Allow the puff pastry rolls to cool slightly before serving. They are best enjoyed warm!

Nutritional Information (Per Roll – based on 10 servings)

NutrientAmount
Calories~200 kcal
Carbohydrates~15 g
Protein~8 g
Fat~14 g
Saturated Fat~7 g
Fiber~1 g
Sodium~300 mg

Puff Pastry Rolls: A Versatile Delight for Any Occasion

While puff pastry rolls are typically served as appetizers or snacks, they are incredibly versatile. You can easily customize the filling to suit your tastes or dietary preferences. For instance, you can add spinach, olives, or roasted vegetables for a vegetarian version. If you prefer something with a bit of a kick, you can incorporate spicy peppers or sun-dried tomatoes into the filling.

For a more indulgent treat, you can add a handful of shredded mozzarella or Parmesan cheese to the filling, or even drizzle the rolls with a balsamic glaze before serving. The beauty of this recipe lies in its adaptability—you can make it your own with just a few simple tweaks.

These puff pastry rolls are also perfect for meal prep. You can prepare them in advance, freeze them, and then bake them whenever you need a quick snack or appetizer. This makes them a great option for busy weeknights or when you’re hosting unexpected guests. Just bake and serve—these rolls will be a hit every time.

FAQs About Puff Pastry Rolls

Can I use store-bought puff pastry for this recipe?

Yes, store-bought puff pastry works perfectly for this recipe. In fact, using ready-made puff pastry can save you time and effort, making it a great option for those who want a quick and easy solution. However, if you prefer, you can make your own puff pastry from scratch.

Can I freeze puff pastry rolls?

Absolutely! These rolls freeze very well. You can assemble them, place them on a baking sheet, and freeze them before baking. Once frozen, transfer the rolls to an airtight container or zip-top bag and store them for up to a month. When you’re ready to bake them, simply pop them in the oven without thawing for a convenient, fresh snack or appetizer.

Can I make the filling ahead of time?

Yes, you can prepare the filling in advance and store it in the refrigerator for up to 2 days. Just make sure to let it come to room temperature before using it in the puff pastry.

Can I add other fillings?

Definitely! This recipe is highly versatile, and you can experiment with a variety of fillings. Consider adding cooked spinach, mushrooms, or even cooked chicken or bacon for a heartier filling. You can also experiment with different types of cheese, such as ricotta or goat cheese, to create a new flavor profile.

What can I serve these puff pastry rolls with?

These rolls are perfect on their own, but they pair wonderfully with a variety of sides. Serve them with a fresh salad, a bowl of soup, or a dipping sauce like marinara or garlic butter for an extra layer of flavor.

Conclusion: A Recipe to Pass Down Through Generations

Puff pastry rolls are more than just a snack—they’re a way to connect with our past, honor family traditions, and create new memories. Whether you’re baking them for a special occasion or just because, each bite is a reminder that food has the power to bring us together, to evoke emotions, and to carry on the legacy of those who came before us.

Baking these puff pastry rolls is more than just a recipe; it’s a celebration of love, comfort, and the joy that comes from sharing a meal with others. The simple act of preparing these rolls in my kitchen brings me back to my grandmother’s warmth and the times we spent together. And as I serve them to my own family, I can only hope that they too will carry on this tradition for generations to come.

So the next time you’re in the kitchen, take a moment to savor the process, and remember that some of the best memories are made with a few simple ingredients, a little love, and a whole lot of warmth.

Amal

The Heart of the Kitchen: A Family Tradition of Puff Pastry Rolls

These cheesy puff pastry rolls are a delightful treat, perfect for snacking or serving as appetizers at your next gathering. With their flaky, golden exterior and creamy, cheesy filling, every bite promises a burst of savory goodness. They’re easy to make and sure to impress guests or satisfy your cravings at home!
Prep Time 15 minutes
Cook Time 20 minutes
Total Time 35 minutes
Servings: 12 rolls
Course: Snack
Cuisine: Mediterranean-Inspired

Ingredients
  

  • 600 g 21.16 oz puff pastry
  • 300 g 10.6 oz cream cheese
  • 2 cloves garlic minced
  • 200 g 7 oz feta cheese, crumbled
  • 100 g 3.5 oz pressed cheese, grated
  • 20 g 0.7 oz parsley, chopped
  • 1 egg beaten
  • 50 g 1.76 oz pressed cheese, grated (for topping)

Method
 

  1. Preheat the Oven: Preheat your oven to 375°F (190°C). Line a baking sheet with parchment paper for easy cleanup.
  2. Prepare the Filling: In a large mixing bowl, combine cream cheese, minced garlic, crumbled feta, grated pressed cheese, and chopped parsley. Mix until smooth and well combined.
  3. Roll the Pastry: On a lightly floured surface, roll out the puff pastry into a large rectangle. Slice the pastry into strips (about 2 inches wide).
  4. Fill and Roll: Place a generous amount of the cheese mixture onto each pastry strip. Roll them up tightly, sealing the edges to secure the filling.
  5. Brush with Egg: Brush the tops of each roll with the beaten egg for a glossy, golden finish when baked.
  6. Top with Cheese: Sprinkle the grated pressed cheese over the rolls before baking for an extra cheesy crust.
  7. Bake: Arrange the rolls on the prepared baking sheet and bake for 15-20 minutes or until golden brown and puffed up.
  8. Cool and Serve: Allow the rolls to cool slightly before serving. They are best enjoyed warm and fresh out of the oven!

Notes

  • You can customize the filling by adding spinach, olives, or roasted vegetables for a different flavor profile.
  • For a bit of spice, consider adding some chili flakes or hot sauce to the cheese mixture.
  • These rolls can be made ahead of time and frozen. Just bake them directly from the freezer for a quick and easy snack or appetizer.
  • If you prefer a vegan version, substitute the cheese and cream cheese with plant-based alternatives.

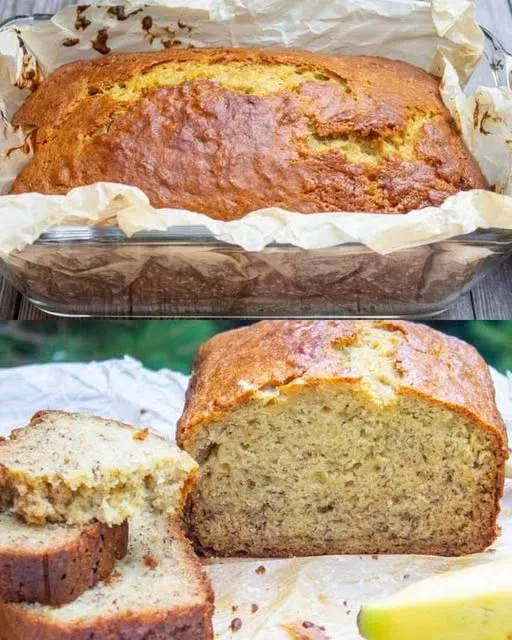
A Slice of Comfort: The Journey to Perfecting Banana Bread

There’s something uniquely comforting about the aroma of freshly baked banana bread. The scent fills the house, creating an inviting warmth that signals home. For me, banana bread has always been more than just a dessert—it’s a piece of memory, a connection to my childhood.

Growing up, my grandmother had a way of turning ordinary ingredients into something magical. It was in her kitchen that I first learned the art of making banana bread, a recipe passed down through generations. The way she carefully mashed the bananas, creamed the butter, and mixed the ingredients together with such patience made me realize that baking isn’t just about the outcome—it’s about the love and attention you pour into every step.

As a child, I would sit on the counter, watching her work, eagerly waiting for that moment when the loaf would rise in the oven. The anticipation was always the same: it was a promise of something special, something made with care. And when that loaf finally came out, golden and slightly cracked on top, it never failed to delight. We’d slice it while it was still warm, spread a little butter, and eat it together, savoring every bite.

As I grew older and moved far away from home, that banana bread became a connection to the past. It was my grandmother’s love, captured in every slice. And so, I began baking it myself—not just for special occasions, but for moments when I needed a little reminder of where I came from. Every time I pull that loaf out of the oven, I feel closer to her, and those sweet memories flood back.

Banana bread is not just a recipe; it’s a reminder that some things in life are constant, and the simple act of baking can bring joy, comfort, and a sense of belonging.

Banana Bread: A Simple Yet Perfect Treat

Banana bread is, without a doubt, a classic. It’s one of those baked goods that never goes out of style, and for good reason. The moist, tender texture, paired with the natural sweetness of ripe bananas, makes it an irresistible treat. But what sets this recipe apart is its undeniable richness and texture—it’s moist in all the right ways, with a crumb that melts in your mouth.

It’s easy to see why this loaf is such a beloved recipe. Whether you’re looking for something to serve for breakfast, an afternoon snack, or a simple dessert, banana bread fits the bill. It’s versatile and can be enjoyed by everyone, from kids to adults. Plus, it’s incredibly forgiving—if you’re not a seasoned baker, there’s little chance you’ll mess it up.

However, what really makes this recipe shine is the balance between flavors. The sweetness of the ripe bananas shines through without being overpowering. The butter adds richness, while the buttermilk lends the perfect amount of tang. Each bite is a harmony of flavors, and each slice is guaranteed to bring comfort.

Ingredients

IngredientAmount
Ripe bananas3 large
Butter (softened)1/2 cup (115 g)
Sugar1 cup (200 g)
Eggs2
All-purpose flour1.5 cups (180 g)
Baking soda1 teaspoon
Salt1/4 teaspoon
Buttermilk (or milk)1/4 cup (60 ml)
Vanilla extract1 teaspoon

Directions

  1. Preheat and Prepare: Preheat your oven to 350°F (175°C). Grease and flour a 9×5-inch loaf pan or line it with parchment paper.
  2. Mash the Bananas: In a large bowl, mash the ripe bananas with a fork or potato masher until smooth but with a few lumps. You should have about 1.5 cups of mashed banana.
  3. Cream the Butter and Sugar: In another bowl, cream together the softened butter and sugar until light and fluffy. This will add a fluffy texture to your bread.
  4. Add Eggs and Vanilla: Beat in the eggs, one at a time, ensuring each is fully incorporated before adding the next. Stir in the vanilla extract for an added layer of flavor.
  5. Combine Dry Ingredients: In a separate bowl, whisk together the flour, baking soda, and salt. Gradually add the dry ingredients to the banana mixture, alternating with buttermilk. Start and end with the dry ingredients, mixing until just combined. Be careful not to overmix to avoid a dense loaf.
  6. Pour and Bake: Pour the batter into the prepared loaf pan, smoothing the top with a spatula. Bake in the preheated oven for 60–70 minutes, or until a toothpick inserted into the center comes out clean, with just a few crumbs.
  7. Cool and Serve: Let the banana bread cool in the pan for 10 minutes before transferring it to a wire rack to cool completely. Slice and enjoy!

Nutritional Information (Per Serving – based on 10 slices)

NutrientAmount
Calories~250 kcal
Carbohydrates~35 g
Sugars~18 g
Protein~3 g
Fat~12 g
Saturated Fat~7 g
Fiber~2 g
Sodium~150 mg

The Essential Ingredients That Make the Difference

The beauty of banana bread lies in its simplicity. The ingredients are basic—flour, sugar, butter, and eggs—but the magic happens when these ingredients come together. The key to achieving the perfect banana bread lies in using ripe bananas. Overripe bananas, which are soft and speckled with brown spots, provide the natural sweetness that gives the bread its distinctive flavor. They also contribute to the moist texture, preventing the bread from being dry or dense.

Buttermilk is another essential ingredient. It gives the bread a tender crumb, making each slice light yet satisfying. If you don’t have buttermilk on hand, you can easily substitute it with milk and a splash of vinegar or lemon juice, which will mimic the acidity and add the same effect to the dough.

Butter is the fat that brings richness to the bread. While you can substitute it with oil, butter provides flavor and texture that oil simply can’t match. The combination of butter and bananas results in a loaf that’s not just moist but also full of depth.

Why This Banana Bread Recipe Is the Ultimate Comfort Food

There are many variations of banana bread out there, but this particular recipe stands out. What makes it so special is the balance of texture and flavor. Not too heavy, not too light—it strikes the perfect balance. The crumb is tender and soft, while the crust is golden brown with just the right amount of crispness. It’s the kind of bread that holds up beautifully whether you enjoy it fresh from the oven or toasted the next day with a pat of butter.

The flavor profile of this banana bread is also versatile. It can easily be customized with additional mix-ins such as chocolate chips, walnuts, or even a swirl of cinnamon. However, it’s just as delicious without any extra ingredients. Sometimes, simplicity is best, and this recipe allows the bananas to shine without distraction.

In a world full of fast-paced living and complicated recipes, this banana bread is a reminder that the most comforting foods are often the simplest. It’s a recipe that invites you to slow down and savor each bite, and it’s the kind of food that makes you feel good both physically and emotionally.

Frequently Asked Questions (FAQs)

Can I use frozen bananas for banana bread?

Yes, frozen bananas are actually a great option for banana bread. In fact, many bakers swear by them! Simply thaw the bananas, and they’ll be just as sweet and mushy as ripe bananas. Just make sure to drain any excess liquid before mashing.

Can I use all-purpose flour instead of whole wheat flour?

Yes, this recipe calls for all-purpose flour, and it works perfectly for a light and fluffy loaf. If you prefer a heartier texture, you can substitute part of the all-purpose flour with whole wheat flour. However, whole wheat flour will result in a denser loaf.

How can I make this recipe dairy-free?

If you want to make this recipe dairy-free, you can substitute the butter with vegan butter or coconut oil. For buttermilk, use a dairy-free alternative such as almond milk mixed with a little lemon juice or vinegar.

How do I store banana bread?

Banana bread can be stored at room temperature for up to 3 days. Simply wrap it tightly in plastic wrap or foil. If you want to keep it for longer, it can be stored in the refrigerator for up to 1 week or frozen for up to 3 months.

Can I add other ingredients to the banana bread?

Absolutely! You can customize this banana bread by adding chocolate chips, walnuts, pecans, or even shredded coconut. Just be sure not to overload it with too many additions, as it could affect the texture.

Conclusion: More Than Just a Loaf

Banana bread is more than just a recipe; it’s a slice of nostalgia, a comforting embrace, and a timeless favorite. Whether you’re baking it for the first time or it’s a recipe passed down through generations, the experience of making and enjoying banana bread is always special. It’s simple yet satisfying, and it’s always there when you need a little pick-me-up.

The next time you bake this banana bread, take a moment to savor not only the delicious flavor but also the memories and stories it brings with it. Whether you enjoy it fresh out of the oven with a cup of coffee or toast it for breakfast the next morning, this banana bread is more than just food—it’s a piece of home.

Amal

A Slice of Comfort: The Journey to Perfecting Banana Bread

This banana bread is a slice of pure comfort! With a rich, buttery crumb and the perfect balance of sweetness, it’s the go-to treat for any time of the day. Whether you’re having it for breakfast or as an afternoon snack, each slice of this moist banana bread is sure to delight!
Prep Time 15 minutes
Cook Time 1 hour 10 minutes
Total Time 1 hour 15 minutes
Servings: 10 servings
Course: Dessert
Cuisine: American

Ingredients
  

  • 3 ripe bananas mashed
  • 1/2 cup 115 g unsalted butter, softened
  • 1 cup 200 g granulated sugar
  • 2 large eggs
  • 1.5 cups 180 g all-purpose flour
  • 1 teaspoon baking soda
  • 1/4 teaspoon salt
  • 1/4 cup 60 ml buttermilk (or milk)
  • 1 teaspoon vanilla extract

Method
 

  1. Preheat the Oven: Preheat your oven to 350°F (175°C) and grease or line a 9×5-inch loaf pan with parchment paper.
  2. Prepare the Bananas: Mash the ripe bananas in a large bowl using a fork or potato masher. You should have about 1.5 cups of mashed banana.
  3. Cream the Butter and Sugar: In a separate bowl, cream together the softened butter and granulated sugar until light and fluffy.
  4. Add Eggs and Vanilla: Beat in the eggs, one at a time, ensuring each one is well incorporated. Stir in the vanilla extract.
  5. Combine Dry Ingredients: In a small bowl, whisk together the all-purpose flour, baking soda, and salt.
  6. Mix Wet and Dry Ingredients: Gradually add the dry ingredients to the wet ingredients, alternating with buttermilk. Start with the flour mixture and end with the flour, mixing just until combined.
  7. Bake: Pour the batter into the prepared loaf pan, smoothing the top with a spatula. Bake for 60-70 minutes, or until a toothpick inserted in the center comes out clean or with just a few crumbs.
  8. Cool and Serve: Let the bread cool in the pan for 10 minutes before transferring to a wire rack to cool completely. Slice and serve!

Notes

  • For an extra indulgent banana bread, add chocolate chips or chopped nuts like walnuts or pecans.
  • This banana bread can be stored at room temperature in an airtight container for up to 3 days.
  • If you don’t have buttermilk, you can substitute it with regular milk and add a splash of lemon juice or vinegar to replicate the acidity.

Whispers of Summer: Cake That Melts in Your Mouth

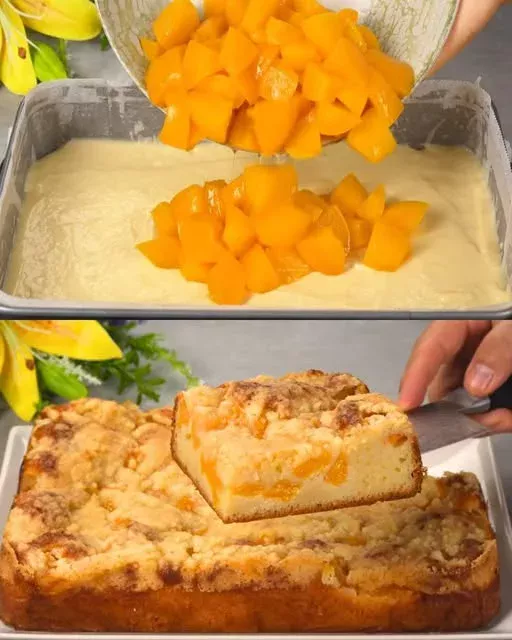
Some of the fondest memories I have are from the summer afternoons spent in my grandmother’s kitchen. The sun would be dipping low, casting a warm glow on everything it touched. The air would smell of freshly cut grass, and yet, the thing that always anchored me in that moment was the scent of cake baking in the oven. It wasn’t the typical chocolate or sponge that you would expect, but a simple, fruity cake—a cake that seemed to hold the sweetness of the summer itself. The gentle fragrance of yogurt and ripe peaches would fill the house, and no matter how much we had eaten earlier in the day, we would always find room for just one more slice.

I remember sitting at the kitchen table, eagerly awaiting the moment the cake would come out of the oven, still warm, golden and slightly crumbly. My grandmother would carefully slice it into generous pieces and pass it around. Every bite felt like a celebration, the cake melting in your mouth with the syrupy sweetness of peaches tucked underneath. It wasn’t just a dessert; it was an experience—one that wrapped us in warmth, nostalgia, and a sense of belonging.

As I grew older and moved away, I realized that there are certain flavors that hold the power to bring you back to the places and people you love. This cake became more than just a recipe; it became a symbol of those moments that will forever be etched in my heart. I started making it myself—sometimes just for a quiet evening, other times for family gatherings. With each slice, I felt a little closer to home, a little closer to those sweet memories.

The Simplicity That Speaks Volumes

This cake is simple. It doesn’t call for extravagant ingredients or time-consuming techniques. What makes it special is how its humble components work together. The combination of yogurt and sunflower oil creates a moist, tender base, while the peaches add just the right balance of sweetness. The crumble topping, made with cold butter, flour, and sugar, gives it a delightful crunch that contrasts beautifully with the soft texture of the cake beneath.

And yet, despite how easy it is to make, this cake is anything but ordinary. It’s a cake that, while simple, fills your home with warmth and a sense of nostalgia. It’s the kind of cake you can bake on a whim with ingredients you likely already have in your pantry, but still leaves a lasting impression on anyone who gets a slice.

Ingredients

Cake Batter:

IngredientAmount
Eggs2
Sugar2/5 cup (100 g)
Salt1 pinch
Sunflower oil2/5 cup (100 ml / 3.4 fl oz)
Yogurt3/4 cup (180 g)
All-purpose flour1.5 cups (220 g)
Baking powder1 teaspoon

Topping:

IngredientAmount
Peaches in syrupAbout 400 g (drained weight)
All-purpose flour2 tablespoons (50 g)
Sugar3 tablespoons (50 g)
Cold butter40 g (cut into small cubes)

Directions

  1. Prepare the cake batter: In a large mixing bowl, beat the eggs with sugar and a pinch of salt until light and frothy. Stir in the sunflower oil and yogurt. Gradually fold in the flour and baking powder until just combined and smooth.
  2. Assemble the base: Pour the cake batter into a greased or parchment-lined 9-inch (23 cm) springform pan or similar.
  3. Add the peaches: Slice the drained peaches and arrange them evenly over the top of the batter.
  4. Make the crumble topping: In a separate bowl, mix flour and sugar. Add the cold butter and rub with fingertips until it resembles coarse crumbs.
  5. Top and bake: Sprinkle the crumble mixture over the peaches. Bake in a preheated oven at 180°C (350°F) for 35–40 minutes or until the top is golden and a toothpick inserted into the cake comes out clean.
  6. Cool and serve: Let the cake cool slightly before slicing. Best served warm or at room temperature.

Nutritional Info (Per Serving – based on 10 slices)

NutrientAmount
Calories~280 kcal
Carbohydrates~32 g
Sugars~18 g
Protein~5 g
Fat~14 g
Saturated Fat~5 g
Fiber~1 g
Sodium~110 mg

A Cake for Every Occasion

There’s no need to wait for a special occasion to bake this cake. It’s perfect for any time you crave something comforting and sweet. Whether you’re hosting friends for afternoon tea, needing a simple dessert after dinner, or preparing a thoughtful gift for a loved one, this cake fits the bill.

Its versatility also makes it ideal for any time of the year. In summer, fresh peaches can take center stage, while during the colder months, canned peaches or even other fruits like pears or plums can be used. It’s a cake that adapts to your cravings and the season, making it a true year-round favorite.

The Power of Fruit in Desserts

The peaches in this cake play a crucial role. While they serve as a delicious topping, they also provide moisture and balance the sweetness of the cake. The syrupy peaches melt into the crumb, creating a harmonious texture that’s both rich and light at the same time.

Fresh fruit in desserts brings with it an incredible depth of flavor. The natural sugars of the fruit caramelize slightly in the oven, adding a richness that you simply can’t get from artificial sweeteners or syrups. Peaches, in particular, have a delicate sweetness that pairs beautifully with the tang of the yogurt in the cake batter, creating a perfect contrast of flavors.

Frequently Asked Questions (FAQs)

Can I use other fruits instead of peaches?

Absolutely! While peaches are the traditional choice, you can easily swap them out for other fruits. Pears, plums, or even apples work well in this recipe. You can also use berries like raspberries, blackberries, or blueberries, though you may need to adjust the sugar slightly depending on the sweetness of the fruit.

Can I make this cake ahead of time?

Yes! This cake actually tastes even better the day after it’s baked, as the flavors have had time to meld together. You can bake it the night before and store it in an airtight container. If you prefer it warm, simply reheat it in the oven at a low temperature for about 10 minutes.

Can I freeze this cake?

Yes, this cake freezes wonderfully. Let it cool completely, then wrap it tightly in plastic wrap or foil and place it in an airtight container. It will keep in the freezer for up to three months. When you’re ready to enjoy it, simply let it thaw at room temperature or reheat it in the oven.

What can I substitute for yogurt?

If you don’t have yogurt on hand or prefer a non-dairy option, you can substitute the yogurt with sour cream, buttermilk, or even a dairy-free yogurt alternative like almond or coconut yogurt. These options will provide the same moisture and slight tang that yogurt adds to the cake.

How can I make this cake gluten-free?

You can substitute the all-purpose flour with a gluten-free flour blend. Be sure to check that the flour blend you use has a good structure for cakes, or consider adding a bit of xanthan gum to help the texture. It’s also a good idea to check the other ingredients to ensure they’re gluten-free, like the baking powder.

Can I use margarine instead of butter for the topping?

Yes, margarine can be used in place of butter for the crumble topping. While butter gives a slightly richer flavor, margarine will still provide the crumbly texture you need for the topping.

The Simple Joy of Baking

What I love most about this cake is its ability to bring people together. It’s a recipe that doesn’t need to be fancy or over-complicated. It’s the kind of dessert that reminds you of the beauty of simplicity. It doesn’t need layers of frosting or intricate decoration—just the soft, comforting cake base, the syrupy peaches, and the buttery crumble topping. In a world where things can often feel rushed and overwhelming, this cake is a gentle reminder of how the simplest things can bring the most joy.

Each slice carries with it the power of memories, family, and time spent together. It’s a cake that invites conversation, a shared moment over a warm dessert. It’s not about impressing others with elaborate techniques, but about creating something that feels familiar, comforting, and timeless.

Conclusion: The Heart of the Home

Baking this cake is more than just a culinary act; it’s a way to reconnect with the past and create new memories. It’s a way to show love and care through the act of preparing something special for the people in your life. It’s a celebration of simple ingredients coming together to create something greater than the sum of its parts.

As you bake this cake, take a moment to enjoy the process. Watch as the dough rises, the peaches caramelize, and the crumble browns in the oven. Let it fill your home with the same warmth and comfort that I experienced all those years ago in my grandmother’s kitchen. And when you finally take that first bite, remember that this cake is more than just a treat. It’s a piece of home, a whisper of summer, and a timeless reminder of the power of good food and cherished memories.

Amal

Whispers of Summer: Cake That Melts in Your Mouth

Golden and soft with every bite, this cake is an invitation to savor the sweetness of summer. With a light yogurt batter and syrupy peaches nestled underneath a buttery crumble topping, this dessert is not only easy to make but absolutely unforgettable. It’s perfect for any occasion, from family gatherings to quiet evenings at home.
Prep Time 15 minutes
Cook Time 40 minutes
Total Time 1 hour
Servings: 8 -10 servings
Course: Dessert
Cuisine: American

Ingredients
  

  • 2 eggs
  • 100 g sugar about 2/5 cup
  • 1 pinch of salt
  • 100 ml sunflower oil about 2/5 cup
  • 180 g yogurt about 3/4 cup
  • 220 g all-purpose flour about 1.5 cups
  • 1 teaspoon baking powder
For the Topping:
  • 400 g peaches in syrup drained
  • 50 g all-purpose flour about 2 tablespoons
  • 50 g sugar about 3 tablespoons
  • 40 g cold butter cut into small cubes

Method
 

  1. Preheat the oven to 180°C (350°F). Grease or line a 9-inch (23 cm) springform pan with parchment paper.
  2. In a large mixing bowl, whisk the eggs with the sugar and a pinch of salt until the mixture is light and fluffy.
  3. Add the sunflower oil and yogurt, stirring until well combined.
  4. Gradually fold in the flour and baking powder until you have a smooth, thick batter.
  5. Pour the batter into the prepared pan, spreading it evenly.
  6. Slice the peaches and arrange them on top of the batter.
  7. In a small bowl, combine the flour and sugar for the topping. Add the cold butter and rub it in with your fingers until the mixture resembles coarse crumbs.
  8. Sprinkle the crumble mixture evenly over the peaches and cake batter.
  9. Bake for 35-40 minutes, or until the top is golden and a toothpick inserted into the cake comes out clean.
  10. Let the cake cool for a few minutes before slicing and serving. Enjoy it warm or at room temperature!

Notes

  • The cake is best enjoyed warm, but it can be stored in an airtight container for up to 3 days.
  • If you don’t have peaches, feel free to substitute with pears, plums, or berries.
  • For a twist, add a pinch of cinnamon to the crumble topping for extra flavor.
  • This cake can be made ahead of time and stored in the refrigerator, making it perfect for dinner parties or casual gatherings.
  • If you prefer a dairy-free option, substitute the yogurt with coconut yogurt and use a non-dairy butter.

Pillows of Joy: The Magic of Cheese-Filled Bread

There’s something universally comforting about bread—the way it rises, the way it fills the house with a scent so warm it feels like a hug. But for me, it’s not just the bread. It’s what hides inside. Melting cheese tucked between folds of soft, golden dough reminds me of Saturday afternoons in my childhood kitchen, when the oven door seemed like a portal and my mother’s hands moved like poetry.

Our family didn’t eat extravagantly, but we always ate with intention. And when cheese-filled bread made its way to the table, it wasn’t just food—it was celebration. It was a reward for a week well done, a peace offering on tense days, and a simple way of saying, I made this for you. My mother would press her fingers into each ball of dough, sealing in the cheese with the same care she used to tie our scarves in winter.

Now, years later, I still make this bread. And every time I press the edges closed around the filling, I feel like I’m reconnecting with that warmth, passing it on, one bite at a time.

Why Cheese-Filled Bread Never Goes Out of Style

In a world where food trends come and go at lightning speed, there’s something incredibly grounding about returning to the basics. Dough. Cheese. Heat. That’s all you need. But in the simplicity lies its genius.

Cheese-filled bread doesn’t chase perfection—it delivers satisfaction. It doesn’t rely on elaborate presentation—it lets flavor do the talking. Whether you’re making it for a casual family breakfast, a hearty side to soup, or a comforting late-night snack, this bread always feels right.

Ingredients

For the Dough:

IngredientAmount
Yeast1 teaspoon (4 g)
Warm water1.5 cups (300 ml)
All-purpose flour5 cups (540 g)
Salt1 teaspoon (5 g)

Directions

  1. Activate the yeast: In a large bowl, dissolve the yeast in the warm water. Let sit for 5–10 minutes until bubbly and foamy.
  2. Form the dough: Gradually mix in the flour and salt, stirring until a dough begins to form. Knead by hand for 8–10 minutes (or with a mixer for 5–6 minutes) until smooth and elastic.
  3. First rise: Cover the dough with a clean towel and let it rise in a warm spot for 1–1.5 hours, or until doubled in size.
  4. Shape and fill: Punch down the dough, divide it into even portions (8–10 pieces), and flatten each slightly. Place a spoonful of your desired cheese in the center and fold the dough around it, pinching to seal.
  5. Second rise: Place filled dough balls seam-side down on a parchment-lined tray. Cover and let rise for 20–30 minutes.
  6. Bake: Preheat oven to 200°C (390°F). Bake the filled breads for 18–22 minutes, or until golden brown on top.
  7. Cool and serve: Allow to cool slightly before serving warm. The cheese inside will be melty and irresistible.

Nutrient Breakdown (Per Filled Bread, approx. 1 of 10 servings without cheese):

NutrientAmount
Calories~185 kcal
Carbohydrates~36 g
Protein~5 g
Fat~1 g
Fiber~1.2 g
Sodium~240 mg

The Art of Simplicity in Every Fold

Despite how impressive it may look when pulled apart, cheese-filled bread is rooted in honest, uncomplicated ingredients. The dough itself is a simple blend of flour, salt, yeast, and warm water—nothing extravagant, just pantry staples that work together like old friends.

Once it rises and softens into a supple dough, it becomes a blank canvas. The real magic happens in the filling. Cheese, whether shredded, cubed, or crumbled, is nestled into the center and sealed in like a hidden treasure. And as it bakes, it melts. It bubbles. It transforms into something utterly irresistible.

Filling Inspiration: Not Just Cheese

While cheese is the star, this bread is endlessly customizable. You can tailor it to your mood, your ingredients, or your meal.

Here are a few creative variations:

  • Garlic Herb Cheese: Mix shredded mozzarella with minced garlic, parsley, and a touch of oregano.
  • Spinach & Feta: A classic Mediterranean twist with crumbled feta and wilted spinach.
  • Pepper Jack & Jalapeño: For a spicy kick, perfect for game day or dipping into chili.
  • Cream Cheese & Sun-Dried Tomato: Smooth, tangy, and luxurious.
  • Sweet Version: Swap cheese for a dollop of ricotta and honey for a breakfast variation.

This is one of those recipes where “use what you have” actually works. Leftover cheeses, herbs, or cooked vegetables? Fold them in. The dough welcomes them all.

A Recipe That Teaches Patience

This bread isn’t difficult, but it does ask you to slow down. To let yeast do its quiet work. To give the dough time to rest. To resist the urge to skip the second rise, even when you’re hungry.

But in those quiet pauses—waiting for the dough to puff up, watching it brown in the oven—you’ll discover something that goes beyond cooking. It’s the gentle rhythm of handmade food, the reward of taking your time. In a fast-paced world, this recipe is a breath of warm, fragrant air.

Serving Suggestions: Make It a Meal

Cheese-filled bread isn’t just a side. With a few additions, it becomes the main event.

  • Soup Companion: Serve alongside creamy tomato soup or roasted red pepper bisque.
  • Salad’s Best Friend: Pair with a crisp green salad with lemon vinaigrette.
  • Charcuterie Staple: Slice and serve as part of a rustic cheese and meat board.
  • Lunchbox Favorite: These reheat beautifully and pack well for work or school.
  • Brunch Upgrade: Serve with eggs, olives, and pickled veggies for a Mediterranean-style brunch.

However you plate it, this bread brings with it a sense of richness that goes far beyond its ingredients.

Frequently Asked Questions (FAQs)

Can I make the dough ahead of time?

Yes. You can make the dough and let it rise overnight in the refrigerator. Just bring it to room temperature before shaping and filling.

What cheese works best?

Mozzarella is a classic for stretch and melt. Feta, cheddar, provolone, and gouda all work beautifully too. You can even mix a few kinds together for deeper flavor.

Can I freeze the dough or the filled bread?

Absolutely. After the first rise, portion and freeze the dough in balls. Or assemble the cheese-filled dough balls, freeze them on a tray, and store them in a bag for quick baking later. You can also freeze the baked bread and reheat as needed.

Why did my dough not rise?

This can happen if your yeast is expired or your water was too hot and killed the yeast. Always use fresh yeast and warm (not hot) water—around 38°C (100°F) is ideal.

Can I use whole wheat flour instead?

You can substitute part of the all-purpose flour with whole wheat flour (up to 50%) for a heartier texture. Just note that it may require a bit more water and will rise slightly less.

Do I need to use a stand mixer?

Not at all. This dough is soft and forgiving. It kneads beautifully by hand, which makes it even more meditative to prepare.

How do I store leftovers?

Keep leftover bread in an airtight container at room temperature for up to 2 days, or refrigerate for up to 4. Reheat in the oven or toaster for the best texture.

The Power of Bread with a Hidden Heart

There’s a certain kind of joy in tearing open a piece of warm bread and discovering the soft, molten cheese tucked inside. It’s a surprise that never gets old, no matter how many times you’ve made it. And maybe that’s the best part—how something so simple can keep surprising you, meal after meal, year after year.

In a way, cheese-filled bread is more than a recipe. It’s a reminder of what’s possible with the most basic things: a little flour, some water, and a filling made from love. Whether you’re making it for your family, your guests, or just yourself on a quiet afternoon, this bread brings more than comfort—it brings connection.

So go ahead. Flour your hands, fold in something cheesy, and let the oven work its magic. One warm, golden bite at a time, you’ll remember what homemade really means.

Amal

Pillows of Joy: The Magic of Cheese-Filled Bread

Golden on the outside, melty on the inside—these cheese-filled bread pillows are everything comfort food should be. Made from a soft, yeast-risen dough, each piece is lovingly wrapped around your favorite cheese, baked until golden, and perfect served warm for any meal or snack.
Prep Time 20 minutes
Cook Time 20 minutes
Total Time 1 hour 40 minutes
Servings: 8 –10 cheese-filled breads
Course: Bread
Cuisine: Mediterranean-Inspired

Ingredients
  

  • 1 teaspoon yeast 4 g
  • 1.5 cups warm water 300 ml
  • 5 cups all-purpose flour 540 g
  • 1 teaspoon salt 5 g
  • Cheese for filling mozzarella, feta, cheddar, or a mix—about 200–250 g

Method
 

  1. In a large mixing bowl, dissolve the yeast in warm water and let it sit for 5–10 minutes until foamy.
  2. Add flour and salt to the bowl and mix until a shaggy dough forms.
  3. Knead the dough for 8–10 minutes by hand or 5–6 minutes with a mixer until smooth and elastic.
  4. Cover the dough and let it rise in a warm spot for 1 to 1.5 hours, or until doubled in size.
  5. Punch down the dough and divide it into 8–10 equal pieces.
  6. Flatten each piece into a round disc and place a spoonful of cheese in the center. Fold the dough around the filling and pinch to seal.
  7. Place the filled dough balls seam-side down on a parchment-lined baking tray. Cover and let rise for 20–30 minutes.
  8. Preheat the oven to 200°C (390°F).
  9. Bake for 18–22 minutes, or until golden brown on top.
  10. Let cool slightly before serving. Serve warm to enjoy the melted cheese center.

Notes

  • Mozzarella is ideal for gooey melt, but feta or a spiced cheese mix adds bold flavor.
  • Add chopped herbs or garlic powder to the dough for extra flavor.
  • These freeze well—just reheat in the oven at 180°C (350°F) for 8–10 minutes.

The Dough That Holds Everything Together: Simple Ingredients, Infinite Possibilities

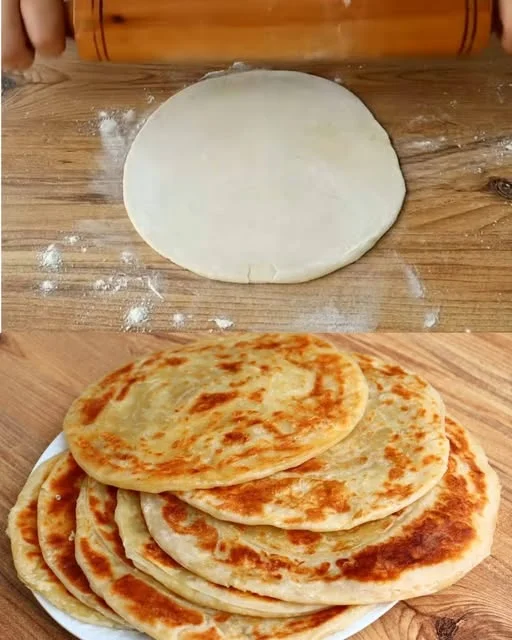
Some of my most treasured memories begin not in a grand kitchen or under the glow of elegant chandeliers, but in a quiet, modest room with a single wooden table worn smooth by generations of kneading hands. My grandmother didn’t measure wealth in silverware or status, but in the softness of a homemade flatbread, the scent of browning dough on a cast-iron pan, and the way a shared meal could make a hard day disappear.

There was a quiet magic in how she brought something to life from almost nothing: just a bit of flour, a splash of water, a pinch of salt, and a hunk of cold butter. With these, she made dough that stretched like patience, folded like love, and baked into something that never lasted longer than it took to pass it around the table.

This recipe is more than a guide to making dough. It’s a reminder that comfort doesn’t have to be complicated. It’s the story of resilience passed down through a family that didn’t always have much, but always had each other—and a dough that never failed.

Why Simple Dough Still Matters

In today’s world, we’re surrounded by convenience. Ready-made everything, ultra-processed options, and endless distractions have turned many kitchens quiet. But there’s something grounding about returning to basics. This dough—made from just flour, water, salt, and butter—is not just a recipe, but a return to something deeply human.

It reminds us that nourishment doesn’t have to be expensive, exotic, or extreme. Sometimes, the most satisfying dishes are the ones built on simplicity and repetition. This dough offers exactly that.

What Makes This Dough So Special?

  1. Versatility: Use it for flatbreads, hand pies, savory tarts, dumpling wrappers, galettes, or even a quick rustic crust.
  2. Accessible Ingredients: Almost everyone has flour, water, and salt on hand. Add butter, and you have a complete, balanced dough.
  3. No Special Equipment Required: No mixers, processors, or fancy tools—just your hands and a surface to roll on.
  4. Foolproof Process: No yeast, no rising time, no fermentation. Just mix, rest, and use.

Ingredient

IngredientAmount
White flourLess than 4 cups (about 410 g)
Water1.5 cups (about 300 ml)
Salt1 teaspoon (about 6 g)
Butter160 g (cold, diced)

Directions

  1. Start the foundation: In a large mixing bowl, combine the flour and salt. Stir to distribute evenly.
  2. Add the butter: Using your fingers or a pastry cutter, cut the cold butter into the flour mixture until it resembles coarse crumbs. Work quickly to keep the butter cold.
  3. Incorporate the water: Gradually pour in the water while mixing with your hand or a spoon until a rough dough forms. It should be moist but not sticky. Adjust with a sprinkle of flour or splash of water if needed.
  4. Knead briefly: Turn the dough onto a lightly floured surface and knead for 2–3 minutes just until smooth. Avoid overworking to maintain tenderness.
  5. Rest and relax: Cover the dough and let it rest for 15–30 minutes at room temperature before shaping or rolling.
  6. Shape and bake/cook as needed: Use it for flatbreads, hand pies, galettes, or savory turnovers. Bake or pan-cook depending on your chosen dish.

Nutrient Breakdown (Per 1 of 8 servings):

NutrientAmount
Calories~240 kcal
Carbohydrates~26 g
Protein~3.5 g
Fat~14 g
Saturated Fat~9 g
Sodium~180 mg
Fiber~1 g
Sugar~0.2 g

The Art of Simplicity: Crafting Connection with Your Hands

There’s a unique intimacy in working with dough. It slows you down. It invites you to be present. In a world of instant gratification, this kind of tactile ritual feels almost radical.

This dough doesn’t demand perfection—it rewards patience and care. The cool butter beneath your fingertips, the transformation from coarse to cohesive, the gentle resistance as you knead—all of it teaches you something not just about food, but about life.

Creative Ways to Use This All-Purpose Dough

What you do with this dough is limited only by your imagination. Here are some ideas to inspire your next homemade creation:

1. Stovetop Flatbreads

Roll out small discs, cook them dry or lightly oiled in a skillet, and serve with dips, soups, or warm spreads.

2. Savory Hand Pies

Fill with mashed vegetables, cheese, or leftovers, then bake or fry for an easy snack or lunchbox filler.

3. Quick Rustic Tarts

Shape a galette by piling sliced seasonal vegetables or fruits in the center and folding the edges over.

4. Buttery Crackers

Roll thin, sprinkle with seeds or herbs, and bake until crisp. Great for cheese boards or savory snacking.

5. Pan-Fried Dumpling Wrappers

Cut into rounds, fill with spiced lentils, or shredded chicken and greens, and pan-fry or steam.

A Legacy in Every Fold: Why Butter Matters

The addition of butter in this dough isn’t just for texture—it’s emotional. It’s the richness that makes something humble feel luxurious. Butter makes the dough tender, gives it structure, and adds subtle flavor that no oil or shortening quite replicates.

More importantly, it turns a three-ingredient base into something reminiscent of a pastry—flaky at the edges, soft in the center. And when you bake or toast it just right, it carries that unmistakable home-kitchen aroma that lingers in your memory.

FAQs: All You Need to Know About This Simple Dough

Can I make this dough without butter?

Yes. You can replace the butter with solid coconut oil, lard, or vegan butter. Each alternative will yield a slightly different flavor and texture, but the recipe will still work.

Can I freeze this dough?

Absolutely. After kneading, divide the dough into portions, wrap in cling film, and freeze for up to 2 months. Thaw in the refrigerator before using.

Do I need to rest the dough?

Yes, a short rest of 15–30 minutes is ideal. This relaxes the gluten and makes the dough easier to roll out without shrinking.

Can I use whole wheat flour instead of white flour?

Yes, though it will produce a denser, heartier result. You may need to increase the water slightly. A 50/50 mix of white and whole wheat flour offers a nice balance.

What if I don’t have a rolling pin?

No problem. Use a clean bottle, jar, or even press the dough with your hands. This recipe is rustic and forgiving.

How do I make the dough crispier or flakier?

For extra crispness, roll thinner and cook or bake longer. For a flakier result, keep the butter as cold as possible and avoid overworking the dough.

Can I add flavorings?

Absolutely! Add herbs (like rosemary or thyme), spices (such as cumin or paprika), or even grated cheese or minced garlic directly into the dough for a savory twist.

Is this dough suitable for sweet recipes?

Yes. Add 1–2 tablespoons of sugar or honey to the dough and use it as a base for fruit galettes, hand pies, or turnovers.

How long will this dough last in the fridge?

You can keep the prepared dough in the fridge for up to 3 days, tightly wrapped. Let it come to room temperature before rolling out.

Why This Recipe Belongs in Every Kitchen

This dough is not just useful—it’s transformative. It’s what you make when your cupboards are nearly empty, when you’re craving comfort, or when you’re trying to feed others with whatever you have on hand. It’s a recipe that turns scarcity into abundance, and effort into nourishment.

It’s also an invitation: to slow down, to create with your hands, and to connect to something deeper than just the meal in front of you. Whether you’re rolling it out on a quiet Sunday morning or improvising a weeknight dinner, this dough adapts to your life—quietly, beautifully, and reliably.

Conclusion: The Heart of Home is in the Dough

At its core, this dough is about more than flour, water, salt, and butter. It’s about how much we can do with very little. It’s about learning from those who came before us—the ones who taught us to trust our hands, our instincts, and the process.

So the next time your kitchen feels uninspiring or your fridge feels empty, remember this: if you have flour, water, and salt, you can make something from nothing. And if you add a little butter and a lot of heart, you just might make a memory worth keeping.

Amal

The Dough That Holds Everything Together: Simple Ingredients, Infinite Possibilities

This simple, four-ingredient dough is the foundation of countless homemade creations. Soft, buttery, and versatile, it requires only flour, water, salt, and butter—making it the perfect go-to recipe when your pantry is low but your creativity is high.
Prep Time 15 minutes
Cook Time 30 minutes
Total Time 45 minutes
Servings: 8 servings
Course: Breakfast
Cuisine: International

Ingredients
  

  • Less than 4 cups of white flour about 410 g
  • 1.5 cups of water about 300 ml
  • 1 teaspoon of salt about 6 g
  • 160 g cold butter cut into cubes

Method
 

  1. In a large bowl, mix the flour and salt until combined.
  2. Add the cold, cubed butter and use your fingers or a pastry cutter to rub it into the flour until the mixture resembles coarse crumbs.
  3. Slowly pour in the water while mixing with a spoon or your hands until a rough dough forms. It should be soft but not overly sticky.
  4. Transfer the dough to a lightly floured surface and knead gently for 2–3 minutes until smooth.
  5. Cover and let the dough rest at room temperature for 15–30 minutes before using.
  6. Roll out and shape as desired for flatbreads, pastries, galettes, or hand pies.
  7. Bake or cook according to your specific recipe needs.

Notes

  • Resting the dough allows the gluten to relax, making it easier to roll out and preventing shrinkage during baking.
  • For extra flavor, you can add dried herbs or spices to the flour before mixing.
  • Store unused dough wrapped in the fridge for up to 3 days or freeze for later use.
  • Works beautifully as a savory tart base or for rustic-style pizza.

The Secret of Ageless Baking: A Legacy in Every Bite

I remember the smell before anything else. Long before I could reach the kitchen counter or understand why some foods made me feel better than others, I could always tell when my grandmother was baking. The aroma would curl up the staircase, warm and earthy—apples, oats, and something sweet that didn’t come from sugar. It was comfort, wellness, and history wrapped in one quiet, golden scent.

My grandmother turned 100 this year, and while the world has changed more in her lifetime than most of us can imagine, her values haven’t. She has always believed in simplicity, patience, and listening to your body. She never followed fads. She never counted calories. But she always baked without refined sugar or flour. And now, decades later, science seems to be catching up with her wisdom.

This recipe, what I like to call the Ageless Morning Bake, is a tribute to that philosophy and to the woman who unknowingly taught me that food isn’t just fuel—it’s memory, medicine, and a message passed on through generations.

Back to the Basics: Why This Bake Works

There’s a quiet power in humble ingredients. Apples, carrots, bananas, cottage cheese, oats—none of these are flashy superfoods with marketing campaigns behind them. But together, they create a deeply nourishing and delightfully textured bake that satisfies without overwhelming.

This flourless, sugar-free breakfast cake isn’t just healthy—it’s intentionally designed to support longevity and balance. The natural sweetness from fruits replaces the need for added sugar, and cottage cheese adds protein that makes the dish more filling and metabolically friendly.

Each element plays a role:

  • Oats offer slow-burning carbohydrates and fiber that promote gut health.
  • Banana and apple bring in potassium and natural sweetness.
  • Carrots add beta-carotene for eye and skin health.
  • Cottage cheese and eggs provide structure and protein for muscle and hormone support.
  • Coconut oil contributes healthy fats that help absorb fat-soluble nutrients.
  • Corn starch and baking powder give just enough lift to keep the bake light without flour.
  • Coconut blossom sugar is used in moderation for depth—it’s low glycemic and mineral-rich.

The result? A moist, tender, slightly sweet bake that doesn’t spike your blood sugar or leave you feeling heavy. It’s something you can eat every day—and in my family, we often do.

Ingredients

IngredientAmount
Oatmeal150 g
Apple1 (grated)
Carrot1 (grated)
Eggs4 total (divided)
Banana1 (ripe, mashed)
Coconut oil20 g (melted)
Baking powder1 teaspoon
Cottage cheese360 g
Corn starch20 g
Coconut blossom sugar30 g

Directions: The Legacy Loaf Method

  1. Preheat the oven to 180°C (350°F) and line a loaf pan or small square baking dish with parchment paper.
  2. Mix the base: In a large bowl, combine oatmeal, grated apple, grated carrot, mashed banana, 2 eggs, melted coconut oil, and baking powder. Stir until well combined.
  3. Prepare the creamy layer: In another bowl, blend cottage cheese with the remaining 2 eggs, corn starch, and coconut blossom sugar until smooth and creamy.
  4. Layer and swirl: Pour the oatmeal mixture into the prepared pan. Spoon the cottage cheese mixture over the top and gently swirl with a knife or skewer for a marbled effect.
  5. Bake for 45–50 minutes, or until the top is golden and set. A toothpick inserted in the center should come out mostly clean.
  6. Cool & serve: Let it cool in the pan for 10 minutes, then transfer to a wire rack. Slice and enjoy warm or chilled — perfect for breakfast or a wholesome snack.

Nutrient Breakdown (Per Serving – Approx. 1 of 8 slices):

NutrientAmount
Calories~180 kcal
Protein~10 g
Carbohydrates~18 g
Sugars (natural)~7 g
Fiber~3 g
Fat~8 g
Saturated Fat~3 g
Calcium~100 mg

A Wellness Ritual in Disguise

This isn’t just a recipe. It’s a daily ritual that reconnects you with your body’s natural rhythms. Unlike processed cereals or rushed toast, this bake feels intentional. It invites mindfulness. It nourishes rather than numbs.

There’s something almost sacred about slicing into something you’ve made yourself—knowing every ingredient was chosen for your well-being. That’s the difference between eating and nourishing.

And in a world that rushes everything, this kind of baking slows you down just enough to make room for reflection, calm, and joy.

A Bake That Fits Every Lifestyle

Whether you’re following a low-sugar lifestyle, managing diabetes, or just trying to eat more whole foods, this bake fits effortlessly. It’s naturally gluten-free (just be sure to use certified gluten-free oats if you’re sensitive), low in added sugar, and packed with fiber and protein.

It’s also remarkably versatile. Some enjoy it as a quick breakfast with a dollop of Greek yogurt or a spoonful of nut butter. Others serve it as a mid-afternoon pick-me-up or even a guilt-free dessert. It’s filling enough to keep hunger at bay and gentle enough to digest easily—an ideal combination for anyone looking to age gracefully.

Frequently Asked Questions

Can I make this bake vegan?

Absolutely! Replace the eggs with flax eggs (1 tablespoon ground flaxseed + 3 tablespoons water per egg), and use a plant-based cottage cheese alternative or soft tofu blended with lemon juice and a pinch of salt. You’ll still get the creamy, layered texture with a plant-forward twist.

Is this recipe suitable for children?

Yes. In fact, it’s a fantastic way to introduce young children to naturally sweetened baked goods. Since the sugar content is low and the fiber and nutrients are high, it makes a perfect school snack or breakfast option for toddlers and older kids alike.

How do I store it, and can I freeze it?

Once baked and cooled, you can store the slices in an airtight container in the fridge for up to 5 days. It actually gets better after the first day as the flavors continue to meld. For longer storage, wrap individual slices in parchment and freeze for up to 2 months. Reheat in the oven or toaster for best results.

Can I substitute the fruit or vegetables?

Yes. The apple can be replaced with pear or zucchini. The carrot can be swapped for pumpkin or sweet potato puree. Just keep the moisture levels consistent. If your substitutes are too wet (like grated zucchini), be sure to squeeze out the excess water.

Why is this recipe so healthy?

This bake avoids refined sugar and flour, which are common culprits in blood sugar spikes and chronic inflammation. Instead, it relies on whole, fiber-rich ingredients that support digestion, satiety, and long-term health. The combination of protein, healthy fats, and slow-digesting carbs makes it metabolically balanced—ideal for energy without crashes.

What does it taste like?

Think of it as a cross between a baked oatmeal bar, a cheesecake, and a carrot cake—moist, subtly sweet, with occasional bites of fruit and creamy cottage cheese. It doesn’t taste like “health food,” but it’s not indulgent either. It’s comfort food with a purpose.

Adding Your Own Twist: Customizing the Bake

This recipe is meant to be a template, not a rule. My grandmother often changed it based on the season, what was in the pantry, or how she was feeling that day. Here are a few ways you can adapt it:

  • Add spices: Cinnamon, cardamom, nutmeg, or a dash of vanilla for extra warmth.
  • Mix in nuts or seeds: Chopped walnuts, sunflower seeds, or flaxseeds for texture and nutrition.
  • Use seasonal fruits: Blueberries in summer, grated pear in fall, even mashed mango in spring.
  • Make it savory: Omit the banana and sugar, and add herbs like rosemary or thyme, with sautéed onions and a touch of goat cheese.

The more you personalize it, the more meaningful it becomes—just like any handed-down family recipe.

Longevity on a Plate

My grandmother never called what she did “healthy eating.” She just believed that food should be made from real ingredients, shared with people you love, and never rushed. Her meals were slow. Her hands were steady. And her heart was always in it.

We live in a time of fast everything—fast food, fast results, fast answers. But maybe the secret to longevity isn’t just in the ingredients. Maybe it’s in the pace. Maybe it’s in the ritual. Maybe it’s in the quiet pride of making something with your own two hands that you know is good for you.

This bake is just one example. But it’s a delicious one. And if you’ve ever wanted to eat something your future self will thank you for, this might just be it.

Conclusion: One Slice at a Time

It’s tempting to think we need to overhaul our diets overnight to see real change. But often, it starts with just one small shift—a healthier breakfast, a better snack, a recipe that makes you feel cared for.

The Ageless Morning Bake is more than a recipe. It’s a philosophy passed down from a woman who has seen more than a century of change and has never once stopped baking. Every bite carries a bit of her strength, her warmth, and her intuition.

So if you’re looking for something that’s easy to make, deeply satisfying, and quietly transformative, give this a try. You may just find that what nourishes your body can also feed your spirit.

Amal

The Secret of Ageless Baking: A Legacy in Every Bite

This wholesome, naturally sweet breakfast bake is inspired by a 100-year-old family recipe passed down through generations. Made without refined sugar or flour, it’s packed with oats, apples, carrots, banana, and cottage cheese for a soft, nourishing, and satisfying treat perfect for breakfast or an anytime snack.
Prep Time 15 minutes
Cook Time 45 minutes
Total Time 1 hour
Servings: 8 slices
Course: Breakfast
Cuisine: Wholesome

Ingredients
  

  • 150 g oatmeal
  • 1 apple grated
  • 1 carrot grated
  • 2 eggs
  • 1 ripe banana mashed
  • 20 g coconut oil melted
  • 1 teaspoon baking powder
  • 360 g cottage cheese
  • 2 additional eggs for cheese layer
  • 20 g corn starch
  • 30 g coconut blossom sugar

Method
 

  1. Preheat the oven to 180°C (350°F) and line a loaf pan or square baking dish with parchment paper.
  2. In a large mixing bowl, combine oatmeal, grated apple, grated carrot, 2 eggs, mashed banana, melted coconut oil, and baking powder. Mix well.
  3. In a separate bowl, whisk together the cottage cheese, remaining 2 eggs, corn starch, and coconut blossom sugar until smooth and creamy.
  4. Pour the oat mixture into the prepared baking dish and smooth the top.
  5. Gently spoon the cheese mixture over the oat base. Use a knife or skewer to swirl the layers slightly for a marbled effect.
  6. Bake for 45–50 minutes or until golden and set. A toothpick inserted in the center should come out mostly clean.
  7. Let it cool for 10–15 minutes before slicing. Serve warm or chilled.

Notes

  • For extra sweetness, you can add a few chopped dates or raisins into the oat mixture.
  • Make it dairy-free by substituting cottage cheese with a thick plant-based yogurt or tofu.
  • Keeps well in the fridge for up to 4 days and freezes beautifully.
  • Great for meal prepping or serving to guests who love wholesome treats.

A Simple Comfort from the Garden

When I was growing up, my grandmother’s kitchen was a sanctuary, the heart of our family. I can still remember the warm, earthy scent of roasting vegetables that would drift from the oven, a sign that another family meal was coming together. Among the array of dishes she’d create, one always stood out: her simple roasted eggplant. It was a humble dish, but the way the eggplant transformed in the oven, golden and caramelized, with every bite offering a combination of tender softness and savory richness, made it something special. It’s a recipe that’s been passed down through generations, and though the ingredients are modest, the flavors are anything but.

Eggplants have a unique ability to absorb the flavors around them, making them a perfect canvas for spices, herbs, and seasonings. For me, this particular eggplant recipe represents comfort, tradition, and the importance of simplicity in cooking. It’s a dish that reminds me of home, where food was not just about nourishment, but about love and family. And it’s a recipe I now share with others, knowing that it can evoke the same sense of warmth and joy in their homes.

Eggplant: A Versatile Gem in the Vegetable Kingdom

Eggplant, also known as aubergine in some parts of the world, has long been a staple in Mediterranean and Middle Eastern cuisine. Its versatility is what makes it such a beloved vegetable. Whether it’s being grilled, baked, or stuffed, eggplant can easily take on a variety of flavors, making it an essential ingredient in many dishes. While it can sometimes be seen as an unassuming vegetable, its rich, creamy texture and mild flavor are perfect for absorbing the aromas and seasonings that surround it.

In this recipe, we let the eggplant shine by keeping things simple, using only a few ingredients to enhance its natural flavor. The olive oil, garlic, and herbs used in this dish provide just the right balance of richness and freshness. It’s a dish that’s easy to prepare, but one that packs a punch in terms of flavor and satisfaction.

Ingredients

IngredientAmount
Eggplants2
Olive oilTo taste
Garlic3 cloves, minced
Fresh DillTo taste, chopped
SaltTo taste
Black PepperTo taste
Italian HerbsTo taste

Instructions:

  1. Preheat the oven: Start by preheating your oven to 400°F (200°C). This ensures it’s ready for the eggplant once prepped.
  2. Prepare the eggplant: Slice the eggplants into rounds about 1/2-inch thick. You can peel them if you prefer a smoother texture, but the skin adds a beautiful color and extra nutrients.
  3. Season the eggplant: Place the eggplant slices on a baking sheet lined with parchment paper. Drizzle olive oil generously over the slices and rub them in gently. Sprinkle salt, black pepper, and Italian herbs to taste, making sure every slice is well-seasoned.
  4. Garlic infusion: Mince the garlic cloves and sprinkle them over the eggplant. This will add a fragrant aroma and an extra layer of flavor.
  5. Bake: Pop the baking sheet in the oven for about 20-25 minutes, or until the eggplant becomes golden brown and soft in the middle.
  6. Garnish with dill: Once out of the oven, sprinkle freshly chopped dill over the eggplant slices. This gives it a fresh, herbal note that complements the richness of the olive oil and the earthiness of the eggplant.

Nutritional Information

NutrientPer Serving (Approx.)
Calories100-120 kcal
Fat7-8 g
Carbohydrates8-10 g
Fiber4-5 g
Protein1-2 g

Why This Eggplant Recipe Works

The secret to this recipe’s success lies in the balance of ingredients and the method of cooking. Eggplants can often turn mushy if not prepared properly, but when baked or roasted at the right temperature, they caramelize beautifully, becoming tender with a slightly smoky flavor. The olive oil provides a rich, smooth finish, while the garlic infuses the eggplant with depth and warmth. The combination of fresh dill and Italian herbs elevates the dish, giving it a fragrant, herbaceous touch that complements the eggplant’s natural earthiness.

Health Benefits of Eggplants

Eggplants are not only delicious but also packed with nutrients. They’re a great source of fiber, which aids digestion and promotes heart health. Rich in antioxidants like nasunin, found in the skin, eggplants help protect the body from free radical damage. They also contain vitamins like B6, vitamin C, and folate, which are important for overall health. With their low calorie content, eggplants are a fantastic addition to any diet, especially if you’re looking to maintain or lose weight while still enjoying flavorful meals.

A Perfect Side or Standalone Dish

One of the beautiful things about this eggplant recipe is its versatility. You can serve it as a side dish alongside your favorite protein, like grilled chicken or lamb, or even use it as the main event in a vegetarian meal. It pairs wonderfully with grains like quinoa, couscous, or rice, making it a complete and balanced dish. You could even throw it into a warm pita with some hummus and feta cheese for a Mediterranean-inspired wrap.

FAQ Section

  1. Can I use other herbs besides dill? Absolutely! While dill adds a lovely freshness to this dish, you can easily swap it out for other herbs like basil, oregano, or thyme. Each herb will bring its own distinct flavor profile, allowing you to customize the dish to your tastes.
  2. Can I grill the eggplant instead of baking it? Yes! Grilling eggplant adds a wonderful smoky flavor and texture. Just be sure to brush the slices with olive oil before placing them on the grill to prevent them from sticking.
  3. How do I make this dish vegan? This recipe is already vegan-friendly, as it doesn’t contain any animal products. However, if you want to add a vegan-friendly cheese alternative or drizzle some tahini on top, feel free to do so.
  4. Can I prepare this dish in advance? Yes, this dish is great for meal prep. You can roast the eggplant ahead of time and store it in the fridge for a few days. Simply reheat it in the oven or microwave before serving.
  5. What should I serve with roasted eggplant? Roasted eggplant pairs well with a variety of dishes. Try it with a refreshing cucumber salad, roasted chickpeas, or a grain salad like tabbouleh. It also works wonderfully alongside grilled meats or as part of a mezze platter with hummus and pita.

The Benefits of Simplicity in Cooking

In today’s world, we’re often bombarded with complex recipes and elaborate dishes, sometimes leading us to forget the joy of simple, home-cooked meals. This eggplant recipe serves as a reminder that food doesn’t have to be complicated to be delicious. With just a handful of ingredients and a little time in the oven, you can create a dish that’s not only nutritious but bursting with flavor. It’s proof that the best meals are often the simplest ones, prepared with love and a focus on fresh ingredients.

Conclusion: A Dish Worth Repeating

Whether you’re cooking for yourself, your family, or friends, this eggplant recipe is a surefire way to create something memorable. It’s a dish that brings out the natural beauty of the eggplant and enhances it with a few carefully chosen ingredients. It’s versatile, healthy, and easy to make, making it perfect for any occasion. So, the next time you’re in the kitchen and looking for a meal that’s both comforting and delicious, consider roasting up some eggplant—it’s simple, satisfying, and, most importantly, full of flavor.

Cooking this dish will not only give you a sense of accomplishment but also connect you to a tradition of cooking that’s been passed down through generations. It’s a reminder that even in the busiest of times, we can always find comfort in the kitchen, with a few simple ingredients and a lot of heart.

Amal

A Simple Comfort from the Garden

This roasted eggplant recipe is a perfect balance of savory and earthy flavors. With minimal ingredients, it brings out the natural sweetness of eggplant, enhanced with garlic, olive oil, and fresh herbs. Whether as a side dish or a main, it’s both healthy and satisfying.
Prep Time 10 minutes
Cook Time 30 minutes
Total Time 40 minutes
Servings: 4 –6 servings
Course: Side Dish
Cuisine: Mediterranean-Inspired

Ingredients
  

  • 2 eggplants
  • Olive oil for drizzling
  • 3 cloves of garlic minced
  • Fresh dill finely chopped
  • Salt to taste
  • Black pepper to taste
  • Italian herbs oregano, thyme, rosemary, to taste

Method
 

  1. Preheat your oven to 400°F (200°C).
  2. Cut the eggplants in half lengthwise and then slice them into wedges or rounds, depending on your preference.
  3. Place the eggplant slices on a baking sheet lined with parchment paper.
  4. Drizzle the eggplants with olive oil and sprinkle with minced garlic, salt, pepper, and Italian herbs.
  5. Toss the eggplant slices to coat them evenly with the seasonings and oil.
  6. Roast in the preheated oven for about 25-30 minutes, or until the eggplant is tender and golden brown, flipping halfway through for even cooking.
  7. Once cooked, remove from the oven and sprinkle with fresh dill before serving.

Notes

  • If you prefer a more intense flavor, you can let the eggplant slices sit with the olive oil and seasonings for 15-20 minutes before roasting.
  • For a smoky touch, you can grill the eggplant slices instead of roasting them.
  • This dish is perfect as a side, or you can enjoy it on its own as a light vegetarian meal.

Decadent Condensed Milk & Chocolate Nut Bars: A Sweet Indulgence for Every Occasion

When I think about comfort food, one of the first things that come to mind is my grandmother’s kitchen — a warm, inviting space filled with the smells of freshly baked treats, rich chocolate, and the soft, buttery scent of nuts being toasted. Growing up, my siblings and I would eagerly crowd around the kitchen table while she worked, eagerly awaiting the moment when we could dive into one of her delicious creations. Among her many masterpieces, there was one that always stood out: a simple yet indulgent chocolate nut dessert.

What made it so special wasn’t just the layers of crunchy nuts, silky chocolate, and creamy sweetness, but the love and care she put into each batch. It was a recipe she had perfected over the years, passed down from her mother, and later tweaked for her grandchildren. The joy we all felt when biting into those bars — rich, nutty, and absolutely indulgent — became a part of our family tradition. It was a treat that brought us together, made us smile, and reminded us of the importance of family and shared moments.

As I got older, life got busier, and I found myself spending less time in the kitchen. Yet, every now and then, I would crave that familiar treat. That’s when I decided to recreate my grandmother’s recipe, with a few modern twists. These Condensed Milk & Chocolate Nut Bars are my take on that childhood favorite, bringing together the creamy richness of sweetened condensed milk, the crunch of toasted nuts, and the decadence of dark chocolate, creating a simple yet luxurious treat for today’s busy world.

The Perfect Balance of Sweet, Nutty, and Chocolatey

What makes these bars so special is their balance of flavors and textures. The sweetened condensed milk gives them a creamy, melt-in-your-mouth base, while the dark chocolate adds a rich, slightly bitter contrast that enhances the sweetness of the milk. The nuts—pecans, peanuts, and hazelnuts—add the perfect crunch, bringing in a savory balance that prevents the dessert from feeling too rich. Together, they form a heavenly combination that’s both satisfying and indulgent.

These bars are also highly customizable, making them the perfect base for anyone to experiment with. Whether you prefer almonds, cashews, or even a mix of dried fruit, the recipe is versatile enough to allow you to play with the ingredients. The final result is always delicious and always a crowd-pleaser.

Ingredients:

IngredientAmount
Pecans (or walnuts)60g (2.1 oz)
Peanuts60g (2.1 oz)
Sweetened Condensed Milk380g (13.4 oz)
Sunflower Oil (for greasing)As needed
Hazelnuts15g (0.5 oz)
Dark Chocolate (unsweetened)100g (3.5 oz)
Kandurin/Golden Glitter (optional)As desired

Instructions:

  1. Prepare the nuts: Start by roughly chopping the pecans, peanuts, and hazelnuts. Toast them lightly in a dry pan over medium heat for about 5 minutes until aromatic and slightly crisp. Set aside to cool.
  2. Melt the chocolate: Break the dark chocolate into small pieces and place it in a heatproof bowl. Gently melt the chocolate in a double boiler or microwave, stirring until smooth and glossy.
  3. Combine condensed milk and nuts: In a large mixing bowl, pour in the sweetened condensed milk. Add the toasted pecans, peanuts, and hazelnuts, stirring to coat the nuts evenly with the condensed milk.
  4. Mix in melted chocolate: Pour the melted dark chocolate into the nut and condensed milk mixture. Stir thoroughly until all ingredients are evenly combined.
  5. Shape the mixture: Lightly grease a small baking pan or silicone mold with sunflower oil. Pour the mixture into the pan, spreading it evenly. Use a spatula to press it down gently.
  6. Chill and set: Refrigerate for at least 2 hours or until the mixture firms up completely. This will allow the bars to set into a fudgy, nutty chocolate treat.
  7. Optional golden finish: For a festive touch, sprinkle Kandurin or golden glitter on top of the dessert once it has set. This adds a beautiful, shimmering effect, perfect for special occasions.
  8. Serve and enjoy: Once chilled and set, cut into squares or bars and enjoy the rich, creamy, nutty goodness.

Nutrients:

NutrientPer Serving (1 bar)
Calories180 kcal
Total Fat12g
Saturated Fat2g
Carbohydrates15g
Sugars12g
Protein3g
Fiber2g
Sodium15mg

Why You Should Try This Recipe

1. Simplicity Meets Elegance

One of the things that sets this recipe apart is its simplicity. You don’t need a long list of ingredients or hours of preparation. With just a few pantry staples—sweetened condensed milk, dark chocolate, and a handful of nuts—you can create a treat that tastes like it came straight from a bakery. Whether you’re hosting a dinner party, attending a potluck, or simply craving something sweet, these bars are sure to impress.

2. Perfect for Any Occasion

These bars are incredibly versatile and can fit in any situation. They make the perfect holiday gift, a sweet addition to a picnic, or a simple dessert to enjoy with your family after dinner. Their rich, decadent flavor profile makes them a treat that will be loved by both adults and children alike. Whether you’re celebrating a special occasion or just need a quick sweet fix, these bars are a go-to dessert that never disappoints.

3. Make-Ahead and Easy to Store

Another fantastic feature of these condensed milk and chocolate nut bars is that they’re incredibly easy to store and keep. Unlike traditional baked goods, they don’t require any special storage techniques, and they stay fresh in an airtight container in the fridge for up to a week. This makes them the perfect dessert for those who love having something delicious on hand for whenever the craving strikes. And because they’re made without baking, they can be put together in no time, leaving you more time to enjoy your day.

4. Nutritious Twist with Healthy Nuts

While this dessert is indulgent, it also incorporates the goodness of healthy nuts. Pecans, hazelnuts, and peanuts not only bring in a crunchy texture, but they also add nutritional benefits, including healthy fats, fiber, and protein. By using these nuts, you’re adding an extra layer of nutrition to a treat that would otherwise be a bit more indulgent. Nuts are rich in antioxidants, vitamins, and minerals, making this dessert a bit more guilt-free. Pairing it with dark chocolate only increases its antioxidant content, making it a dessert that offers both flavor and a bit of nutritional value.

Frequently Asked Questions (FAQs)

Can I use different types of nuts?

Yes! This recipe is highly adaptable. You can replace the pecans, peanuts, and hazelnuts with any nuts you prefer, such as almonds, walnuts, or cashews. The key is to toast the nuts to enhance their flavor and provide a satisfying crunch in each bite.

Can I make this recipe without condensed milk?

Sweetened condensed milk is essential to the creamy texture of these bars. However, if you’re looking for a healthier alternative, you can try substituting it with coconut milk and maple syrup for a more natural, dairy-free version. Keep in mind that the texture may vary slightly, but it will still be delicious.

How long do these bars keep?

These bars stay fresh for up to a week if stored in an airtight container in the refrigerator. For longer storage, you can freeze them for up to 3 months. Just make sure to let them cool completely before storing.

Can I use milk chocolate instead of dark chocolate?

You absolutely can! If you prefer a sweeter bar, milk chocolate will work perfectly fine. Dark chocolate gives the bars a richer flavor and slightly bitter contrast to the sweetness, but if you’re looking for a more classic sweet chocolate taste, milk chocolate is a great option.

Can I add flavors like vanilla or coffee?

Yes, feel free to experiment with flavor additions! A splash of vanilla extract or a teaspoon of instant coffee can elevate the chocolate flavor, giving it a more complex, layered taste.

Can I make this recipe vegan?

To make this recipe vegan, substitute the sweetened condensed milk with a plant-based version or use coconut milk and maple syrup. Opt for dairy-free dark chocolate, and ensure the nuts are not roasted in butter.

Conclusion: A Treat that Brings Back Memories

This Condensed Milk & Chocolate Nut Bar recipe is more than just a delicious dessert; it’s a way to bring back the joy of sharing simple pleasures with loved ones. Whether it’s for a family gathering, a special event, or just a sweet treat on a quiet afternoon, these bars are the perfect choice. They remind me of my grandmother’s kitchen, of the love we shared over simple meals and treats.

Today, I’m proud to pass this recipe on, knowing it will continue to create moments of joy for those who try it. The beauty of this dessert lies in its simplicity and versatility—ingredients you likely already have in your pantry, but when combined, create something truly special. It’s the kind of dessert that brings people together, not just for the sweet taste, but for the memories and connections it fosters.

So the next time you’re looking for a dessert that’s both easy and indulgent, reach for this recipe. It’s a timeless treat that will surely become a new favorite in your kitchen, and like my grandmother’s, will one day be passed down as part of your family’s traditions.

Amal

Decadent Condensed Milk & Chocolate Nut Bars: A Sweet Indulgence for Every Occasion

This indulgent dessert brings together the richness of dark chocolate, the creamy sweetness of condensed milk, and a delightful mix of nuts, creating a treat that’s sure to satisfy your sweet tooth. With a touch of golden glitter for an extra dash of elegance, this recipe is perfect for special occasions or simply when you crave something extraordinary.
Prep Time 15 minutes
Cook Time 10 minutes
Total Time 2 hours 30 minutes
Servings: 12 -15 servings
Course: Dessert
Cuisine: International

Ingredients
  

  • Pecans or walnuts – 60g (2.1 oz)
  • Peanuts – 60g 2.1 oz
  • Sweetened Condensed Milk – 380g 13.4 oz
  • Sunflower Oil – For greasing
  • Hazelnuts – 15g 0.5 oz
  • Dark Chocolate – 100g 3.5 oz
  • By Request: Kandurin/Golden Glitter Food Coloring – For a dazzling finish

Method
 

  1. Prepare the nuts: Begin by roughly chopping the pecans, peanuts, and hazelnuts. Toast them lightly in a dry pan over medium heat for about 5 minutes, ensuring they become aromatic and slightly crisp. Set aside to cool.
  2. Melt the chocolate: Break the dark chocolate into small pieces and place them in a heatproof bowl. Gently melt the chocolate either in a double boiler or in the microwave, stirring occasionally until smooth.
  3. Combine condensed milk and nuts: In a large mixing bowl, pour in the sweetened condensed milk. Add the toasted pecans, peanuts, and hazelnuts, mixing thoroughly to ensure all the nuts are coated with the condensed milk.
  4. Mix in melted chocolate: Pour the melted dark chocolate into the nut and condensed milk mixture. Stir well until everything is evenly combined and you have a rich, thick texture.
  5. Shape the mixture: Grease a small baking pan or a silicone mold with sunflower oil. Pour the mixture into the pan, spreading it out evenly. Use a spatula to press it down gently.
  6. Chill and set: Refrigerate the mixture for at least 2 hours or until it firms up completely. The dessert will set into a fudgy, nutty, chocolatey delight.
  7. Optional golden finish: For a special touch, sprinkle Kandurin (golden glitter) on top once the dessert has set. This adds a beautiful shimmering effect that’s perfect for festive occasions.
  8. Serve and enjoy: Once chilled, cut into squares or bars. Serve chilled and enjoy the delightful combination of creamy, nutty, and chocolate goodness.

Notes

  • Storage: Store any leftovers in an airtight container in the refrigerator for up to 1 week. These treats make for a great snack or dessert to keep on hand.
  • Customization: Feel free to substitute the pecans with other nuts such as almonds or cashews for a different flavor profile.
  • Golden Glitter: If you choose to use Kandurin or any edible glitter, ensure it is food-safe and made for consumption.