Crisp Cabbage and Cucumber Salad with Lemon Sesame Dressing

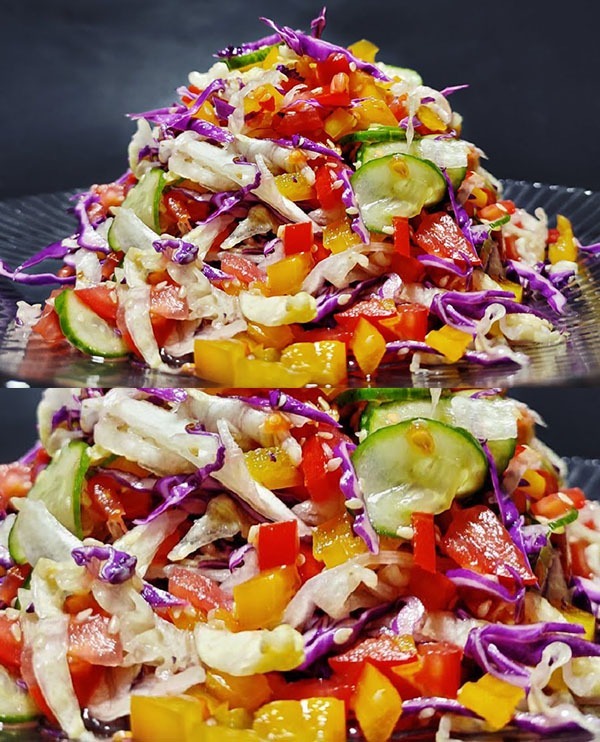
Get ready to add a splash of color and crunch to your meals with this vibrant Cabbage and Cucumber Salad! Perfect for those who love fresh and zesty flavors, this salad combines the crispness of green cabbage, the deep hues of red cabbage, and the refreshing bite of cucumbers. With a simple yet flavorful dressing that brings out the natural sweetness and tanginess of the vegetables, this salad is a delightful side dish that pairs well with almost any main course. Whether you’re looking for a light lunch option or a healthy addition to your dinner table, this salad is sure to impress with its simplicity and delicious taste. Let’s whisk together this easy, nutritious, and eye-catching salad!

Salad Ingredients:

  • 250 grams (about 1/2) of a green cabbage
  • 1/2 of a red cabbage
  • 1 to 2 fresh cucumbers
  • 1/3 teaspoon of salt
  • A drizzle of olive oil
  • 1/2 of a yellow bell pepper

Dressing Ingredients:

  • 2 tablespoons of olive oil
  • Juice of 1 lemon
  • 1 tablespoon of sesame seeds

Instructions:

  1. Prepare the Vegetables: Start by thinly slicing both the green and red cabbages into fine strips. Slice the cucumbers into thin rounds or half-moons, depending on your preference. Cut the yellow pepper into thin strips.
  2. Combine the Salad: In a large salad bowl, mix together the sliced green cabbage, red cabbage, cucumbers, and yellow pepper strips. Sprinkle with 1/3 teaspoon of salt and a generous drizzle of olive oil. Toss everything together until the vegetables are lightly coated.
  3. Make the Dressing: For the dressing, whisk together 2 tablespoons of olive oil, the freshly squeezed juice of one lemon, and 1 tablespoon of sesame seeds in a small bowl.
  4. Dress the Salad: Pour the lemon sesame dressing over the prepared salad. Toss the salad once more to ensure all the vegetables are evenly coated with the dressing.
  5. Serve: Allow the salad to sit for a few minutes before serving to let the flavors meld together. This crisp and vibrant salad is perfect as a refreshing side dish or a light main course.

This Crisp Cabbage and Cucumber Salad with Lemon Sesame Dressing brings together the fresh flavors of the garden in a light, tangy dressing. It’s a simple, nutritious dish that’s easy to put together and perfect for any occasion. Enjoy the crunch and zest in every bite!

Crispy Vegetable Pancakes

Hello! Today, we’re going to make some super tasty Veggie Pancakes. These pancakes are a little different from your usual breakfast ones because they’re made with onions, carrots, and potatoes. They’re crispy on the outside and soft on the inside, with a hint of seasoning to make them just right. Plus, they’re super easy to cook up and a fun way to eat more vegetables. Whether you need a quick snack or a side dish for your meal, these veggie pancakes are perfect. Let’s grab our ingredients and start cooking these yummy pancakes together!

Ingredients:

  • 100 grams of onion (about 1/2 of a medium onion)
  • 100 grams of carrot (approximately 1 large carrot)
  • 356 grams of potatoes (roughly 2 medium-sized)
  • 1 large egg
  • 2 tablespoons of all-purpose flour
  • Salt and freshly ground black pepper, adjusted to your preference
  • Olive oil for frying

Instructions:

  1. Prepare the Vegetables: Begin by peeling the onion, carrot, and potatoes. Finely grate all three vegetables into a large mixing bowl. The finer the vegetables, the more uniform the pancakes will cook.
  2. Combine Ingredients: Crack the egg into the bowl with the grated vegetables. Add the two tablespoons of all-purpose flour to the mix. Season generously with salt and black pepper according to your taste preferences.
  3. Mix Well: Stir the mixture until all the ingredients are well combined and the vegetables are evenly coated with the egg and flour mixture. This will help bind the pancakes together when cooking.
  4. Heat the Pan: Place a non-stick frying pan over medium heat and add a generous amount of olive oil to cover the bottom. Allow the oil to heat up until it’s hot but not smoking.
  5. Cook the Pancakes: Once the oil is hot, spoon portions of the vegetable mixture into the pan, flattening them slightly to form pancakes. Cook for about 4-5 minutes on each side or until they are golden brown and crispy on the edges.
  6. Serve Warm: Once cooked, transfer the vegetable pancakes to a paper towel-lined plate to remove any excess oil. Serve the pancakes warm as a delicious side dish or a light main course.

These crispy vegetable pancakes are a delightful way to enjoy your veggies, offering a perfect balance of flavors and textures. Whether served with a dollop of sour cream or enjoyed as is, they’re sure to be a hit at any meal!

Crunchy Banana Seed Cookies

Hey everyone! Are you ready to make some super easy and healthy cookies? Today, we’re going to whip up a batch of Banana Seed Cookies that are not only delicious but also good for you. We’re using just four ingredients: sesame seeds, pumpkin seeds, banana, and a pinch of salt. That’s it! These cookies are going to be crunchy, a little sweet from the banana, and packed with goodness from the seeds. Plus, they’re super simple to make, so even if you’re not a pro baker, you can still make these cookies with no trouble. Perfect for a quick snack, a healthy treat, or to share with friends and family. Let’s get baking and enjoy some yummy cookies together!

Ingredients:

  • 1 cup of sesame seeds (about 130 grams)
  • 1 cup of pumpkin seeds (about 130 grams)
  • Just over 1/2 cup of mashed banana (about 140 grams)
  • A small pinch of salt

Instructions:

  1. Start with the Oven: First things first, heat your oven up to 180°C (350°F). This gets it ready for baking your delicious cookies.
  2. Mix Your Ingredients: Grab a large bowl and pour in your sesame seeds, pumpkin seeds, and the mashed banana. This combo might seem simple, but it’s going to make something really tasty.
  3. Season the Mix: Throw in that pinch of salt into the bowl. It’s just a tiny bit, but it’s going to help bring out all the yummy flavors.
  4. Prepare for Baking: Take out a baking sheet and line it with some parchment paper. This helps make sure your cookies don’t stick. Now, spread your seed and banana mixture onto the sheet. You can shape it a bit if you like, or just leave it natural and rustic.
  5. Bake Time: Slide your baking sheet into the oven, ideally on the lower rack so everything bakes evenly. Let it bake for about 15-20 minutes. You’re looking for a nice golden brown color to know it’s done.
  6. Cool Down: Once you take them out of the oven, let your cookies cool down a bit. They might be tempting to eat right away, but giving them a minute helps them set and become even more delicious.

And there you have it! These Banana Seed Cookies are not just easy to make but are a healthier option when you’re craving something sweet. They’re gluten-free, packed with nutrients from the seeds, and naturally sweetened with banana. Perfect for a guilt-free snack anytime!

Nutty Apricot Delight Cookies

Hey everyone! Today, we’re going to make some super yummy and healthy cookies that are perfect for snacking without any guilt. Imagine biting into a cookie full of crunchy nuts, seeds, and sweet apricots, all held together with a touch of honey. Sounds delicious, right? Well, it’s not just delicious; it’s also really good for you! These cookies don’t have any flour or added sugar, making them a great choice if you’re looking for a healthier treat. We’ll use apricots to add sweetness, a variety of nuts and seeds for crunch and nutrition, and honey to bind everything together. Plus, they’re super easy to make. Let’s get started on these tasty and wholesome apricot cookies!

Ingredients:

  • 70g of dried apricots (just under 3 ounces)
  • Water, enough to cover apricots for soaking
  • 50g of walnuts (roughly 1.8 ounces), roughly chopped
  • 70g of hazelnuts (about 2.5 ounces)
  • 30g of pumpkin seeds (approximately 1 ounce)
  • 40g of sunflower seeds (around 1.4 ounces)
  • 20g of sesame seeds (close to 0.7 ounces)
  • 20g of flaxseeds (also about 0.7 ounces)
  • 60g of almonds (roughly 2 ounces)
  • 20g of pine nuts (about 0.7 ounces)
  • 40ml of natural honey (about 1.4 fluid ounces)
  • 1 egg white
  • A pinch of salt

Directions:

  1. Soften the Apricots:
    • Place the dried apricots in a bowl and cover with cold water. Let them soak for about 15 to 20 minutes to soften up. After soaking, drain off the water completely.
  2. Prepare Nuts and Seeds:
    • Take the walnuts, hazelnuts, almonds, and pine nuts and give them a rough chop to get them into smaller pieces. Grab a large mixing bowl and toss in these chopped nuts along with the pumpkin seeds, sunflower seeds, sesame seeds, and flaxseeds.
  3. Combine Apricots and Sweeten:
    • Chop the soaked apricots into small pieces and add them to your bowl of nuts and seeds. Drizzle the natural honey over the top and stir the mixture until everything is nicely coated with honey.
  4. Bind the Mixture:
    • Crack an egg and separate the white from the yolk. Add the egg white to your mixture along with a pinch of salt. Stir everything together until the mixture becomes sticky and holds together.
  5. Shape and Bake:
    • Preheat your oven to 180°C (360°F). Line a baking tray with parchment paper. With your hands or a spoon, form small cookie shapes with the mixture and place them on the tray. Bake in the oven for about 15-20 minutes, or until they turn a lovely golden brown.
  6. Cool Down:
    • Once baked, remove the cookies from the oven and let them cool on a wire rack. This will help them to firm up and become crunchy.
  7. Serve and Enjoy:
    • Once cooled, your Nutty Apricot Delight Cookies are ready to be enjoyed. These are great as a healthy snack or a quick breakfast on the go!

This recipe offers a fantastic way to enjoy a sweet treat without the guilt, combining the natural sweetness of apricots with the rich flavors and textures of various nuts and seeds. Perfect for health-conscious cookie lovers!

Savory Zucchini Pancakes with Fresh Herbs

Hey there! If you’re looking for a delicious and simple recipe to make something different for breakfast, lunch, or dinner, you’re in the right place. I’m going to show you how to make zucchini pancakes. They’re not your regular sweet pancakes; these are savory and filled with tasty veggies and herbs. We’ll use zucchinis, eggs, cheese, and some fresh herbs like spring onions and dill to make these pancakes super flavorful. Plus, I’ll teach you how to whip up a quick sour cream and garlic sauce that goes perfectly with them. Whether you’re cooking for yourself, your family, or friends, everyone is going to love these pancakes. Let’s get started and make some delicious eats!

Ingredients:

  • 2 zucchinis
  • 3 eggs
  • A handful of spring onions
  • A handful of dill
  • 100 grams of your favorite cheese
  • 4 tablespoons of flour
  • 1 teaspoon of baking powder
  • Salt and pepper to taste
  • 4 to 5 tablespoons of sour cream for serving
  • 1 cucumber for garnish
  • 2 garlic cloves

Instructions:

  1. Vegetable Prep: Begin by rinsing the zucchinis. Grate them coarsely into a mixing bowl. Finely slice the spring onions and dill. Mince the garlic cloves, and dice the cucumber into small pieces for a side salad or garnish.
  2. Create the Batter: In the bowl with the grated zucchini, crack the eggs. Add the finely sliced spring onions, chopped dill, and shred the cheese into the mix. Stir these ingredients together until they’re well combined.
  3. Adding Dry Ingredients: Over the wet mix, sift in the flour and baking powder. Season the batter with salt and freshly ground black pepper to your liking. Stir the mixture until it’s just combined, making sure not to overmix.
  4. Cooking the Pancakes: Heat a non-stick skillet over medium heat. Once hot, use a ladle to pour batter onto the skillet, forming small pancakes. Cook until they’re golden brown on each side, flipping once, about 2-3 minutes per side.
  5. Sour Cream Garlic Sauce: While the pancakes are cooking, prepare a dipping sauce. Combine the sour cream with the minced garlic, adding a pinch of salt to taste. Mix well until smooth.
  6. Serving: Serve the warm zucchini pancakes with a dollop of the sour cream garlic sauce and a side of the diced cucumber.
  7. Enjoyment: Dig into these savory pancakes, perfect for any meal of the day. They offer a delightful mix of fresh flavors and textures, making them a hit for both kids and adults alike.

This revamped recipe takes a classic approach to zucchini pancakes, incorporating fresh herbs and a tangy sour cream garlic sauce for added flavor. It’s a versatile dish that can be enjoyed as a main course, side dish, or even a hearty snack.

Homemade Bread with Sunflower Seed Oil

Welcome to a fun and simple way to make your own bread at home! This recipe is perfect for anyone who wants to try baking bread for the first time or for those who love homemade goodies. We’ll use ingredients like warm water, milk, yeast, sugar, sunflower seed oil, salt, and flour. I’ll guide you step by step, so you end up with a delicious loaf of bread that’s soft on the inside and golden on the outside. Plus, we’ll add a little butter on top for extra yumminess. Let’s start this bread-making adventure and fill your home with the lovely smell of baking bread!

Ingredients:

  • 3/4 cup of lukewarm water
  • 3/4 cup of milk, heated
  • 2 1/2 teaspoons of active dry yeast
  • 2 tablespoons of granulated sugar
  • 7 tablespoons and an additional 1 teaspoon of sunflower seed oil
  • 1 teaspoon of fine-grain salt
  • 6 cups of all-purpose wheat flour
  • Butter, as preferred for serving

Instructions:

  1. Begin by combining the lukewarm water and hot milk in a large mixing bowl. This mixture should be warm to the touch but not too hot to prevent harming the yeast.
  2. Sprinkle the active dry yeast over the warm liquid mixture and add the granulated sugar. Stir gently to combine. Let this sit for about 5 to 10 minutes, or until the mixture becomes frothy, indicating that the yeast is active and ready.
  3. Stir in 7 tablespoons plus 1 teaspoon of sunflower seed oil into the yeast mixture. Add the teaspoon of fine-grain salt. These additions will help enrich the bread’s flavor and texture.
  4. Gradually add the all-purpose wheat flour to the liquid ingredients, mixing continuously. Begin with adding a cup at a time, stirring well after each addition, until a dough starts to form.
  5. Once the dough has formed, transfer it onto a lightly floured surface. Knead the dough for about 8 to 10 minutes, or until it becomes smooth and elastic. If the dough is too sticky, you can add a little more flour, but do so sparingly to avoid drying out the dough.
  6. Place the kneaded dough in a clean, oiled bowl, turning it once to coat all sides with oil. Cover the bowl with a clean kitchen towel and set it in a warm, draft-free area. Allow the dough to rise until it has doubled in size, which usually takes about 1 to 1.5 hours.
  7. Once the dough has doubled, punch it down gently to release any air bubbles. Shape it according to your preference or fit it into a greased bread pan.
  8. Preheat your oven to a temperature recommended for baking bread (usually around 350°F to 375°F). Let the shaped dough undergo a second rise until it puffs up nicely, about 30 minutes.
  9. Bake the bread in the preheated oven until the crust is golden brown and the loaf sounds hollow when tapped, approximately 25 to 35 minutes.
  10. Remove the bread from the oven and allow it to cool on a wire rack. Serve your homemade bread with butter to taste. Enjoy the warm, comforting flavors of your freshly baked creation!

This recipe provides a fresh take on making homemade bread, incorporating the light, nutty flavor of sunflower seed oil for a unique twist.

Garden Harvest Salad Recipe

Today, we’re going to make a super easy and delicious salad that’s perfect for any meal! This salad is packed with tasty veggies like carrots, red pepper, peas, and corn, plus some canned ham for extra flavor. We’ll mix everything together with mayonnaise and yogurt to make it creamy, and add a little salt and pepper to taste. It’s a great dish to bring to a picnic or have as a side for dinner. Let’s get started and mix up something yummy!

Ingredients:

  • 3 medium carrots, peeled and grated
  • 7 eggs, hard-boiled and finely chopped
  • 200 g canned ham, diced
  • 1 red pepper, finely diced
  • 200 g canned peas, drained
  • 180 g canned corn, drained
  • 3 tablespoons mayonnaise
  • 3 tablespoons natural yogurt
  • 1/2 teaspoon black pepper
  • 1/2 teaspoon salt

Instructions:

  1. Prep the Vegetables and Eggs:
    • Start by preparing your vegetables. Grate the carrots, dice the red pepper, and ensure your canned peas and corn are well-drained to remove any excess liquid. For the eggs, place them in a pot of water, bring to a boil, then let them simmer for about 10 minutes. Cool them under cold water, peel, and then chop finely.
  2. Mix the Salad:
    • In a large bowl, combine the grated carrots, chopped eggs, diced ham, and red pepper. Add the drained peas and corn to the mixture. Toss these ingredients together gently to distribute them evenly.
  3. Prepare the Dressing:
    • In a separate small bowl, whisk together the mayonnaise and natural yogurt until smooth. Season with black pepper and salt according to your taste.
  4. Combine and Chill:
    • Pour the dressing over the vegetable and egg mixture, and stir well to ensure everything is coated evenly with the dressing. Cover the bowl with plastic wrap and let it chill in the refrigerator for at least an hour to allow the flavors to meld.
  5. Serve:
    • Once chilled, give the salad a gentle stir and do a taste test to adjust the seasoning if necessary. Serve the Garden Harvest Salad Cups chilled, ideally on a bed of fresh greens or in individual cups for a fancy presentation.

This “Garden Harvest Salad Cups” recipe brings a colorful and tasty twist to your table, combining the crunchiness of fresh vegetables with the savory notes of ham and the richness of eggs, all tied together with a creamy and tangy dressing. It’s a versatile dish that can be enjoyed on its own or as a complement to any main course. Enjoy your meal!

Savory Vegetable Cheese Pancakes

Let’s make something fun and tasty today: Veggie-Cheese Pancakes! This recipe is like a magic trick where we turn simple ingredients like eggs, milk, flour, and some veggies into delicious pancakes. But these aren’t just any pancakes; they’re filled with yummy vegetables and melty cheese, making them perfect for any meal. Whether you’re looking for a new breakfast idea or a yummy snack, these pancakes are going to be a hit. Let’s get cooking and fill our kitchen with the smell of these awesome pancakes!

Ingredients:

  • 2 large eggs
  • 1.5 cups of milk
  • 1.5 cups of water
  • 1 tablespoon of sugar
  • 1 teaspoon of active dry yeast
  • 1 teaspoon of baking soda
  • 3.5 cups of all-purpose flour
  • 1 teaspoon of salt
  • 1 medium green or red bell pepper, finely diced
  • 1 medium tomato, finely diced
  • 1 medium potato, grated
  • 120 grams of your favorite cheese (cheddar, mozzarella, etc.), grated

Instructions:

  1. Prepare the Batter:
    • In a large bowl, whisk together the eggs, milk, and water until well combined. Stir in the sugar and let it dissolve.
    • Sprinkle the yeast over the liquid mixture, stir gently, and allow it to activate for about 10 minutes, or until it becomes frothy.
    • In another bowl, mix the flour, baking soda, and salt. Gradually add the dry ingredients to the wet, mixing until you have a smooth batter. Let the batter rest for about 30 minutes to allow the yeast to work.
  2. Add the Veggies and Cheese:
    • After the batter has rested, fold in the diced bell pepper, tomato, grated potato, and grated cheese. Mix until everything is evenly distributed.
  3. Cook the Pancakes:
    • Heat a non-stick skillet or griddle over medium heat. Lightly grease it with a bit of oil or butter.
    • Pour 1/4 cup of batter for each pancake onto the skillet. Cook until bubbles form on the surface, then flip and cook until golden brown on the other side and cooked through.
  4. Serve:
    • Serve the pancakes hot, with your choice of toppings or sides. They go great with a dollop of sour cream, a sprinkle of fresh herbs, or even a side of your favorite salad.

This “Savory Vegetable Cheese Pancakes” recipe is a fantastic way to enjoy pancakes with a twist. The addition of fresh veggies and cheese not only adds flavor but also makes this dish more nutritious and satisfying. Enjoy experimenting with this versatile recipe by adding your own favorite ingredients or spices!

Savory Onion and Potato Pancakes

Whip up a delightful and hearty dish with our savory onion and potato pancakes recipe. Combining the sweetness of red onions, the earthiness of potatoes, and the richness of cheese, these pancakes are perfect for any meal of the day. Seasoned with salt and pepper, and bound together with eggs and flour, they are fried until golden and crispy. Served with fresh tomatoes and a sprinkle of dill or parsley, these pancakes offer a delicious blend of flavors and textures. Let’s dive into the recipe and create a dish that’s sure to become a new favorite.

Ingredients:

  • 4 red onions, finely sliced
  • 4 eggs
  • 2 potatoes, grated
  • Salt, to taste
  • Ground black pepper, to taste
  • 4 tablespoons plain flour
  • Vegetable oil, for frying
  • 2 tomatoes, sliced
  • 1 bunch of dill or parsley, chopped
  • Cheese, grated, to taste

Instructions:

  1. Prepare the Ingredients:
    • Begin by removing the skins and thinly slicing the red onions. Then, shred the potatoes and press them to remove any extra water. Slice the tomatoes and chop the dill or parsley. Set aside.
  2. Make the Pancake Batter:
    • In a large mixing bowl, combine the sliced onions, grated potatoes, eggs, salt, and ground black pepper. Mix well to ensure the ingredients are evenly distributed.
    • Add the plain flour to the mixture and stir until a cohesive batter forms. If the mixture seems too wet, add a little more flour to adjust the consistency.
  3. Cook the Pancakes:
    • Warm up a good amount of vegetable oil in a skillet on medium heat. Once the oil is hot, spoon the batter into the pan, forming pancakes of your desired size.
    • Fry the pancakes for a few minutes on each side, or until they are golden brown and crispy. Once cooked, transfer them to a paper towel-lined plate to drain any excess oil.
  4. Assemble and Serve:
    • Serve the hot pancakes topped with sliced tomatoes, a sprinkle of grated cheese, and a garnish of chopped dill or parsley.

Conclusion: Enjoy your savory onion and potato pancakes as a fulfilling breakfast, a satisfying lunch, or a cozy dinner. This versatile dish not only showcases the humble onion and potato in a flavorful way but also brings a touch of comfort to your dining table. Perfect for any day of the year, these pancakes are sure to please everyone.

Garlic Butter French Fries Recipe

Welcome to our delicious twist on a classic favorite: Garlic Butter French Fries. This recipe takes the traditional crispy french fries and elevates them with a rich, garlicky butter topping. Perfect as a side dish, snack, or treat, these fries combine the comforting crunch of perfectly fried potatoes with the irresistible flavor of garlic butter. Whether you’re looking for something special to serve at a gathering or just want to indulge in a flavorful snack, these garlic butter french fries are sure to impress. Let’s dive in and make some mouthwatering fries!

Ingredients:

  • 600g potatoes
  • 2 tablespoons corn flour
  • 2 tablespoons butter
  • 2 tablespoons finely minced garlic
  • Oil for frying

Instructions:

  1. Prepare the Potatoes: Begin by peeling the potatoes and cutting them into thin strips. Try to keep the size consistent for even cooking.
  2. Blanch the Fries: Bring a large pot of water to a boil. Blanch the potato strips for about 3-4 minutes. Drain them and let them cool.
  3. Corn Flour Coating: Once cooled, pat the potato strips dry with a towel. Place them in a large bowl and sprinkle with corn flour. Toss until the fries are evenly coated.
  4. First Fry: Heat oil in a deep fryer or a large, deep pan to 160°C (320°F). Fry the potato strips in batches for 15 minutes each, or until they are soft but not browned. Remove from the oil and drain on paper towels. Let them cool for a few minutes.
  5. Second Fry: Increase the oil temperature to 190°C (374°F). Return the fries to the oil in batches and fry for an additional 5 minutes, or until they are golden brown and crispy. Remove from the oil and drain on fresh paper towels.
  6. Garlic Butter Mixture: While the fries are cooling from their second fry, melt the butter in a small pan over medium heat. Add the minced garlic to the melted butter and sauté until it’s fragrant, about 1-2 minutes. Be careful not to burn the garlic.
  7. Toss Fries in Garlic Butter: Transfer the crispy fries to a large bowl. Pour the garlic butter over the fries and toss gently until they are well coated.
  8. Serve: Serve the garlic butter french fries hot, with your favorite dipping sauce or as they are, and enjoy the rich, garlicky goodness.

These garlic butter french fries are a fantastic way to upgrade your fry game, offering a delightful combination of flavors that will have everyone asking for more. Happy cooking!