Easy Chicken Drumsticks with Veggies

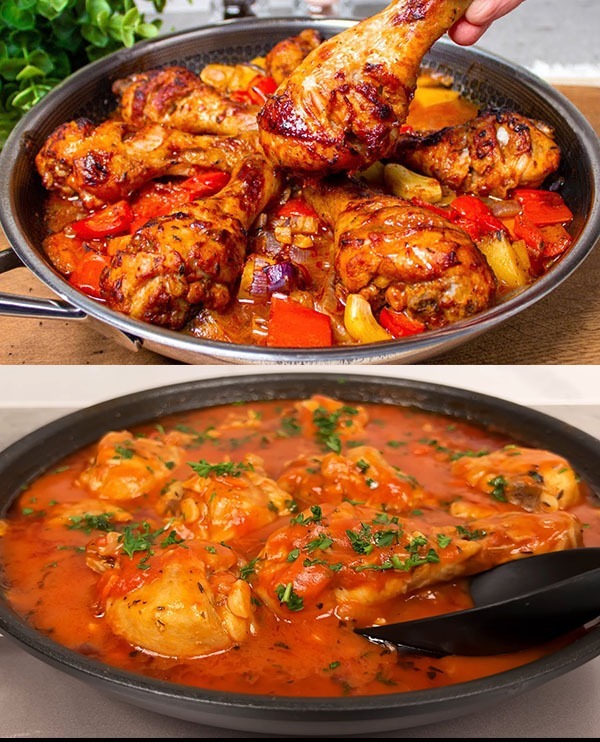
Today, we’re making a super simple and tasty chicken drumsticks meal with lots of yummy vegetables like potatoes, carrots, and more. This recipe is easy to follow, and you’ll end up with a delicious dinner that everyone will love. We’ll mix some spices with tomato paste to make our chicken taste amazing, and then bake everything together in the oven. Let’s get started on this fun and healthy meal!

Ingredients:

  • Chicken Drumsticks: 7 pieces
  • Tomato Paste: 2 tablespoons
  • Olive Oil: 3 tablespoons
  • Seasonings: Salt, Black Pepper, Curry, Thyme (adjust to taste)
  • Hot Water: 200 ml
  • Potatoes: 3, cut into wedges
  • Carrots: 4, sliced
  • Red Onion: 1, chopped
  • Paprika (vegetable): 1, sliced
  • Garlic Cloves: 5, minced
  • Onion: 1, diced
  • Zucchini: 1, sliced
  • Eggplant: 1, cubed
  • Tomato Sauce: 100 ml

Instructions:

  1. Preparation:
    • Preheat your oven to 200°C (392°F).
    • In a large bowl, mix the tomato paste, olive oil, salt, black pepper, curry, and thyme. Stir until well combined.
  2. Marinate the Chicken:
    • Add the chicken drumsticks to the bowl and toss them until they are fully coated with the marinade. Let them marinate for at least 30 minutes. For deeper flavor, marinate overnight in the refrigerator.
  3. Prepare the Vegetables:
    • While the chicken is marinating, prepare your vegetables as described in the ingredients list.
  4. Assemble for Baking:
    • In a large baking dish, spread the potatoes, carrots, red onion, paprika, garlic, onion, zucchini, and eggplant evenly.
    • Place the marinated chicken drumsticks on top of the vegetables.
    • Pour the hot water around the chicken and vegetables in the dish. This will help to create a moist environment for the chicken and vegetables to cook in.
    • Drizzle the tomato sauce over the chicken and vegetables.
  5. Baking:
    • Cover the baking dish with aluminum foil and bake in the preheated oven for about 45 minutes.
    • After 45 minutes, remove the foil and bake for an additional 15-20 minutes, or until the chicken is golden brown and the vegetables are tender.
  6. Serving:
    • Let the dish rest for a few minutes after taking it out of the oven.
    • Serve warm, ensuring each plate gets a portion of chicken and a generous helping of the roasted vegetables.

Tips:

  • For an extra kick, add a pinch of chili flakes to the marinade.
  • If you prefer your vegetables with a bit more crunch, add them to the baking dish 15 minutes after the chicken has started cooking.

Enjoy your flavorful and nutritious chicken drumsticks dish, perfect for a cozy family dinner!

Matcha Sponge Cake Recipe

Ingredients:

  • 4 large eggs, room temperature
  • 120g (1 cup) all-purpose flour
  • 120g (1/2 cup) granulated sugar
  • 1 tablespoon matcha (green tea) powder
  • 60ml (1/4 cup) milk, room temperature
  • 60ml (1/4 cup) vegetable oil
  • 1 teaspoon vanilla extract
  • 1/2 teaspoon baking powder
  • A pinch of salt

Instructions:

  1. Preheat Oven and Prepare Pan:
    • Preheat your oven to 175°C (350°F). Line the bottom of an 8-inch round cake pan with parchment paper and lightly grease the sides.
  2. Mix Dry Ingredients:
    • Sift together the all-purpose flour, matcha powder, baking powder, and salt into a bowl. Sifting not only combines these ingredients but also aerates the flour, making the cake lighter.
  3. Combine Wet Ingredients:
    • In a separate bowl, whisk together the eggs and granulated sugar until the mixture is pale and slightly thickened. This can take about 5 minutes with an electric mixer on high speed.
    • Add the milk, vegetable oil, and vanilla extract to the egg mixture, and gently whisk until just combined.
  4. Combine Wet and Dry Ingredients:
    • Gradually add the dry ingredients to the wet ingredients, folding gently with a spatula until just combined. Make sure not to mix too much, as doing so can cause the batter to lose volume and alter the texture of the cake.
  5. Bake:
    • Transfer the mixture into the ready cake pan, evening out the surface with a spatula. Cook in the oven, already heated, for 25-30 minutes, or until a toothpick poked into the middle of the cake comes out without any batter sticking to it.
  6. Cool:
    • Take the cake out of the oven and allow it to cool down in the pan for roughly 10 minutes. Then, run a knife around the edge of the pan to loosen the cake and invert it onto a wire rack to cool completely.
  7. Serve:
    • Once cooled, you can dust the cake with additional matcha powder for decoration and a more intense flavor. Serve as is, or with a dollop of whipped cream and fresh fruit.

This Matcha Sponge Cake is a wonderful introduction to Japanese-style desserts, offering a unique flavor that’s not overly sweet and a texture that’s light and airy. Enjoy baking and indulging in your homemade Japanese cake!

Banana Bread Brownies Recipe

Dive into the sweet world of baking with this unique twist on two classic favorites: banana bread and brownies. This recipe brings together the moist, comforting texture of banana bread with the rich, chocolatey goodness of brownies, creating a delectable treat that’s sure to please everyone. Whether you’re a seasoned baker or new to the kitchen, these Banana Bread Brownies are easy to make and impossible to resist. Let’s get started on this delightful journey that promises the best of both worlds in every bite.

Ingredients:

  • For the Brownies:
    • 2 ripe bananas, mashed
    • 1/2 cup (1 stick) unsalted butter, melted
    • 1 cup granulated sugar
    • 1 egg, room temperature
    • 1 teaspoon vanilla extract
    • 1/2 cup all-purpose flour
    • 1/2 cup cocoa powder
    • 1/2 teaspoon baking powder
    • 1/4 teaspoon salt
    • 1/2 cup chocolate chips (optional)
  • For the Banana Bread Swirl:
    • 1 ripe banana, mashed
    • 2 tablespoons unsalted butter, softened
    • 1/4 cup brown sugar
    • 1/2 teaspoon cinnamon
    • 1/4 cup all-purpose flour

Instructions:

  1. Preheat Oven and Prepare Pan:
    • Preheat your oven to 350°F (175°C). Grease an 8×8 inch baking pan or line it with parchment paper for easy removal.
  2. Mix Brownie Batter:
    • In a large bowl, combine the mashed bananas with melted butter. Stir in granulated sugar, egg, and vanilla extract until well combined.
    • Sift together flour, cocoa powder, baking powder, and salt. Gradually add the dry ingredients to the wet ingredients, mixing until just combined. Fold in chocolate chips if using.
  3. Prepare Banana Bread Swirl:
    • In a separate bowl, mix together the mashed banana, softened butter, brown sugar, cinnamon, and flour until smooth.
  4. Assemble:
    • Pour the brownie batter into the prepared pan, spreading it out evenly. Dollop the banana bread mixture on top of the brownie layer. Use a knife or skewer to swirl the two mixtures together, creating a marbled effect.
  5. Bake:
    • Bake in the preheated oven for 25-30 minutes, or until a toothpick inserted into the center comes out mostly clean with a few moist crumbs.
  6. Cool and Serve:
    • Allow the brownies to cool in the pan before cutting into squares. Serve as is, or for an extra treat, top with a scoop of vanilla ice cream.

Enjoy your homemade Banana Bread Brownies, a perfect blend of banana bread’s moist texture and the rich taste of brownies, making every bite a delightful experience.

Homemade Chicken Pot Pie Soup Recipe

Dive into the heartwarming embrace of our Cozy Chicken Pot Pie Soup, a delightful twist on the classic comfort food. This recipe marries the rich, savory flavors of a traditional chicken pot pie with the soothing warmth of a creamy soup. Perfect for chilly evenings or whenever you’re in need of a comforting meal, this soup brings the essence of home-cooked goodness to your table. With tender chunks of chicken, a medley of vegetables, and a creamy broth, each spoonful is like a hug for your soul. Let’s embark on this culinary journey to create a soup that’s sure to become a cherished favorite in your recipe collection.

Ingredients:

  • For the Soup:
    • 2 tablespoons olive oil
    • 1 medium onion, chopped
    • 2 garlic cloves, minced
    • 2 medium carrots, diced
    • 2 celery stalks, diced
    • 1/2 cup frozen peas
    • 1/2 cup frozen corn
    • 2 medium potatoes, peeled and cubed
    • 2 cups cooked chicken, shredded (you can use leftover rotisserie chicken)
    • 4 cups chicken broth
    • 1 cup milk
    • 1/2 cup all-purpose flour
    • 1 teaspoon dried thyme
    • 1 teaspoon dried parsley
    • Salt and pepper to taste
  • For Thickening (Roux):
    • 2 tablespoons butter
    • 1/4 cup all-purpose flour

Instructions:

  1. Prepare the Vegetables:
    • Warm the olive oil in a big pot over medium heat. Then, mix in the chopped onions, minced garlic, diced carrots, and celery. Cook until the vegetables are softened, about 5 minutes.
  2. Cook the Soup:
    • Add the frozen peas, corn, and cubed potatoes to the pot. Stir in the cooked chicken and chicken broth. Bring the mixture to a simmer.
  3. Season the Soup:
    • Add the dried thyme, parsley, salt, and pepper to the pot. Let the soup simmer gently until the potatoes are tender, about 15 minutes.
  4. Make the Roux:
    • In a separate pan, melt the butter over medium heat. Stir in the flour and cook for about 2 minutes, stirring constantly, until the mixture is golden brown.
  5. Thicken the Soup:
    • Gradually whisk the milk into the roux until smooth. Pour this mixture into the simmering soup, stirring constantly until the soup thickens. This should take about 5 minutes.
  6. Final Adjustments:
    • Taste the soup and adjust the seasoning with more salt and pepper if needed. If the soup is too thick, you can thin it with a little more chicken broth or milk.
  7. Serve:
    • Ladle the soup into bowls. For an extra touch, serve with a sprinkle of chopped parsley on top or a side of crusty bread for dipping.

This Chicken Pot Pie Soup brings all the cozy flavors of the traditional pie in a bowl, making it a comforting and satisfying meal for any day of the week. Enjoy your homemade soup!

Easy Milky Coconut-Cheese Dessert

Let’s make a super easy and yummy dessert that’s creamy and full of coconut flavor! We’ll mix milk, a little sugar, and cornstarch with some cheese to make it extra creamy. Then, we’ll let it chill until it’s just right. To make it even more special, we’ll sprinkle coconut on top. It’s a fun and simple treat that’s perfect for when you want something sweet and satisfying. Ready to get started?

Ingredients:

  • Milk: 600g (approximately 2.5 cups)
  • Sugar: 50g (about 4 tablespoons)
  • Cornstarch: 60g (roughly 0.5 cup)
  • Cheese Slices: 2 pieces
  • Shredded Coconut for garnish

Instructions:

  1. Combine and Cook: In a medium-sized saucepan, whisk together the milk, sugar, and cornstarch until smooth. Add the cheese slices to the mixture. Place the saucepan over low heat, stirring continuously, until the mixture thickens and the cheese has fully melted. Be patient and keep the heat low to avoid burning.
  2. Chill: Once the mixture has thickened to a pudding-like consistency, remove the saucepan from the heat. Pour the mixture into a serving dish or individual cups. Allow it to cool to room temperature before covering and placing it in the refrigerator. Chill the pudding for at least 4 hours, or for best results, leave it overnight to set completely.
  3. Garnish and Serve: Before serving, sprinkle a generous amount of shredded coconut over the top of the pudding. For an extra touch of sweetness and texture, you can also sprinkle some milk powder along with the coconut if desired.

Tips for Success:

  • Ensure continuous stirring while cooking to prevent the pudding from sticking to the bottom of the pan or forming lumps.
  • For a smoother texture, consider blending the mixture before chilling if you notice any lumps or unevenness.
  • Experiment with different types of cheese for varying flavors. Cream cheese or soft white cheeses work well for a creamier texture.

Serving Suggestion: Enjoy this delightful coconut-cheese pudding as a refreshing dessert after a meal or as a sweet treat at any time of the day. Its creamy texture combined with the tropical flavor of coconut makes it a unique and satisfying dessert option.

Super Easy Caramel Milk Pudding

Today, we’re going to make a super yummy caramel milk pudding! It’s creamy, sweet, and has a delicious caramel layer on top that makes it extra special. We’ll mix some eggs, milk, a bit of cream, and sugar to create a smooth and soft pudding. Then, we’ll make a simple caramel sauce to go on top. This dessert is perfect for when you want something sweet and comforting. It’s really easy to make, so let’s get started and whip up a tasty treat that everyone will love!

Ingredients:

  • Sugar: 95g + 80g for caramel
  • Water: 20g + 25g (warm)
  • Eggs: 4
  • Milk: 360g
  • Heavy Cream: 40g

Instructions:

For the Caramel:

  1. In a small saucepan, combine 80g of sugar with 20g of water. Cook over medium heat until the sugar dissolves and turns into a golden caramel. Be careful not to burn it.
  2. Carefully add 25g of warm water to the caramel. This will stop the cooking process and thin it out a bit. Pour the caramel into the bottom of your pudding mold or molds, and set aside to cool.

For the Pudding:

  1. In a mixing bowl, lightly beat the 4 eggs. Add 95g of sugar, and mix until well combined.
  2. Pour in 360g of milk and 40g of heavy cream into the egg mixture. Gently stir the mixture with a whisk. Remember, the goal is to mix without incorporating too much air to avoid overwhipping.
  3. Strain the mixture through a fine sieve to ensure a smooth texture. This step helps remove any egg strands or lumps for a silky-smooth pudding.
  4. Pour the strained mixture over the caramel in the mold.

Cooking the Pudding:

  1. Preheat your oven to 160°C (320°F). Place the pudding mold in a larger baking dish. Pour hot water into the baking dish until it comes halfway up the sides of the pudding mold. This water bath method helps cook the pudding gently and evenly.
  2. Bake for about 40-50 minutes, or until the pudding is set but still slightly wobbly in the center.
  3. Once done, remove from the oven and let cool. Refrigerate for at least 4 hours, or overnight, to fully set.

Serving:

  1. To serve, run a knife around the edge of the pudding to loosen it from the mold. Invert onto a plate. The caramel sauce will flow over the creamy pudding.

Tips:

  • Adding whipped cream to the mixture, as suggested, makes the pudding richer and softer. However, if you prefer, you can use milk instead for a lighter version.
  • When mixing, do it gently with a whisk to avoid incorporating too much air, which can affect the pudding’s texture.

Enjoy your homemade creamy milk pudding, a perfect blend of smooth texture and rich flavors, topped with delicious caramel sauce!

Cloudy Sky Jelly Cake

Let’s make a fun and yummy dessert that looks like the sky! We’ll use cream cheese and sugar to make fluffy clouds, whip up some cream, and then create layers of clear and blue jelly that remind us of the sky. It’s like making a piece of art you can eat! This dessert is perfect for sharing with friends and family, and it’s not too hard to make. Follow along, and let’s create a beautiful sky on a plate!

Ingredients:

For the Clouds:

  • Cream Cheese: 100g
  • Granulated Sugar: 20g
  • Powdered Gelatin: 3g
  • Water: 1 tablespoon

For the Whipped Cream:

  • Fresh Cream: 100ml

For the Clear Jelly:

  • Water: 400ml
  • White grape juice: 150ml
  • Sheet Gelatin: 12g
  • Granulated Sugar: 30g to 40g

For the Sky Blue Jelly:

  • Prepared Clear Jelly Liquid: 150ml
  • Blue Curacao Syrup: A dash
  • Strawberry Syrup: A dash

Instructions:

  1. Creating the Clouds:
    • Dissolve 3g of powdered gelatin in 1 tablespoon of water. Heat this mixture for 10 seconds at 500W in the microwave, ensuring it becomes liquid.
    • In a mixing bowl, blend 100g of cream cheese with 20g of granulated sugar until smooth.
    • Once the gelatin is liquid, mix it into the cream cheese blend. Incorporate 100ml of fresh cream, whipped to soft peaks, into the mixture. Be quick to avoid lumps.
    • Spoon or pipe this mixture onto a tray lined with parchment paper to form cloud shapes. Refrigerate until set.
  2. Preparing the Clear Jelly:
    • In a saucepan, combine 400ml of water, 150ml of white wine, and 30g to 40g of granulated sugar. Bring to a boil.
    • Remove from heat and dissolve 12g of sheet gelatin in the hot liquid.
    • Allow the mixture to cool slightly before pouring it into your desired mold. If adding cloud shapes, ensure they are set before adding them to the mold. Refrigerate until the jelly is firm.
  3. Creating the Sky Blue Jelly:
    • Take 150ml of the prepared clear jelly liquid. Add a small amount of Blue Curacao syrup and strawberry syrup to achieve a sky blue color.
    • Once the clear jelly layer is set, pour the sky blue jelly mixture over it. Refrigerate until this layer is also firm.

Tips:

  • Adjust the sugar in the clear jelly according to your taste and the sweetness of the wine.
  • If the wine’s aroma is too strong, you can reduce the quantity and adjust the gelatin accordingly.
  • The key to a beautiful layered effect is to ensure each layer is partially set before adding the next. This prevents the layers from blending together.

Serving Suggestion: Enjoy this visually stunning dessert as a centerpiece at your next gathering. Its layers mimic the beauty of the sky, from fluffy clouds to the clear blue beyond, offering not just a treat for the palate but also a feast for the eyes.

Crisp Cabbage and Apple Salad

Let’s make a super simple and tasty salad that’s perfect for any time of the day! We’ll use fresh cabbage, a sweet apple, a crunchy carrot, and some spring onions to create a salad that’s bursting with flavors and textures. To dress it up, we’ll squeeze in some lemon juice, add creamy yogurt, sweet honey, garlic, and a bit of mustard for an extra kick. This salad is not only delicious but also really easy to put together. Whether you’re looking for a quick lunch or a healthy side dish, this salad is a great choice. Let’s get started and whip up a bowl of this yummy cabbage salad!

Ingredients:

  • 400g of crisp, fresh cabbage
  • 1 tsp of fine sea salt
  • 1/2 tsp of baking soda
  • 1 fresh apple, thoroughly rinsed
  • 1 fresh carrot
  • A handful of vibrant spring onions
  • Juice from half a fresh lemon
  • 4 tbsp of creamy yogurt
  • 2 tbsp of natural honey
  • 3 cloves of aromatic garlic
  • 1 tsp of tangy mustard

Instructions:

  1. Begin by finely shredding the 400g of fresh cabbage into a large mixing bowl. Sprinkle with 1 tsp of salt and 1/2 tsp of baking soda, mixing well to ensure even coverage.
  2. Take the rinsed apple and carrot, and grate them into the bowl with the cabbage, adding a burst of color and sweetness.
  3. Finely chop a generous bunch of spring onions and add them to the bowl, introducing a fresh, oniony crunch to the mix.
  4. Extract the juice from half a lemon and drizzle it over the salad ingredients, adding a zesty tang that will brighten the flavors.
  5. Add 4 tablespoons of creamy yogurt to the bowl, providing a smooth, cooling contrast to the crisp vegetables.
  6. Drizzle 2 tablespoons of natural honey over the mixture, adding a subtle sweetness that complements the tangy lemon.
  7. Mince 3 cloves of garlic as finely as possible and add them to the salad, introducing a warm, aromatic depth.
  8. Finally, stir in 1 teaspoon of tangy mustard, mixing thoroughly to ensure every bite is infused with flavor.
  9. Toss the salad well to combine all the ingredients, ensuring the dressing evenly coats the vegetables.
  10. Serve this crisp, refreshing salad as a delightful side dish or a light, nutritious meal on its own. Enjoy the harmonious blend of flavors and textures that make this dish uniquely satisfying.

Bon Appétit!