Discover the joy of turning simple ingredients into a delightful and nutritious meal with this broccoli patties recipe. Since mastering this dish, it’s become a daily favorite, offering a perfect blend of health and flavor. Accompanied by a tangy yogurt garlic dressing, these patties are a testament to the versatility of broccoli. Let’s dive into the recipe that will transform your meal times.
Ingredients for the Patties:
Broccoli: 500g (1 lb 1¾ oz), chopped
Garlic: 3 cloves, minced
Eggs: 2, beaten
Rolled Oats: 100g (1 cup)
Grated Mozzarella: 100g (3½ oz)
Salt: To taste
Black Pepper: To taste
Olive Oil: For frying
Ingredients for the Dressing:
Yogurt: 125g (½ cup)
Garlic: 2 cloves, minced
Parsley: Chopped, to taste
Lemon Juice: From half a lemon
Salt: To taste
Black Pepper: To taste
Baking Instructions:
Temperature: 200°C (392°F)
Time: 20 minutes
Heat Setting: Top and bottom heat
Preparation Steps:
Prepare the Broccoli:
Steam or boil the broccoli until it’s tender but still firm. Let it cool, then chop finely or pulse in a food processor until you get small pieces.
Make the Patty Mixture:
In a large bowl, combine the finely chopped broccoli, minced garlic, beaten eggs, rolled oats, grated mozzarella, salt, and black pepper. Mix well until the ingredients are evenly distributed and the mixture holds together.
Shape the Patties:
Form the mixture into patties using your hands. If the mixture is too sticky, you can oil your hands slightly or add a bit more oats to the mixture.
Cook the Patties:
Heat a generous amount of olive oil in a skillet over medium heat. Fry the patties until they are golden brown on both sides, approximately 4-5 minutes per side.
Prepare the Dressing:
While the patties are cooking, prepare the dressing by mixing yogurt, minced garlic, chopped parsley, lemon juice, salt, and black pepper in a small bowl. Adjust the seasoning to your taste.
Bake:
For a crispier finish, you can also bake the fried patties in the preheated oven at 200°C (392°F) for about 20 minutes, flipping halfway through.
Serve:
Serve the broccoli patties hot, drizzled with the yogurt garlic dressing or with the dressing on the side as a dip.
These broccoli patties are a fantastic way to enjoy a healthy, flavorful meal any day of the week. Whether you’re looking for a new favorite lunch, dinner, or a nutritious snack, this recipe is sure to satisfy. Enjoy the delightful combination of tender broccoli, melted mozzarella, and the tangy freshness of the yogurt garlic dressing.
Indulge in the delightful crunch and soft interior of homemade churros, a treat that brings a piece of Spanish cuisine right into your kitchen. This recipe simplifies the process, allowing you to create these sugary, buttery delights with an optional Nutella filling for an extra layer of decadence. Let’s get started on this sweet adventure.
Ingredients:
Water: 250ml
Sugar: 30g, plus extra for coating
Salt: 1/4 teaspoon
Vanilla Extract: 1/2 teaspoon
Butter: 50g, unsalted
All-Purpose Flour: 200g
Eggs: 2, large
Nutella: Optional, for filling
Instructions:
Prepare the Dough:
In a medium saucepan, combine the water, 30g of sugar, salt, and butter. Bring the mixture to a boil over medium heat, stirring until the butter is fully melted.
Remove the saucepan from the heat and stir in the vanilla extract. Quickly add the flour, stirring vigorously until the mixture forms a smooth dough that pulls away from the sides of the pan.
Incorporate the Eggs:
Allow the dough to cool slightly, then add the eggs one at a time, fully incorporating each egg before adding the next. The dough should be smooth and glossy.
Heat the Oil:
Fill a deep skillet or saucepan with oil, about 2 inches deep, and heat it to 180°C (356°F). Prepare a plate lined with paper towels for draining the churros.
Pipe and Fry:
Spoon the dough into a piping bag fitted with a large star tip. Carefully pipe 4-6 inch lengths of dough into the hot oil, cutting it with scissors. Fry the churros, turning them occasionally, until they are golden brown on all sides.
Coat with Sugar:
Mix some sugar in a shallow dish. Drain the churros on the paper towels briefly, then while still warm, roll them in the sugar to coat.
Serve with Nutella:
If using Nutella, warm it slightly to make it more fluid for dipping. Serve the churros with Nutella on the side for dipping, or fill them using a narrow piping tip and bag.
Enjoy the irresistible texture and flavor of these homemade churros, perfect for a special treat or to bring a touch of Spanish flair to your dessert table. Whether enjoyed plain, sugared, or filled with Nutella, they’re sure to be a hit.
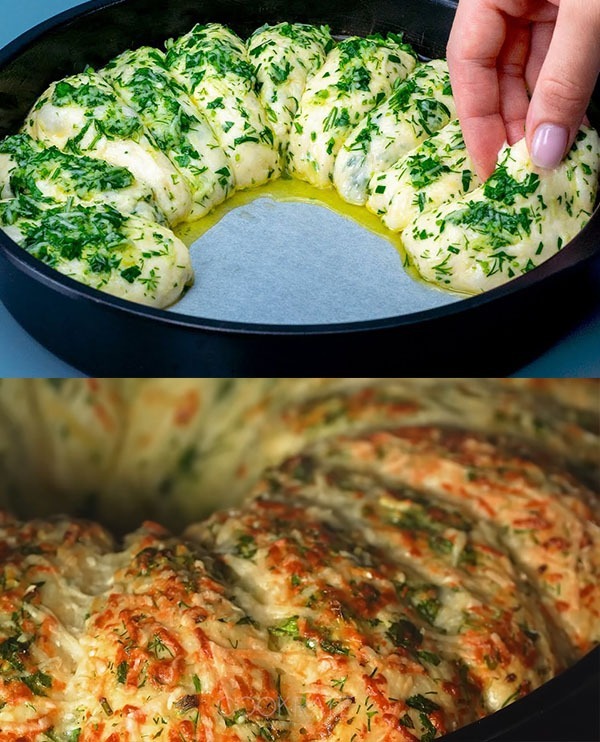
Immerse yourself in the warmth of tradition with this century-old recipe, passed down through generations. This herb and garlic bread, a legacy of my grandmother’s culinary prowess, stands as the most flavorful bread I’ve ever had the pleasure of tasting. Let’s honor this timeless recipe by creating a loaf infused with herbs, garlic, and a blend of cheeses that promises to captivate your senses.
Ingredients for the Dough:
Warm Water: 280 ml (9.46 fl oz)
Sugar: 10 g (0.35 oz)
Yeast: 5 g (0.18 oz) – Allow to hydrate for 10 minutes
Flour: 370 g (13 oz)
Salt: 10 g (0.35 oz)
Oil: 40 ml (1.35 fl oz) – Let the dough leaven for 1 hour
Herb and Garlic Mixture:
Parsley: 15 g (½ oz), finely chopped
Dill: 15 g (½ oz), finely chopped
Garlic: 60 g (2 oz), minced
Oil: 50 ml (⅕ cup)
Parmesan Cheese: 40 g (1.4 oz), grated
Melted Butter: 75 g (2.65 oz)
For Garnishing:
Parmesan Cheese: 30 g (1 oz), for sprinkling
Tray Diameter: 26 cm (10.24 in)
For the Topping:
Whole Garlic Cloves: 2, roasted
Red Onion: 1, thinly sliced
Oil: 20 ml (0.7 fl oz)
Salt: 8 g (0.29 oz)
Black Pepper: 5 g (0.18 oz)
Cream Cheese: 150 g (5.3 oz)
Green Onion: 10 g (0.35 oz), chopped
Parsley: 10 g (0.35 oz), chopped
Parmesan Cheese: 30 g (1 oz), for sprinkling
Mozzarella Cheese: 40 g (1.4 oz), shredded
Additional Salt and Black Pepper: 10 g each, to taste
Preparation Steps:
Activate the Yeast:
In a bowl, mix warm water, sugar, and yeast. Let it sit for 10 minutes until frothy.
Prepare the Dough:
Combine the activated yeast mixture with flour, salt, and oil. Knead until a smooth dough forms. Cover and let it rise for 1 hour until doubled in size.
Herb and Garlic Mixture:
Mix together parsley, dill, minced garlic, oil, grated Parmesan, and melted butter. Set aside.
Assemble the Bread:
Once risen, roll out the dough and spread the herb and garlic mixture evenly on top. Roll the dough and slice into pieces if desired, then place in a greased 26 cm tray. Sprinkle with additional Parmesan.
Prepare the Topping:
In a small bowl, combine cream cheese, roasted whole garlic cloves, sliced red onion, oil, salt, black pepper, chopped green onion, parsley, and shredded mozzarella. Mix well.
Bake:
Preheat the oven to 180°C (356°F). Top the dough with the cheese and vegetable mixture. Bake for 25 minutes or until golden and bubbly.
Serve:
Let the bread cool slightly before serving. Enjoy the rich flavors and soft, fluffy texture that make this bread truly unforgettable.
This Heirloom Herb and Garlic Bread not only carries the legacy of traditional baking but also offers a burst of flavors that make it a perfect accompaniment to any meal. Enjoy the process and the delicious outcome of this cherished recipe.
Indulge in the rich flavors and nutritious goodness of these German-inspired healthy cookies, a perfect treat to enjoy any time of the day. Packed with a variety of nuts, seeds, and dried fruits, these cookies offer a delightful crunch and natural sweetness that will keep you coming back for more. Here’s how to make these nourishing treats from scratch.
Ingredients:
Dried Apricots: 80g, chopped
Walnuts: 50g, roughly chopped
Peanuts: 100g, crushed
Pumpkin Seeds: 30g
Sunflower Seeds: 30g
Sesame Seeds: 10g
Almonds: 50g, sliced or chopped
Dried Cherries: 100g, chopped
Candied Fruits: 50g, chopped
Egg White: 1, from a large egg
Honey: 10g
Instructions:
Preheat the Oven:
Begin by preheating your oven to 180°C (356°F). Line a baking sheet with parchment paper to prevent sticking.
Mix Dry Ingredients:
In a large mixing bowl, combine the chopped dried apricots, walnuts, peanuts, pumpkin seeds, sunflower seeds, sesame seeds, almonds, dried cherries, and candied fruits. Toss them together until well mixed.
Bind the Mixture:
In a separate small bowl, whisk the egg white until it becomes frothy. Add the honey to the egg white and whisk again until well combined. Pour this mixture over the dry ingredients in the large bowl. Stir everything together until the dry ingredients are evenly coated and the mixture starts to stick together.
Shape the Cookies:
Take small portions of the mixture and shape them into cookies. You can use a spoon or your hands to form them. Place each cookie on the prepared baking sheet, leaving some space between them.
Bake:
Place the baking sheet in the preheated oven and bake the cookies for about 12-15 minutes, or until they are golden and firm to the touch.
Cool and Enjoy:
Once baked, remove the cookies from the oven and let them cool on the baking sheet for a few minutes. Then, transfer them to a wire rack to cool completely.
Enjoy these wholesome cookies as a nutritious snack or a quick breakfast on the go.
These German-style healthy cookies are not only delicious but also packed with the goodness of nuts, seeds, and dried fruits, making them a perfect energy booster any time of the day. Whether you’re enjoying them with a cup of tea or as a quick snack, these cookies are sure to satisfy your cravings in the healthiest way possible.
Dive into a world of freshness and crunch with this irresistible salad that combines the vibrant flavors of cabbage, carrot, and apple. Paired with homemade bruschettas, this dish is a celebration of simple ingredients coming together to create a feast for the senses. Perfect for any meal, this salad and bruschetta combo is sure to become a new favorite. Let’s get started!
Salad Ingredients:
Cabbage: 150g, thinly sliced
Red Cabbage: 150g, thinly sliced
Carrots: 2, grated
Chives: Chopped, to taste
Apple: 1, thinly sliced
Olive Oil: 50ml
Sugar: A pinch
Salt: To taste
Mustard: 1 tablespoon
Lemon Juice: From 1/2 a lemon
For the Bruschettas:
Bread: Slices, as needed
Olive Oil: For brushing
Salt: A sprinkle
Tomato: 1, finely chopped
Garlic Clove: 1, minced
Feta Cheese: 20g, crumbled
Parsley: Chopped, to taste
Dill: Chopped, to taste
Lemon Juice: A squeeze
Instructions:
Preparing the Salad:
Combine the Ingredients:
In a large bowl, mix together the thinly sliced cabbage and red cabbage, grated carrots, chopped chives, and thinly sliced apple.
Dress the Salad:
Whisk together olive oil, a pinch of sugar, salt to taste, mustard, and lemon juice in a small bowl. Pour this dressing over the salad ingredients and toss well to coat everything evenly.
Let It Marinate:
Allow the salad to sit for a few minutes to let the flavors meld together.
Making the Bruschettas:
Prepare the Bread:
Preheat your oven to 180°C (350°F). Brush slices of bread with olive oil and sprinkle a little salt on top. Place them on a baking sheet.
Bake:
Bake in the preheated oven for about 10 minutes, or until the bread is crispy and golden.
Prepare the Topping:
In a bowl, combine the finely chopped tomato, minced garlic, crumbled feta cheese, chopped parsley, dill, a squeeze of lemon juice, and a drizzle of olive oil. Season with salt to taste and mix well.
Assemble the Bruschettas:
Once the bread is toasted, spoon the tomato and feta mixture onto each slice.
Serve:
Enjoy the bruschettas alongside the crunchy cabbage, carrot, and apple salad for a refreshing and satisfying meal.
This salad and bruschetta recipe is a testament to the beauty of fresh, simple ingredients creating a dish that’s both nourishing and delightful. Whether you’re looking for a light lunch, a side dish, or a healthy snack, this combo is sure to impress. Enjoy the crunch, the freshness, and the burst of flavors with every bite!
In the hustle and bustle of daily life, finding time to cook a satisfying dinner can be a challenge. This recipe is a lifesaver for those busy evenings when you crave something delicious yet easy to prepare. Featuring a baguette transformed into a flavorful boat filled with a mix of eggs, tomatoes, onions, and sour cream, this dish is not only mouthwatering but also versatile enough to enjoy any day of the week. Let’s dive into the ingredients and steps for making this delightful dinner.
Ingredients:
Baguette: 1 large, preferably fresh
Eggs: 3-4, depending on the size of your baguette
Tomato: 1 medium, diced
Onion: 1 small, finely chopped
Sour Cream: 2 tablespoons
Ground Black Pepper: To taste
Salt: To taste
Chives or Green Onions: Chopped, for garnish
Instructions:
Prep the Baguette:
Begin by preheating your oven to 180°C (356°F). Take the baguette and cut it in half lengthwise. Hollow out each half slightly to create a “boat” that will hold the filling.
Prepare the Filling:
In a mixing bowl, crack the eggs and beat them lightly. Add the diced tomato, chopped onion, sour cream, a pinch of salt, and ground black pepper to the eggs. Mix everything together until well combined.
Fill the Baguette Boats:
Spoon the egg mixture evenly into the hollowed-out centers of each baguette half. Use a fork to gently mix the filling within the baguette if needed, ensuring the ingredients are evenly distributed.
Bake:
Place the filled baguette halves on a baking sheet lined with parchment paper. Bake in the preheated oven for about 15-20 minutes, or until the egg mixture is set and the baguette is crispy and golden brown.
Garnish and Serve:
Once baked, remove the baguette boats from the oven and let them cool for a couple of minutes. Sprinkle chopped chives or green onions on top for a fresh, flavorful finish.
Slice the baguette boats into individual portions and serve warm.
This Quick and Delicious Baguette Boat Dinner is a testament to the fact that you don’t need to spend hours in the kitchen to enjoy a hearty and tasty meal. It’s perfect for those evenings when you’re short on time but still want to sit down to something homemade and satisfying. Enjoy your culinary creation!
Discover the joy of cooking with this incredibly tasty and simple recipe that transforms everyday ingredients into a delightful dish. Combining the freshness of zucchini with the earthiness of potatoes, this recipe is a testament to the magic of simple cooking. Perfect for any meal, it’s a dish you’ll wish you had tried sooner. Let’s dive into the ingredients and steps to create this savory sensation.
Ingredients:
Zucchini: 2, medium-sized
Potato: 1, large
Milk: 350ml
Eggs: 3, large
Flour: 200 grams
Vegetable Oil: 1 tablespoon
Salt: 1 teaspoon
For the Filling:
Sour Cream: 100 grams
Green Onions and Dill: Fresh, chopped to taste
Instructions:
Prepare the Vegetables:
Wash the zucchini and potato thoroughly. Grate both the zucchini and potato into a large mixing bowl. There’s no need to peel them if you prefer the extra nutrients and texture the skin provides.
Mix the Batter:
To the grated vegetables, add the milk, eggs, flour, vegetable oil, and salt. Stir the mixture until well combined and you have a smooth, slightly thick batter.
Cook the Mixture:
Heat a non-stick skillet over medium heat. Once hot, pour in portions of the batter to form pancakes or fritters. Cook until the edges are golden and the center is set, about 2-3 minutes per side. Repeat with the remaining batter, adding more oil to the pan as needed.
Prepare the Filling:
In a small bowl, mix the sour cream with chopped green onions and dill. This creamy filling will add a fresh and tangy flavor to complement the savory pancakes.
Assemble and Serve:
Once all the pancakes are cooked, serve them warm with a dollop of the sour cream mixture on top. The combination of the creamy filling with the crispy, savory pancakes is simply irresistible.
Enjoy:
Dive into this delightful dish that’s perfect for any time of the day. Whether it’s a cozy breakfast, a light lunch, or a comforting dinner, these zucchini and potato pancakes are sure to satisfy.
This Zucchini and Potato Delight is not just delicious but also a great way to incorporate more vegetables into your diet. It’s a versatile recipe that can be adapted to include your favorite herbs or spices, making it a new go-to dish in your cooking repertoire. Enjoy the simplicity and deliciousness of home-cooked meals!
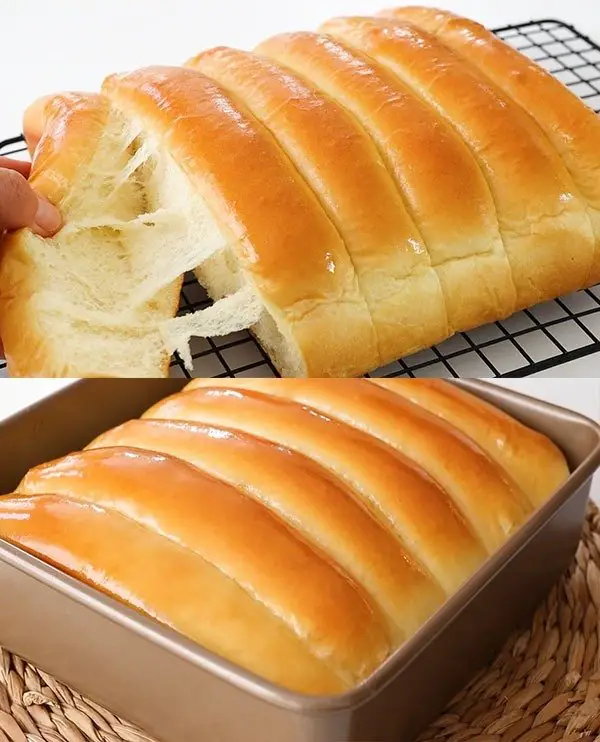
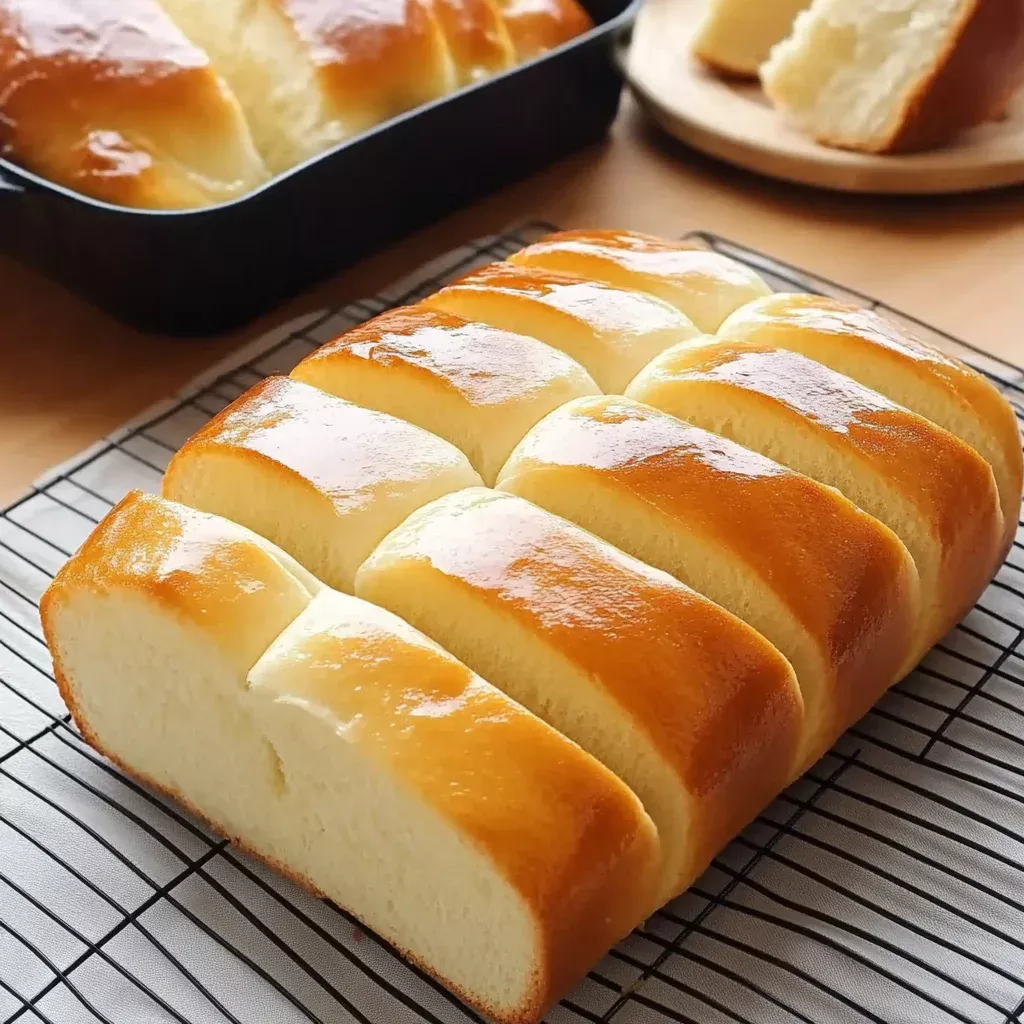
Imagine biting into a slice of bread so fluffy, it feels like a cloud. That’s exactly what you get with this Cloud Soft Condensed Milk Bread. As a busy mom or professional, finding time to bake can be a challenge, but this recipe is your quick solution for a busy day. With its unique sweetness and tenderness, it’s perfect for impressing your loved ones or simply treating yourself. Whether you’re a seasoned baker or a newbie, this bread is a delightful homemade treat that brings warmth and comfort to any table.
Why You’ll Love This Cloud Soft Condensed Milk Bread
This bread is a dream come true for anyone craving a quick, delicious homemade treat. Its cloud-like texture and subtle sweetness make it irresistible. You’ll love how easy it is to whip up, even on a hectic day. Plus, the aroma that fills your kitchen is pure bliss. Whether you’re baking for family or friends, this bread is sure to impress with minimal effort.
Ingredients Cloud Soft Condensed Milk Bread
Creating this Cloud Soft Condensed Milk Bread is a breeze with a few pantry staples. You’ll need all-purpose flour, which forms the base of our bread, providing structure and chewiness. Granulated sugar adds a touch of sweetness, while salt balances the flavors perfectly. Instant yeast is our secret weapon for that quick rise, making the bread fluffy and light.
Whole milk, warmed to just the right temperature, helps activate the yeast and adds richness. Sweetened condensed milk is the star ingredient, lending a unique sweetness and tenderness to the bread. Melted unsalted butter brings a buttery flavor, while a large egg adds moisture and binds everything together. A hint of vanilla extract enhances the overall aroma.
For a golden crust, a little milk brushed on top before baking does the trick. If you’re feeling adventurous, consider adding almond extract for a nutty twist or mix in chocolate chips or dried fruit for extra sweetness and texture. Remember, the exact quantities are listed at the bottom of the article for easy reference and printing.
How to Make Cloud Soft Condensed Milk Bread
Prepare the Dry Ingredients
Start by gathering your dry ingredients. In a large mixing bowl, combine the all-purpose flour, granulated sugar, salt, and instant yeast. Stir them together until they’re well mixed. This ensures that the yeast is evenly distributed, which is key for a consistent rise. Remember, the yeast is your bread’s best friend, helping it achieve that fluffy texture.
Mix the Wet Ingredients
In a separate bowl, whisk together the warmed whole milk, sweetened condensed milk, melted unsalted butter, a large egg, and vanilla extract. Make sure the milk is just warm, not hot, to avoid killing the yeast. This mixture should be smooth and well combined, creating a rich base for your dough. The sweetened condensed milk adds a unique sweetness that sets this bread apart.
Combine and Knead the Dough
Pour the wet ingredients into the bowl with the dry ingredients. Mix until a dough begins to form. Once combined, transfer the dough to a floured surface. Knead it for about 8-10 minutes until it becomes smooth and elastic. This step is crucial for developing the gluten, which gives the bread its structure. If the dough feels sticky, sprinkle a little more flour as needed.
First Rise
Place the kneaded dough into a greased bowl. Cover it with a clean kitchen towel and let it rise in a warm place for about an hour. The dough should double in size. This is the yeast working its magic, creating air pockets that make the bread light and airy. If your kitchen is cool, try placing the bowl in a slightly warm oven (turned off) to help it rise.
Shape and Second Rise
Once the dough has risen, gently punch it down to release the air. Shape it into a loaf and place it in a greased 9×5-inch loaf pan. Cover it again with the towel and let it rise for another 30-45 minutes. This second rise is important for achieving that cloud-like texture. The dough should rise just above the rim of the pan, indicating it’s ready for baking.
Bake to Perfection
Preheat your oven to 350°F. Before baking, brush the top of the loaf with a tablespoon of milk. This will give your bread a beautiful golden crust. Bake for 25-30 minutes, or until the bread is golden brown and sounds hollow when tapped on the bottom. Once baked, let it cool in the pan for 10 minutes before transferring it to a wire rack to cool completely. Enjoy the irresistible aroma that fills your kitchen!
Tips for Success
Ensure your yeast is fresh for the best rise; expired yeast can lead to dense bread.
Use a kitchen thermometer to check the milk temperature; it should be around 110°F.
Knead the dough until it’s smooth and elastic; this develops the gluten for structure.
Let the dough rise in a warm, draft-free area for optimal results.
For a softer crust, cover the bread with a towel while it cools.
Equipment Needed
Large mixing bowl – or use a stand mixer with a dough hook for convenience.
Whisk – a fork can work in a pinch for mixing wet ingredients.
9×5-inch loaf pan – a cake pan can be an alternative for a different shape.
Kitchen towel – or plastic wrap to cover the dough while it rises.
Wire rack – a cutting board can be used for cooling if needed.
Variations
For a nutty twist, add 1/2 cup of chopped almonds or walnuts to the dough.
Swap the all-purpose flour with whole wheat flour for a heartier loaf.
Incorporate 1/2 cup of raisins or dried cranberries for a fruity touch.
For a dairy-free version, use almond milk and vegan butter.
Add a teaspoon of cinnamon to the dry ingredients for a warm, spiced flavor.
Serving Suggestions
Pair with a pat of butter and a drizzle of honey for a sweet morning treat.
Serve alongside a warm bowl of soup for a comforting lunch.
Toast slices and top with avocado and a sprinkle of sea salt for a savory snack.
Enjoy with a cup of tea or coffee for a relaxing afternoon break.
Present on a wooden board with assorted cheeses and fruits for a delightful brunch spread.
FAQs about Cloud Soft Condensed Milk Bread
Can I use active dry yeast instead of instant yeast?
Absolutely! If you’re using active dry yeast, dissolve it in the warmed milk first and let it sit for about 5 minutes until it becomes frothy. This step ensures the yeast is activated before mixing it with the other ingredients.
What if I don’t have sweetened condensed milk?
No worries! You can substitute it with an equal amount of evaporated milk and add a bit more sugar to taste. This will still give your bread a lovely sweetness and tenderness.
How do I know if my dough has risen enough?
A simple test is to gently press your finger into the dough. If the indentation remains, it’s ready for the next step. If it springs back, give it a little more time to rise.
Can I freeze this bread?
Yes, you can! Once the bread has cooled completely, wrap it tightly in plastic wrap and then in aluminum foil. It can be frozen for up to 3 months. Thaw it at room temperature before serving.
Why is my bread dense and not fluffy?
This could be due to expired yeast or not kneading the dough enough. Ensure your yeast is fresh and knead the dough until it’s smooth and elastic to develop the gluten properly.
Final Thoughts
Baking this Cloud Soft Condensed Milk Bread is like wrapping yourself in a warm, cozy blanket on a chilly day. The process is as rewarding as the end result, filling your home with an aroma that whispers comfort and joy. Each slice is a testament to the magic of simple ingredients coming together to create something extraordinary. Whether you’re sharing it with loved ones or savoring a quiet moment alone, this bread is a reminder of the simple pleasures in life. So, roll up your sleeves, embrace the flour-dusted adventure, and enjoy every fluffy bite!
Paul
Cloud Soft Condensed Milk Bread Recipe for Unbelievable Fluffiness
This Cloud Soft Condensed Milk Bread is incredibly fluffy and soft, perfect for a delightful homemade treat. The addition of sweetened condensed milk gives it a unique sweetness and tenderness.
In a large mixing bowl, combine the flour, sugar, salt, and instant yeast. Mix well to combine the dry ingredients evenly.
In a separate bowl, whisk together the warmed milk, sweetened condensed milk, melted butter, egg, and vanilla extract until smooth.
Pour the wet ingredients into the dry ingredients and mix until a dough forms.
Knead the dough on a floured surface for about 8-10 minutes until it becomes smooth and elastic.
Place the dough in a greased bowl, cover it with a clean kitchen towel, and let it rise in a warm place for about 1 hour or until it has doubled in size.
After the dough has risen, punch it down to release the air. Shape it into a loaf and place it in a greased 9×5-inch loaf pan.
Cover the loaf pan with the kitchen towel and let it rise again for about 30-45 minutes, or until it has risen just above the rim of the pan.
Preheat the oven to 350°F. Brush the top of the loaf with the tablespoon of milk for a golden crust.
Bake for 25-30 minutes, or until the bread is golden brown and sounds hollow when tapped on the bottom.
Remove the bread from the oven and let it cool in the pan for 10 minutes before transferring it to a wire rack to cool completely.
Notes
For a richer flavor, try adding 1/2 teaspoon of almond extract along with the vanilla.
You can also mix in 1/2 cup of chocolate chips or dried fruit into the dough for added sweetness and texture.
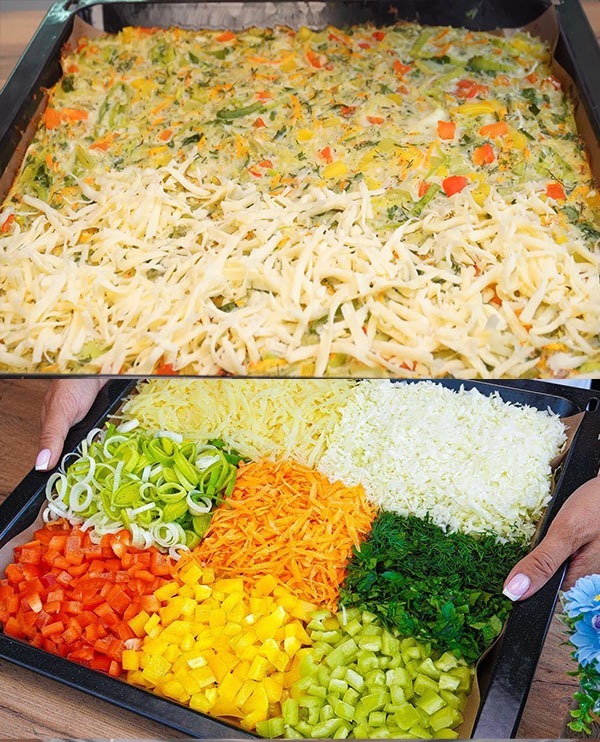
Are you tired of the same old routine when it comes to cooking vegetables? Get ready to elevate your vegetable game with this mouthwatering recipe that will change the way you think about veggies! Bursting with vibrant colors, flavors, and textures, this vegetable bake with cheese and cream is a true delight for the senses. With a medley of fresh ingredients like peppers, carrots, potatoes, and mushrooms, all baked to perfection and topped with creamy cheese and a luscious cream sauce, this dish is sure to become a new family favorite. So, roll up your sleeves and let’s dive into the wonderful world of delicious and nutritious cooking!
Ingredients:
3 peppers
1 carrot
7 small potatoes
Water
Parsley
Dill
Leek
1/2 cabbage
4 eggs
Salt
Black pepper
Italian herbs
50 ml (1/4 cup) milk
30 ml (2 tablespoons) olive oil
5 tablespoons flour
1 teaspoon baking powder
200 grams (1 glass) cheese
1 onion
Olive oil
200 grams (7 oz) mushrooms
150 ml (1/2 cup) cream
Instructions:
Preheat your oven to 200°C (400°F).
Prepare the vegetables by slicing the peppers, carrot, potatoes, leek, and cabbage into bite-sized pieces. Place them in a large baking dish and cover them with water. Leave to soak for 10 minutes, then drain and squeeze out any excess water.
In a mixing bowl, beat the eggs and season with salt, black pepper, and Italian herbs. Add the milk, olive oil, flour, and baking powder, and mix until smooth.
Pour the egg mixture over the vegetables in the baking dish, ensuring they are evenly coated.
Bake in the preheated oven for 25 minutes, or until the top is golden brown and the vegetables are tender.
While the vegetables are baking, prepare the cheese topping. Grate the cheese and chop the onion. Heat some olive oil in a skillet and sauté the onion until golden brown. Add the mushrooms and cook, covered, for 15 minutes to prevent the liquid from evaporating.
Once the vegetables are cooked, sprinkle the cheese over the top and return to the oven for 10-12 minutes, or until the cheese is melted and bubbly.
Finally, pour the cream over the vegetables and season with salt and black pepper. Return to the oven and cook for another 5-7 minutes, or until the cream is heated through.
Serve hot, garnished with chopped parsley and dill, and enjoy your delicious vegetable bake!
Note: Feel free to adjust the seasoning and ingredients according to your taste preferences.
And there you have it – a tantalizing vegetable bake that’s as delicious as it is nutritious! From the moment you take your first bite, you’ll be greeted with a symphony of flavors and textures that will leave you craving more. Whether enjoyed as a hearty main course or a flavorful side dish, this recipe is sure to satisfy even the most discerning palate. So, the next time you’re in need of a meal that’s both comforting and wholesome, remember this recipe and treat yourself to a plateful of veggie goodness. With its rich flavors and satisfying ingredients, this vegetable bake is bound to become a staple in your kitchen repertoire. Bon appétit!
Greetings, everyone! I hope you’re all doing well. Today, I’m excited to share with you a super quick and easy recipe that’s perfect for a satisfying lunch or dinner. With just a few simple ingredients that you likely already have in your kitchen, we’ll create something truly delicious. Let’s dive into the recipe.
Ingredients for the Dough:
Granulated Sugar: 1 tablespoon (20 grams)
Fast-Acting Yeast: 1 teaspoon (5 grams)
Egg: 1, large
Warm Milk: 1 cup (200 ml)
Vegetable Oil: 4 tablespoons (25 ml)
All-Purpose Flour: 3 cups (360 grams)
Salt: 1 teaspoon (6 grams)
For the Filling:
Cheddar Cheese: 150 grams, grated
Feta Cheese: 150 grams, crumbled (any type works)
Red Bell Pepper: 1, finely chopped
Long Pepper: 1, finely chopped (can use any mild pepper)
Dill: Fresh, chopped (to taste)
Nigella Seeds: For sprinkling
Sesame Seeds: For sprinkling
For the Topping:
Egg Yolk: 1, for brushing
Instructions:
Prepare the Dough:
In a large mixing bowl, dissolve the granulated sugar and fast-acting yeast in warm milk. Let it sit for a few minutes until frothy.
Beat in the egg and vegetable oil until well combined.
Gradually add the all-purpose flour and salt, mixing until a soft dough forms. Knead the dough on a floured surface until smooth and elastic.
Place the dough in a greased bowl, cover with a cloth, and let it rise in a warm place until doubled in size, about 1 hour.
Prepare the Filling:
In a bowl, mix together the grated cheddar cheese, crumbled feta cheese, chopped red bell pepper, and long pepper. Add chopped dill to your liking.
Assemble:
Once the dough has risen, punch it down and roll it out on a floured surface into a large rectangle.
Spread the cheese and pepper filling evenly over the dough, leaving a small border around the edges.
Roll the dough up tightly, starting from one long side, to enclose the filling. Seal the edges.
Prepare for Baking:
Transfer the roll to a baking sheet lined with parchment paper. Shape it as desired (a spiral or a simple loaf).
Brush the top of the dough with beaten egg yolk and sprinkle with nigella and sesame seeds.
Bake:
Preheat your oven to 180°C (356°F).
Bake the bread for about 25 minutes, or until golden brown and cooked through.
Serve:
Let the bread cool slightly before slicing. Serve warm for a comforting and cheesy delight.
This cheesy bread is not only easy to make but also incredibly versatile. Whether you’re in need of a quick lunch, a hearty dinner, or a delicious snack, this recipe has got you covered. Enjoy the melting goodness of cheddar and feta, wrapped in a soft, homemade bread that’s sure to impress. Happy baking!