

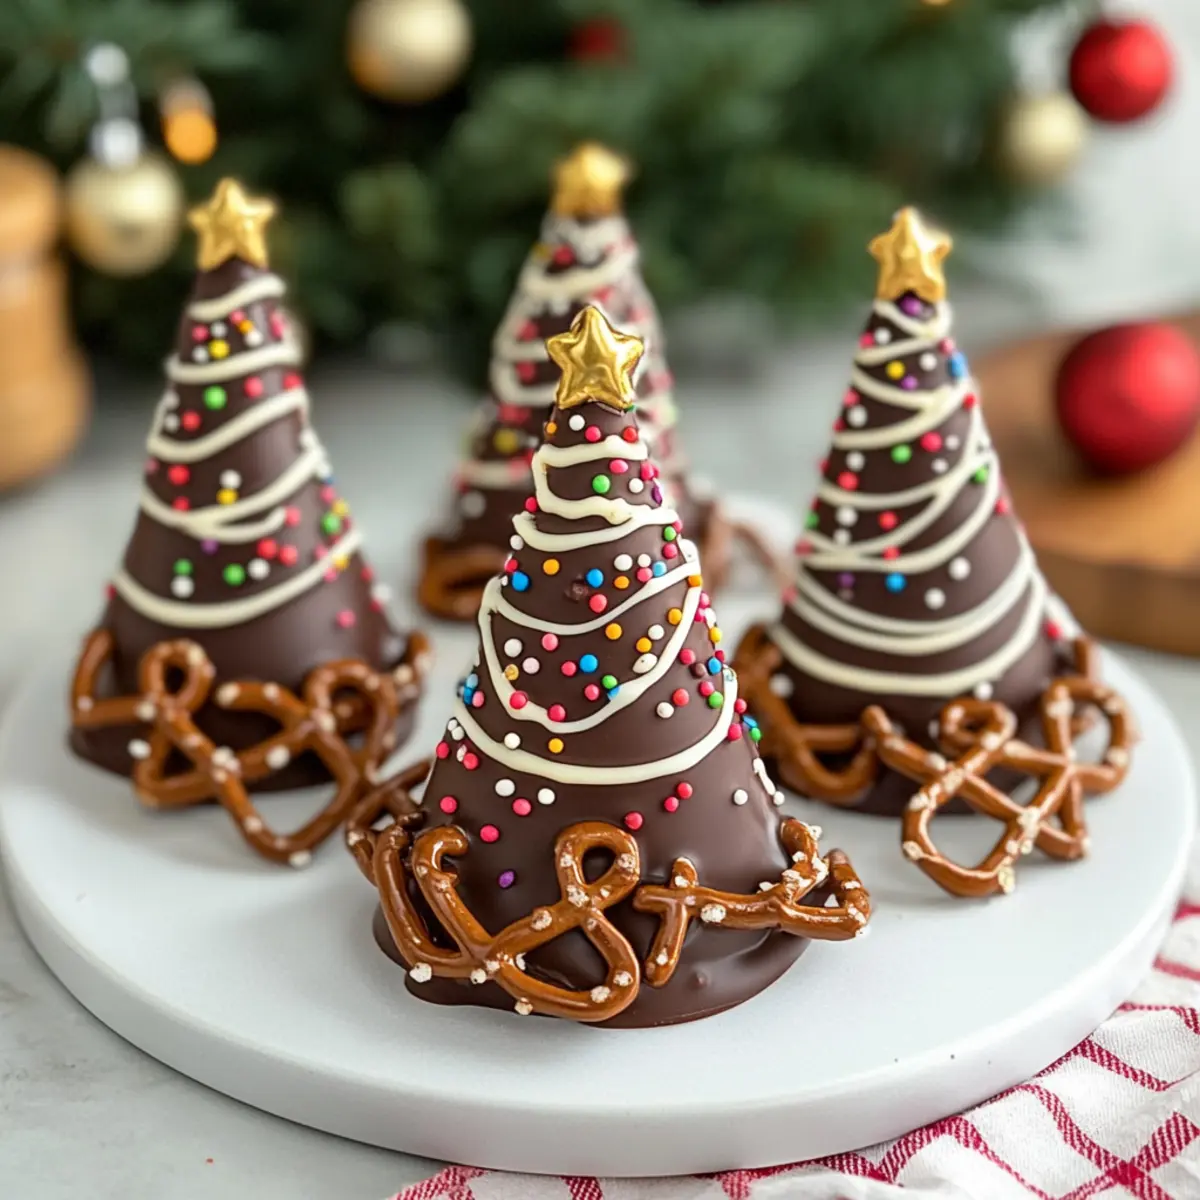
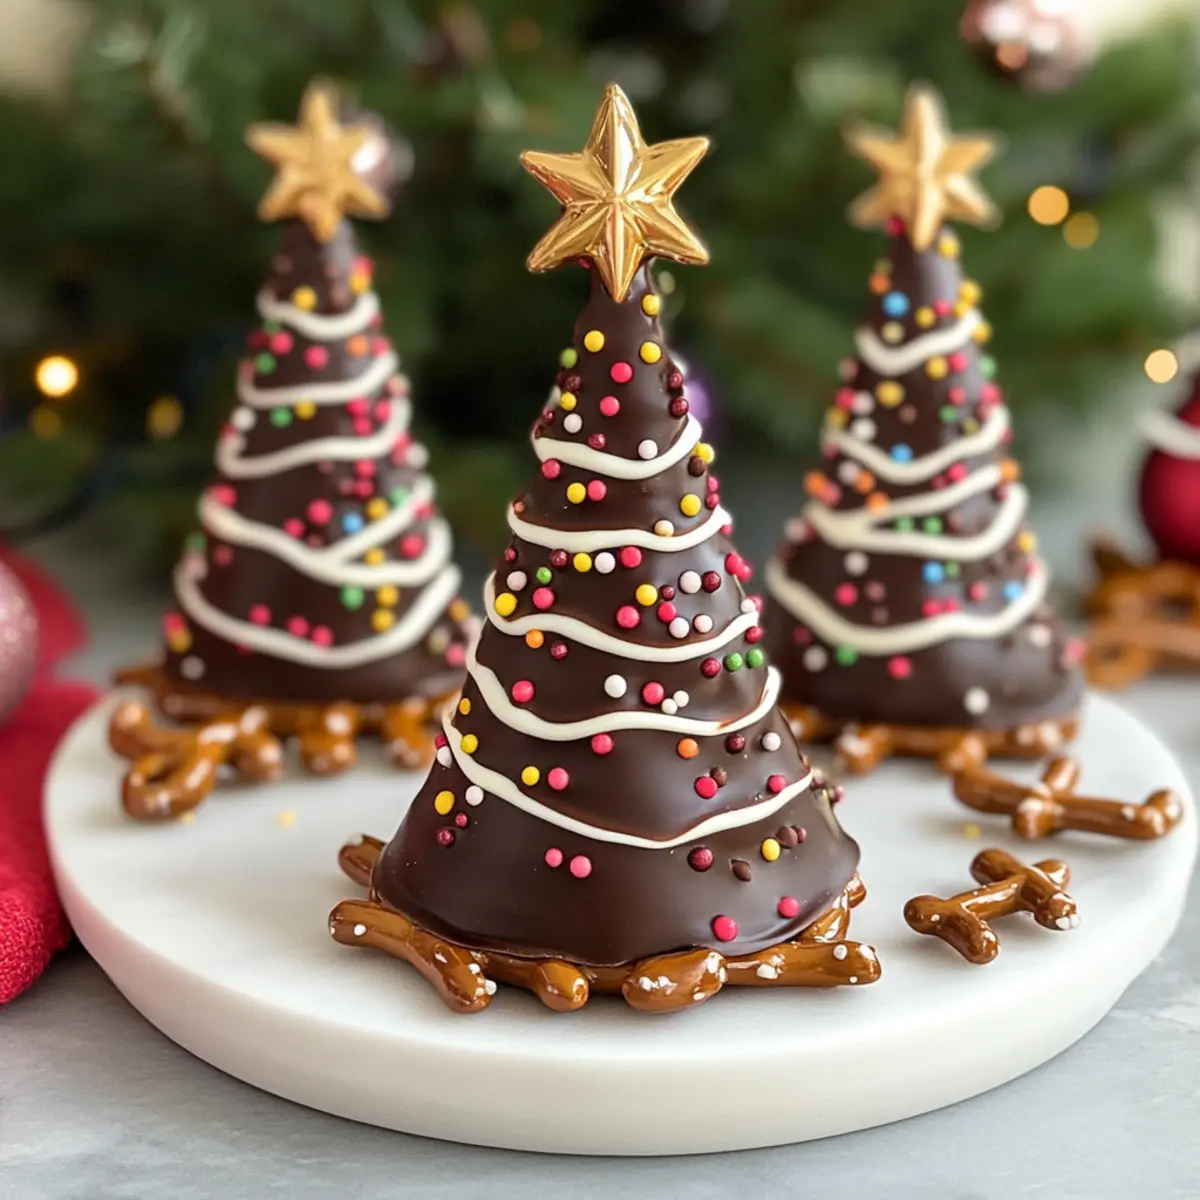
As I stood amidst the festive chaos of holiday preparation, a delightful thought popped into my mind—who wouldn’t love a playful, no-bake treat to brighten up their celebrations? That’s when I decided to create these adorable Christmas Chocolate Trees. This easy Christmas Chocolate Trees recipe is a fun way to merge the rich taste of dark chocolate with the whimsical crunch of pretzel trunks, all topped with colorful sprinkles. With a prep time of just 30 minutes, these treats are perfect for those busy moments with family or when you need a creative distraction with the kids. Whether served on a platter or as a hot cocoa garnish, these delightful chocolate sculptures are bound to be a hit at any gathering. So, ready to bring a touch of magic to your holiday table? Let’s dive into this sweet adventure!
Why Make Christmas Chocolate Trees?
Joyful Holiday Activity: These Christmas Chocolate Trees are not just a treat, but a crafting experience that brings family and friends together in the kitchen.
Effortless Preparation: With just 30 minutes needed, they’re perfect for busy holiday schedules.
Customizable Creativity: Feel free to swap chocolate types or experiment with toppings like crushed nuts or coconut for unique flavors.
Perfect Presentation: These festive trees look stunning on any holiday platter, adding a sprinkle of joy to your festive gatherings.
Gluten-Free Option: Using gluten-free pretzels makes this recipe inclusive for everyone to enjoy!
So what are you waiting for? Get ready for more festive fun and consider pairing these with Coconut Chocolate Rolls or homemade Chocolate Oat Bites for a delightful treat table!
Christmas Chocolate Trees Ingredients
• Everything you need for your festive treat!
For the Trees
- Dark Chocolate – This is the star of the show, delivering a rich cocoa flavor. Feel free to substitute with milk or white chocolate for a sweeter twist!
- Pretzel Sticks – These delightful trunks add a fun crunch. Opt for gluten-free pretzels to cater to those with dietary restrictions.
For the Snowy Decoration
- White Chocolate – Optional but adds a beautiful snowy effect to your trees. You can skip this if you prefer!
- Mini Colorful Sprinkles – These bring cheerful flair! Try using edible glitter or themed sprinkles for an extra festive touch on your Christmas Chocolate Trees.
Enjoy whipping up this scrumptious recipe and bring that holiday cheer to life!
Step‑by‑Step Instructions for Christmas Chocolate Trees Recipe
Step 1: Prepare Your Workspace
Start by lining a baking tray with parchment paper to ensure your Christmas Chocolate Trees don’t stick. This will create a smooth surface for shaping the chocolate. Set your tray aside and ensure you have all ingredients and equipment ready: a microwave or double boiler, a piping bag, and colorful sprinkles to decorate your trees.
Step 2: Melt the Dark Chocolate
In a microwave-safe bowl or double boiler, melt the dark chocolate, heating it in 20-second intervals. Stir after each interval until the chocolate is fully melted and smooth. Aim for a glossy finish, which indicates it’s ready. This rich chocolate will be the foundation of your Christmas Chocolate Trees, so take your time to get it perfectly melted.
Step 3: Prepare for Piping
Once your dark chocolate is melted, transfer it into a piping bag or a zip-top bag with a small corner cut off. This will allow you to create precise tree shapes on the parchment paper. You’re looking for about 3 inches tall and 2 inches wide, ensuring that each tree’s base overlaps with a pretzel stick for added stability.
Step 4: Pipe the Tree Shapes
Begin piping the chocolate onto the parchment paper, forming triangular tree shapes. Make sure the base of each tree touches a pretzel stick, which will serve as the trunk. Work quickly to prevent the chocolate from setting before you’re done. Each tree should have an appealing silhouette, so take care to create nice edges while filling in the shape.
Step 5: Add a Snowy Effect
Melt the white chocolate, if using, and use it to drizzle over the piped chocolate trees for a charming snowy effect. This should be done while the dark chocolate is still wet, allowing the white chocolate to adhere nicely. The contrast of the dark and white chocolates will not only look beautiful but taste heavenly too!
Step 6: Decorate with Sprinkles
While the white chocolate drizzle is still warm and soft, generously sprinkle mini colorful sprinkles on top of your chocolate trees. This adds a festive touch and extra flavor. Be creative with the colors and shapes; the more colorful, the merrier your Christmas Chocolate Trees will be!
Step 7: Let Them Set
Allow the decorated trees to set at room temperature or place them in the refrigerator for about 15-20 minutes. You’ll know they’re ready when the chocolate is firm to the touch. This is the perfect time to clean up your workspace while waiting for the magic to happen with your Christmas Chocolate Trees!
Step 8: Serve and Enjoy
Once set, gently lift each tree from the parchment paper and arrange them on a festive plate. These delightful Christmas Chocolate Trees are perfect to showcase at any holiday gathering. Whether as a treat by themselves or a whimsical addition to a dessert table, they’re sure to be a hit with family and friends alike!

Make Ahead Options
These delightful Christmas Chocolate Trees are perfect for busy home cooks looking to save time during the hectic holiday season! You can prepare the chocolate tree shapes up to 24 hours in advance. Simply complete steps 1 through 6 and only skip the final decorating step. Once your trees are formed and set, store them in an airtight container in the refrigerator to maintain their quality. Just before serving, drizzle the melted white chocolate and sprinkle with colorful decorations to ensure they look fresh and festive. This way, you’ll have beautiful, ready-to-serve treats that are just as delicious and playful, allowing you to enjoy more time with loved ones!
How to Store and Freeze Christmas Chocolate Trees
Room Temperature: Keep your Christmas Chocolate Trees in an airtight container at room temperature for up to 5 days to maintain their deliciousness and crunchiness.
Fridge: For longer-lasting treats, store them in the refrigerator where they can stay fresh for up to 2 weeks. Ensure layers are separated by parchment to avoid sticking.
Freezer: These festive delights can be frozen for up to 2 months! Just make sure they’re tightly wrapped in plastic wrap and then placed in an airtight container for added protection.
Reheating: If stored in the fridge or freezer, let your trees sit at room temperature for about 15-20 minutes before serving, allowing them to regain their beautiful form and flavor.
Expert Tips for Christmas Chocolate Trees
-
Piping Technique: Practice your piping technique before starting on the actual trees. A steady hand will help ensure that your Christmas Chocolate Trees have smooth, defined shapes.
-
Chocolate Consistency: Make sure the dark chocolate is fully melted and smooth to prevent lumps that can ruin the tree shapes. Using a double boiler helps control the heat for perfect melting.
-
Decorate Promptly: Add the white chocolate drizzle and sprinkles while the dark chocolate is still wet, ensuring everything sticks beautifully. Don’t delay—work quickly for the best results!
-
Storage Savvy: Store your Christmas Chocolate Trees in an airtight container with parchment layers in between. This keeps them fresh and prevents sticking.
-
Safety First: If you have kids helping out, supervise them while melting chocolate to avoid burns. It’s a fun way to get them involved in creating these festive treats!
What to Serve with Christmas Chocolate Trees?
These delightful treats not only bring joy to your holiday table, but they can also be paired beautifully with other festive bites for an unforgettable spread.
- Creamy Hot Cocoa: A warm cup of rich hot cocoa pairs perfectly, enhancing the chocolate experience and adding cozy vibes to your celebration.
- Festive Sugar Cookies: These sweet cookies add a different texture and a sugar rush, making them a delightful complement to the rich chocolate trees.
- Whipped Cream Dip: A light, fluffy whipped cream dip for fruit or pretzels perfectly balances the sweetness of the chocolate trees while adding creaminess.
- Peppermint Bark: The crunch and minty freshness of peppermint bark contrast beautifully with the richness of the chocolate, bringing a holiday classic to your spread.
- Coconut Chocolate Rolls: These no-bake treats are a delightful companion, offering chewy coconut texture that enhances your dessert table.
- Fruit Platter: A fresh fruit platter adds a refreshing contrast, showcasing seasonal fruits that are both vibrant and palate-cleansing.
- Sparkling Fruit Juice: For drinks, serve sparkling fruit juice to elevate the festivity, perfectly balancing sweetness with a bubbly touch.
- Nutty Trail Mix: For a crunchy snack, a nutty trail mix complements the sweet chocolate, offering a delightful contrast of flavors and textures.
Christmas Chocolate Trees Recipe Variations
Feel free to let your creativity sparkle as you customize this delicious recipe for your celebrations!
-
Dairy-Free: Use dairy-free chocolate options to create a family-friendly treat for lactose intolerant guests.
-
Nutty Delight: Sprinkle crushed nuts over the chocolate before it sets for added crunch and earthy flavor.
-
Coconut Dream: Add shredded coconut as a topping for a tropical twist that pairs delightfully with chocolate’s richness.
-
Flavor Infusion: Experiment with flavored chocolates, like raspberry or orange, to give your trees a unique flair that’s sure to surprise.
-
Spicy Touch: A gentle sprinkle of crushed red pepper or cayenne can add a thrilling kick, making this dessert a pleasant surprise!
-
Holiday Colors: Use themed sprinkles or edible glitter that match your party’s color scheme for a personalized presentation.
-
Mini Treats: Instead of giant trees, pipe small chocolate shapes to create delightful miniatures—perfect as individual party favors!
Your Christmas Chocolate Trees will surely shine even brighter with these fun variations! If you’re looking for more festive inspiration, why not pair them with some delicious Coffee Chocolate Truffles or treat yourself to the delightful flavors of some Matcha Sponge Cake?
Christmas Chocolate Trees Recipe FAQs
What type of chocolate is best for the Christmas Chocolate Trees?
Absolutely! Dark chocolate is the star of this recipe, delivering a rich cocoa flavor. However, you can swap it with milk or white chocolate if you prefer a sweeter treat. Just keep in mind that each type brings a unique taste, so feel free to experiment based on your preference!
How should I store my Christmas Chocolate Trees?
Very good question! Store your Christmas Chocolate Trees in an airtight container at room temperature for up to 5 days. If you want to enjoy them a bit longer, they can be kept in the refrigerator for up to 2 weeks. Just remember to place parchment paper between layers to prevent them from sticking together!
Can I freeze the Christmas Chocolate Trees?
Absolutely, freezing is an excellent option! To freeze your Christmas Chocolate Trees, wrap each one individually in plastic wrap and then place them in an airtight container. They can be frozen for up to 2 months. When you’re ready to enjoy them, simply let them sit at room temperature for about 15-20 minutes to regain their lovely texture and flavor.
What should I do if my chocolate starts to set while piping?
Great question! If your chocolate begins to set while you’re piping, you can quickly reheat it in the microwave or over a double boiler for a few seconds until it becomes smooth again. Make sure to stir it gently to maintain the right consistency for shaping your Christmas Chocolate Trees. Working quickly is essential here!
Are there any dietary considerations I should keep in mind?
Yes! By using gluten-free pretzels, you can easily make these Christmas Chocolate Trees suitable for friends and family with gluten intolerance. Additionally, always check the labels for the chocolate you choose, as some may contain allergens like dairy or nuts. Feel free to get creative and use dairy-free chocolate options if needed!
How do I make my Christmas Chocolate Trees look extra festive?
Very easy! To amp up the festive flair, you can use colorful edible glitter or themed holiday sprinkles alongside the mini colorful sprinkles. Another fun idea is to drizzle different colored chocolate on top or to use crushed nuts and coconut flakes as alternative toppings! The more the merrier when it comes to decorating!

Delightful Christmas Chocolate Trees Recipe for Festive Fun
Ingredients
Equipment
Method
- Prepare your workspace by lining a baking tray with parchment paper.
- Melt the dark chocolate in a microwave-safe bowl or double boiler, stirring until smooth.
- Once melted, transfer the chocolate to a piping bag and prepare to pipe shapes.
- Pipe triangular tree shapes, ensuring each base touches a pretzel stick.
- Melt white chocolate and drizzle over trees for a snowy effect.
- While still wet, add mini colorful sprinkles on top of the trees.
- Allow the trees to set at room temperature or refrigerate for 15-20 minutes.
- Once set, lift trees from parchment and arrange on a plate for serving.