


There’s something magical about transforming a few basic ingredients into something as satisfying as fresh homemade cheese. For me, the process of making cheese is more than just cooking—it’s a connection to tradition, a reminder of simpler times, and a way to slow down and appreciate the beauty of homemade food.
Growing up, my grandmother would always have fresh cheese in her kitchen. She never bought it from the store—she made it herself. I remember standing beside her as she heated the milk, watching curds form like tiny clouds in the pot. She would strain it carefully, press it gently, and season it just enough to enhance the natural flavors. Every time she handed me a piece, still slightly warm, I knew it was made with love.
Now, whenever I make homemade cheese, I think of those moments. It reminds me that good food doesn’t have to be complicated—it just has to be made with care. This Homemade Fresh Cheese Recipe is simple, requiring just milk, eggs, and yogurt. No special equipment, no complicated techniques—just a pot, a strainer, and a little patience. The result? A creamy, mild cheese that you can use in countless ways.
Whether you spread it on toast, crumble it over a salad, or enjoy it with fresh fruit and honey, this cheese is a celebration of simple ingredients turned into something special.
Why You’ll Love This Recipe
1. Made with Just Three Ingredients
This recipe only requires milk, eggs, and yogurt—staples that you likely already have in your kitchen.
2. No Special Equipment Needed
Unlike traditional cheesemaking, which often requires rennet, thermometers, or cheese molds, this recipe keeps it simple. All you need is a pot, a whisk, and a strainer with cheesecloth or a fine sieve.
3. Creamy, Mild, and Versatile
This fresh cheese has a light, creamy texture with a delicate flavor that can be enjoyed on its own or enhanced with herbs, spices, or a drizzle of honey.
4. Healthier and Fresher than Store-Bought Cheese
When you make cheese at home, you control the ingredients—no preservatives, additives, or unnecessary fillers. Just pure, fresh dairy goodness.
5. A Fun, Satisfying Kitchen Project
There’s a special kind of satisfaction in making cheese from scratch. It’s a hands-on, rewarding process that fills your kitchen with warmth and nostalgia.
Ingredients
| Ingredient | Quantity |
|---|---|
| Milk | 1.5 liters (6 cups) |
| Eggs | 4 large |
| Natural yogurt | 240g (1 cup) |
| Salt (optional) | To taste |
Directions
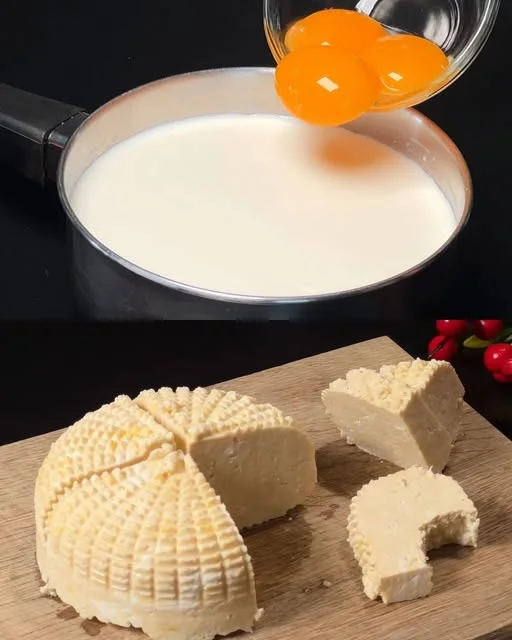
- Heat the Milk – In a large pot, warm the milk over medium heat until it reaches a gentle simmer. Do not let it boil.
- Add the Eggs and Yogurt – Whisk the eggs in a separate bowl. Stir the yogurt into the milk, then gradually add the beaten eggs while stirring continuously.
- Curd Formation – Continue stirring until curds begin to separate from the liquid (whey). This process usually takes 5–7 minutes.
- Strain the Cheese – Pour the mixture through a cheesecloth-lined strainer or sieve to drain the whey. Let it sit for about 15–20 minutes until most of the liquid is removed.
- Shape & Cool – Gather the cheesecloth and gently press out excess moisture. Transfer the cheese to a bowl or mold, then refrigerate for at least an hour before serving.
Nutritional Information (Per Serving – Approx. 50g of Cheese)
| Nutrient | Amount |
|---|---|
| Calories | 90 kcal |
| Carbohydrates | 2 g |
| Protein | 8 g |
| Fat | 6 g |
| Saturated Fat | 3 g |
| Sugar | 1 g |
| Sodium | 50 mg |
How to Use Your Homemade Cheese
Once you’ve made this creamy homemade cheese, the possibilities are endless! Here are some delicious ways to enjoy it:
1. Spread on Toast
Mix your fresh cheese with a pinch of salt and spread it on a slice of warm, crusty bread. Add a drizzle of honey for a sweet touch or a sprinkle of black pepper for a savory kick.
2. Crumbled Over Salads
This cheese adds a creamy texture to salads. Try it over a Greek salad, roasted vegetable salad, or even a fresh arugula and cherry tomato mix.
3. Stuffed in Pastries or Dough
Use it as a filling for homemade cheese-filled pastries, empanadas, or even stuffed flatbreads.
4. Paired with Fruit and Nuts
Serve it alongside fresh figs, grapes, or apple slices with a handful of almonds or walnuts for a delicious and balanced snack.
5. Mixed into Scrambled Eggs or Omelets
Stir some of the cheese into scrambled eggs or fold it into an omelet with spinach and mushrooms for a creamy, flavorful breakfast.
6. Blended into Creamy Dips
Mix the cheese with a bit of olive oil, garlic, and herbs to create a smooth dip for vegetables, crackers, or pita bread.
7. Used as a Ricotta Substitute
This cheese works well in recipes that call for ricotta, such as lasagna, stuffed shells, or even cheesecake.
FAQs: Everything You Need to Know About Homemade Cheese
Q: What type of milk is best for this recipe?
Use whole milk for the creamiest texture. Low-fat milk will work, but the cheese will be less rich. Avoid ultra-pasteurized milk, as it doesn’t curdle as well.
Q: Can I use plant-based milk to make a dairy-free version?
No, this recipe relies on the natural proteins in dairy milk to form curds. Plant-based alternatives like almond or soy milk do not have the same properties needed for cheesemaking.
Q: How long does homemade cheese last?
Store your fresh cheese in an airtight container in the refrigerator for up to 5 days. Since it doesn’t contain preservatives, it’s best enjoyed fresh.
Q: Can I add flavorings to the cheese?
Absolutely! You can mix in:
- Fresh herbs like parsley, basil, or chives
- Garlic powder or roasted garlic for a savory twist
- Crushed red pepper flakes for a hint of heat
- Lemon zest for a fresh, citrusy note
Q: How can I make the cheese firmer?
If you prefer a firmer cheese, let it drain longer—up to an hour—and press it gently with a spoon to remove excess moisture.
Q: Can I freeze homemade cheese?
Freezing is not recommended, as it can change the texture, making it crumbly and grainy. It’s best to enjoy it fresh.
Q: What can I do with the leftover whey?
Don’t throw it away! The whey (the liquid left after straining the cheese) is full of nutrients and can be used in:
- Smoothies or soups for an extra protein boost
- Baking (replace water or milk in bread or pancake recipes)
- Cooking grains like rice or quinoa for added flavor
Why This Recipe Belongs in Your Kitchen
Making your own homemade cheese is about more than just cooking—it’s about creating something from scratch, connecting with tradition, and appreciating simple ingredients in their purest form.
This recipe is:
✔ Easy and beginner-friendly
✔ Made with just 3 ingredients
✔ Customizable with different flavors and seasonings
✔ A healthier alternative to store-bought cheese
✔ A fun and rewarding kitchen project
Whether you’re making it for yourself, your family, or to impress guests with your cheesemaking skills, this recipe is one you’ll want to keep. So the next time you have a few extra cups of milk, some eggs, and a bit of yogurt, take a moment to slow down, stir the pot, and watch as something simple and beautiful comes to life.
With every creamy, homemade bite, you’ll know—it’s always worth making it yourself.
Creamy Homemade Fresh Cheese – A Simple, Rewarding Tradition
Ingredients
Method
- Heat the milk in a pot over medium heat until it reaches a gentle simmer. Do not boil.
- In a separate bowl, whisk the eggs. Stir the yogurt into the milk, then gradually add the beaten eggs, stirring continuously.
- Keep stirring until curds begin to form and separate from the liquid (whey). This usually takes 5–7 minutes.
- Strain the mixture through a cheesecloth-lined strainer to remove excess whey. Let it drain for 15–20 minutes.
- Press the cheese gently into a mold or bowl and refrigerate for at least an hour before serving.
Notes
- For a firmer cheese, let it drain longer and press it gently to remove excess moisture.
- Enhance the flavor with fresh herbs, garlic, or a drizzle of olive oil.
- Store in an airtight container in the fridge for up to 5 days.