

A Sweet Slice of Easter Memories
Easter has always been a time of joy, renewal, and family traditions. When I was a child, the kitchen would come alive with the scents of vanilla, cocoa, and fresh cream as my mother prepared our Easter desserts. Among all the treats, one stood out—the Swiss roll cake.
It wasn’t just about the taste; it was the excitement of watching her carefully roll the warm sponge, the anticipation of revealing the perfect spiral inside. I would sit at the counter, eyes wide, as she marbled the batter with soft pastel colors, turning a simple chocolate sponge into a masterpiece of swirls. The light, airy cake, paired with a fluffy whipped cream filling, felt like the essence of spring—delicate, fresh, and wonderfully sweet.
Now, I carry on this tradition in my own home, making an Easter Swiss Roll Cake with a Colorful Marbled Sponge. It’s a dessert that feels like a celebration in itself, bringing a pop of color and joy to the holiday table. Whether you’re making it for your family, friends, or simply to enjoy a moment of baking magic, this cake is bound to become a cherished Easter tradition.
What Makes This Easter Swiss Roll Special?
The Swiss roll is a classic dessert, but what sets this Easter version apart is its vibrant marbled sponge and light-as-air whipped cream filling. Here’s why it’s a must-have for your Easter gathering:
1. A Stunning Marbled Effect
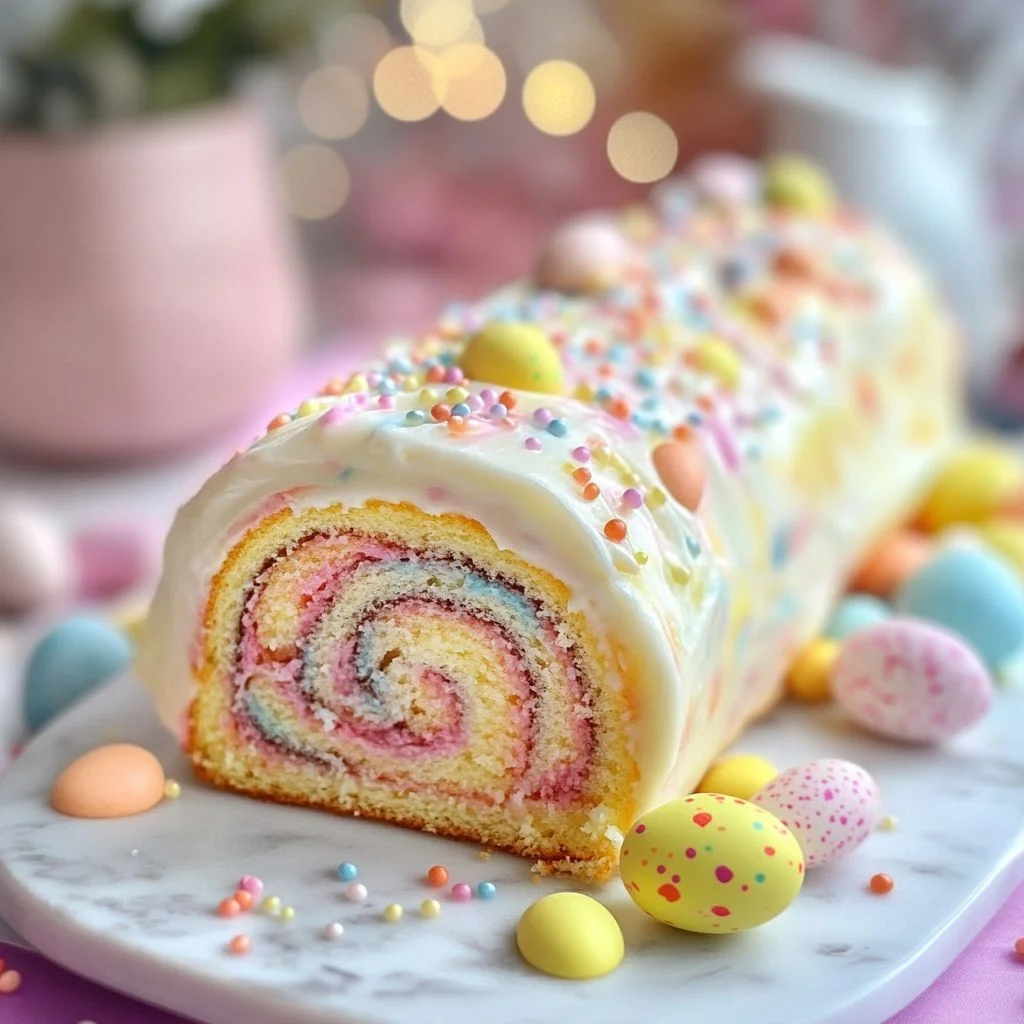
The pastel-colored swirls running through the chocolate sponge create a mesmerizing look, making it as eye-catching as it is delicious. The soft hues of pink, blue, and yellow give the cake a festive touch, reminiscent of Easter eggs and springtime blooms.
2. Perfectly Light and Fluffy
Unlike heavier cakes, this Swiss roll has a delicate sponge that melts in your mouth. The airy texture pairs beautifully with the smooth whipped cream filling, making it a refreshing dessert after a hearty Easter meal.
3. A Nostalgic Yet Unique Treat
Many of us grew up enjoying Swiss rolls from bakeries or store-bought versions. This homemade version captures that nostalgia while adding an elegant, handcrafted twist that makes it even more special.
4. Surprisingly Easy to Make
Despite its intricate appearance, this cake is easier to make than it looks. The batter comes together quickly, and the rolling technique, once mastered, makes for a fun and rewarding baking experience.
Ingredients
For the Cake
| Ingredient | Amount |
|---|---|
| Large eggs | 3 |
| Granulated sugar | 1 cup |
| Vanilla extract | 1 teaspoon |
| All-purpose flour | 1/2 cup |
| Unsweetened cocoa powder | 1/4 cup |
| Baking powder | 1/4 teaspoon |
| Salt | 1/4 teaspoon |
| Milk | 1/4 cup |
| Vegetable oil | 1/4 cup |
| Food coloring (pastel colors) | As needed |
For the Filling
| Ingredient | Amount |
|---|---|
| Heavy whipping cream | 1 cup |
| Powdered sugar | 2 tablespoons |
| Vanilla extract | 1 teaspoon |
For Dusting
| Ingredient | Amount |
|---|---|
| Powdered sugar | As needed |
Directions
1. Prepare the Baking Pan
- Preheat your oven to 350°F (175°C).
- Line a 15×10-inch jelly roll pan with parchment paper and lightly grease it to prevent sticking.
2. Make the Cake Batter
- In a large mixing bowl, beat the eggs and granulated sugar on high speed for about 5 minutes until the mixture becomes thick and pale.
- Stir in the vanilla extract.
3. Combine the Dry Ingredients
- In a separate bowl, whisk together the flour, cocoa powder, baking powder, and salt.
- Gradually fold the dry ingredients into the egg mixture until just combined.
4. Incorporate the Liquid Ingredients
- In a small bowl, mix the milk and vegetable oil.
- Gently fold this mixture into the batter until smooth and fully incorporated.
5. Create the Marbled Effect
- Divide the batter into three equal portions.
- Tint each portion with a different pastel food coloring (such as pink, blue, and yellow).
- Spoon dollops of the colored batter randomly onto the prepared pan.
- Use a toothpick or skewer to gently swirl the colors together to create a marbled effect.
6. Bake the Cake
- Bake for 10-12 minutes, or until the cake springs back when lightly touched.
- Do not overbake, as this will make rolling more difficult.
7. Roll the Cake
- While the cake is still warm, carefully lift it with the parchment paper and place it on a clean surface.
- Dust a clean kitchen towel with powdered sugar and flip the cake onto the towel, removing the parchment paper.
- Starting from the short end, gently roll the cake with the towel inside into a log shape.
- Allow it to cool completely in this shape to prevent cracking.
8. Prepare the Whipped Cream Filling
- In a chilled mixing bowl, beat the heavy whipping cream, powdered sugar, and vanilla extract until stiff peaks form.
9. Assemble the Swiss Roll
- Once the cake has cooled, carefully unroll it.
- Spread the whipped cream evenly over the surface, leaving a small border around the edges.
- Gently re-roll the cake without the towel, making sure not to squeeze out the filling.
10. Final Touches
- Dust the top with powdered sugar for a classic look.
- Slice and serve your beautiful Easter Swiss Roll Cake!
Nutritional Information (Per Serving)
| Nutrient | Amount |
|---|---|
| Calories | ~250 kcal |
| Carbohydrates | ~30g |
| Protein | ~4g |
| Fat | ~12g |
| Saturated Fat | ~6g |
| Sugar | ~20g |
| Fiber | ~1g |
| Sodium | ~80mg |
The History of Swiss Roll Cakes
Swiss rolls, also known as jelly rolls or roulades, have been a beloved dessert for centuries. Though the exact origin is debated, many believe the cake was first developed in Central Europe, with variations appearing in Swiss, Austrian, and German pastry traditions.
These cakes gained popularity worldwide for their simple yet elegant presentation—soft sponge cake wrapped around a creamy filling. Over time, Swiss rolls evolved into different flavors, from classic vanilla and chocolate to fruit-filled variations. Today, the Easter Swiss Roll Cake adds a festive, colorful twist to this timeless dessert, making it a perfect centerpiece for holiday celebrations.
Creative Variations to Try
One of the best things about this Swiss roll is its versatility. You can easily customize it to match your personal taste or Easter theme. Here are some exciting variations to experiment with:
1. Lemon Cream Swiss Roll
Swap the cocoa powder for more flour to create a plain vanilla sponge, then fill it with a tangy lemon whipped cream. The citrusy flavor adds a bright and refreshing twist.
2. Strawberry Shortcake Swiss Roll
Fold in finely chopped strawberries into the whipped cream filling for a fruity burst of flavor. This pairs beautifully with the pastel marbled sponge.
3. Chocolate Lover’s Swiss Roll
For a richer dessert, fill the cake with a chocolate ganache or chocolate whipped cream. You can even drizzle melted chocolate over the top for an extra indulgent finish.
4. Coconut Cream Swiss Roll
Add shredded coconut to the whipped cream filling and sprinkle toasted coconut flakes on top. This tropical-inspired version is a fantastic way to welcome spring.
5. Gluten-Free Swiss Roll
Use a gluten-free flour blend in place of all-purpose flour to make this cake suitable for gluten-sensitive guests without compromising on texture.
Frequently Asked Questions
1. Why did my Swiss roll crack when I rolled it?
Swiss rolls can crack if they are overbaked or if they cool too much before rolling. To prevent this:
- Make sure not to overbake the sponge—it should be soft and slightly springy to the touch.
- Roll the cake while it’s still warm using a kitchen towel to help shape it.
2. Can I make this cake ahead of time?
Yes! This Swiss roll can be made a day in advance. Keep it refrigerated until ready to serve. The whipped cream filling stays fresh, and the cake holds its shape well.
3. How do I get a smooth, even swirl in my roll?
To achieve a perfect swirl:
- Spread the filling evenly across the sponge, leaving a small border at the edges.
- Use gentle, even pressure when rolling to keep it tight but not too compressed.
4. What food coloring should I use for the marbled effect?
Gel food coloring works best, as it provides vibrant colors without adding extra liquid to the batter. A few drops are all you need to achieve soft pastel hues.
5. Can I freeze a Swiss roll?
Yes, you can freeze it without the filling. Wrap the baked and rolled sponge in plastic wrap and store it in an airtight container for up to 1 month. When ready to use, thaw at room temperature and fill with fresh whipped cream.
How to Serve and Present Your Easter Swiss Roll
This cake is already a visual masterpiece, but you can take the presentation to the next level with a few finishing touches:
- Dust with powdered sugar for an elegant, classic look.
- Drizzle with melted white chocolate to enhance the festive feel.
- Garnish with edible flowers or pastel sprinkles to make it even more Easter-themed.
- Serve with fresh berries to add a refreshing contrast to the sweet cake.
Pair this dessert with a cup of tea, a glass of sparkling lemonade, or even a scoop of vanilla ice cream for a delightful Easter treat.
Why This Easter Swiss Roll Will Become a Family Favorite
Beyond its stunning appearance and delicious flavor, this Swiss roll carries a sense of tradition and joy. There’s something truly special about baking a cake that brings people together, whether it’s children eagerly watching the marbling process or loved ones sharing slices around the table.
This Easter, as you prepare to celebrate with family and friends, take a moment to enjoy the simple pleasures—mixing batter, rolling a warm sponge, and creating something beautiful with your hands. This Easter Swiss Roll Cake is more than just a dessert; it’s a symbol of springtime renewal, creativity, and the sweet memories that last long after the last bite.
So go ahead, roll up some Easter magic, and let this cake be the highlight of your holiday feast!
Easter Swiss Roll Cake with Colorful Marbled Sponge
Ingredients
Method
- Preheat the oven to 350°F (175°C).
- Line a 15×10-inch jelly roll pan with parchment paper and lightly grease it.
- In a large bowl, beat the eggs and granulated sugar on high speed for about 5 minutes until thick and pale.
- Stir in the vanilla extract.
- In a separate bowl, whisk together the flour, cocoa powder, baking powder, and salt.
- Gradually fold the dry ingredients into the egg mixture until just combined.
- In a small bowl, mix the milk and vegetable oil.
- Gently fold this into the batter until smooth and fully incorporated.
- Divide the batter into three equal portions and tint each with a different pastel food coloring (e.g., pink, blue, and yellow).
- Spoon dollops of the colored batter randomly onto the prepared pan.
- Use a toothpick or skewer to gently swirl the colors together for a marbled effect.
- Bake for 10-12 minutes or until the cake springs back when lightly touched.
- While the cake is still warm, carefully lift it with the parchment paper and place it on a clean surface.
- Dust a clean kitchen towel with powdered sugar and flip the cake onto the towel.
- Remove the parchment paper and gently roll the cake (with the towel inside) into a log shape.
- Let it cool completely.
- In a chilled bowl, beat the heavy whipping cream, powdered sugar, and vanilla extract until stiff peaks form.
- Carefully unroll the cooled cake.
- Spread the whipped cream evenly over the surface, leaving a small border around the edges.
- Re-roll the cake (without the towel), ensuring a tight but gentle roll.
- Dust with powdered sugar for a simple finish.
- Slice and serve this beautifully marbled Swiss roll!
Notes
- Roll the cake while it’s still warm to prevent cracks.
- Let the Jello cool slightly before pouring it over the cream cheese layer to prevent melting.
- Use gel food coloring for vibrant pastel shades without altering the batter consistency.
- Store leftovers in the refrigerator for up to 3 days.