

I’ll never forget the first time I made butter from scratch. It was a quiet afternoon in the kitchen, and I had just finished reading a passage in an old cookbook about the art of butter-making. Intrigued, I decided to give it a try, not fully expecting to succeed. The process was simple—almost deceptively so—but the result was nothing short of magical. As the cream transformed into soft, golden butter, I realized that what I was doing was not just a kitchen experiment—it was a step back in time, reconnecting with a tradition that’s been passed down through generations.
Growing up, I never considered making butter myself. It was always a product that came from the grocery store shelves. But as I started to delve deeper into the world of homemade, artisanal foods, I came to understand the joy and satisfaction that comes from making something so fundamental from scratch. Making butter isn’t just about the final product; it’s about the process, the connection to the ingredients, and the feeling of pride that comes from creating something with your own hands. It was during that first batch of homemade butter that I realized how much the simple, everyday things in life—like fresh butter on warm bread—can bring about the deepest sense of contentment.
The Magic of Making Homemade Butter
There’s something incredibly satisfying about making butter from scratch. It’s one of the oldest forms of food preparation, dating back to ancient civilizations. Butter-making is a process that’s deeply rooted in culture and history. It’s amazing how something as simple as cream can transform, through just a little patience and care, into a creamy, rich product that enhances so many dishes.
For generations, butter was made by hand, churned in large wooden barrels by farmers and homemakers alike. Today, making butter at home has become something of a lost art in many parts of the world. But for those who decide to make their own butter, the process is not only a connection to the past—it’s also a deeply rewarding experience. The final product is richer, fresher, and more flavorful than anything you can buy at the store. It carries the love and effort of the maker, and every spoonful is a reminder of the beauty in simple things.
What’s even more remarkable is how quickly the process can be done. In just five minutes, you can turn 1 liter of cream into a kilogram of butter. The trick is to use a stand mixer or hand mixer, which speeds up the churning process. The butter forms almost magically as the cream separates into thick, golden butter and buttermilk. It’s a fun, simple way to take control of your food, and the best part is you can use it immediately.
Ingredients
| Ingredient | Quantity |
|---|---|
| Cream (33% fat) | 1 liter |
| Ice cubes | As needed |
| Cold water | As needed |
Directions:
- Prepare the Cream:
Pour the 1 liter of cream (33% fat) into a stand mixer or a large bowl if you’re using a hand mixer. Ensure the cream is cold for the best results. - Whip the Cream:
Begin mixing the cream on medium speed. In a few minutes, the cream will start to thicken and whip into whipped cream. Continue mixing until the whipped cream turns into butter, separating from the buttermilk. - Drain the Buttermilk:
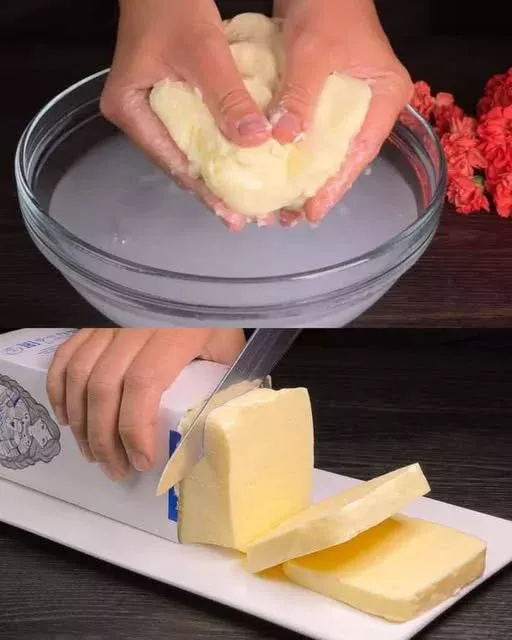
Once the butter forms, carefully drain the buttermilk from the mixing bowl. You can use the buttermilk for other recipes like pancakes or scones. - Wash the Butter:
To wash the butter, add cold water to the bowl and knead the butter to remove any remaining buttermilk. Repeat this process a few times, changing the water as necessary, until the water runs clear. - Solidify the Butter:
Place the butter into a clean bowl and add a few ice cubes. Knead the butter until it’s solidified and firm. The ice helps to quickly harden the butter. - Store the Butter:
Once the butter is firm and free from buttermilk, transfer it to an airtight container for storage. You can refrigerate it for up to 2 weeks or freeze it for longer storage.
Nutritional Information (per 100g of butter):
| Nutrient | Amount per 100g |
|---|---|
| Calories | 717 kcal |
| Protein | 1g |
| Carbohydrates | 0g |
| Fat | 81g |
| Saturated Fat | 51g |
| Cholesterol | 215mg |
| Sodium | 11mg |
Why Make Your Own Butter?
In today’s world of mass production and convenience, making your own butter might seem like a labor-intensive task. But the truth is, homemade butter offers several advantages that store-bought versions simply can’t match. Here are a few reasons why making butter at home is worth the effort:
- Freshness: Homemade butter is incredibly fresh. The moment you churn it, you’re able to taste the difference in texture and flavor compared to store-bought varieties, which may have been sitting on shelves for weeks or even months.
- Control Over Ingredients: When you make your own butter, you control what goes into it. There are no preservatives, additives, or artificial flavors—just pure cream. If you prefer, you can experiment with different flavors by adding herbs, spices, or even a bit of sea salt.
- Rich Flavor: Homemade butter has a richness and depth of flavor that store-bought butter simply can’t replicate. It’s smooth, creamy, and has a fuller taste. Whether spread on toast, added to recipes, or used to finish a dish, it’s a delight in every bite.
- Satisfaction and Tradition: Making butter is a hands-on process that connects you to the tradition of food-making. It’s a beautiful way to slow down and savor the process of creating something nourishing from scratch. There’s a deep satisfaction in making something so fundamental and basic, yet so full of flavor.
- Economic: While store-bought butter is relatively inexpensive, making your own can save money in the long run. One liter of cream yields about 1 kilogram of butter, which can be much more cost-effective compared to buying high-quality butter.
- Environmental Impact: By making your own butter, you can reduce packaging waste associated with buying pre-packaged butter. You also support smaller, local dairies if you choose to source your cream from local farmers.
What You’ll Need for Homemade Butter
Making butter at home requires just three basic ingredients: cream, ice cubes, and cold water. But more than the ingredients, the key to success lies in the process—the art of churning the cream until it separates into butter and buttermilk. While a stand mixer or hand mixer is ideal, you can also use a manual butter churn for a more traditional approach, though it requires a bit more time and effort.
The quality of your cream will make a big difference in the final product. Opt for heavy cream with a high-fat content (at least 33% fat). The higher the fat content, the more butter you’ll yield. Fresh, high-quality cream will give your butter the best flavor and texture. If possible, seek out cream from a local farm or a reputable dairy to ensure the freshest product.
Frequently Asked Questions (FAQs)
1. How do I know when the butter is ready?
You’ll know the butter is ready when the cream separates into clumps of butter and a thin, watery liquid (buttermilk). This process typically happens after a few minutes of mixing. If you’re unsure, just stop the mixer and check—if the mixture looks thick and the buttermilk is separated, you’re done.
2. Can I add flavors to my homemade butter?
Absolutely! Once your butter is formed and rinsed, you can add various flavors. Fresh herbs like rosemary or thyme, garlic, lemon zest, or even a pinch of sea salt can elevate your homemade butter. Simply knead the additions into the butter after it has been rinsed and shaped.
3. Can I use this method for smaller quantities of cream?
Yes, you can use this method for smaller amounts of cream. The process remains the same, but it will take less time to churn. However, the larger the amount of cream, the easier it is to get a good separation of butter and buttermilk.
4. What should I do with the buttermilk?
Buttermilk is a valuable byproduct of the butter-making process! It can be used in cooking and baking, such as in pancakes, muffins, biscuits, or as a marinade for chicken. Don’t throw it away—use it for its tangy, slightly acidic flavor.
5. How long does homemade butter last?
Homemade butter typically lasts for about two weeks in the refrigerator. If you want to keep it longer, you can freeze the butter for up to three months. Make sure to wrap it tightly in plastic wrap or store it in an airtight container.
Conclusion: The Joy of Homemade Butter
Making your own butter is a simple yet incredibly rewarding process. From the moment the cream transforms into golden butter, you experience the satisfaction of creating something fresh, flavorful, and full of history. It’s a journey into the past, a return to traditional methods of food preparation, and a reminder that some of the best things in life come from the simplest ingredients.
As I continue to make butter in my own kitchen, I am reminded of the connection between food, family, and tradition. Butter may seem like a small, everyday food, but it carries with it a sense of comfort, of home, and of care. Whether you’re using it to spread on warm bread, dollop onto pancakes, or enhance your favorite dishes, homemade butter has a way of making everything taste a little better. So, the next time you’re in the kitchen, consider making your own batch of butter—it’s not just a culinary skill, it’s a connection to the past, a labor of love, and a beautiful reminder of the joy found in simple things.
Homemade Butter: A Journey to the Heart of Simplicity and Tradition
Ingredients
Method
- Pour the cream into a stand mixer or a large mixing bowl if you are using a hand mixer. Ensure the cream is cold for the best results.
- Begin whipping the cream on medium speed. As you continue mixing, the cream will thicken and eventually begin to turn into whipped cream.
- Keep mixing until the whipped cream separates into butter and buttermilk. This process should take around 5 minutes.
- Drain the buttermilk and save it for other recipes, like pancakes or scones.
- Add cold water to the butter and knead it to remove any remaining buttermilk. Change the water as needed until it runs clear.
- Place a few ice cubes into the butter and knead until it becomes firm. This will help solidify the butter and improve its texture.
- Transfer the butter into an airtight container for storage. Refrigerate for up to two weeks or freeze for longer storage.
Notes
- For extra flavor, you can experiment with adding a pinch of salt or fresh herbs like rosemary or thyme to the butter after it has solidified.
- Be sure to wash the butter thoroughly to remove any traces of buttermilk. This will help extend its shelf life.
- If you want to make a larger batch, simply scale up the ingredients accordingly. For each liter of cream, you’ll get about 1 kilogram of butter.