

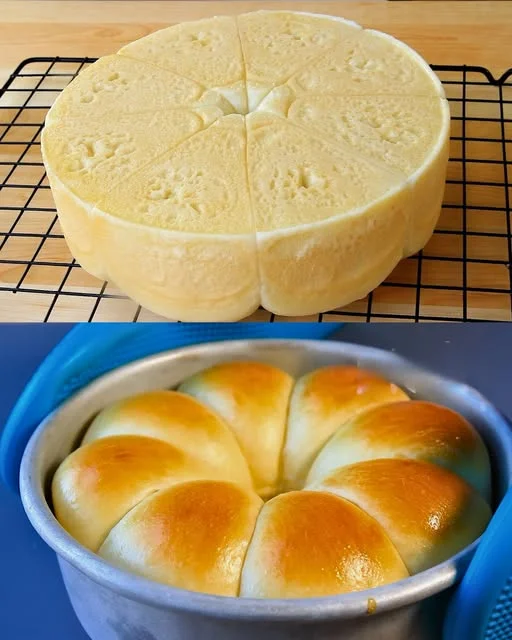
Making fresh, soft, and fluffy bread at home doesn’t require an oven. This easy no-oven milk bread recipe is a game-changer for those who love homemade bread but don’t have access to traditional baking methods. The result? A light, airy, and slightly sweet bread with a tender crumb that melts in your mouth.
If you’ve ever thought baking bread at home was too complicated, this recipe will prove you wrong. It requires basic pantry ingredients, simple techniques, and a little patience to achieve bakery-quality bread. Whether you’re making it for breakfast, sandwiches, or just to enjoy with butter and jam, this stovetop milk bread is bound to become a household favorite.
Why This No-Oven Milk Bread is a Must-Try
Homemade bread has a charm that store-bought bread simply can’t match. From the warm, inviting aroma to the satisfaction of slicing into a freshly baked loaf, there’s something incredibly rewarding about baking bread from scratch.
This milk bread recipe is particularly special because it:
1. Requires No Oven
Many people assume that soft, fluffy bread can only be baked in an oven, but this recipe proves otherwise. Cooking it in a covered pan on the stovetop ensures that it rises beautifully and develops a golden, tender crust.
2. Has a Soft, Pillow-Like Texture
Unlike regular bread, which can sometimes turn out dense or dry, this milk bread is incredibly soft and light. The secret lies in the combination of milk and butter, which enriches the dough and keeps it moist.
3. Uses Simple and Affordable Ingredients
This recipe doesn’t require any fancy or hard-to-find ingredients. With just flour, milk, yeast, butter, sugar, and salt, you can create a batch of fresh bread at home without breaking the bank.
4. Is Perfect for Multiple Uses
This milk bread can be enjoyed in many ways—toast it for breakfast, make sandwiches, serve it with soups, or even turn it into a dessert by adding sweet toppings. The possibilities are endless.
Ingredients
| Ingredient | Quantity |
|---|---|
| Warm milk | 150ml |
| White sugar | 25g (2 tbsp) |
| Active dry yeast | 3g (1 tsp) |
| Egg | 1 |
| All-purpose or bread flour | 300g |
| Salt | 3g (0.5 tsp) |
| Unsalted butter (for dough) | 30g (2 tbsp) |
| Unsalted butter (for baking pan) | 5g |
Directions
- In a bowl, mix warm milk, sugar, and yeast. Let sit for 5-10 minutes until foamy.
- Add the egg, flour, and salt to the yeast mixture and mix until a rough dough forms.
- Knead the dough for 10 minutes, then add butter and knead for another 5 minutes until smooth and elastic.
- Cover and let the dough rise for 1 hour, or until doubled in size.
- Punch down the dough, divide into equal portions, and shape into rolls.
- Grease a pan with butter and place the rolls inside. Cover and let rise for another 30 minutes.
- Heat a covered pan on low heat and place the rolls inside. Cook for 10-12 minutes on one side, then flip and cook for another 8-10 minutes until golden brown and fully cooked.
- Let the bread cool slightly before serving.
Nutritional Information (Per Serving, Approx.)
| Nutrient | Amount |
|---|---|
| Calories | 180 kcal |
| Protein | 5g |
| Carbohydrates | 30g |
| Fats | 5g |
| Fiber | 1g |
| Sugar | 4g |
| Calcium | 50mg |
| Iron | 1mg |
The Secret to Making Soft and Fluffy Milk Bread
Many home bakers struggle with making bread that is light and airy instead of dense and heavy. Here are a few key tips to ensure your no-oven milk bread turns out perfectly every time:
1. Use Warm Milk for Activation
Warm milk helps activate the yeast, allowing the dough to rise properly. If the milk is too hot, it will kill the yeast; if it’s too cold, the yeast won’t activate effectively. The ideal temperature is around 100-110°F (37-43°C).
2. Knead the Dough Well
Kneading helps develop the gluten in the flour, which is essential for a soft, stretchy dough. Knead until the dough becomes smooth and elastic, which usually takes about 10-15 minutes by hand. If the dough is too sticky, resist the temptation to add too much extra flour, as this can make the bread dry.
3. Allow Proper Rising Time
Patience is key when making bread. The dough needs time to rise and double in size. A warm, draft-free environment is best for proofing. If the dough doesn’t rise enough, the bread may turn out dense.
4. Cook on Low Heat for Even Baking
Since this bread is cooked on the stovetop, maintaining the right heat level is crucial. If the heat is too high, the outside will brown too quickly while the inside remains undercooked. Using low to medium-low heat allows the bread to cook evenly.
Ways to Enjoy No-Oven Milk Bread
This bread is delicious on its own, but you can take it to the next level with these serving ideas:
1. Classic Butter and Jam
Spread a generous layer of butter and your favorite jam on a warm slice of milk bread for a simple yet satisfying treat.
2. French Toast
Dip slices of this bread in a mixture of eggs, milk, and cinnamon, then cook them in a pan for a rich and flavorful breakfast.
3. Sandwiches and Sliders
Since this bread is soft yet sturdy, it makes a fantastic base for sandwiches. Use it for breakfast sandwiches, grilled cheese, or mini sliders.
4. Bread Pudding
If you have leftovers, turn them into a delicious bread pudding by soaking them in a mixture of milk, eggs, sugar, and vanilla, then baking or steaming until set.
Common Mistakes to Avoid
Even though this bread is easy to make, a few mistakes can affect the final outcome. Here’s how to avoid them:
1. Not Activating the Yeast Properly
If your yeast doesn’t foam up after being mixed with warm milk and sugar, it might be expired, or the milk might be too hot or too cold. Always check the freshness of your yeast before starting.
2. Using Too Much Flour
Adding too much flour to the dough can make it stiff and dry. If the dough is slightly sticky, that’s okay—it will become smoother as you knead. Only add extra flour if it’s too wet to handle.
3. Skipping the Second Rise
The second rise allows the dough to develop a better texture. If you skip this step, the bread may turn out dense instead of soft and fluffy.
4. Cooking at Too High a Temperature
Bread needs time to cook through without burning on the outside. Keeping the heat low and covering the pan helps trap steam, which mimics an oven’s baking environment.
FAQs About No-Oven Milk Bread
1. Can I Use Whole Wheat Flour Instead of All-Purpose Flour?
Yes, but whole wheat flour absorbs more liquid and may result in a denser texture. To maintain softness, use half whole wheat and half all-purpose flour.
2. How Do I Store Leftover Milk Bread?
Store the bread in an airtight container or wrap it in plastic wrap at room temperature for up to 3 days. If you need to store it longer, freeze it and reheat before serving.
3. Can I Make This Recipe Vegan?
Yes! Replace milk with a plant-based alternative (such as almond or soy milk), butter with vegan butter or coconut oil, and the egg with a flaxseed or chia egg.
4. What If I Don’t Have Yeast?
You can try making a quick version using baking powder, but the texture will be different. Yeast provides the signature fluffiness of milk bread.
5. Can I Cook This Bread in an Oven Instead?
Absolutely! If you prefer to bake it, preheat your oven to 180°C (350°F) and bake for about 20-25 minutes, or until golden brown on top.
Conclusion: A Soft and Fluffy Bread You Can Make Anytime
This no-oven milk bread proves that homemade bread can be both simple and incredibly delicious. Whether you’re new to bread-making or looking for a stovetop alternative, this recipe is easy to follow and yields a bakery-quality loaf with minimal effort.
With its soft texture, rich flavor, and endless serving possibilities, this bread is perfect for breakfast, snacks, or even meal prep. Plus, it’s a great way to enjoy fresh, preservative-free bread at home without needing an oven.
If you’ve never made bread before, now is the time to try! This easy stovetop bread recipe will change the way you think about homemade bread forever.
No-Oven Super Soft Milk Bread – The Perfect Homemade Bread Recipe
Ingredients
Method
- In a bowl, mix warm milk, sugar, and yeast. Let sit for 5-10 minutes until foamy.
- Add the egg, flour, and salt, then mix until a rough dough forms.
- Knead the dough for 10 minutes, then add butter and continue kneading for another 5 minutes until smooth and elastic.
- Cover the dough and let it rise for 1 hour, or until doubled in size.
- Punch down the dough, divide into equal portions, and shape into rolls.
- Grease a pan with butter and place the rolls inside. Cover and let rise for another 30 minutes.
- Heat a covered pan on low heat and place the rolls inside. Cook for 10-12 minutes on one side, then flip and cook for another 8-10 minutes until golden brown and fully cooked.
- Let the bread cool slightly before serving.
Notes
- Ensure the yeast is active by letting it foam in the warm milk before proceeding.
- Use low heat while cooking to prevent burning while allowing the bread to cook through.
- Store in an airtight container at room temperature for up to 3 days or freeze for longer storage.
- Serve warm with butter, jam, or honey for extra flavor.