Flank Steak Pinwheels with Spinach and Cheese Delight

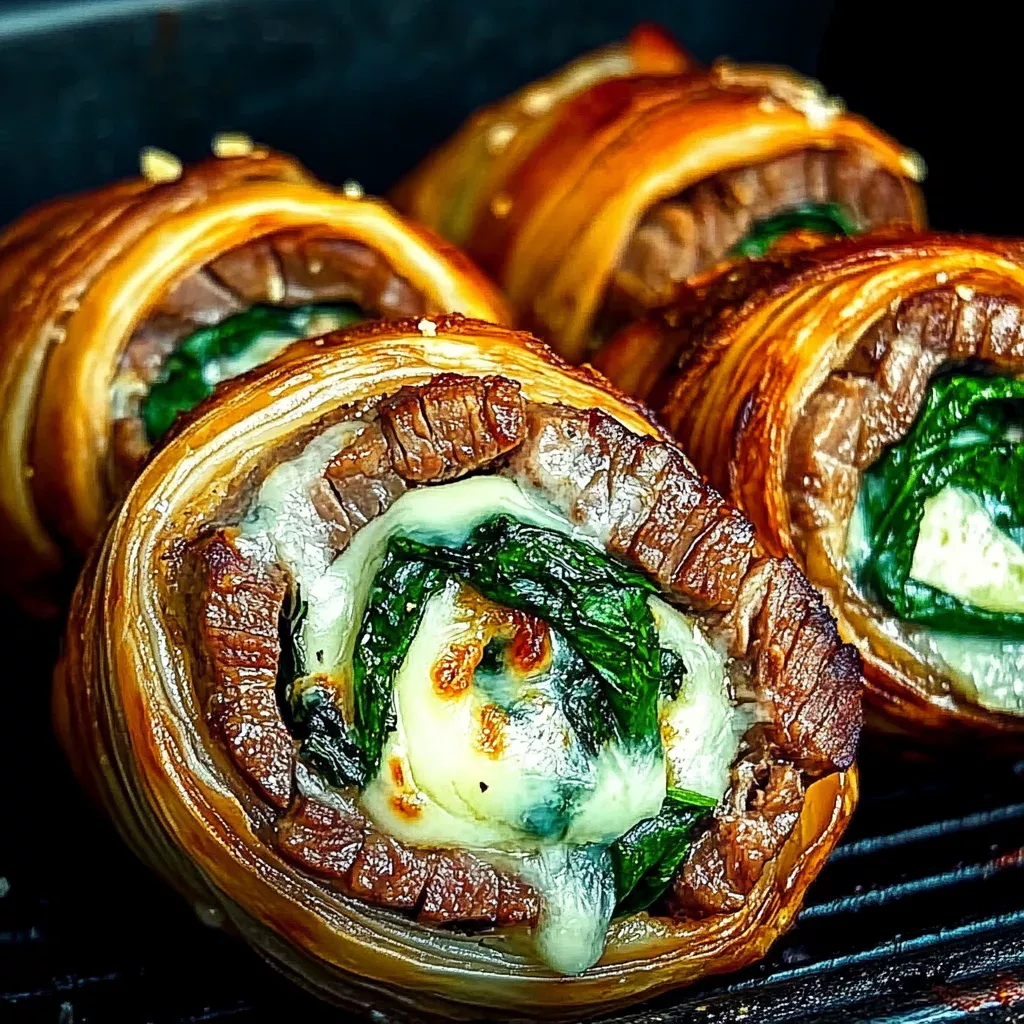
Introduction to Flank Steak Pinwheels with Spinach and Cheese

Oh, the joy of discovering a dish that feels like a warm hug after a long day! Flank Steak Pinwheels with Spinach and Cheese is just that—a delightful blend of flavors wrapped in a tender embrace. Imagine coming home to a meal that’s not only quick to prepare but also impressively delicious. Whether you’re a busy mom juggling a million things or a professional seeking a culinary escape, this recipe is your ticket to a satisfying dinner. It’s a savory symphony of spinach, ricotta, and mozzarella, all rolled into one delectable bite. Let’s dive in!

Why You’ll Love This Flank Steak Pinwheels with Spinach and Cheese

Picture this: a dish that’s as easy as pie, yet tastes like a gourmet masterpiece. These Flank Steak Pinwheels with Spinach and Cheese are a breeze to whip up, making them perfect for those hectic weeknights. The combination of tender steak and creamy cheese is a match made in culinary heaven. Plus, it’s a low-carb delight that doesn’t skimp on flavor. What’s not to love?

Ingredients for Flank Steak Pinwheels with Spinach and Cheese

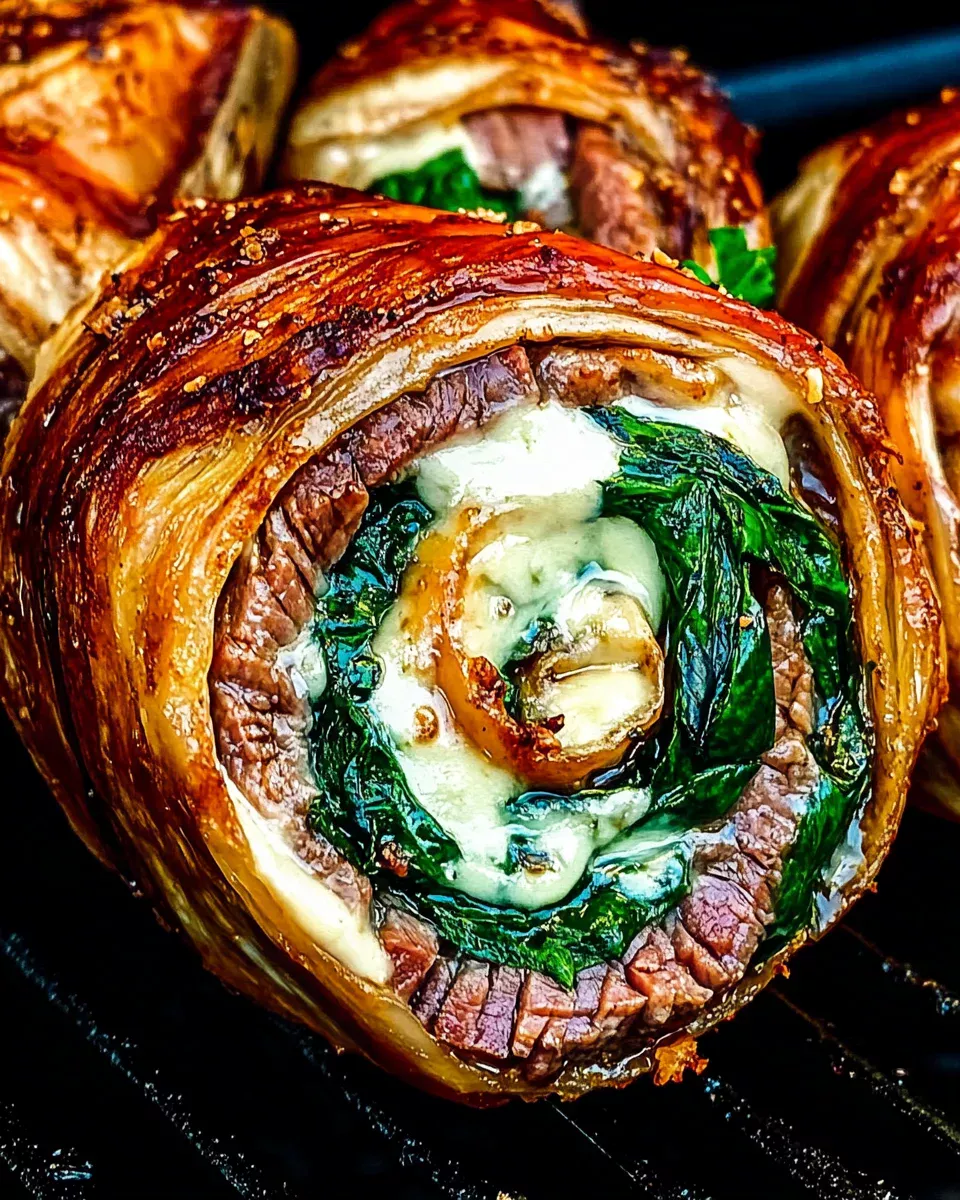
Let’s talk ingredients! At the heart of this dish is the flank steak, a lean cut that’s perfect for rolling. Fresh spinach adds a pop of color and nutrients, while ricotta cheese brings a creamy texture. Shredded mozzarella melts beautifully, creating that gooey goodness we all crave. Minced garlic infuses the filling with aromatic depth, and a sprinkle of salt and pepper enhances every bite. Italian seasoning ties it all together with a hint of Mediterranean flair. Olive oil is your go-to for searing, and a splash of balsamic vinegar adds a tangy finish. Don’t forget toothpicks or kitchen twine to keep everything snug. For exact measurements, scroll to the bottom of the article where you can print the full recipe.

How to Make Flank Steak Pinwheels with Spinach and Cheese

Preparing the Flank Steak

First things first, let’s get that flank steak ready. Place it between two pieces of plastic wrap. This keeps things tidy and makes pounding easier. Grab a meat mallet or rolling pin and gently pound the steak to an even thickness of about ½ inch. This step ensures even cooking and makes rolling a breeze. Once pounded, set it aside and get ready for the next step.

Mixing the Filling

Now, onto the filling! In a mixing bowl, combine chopped spinach, ricotta cheese, and shredded mozzarella. Add minced garlic for that aromatic punch. Season with salt, pepper, and Italian seasoning. Mix everything well until it’s a harmonious blend of flavors. This filling is the heart of your pinwheels, so make sure it’s well combined and ready to spread.

Assembling the Pinwheels

Time to roll up our sleeves and assemble these beauties. Spread the cheese and spinach mixture evenly over the pounded flank steak. Leave a small border around the edges to prevent overflow. Starting from one end, carefully roll the steak into a tight log. Secure the ends with toothpicks or tie with kitchen twine. This step is crucial to keep everything snug and in place during cooking.

Cooking the Pinwheels

Heat olive oil in a large oven-safe skillet over medium-high heat. Once hot, sear the rolled steak for about 3-4 minutes on each side until browned. This searing locks in the flavors and gives a lovely crust. Drizzle balsamic vinegar over the top for a tangy touch. Transfer the skillet to a preheated oven at 375°F. Bake for 20-25 minutes, or until the internal temperature hits 145°F for medium-rare. Let the pinwheels rest for 5-10 minutes before slicing into 1-inch pieces. Serve warm and enjoy the deliciousness!

Tips for Success

  • Ensure the flank steak is evenly pounded for consistent cooking.
  • Use fresh spinach for the best flavor and texture.
  • Secure the roll tightly to prevent the filling from spilling out.
  • Let the pinwheels rest before slicing to retain juices.
  • Experiment with different cheeses for a unique twist.

Equipment Needed

  • Meat mallet or rolling pin for pounding the steak
  • Mixing bowl for combining the filling ingredients
  • Large oven-safe skillet for searing and baking
  • Plastic wrap to keep the workspace tidy
  • Toothpicks or kitchen twine to secure the pinwheels

Variations

  • Swap out the spinach for kale or arugula for a different leafy green flavor.
  • Add sun-dried tomatoes to the filling for a burst of tangy sweetness.
  • Try using feta or goat cheese instead of ricotta for a tangier taste.
  • For a spicy kick, include a pinch of red pepper flakes in the filling.
  • Make it dairy-free by using vegan cheese alternatives.
  • Incorporate chopped mushrooms for an earthy, umami twist.
  • Use a gluten-free balsamic glaze for a celiac-friendly option.

Serving Suggestions

  • Pair with a crisp green salad drizzled with lemon vinaigrette for a refreshing contrast.
  • Serve alongside roasted garlic mashed potatoes for a comforting side.
  • Complement with a glass of full-bodied red wine, like Cabernet Sauvignon.
  • Garnish with fresh basil leaves for a pop of color and flavor.
  • Present on a wooden board for a rustic, inviting look.

FAQs about Flank Steak Pinwheels with Spinach and Cheese

Can I prepare the pinwheels ahead of time?

Absolutely! You can assemble the pinwheels a day in advance. Just wrap them tightly in plastic wrap and store in the fridge. When you’re ready to cook, follow the searing and baking steps. This makes it a perfect dish for entertaining or busy weeknights.

What can I use instead of flank steak?

If flank steak isn’t available, skirt steak is a great alternative. It’s equally tender and works well for rolling. Just ensure it’s pounded to an even thickness for best results. Both cuts are ideal for these pinwheels, offering a delicious base for the filling.

How do I know when the steak is cooked to perfection?

Using a meat thermometer is key. Aim for an internal temperature of 145°F for medium-rare. This ensures the steak is juicy and tender. Remember, the steak will continue to cook slightly as it rests, so don’t skip the resting step!

Can I freeze the pinwheels?

Yes, you can freeze them! After assembling, wrap the pinwheels tightly in plastic wrap and place in a freezer-safe bag. They can be frozen for up to 3 months. Thaw in the fridge overnight before cooking as directed. This is a great way to have a ready-to-cook meal on hand.

What if I don’t have an oven-safe skillet?

No worries! You can sear the pinwheels in a regular skillet, then transfer them to a baking dish for the oven. Just make sure to preheat the dish in the oven for a few minutes before adding the pinwheels. This helps maintain the cooking temperature and ensures even baking.

Final Thoughts

There’s something truly magical about Flank Steak Pinwheels with Spinach and Cheese. It’s a dish that transforms a simple dinner into a memorable experience. The tender steak, wrapped around a creamy, cheesy filling, is like a culinary hug that warms the soul. Whether you’re sharing it with family or savoring it solo, each bite is a celebration of flavors. It’s a reminder that even on the busiest days, a delicious meal is within reach. So, roll up your sleeves, embrace the joy of cooking, and let these pinwheels bring a little extra delight to your table.

Flank Steak Pinwheels with Spinach and Cheese
Paul

Flank Steak Pinwheels with Spinach and Cheese Delight

Flank Steak Pinwheels with Spinach and Cheese is a delicious and savory dish featuring tender flank steak rolled with a flavorful mixture of spinach, ricotta, and mozzarella cheese, seasoned with garlic and Italian herbs.
Prep Time 20 minutes
Cook Time 30 minutes
Total Time 50 minutes
Servings: 4 servings
Course: Main Course
Cuisine: American
Calories: 350

Ingredients
  

  • 1 ½ pounds flank steak
  • 1 cup fresh spinach chopped
  • 1 cup ricotta cheese
  • 1 cup shredded mozzarella cheese
  • 2 cloves garlic minced
  • 1 teaspoon salt
  • ½ teaspoon black pepper
  • 1 teaspoon Italian seasoning
  • 2 tablespoons olive oil
  • 1 tablespoon balsamic vinegar
  • Toothpicks or kitchen twine for securing

Method
 

  1. Preheat your oven to 375°F (190°C).
  2. Place the flank steak between two pieces of plastic wrap and pound it to an even thickness of about ½ inch using a meat mallet or rolling pin.
  3. In a mixing bowl, combine the chopped spinach, ricotta cheese, mozzarella cheese, minced garlic, salt, pepper, and Italian seasoning. Mix well until all ingredients are evenly combined.
  4. Spread the cheese and spinach mixture evenly over the pounded flank steak, leaving a small border around the edges.
  5. Starting from one end, carefully roll the flank steak tightly into a log shape. Secure the ends with toothpicks or tie with kitchen twine.
  6. Heat olive oil in a large oven-safe skillet over medium-high heat. Once hot, sear the rolled flank steak for about 3-4 minutes on each side until browned.
  7. Drizzle balsamic vinegar over the top of the steak, then transfer the skillet to the preheated oven. Bake for 20-25 minutes, or until the internal temperature reaches 145°F (medium-rare).
  8. Remove from the oven and let the pinwheels rest for 5-10 minutes before slicing into 1-inch thick pieces. Serve warm.

Notes

  • For added flavor, consider marinating the flank steak in your favorite marinade for a few hours before preparing.
  • You can substitute the spinach with kale or arugula for a different taste, or add sun-dried tomatoes for an extra burst of flavor.

Spicy Salmon Sushi Bake: Discover a Flavorful Twist Today!

Introduction to Spicy Salmon Sushi Bake

Have you ever craved sushi but felt too pressed for time to roll those delicate pieces? Enter the Spicy Salmon Sushi Bake, a delightful twist on traditional sushi that’s perfect for busy days. Imagine all the flavors of your favorite sushi roll, but in a warm, comforting bake. It’s like a cozy blanket for your taste buds! This dish is not only a time-saver but also a crowd-pleaser, sure to impress your loved ones. Whether you’re a sushi aficionado or a newbie, this recipe is your ticket to a deliciously easy meal.

Why You’ll Love This Spicy Salmon Sushi Bake

This Spicy Salmon Sushi Bake is a game-changer for those hectic weeknights. It’s quick to prepare, bursting with flavor, and requires minimal cleanup—what’s not to love? The combination of spicy salmon, creamy avocado, and savory sushi rice creates a symphony of taste that dances on your palate. Plus, it’s versatile enough to please even the pickiest eaters in your family. Trust me, you’ll be hooked!

Ingredients for Spicy Salmon Sushi Bake

Creating this Spicy Salmon Sushi Bake is a breeze with a handful of simple ingredients. Let’s dive into what you’ll need:

  • Sushi Rice: The foundation of our dish, providing that classic sticky texture. You can find it in most grocery stores.
  • Water: Essential for cooking the rice to perfection.
  • Rice Vinegar: Adds a tangy kick to the rice, balancing the flavors beautifully.
  • Sugar and Salt: These pantry staples enhance the rice’s flavor, making it irresistible.
  • Salmon Fillet: The star of the show, offering a rich, buttery taste. Opt for fresh, skinless fillets for best results.
  • Mayonnaise: Provides creaminess to the spicy salmon mixture. Feel free to use a light version if you prefer.
  • Sriracha Sauce: Brings the heat! Adjust the amount to suit your spice tolerance.
  • Sesame Oil: Infuses a nutty aroma, elevating the dish’s overall flavor profile.
  • Avocado: Adds a creamy, buttery texture on top. Choose ripe avocados for the best taste.
  • Green Onions: These add a fresh, crisp bite and a pop of color.
  • Nori Strips: For that authentic sushi experience, providing a subtle seaweed flavor.
  • Soy Sauce: A classic accompaniment for serving, enhancing the umami notes.

Exact quantities for each ingredient are listed at the bottom of the article, ready for printing. Feel free to experiment with substitutions, like using cooked shrimp or crab instead of salmon, to suit your taste preferences!

How to Make Spicy Salmon Sushi Bake

Preparing the Sushi Rice

Start by rinsing the sushi rice under cold water. This step is crucial to remove excess starch, ensuring the rice doesn’t turn gummy. Once the water runs clear, combine the rice and water in a rice cooker or pot. If using a pot, bring it to a boil, then reduce the heat to low. Cover and let it simmer for about 20 minutes. While the rice cooks, mix rice vinegar, sugar, and salt in a small bowl until dissolved. Once the rice is ready, transfer it to a large bowl and gently fold in the vinegar mixture. Let it cool slightly before moving on.

Baking the Salmon

Preheat your oven to 375°F (190°C). Place the salmon fillet in a baking dish, ensuring it’s skinless for easy flaking later. Bake for 15-20 minutes, or until the salmon is cooked through and flakes easily with a fork. Once done, remove it from the oven and let it cool slightly. This step is where the magic begins, as the salmon’s rich, buttery flavor develops beautifully in the oven.

Mixing the Spicy Salmon

In a separate bowl, combine the flaked salmon with mayonnaise, sriracha sauce, and sesame oil. This mixture is where the spicy magic happens! Adjust the sriracha to your liking—more for a fiery kick, less for a milder taste. The sesame oil adds a nutty aroma that complements the salmon perfectly. Mix until everything is well combined, creating a creamy, spicy salmon mixture that’s ready to layer.

Assembling the Sushi Bake

In a large baking dish, spread the prepared sushi rice evenly across the bottom. This forms the base of your sushi bake, providing that classic sticky texture. Next, layer the spicy salmon mixture on top of the rice, spreading it evenly. This step is where the flavors start to meld together, creating a harmonious blend of spicy, savory, and umami notes.

Final Baking and Serving

Place the assembled dish back into the preheated oven. Bake for 10-15 minutes, just until everything is heated through and the top is slightly crispy. Once done, remove from the oven and top with sliced avocado and chopped green onions. These add a fresh, creamy contrast to the spicy bake. Serve with nori strips and soy sauce on the side for that authentic sushi experience. Enjoy your homemade Spicy Salmon Sushi Bake!

Tips for Success

  • Rinse the sushi rice thoroughly to avoid a gummy texture.
  • Use fresh salmon for the best flavor and texture.
  • Adjust the sriracha to suit your spice preference.
  • Let the rice cool slightly before assembling to prevent sogginess.
  • For a crispy top, broil the bake for the last 2 minutes.
  • Serve immediately for the freshest taste and texture.

Equipment Needed

  • Rice Cooker or Pot: Essential for cooking the sushi rice. A pot works just as well if you don’t have a rice cooker.
  • Baking Dish: Use a medium-sized dish for even baking.
  • Mixing Bowls: Handy for combining ingredients.
  • Fork: Perfect for flaking the salmon.
  • Oven: Preheat to 375°F for baking the salmon and final dish.

Variations

  • Seafood Swap: Substitute the salmon with cooked shrimp or crab for a different seafood twist.
  • Vegetarian Option: Replace the salmon with roasted vegetables like bell peppers and zucchini for a veggie-friendly version.
  • Spice Level: Adjust the sriracha to your liking, or try adding a dash of wasabi for an extra kick.
  • Low-Carb: Use cauliflower rice instead of sushi rice for a lighter, low-carb alternative.
  • Gluten-Free: Ensure all ingredients, especially soy sauce, are certified gluten-free for a safe meal.

Serving Suggestions

  • Side Salad: Pair with a crisp cucumber and seaweed salad for a refreshing contrast.
  • Drink: Enjoy with a chilled glass of sake or a light, citrusy white wine.
  • Presentation: Serve on a wooden board with nori strips and soy sauce in small bowls for an elegant touch.

FAQs about Spicy Salmon Sushi Bake

Can I make this Spicy Salmon Sushi Bake ahead of time?

Absolutely! You can prepare the sushi rice and spicy salmon mixture a day in advance. Store them separately in airtight containers in the fridge. When you’re ready to serve, assemble and bake as directed. This makes it a perfect dish for entertaining or busy weeknights.

What can I use instead of salmon in this sushi bake?

If you’re not a fan of salmon, feel free to swap it with cooked shrimp or crab. Both options offer a delightful seafood twist. For a vegetarian version, roasted vegetables like bell peppers and zucchini work wonderfully.

How do I store leftovers of the Spicy Salmon Sushi Bake?

Leftovers can be stored in an airtight container in the refrigerator for up to three days. To reheat, simply pop it in the oven at 350°F until warmed through. Avoid microwaving, as it can make the rice gummy.

Is this recipe gluten-free?

Yes, this Spicy Salmon Sushi Bake can be gluten-free if you use certified gluten-free soy sauce. Always double-check the labels of your ingredients to ensure they meet your dietary needs.

Can I adjust the spice level in this sushi bake?

Definitely! The beauty of this recipe is its flexibility. You can easily adjust the sriracha to suit your spice preference. For a milder version, use less sriracha, or add more for an extra kick. You can even drizzle some on top before serving for added heat.

Final Thoughts

Creating this Spicy Salmon Sushi Bake is like embarking on a culinary adventure, where each bite tells a story of flavor and comfort. It’s a dish that brings the joy of sushi into the warmth of your home, without the fuss of rolling. Whether you’re sharing it with family or savoring it solo, this recipe is a testament to the magic of simple ingredients coming together in harmony. So, gather your loved ones, set the table, and let this sushi bake be the centerpiece of a meal filled with laughter and love. Happy cooking!

Spicy Salmon Sushi Bake
Paul

Spicy Salmon Sushi Bake: Discover a Flavorful Twist Today!

A delicious and flavorful twist on traditional sushi, this Spicy Salmon Sushi Bake combines sushi rice, baked salmon, and a spicy mayo mixture, topped with avocado and green onions.
Prep Time 15 minutes
Cook Time 45 minutes
Total Time 1 hour
Servings: 4 servings
Course: Main Course
Cuisine: Japanese
Calories: 480

Ingredients
  

  • 2 cups sushi rice
  • 2 1/2 cups water
  • 1/4 cup rice vinegar
  • 2 tablespoons sugar
  • 1 teaspoon salt
  • 1 pound salmon fillet skinless
  • 2 tablespoons mayonnaise
  • 2 tablespoons sriracha sauce
  • 1 teaspoon sesame oil
  • 1 avocado sliced
  • 1/4 cup green onions chopped
  • 1 sheet nori cut into strips
  • Soy sauce for serving

Method
 

  1. Preheat your oven to 375°F (190°C).
  2. Rinse the sushi rice under cold water until the water runs clear. Combine the rinsed rice and water in a rice cooker or pot, and cook according to the rice cooker instructions or bring to a boil, then reduce heat to low, cover, and simmer for 20 minutes.
  3. In a small bowl, mix the rice vinegar, sugar, and salt until dissolved. Once the rice is cooked, transfer it to a large bowl and gently fold in the vinegar mixture. Allow the rice to cool slightly.
  4. While the rice is cooling, prepare the salmon. Place the salmon fillet in a baking dish and bake for 15-20 minutes, or until cooked through. Remove from the oven and let it cool slightly, then flake the salmon with a fork.
  5. In a separate bowl, mix the flaked salmon with mayonnaise, sriracha sauce, and sesame oil until well combined.
  6. In a large baking dish, spread the sushi rice evenly across the bottom. Layer the spicy salmon mixture on top of the rice.
  7. Bake in the preheated oven for 10-15 minutes, until heated through and slightly crispy on top.
  8. Remove from the oven and top with sliced avocado and chopped green onions. Serve with nori strips and soy sauce on the side.

Notes

  • For an extra kick, add more sriracha to the salmon mixture or drizzle it on top before serving.
  • You can also substitute the salmon with cooked shrimp or crab for a different flavor.

Mozzarella Melt Bread: A Homemade Classic That Warms More Than Just the Oven

Some of the best recipes in life don’t come from a cookbook. They come from a craving, a memory, or even a quiet afternoon with nothing but a few ingredients in the pantry and a little time to slow down.

This recipe was born on one of those days.

It was the weekend, gray outside, and the fridge was relatively bare. I wasn’t in the mood to leave the house or make anything extravagant. But I wanted something warm, comforting, and homemade—something that could make the house smell like love. As I scanned the shelves, I realized I had flour, yeast, milk, and mozzarella. That was all I needed.

So, I set the water to warm, stirred the yeast with sugar, and began the process. No special gadgets, no stand mixer—just my hands and a wooden spoon. Within minutes, the dough came together. An hour later, it had risen beautifully, puffed up with potential. I folded in the cheese, shaped the loaf, and baked it to golden perfection.

The smell was everything you’d expect from fresh bread—and then something more. It had a cheesy, buttery note that filled the kitchen and lingered long after the loaf came out of the oven. When I finally sliced into it, steam curled upward, and the interior was soft, warm, and speckled with melted mozzarella.

That was the moment I knew: this wasn’t just a quick fix. It was a keeper. A recipe I’d return to again and again, not just for how easy it was, but for the comfort it gave.

A Bread That Balances Simplicity and Indulgence

Homemade bread can seem like a project for the experienced or the patient. But this recipe is for everyone. It’s the kind of bread you can make with minimal effort, using ingredients you already have at home. And the addition of mozzarella makes it just indulgent enough to feel special.

What makes Mozzarella Melt Bread stand out is the texture and flavor contrast:

  • A soft, pillowy crumb on the inside
  • A golden crust that’s crisp but not tough
  • Little strands of melted mozzarella folded throughout
  • A subtle sweetness from the milk and sugar that balances the salt and cheese

It’s not too cheesy. It’s just right. And it’s endlessly versatile.

Ingredients Table

IngredientQuantity
Warm water½ cup
Warm milk½ cup
Dry yeast1 teaspoon
Sugar1 tablespoon
Salt½ teaspoon
Oil1 tablespoon
All-purpose flour3 cups
Mozzarella cheese100 g, shredded

Directions: From Dough to Dreamy in No Time

  1. Activate the yeast: In a large bowl, combine warm water, warm milk, yeast, and sugar. Stir and let sit for 5–10 minutes until foamy.
  2. Form the dough: Add salt, oil, and flour gradually, mixing until a soft dough forms. Knead for 8–10 minutes until smooth and elastic.
  3. Let it rise: Cover the bowl with a towel and let the dough rise in a warm place for 1 hour or until doubled in size.
  4. Add the cheese: Punch down the dough and knead in the mozzarella cheese until well distributed.
  5. Shape and proof: Shape into a loaf or rolls and place on a greased baking tray or in a loaf pan. Cover and let rise for another 30–40 minutes.
  6. Bake: Preheat oven to 180°C (350°F). Bake for 25–30 minutes or until golden brown and cooked through.
  7. Cool and enjoy: Let cool slightly before slicing. Serve warm for maximum cheesy goodness.

Nutritional Breakdown (Per Slice – Approx. based on 10 slices)

NutrientAmount
Calories~210 kcal
Protein~7 g
Total Fat~5 g
Saturated Fat~2.5 g
Carbohydrates~32 g
Sugars~2 g
Fiber~1 g
Sodium~200 mg
Calcium~90 mg
Iron~1.5 mg

Why You’ll Love This Bread

1. Beginner-Friendly, No-Fuss Method

If you’ve never baked bread before, this is the perfect place to start. The dough comes together easily, and you don’t need a mixer or any technical skills. Just a warm bowl, a bit of kneading, and some patience while the yeast does its magic.

2. Uses Pantry Staples

The ingredient list is wonderfully simple: flour, milk, water, yeast, sugar, salt, oil, and mozzarella. No eggs, no butter (unless you want to finish the crust with a brush of it), and no complicated add-ins.

3. The Cheese Makes It Special

Mozzarella melts into the bread, giving it richness without overwhelming it. Each bite has just enough gooeyness to make it feel luxurious without being messy or greasy.

4. Versatile and Customizable

Once you’ve mastered the base, you can tweak this recipe endlessly—add herbs, use different cheeses, or shape it into rolls or braids. The possibilities are wide open.

Ways to Serve Mozzarella Melt Bread

This bread fits into nearly every meal of the day. Here are just a few ideas:

1. Fresh Out of the Oven

Honestly, nothing beats it warm from the oven, sliced thick with a pat of salted butter. It’s comforting, satisfying, and somehow makes everything feel okay.

2. Toasted with Toppings

The next morning, try toasting a slice and topping it with smashed avocado, a poached egg, or even a drizzle of honey and chili flakes.

3. Sandwich Ready

Use it for paninis or grilled cheese sandwiches. The cheese inside the bread complements whatever fillings you add, from ham and mustard to roasted vegetables and pesto.

4. Soup Companion

This is the perfect bread to dip into soups—especially tomato, minestrone, or creamy mushroom. It soaks up broth beautifully and adds richness to every bite.

5. Party Platter Favorite

Cut it into thick cubes and serve as part of a cheese board. Add olive oil, balsamic glaze, or garlic butter on the side for dipping.

Simple Variations to Make It Your Own

Once you’ve made this version once, try experimenting with these easy swaps and additions:

1. Add Herbs

Mix chopped rosemary, thyme, or basil into the dough or sprinkle them on top before baking for an aromatic boost.

2. Go Bold with Cheese

Mozzarella is mellow and melty, but you can also try provolone, cheddar, gouda, or even parmesan for stronger flavor.

3. Make It Spicy

Add a pinch of chili flakes to the dough or stir in diced jalapeños for a spicy kick.

4. Try Whole Wheat

Swap out a cup of all-purpose flour for whole wheat to make it heartier. Just know it may be slightly denser.

5. Stuff It Instead

Instead of mixing the cheese into the dough, flatten the dough, layer the cheese inside, and roll it up to create a cheesy swirl loaf.

Tips for Baking Bread at Home

Even with a simple recipe, a few smart techniques can make all the difference:

  • Use lukewarm water and milk, not hot. The temperature should be slightly warm to the touch—about 100–110°F (37–43°C).
  • Let the dough rise fully during both proofing stages. Rushing this step can lead to a dense loaf.
  • Oil your hands lightly when kneading if the dough is sticky—avoid adding too much extra flour.
  • Cool before slicing to prevent gummy texture. Let the loaf rest at least 10–15 minutes out of the oven.
  • Store properly: Keep leftovers in an airtight bag at room temperature for up to 2 days or freeze for longer storage.

Frequently Asked Questions (FAQs)

Can I use active dry yeast instead of instant yeast?

Yes. Just make sure to proof it in warm water with sugar first until it foams, which takes about 5–10 minutes.

Do I have to use mozzarella?

No. You can use other cheeses like cheddar, provolone, fontina, or gouda. Just keep in mind that some cheeses melt differently and may create a more oily result.

Can I knead the dough in a stand mixer?

Definitely. Use the dough hook on medium speed for about 6–8 minutes until the dough is smooth and elastic.

Is this bread freezer-friendly?

Yes. Let the baked loaf cool completely, then slice and freeze in a freezer-safe bag. Reheat slices in the toaster or oven.

Can I make rolls instead of a loaf?

Yes. Divide the dough into equal portions, shape into rolls, and bake for a shorter time—usually 15–18 minutes until golden brown.

What if my dough doesn’t rise?

Double-check that your yeast is fresh and your liquids weren’t too hot. A cold kitchen can also slow down the process—try placing the dough in a slightly warm (but turned-off) oven to help it rise.

Can I make it dairy-free?

Yes. Use dairy-free milk (like almond or oat) and a plant-based cheese alternative. The result may be slightly different but still delicious.

Conclusion: A Recipe to Bake Again and Again

There’s a quiet joy in baking bread. It asks you to slow down, to trust the process, and to create something with your hands that nourishes more than just hunger.

This Mozzarella Melt Bread is humble in its ingredients but rich in comfort. It turns a handful of everyday staples into something worth sharing—a loaf that brings people together around the table and reminds us that the best food doesn’t have to be complicated.

Whether it’s your first time making bread or your hundredth, this recipe will leave you with something golden, warm, and deeply satisfying.

So go ahead—preheat the oven, let the dough rise, and enjoy the magic that only homemade bread can bring.

Strawberry Mascarpone Puff Pastry Delight: A Light Dessert with Layers of Memory and Cream

There’s something special about strawberries and cream.

Not just the flavor—the kind of timeless sweetness that tastes like summer—but the memory that often comes with it. For me, the scent of strawberries takes me back to sun-drenched afternoons in my grandmother’s kitchen. She always kept a carton of heavy cream in the fridge and a basket of overripe strawberries on the counter. The moment the sun peeked through the windows, she’d pull out a mixing bowl, whip cream by hand, and slice the berries into delicate fans. She didn’t follow a recipe. She followed instinct.

And if puff pastry had been more common in her tiny kitchen, she would’ve wrapped that whole memory in golden layers and served it like royalty.

Years later, I found myself craving something that honored that memory—but with a little modern elegance. That’s how this Strawberry Mascarpone Puff Pastry Delight was born. It’s my take on the nostalgic strawberries and cream—but reimagined as a crisp, flaky, cloud-like dessert that’s as beautiful as it is delicious.

It’s light enough for spring brunch, impressive enough for a holiday table, and easy enough to make on a lazy Sunday afternoon. Whether you’re serving guests or simply treating yourself, this dessert will leave you smiling with every bite.

A Dessert That Feels Like a Celebration

This dessert is everything you want in a no-stress, high-impact sweet treat. It takes familiar ingredients—puff pastry, cream, mascarpone, strawberries—and combines them into something elegant and restaurant-worthy, without the complicated techniques.

What makes it truly stand out is the contrast in textures: crisp, buttery layers of puff pastry give way to cool, creamy filling and juicy slices of fresh strawberries. It’s light yet rich, refined but approachable.

Better still, it can be made ahead, customized with seasonal fruits, or even transformed into mini desserts for entertaining. It’s the kind of recipe that feels versatile and indulgent at the same time.

Why This Dessert Works Every Time

1. Puff Pastry Magic

Store-bought puff pastry is one of the most convenient and effective ingredients you can keep in your freezer. It puffs beautifully in the oven, creating dozens of airy layers that are the perfect contrast to smooth fillings.

Whether you cut it into elegant rectangles, charming hearts, or rustic rounds, the final product always feels special—without any rolling pins or dough-making required.

2. Mascarpone Cream That’s Just Sweet Enough

The filling is a simple combination of mascarpone cheese, whipped cream, and a touch of powdered sugar. It’s not overly sweet, allowing the richness of the mascarpone and the natural sweetness of the strawberries to shine through.

It’s luxurious, silky, and sturdy enough to hold between layers—yet still melts in your mouth.

3. Fresh Strawberries Bring It to Life

Strawberries offer color, juiciness, and brightness. They cut through the richness of the cream and the butteriness of the pastry. Plus, they make the final dessert feel fresh, seasonal, and visually stunning.

And because they’re layered raw, you get that pure, vibrant strawberry flavor in every bite.

Ingredients Table

IngredientQuantity
Puff pastry (leafy dough)1 sheet, thawed if frozen
Milk (for brushing)As needed
Vanilla sugar8 g (1 teaspoon)
Sweetened whipping cream200 ml (¾ cup)
Mascarpone cheese125 g (½ cup)
Powdered sugar (soft sugar)3 tablespoons
Fresh strawberries, slicedAs needed (approx. 1 cup)

Directions: Delicate Layers, Bold Delight

  1. Preheat the oven to 200°C (390°F) and line a baking tray with parchment paper.
  2. Cut and bake the pastry: Roll out puff pastry and cut into squares or rectangles. Place on tray, brush lightly with milk, and bake for 12–15 minutes or until golden and puffed. Cool completely.
  3. Whip the cream: In a cold bowl, whip sweetened cream with vanilla sugar until soft peaks form.
  4. Make the filling: In a separate bowl, mix mascarpone with powdered sugar until smooth. Gently fold in the whipped cream until fully combined.
  5. Assemble the pastries: Slice each pastry in half horizontally. Pipe or spoon mascarpone cream onto the bottom half, layer with sliced strawberries, and cap with the top half.
  6. Optional finish: Dust with powdered sugar and serve immediately or chill for 15–30 minutes before serving.

Nutritional Breakdown (Per Serving – Approximate)

NutrientAmount
Calories~320 kcal
Protein~4 g
Total Fat~23 g
Saturated Fat~13 g
Carbohydrates~24 g
Sugars~12 g
Fiber~1 g
Sodium~140 mg
Calcium~60 mg

Serving Ideas and Occasions

This dessert fits beautifully into so many moments:

  • Mother’s Day or Spring Brunch – Serve with a glass of sparkling wine or citrus-infused tea.
  • Date Night In – Elegant, shareable, and surprisingly easy to prep ahead.
  • Summer Gatherings – Use fresh berries from the market and keep the portions light and bite-sized.
  • Holiday Dessert Table – Add a dusting of powdered sugar and a sprig of mint to make it winter-festive.

It’s equally at home as a plated dessert or as part of a dessert buffet. And because you can prep most components ahead of time, it’s ideal for entertaining.

Creative Twists and Flavor Variations

1. Swap the Berries

Strawberries are classic, but raspberries, blueberries, blackberries, or a mix of all work beautifully. For a winter twist, try poached pears or roasted plums.

2. Add Citrus

Fold a little lemon or orange zest into the mascarpone cream for added brightness.

3. Infuse the Cream

Try adding a drop of almond extract, a splash of vanilla bean paste, or even a touch of rosewater to the filling for something unexpected.

4. Make it Mini

Cut puff pastry into smaller squares or rounds to create individual servings. Perfect for cocktail parties or dessert platters.

5. Turn it into a Tart

Bake the pastry as a full sheet, flattening the center slightly with a fork, and top with cream and fruit for a rustic tart-style presentation.

Tips for Success

Even with simple ingredients, a few thoughtful tips can help you create the perfect pastry every time:

  • Use chilled tools and ingredients when whipping cream. Cold bowls and beaters help the cream whip faster and hold its shape longer.
  • Let puff pastry fully cool before adding the filling to prevent melting or soggy layers.
  • Slice strawberries just before assembling for maximum freshness and presentation.
  • Don’t over-whip the cream. Stop when soft peaks form—it should be smooth, not grainy.
  • Dust with powdered sugar right before serving for that perfect patisserie finish.

Frequently Asked Questions (FAQs)

Can I make this ahead of time?

Yes! You can bake the puff pastry and make the mascarpone filling a few hours in advance. Store the pastry at room temperature and the cream in the refrigerator. Assemble just before serving for best texture.

Can I use cream cheese instead of mascarpone?

You can, though it will be a bit tangier and firmer. To soften it, blend cream cheese with a tablespoon or two of sour cream or additional whipped cream before folding it in.

What if I don’t have vanilla sugar?

You can substitute with regular sugar and a splash of vanilla extract. The flavor will be nearly identical.

Can I make this dessert dairy-free?

Yes. Use a dairy-free puff pastry (check the label), a non-dairy whipping cream, and a dairy-free mascarpone or thick coconut cream alternative.

How long will leftovers keep?

These are best enjoyed fresh, but leftovers can be stored in the refrigerator for up to 24 hours. The pastry may soften slightly over time but will still taste delicious.

Can I make it more indulgent?

Absolutely. Drizzle with dark chocolate, add chopped pistachios or almonds, or top with whipped cream and berry syrup for a decadent twist.

Can I freeze this dessert?

Freezing is not recommended once assembled, as the cream and berries will not thaw well. However, the puff pastry can be baked and frozen separately, then refreshed in the oven before assembling.

Conclusion: A Light, Luxurious Bite of Joy

In a world of complex desserts and endless recipe options, this Strawberry Mascarpone Puff Pastry Delight is a breath of fresh air.

It doesn’t ask for perfection. It doesn’t demand hours in the kitchen. It simply combines a few good ingredients—flaky pastry, rich cream, fresh strawberries—and lets them do what they do best.

Whether you’re carrying forward a memory, making something new for loved ones, or just giving yourself a sweet reward after a long week, this dessert is here for you. It’s proof that elegance and ease can live on the same plate.

So go ahead—bake the pastry, whip the cream, slice the strawberries. Stack it all together and take that first bite.

The Best Breast Chicken Recipe: Layers of Comfort in Every Bite

There are meals that bring people together—and then there are meals that make them stay longer at the table. This is one of those.

I still remember the first time I made this chicken and potato layered bake. It was a cold, gray afternoon, the kind that invites you to lean into the warmth of the kitchen. I wasn’t planning anything special. Just wanted to use up a few things: potatoes that were starting to sprout, a pack of chicken breast, some leftover mushrooms, and a small block of cheese that had been sitting in the fridge far too long.

As I grated the potatoes and stirred the onions with a bit of butter, a kind of rhythm set in. The scent of mushrooms and garlic filled the air. I layered everything in the dish—soft vegetables, seasoned chicken cubes, golden potato mixture—and slid it into the oven. I didn’t expect much. But when I pulled it out, bubbling and golden under a melted blanket of cheese, I knew I had something worth remembering.

When we sat down to eat, no one said a word—until the second bite. Then came the compliments. Then the requests for more. That dish, born out of necessity, quickly became a comfort-food classic in our home.

And now, I’m sharing it with you.

A Family Recipe in the Making

What makes this dish so special isn’t just how good it tastes. It’s how easy it is to love.

This baked chicken and potato casserole is a fusion of familiar flavors—tender chicken breast, grated potatoes, sautéed mushrooms, buttery onions, fresh herbs, and just enough cheese to make it feel indulgent. It’s the kind of meal that feels homemade and hearty, yet structured and beautiful enough to serve at a family dinner or casual gathering.

It’s cozy but not heavy, rich but balanced. It’s what happens when a few simple ingredients are brought together with purpose and a little bit of love.

Why This Recipe Works

1. It’s a One-Dish Wonder

Everything bakes in one dish—protein, vegetables, and carbs—making it a full meal that saves you time and cleanup. There’s no need for sides unless you want them.

2. Textural Contrast

The layering of ingredients gives you that magical combination of textures: creamy chicken, soft mushrooms, buttery onions, and crisp edges of golden potato and melted cheese.

3. Balanced Flavors

The potatoes and flour base provide comfort and structure. The chicken brings protein and flavor. Mushrooms add depth and earthiness. And the herbs and cheese brighten and round it all out.

4. Adaptable to Taste

This dish works whether you want it light or indulgent. You can easily substitute ingredients depending on what you have or what your dietary preferences are.

Main Ingredients Table

IngredientQuantity
Eggs2
Medium potatoes, grated7
Onions, chopped2
Butter (for sautéing)As needed
Carrot, grated1
Parsley, choppedTo taste
All-purpose flour5 tablespoons
Chicken fillet, cubed500 g (1.1 lbs)
Medium mushrooms, sliced9
Cheese (cheddar or mozzarella), grated100 g (3.5 oz)

Directions: A Savory Bake with Layers of Love

  1. Preheat oven to 180°C (350°F). Grease a baking dish with a bit of butter or oil.
  2. Sauté the vegetables: In a skillet, melt some butter and sauté the chopped onions, grated carrot, and sliced mushrooms until soft and lightly golden. Set aside.
  3. Prepare the potato mixture: In a large bowl, mix the grated potatoes with flour, eggs, parsley, salt, and pepper. Stir until evenly combined.
  4. Assemble the bake:
    • Spread half the potato mixture into the base of the baking dish.
    • Layer the cubed chicken fillet evenly over the potatoes.
    • Add the sautéed vegetables on top of the chicken.
    • Spread the remaining potato mixture over the top and smooth it out.
  5. Bake uncovered for 35–40 minutes. Remove from the oven, sprinkle the grated cheese evenly on top, and return to the oven for another 10–15 minutes, or until the cheese is melted and golden.
  6. Let rest for 5 minutes, slice, and serve hot.

Nutritional Breakdown (Per Serving – Based on 6 servings)

NutrientApprox. Amount
Calories~430 kcal
Protein~31 g
Total Fat~18 g
Saturated Fat~8 g
Carbohydrates~35 g
Fiber~4 g
Sugars~4 g
Sodium~420 mg
Calcium~180 mg
Iron~2.7 mg

Ingredient Highlights

Chicken Breast

Lean, mild, and quick-cooking, chicken breast is the perfect protein for this dish. Cubing it keeps it juicy and ensures it cooks evenly with the other ingredients.

Potatoes

Grated raw and mixed with flour, potatoes become the “crust” and filler of this casserole. They crisp up beautifully on the top layer while staying soft underneath.

Onions & Carrots

These two create the sweet, aromatic base. Sautéed in butter, they infuse every layer with comforting flavor.

Mushrooms

Sliced and softened with the other vegetables, mushrooms add that subtle earthiness that gives this dish depth.

Eggs & Flour

They bind the grated potato mixture together, giving it texture and helping it crisp up in the oven.

Cheese

The final layer of cheddar or mozzarella brings everything together with a creamy, bubbling finish. Use your favorite melting cheese or a mix of several.

Fresh Herbs

Parsley and dill (or chives, thyme, or basil) add a pop of freshness that balances the richness of the dish.

Serving Ideas

This casserole is a full meal in itself, but here are a few simple accompaniments to elevate the experience:

  • A crisp side salad with lemon vinaigrette
  • Steamed green beans or roasted broccoli
  • Pickled vegetables for a tangy contrast
  • A dollop of sour cream or herbed yogurt
  • Crusty bread to scoop up the soft, cheesy edges

Variations to Try

One of the best things about this recipe is its flexibility. Try some of these variations to make it your own:

1. Add a Sauce Layer

A light cream sauce or even a spoonful of tomato purée between layers adds moisture and flavor.

2. Go Vegetarian

Swap chicken with roasted cauliflower, lentils, or plant-based protein. Keep the rest of the ingredients the same.

3. Make It Spicy

Add chili flakes to the sautéed vegetables or mix a pinch of cayenne into the grated potatoes for heat lovers.

4. Use Sweet Potatoes

For a deeper flavor and more nutrients, swap some or all of the regular potatoes with grated sweet potato.

5. Try Different Cheeses

Gouda, provolone, or even feta work well here. Mixing in parmesan gives a salty, nutty finish.

Tips for Success

  • Grate your potatoes last: They oxidize quickly. Keep them submerged in water until you’re ready to mix, then squeeze out excess moisture before adding to the bowl.
  • Season each layer: A bit of salt and pepper on the vegetables, chicken, and potato mix makes all the difference.
  • Bake uncovered: This ensures the top becomes beautifully golden and slightly crispy.
  • Let it rest before slicing: Like lasagna, it holds together better if you wait a few minutes after baking.

Frequently Asked Questions (FAQs)

Can I use chicken thighs instead of breast?

Yes, absolutely. Chicken thighs are juicier and more forgiving if slightly overcooked. Just chop into small cubes, same as the breast.

Can I prepare this in advance?

Yes. You can assemble the entire dish ahead of time and refrigerate it (covered) for up to 24 hours. Bake just before serving.

Can I freeze leftovers?

Definitely. Let the dish cool completely, slice into portions, and freeze in airtight containers. Thaw in the fridge overnight and reheat in the oven.

How do I make it gluten-free?

Use a gluten-free flour blend in place of the regular flour. The rest of the ingredients are naturally gluten-free.

What kind of cheese works best?

Cheddar and mozzarella are great melting cheeses, but you can mix in parmesan, gouda, or provolone for added flavor.

Can I add more vegetables?

Of course! Zucchini, bell peppers, spinach, or even corn can be added to the sautéed vegetable mix. Just make sure to remove excess moisture.

How long will leftovers keep?

Stored in an airtight container in the fridge, leftovers will keep for 3–4 days. They reheat well in the oven or microwave.

Conclusion: A Recipe That Brings People to the Table

In the end, this isn’t just a dish. It’s a reminder of what simple ingredients can do when they come together with care.

This cheesy chicken and potato bake doesn’t rely on fancy techniques or hard-to-find ingredients. It’s food from the heart—unfussy, nourishing, and quietly impressive. The kind of meal that fills your kitchen with warmth and brings everyone to the table, no matter how busy the day.

Whether you’re cooking for your family, hosting a casual dinner, or just feeding yourself with something that feels like home, this recipe delivers.

It’s not only the best chicken breast recipe because of how it tastes—but because of how it makes people feel.

Pasta for the Whole Family in Minutes: A Creamy Pork Spaghetti They’ll Ask for Again and Again

There are meals you cook because they’re quick. Others, because they’re comforting. And sometimes—if you’re lucky—you find one that does both.

For me, this Creamy Pork Spaghetti is that meal.

It came to life on a weekday that had run too long. I was juggling work, family, and an overwhelming to-do list. My kitchen looked like it hadn’t been loved in a while—just the basics in the fridge, and a bit of hope in the pantry. I needed something fast, filling, and familiar. Something that wouldn’t just feed my family, but anchor us, bring us around the table, even for just 20 minutes of togetherness.

So I reached for the staples: pasta, garlic, a small slab of pork left over from Sunday, and a block of cheese that had seen better days. With those few ingredients, I threw together a simple garlic cream sauce, sliced the pork thin, and gave it all a generous handful of herbs.

I wasn’t expecting magic—but that’s exactly what it turned into.

My family didn’t just eat dinner that night. We lingered. We shared stories between bites. Seconds were served, plates wiped clean. It wasn’t fancy. It wasn’t even planned. But it was one of the best meals we’d had in weeks.

Since then, this creamy pork spaghetti has become a go-to recipe in our house. It’s the kind of dish that meets you where you are—busy, tired, or just craving something warm. It’s quick, it’s easy, and best of all, it feels like it was made with care—even when it comes together in under 30 minutes.

Why This Recipe Works So Well

1. It’s Incredibly Fast and Practical

This meal is ready in the time it takes to boil pasta and sear a few slices of pork. You don’t need anything fancy, and you likely already have the ingredients. It’s ideal for busy weeknights or when you’re short on time but still want to sit down to something satisfying.

2. It’s Creamy, But Not Heavy

The sauce is made with milk and a touch of flour for thickening, so it’s lighter than traditional cream-based sauces. The butter and cheese bring richness without overwhelming the dish, and the balance of garlic, paprika, and herbs adds brightness.

3. It’s Family-Friendly

There’s no spice unless you want it. The flavors are warm, mild, and familiar, which makes it a big hit with kids and adults alike. The texture of the pork adds variety, while the melted cheese holds everything together in one happy bite.

4. It’s Versatile

Don’t have pork? Use chicken, turkey, ham, or even sautéed mushrooms for a vegetarian spin. No mozzarella? Any melty cheese will do. This recipe is all about using what you have—and making it shine.

Ingredients Table

IngredientQuantity
Spaghetti250 g
Pork breast, sliced200 g
Garlic cloves, minced2
Olive oil1 tablespoon
Butter40 g
SaltTo taste
Black pepperTo taste
All-purpose flour1 tablespoon
Milk300 ml
Cheese (cheddar or mozzarella), grated100 g
Paprika1 teaspoon
Fresh parsley and dillFor garnish

Directions: Creamy Comfort, Ready in No Time

  1. Cook the pasta: Boil spaghetti in salted water until al dente. Drain and set aside, reserving a bit of pasta water if needed for loosening the sauce.
  2. Sauté the pork: In a large skillet, heat olive oil over medium heat. Add sliced pork and cook until browned. Add minced garlic and cook for another minute until fragrant. Season with salt, pepper, and paprika.
  3. Make the creamy sauce: Push the pork to one side of the pan and melt butter in the cleared space. Stir in the flour and cook for 1 minute. Gradually pour in milk, whisking to avoid lumps. Simmer until the sauce thickens.
  4. Add cheese: Stir in grated cheese until melted and smooth. Adjust seasoning to taste.
  5. Combine: Add the cooked spaghetti to the skillet and toss to coat in the sauce. Add a splash of pasta water if needed for a silkier texture.
  6. Serve: Plate the pasta and garnish with chopped parsley and dill for a fresh finish.

Nutritional Breakdown (Per Serving – Approx. 1 of 3 servings)

NutrientAmount (Approx.)
Calories~580 kcal
Protein~28 g
Total Fat~30 g
Saturated Fat~14 g
Carbohydrates~48 g
Sugars~5 g
Fiber~2 g
Sodium~520 mg
Calcium~220 mg
Iron~2.5 mg

The Ingredients: Simple, But Intentional

Every component of this dish serves a purpose. Let’s look at why it works so well.

Spaghetti

You could use penne or fusilli, but spaghetti brings just the right amount of slurp and holds the sauce beautifully. It cooks quickly, and its texture balances the richness of the pork and cheese.

Pork Breast

Thinly sliced pork cooks fast and brings a juicy, savory flavor that stands out against the creamy base. It’s leaner than beef but still hearty, making it perfect for pasta dishes.

Garlic and Paprika

These two seasonings form the flavor base. Garlic adds depth and warmth, while paprika gives the dish color and a subtle smokiness.

Milk, Butter, and Flour

This classic trio forms the creamy béchamel-style sauce. It’s lighter than cream and thickens perfectly with a little whisking. The butter enhances flavor, and the flour binds the milk into a silky sauce.

Cheese

Melted cheese takes the sauce from good to irresistible. Cheddar brings sharpness, mozzarella brings that stretchy pull—use what you love or what’s in your fridge.

Fresh Herbs

A final sprinkle of parsley and dill brightens the dish and adds a fresh note to balance the richness. It also makes the plate look fresh and inviting.

Serving Suggestions: Make It a Meal

  • With a fresh salad: Try arugula with lemon vinaigrette or a simple cucumber and tomato salad.
  • Add a vegetable side: Roasted broccoli, green beans, or grilled zucchini go beautifully.
  • Garlic bread or toast: Because when there’s sauce, you’ll want to soak up every drop.
  • Wine pairing: A dry white like Pinot Grigio or a light red like Gamay works well with the creamy, savory tones of this dish.

Variations to Try

Once you’ve made the original, try one of these twists to keep things interesting:

1. Make It Spicy

Add a pinch of red pepper flakes or chili oil to the garlic while cooking for a little heat.

2. Go Herb-Heavy

Stir chopped basil, thyme, or oregano into the sauce for more complexity.

3. Add Vegetables

Toss in spinach, peas, or mushrooms to bulk it up and boost nutrition.

4. Use a Different Pasta

Fettuccine or rigatoni give the dish a new feel. Gluten-free pasta also works perfectly.

5. Turn It into a Bake

Mix everything together, transfer to a baking dish, top with extra cheese, and bake until golden.

Frequently Asked Questions (FAQs)

Can I use chicken instead of pork?

Absolutely. Chicken breast or thigh both work well. Just slice it thin for quick, even cooking.

Is this dish freezer-friendly?

While pasta and dairy sauces don’t always freeze perfectly, this dish can be frozen in portions. Let it cool, freeze in airtight containers, and thaw gently before reheating.

What type of cheese works best?

Cheddar and mozzarella are both great. You can also use gouda, provolone, or even parmesan for a sharper kick. A mix of cheeses adds depth.

Can I make this without flour?

Yes—skip the flour and reduce the milk slightly for a thinner sauce, or use cornstarch as a gluten-free thickener.

How do I reheat leftovers?

Reheat gently on the stovetop or in the microwave with a splash of milk to loosen the sauce. It tastes just as good the next day.

Is this suitable for kids?

Very much so. It’s flavorful but mild, and the creamy texture makes it easy for little ones to enjoy. You can also chop the pork smaller for easier eating.

What herbs work best?

Parsley and dill are fresh and bright, but basil, chives, or even thyme work well depending on your flavor preferences.

Conclusion: Quick Doesn’t Have to Mean Ordinary

In a world that often moves too fast, meals like this offer a moment of pause.

This Creamy Pork Spaghetti is more than a dinner—it’s a reminder that delicious food doesn’t need to be complicated or time-consuming. It’s about working with what you have, cooking with intention, and feeding the people you love (yourself included).

Whether you’re cooking for a full house, a quiet night in, or something in between, this recipe is the kind that quietly wins hearts. It’s the dish your kids will ask for again. The one your partner will brag about to friends. The one you’ll keep in your back pocket, ready for when life gets messy but dinner still matters.

So go ahead—boil the water, sear the pork, and let the garlic and butter do the heavy lifting. Because when you serve this creamy spaghetti, you’re not just making pasta.

Garden Glory on a Plate: The Story Behind Juicy Chicken Fillet with Vegetables

Some recipes are created, others are remembered—and this one, for me, is both.

The first time I made this dish, it wasn’t for a blog post, a dinner party, or even a planned meal. It was the end of a long day, and I was standing in my kitchen with a couple of chicken fillets, a drawer full of vegetables on the brink of becoming forgotten, and that quiet hunger for something warm and wholesome.

As I chopped, tossed, and seared, I wasn’t following any recipe. Just instincts, flavors I love, and the comforting rhythm of cooking for myself. That night, when I pulled the tray from the oven, golden fillets resting atop a colorful bed of vegetables, I knew I had stumbled on something simple yet special.

Since then, this Juicy Chicken Fillet with Vegetables has become one of those go-to meals in my kitchen. It’s easy but elegant, light but satisfying. It’s the kind of meal you can eat on your own, or serve to friends, and either way—it feels like you’ve done something good.

A Meal That Nourishes Without Fuss

This recipe is everything we look for in everyday cooking: fresh, balanced, and full of flavor without being fussy. It’s a one-pan wonder that brings together lean protein, seasonal vegetables, and Mediterranean-inspired seasoning. But most importantly, it respects your time without compromising taste.

The ingredients are humble—chicken fillets, zucchini, peppers, onion, garlic. But when seasoned with paprika, oregano, and finished with lemon juice and fresh herbs, they come alive. A quick sear on the chicken gives it a golden crust, while baking ensures it stays tender and juicy. Meanwhile, the vegetables roast into soft, caramelized perfection beneath.

It’s a dish that proves healthy eating doesn’t have to be boring—or difficult.

Why You’ll Keep Coming Back to This Dish

Aside from being delicious, there are plenty of reasons why this meal deserves a regular spot on your table.

1. It’s Nutritious and Balanced

This dish hits all the key food groups in one meal—lean protein, fiber-rich vegetables, healthy fats, and loads of vitamins. It’s gluten-free, naturally low in carbs, and can easily be made dairy-free or low-fat, depending on your needs.

2. It’s Versatile

You can make this dish with whatever vegetables you have on hand. Swap eggplant for broccoli, or carrots for sweet potatoes. It’s a forgiving recipe that works year-round.

3. It’s Meal-Prep Friendly

Make a double batch and you’ve got lunch or dinner sorted for days. It reheats beautifully and holds up well in the fridge for up to four days.

4. It’s Family-Approved

Even picky eaters tend to love this recipe—thanks to the juicy chicken, mild seasoning, and colorful presentation. It’s easy to adjust the flavors depending on your household preferences.

Ingredients Table

IngredientQuantity
Chicken fillets2 (approx. 400 g)
SaltTo taste
Black pepperTo taste
Paprika1 teaspoon
Garlic powder1 teaspoon
Olive oil (for searing)1 tablespoon
Zucchini, sliced1 medium
Red bell pepper, sliced1
Yellow bell pepper, sliced1
Eggplant, cubed1 small
Carrot, thinly sliced1 medium
Red onion, sliced1 small
Garlic cloves, minced2
Olive oil (for vegetables)2 tablespoons
Dried oregano1 teaspoon
Lemon juiceFrom 1/2 lemon
Fresh parsley or basilFor garnish

Directions

  1. Preheat oven to 200°C (400°F) and line a baking tray with parchment paper.
  2. Season the chicken fillets with salt, pepper, paprika, and garlic powder.
  3. Sear the chicken in 1 tablespoon of olive oil over medium-high heat for 2–3 minutes per side until golden brown. Do not fully cook through. Set aside.
  4. Toss the vegetables—zucchini, bell peppers, eggplant, carrot, onion, and garlic—in 2 tablespoons olive oil, oregano, salt, and pepper.
  5. Spread vegetables evenly on the baking tray and place the seared chicken fillets on top.
  6. Bake in the oven for 20–25 minutes, or until the chicken is cooked through and the vegetables are tender.
  7. Finish with freshness by drizzling lemon juice over the top and garnishing with freshly chopped parsley or basil.

Nutritional Breakdown (Per Serving – Based on 2 servings)

NutrientAmount
Calories~420 kcal
Protein~38 g
Total Fat~22 g
Saturated Fat~4 g
Carbohydrates~18 g
Sugars~8 g
Fiber~6 g
Sodium~320 mg
Vitamin C~90% DV
Iron~2.5 mg

The Flavor Equation: Simple Seasoning, Big Impact

You don’t need a long list of spices or sauces to make this dish sing. Here’s why the seasoning matters:

  • Paprika adds color and a warm depth without heat. Use sweet or smoked, depending on your preference.
  • Garlic powder + fresh garlic work together to build flavor from the inside out—both subtle and aromatic.
  • Oregano brings a Mediterranean herbaceous note that ties the dish together.
  • Lemon juice at the end adds a bright finish and lifts the whole plate.
  • Fresh herbs (like parsley or basil) bring it to life with color and freshness.

These simple additions make the vegetables shine and keep the chicken incredibly flavorful without overpowering it.

Vegetables That Make the Plate Beautiful

This dish is as much about the vegetables as it is the protein. The natural sweetness of bell peppers, the earthiness of eggplant, the softness of roasted onion—all come together to create a medley that supports the star of the plate: the juicy chicken.

Roasting vegetables brings out their best textures and flavors. The zucchini caramelizes at the edges, the onion becomes soft and fragrant, and the eggplant melts into the mix, absorbing every drop of olive oil and seasoning.

Don’t be afraid to pile your tray high with veggies—this dish only gets better with abundance.

Ways to Make It Your Own

As much as I love the base recipe, part of what makes this dish so rewarding is how easy it is to customize. Here are some ideas:

1. Add a Sauce

Drizzle with tahini, garlic yogurt, or pesto before serving for a saucier finish.

2. Make It Spicy

Add chili flakes or cayenne to the chicken seasoning for a subtle heat.

3. Add a Carb

Serve over couscous, quinoa, rice, or even mashed potatoes for a heartier meal.

4. Use Different Proteins

Try turkey fillets, boneless thighs, tofu, or salmon. The method works across proteins with minor adjustments to cooking time.

5. Go Sheet-Pan Style

Toss everything together in a single tray for true one-pan ease. No searing required.

Tips for Success

Even though this dish is beginner-friendly, a few small tips will elevate your results:

  • Pat the chicken dry before searing to ensure a golden crust.
  • Don’t overcrowd the tray—space helps vegetables roast instead of steam.
  • Use uniform cuts for your vegetables so they cook evenly.
  • Add lemon juice and herbs at the end to preserve their brightness.
  • Let the chicken rest before slicing to keep it juicy inside.

Frequently Asked Questions (FAQs)

Can I make this recipe ahead of time?

Yes! You can roast the vegetables and cook the chicken ahead. Reheat gently in the oven or microwave. Add fresh herbs and lemon juice right before serving.

Is this recipe freezer-friendly?

While the vegetables may lose some texture after freezing, the dish is still freezer-friendly. Store in airtight containers and thaw overnight in the fridge before reheating.

What other vegetables can I use?

Anything that roasts well! Broccoli, cauliflower, sweet potatoes, cherry tomatoes, mushrooms, or asparagus all work beautifully.

How do I keep the chicken juicy?

Sear it first for flavor, and then bake just until it reaches an internal temperature of 74°C (165°F). Let it rest before cutting to keep juices inside.

Can I use chicken thighs instead of fillets?

Absolutely. Thighs will be even juicier—just adjust cooking time slightly, as they may take longer.

Is this suitable for kids?

Yes! It’s flavorful but mild. Skip the lemon and herbs if your kids prefer simpler tastes. You can also cut the vegetables into fun shapes to make them more appealing.

What’s the best way to serve this dish?

It’s delicious on its own, but also pairs well with grains, salads, or a simple yogurt dip. It makes a fantastic lunchbox meal or light dinner.

Conclusion: Real Food, Real Flavor, Real Comfort

There’s a certain kind of comfort in recipes like this one. The kind you find at the end of a long day, when you want something real. Something that fills you up without slowing you down. Something that reminds you how rewarding cooking can be, even when you don’t have a lot of time or ingredients.

This Juicy Chicken Fillet with Vegetables is one of those dishes you’ll return to again and again—not because it’s complicated, but because it’s complete. It tastes like effort, even when it doesn’t take much. It’s colorful, fresh, balanced, and endlessly versatile.

And maybe best of all—it makes you feel like you’ve done something good, both for your body and for your table.

So whether you’re cooking for yourself, your family, or friends you want to impress without stress, let this dish be your go-to. A simple idea, beautifully done. That’s real cooking.

Surprise Your Guests: A Family-Inspired Comfort Dish with Creamy Layers and Rich Flavor

Some recipes find their way into your life quietly. They don’t come from cookbooks or cooking shows, but from real conversations and shared meals—the kind where people sit long after the plates are empty, still talking. This creamy minced meat and egg potato bake is one of those recipes.

I first tasted a version of this dish at a friend’s dinner table. It was a cool autumn evening, and we had gathered for what was meant to be a simple weeknight meal. But when she brought out the baking dish, steaming and golden on top, the room went quiet. The smell alone had us all sitting straighter in our chairs.

It was rustic and rich, with layers of seasoned minced meat, tender potatoes, creamy sauce, and bubbling cheese on top. The flavor was deep and warming, with little surprises in every bite—mushrooms here, sweet leeks there, and just a hint of garlic and dill tying it all together.

“This,” she said, “is what I make when I want to make people feel at home.”

And it did.

That night, the bake became more than a meal—it became a memory. Since then, I’ve adapted it in my own kitchen, made it for friends, for holidays, and even just on quiet Sundays when I need something cozy. It’s one of those dishes that always gets a reaction, always gets asked for again, and always reminds me why cooking is so much more than feeding—it’s giving.

Why This Recipe Works So Well

This potato bake is one of those magic combinations of ingredients that feels elevated yet deeply familiar. At its core, it’s simple: ground meat, vegetables, eggs, dairy, and potatoes. But it’s the thoughtful layering and balance of textures and flavors that makes it shine.

It’s Comforting and Hearty

The creamy mixture of milk, eggs, and cheese settles into the meat and potatoes during baking, creating almost a custard-like base that holds everything together. It’s rich but not overwhelming. The cream and cheese balance the protein of the meat and the starch of the potatoes, making every forkful satisfying.

It Feels Special Without Being Complicated

While the ingredient list is humble, the result is worthy of a dinner party. That’s the magic—this is the kind of dish you could serve to guests or keep as a go-to for cozy family meals.

It’s Adaptable

Once you understand the structure, you can modify this recipe endlessly. Want to make it vegetarian? Swap in lentils and mushrooms. Need to feed a crowd? Double the batch and bake it in a larger dish. Cooking for kids? Dial down the garlic and herbs, or sneak in finely chopped veggies.

Ingredients Table

IngredientQuantity
Ground meat (Hackfleisch)500 g (1.1 lbs)
Eggs2
SaltTo taste
Sweet paprika1 teaspoon
Dried garlic1 teaspoon
Mixed pepperTo taste
Fresh garlic, minced1 clove
Fresh dill, choppedA few sprigs
Cream100 g (3.5 oz)
Onion, finely chopped1
Butter (for sautéing)20 g (0.7 oz)
Tomato paste2 tablespoons
Potatoes, peeled and sliced500 g (1.1 lbs)
Leek, finely chopped1
Olive oil (for frying)As needed
Butter (for potatoes)20 g (0.7 oz)
Mushrooms, sliced100 g (3.5 oz)
Cheese, grated50 g (1.8 oz)
Milk100 ml (3.4 fl oz)

Directions: Layers of Flavor, Straight from the Oven

  1. Sauté the vegetables: In a pan, heat a bit of olive oil and butter. Sauté the finely chopped onion, leek, and mushrooms until soft and fragrant. Remove from heat.
  2. Prepare the meat mixture: In a large bowl, combine the ground meat with eggs, salt, sweet paprika, dried garlic, minced fresh garlic, mixed pepper, and chopped dill. Stir in the cream and tomato paste. Mix well until fully combined.
  3. Par-cook the potatoes: Lightly fry the sliced potatoes in a bit of butter until just tender but not fully cooked. Season with salt and set aside.
  4. Assemble the bake: Preheat oven to 180°C (350°F). In a greased baking dish, layer the fried potatoes at the bottom. Spread the sautéed vegetables over the potatoes. Add the meat mixture on top and smooth it out.
  5. Make it creamy: In a separate bowl, whisk together the milk and grated cheese. Pour over the top of the assembled bake.
  6. Bake it: Bake uncovered for 35–40 minutes or until the top is golden and the center is cooked through.
  7. Serve hot: Let it cool for a few minutes before slicing and serving. Garnish with extra dill or chives if desired.

Nutritional Breakdown (Per Serving – Approx. 1 of 6 servings)

NutrientAmount (Approx.)
Calories~430 kcal
Protein~24 g
Total Fat~28 g
Saturated Fat~11 g
Carbohydrates~20 g
Sugars~3 g
Fiber~2 g
Sodium~480 mg
Calcium~150 mg
Iron~3 mg

What Makes It Stand Out

This isn’t just another meat and potato casserole. Several ingredients bring depth and interest that set it apart from typical one-pan meals.

Mushrooms

They lend a meaty, earthy note that rounds out the richness of the dish and adds that “umami” layer you want in comfort food.

Leeks

Softer and slightly sweeter than onions, leeks melt into the background of the dish, giving it a luxurious, aromatic undertone.

Fresh Dill

A sprinkle of dill adds brightness and an unexpected herbal twist. It cuts through the richness of the dairy and complements the garlic beautifully.

Tomato Paste

Just a touch adds acidity and color, giving the meat mixture body and a savory depth that makes it feel slow-cooked, even though it’s not.

Serving Suggestions: Make It a Meal

While the dish is hearty enough to stand alone, here are some ideas to complete the experience:

  • Serve with a crisp side salad of greens and lemon vinaigrette for balance.
  • Pair it with a simple cucumber-yogurt dip or tzatziki to echo the dill and brighten the plate.
  • Add roasted vegetables like carrots or green beans on the side for extra color and nutrition.
  • Offer crusty bread to soak up every last bit of the creamy base.

If you’re serving a crowd or hosting a dinner party, this dish holds well and even improves in flavor after a few hours, making it ideal for preparing ahead.

Creative Variations to Try

One of the best things about this dish is how easily it invites creativity. Here are some favorite twists:

1. Vegetarian Option

Replace the meat with cooked lentils, chickpeas, or a mixture of mushrooms and walnuts for a plant-based version.

2. Spicy Upgrade

Add a dash of chili flakes, cayenne, or smoked paprika to the meat mixture for a bold, spicy edge.

3. Cheesy Crust

Top the final layer with a blend of cheeses—cheddar, mozzarella, or gouda for more melt and stretch.

4. Mediterranean Twist

Add olives, sun-dried tomatoes, and oregano for a Greek-inspired flavor profile.

5. Lightened Up

Use Greek yogurt instead of cream, and reduce the cheese for a lighter (but still creamy) version. You can also use sweet potatoes or a mix of root vegetables.

FAQs: What Readers Might Ask

Can I prepare this in advance?

Yes! You can fully assemble the dish a day ahead, cover it, and store it in the fridge. When ready to bake, let it sit at room temperature for 20 minutes and then bake as usual.

Can I freeze leftovers?

Absolutely. Once cooled, portion it out and freeze in airtight containers. To reheat, thaw in the fridge overnight and warm in the oven or microwave.

Can I make this dairy-free?

You can try using plant-based cream and milk alternatives. Oat milk and coconut cream offer good results, though the flavor will change slightly. Nutritional yeast can replace some of the cheesy flavor.

What’s the best meat to use?

Beef or a mix of beef and pork is traditional and flavorful, but ground chicken or turkey also work well for a leaner option.

Do I have to pre-cook the potatoes?

A quick pre-fry or parboil ensures they become tender during baking and helps them absorb flavor. Skipping this step may result in undercooked or dry potatoes.

Can I use pre-cooked or leftover potatoes?

Yes! This is a great way to use up boiled or roasted potatoes—just slice and layer them in as you would normally.

Can I double the recipe?

Definitely. Just use a larger baking dish and extend the baking time slightly. It’s perfect for batch cooking or feeding guests.

Conclusion: A Dish That Feels Like Home

In a world full of flash and fast fixes, there’s something deeply grounding about a dish like this.

It doesn’t try to be trendy. It doesn’t rely on expensive ingredients. But it offers comfort, warmth, and a kind of culinary nostalgia that’s hard to replicate.

Whether you’re making it for your family, hosting friends, or simply craving something hearty and real after a long day, this creamy minced meat and egg potato bake delivers. It feeds more than hunger—it brings people together, sparks conversation, and carries with it that quiet message that says: You’re home.

So surprise your guests—or yourself—with this timeless recipe. Let it fill your kitchen with warmth and your table with joy.

Layers of Love: A Creamy Cabbage Bake Inspired by Home, Heritage, and Simplicity

It’s amazing how a single dish can take you back in time.

I remember sitting in my grandmother’s sun-drenched kitchen, the smell of garlic and fresh dill hanging in the air, the windows fogged from the bubbling oven. She had this way of cooking that didn’t require recipes. No measuring cups, no timers. Just instinct, taste, and heart.

One of the dishes she made often was a layered cabbage bake—soft, steamy cabbage at the base, tender vegetables folded in, and a creamy topping of sour cream, yogurt, and herbs that would set into a light, golden crust. It wasn’t glamorous. It wasn’t trendy. But it was soul-warming. A recipe passed down from her mother and likely from her mother’s mother, too.

Years later, living in a small apartment and learning to cook for myself, I found myself craving that taste. That warmth. That simplicity. So I recreated it, with the help of memory and intuition—and it worked. It felt like a hug from the past. And now, I’m sharing it with you.

This creamy cabbage and vegetable bake is rustic, nutrient-rich, and wonderfully flexible. Whether you grew up with similar dishes or are trying it for the first time, it brings with it a quiet comfort that’s hard to explain and even harder to forget.

Why This Dish Is So Much More Than Cabbage

Cabbage doesn’t often get the love it deserves. It’s humble, yes—but it’s also incredibly versatile, affordable, and packed with nutrition. In this dish, cabbage becomes something magical. When blanched and baked, it softens into a buttery, almost sweet texture that melts in your mouth. And when paired with a mix of mushrooms, peppers, tomatoes, and a tangy herb topping, it transforms into something comforting and craveable.

This dish isn’t about fancy ingredients. It’s about making something truly satisfying with what you have on hand. It’s about letting simple components—cabbage, eggs, garlic, yogurt—shine in a new and beautiful way.

Ingredients Table

IngredientQuantity
Cabbage400g, chopped
Boiling waterFor blanching
Onion1, finely chopped
Vegetable oil1–2 tbsp
Garlic cloves3, minced
Mushrooms7, sliced
Sweet red pepper1, diced
Tomatoes3, peeled and diced
Boiling water (for tomatoes)As needed
Fresh parsleySmall handful, chopped
Eggs4
Sour cream150g
Ground black pepperTo taste
Plain yogurt250g
Fresh dillTo taste, chopped
Lemon1/2, juiced
SaltTo taste

Directions

  1. Blanch the cabbage
    Place the chopped cabbage in a bowl and pour boiling water over it. Let sit for 3–4 minutes, then drain thoroughly and set aside.
  2. Peel and prep tomatoes
    Place the tomatoes in boiling water for 1–2 minutes. Remove, peel off the skins, and dice them.
  3. Sauté the vegetable mixture
    In a large skillet, heat vegetable oil over medium heat. Add chopped onion and garlic. Sauté until fragrant. Add mushrooms and red pepper, cook until softened. Stir in the diced tomatoes and parsley. Simmer for 5–7 minutes until the mixture reduces slightly and becomes saucy.
  4. Assemble the bake
    Preheat your oven to 180°C (350°F). Lightly grease a baking dish. Begin layering with cabbage on the bottom, then a layer of the sautéed vegetable mixture. Repeat layers as needed.
  5. Mix the topping
    In a separate bowl, whisk together the eggs, sour cream, yogurt, lemon juice, chopped dill, salt, and black pepper until smooth and well combined.
  6. Top and bake
    Pour the creamy mixture evenly over the layered vegetables and cabbage. Smooth with a spatula if needed.
  7. Bake for 30–35 minutes, or until the top is golden and set.
  8. Serve slightly cooled. Enjoy warm with fresh herbs, crusty bread, or a crisp salad.

Nutritional Breakdown (Per Serving – Approx. 1 of 6 servings)

NutrientAmount
Calories~210 kcal
Protein~10 g
Total Fat~12 g
Saturated Fat~4 g
Carbohydrates~16 g
Sugars~6 g
Fiber~3 g
Sodium~220 mg
Calcium~120 mg
Iron~1.8 mg

A Comfort Dish Rooted in Tradition

This creamy cabbage bake is inspired by traditional Eastern European and Balkan recipes, where cabbage is a dietary staple and used in everything from soups to stews to stuffed rolls. Versions of this dish exist in many kitchens under different names—some bake it with cheese, others include rice or ground meat.

The beauty of this particular version is its lightness. It’s vegetarian, balanced, and protein-rich, thanks to eggs, yogurt, and sour cream. The flavor is gentle but layered: garlic and onion give it depth, tomatoes bring brightness, and dill and parsley finish it with freshness.

It’s the kind of dish that brings people to the table without fanfare. It doesn’t try to be the star of the show, yet somehow, it always is.

The Layers of Nutrition

Besides being delicious, this recipe is packed with nutrients. Let’s take a moment to break down some of its core ingredients and what they offer:

  • Cabbage: Low in calories but high in fiber, vitamin C, and antioxidants. It’s great for digestion and supports immune health.
  • Mushrooms: A plant-based source of protein and B vitamins. Mushrooms also bring a meaty, umami-rich flavor that enhances vegetarian meals.
  • Garlic & Onion: Not only flavor boosters, but also excellent for cardiovascular health and immune support.
  • Tomatoes: Rich in lycopene, a powerful antioxidant that supports heart health and may reduce inflammation.
  • Eggs: A complete protein and great source of healthy fats, vitamins D and B12, and choline, which supports brain function.
  • Yogurt & Sour Cream: Add protein and calcium while giving the dish creaminess. Use full-fat varieties for richness or opt for lighter versions depending on your dietary needs.
  • Herbs (Dill and Parsley): More than garnish—fresh herbs add flavor, color, and nutrients, especially vitamins A and K.

This dish proves that comfort food doesn’t have to be heavy or indulgent to be satisfying. It nourishes the body and spirit alike.

How to Make It Your Own: Delicious Variations

One of the best things about this recipe is its adaptability. Whether you’re working with seasonal produce, different dietary preferences, or just your own personal taste, you can customize this bake easily.

1. Add a Grain Layer

For a heartier version, layer in cooked rice, quinoa, or bulgur between the vegetables and cabbage. It becomes more like a one-dish meal.

2. Include Protein

Want to make it even more filling? Add cooked lentils, white beans, or crumbled tofu between the layers. Or, if you’re not vegetarian, cooked ground chicken or turkey works wonderfully.

3. Swap the Sauce

Instead of yogurt and sour cream, you can try ricotta or even a light béchamel sauce if you want a creamier finish. Or add a sprinkle of cheese on top for extra golden goodness.

4. Make It Spicy

Stir a bit of crushed red pepper or chili flakes into the vegetable mixture for a little kick.

5. Go Full Garden

This recipe works with whatever vegetables you have on hand. Zucchini, shredded carrots, spinach, or eggplant all fit beautifully.

Tips for Success

Even though this dish is rustic and forgiving, here are a few tips to make it shine:

  • Blanch the cabbage just enough to soften it without losing texture. This step is essential for even baking and a silky mouthfeel.
  • Drain your tomatoes if they’re very watery, or cook down the filling a bit longer so the final dish doesn’t get soggy.
  • Season each layer lightly—especially the cabbage. Don’t rely on the sauce alone to flavor the whole dish.
  • Let it rest after baking. It will slice cleaner, and the layers will set beautifully.
  • Use fresh herbs when possible. They make a world of difference in a dish this simple.

Frequently Asked Questions (FAQs)

Can I make this recipe ahead of time?

Yes! You can assemble it completely and store it covered in the fridge for up to 24 hours before baking. You can also bake it fully and reheat before serving.

Is it freezer-friendly?

It freezes well. Let it cool completely, slice into portions, and freeze in airtight containers. To reheat, thaw overnight and warm in the oven or microwave.

Can I make it dairy-free?

Absolutely. Substitute the yogurt and sour cream with non-dairy alternatives like coconut yogurt, cashew cream, or a vegan sour cream. Just make sure to use options that hold up well to baking.

What kind of cabbage should I use?

Green cabbage works best, but you could also use savoy cabbage or napa cabbage for a softer texture. Avoid red cabbage, as it will change the color and flavor profile.

Can I serve this cold or at room temperature?

Yes! It tastes delicious warm or chilled. It makes a great addition to lunchboxes or as part of a brunch spread.

What can I serve this with?

It pairs beautifully with crusty bread, a green salad, or a tangy cucumber yogurt side. It can be a main or a hearty side dish depending on the occasion.

Conclusion: A Dish That Feeds More Than Just Hunger

Some recipes are about precision, but this one is about feeling.

It’s about standing in your kitchen on a quiet afternoon, layering simple, nourishing ingredients with care. It’s about watching them come together in the oven to become something comforting and complete. It’s about honoring the foods our families and cultures have always leaned on—ingredients that were once considered humble but are now celebrated for their depth and nourishment.

This creamy cabbage and vegetable bake may not be flashy. It may not go viral on social media. But it will win hearts.

It’s the kind of meal you bring to a neighbor in need, serve to a loved one on a rainy day, or make for yourself when the world feels loud and you need something soft, quiet, and kind.

May it warm your home the way it has warmed mine.

The Best Dinner I’ve Ever Eaten – A Pasta Bake Passed Down with Love

It’s funny how some of the best meals in life don’t come from cookbooks or restaurants—but from friends. Shared not with measuring cups and timers, but with laughter, casual conversation, and the sort of storytelling that turns dinner into an experience.

I remember vividly the night I first tasted this pasta bake. I was visiting an old friend who had grown up in a small town near Florence, Italy. We hadn’t seen each other in years, and over the course of catching up, I watched her pull ingredients from the fridge with ease and familiarity. There was no recipe card, no fancy equipment—just intuition, olive oil, and the confidence of someone raised in a culture where food is love and cooking is second nature.

She said her mother used to make this dish every Sunday, layering pasta, meat, vegetables, creamy béchamel, and bubbling mozzarella into one big casserole dish. She called it pasta al forno, but told me, smiling, “You can call it whatever you want—as long as you make it with your heart.” That dinner—warm, comforting, and deeply flavorful—was one of the most memorable I’ve ever had. It wasn’t just the taste that stayed with me—it was the feeling of being welcomed, nourished, and cared for.

Since then, I’ve made this recipe for countless dinners, from family gatherings to weeknight comfort meals. Every time, it brings the same sense of home, of stories shared across the table. This isn’t just a recipe. It’s an heirloom of affection.

The Soul of Italian Comfort Food

What makes this dish truly special isn’t just the ingredients—it’s the intention behind it. Italian cuisine is rooted in simplicity, balance, and honoring the ingredients. This dish does exactly that. It layers the everyday (pasta, meat, vegetables) with warmth and indulgence (béchamel sauce, mozzarella), creating a meal that’s both deeply satisfying and nostalgic.

Where many pasta bakes rely on shortcuts or ready-made sauces, this one insists on going just one step further—and it shows. The silky béchamel sauce envelops every ingredient, tying the dish together with a creamy, delicate touch. The sweet red pepper and leeks add brightness and earthiness. The minced meat brings richness and body, while the mozzarella gives that irresistible golden finish.

It’s not fussy. It doesn’t try to impress. It just works—every single time.

Ingredients Table

IngredientQuantity
Pasta (penne or rigatoni)250 g
Onion, finely chopped1 medium
Garlic cloves, minced2
Sweet red pepper, chopped1
Minced meat (beef or mixed)600 g
Tomatoes, diced2 medium
Leek stalk, thinly sliced1
Butter40 g
All-purpose flour20 g
Milk500 ml
Hard mozzarella cheese, grated100 g
Vegetable oilAs needed
SaltTo taste
Ground black pepperTo taste

Directions

  1. Boil the pasta
    Cook pasta in a large pot of salted boiling water until just under al dente. Drain and set aside.
  2. Make the meat and vegetable filling
    In a large skillet, heat a bit of vegetable oil over medium heat. Add chopped onion, garlic, and red pepper. Sauté for 3–4 minutes until softened. Add minced meat and cook, breaking it apart, until browned. Add diced tomatoes and sliced leek. Season generously with salt and ground black pepper. Simmer for 10–12 minutes until the mixture thickens.
  3. Prepare the béchamel sauce
    In a separate saucepan, melt butter over medium heat. Whisk in the flour and stir constantly for about 1–2 minutes. Slowly add the milk while whisking continuously to avoid lumps. Cook until the sauce thickens and becomes smooth. Season with a pinch of salt and pepper.
  4. Assemble the dish
    Preheat the oven to 180°C (350°F). In a large baking dish, layer the cooked pasta first, then the meat and vegetable mixture. Pour the béchamel sauce evenly over the top and sprinkle generously with grated mozzarella.
  5. Bake to golden perfection
    Place the dish in the oven and bake for 20–25 minutes, or until bubbling and golden on top.
  6. Rest and serve
    Allow the dish to rest for 5–10 minutes after baking before serving. Serve warm with a crisp salad or fresh bread.

Nutritional Breakdown (Per Serving – Approx. 1 of 6 servings)

NutrientAmount
Calories~510 kcal
Protein~32 g
Total Fat~25 g
Saturated Fat~11 g
Carbohydrates~38 g
Sugars~6 g
Fiber~3 g
Sodium~430 mg
Calcium~190 mg
Iron~3.2 mg

Why This Dish Is Always a Crowd-Pleaser

One of the reasons this recipe has stayed in my personal rotation for so long is how adaptable it is. It’s a dinner party hero, a weekday staple, and a freezer-friendly fallback all in one.

Here’s why it shines:

  • Layered flavor: Every bite offers contrast—savory meat, tender pasta, soft vegetables, creamy sauce, and golden cheese.
  • Make-ahead friendly: You can assemble it in advance and refrigerate it until ready to bake.
  • Feeds a crowd: One baking dish can easily serve 4–6 people generously.
  • Kid-approved: Even picky eaters tend to love it—mild flavors, soft textures, and melted cheese tend to do the trick.
  • Perfectly balanced: It’s rich, but not overwhelming. Creamy, but not heavy.

And perhaps best of all—it looks and smells as good as it tastes. The bubbling top, the aroma of garlic and herbs, the slightly crisp edges of baked cheese—it’s comfort, celebration, and warmth on a plate.

Ingredient Highlights: A Love Letter to Each Layer

Minced Meat

This is the heart of the filling. Whether you use ground beef, pork, veal, or a combination, the meat adds savory depth and richness. It also acts as the perfect carrier for all the sautéed aromatics and vegetables.

Sweet Red Pepper and Leek

These two ingredients elevate the dish beyond a basic meat sauce. The red pepper adds subtle sweetness and color, while leeks bring a gentle onion flavor with a creamy texture once cooked down.

Tomatoes

Used fresh in this recipe, tomatoes help balance the richness with acidity and brightness. You can use canned if needed, but ripe fresh tomatoes truly enhance the rustic charm.

Béchamel Sauce

This is where the magic happens. Instead of using a tomato-based sauce or store-bought cream, you make a simple white sauce from butter, flour, and milk. It brings a velvety texture and gently coats the pasta, making every bite luxurious without being overpowering.

Mozzarella

The final layer—the crown. A generous sprinkle of hard mozzarella on top bubbles and browns as it bakes, giving the dish that irresistible golden crust and cheesy finish.

Ways to Make It Your Own

While the original version is perfect as-is, this dish is also highly versatile. Depending on your mood, season, or dietary needs, you can adapt it in many delicious directions.

Vegetarian Version

Skip the meat entirely and add sautéed mushrooms, spinach, or zucchini instead. You can also add lentils for extra protein.

Spicy Kick

Add a chopped chili or some crushed red pepper flakes to the meat mixture for a touch of heat.

Extra Herby

Add a handful of fresh herbs like basil, oregano, or thyme to the béchamel or meat sauce for added depth.

Gluten-Free

Use gluten-free pasta and substitute the flour in the béchamel with cornstarch or a gluten-free flour blend.

Cheese Variations

Hard mozzarella works best for its melt and flavor, but you can experiment with provolone, parmesan, or even a bit of gorgonzola if you’re feeling bold.

Tips for Success

  • Use high-quality pasta: A sturdy pasta like rigatoni or penne holds its shape and doesn’t become mushy after baking.
  • Don’t overcook your pasta: Boil it until just under al dente, as it will continue to cook in the oven.
  • Let it rest before serving: This helps the layers set and makes serving easier.
  • Grate your own cheese: Pre-shredded cheese often has anti-caking agents that affect melt quality.
  • Double the recipe: It freezes beautifully. Make one for now, one for later.

Frequently Asked Questions (FAQs)

1. Can I make this dish ahead of time?

Yes! You can assemble the entire dish, cover it, and refrigerate for up to 24 hours before baking. It’s perfect for prepping the night before.

2. Can I freeze it?

Absolutely. You can freeze it either before baking (assembled and uncooked) or after it’s fully baked. To reheat, thaw in the fridge overnight and bake as usual.

3. Can I use different meats?

Yes. A mix of beef and pork is traditional, but feel free to use ground turkey, chicken, or even plant-based meat alternatives.

4. Can I add more vegetables?

Of course! This recipe is very forgiving. Mushrooms, spinach, zucchini, or eggplant can be delicious additions.

5. How do I store leftovers?

Store in an airtight container in the fridge for up to 4 days. Reheat in the oven or microwave until hot throughout.

6. What should I serve with it?

It pairs beautifully with a simple green salad, roasted vegetables, or garlic bread. A glass of red wine doesn’t hurt either.

Conclusion: A Recipe That Feels Like Home

Some recipes are made for dinner. Others, like this one, are made for memories.

Whether it’s passed down from a friend, scribbled on a napkin, or discovered over a bottle of wine, a dish like this becomes part of your story. It becomes something you crave not just for its taste, but for the way it makes you feel—nourished, connected, and at peace.

So the next time you want to cook something that feels like a hug, something that fills your kitchen with joy and your table with smiles, remember this pasta bake. It’s more than a meal. It’s a gift from a friend—and now, from you to the ones you love.

Stay Connected

Get recipes via email: