There’s a quiet kind of magic in slow mornings—the kind where you’re not racing against the clock, but instead, easing into the day with intention. For me, these moments always start in the kitchen. And few recipes evoke that sense of calm and comfort quite like a dish of Baked Oatmeal with Apples and Cottage Cheese.
It began during a time when life felt uncertain. I had just moved into a small apartment in a new city—windows that creaked when they opened, a tiny stove that sometimes needed convincing to light, and a heart craving familiarity. The world outside was moving fast, but I was determined to build a pocket of warmth for myself within those four walls. On a chilly autumn morning, I chopped some apples, warmed some milk, and stirred together oats, cottage cheese, and a few pantry staples. What emerged from the oven was something far greater than the sum of its parts: it was soft, comforting, and quietly nourishing—exactly what I needed.
Since then, this recipe has been my go-to for chilly mornings, weekend resets, and sharing love with others. It’s simple, yet deeply satisfying—a warm hug in edible form.
A Breakfast That Nourishes Beyond Hunger
At first glance, baked oatmeal might not seem revolutionary. But when you add fresh apples, creamy cottage cheese, and just the right hint of spice, it transforms into something special—warm, hearty, lightly sweet, and rich in texture. It’s not just a breakfast—it’s a moment of pause, a way to slow down and center yourself before the day takes over.
Unlike traditional oatmeal, which can sometimes feel mushy or one-note, baked oatmeal offers structure. It’s spoonable but sliceable, soft yet slightly crisp on the top. And the cottage cheese? That’s the secret star. It adds a protein boost and a rich creaminess without overpowering the apple or oats.
This dish balances indulgence and nutrition. It’s the kind of food that makes you feel cared for—whether you’re feeding yourself or the people you love.
Ingredients Table
Ingredient
Quantity
Rolled oatmeal
1 cup (90 g)
Warm milk
½ cup (150 ml)
Apples, peeled and chopped
2 medium
Butter
1 tbsp (20 g)
Cottage cheese
½ cup (120 g)
Egg
1 large
Honey or maple syrup
2 tbsp (optional)
Cinnamon
1 tsp
Vanilla extract
½ tsp
Baking powder
½ tsp
Pinch of salt
To taste
Baking Directions: “From Bowl to Cozy Bliss”
Preheat & Prep: Preheat your oven to 180°C (350°F). Lightly grease a small baking dish or individual ramekins with butter.
Soften the Base: In a large bowl, combine the oatmeal and warm milk. Let it sit for 5–10 minutes to soften the oats.
Mix It Up: Add in the chopped apples, cottage cheese, egg, butter (melted), cinnamon, vanilla extract, baking powder, salt, and sweetener if using. Mix until fully combined.
Into the Oven: Pour the mixture into the prepared dish. Spread evenly and press down gently with a spoon.
Bake to Golden: Bake for 30–35 minutes, or until the top is set and lightly golden.
Serve Warm: Let it cool slightly before serving. Enjoy as a nourishing breakfast or a wholesome snack. Pairs perfectly with a dollop of yogurt or an extra drizzle of honey.
Nutritional Breakdown (Per Serving – approx. 1 of 4 servings)
Nutrient
Amount
Calories
~220 kcal
Protein
~9 g
Total Fat
~6 g
Saturated Fat
~3 g
Carbohydrates
~30 g
Sugars
~12 g
Fiber
~3 g
Sodium
~160 mg
Calcium
~120 mg
Iron
~1.5 mg
Why This Recipe Works: The Harmony of Ingredients
Each ingredient in this recipe plays a thoughtful role—not just in flavor, but in creating the perfect texture and nutritional profile.
Oats
Rolled oats are the base. They’re hearty and full of fiber, creating a satisfying structure that absorbs the flavors around them. They also offer a slow-release energy that keeps you full for hours.
Apples
Fresh apples bring sweetness, moisture, and that classic fall flavor. As they bake, they soften slightly but still hold their shape, adding bites of freshness throughout.
Cottage Cheese
Often underrated, cottage cheese is the protein powerhouse here. It melts into the oats, giving the dish a custard-like creaminess. It also adds calcium, probiotics, and a mild tang that balances the sweetness of the apples and honey.
Warm Milk & Egg
These create the liquid binder that softens the oats while baking and helps hold the dish together. The egg gives it structure, while the milk adds richness.
Spices & Sweetener
Cinnamon, vanilla, and a touch of honey (or maple syrup) round out the flavor with warmth and subtle sweetness—though you can absolutely adjust these to your taste.
What Makes It Stand Out: A Versatile, Feel-Good Meal
Beyond taste and texture, what makes this baked oatmeal so beloved is its versatility. It fits beautifully into all kinds of lifestyles and routines.
Meal prep friendly: Bake once, eat all week. Store it in the fridge and reheat in the morning.
Customizable: You can adjust the sweetener, fruit, and mix-ins based on what’s in your kitchen.
Nutritious: High in fiber, protein, and slow-digesting carbs, it’s the kind of breakfast that energizes you without a crash.
Family-approved: Kids love the soft texture and natural sweetness. Adults appreciate how it feels indulgent without being heavy.
It’s also one of those rare recipes that feels equally at home on a cozy weekday morning or as part of a weekend brunch spread.
Creative Variations to Keep It Fresh
Once you’ve tried the original, you’ll find countless ways to make this recipe your own. Here are a few variations to spark your imagination:
Berry Almond Crunch
Swap apples for blueberries or raspberries, and add slivered almonds on top before baking.
Banana Nut Bake
Use mashed bananas in place of apples, and stir in chopped walnuts and a pinch of nutmeg.
Tropical Morning
Add chopped pineapple, shredded coconut, and a bit of lime zest for a sunny flavor twist.
Chocolate & Cherry Delight
Toss in dried cherries and dark chocolate chips for a more decadent (but still breakfast-appropriate) option.
Vegan-Friendly Version
Use plant-based milk, skip the egg, and substitute cottage cheese with a vegan yogurt or tofu-based mixture.
The base recipe is endlessly flexible. Let your cravings and pantry guide you.
Tips for Best Results
To help you achieve that perfectly baked, golden-topped dish every time, here are a few extra tips:
Soften the oats first: Letting the oats soak in warm milk for a few minutes helps them soften slightly and absorb flavor.
Use firm apples: Varieties like Honeycrisp or Granny Smith hold up well during baking and offer a great balance of tart and sweet.
Add texture on top: A sprinkle of oats or chopped nuts on top adds a bit of crunch.
Chill it for later: This dish tastes just as good cold or reheated the next day. Drizzle a little milk or yogurt over leftovers to refresh the texture.
Avoid overbaking: Take it out once the top is golden and the center is just set—it will continue to cook slightly as it cools.
Frequently Asked Questions (FAQs)
1. Can I make this recipe dairy-free?
Yes! Use plant-based milk like almond or oat milk, and swap the cottage cheese for dairy-free yogurt or blended tofu for a creamy texture.
2. Is it suitable for kids?
Absolutely. It’s naturally sweetened, soft in texture, and packed with nutrients. You can leave out any added sugar for younger children and still have a flavorful result.
3. Can I use steel-cut oats?
Not for this particular version, as they require more liquid and a longer cooking time. Stick with rolled oats for best texture.
4. How long does it keep?
Store in the fridge for up to 5 days. Reheat in the microwave or oven, or enjoy cold.
5. Can I freeze it?
Yes! Slice it into portions and wrap individually. Freeze for up to 3 months and reheat from frozen in the microwave or oven.
6. Can I serve this as dessert?
Absolutely. With a drizzle of maple syrup or a scoop of vanilla yogurt on top, it becomes a wholesome dessert option.
Conclusion: A Breakfast That Feels Like Home
There’s a quiet joy in cooking something simple yet meaningful—something that smells like comfort and tastes like care. Baked Oatmeal with Apples and Cottage Cheese is more than just a recipe. It’s a way to welcome yourself into the day. To nourish your body, yes—but also to remind yourself that you deserve softness, warmth, and intention first thing in the morning.
Whether you’re making it for a bustling household, meal-prepping for a busy week, or setting the tone for a gentle Sunday, this dish offers something real. Something grounding. Something good.
So the next time you find yourself craving a slow start, preheat your oven, gather your oats and apples, and give yourself the gift of a breakfast worth waking up for.
There’s something deeply comforting about a family recipe that travels with you through life. For me, Stuffed Meatballs with Vegetables and Cheese isn’t just a meal—it’s a memory, a moment in time suspended by flavor.
When I was ten, my grandmother would invite all of us over on Sundays, the kitchen already humming with the scents of browned garlic and sizzling onions by the time we arrived. Her kitchen was her canvas, and those little stuffed meatballs were her masterpiece. But what made them truly special wasn’t just the tender meats or gooey cheese hidden inside—it was the love she kneaded into every bite. She’d always wink and say, “These meatballs have secrets inside. Just like people. Be gentle with both.”
Years later, when I moved to a new city and felt the inevitable ache of distance, I found myself making these meatballs one quiet weekend. As the aroma filled my apartment, I was home again. That’s the magic of a dish like this—it nourishes far more than your hunger.
A Recipe That Does More Than Fill a Plate
These meatballs are a layered experience—literally and metaphorically. The combination of three types of meat (beef, chicken, and pork) creates a deeply savory foundation. Then, in the center, you find a medley of finely chopped vegetables and melting cheese. It’s a hidden treasure with every bite, offering contrast in texture, flavor, and comfort.
What elevates this dish is how adaptable it is. You can dress it up for a dinner party with a rustic tomato basil sauce and handmade pasta, or keep it casual with a side of garlic bread and salad. It works as a freezer-friendly prep-ahead meal just as well as it does a crowd-pleaser on game night.
Ingredients Table
Ingredient
Quantity
Minced chicken
400 g
Ground beef
400 g
Minced pork
400 g
Eggs
2
Onion (chopped)
1 medium
Garlic cloves (minced)
2
Bell peppers (diced)
1/2 cup
Carrot (grated)
1/3 cup
Zucchini (finely chopped)
1/3 cup
Shredded cheese (mozzarella or cheddar)
1 cup
Breadcrumbs
3/4 cup
Fresh parsley (chopped)
2 tbsp
Salt
To taste
Black pepper
To taste
Olive oil
For brushing
Step-by-Step Directions: “The Meatball Masterpiece”
Preheat & Prep: Preheat your oven to 190°C (375°F). Lightly grease a baking sheet or line with parchment paper.
Mix the Base: In a large bowl, combine minced chicken, ground beef, and minced pork. Add eggs, chopped onion, minced garlic, parsley, salt, pepper, and breadcrumbs. Mix well until all ingredients are evenly combined.
Shape the Magic: Take a portion of the meat mixture (about the size of a golf ball), flatten it in your palm, and place a spoonful of mixed vegetables and shredded cheese in the center. Carefully close and shape into a ball, sealing the filling inside.
Bake to Perfection: Place the stuffed meatballs on the prepared baking sheet. Lightly brush the tops with olive oil for a nice golden finish.
Into the Oven: Bake for 25–30 minutes or until meatballs are cooked through and nicely browned on the outside.
Serve and Savor: Serve hot with a side of tomato sauce, pasta, or roasted vegetables for a hearty meal.
The Power of the Trio: Understanding the Meat Blend
Why three kinds of meat? It’s not just to be extra—though it is indulgent. Each protein brings something to the table:
Ground beef delivers depth and richness.
Minced chicken lightens the mix and keeps it lean.
Minced pork adds moisture and subtle sweetness.
The blend creates a balance that’s hard to achieve with a single meat alone. This harmony allows the other flavors—especially the cheese and veggies—to shine rather than get lost in a heavy base.
If you’re following a specific diet, this blend is easy to adapt. Swap pork for turkey, or use all chicken for a leaner version. Just remember that fat = flavor, so if you go lean, add a splash of olive oil or a bit more cheese to keep everything juicy.
The Hidden Heart: Vegetables and Cheese as Soulful Fillings
Let’s talk about the filling—that warm, gooey center that feels like the culinary version of a surprise hug. The vegetables (think bell peppers, grated carrots, zucchini) are more than just healthy fillers. They add a fresh bite, a slight crunch, and nutrients that round out the richness of the meat.
Then there’s the cheese. Oh, the cheese.
Mozzarella brings that classic melt. Cheddar introduces a tang. Gouda, if you’re feeling fancy, adds a touch of smokiness. Mix and match depending on what’s in your fridge or what you’re craving that day.
The beauty of stuffing these meatballs is that it turns something simple into something thoughtful. It says, “I went the extra mile.” And your dinner guests—or your future self—will thank you for it.
Tips to Nail It Every Time
Getting stuffed meatballs just right takes a little care, but it’s absolutely worth it. Here are a few tips to ensure they come out perfect every time:
1. Don’t Overmix the Meat
Overmixing can make the meat tough. Combine ingredients until just incorporated—it’s okay if it looks a little rustic.
2. Use Cold Fillings
Chill your vegetable and cheese filling before stuffing the meatballs. This helps the center stay put while cooking and prevents the cheese from leaking too early.
3. Size Matters
If your meatballs are too large, they may cook unevenly. Aim for golf-ball-sized portions for even cooking with enough room for stuffing.
4. Seal Them Like a Pro
Ensure the stuffing is completely sealed inside the meat. Wet hands can help shape and smooth the meatballs more easily without sticking.
5. Bake, Don’t Fry (Unless You’re Feeling Bold)
Baking ensures even cooking and keeps things a little healthier. But if you want that crisp golden exterior, sear them in a pan before baking.
Creative Variations: Your Meatball, Your Rules
Don’t be afraid to experiment. The base recipe is endlessly customizable:
Spicy Kick: Add chopped jalapeños or red pepper flakes to the meat mix.
Italian Classic: Use basil, oregano, and Parmesan in both the mix and filling.
Mediterranean Mood: Add chopped olives, sun-dried tomatoes, and feta to the filling.
Vegetarian Twist: Use lentils and mashed chickpeas with breadcrumbs and egg as the base, then stuff with roasted vegetables and cheese.
You can even make a breakfast version with scrambled eggs and cheese inside. Sounds wild, but trust me—it works.
Frequently Asked Questions (FAQs)
1. Can I make these meatballs in advance?
Yes! You can prepare them ahead of time and refrigerate for up to 24 hours before baking. They also freeze beautifully—just flash-freeze on a tray, then store in a sealed bag. Bake straight from frozen, adding an extra 5–10 minutes.
2. What if my meatballs fall apart?
This usually happens if the binding agents (eggs, breadcrumbs) aren’t balanced. Make sure your mixture holds its shape when pressed. Also, don’t skip chilling them before baking—it helps them stay firm.
3. What cheese is best for stuffing?
Mozzarella is a classic for meltability, but you can use cheddar, gouda, provolone, or even cream cheese blended with herbs. Hard cheeses like Parmesan work better mixed into the meat rather than as stuffing.
4. How do I serve stuffed meatballs?
They’re versatile. Serve over pasta, tucked into a sub roll, or alongside mashed potatoes and gravy. For low-carb options, go with cauliflower rice or sautéed greens.
5. Can I make a gluten-free version?
Absolutely. Use gluten-free breadcrumbs or almond flour as a substitute. Make sure any sauces or seasonings you use are gluten-free too.
More Than a Recipe: A Moment of Connection
Food has a way of bridging distances—across generations, across cities, across the gaps we sometimes feel in our day-to-day lives. These Stuffed Meatballs with Vegetables and Cheese are more than just a combination of meat, cheese, and veggies. They are comfort wrapped in warmth, a small reminder that home isn’t always a place—it’s sometimes just a plate of food made with intention.
Whether you’re feeding a hungry family on a weeknight or looking for that perfect recipe to bring to your next gathering, this dish never disappoints. It’s rich without being overwhelming, creative without being complicated. But above all, it tells a story. And that story is yours to continue, one meatball at a time.
Honeycomb Cheesecake Recipe is a delightful treat that combines the rich flavors of cheesecake with the sweet, airy texture of honeycomb candy. This dessert is perfect for any occasion, whether it’s a birthday party, a family gathering, or just a cozy night in. With its luscious filling and crunchy topping, it’s sure to impress your guests and satisfy your sweet tooth.
Making a cheesecake might seem daunting, but this recipe breaks it down into simple steps. You’ll find that the process is not only easy but also enjoyable. The combination of cream cheese, whipped cream, and honeycomb creates a light and fluffy texture that melts in your mouth. Plus, the graham cracker crust adds a delicious crunch that perfectly complements the creamy filling.
Honeycomb Cheesecake Recipe approachable and rewarding. So, let’s dive in and discover how to create this sweet masterpiece!
Ingredients for Honeycomb Cheesecake Recipe
Honeycomb Cheesecake Recipe, you’ll need a few key ingredients that come together to form a delicious dessert. Here’s what you’ll need:
1 ½ cups graham cracker crumbs
½ cup unsalted butter, melted
2 tablespoons granulated sugar
16 ounces cream cheese, softened
1 cup powdered sugar
1 teaspoon vanilla extract
1 cup heavy whipping cream
1 cup honeycomb candy, chopped (plus extra for topping)
1 tablespoon lemon juice
These ingredients are easy to find at your local grocery store. The graham cracker crumbs form a crunchy base, while the cream cheese and heavy cream create a rich and creamy filling. The honeycomb candy adds a unique sweetness and texture that makes this cheesecake stand out.
Honeycomb Cheesecake Recipe so special!
Step-by-Step Preparation of Honeycomb Cheesecake Recipe
Honeycomb Cheesecake Recipe. Follow these simple steps to create a delicious cheesecake that will wow your friends and family!
Step 1: Preparing the Crust
First, let’s make the crust. In a medium bowl, combine the graham cracker crumbs, melted butter, and granulated sugar. Mix everything together until it resembles wet sand. This mixture will form the base of your cheesecake.
Next, press the crumb mixture firmly into the bottom of a 9-inch springform pan. Make sure it’s even and compact. This step is crucial for a sturdy crust. Once done, bake it in a preheated oven at 325°F for about 10 minutes. After baking, remove it from the oven and let it cool completely.
Step 2: Making the Cheesecake Filling
While the crust cools, let’s prepare the cheesecake filling. In a large mixing bowl, beat the softened cream cheese with an electric mixer. Mix until it’s smooth and creamy, which should take about 2-3 minutes. Gradually add the powdered sugar and vanilla extract, mixing until everything is well combined.
In a separate bowl, whip the heavy cream until stiff peaks form. This means the cream should hold its shape when you lift the whisk. Gently fold the whipped cream into the cream cheese mixture. Be careful not to deflate the whipped cream; you want to keep that light and airy texture!
Step 3: Creating the Honeycomb Topping
Now, it’s time to add the star ingredient: honeycomb candy! Chop the honeycomb into small pieces. Then, fold the chopped honeycomb and lemon juice into the cheesecake filling. This will add a delightful crunch and sweetness to your cheesecake.
Step 4: Assembling the Honeycomb Cheesecake
With the crust cooled and the filling ready, it’s time to assemble your cheesecake. Pour the cheesecake filling over the cooled crust. Use a spatula to smooth the top, ensuring it’s even. This step is important for a beautiful presentation!
Step 5: Baking the Cheesecake
Unlike traditional cheesecakes, this one doesn’t require baking after assembly. Instead, you’ll need to refrigerate it. Cover the springform pan with plastic wrap or aluminum foil. Place it in the refrigerator for at least 4 hours, or overnight if you can wait. This allows the cheesecake to set properly.
Step 6: Cooling and Setting
Honeycomb Cheesecake Recipe.
Variation of Honeycomb Cheesecake Recipe
Honeycomb Cheesecake Recipe is already a delightful treat, there are many ways to customize it to suit your taste. Whether you want to experiment with different flavors or cater to dietary needs, these variations will help you create a cheesecake that’s uniquely yours!
Alternative Flavors and Toppings
One of the best things about cheesecake is its versatility. You can easily switch up the flavors to keep things exciting. Here are some ideas:
Chocolate Honeycomb Cheesecake: For a rich twist, add ¼ cup of cocoa powder to the cream cheese mixture. This will give your cheesecake a delicious chocolate flavor that pairs wonderfully with the honeycomb.
Berry Bliss Cheesecake: Fold in 1 cup of fresh berries, such as strawberries or blueberries, into the filling. This adds a fruity freshness that balances the sweetness of the honeycomb.
Caramel Drizzle: Drizzle caramel sauce over the top before serving. This adds a sweet, gooey layer that complements the crunchy honeycomb perfectly.
Nutty Crunch: Mix in some chopped nuts, like pecans or almonds, for an extra crunch. You can also sprinkle them on top for a beautiful presentation.
Honeycomb Cheesecake Recipe is a blank canvas waiting for your personal touch.
Gluten-Free Options
If you or your guests are following a gluten-free diet, you can still enjoy this delicious cheesecake. Here’s how to make it gluten-free:
Gluten-Free Crust: Substitute regular graham cracker crumbs with gluten-free graham cracker crumbs or crushed gluten-free cookies. This will ensure your crust is safe for those avoiding gluten.
Check Ingredients: Always check that your cream cheese, powdered sugar, and other ingredients are labeled gluten-free. Most of these items are naturally gluten-free, but it’s good to double-check.
Honeycomb Cheesecake Recipe without worry!
Cooking Note for Honeycomb Cheesecake Recipe
Honeycomb Cheesecake Recipe, a few cooking notes can help ensure your dessert turns out just right. Here are some tips to keep in mind as you prepare this delightful treat:
Room Temperature Ingredients: Make sure your cream cheese is at room temperature before mixing. This helps it blend smoothly without lumps. If it’s too cold, it can be difficult to achieve that creamy texture.
Whipping Cream: When whipping the heavy cream, be careful not to over-whip it. You want stiff peaks, but if you whip too long, it can turn into butter. Keep an eye on it as you whip!
Chilling Time: Patience is key! Allowing the cheesecake to chill for at least 4 hours, or overnight, is crucial for it to set properly. This step ensures that the filling firms up and holds its shape when sliced.
Springform Pan: Using a springform pan makes it easier to remove the cheesecake without damaging it. If you don’t have one, you can use a regular pie dish, but be careful when serving.
Serving Temperature: For the best flavor and texture, serve the cheesecake slightly chilled. This enhances the creamy filling and makes the honeycomb topping even more enjoyable.
Honeycomb Cheesecake Recipe that will impress everyone at your gathering. Happy baking!
Serving Suggestions for Honeycomb Cheesecake Recipe
Honeycomb Cheesecake Recipe is ready, it’s time to think about how to serve it! Presentation can elevate your dessert and make it even more appealing. Here are some delightful serving suggestions to consider:
Chilled Slices: Serve the cheesecake slices chilled for the best flavor. Place them on a decorative plate and garnish with a sprig of mint for a fresh touch.
Honey Drizzle: Drizzle a little honey over each slice before serving. This adds an extra layer of sweetness and enhances the honeycomb flavor.
Fresh Berries: Pair your cheesecake with a side of fresh berries, such as strawberries, raspberries, or blueberries. The tartness of the berries complements the sweetness of the cheesecake beautifully.
Whipped Cream: Add a dollop of freshly whipped cream on top of each slice. This adds a light and airy texture that balances the richness of the cheesecake.
Chocolate Shavings: For a touch of elegance, sprinkle some chocolate shavings on top. This adds a nice visual contrast and a hint of chocolate flavor.
Mini Cheesecakes: For a fun twist, consider making mini cheesecakes in cupcake liners. This makes for easy serving and is perfect for parties!
Honeycomb Cheesecake Recipe but also create a delightful experience for your guests. Enjoy the smiles and compliments as they savor each bite!
Tips for Perfecting Your Honeycomb Cheesecake Recipe
Honeycomb Cheesecake Recipe is all about attention to detail and a few helpful tips. Whether you’re a novice baker or a seasoned pro, these suggestions will help you achieve a cheesecake that’s not only delicious but also visually stunning. Let’s explore some essential tips to elevate your cheesecake game!
Use Quality Ingredients: The flavor of your cheesecake largely depends on the quality of your ingredients. Opt for high-quality cream cheese and fresh honeycomb candy. This will enhance the overall taste and texture of your cheesecake.
Don’t Rush the Mixing: When mixing your cream cheese and sugar, take your time. Beat until the mixture is completely smooth. This step is crucial for avoiding lumps in your cheesecake filling.
Fold Gently: When incorporating the whipped cream and honeycomb into the cream cheese mixture, fold gently. This helps maintain the light and airy texture of the whipped cream, ensuring a fluffy cheesecake.
Chill Thoroughly: As mentioned earlier, chilling is key! Allow your cheesecake to set in the refrigerator for at least 4 hours, or overnight if possible. This ensures that it firms up properly and slices beautifully.
Check for Doneness: If you’re unsure whether your cheesecake is set, gently shake the pan. The center should be slightly jiggly but not liquid. It will firm up as it cools.
Experiment with Toppings: Don’t hesitate to get creative with your toppings! Whether it’s fresh fruit, chocolate drizzle, or extra honeycomb, toppings can add flavor and visual appeal to your cheesecake.
Serve at the Right Temperature: For the best taste, serve your cheesecake slightly chilled. This enhances the flavors and makes the texture even more enjoyable.
Practice Patience: If you’re making this cheesecake for a special occasion, practice patience. Allowing it to chill and set properly will pay off in the end with a perfect slice!
Honeycomb Cheesecake Recipe. Each step is important, and with a little care, you’ll create a dessert that’s sure to impress everyone at your table. Happy baking!
Breakdown of Time for Honeycomb Cheesecake Recipe
Honeycomb Cheesecake Recipe is essential for planning your baking session. Here’s a detailed breakdown of the time you’ll need to create this delicious dessert.
Prep Time
The prep time for this cheesecake is approximately 30 minutes. This includes gathering your ingredients, preparing the crust, and mixing the cheesecake filling. Here’s a quick overview of what to expect:
Gathering ingredients: 5 minutes
Preparing the crust: 10 minutes
Making the cheesecake filling: 15 minutes
With a little organization, you can have everything ready to go in no time!
Cooking Time
While the cheesecake itself doesn’t require baking, you will need to bake the crust. This takes about 10 minutes. Here’s the breakdown:
Baking the crust: 10 minutes
After baking, the cheesecake needs to chill in the refrigerator, which is crucial for it to set properly.
Total Time
Honeycomb Cheesecake Recipe is about 4 hours and 40 minutes. This includes:
Prep time: 30 minutes
Cooking time (baking the crust): 10 minutes
Chilling time: At least 4 hours (or overnight for best results)
So, while the active time is relatively short, the chilling time is essential for achieving that perfect cheesecake texture. Plan ahead, and you’ll be rewarded with a delightful dessert that’s worth the wait!
Nutritional Information for Honeycomb Cheesecake Recipe
Honeycomb Cheesecake Recipe is important, especially if you’re mindful of your diet. This delicious dessert is not only a treat for your taste buds but also provides some nutritional value. Here’s a breakdown of the key nutritional components per serving:
Calories
Each slice of this delightful cheesecake contains approximately 350 calories. This calorie count includes the rich ingredients like cream cheese and heavy whipping cream, which contribute to its creamy texture. While it’s a bit indulgent, it’s perfect for special occasions or when you want to treat yourself!
Protein
In terms of protein, each serving offers about 5 grams. The cream cheese and heavy cream are the main sources of protein in this cheesecake. While it’s not a high-protein dessert, it does provide a small amount that can be part of a balanced diet.
Sodium
The sodium content in each slice is approximately 200 milligrams. This amount comes from the cream cheese and butter used in the recipe. If you’re watching your sodium intake, it’s good to be aware of this number. However, for most people, enjoying this cheesecake in moderation is perfectly fine.
Honeycomb Cheesecake Recipe is a delicious dessert that can fit into a balanced diet when enjoyed in moderation. Remember, it’s all about balance and treating yourself occasionally. Enjoy every bite of this creamy, crunchy delight!
FAQs about Honeycomb Cheesecake Recipe
Can I use store-bought honeycomb for the recipe?
Honeycomb Cheesecake Recipe so special. If you can’t find honeycomb, you can also use honeycomb-flavored candies or even toffee as a substitute.
How do I store leftover honeycomb cheesecake?
Honeycomb Cheesecake Recipe is easy! First, cover the cheesecake with plastic wrap or aluminum foil to keep it fresh. You can also place it in an airtight container. Store it in the refrigerator, where it will stay good for about 3 to 5 days. If you want to keep it longer, consider freezing individual slices. Just wrap them tightly in plastic wrap and place them in a freezer-safe container. When you’re ready to enjoy, simply thaw in the refrigerator overnight.
Can I make honeycomb cheesecake in advance?
Honeycomb Cheesecake Recipe in advance is a great idea! In fact, it’s recommended to let it chill overnight for the best results. This allows the flavors to meld and the cheesecake to set properly. You can prepare it a day or two ahead of your event, making it a convenient dessert option. Just remember to store it properly in the refrigerator until you’re ready to serve!
What can I substitute for cream cheese in the recipe?
Honeycomb Cheesecake Recipe, there are a few options. You can use mascarpone cheese for a similar creamy texture. Another option is to use Greek yogurt, which will give a tangy flavor and a lighter texture. If you prefer a dairy-free option, consider using a vegan cream cheese alternative made from nuts or soy. Just keep in mind that the flavor and texture may vary slightly, but it can still be delicious!
Conclusion on Honeycomb Cheesecake Recipe
Honeycomb Cheesecake Recipe is a delightful dessert that brings together the best of both worlds: creamy cheesecake and crunchy honeycomb. This recipe is not only easy to follow but also allows for creativity and personalization. Whether you choose to stick with the classic version or experiment with different flavors and toppings, you’re sure to create a dessert that will impress everyone.
As you prepare this cheesecake, remember the importance of quality ingredients and patience. Allowing the cheesecake to chill properly is key to achieving that perfect texture. With each slice, you’ll experience the rich creaminess of the filling paired with the sweet crunch of honeycomb, making every bite a true delight.
Honeycomb Cheesecake Recipe. It’s perfect for celebrations, gatherings, or simply as a treat for yourself. We hope you enjoy every moment spent baking and savoring this delicious dessert. Happy baking!
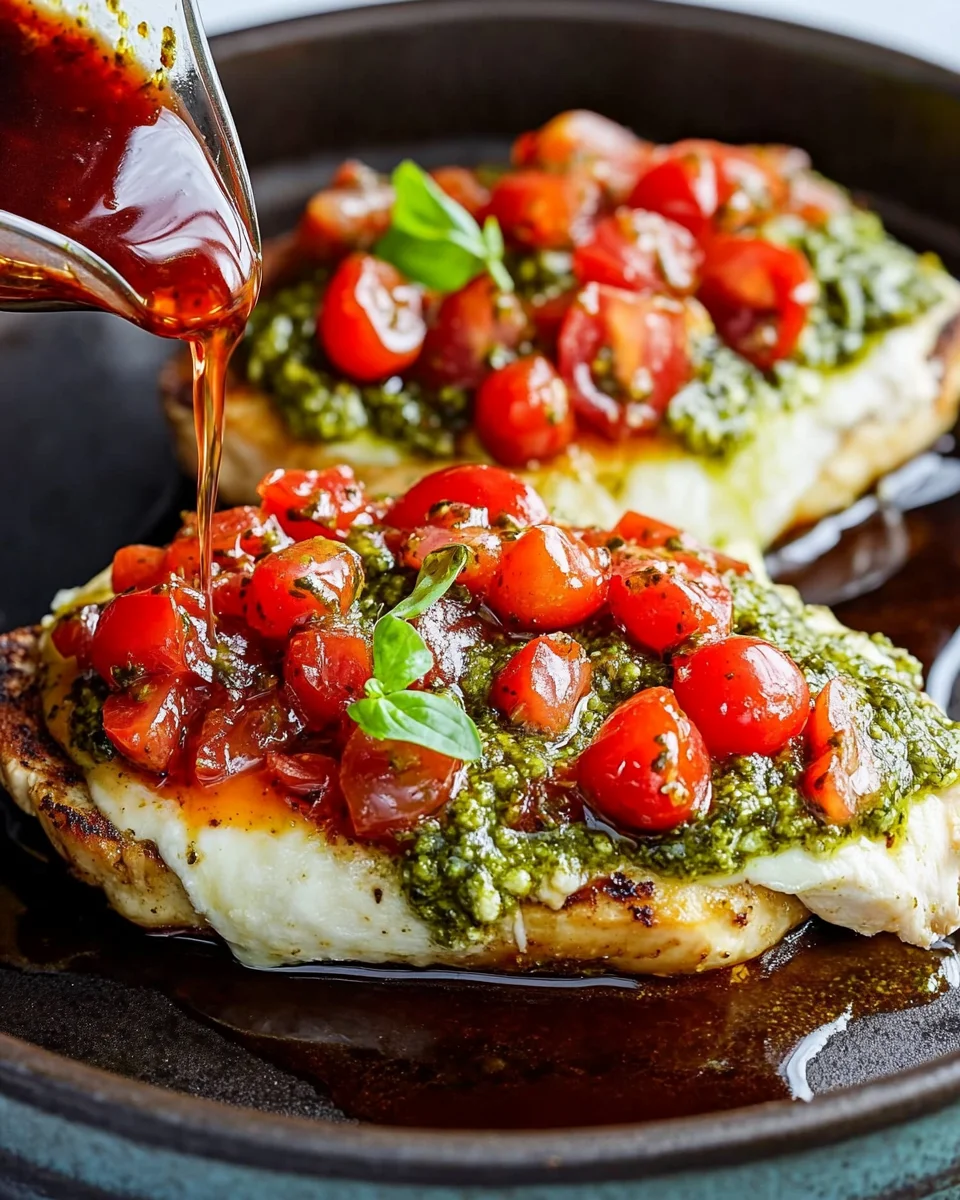
Pesto Bruschetta Chicken Recipe. This dish combines juicy chicken breasts with fresh, vibrant flavors that will make your taste buds dance. It’s perfect for a weeknight meal or a special occasion. With just a few simple ingredients, you can create a dish that looks and tastes gourmet.
What Makes Pesto Bruschetta Chicken Special?
What sets this recipe apart is its delightful combination of flavors and textures. The tender chicken serves as a perfect canvas for the bright, zesty pesto and the juicy cherry tomatoes. The fresh basil adds an aromatic touch, while the melted mozzarella cheese brings everything together in a creamy, comforting way. Plus, the optional drizzle of balsamic glaze adds a sweet and tangy finish that elevates the dish even further.
This recipe is not only tasty but also versatile. You can easily customize it to suit your preferences. Whether you want to add more veggies or switch up the protein, the possibilities are endless. It’s a great way to impress your family or guests without spending hours in the kitchen. So, let’s dive into the ingredients and get started on this mouthwatering meal!
Ingredients for Pesto Bruschetta Chicken Recipe
Pesto Bruschetta Chicken Recipe, you will need a few fresh ingredients. Each component plays a vital role in building the flavors of this dish. Here’s what you’ll need:
These ingredients are not only easy to find but also packed with flavor. The chicken provides a hearty base, while the cherry tomatoes and basil add freshness. The pesto sauce brings a rich, herby taste, and the mozzarella cheese melts beautifully, creating a creamy topping. If you enjoy a little heat, the red pepper flakes are a great addition. Finally, a drizzle of balsamic glaze can enhance the dish with a sweet and tangy kick.
Now that you have your ingredients ready, let’s move on to the step-by-step preparation of this delicious meal!
Step-by-Step Preparation of Pesto Bruschetta Chicken Recipe
Pesto Bruschetta Chicken Recipe. This process is straightforward and will guide you to create a delicious meal that everyone will love. Let’s get started!
Step 1: Preparing the Chicken
First, preheat your oven to 375°F (190°C). This ensures that your chicken will cook evenly. While the oven heats up, take your boneless, skinless chicken breasts and place them on a clean cutting board. Pat them dry with a paper towel. This step helps the seasoning stick better.
Next, in a small bowl, mix together 2 tablespoons of olive oil, 1 teaspoon of garlic powder, salt, and pepper to taste. If you like a little spice, add 1/4 teaspoon of red pepper flakes. Rub this mixture all over the chicken breasts, making sure they are well coated. This will infuse the chicken with flavor as it cooks.
Step 2: Making the Pesto
If you’re using store-bought pesto, you can skip this step. However, if you want to make your own, it’s quite simple! In a food processor, combine 1 cup of fresh basil leaves, 1/4 cup of olive oil, 1/4 cup of grated Parmesan cheese, 1/4 cup of pine nuts, and a pinch of salt. Blend until smooth. This homemade pesto will add a fresh taste to your dish.
Step 3: Assembling the Bruschetta Topping
While the chicken is baking, it’s time to prepare the bruschetta topping. In a medium bowl, combine 1 cup of halved cherry tomatoes and the chopped basil leaves. Pour in the pesto sauce and mix everything together until the tomatoes are well coated. This mixture will add a burst of flavor to your chicken.
Step 4: Cooking the Chicken
After you’ve seasoned the chicken, place the breasts in a baking dish. Bake them in the preheated oven for 20 minutes. This initial cooking time helps the chicken become tender. After 20 minutes, take the chicken out of the oven. Spoon the tomato-basil-pesto mixture evenly over each chicken breast. Then, sprinkle 1 cup of shredded mozzarella cheese on top.
Step 5: Final Assembly and Serving
Return the baking dish to the oven and bake for an additional 10-15 minutes. You’ll know the chicken is done when it reaches an internal temperature of 165°F (75°C) and the cheese is melted and bubbly. Once cooked, remove the dish from the oven and let it rest for 5 minutes. This resting time allows the juices to redistribute, making the chicken even juicier.
Pesto Bruschetta Chicken Recipe is ready to be enjoyed!
Variations of Pesto Bruschetta Chicken Recipe
Pesto Bruschetta Chicken Recipe is not only delicious but also highly adaptable. You can easily modify it to suit different dietary preferences or to simply mix things up. Here are some exciting variations to consider!
Vegetarian Options
If you want to enjoy the flavors of this dish without the chicken, there are plenty of vegetarian options. One great alternative is to use portobello mushrooms. These meaty mushrooms can be grilled or baked and topped with the same pesto, tomato, and mozzarella mixture. They provide a hearty texture that mimics chicken.
Another option is to use zucchini or eggplant slices. Simply slice them into thick rounds, season, and bake until tender. Then, add the bruschetta topping and cheese as you would with the chicken. This way, you can enjoy a flavorful, plant-based meal that everyone will love!
Alternative Proteins
For those who prefer different proteins, there are several tasty alternatives to chicken. Turkey breasts are a lean option that works well with the same seasonings and toppings. Just adjust the cooking time as turkey may take a bit longer to cook through.
Fish lovers can try this recipe with salmon or tilapia. The light, flaky texture of these fish pairs beautifully with the pesto and tomatoes. Just be sure to adjust the cooking time, as fish cooks much faster than chicken. You’ll end up with a delightful dish that’s both healthy and satisfying!
Pesto Bruschetta Chicken Recipe in many different ways. Whether you’re cooking for vegetarians or simply want to try something new, these options will keep your meals exciting and flavorful!
Cooking Note for Pesto Bruschetta Chicken Recipe
Pesto Bruschetta Chicken Recipe, there are a few important cooking notes to keep in mind. These tips will help ensure that your dish turns out perfectly every time.
First, always check the freshness of your ingredients. Fresh basil, ripe cherry tomatoes, and high-quality pesto will significantly enhance the flavor of your dish. If possible, use homemade pesto for a fresher taste. It’s easy to make and can be stored for later use.
Next, be mindful of the chicken’s thickness. If your chicken breasts are particularly thick, consider pounding them to an even thickness. This helps them cook evenly and prevents the outside from drying out while the inside remains undercooked. A meat mallet or rolling pin works well for this task.
Additionally, using a meat thermometer is a great way to ensure your chicken is cooked to perfection. The internal temperature should reach 165°F (75°C) for safe consumption. This tool takes the guesswork out of cooking and helps you avoid overcooking, which can lead to dry chicken.
Lastly, let the chicken rest after baking. This step is crucial as it allows the juices to redistribute throughout the meat. If you cut into the chicken too soon, the juices will run out, leaving you with a drier piece of meat. A resting time of about 5 minutes is ideal.
Pesto Bruschetta Chicken Recipe that will impress your family and friends. Happy cooking!
Serving Suggestions for Pesto Bruschetta Chicken Recipe
Pesto Bruschetta Chicken Recipe is ready, it’s time to think about how to serve it. This dish is not only flavorful but also visually appealing, making it perfect for any dining occasion. Here are some delightful serving suggestions to enhance your meal experience:
Pair with a Fresh Salad: A light, crisp salad complements the rich flavors of the chicken. Consider a simple arugula salad with lemon vinaigrette or a classic Caesar salad. The freshness of the greens balances the hearty chicken beautifully.
Serve with Garlic Bread: Garlic bread is a fantastic side that adds a crunchy texture. You can easily make it by spreading butter and minced garlic on slices of baguette, then toasting them in the oven.
Accompany with Roasted Vegetables: Roasted vegetables like zucchini, bell peppers, or asparagus add color and nutrition to your plate. Toss them in olive oil, salt, and pepper, then roast until tender.
Include a Grain: For a more filling meal, serve the chicken with a side of quinoa, rice, or couscous. These grains soak up the delicious juices from the chicken and pesto, making every bite satisfying.
Garnish with Extra Basil: For a pop of color and flavor, sprinkle some fresh basil leaves on top of the chicken before serving. This not only enhances the presentation but also adds a fresh aroma.
Pesto Bruschetta Chicken Recipe and create a well-rounded meal. Whether it’s a family dinner or a gathering with friends, your dish will surely impress everyone at the table!
Tips for Perfecting Your Pesto Bruschetta Chicken Recipe
Pesto Bruschetta Chicken Recipe turns out perfectly every time, consider these helpful tips. They will enhance the flavors and presentation of your dish, making it even more enjoyable for you and your guests.
Use Fresh Ingredients: Fresh basil, ripe cherry tomatoes, and high-quality mozzarella cheese make a big difference. Fresh ingredients enhance the overall flavor and texture of the dish.
Marinate for Extra Flavor: For a deeper flavor, marinate the chicken in the olive oil and garlic mixture for at least 30 minutes before cooking. This allows the flavors to penetrate the meat.
Experiment with Cheese: While mozzarella is a classic choice, feel free to experiment with other cheeses. Try using provolone or goat cheese for a unique twist.
Adjust the Spice Level: If you enjoy a bit of heat, increase the amount of red pepper flakes. Alternatively, for a milder dish, simply omit them.
Serve Immediately: For the best taste and texture, serve the chicken right after it’s done resting. This ensures the cheese is still melty and the chicken is juicy.
Pesto Bruschetta Chicken Recipe that is not only delicious but also visually stunning. Your family and friends will be impressed with your culinary skills!
Breakdown of Time for Pesto Bruschetta Chicken Recipe
Pesto Bruschetta Chicken Recipe can help you plan your cooking efficiently. Here’s a simple breakdown of the time required for preparation and cooking:
Prep Time
The prep time for this recipe is about 15 minutes. This includes gathering your ingredients, seasoning the chicken, and preparing the bruschetta topping. If you choose to make your own pesto, add an extra 5 minutes for that step.
Cooking Time
The cooking time is approximately 30-35 minutes. This consists of 20 minutes for the initial baking of the chicken and an additional 10-15 minutes for the final baking with the toppings. Always check the internal temperature to ensure the chicken is fully cooked.
Total Time
Pesto Bruschetta Chicken Recipe a quick and satisfying meal option for busy weeknights or special occasions.
By keeping track of your time, you can ensure that everything comes together smoothly. Enjoy the process and the delicious results!
Breakdown of Time for Pesto Bruschetta Chicken Recipe
Pesto Bruschetta Chicken Recipe can help you plan your cooking efficiently. Here’s a simple breakdown of the time required for preparation and cooking:
Prep Time
The prep time for this recipe is about 15 minutes. This includes gathering your ingredients, seasoning the chicken, and preparing the bruschetta topping. If you choose to make your own pesto, add an extra 5 minutes for that step. Having everything ready before you start cooking makes the process smoother and more enjoyable.
Cooking Time
The cooking time is approximately 30-35 minutes. This consists of 20 minutes for the initial baking of the chicken and an additional 10-15 minutes for the final baking with the toppings. Always check the internal temperature to ensure the chicken is fully cooked. Using a meat thermometer can help you avoid any guesswork.
Total Time
Pesto Bruschetta Chicken Recipe a quick and satisfying meal option for busy weeknights or special occasions. With this efficient time breakdown, you can easily fit this delicious dish into your schedule.
By keeping track of your time, you can ensure that everything comes together smoothly. Enjoy the process and the delicious results!
Nutritional Information for Pesto Bruschetta Chicken Recipe
Pesto Bruschetta Chicken Recipe not only delights your taste buds but also provides valuable nutrients. Here’s a breakdown of the nutritional information per serving:
Calories
Pesto Bruschetta Chicken Recipe contains approximately 450 calories. This makes it a satisfying option for dinner without being overly heavy. The combination of chicken, cheese, and fresh toppings ensures you get a fulfilling meal that keeps you energized.
Protein
One of the standout features of this dish is its high protein content. Each serving provides about 40 grams of protein. This is great for muscle repair and growth, making it an excellent choice for those who are active or looking to maintain a healthy lifestyle. The chicken and mozzarella cheese contribute significantly to this protein boost.
Sodium
Pesto Bruschetta Chicken Recipe is around 800 milligrams per serving. While this is a moderate amount, it’s important to be mindful of your overall sodium intake, especially if you are watching your salt consumption. You can reduce sodium by using low-sodium pesto or limiting added salt during preparation.
Pesto Bruschetta Chicken Recipe while staying aligned with your dietary goals. This dish is not only delicious but also a nutritious option for any meal!
FAQs about Pesto Bruschetta Chicken Recipe
Can I make the pesto ahead of time?
Pesto Bruschetta Chicken Recipe.
What can I serve with Pesto Bruschetta Chicken?
Pesto Bruschetta Chicken Recipe. A fresh salad is always a great choice. You can also pair it with garlic bread for a crunchy side. Roasted vegetables like zucchini or asparagus add color and nutrition to your plate. If you want something heartier, consider serving it with quinoa or rice. These sides will complement the flavors of the chicken beautifully!
How do I store leftovers of Pesto Bruschetta Chicken?
Pesto Bruschetta Chicken Recipe, let the chicken cool completely. Then, place it in an airtight container and refrigerate. It will stay fresh for about 3-4 days. When you’re ready to enjoy it again, simply reheat in the oven or microwave until warmed through. This way, you can savor the delicious flavors of your meal even after the first serving!
Conclusion on Pesto Bruschetta Chicken Recipe
Pesto Bruschetta Chicken Recipe is a delightful dish that brings together fresh ingredients and bold flavors. It’s not only easy to prepare but also offers a satisfying meal that can impress family and friends alike. With its juicy chicken, vibrant pesto, and melty mozzarella, this recipe is sure to become a favorite in your household.
Whether you’re cooking for a special occasion or a simple weeknight dinner, this dish is versatile enough to suit any setting. Plus, with the various options for customization, you can easily adapt it to meet different dietary needs or personal preferences. From vegetarian alternatives to different proteins, the possibilities are endless!
Remember to follow the cooking tips and serving suggestions to elevate your meal. By using fresh ingredients and allowing the chicken to rest, you’ll ensure a delicious outcome every time. So, gather your ingredients, roll up your sleeves, and enjoy the process of creating this mouthwatering dish.
Pesto Bruschetta Chicken Recipe. It’s a wonderful way to bring people together around the dinner table, creating not just a meal, but also lasting memories. Happy cooking!
The Thai Peanut Sweet Potato Bowl is a delightful dish that combines vibrant flavors and nutritious ingredients. This bowl is not just a meal; it’s an experience that brings together the warmth of roasted sweet potatoes, the crunch of fresh vegetables, and the creamy richness of peanut sauce. Whether you’re looking for a quick lunch or a hearty dinner, this bowl is sure to satisfy your cravings.
What Makes the Thai Peanut Sweet Potato Bowl Special?
What sets the Thai Peanut Sweet Potato Bowl apart is its unique blend of textures and flavors. The sweet potatoes provide a natural sweetness, while the chickpeas add protein and heartiness. The colorful vegetables, like shredded carrots and red cabbage, contribute a refreshing crunch. And let’s not forget the star of the show—the peanut sauce! This sauce ties everything together with its creamy, nutty flavor and a hint of spice.
Moreover, this bowl is incredibly versatile. You can easily customize it to suit your taste preferences or dietary needs. Want to add more protein? Toss in some grilled chicken or tofu. Prefer a different base? Swap quinoa for brown rice or cauliflower rice. The possibilities are endless!
Not only is this dish delicious, but it’s also packed with nutrients. Sweet potatoes are rich in vitamins and fiber, while chickpeas provide a good source of plant-based protein. This makes the Thai Peanut Sweet Potato Bowl a wholesome choice for anyone looking to eat healthier without sacrificing flavor.
In the following sections, we will explore the ingredients, preparation steps, and variations of this delightful bowl. Get ready to dive into a world of flavor and nutrition!
Ingredients for the Thai Peanut Sweet Potato Bowl
Creating the Thai Peanut Sweet Potato Bowl is simple and requires fresh, wholesome ingredients. Here’s what you’ll need to whip up this delicious dish:
2 medium sweet potatoes, peeled and diced into 1-inch cubes
1 tablespoon olive oil
1 teaspoon salt
1/2 teaspoon black pepper
1 cup cooked quinoa
1 cup chickpeas, drained and rinsed
1 cup shredded carrots
1 cup red cabbage, thinly sliced
1/4 cup chopped green onions
1/4 cup chopped fresh cilantro
For the peanut sauce, gather the following ingredients:
1/4 cup creamy peanut butter
2 tablespoons soy sauce
1 tablespoon maple syrup
1 tablespoon rice vinegar
1 teaspoon sesame oil
1-2 teaspoons sriracha (adjust to taste)
2-3 tablespoons water (to thin the sauce)
These ingredients come together to create a bowl that is not only visually appealing but also packed with flavor and nutrition. The sweet potatoes and chickpeas provide a hearty base, while the fresh vegetables add a delightful crunch. The peanut sauce is the perfect finishing touch, bringing everything together with its creamy texture and rich taste.
Now that you have your ingredients ready, let’s move on to the preparation steps to create your Thai Peanut Sweet Potato Bowl!
Step-by-Step Preparation of the Thai Peanut Sweet Potato Bowl
Now that you have all your ingredients ready, it’s time to dive into the preparation of your Thai Peanut Sweet Potato Bowl. This step-by-step guide will help you create a delicious and nutritious meal that’s sure to impress!
Step 1: Preparing the Sweet Potatoes
First, let’s focus on the sweet potatoes. Preheat your oven to 400°F. While the oven heats up, peel and dice the sweet potatoes into 1-inch cubes. This size helps them cook evenly and become tender.
Next, place the diced sweet potatoes in a large bowl. Drizzle with 1 tablespoon of olive oil, then sprinkle with 1 teaspoon of salt and 1/2 teaspoon of black pepper. Toss everything together until the sweet potatoes are well coated. This step is crucial as it enhances the flavor and helps achieve that lovely caramelization.
Spread the seasoned sweet potatoes on a baking sheet in a single layer. Roast them in the preheated oven for about 25-30 minutes. Remember to flip them halfway through to ensure even cooking. You’ll know they’re done when they’re tender and slightly golden brown.
Step 2: Making the Thai Peanut Sauce
While the sweet potatoes are roasting, it’s time to whip up the peanut sauce. In a small bowl, combine 1/4 cup of creamy peanut butter, 2 tablespoons of soy sauce, 1 tablespoon of maple syrup, 1 tablespoon of rice vinegar, and 1 teaspoon of sesame oil. This combination creates a rich and flavorful sauce.
For a little kick, add 1-2 teaspoons of sriracha, adjusting to your taste preference. If you like it spicier, feel free to add more! To achieve your desired consistency, gradually mix in 2-3 tablespoons of water, one tablespoon at a time. Whisk until the sauce is smooth and creamy. If you prefer a creamier texture, consider blending the sauce in a food processor.
Step 3: Cooking the Vegetables
With the sweet potatoes roasting and the peanut sauce ready, it’s time to prepare the vegetables. You’ll need 1 cup of shredded carrots and 1 cup of thinly sliced red cabbage. These veggies add color and crunch to your bowl.
Simply wash and chop the vegetables as needed. You can use a box grater for the carrots or buy pre-shredded carrots to save time. For the red cabbage, a sharp knife will do the trick. Once chopped, set them aside until the sweet potatoes are ready.
Step 4: Assembling the Thai Peanut Sweet Potato Bowl
Now comes the fun part—assembling your Thai Peanut Sweet Potato Bowl! Start with a base of 1 cup of cooked quinoa in each bowl. Quinoa is a great source of protein and adds a nutty flavor.
Next, top the quinoa with the roasted sweet potatoes, chickpeas, shredded carrots, and red cabbage. Don’t forget to sprinkle 1/4 cup of chopped green onions and 1/4 cup of chopped fresh cilantro on top for added freshness and flavor.
Finally, drizzle the creamy peanut sauce generously over the assembled bowl. You can serve it immediately or chill it in the refrigerator for a refreshing meal prep option. Enjoy your delicious Thai Peanut Sweet Potato Bowl!
Variations of the Thai Peanut Sweet Potato Bowl
The Thai Peanut Sweet Potato Bowl is a fantastic base for creativity. You can easily modify it to suit your taste or dietary needs. Here are some exciting variations to consider!
Adding Protein Options
If you want to boost the protein content of your Thai Peanut Sweet Potato Bowl, there are plenty of options. Here are a few ideas:
Grilled Chicken: Add sliced grilled chicken breast for a lean protein boost. It pairs wonderfully with the peanut sauce.
Tofu: For a plant-based option, try adding cubed, pan-fried tofu. It absorbs flavors well and adds a nice texture.
Edamame: Toss in some shelled edamame for a pop of color and protein. They’re easy to prepare and delicious!
Hard-Boiled Eggs: Sliced hard-boiled eggs can add creaminess and extra protein to your bowl.
Feel free to mix and match these protein options to create a bowl that satisfies your hunger and taste buds!
Alternative Vegetables to Use
While the original recipe calls for shredded carrots and red cabbage, you can switch things up with different vegetables. Here are some tasty alternatives:
Spinach: Fresh spinach adds a vibrant green color and is packed with nutrients. Toss it in raw for a fresh crunch.
Bell Peppers: Sliced bell peppers add sweetness and crunch. They come in various colors, making your bowl visually appealing.
Cucumbers: Thinly sliced cucumbers provide a refreshing crunch. They’re perfect for adding a cool contrast to the warm sweet potatoes.
Broccoli: Lightly steamed or roasted broccoli florets can add a nice texture and flavor to your bowl.
Experimenting with different vegetables not only enhances the flavor but also boosts the nutritional value of your Thai Peanut Sweet Potato Bowl. Enjoy creating your unique version!
Cooking Note for the Thai Peanut Sweet Potato Bowl
When preparing the Thai Peanut Sweet Potato Bowl, a few cooking tips can enhance your experience and ensure delicious results. First, always choose fresh ingredients. Fresh vegetables and sweet potatoes will provide the best flavor and texture. If possible, opt for organic produce to maximize nutritional benefits.
Next, pay attention to the roasting of the sweet potatoes. Make sure they are cut into uniform 1-inch cubes. This ensures even cooking and caramelization. If you prefer a crispier texture, you can roast them a bit longer, but keep an eye on them to prevent burning.
For the peanut sauce, feel free to adjust the ingredients to suit your taste. If you like it sweeter, add a bit more maple syrup. If you prefer a tangier flavor, increase the rice vinegar. The beauty of this sauce lies in its versatility, so don’t hesitate to experiment!
Additionally, if you’re preparing this dish for meal prep, consider storing the components separately. Keep the roasted sweet potatoes, quinoa, and vegetables in airtight containers in the fridge. This way, you can assemble your bowl fresh each time you eat, maintaining the crunch of the veggies and the creaminess of the sauce.
Lastly, don’t forget to garnish your bowl! A sprinkle of sesame seeds or a squeeze of lime can elevate the flavors even more. Enjoy the process of making your Thai Peanut Sweet Potato Bowl, and remember, cooking is all about creativity and fun!
Serving Suggestions for the Thai Peanut Sweet Potato Bowl
Serving your Thai Peanut Sweet Potato Bowl can be as fun and creative as making it! Here are some delightful suggestions to enhance your dining experience:
Garnish with Fresh Herbs: A sprinkle of fresh herbs like cilantro or basil can brighten up the flavors. They add a burst of freshness that complements the peanut sauce beautifully.
Include a Lime Wedge: Serve your bowl with a lime wedge on the side. A squeeze of lime juice just before eating can add a zesty kick that elevates the dish.
Pair with a Side Salad: Consider serving your bowl alongside a light side salad. A simple mix of greens with a light vinaigrette can balance the richness of the peanut sauce.
Top with Avocado: Sliced avocado adds creaminess and healthy fats. It pairs perfectly with the sweet potatoes and peanut sauce, making each bite even more satisfying.
Serve with Rice Paper Rolls: For a fun twist, serve your bowl with fresh rice paper rolls. Fill them with veggies and dip them in the peanut sauce for a delightful appetizer.
Offer Extra Peanut Sauce: Always have extra peanut sauce on the side. Some people love to drizzle more on top or use it as a dip for their veggies.
These serving suggestions not only enhance the flavor but also make your meal visually appealing. Whether you’re enjoying this bowl for lunch, dinner, or meal prep, these ideas will surely impress your family and friends. Enjoy every bite of your Thai Peanut Sweet Potato Bowl!
Tips for Perfecting Your Thai Peanut Sweet Potato Bowl
Creating the perfect Thai Peanut Sweet Potato Bowl is all about attention to detail and a few handy tips. Here are some suggestions to elevate your dish and ensure it’s bursting with flavor!
Choose the Right Sweet Potatoes: Opt for firm, smooth sweet potatoes. Look for ones that are free from blemishes or soft spots. The fresher the sweet potatoes, the better the flavor!
Season Generously: Don’t be shy with the seasoning! A little extra salt and pepper can enhance the natural sweetness of the sweet potatoes. You can also experiment with spices like paprika or garlic powder for added depth.
Roast for Maximum Flavor: Roasting sweet potatoes until they are caramelized brings out their natural sweetness. Make sure to spread them out on the baking sheet to avoid steaming. This helps achieve that perfect crispy texture.
Customize Your Peanut Sauce: The peanut sauce is key to this dish. Feel free to adjust the ingredients to match your taste. If you love garlic, add minced garlic to the sauce. For a nutty twist, try adding a splash of coconut milk.
Mix and Match Vegetables: While the recipe suggests specific vegetables, don’t hesitate to use what you have on hand. Seasonal veggies can add unique flavors and textures. Try adding roasted bell peppers or snap peas for a fresh crunch!
Make it Ahead: If you’re short on time, prepare the components in advance. Roast the sweet potatoes and cook the quinoa ahead of time. Store them in the fridge, and assemble your bowl when you’re ready to eat.
Experiment with Toppings: Toppings can make a big difference! Consider adding toasted nuts, seeds, or even a sprinkle of chili flakes for a spicy kick. These little extras can enhance the overall experience.
Serve Warm: For the best flavor, serve your bowl warm. The warmth of the sweet potatoes and quinoa complements the creamy peanut sauce beautifully.
By following these tips, you’ll create a Thai Peanut Sweet Potato Bowl that’s not only delicious but also visually stunning. Enjoy the process of making this dish, and don’t be afraid to get creative!
Breakdown of Time for the Thai Peanut Sweet Potato Bowl
Understanding the time needed to prepare the Thai Peanut Sweet Potato Bowl can help you plan your cooking efficiently. Here’s a simple breakdown of the time required for each step of the process.
Prep Time
The prep time for this delicious bowl is approximately 15-20 minutes. This includes:
Peeling and dicing the sweet potatoes.
Chopping the vegetables like carrots, red cabbage, green onions, and cilantro.
Measuring out the ingredients for the peanut sauce.
Having all your ingredients prepped and ready to go will make the cooking process smoother and more enjoyable!
Cooking Time
The cooking time for the Thai Peanut Sweet Potato Bowl is about 30-35 minutes. This includes:
Roasting the sweet potatoes for 25-30 minutes in the oven.
Preparing the peanut sauce, which takes about 5 minutes.
While the sweet potatoes roast, you can easily whip up the peanut sauce, making the most of your time in the kitchen.
Total Time
In total, you can expect to spend around 45-55 minutes from start to finish. This includes both prep and cooking time. It’s a manageable timeframe for a nutritious and flavorful meal that serves four people. Plus, the effort is well worth it when you enjoy the delightful flavors of your Thai Peanut Sweet Potato Bowl!
Nutritional Information for the Thai Peanut Sweet Potato Bowl
Understanding the nutritional content of your meals is essential for maintaining a balanced diet. The Thai Peanut Sweet Potato Bowl is not only delicious but also packed with nutrients. Here’s a breakdown of the nutritional information per serving:
Calories
Each serving of the Thai Peanut Sweet Potato Bowl contains approximately 450 calories. This makes it a satisfying meal that provides energy without being overly heavy. The combination of sweet potatoes, quinoa, and chickpeas contributes to the calorie count while offering essential nutrients.
Protein
In terms of protein, this bowl offers about 15 grams per serving. The chickpeas and quinoa are excellent sources of plant-based protein, making this dish a great option for vegetarians and vegans. Protein is vital for muscle repair and growth, making this bowl a nutritious choice for active individuals.
Sodium
The sodium content in the Thai Peanut Sweet Potato Bowl is approximately 600 milligrams per serving. This amount is reasonable, especially considering the flavor-enhancing ingredients like soy sauce in the peanut sauce. If you’re watching your sodium intake, you can opt for low-sodium soy sauce to reduce the overall sodium content.
Overall, the Thai Peanut Sweet Potato Bowl is a well-rounded meal that provides a good balance of calories, protein, and essential nutrients. It’s a fantastic choice for anyone looking to enjoy a healthy and flavorful dish!
FAQs about the Thai Peanut Sweet Potato Bowl
Can I make the Thai Peanut Sweet Potato Bowl ahead of time?
Absolutely! The Thai Peanut Sweet Potato Bowl is perfect for meal prep. You can prepare the components in advance and store them separately in airtight containers. Roast the sweet potatoes, cook the quinoa, and chop the vegetables ahead of time. When you’re ready to eat, simply assemble the bowl and drizzle with the peanut sauce. This way, you can enjoy a fresh and delicious meal any day of the week!
What can I substitute for peanut butter in the sauce?
If you’re looking for a substitute for peanut butter, there are several options. Almond butter or cashew butter can work well, providing a similar creamy texture and nutty flavor. For a nut-free option, try sunflower seed butter. It has a unique taste and is a great alternative for those with nut allergies. Just keep in mind that the flavor of the sauce may change slightly, but it will still be delicious!
Is the Thai Peanut Sweet Potato Bowl vegan-friendly?
Yes, the Thai Peanut Sweet Potato Bowl is entirely vegan-friendly! All the ingredients, including the sweet potatoes, quinoa, chickpeas, and peanut sauce, are plant-based. This makes it a fantastic option for vegans and anyone looking to enjoy a healthy, meat-free meal. You can feel good about serving this bowl to friends and family, knowing it caters to various dietary preferences!
How can I make the Thai Peanut Sweet Potato Bowl spicier?
If you love a little heat, there are several ways to spice up your Thai Peanut Sweet Potato Bowl. First, you can increase the amount of sriracha in the peanut sauce. Start with an extra teaspoon and adjust to your taste. Additionally, consider adding sliced jalapeños or red pepper flakes on top of the assembled bowl for an extra kick. You can also serve it with a side of spicy chili sauce for those who enjoy a fiery flavor!
Conclusion: Enjoying Your Thai Peanut Sweet Potato Bowl
In conclusion, the Thai Peanut Sweet Potato Bowl is a delightful and nutritious meal that brings together a variety of flavors and textures. From the sweet, roasted sweet potatoes to the crunchy vegetables and creamy peanut sauce, every bite is a celebration of taste. This bowl is not only satisfying but also packed with essential nutrients, making it a perfect choice for anyone looking to eat healthily.
As you enjoy your Thai Peanut Sweet Potato Bowl, remember that the beauty of this dish lies in its versatility. Feel free to customize it with your favorite proteins, vegetables, and toppings. Whether you’re preparing it for a quick lunch, a cozy dinner, or meal prepping for the week, this bowl is sure to impress.
Moreover, sharing this dish with family and friends can create a wonderful dining experience. The vibrant colors and delicious flavors are bound to spark joy and conversation at the table. So, gather your loved ones, serve up your beautifully assembled bowls, and enjoy the delightful flavors together!
Lastly, don’t forget to experiment and make this recipe your own. With each preparation, you can discover new combinations and flavors that suit your taste. Enjoy the process of cooking, and savor every moment spent creating and sharing your Thai Peanut Sweet Potato Bowl!
There’s something about the smell of rising dough, warm olive oil, and briny olives that instantly transports me. Maybe it’s childhood. Maybe it’s an old trip to Greece. Or maybe it’s just the power of honest food made slowly.
I first fell in love with olive bread at a small coastal café tucked along the edge of a cliff somewhere in southern Italy. I don’t even remember the name of the town, but I remember the bread. It was served warm, torn by hand at the table, dipped in rich local olive oil, and eaten between sips of wine and quiet conversation. There was nothing fancy about it. No butter. No sauces. Just rustic, crusty bread with dark green olives woven into its golden core. It was soft, fragrant, and deeply flavorful. I didn’t know bread could taste like that.
Years later, back in my own kitchen, I chased that memory. I experimented with flours, different yeasts, water temperatures, fermentation times. But the key turned out to be simplicity—and patience. Good olive bread doesn’t need bells and whistles. It needs time, warmth, and quality ingredients.
This recipe is the result of all that trial, error, and love. And I promise you: once you make it, you’ll never want to go back to store-bought again.
What Makes This Olive Bread So Special?
At its core, olive bread is a celebration of Mediterranean simplicity. It honors ingredients that have been staples for centuries—flour, water, oil, salt, and yeast—brought to life with one humble addition: olives.
But don’t be fooled by its simplicity. This bread is layered with depth. The exterior develops a beautiful golden crust while the interior stays pillowy and soft. As you slice into it, you’ll notice flecks of green and black olives peeking through, each one a burst of savory saltiness that complements the richness of the dough.
Ingredients Table
Ingredient
Quantity
Notes
Olive oil
4 tablespoons (60 ml)
Adds moisture and flavor
Dry yeast
1 tablespoon (10 g)
For a soft, risen dough
Salt
1 teaspoon
Enhances overall flavor
Warm water
1 1/3 cups (320 ml)
Activates the yeast
Plain flour
4 3/4 cups (570 g)
All-purpose flour works best
Optional Add-in:
1 cup chopped olives (black, green, or mixed) – folded into the dough before shaping
Directions
Activate the Yeast In a large bowl, mix warm water with dry yeast and let sit for 5–10 minutes until it becomes frothy.
Build the Dough Add olive oil and salt to the yeast mixture. Gradually add the flour, stirring with a wooden spoon or dough hook until a rough dough forms.
Knead and Rise Knead the dough on a floured surface for 8–10 minutes until smooth and elastic. Place in a lightly oiled bowl, cover, and let it rise for 1 to 1.5 hours or until doubled in size.
Add the Olives (Optional) If using olives, gently knead them into the dough after the first rise.
Shape and Proof Shape the dough into a round or oval loaf. Place on a baking sheet lined with parchment paper or into a floured banneton basket. Cover and let it rise again for about 30–45 minutes.
Bake to Golden Perfection Preheat your oven to 220°C (425°F). Bake the bread for 25–30 minutes, or until the crust is golden and the loaf sounds hollow when tapped on the bottom.
Cool and Slice Let the bread cool on a rack for at least 20 minutes before slicing. Serve warm or at room temperature.
Nutritional Information (Per Slice – Approx. 1/10 of Loaf)
Nutrient
Amount
Calories
~210 kcal
Protein
5 g
Fat
5.5 g
Carbohydrates
35 g
Fiber
1.5 g
Sodium
180 mg
The Perfect Contrast of Texture and Flavor
Olive bread balances the chewy structure of artisan loaves with the silky moisture of olive oil-enriched dough. Every slice delivers a satisfying bite: crisp crust, tender crumb, and a touch of brine from the olives. It’s not too dense. Not too light. Just right.
The olive oil adds not just flavor but also softness and moisture, giving the bread longer shelf life and a rich aroma that lingers in your kitchen long after it’s baked.
Baking Bread as Ritual, Not Just Recipe
There’s something meditative about making bread. Measuring, kneading, shaping—it forces you to slow down and connect. It’s tactile. Grounding. Alive. Yeast needs warmth and time to grow. Dough responds to your hands. Bread is not something you rush. It’s something you build.
Making olive bread, especially, feels almost sacred. From the moment the yeast blooms in warm water to when you fold in the olives and form your loaf, you’re participating in an ancient practice. It’s the kind of food that speaks in generations, not trends.
When it comes out of the oven—golden, cracked on top, steam rising—it’s more than food. It’s an offering.
Ways to Enjoy Olive Bread
This bread is wonderfully versatile. It’s flavorful enough to stand alone, but pairs beautifully with countless dishes. Here are some ideas to make the most of it:
1. Classic Olive Oil & Herbs Dip
Serve warm slices with a shallow bowl of extra virgin olive oil, a splash of balsamic vinegar, crushed garlic, and a pinch of dried oregano or rosemary.
2. Elevated Sandwiches
Use thick slices for grilled paninis with roasted vegetables, cheese, or even thinly sliced steak or chicken.
3. Soup’s Best Friend
Olive bread turns a simple bowl of tomato soup, lentil stew, or minestrone into a full meal.
4. Charcuterie Companion
Add it to a grazing board with cheeses, hummus, olives, grapes, and roasted nuts.
5. Rustic Breakfast
Toast it and top with avocado, poached eggs, or a drizzle of honey and feta for sweet-savory balance.
The Ingredients Matter—Choose with Care
Olives
You can use black olives, green olives, or a combination. Kalamata olives add depth, while green olives provide brightness and bite. Make sure they’re pitted and well-drained.
Flour
Plain all-purpose flour works well here, though you can substitute up to 25% with whole wheat for a heartier texture.
Olive Oil
This is the flavor anchor of the bread. Use a high-quality extra virgin olive oil for the dough—it adds subtle fruitiness and helps soften the crumb.
Yeast
Dry active yeast or instant yeast both work. The rise time is flexible depending on room temperature and how much depth of flavor you want from fermentation.
Frequently Asked Questions (FAQs)
Can I use whole wheat flour?
Yes, but don’t substitute all of the flour. Try using 25–30% whole wheat and the rest plain flour. This gives you added nutrition and a slightly nuttier taste without sacrificing softness.
How long does this bread stay fresh?
Stored in a sealed container at room temperature, it stays fresh for up to 3 days. You can extend shelf life by refrigerating it, though it’s best to reheat slices before serving.
Can I freeze olive bread?
Absolutely. Slice the bread after it cools and wrap it tightly in plastic wrap or foil. Freeze in a sealed bag for up to 2 months. Toast or bake from frozen when ready to eat.
Can I make it without a stand mixer?
Yes. This dough can easily be made by hand. The kneading takes a bit more time but is very manageable—and rewarding.
Can I add herbs or other flavors?
Definitely. Try adding chopped fresh rosemary, thyme, sun-dried tomatoes, roasted garlic, or even a pinch of chili flakes. These additions work beautifully with olives and enhance the Mediterranean vibe.
Is this bread vegan?
Yes. As long as you use plant-based toppings and fillings, the bread itself is 100% vegan. No dairy, no eggs—just pure plant-based simplicity.
Tips for Perfect Olive Bread
Don’t rush the rise. Let the dough rise fully—both after kneading and after shaping. This gives the bread a light, airy texture and allows flavor to develop.
Drain the olives well. Too much moisture can make the dough soggy or unstable. Pat olives dry with a paper towel before adding them.
Score the top. Before baking, use a sharp knife or blade to score the top of the dough. This helps it expand evenly and gives you that bakery-style look.
Use a baking stone or steel. If you have one, it helps create a beautifully crisp crust by conducting high, even heat from the bottom.
Steam the oven. Place a pan of water in the oven or spray water into the hot oven right before baking. This helps develop a crisp, golden crust.
Why Homemade Olive Bread is Worth the Effort
Making bread from scratch isn’t just about saving money or eating better. It’s about reconnecting with the roots of cooking—slowing down, working with your hands, feeding people something real.
Olive bread, in particular, holds a special kind of magic. It’s rustic yet elegant, simple yet layered, humble yet completely impressive. It makes the everyday feel a little more elevated.
Whether you serve it at a gathering or tear it apart on a quiet night with soup, it brings a sense of satisfaction no store-bought loaf ever could. It tastes like effort, like care, like something meant to be shared.
Conclusion: Bread That Brings People to the Table
At the end of the day, food is about more than flavor. It’s about comfort, memory, and connection. And that’s exactly what this olive bread delivers.
Every bite tells a story. Of old kitchens. Of passed-down traditions. Of sun-drenched countries where people gather for long meals and good bread. But mostly, it’s a story you get to write—every time you knead the dough, every time the loaf rises in your kitchen, every time you serve it still warm to the people you love.
So let your home smell like olives and flour. Let your hands get sticky with dough. Let your table be the place where this humble, perfect loaf lives its best life.
It started on a late summer evening in my little apartment kitchen, windows open, a slight breeze stirring the curtain. I wasn’t trying to impress anyone. I was just hungry. I had a pound of ground beef in the fridge and a few bell peppers that were just beginning to wrinkle. I diced what I had, added garlic, onion, a squeeze of tomato paste, and a dash of paprika—and within minutes, the aroma filled the room like a warm hug.
Then something funny happened. My neighbor, who lived across the hall and rarely spoke more than a polite hello, knocked on my door. He smiled awkwardly and said, “I was just wondering… what are you cooking? It smells incredible.”
That was the first time someone asked for a recipe I hadn’t even written down yet. That’s when I knew this dish was special. Simple ingredients, common pantry staples, but a flavor that turns heads—literally. Now, every time I make it, I remember that moment and smile. This isn’t just beef and peppers. This is the kind of food that builds community, starts conversations, and brings people together.
Bold Flavors, Simple Foundations
There’s something deeply satisfying about a meal that looks rustic but tastes like it came out of a street food stall in a busy city. This beef filling does exactly that. It’s not just food—it’s a celebration of texture, flavor, and aroma.
At its heart, this dish is about balance. The richness of ground beef meets the freshness of bell peppers, the sweetness of tomato sauce plays off the warmth of paprika, and a touch of garlic brings it all together. It’s the kind of meal you can serve in a wrap, spoon over rice, or even layer into a casserole.
And the best part? It’s fast. This is a 30-minute miracle you can whip up on a weeknight and still feel like a home-cooked hero.
Ingredients Table – For the Filling
Ingredient
Quantity
Notes
Vegetable oil
2 tablespoons (20 ml)
For sautéing
Ground beef
500 g
Use lean for less grease
Onion, chopped
1 medium
Yellow or white onion
Green peppers, chopped
3
Adds freshness and texture
Red peppers, chopped
3
For sweetness and color
Garlic, minced
3 cloves
Fresh is best
Tomato paste
1 teaspoon (20 g)
Adds depth and umami
Tomato sauce
2 tablespoons (25 g)
For richness
Paprika
1 teaspoon
Smoked or sweet based on taste
Directions – Bold Flavors in 6 Simple Steps
Heat the Oil In a large skillet over medium heat, add the vegetable oil and let it warm up.
Brown the Beef Add the ground beef and cook until browned, breaking it apart with a spoon. This should take about 5–7 minutes.
Add the Aromatics Stir in the chopped onion and cook for 2–3 minutes until softened. Then add the garlic and sauté for another 30 seconds until fragrant.
Add the Peppers Toss in the chopped green and red peppers. Cook for about 5–6 minutes, until they start to soften but still hold some crunch.
Flavor it Up Stir in the tomato paste, tomato sauce, and paprika. Mix thoroughly and let everything simmer together for 5 more minutes, allowing the flavors to marry.
Serve Hot Remove from heat and serve warm in wraps, stuffed into bread, over rice, or with roasted vegetables.
Nutritional Information (Per Serving, Approx. 1/4 of Recipe)
Nutrient
Amount
Calories
~320 kcal
Protein
24 g
Fat
22 g
Carbohydrates
10 g
Fiber
3 g
Sugars
5 g
Sodium
~450 mg
Why This Recipe Works Every Time
The magic of this beef filling lies not in any fancy technique or exotic ingredient—but in how familiar, versatile, and deeply satisfying it is.
1. Flavor Development through Simplicity
By browning the meat first, you develop a rich, caramelized base that anchors the flavor of the whole dish. The vegetables then absorb that flavor while contributing their own sweetness and crunch.
2. Versatile Sauce Elements
A little tomato paste adds a concentrated burst of umami, while tomato sauce lends a soft richness. These ingredients blend seamlessly with the spices to create a saucy coating that clings to every bite.
3. Color and Crunch from Fresh Peppers
Using both green and red peppers provides visual appeal and flavor contrast. The green peppers are grassy and fresh, while the red peppers offer subtle sweetness. Their crunch also gives texture to every spoonful.
4. Aromatic Power
Garlic and onion form the backbone of any great savory recipe, and here, they shine. Together, they elevate the beef from simple to addictive.
Where This Dish Belongs on Your Table
One of the beauties of this beef filling is its adaptability. It’s not confined to one culture, meal, or time of day. Here are just a few ways you can bring it to life:
Stuffed into pita or flatbread with lettuce, pickles, and a drizzle of tahini or yogurt sauce
Wrapped in tortillas for a fusion-style taco or burrito
Spooned over rice or couscous with a side salad
Tucked into a baked potato for a hearty lunch
Served with eggs for a savory breakfast hash
Used as a filling for empanadas or hand pies
It’s the kind of filling that stretches a little meat a long way, making it budget-friendly and family-approved.
Healthier Comfort in Every Bite
Despite being hearty and indulgent in flavor, this dish is surprisingly balanced. Lean ground beef offers protein and iron, while bell peppers contribute vitamin C, antioxidants, and fiber. You’re using a minimal amount of oil, and there’s no sugar or dairy added, which makes it great for many dietary approaches.
You can even tweak it based on your health goals:
Lower the fat by using ground turkey or chicken.
Boost the veggies by adding mushrooms, zucchini, or spinach.
Make it spicier with chili flakes or cayenne.
Keep it low-carb by serving it in lettuce wraps or over cauliflower rice.
Frequently Asked Questions (FAQs)
Can I make this ahead of time?
Absolutely. In fact, the flavor gets better as it sits. You can make it up to 3 days ahead and store it in an airtight container in the refrigerator. Reheat gently on the stove or in the microwave.
Can I freeze this filling?
Yes. This beef filling freezes beautifully. Cool it completely, then portion into freezer-safe bags or containers. It will keep for up to 2 months. Thaw overnight in the fridge and reheat before serving.
What other vegetables can I use?
You can customize this recipe to use whatever’s in your fridge. Mushrooms, zucchini, corn, spinach, or even chopped kale work well. Just adjust the cooking time depending on how soft or firm you want your veggies.
Can I make this vegetarian?
Definitely. Substitute the ground beef with cooked lentils, finely chopped mushrooms, or a plant-based meat alternative. Keep the same spices and aromatics, and you’ll still get that irresistible depth of flavor.
Is this dish spicy?
Not inherently. The paprika gives warmth but not heat. If you love spice, add chili powder, cayenne, or diced jalapeños to kick it up a notch.
What’s the best way to serve this for a crowd?
This filling is perfect for a build-your-own meal setup. Set out a platter of tortillas, lettuce cups, rice, or baked potatoes, and let everyone assemble their own. Add bowls of toppings like shredded cheese, hot sauce, chopped herbs, or hummus for extra flair.
Can I double the recipe?
Yes! This recipe scales up easily. Just make sure to use a large enough pan so the beef browns instead of steaming. You may need to cook the meat in batches if your skillet is small.
Does it work for meal prep?
It’s ideal for meal prep. Cook a batch at the start of the week, portion it into containers with rice or veggies, and you’ve got lunch or dinner ready in minutes.
Flavor That Brings People Together
Food is more than nutrition. It’s memory, it’s connection, it’s emotion. And this dish? It delivers on all three.
There’s a reason it became a neighborhood legend in my building. The smell alone is an invitation. It says, “Come in, sit down, eat well.” It’s the kind of dish that gets passed down not because it’s fancy, but because it’s unforgettable.
You don’t need a gourmet kitchen. You don’t need exotic ingredients. You just need 30 minutes, a hot skillet, and a little faith in the magic of good food. Whether you’re feeding kids, hosting guests, or just trying to survive a long week—this recipe has your back.
Conclusion: A New Classic You’ll Return to Again and Again
In a world full of complex diets, trendy ingredients, and flashy food fads, it’s refreshing to come back to something simple. This beef filling is proof that you don’t need much to make something incredible. Just a handful of vegetables, quality meat, a few pantry staples, and a love for bold flavor.
So next time you’re standing in your kitchen, unsure of what to make, remember this recipe. Remember the sizzle, the aroma, and the way it makes your neighbors pause in the hallway. Cook it once, and you’ll understand why it’s earned its place at the table.
Some of the most unforgettable recipes don’t come from fancy cookbooks or polished food blogs. Sometimes, they come from quiet moments, passed down over a counter, whispered from one cook to another with a twinkle in the eye and a bit of flour on the cheek.
Years ago, while traveling through a small town, I wandered into a modest neighborhood bakery. It smelled like childhood—yeast, butter, and something else I couldn’t quite place. The baker, an older man with a slow, practiced grace, noticed my curiosity. I asked him what gave his bread such a deep, savory aroma.
He smiled, cracked open one of the warm loaves, and revealed a swirl of chickpeas, garlic, and red bell pepper folded into the dough like a hidden treasure. “This,” he said, “is the trick I teach only to those who ask.”
He never gave me measurements. He didn’t write anything down. He just showed me—step by step—how something simple could become unforgettable. I went home, determined to recreate it. It took a few tries. But once I got it right, it became the kind of recipe that stops conversations and makes the whole kitchen smell like home.
Where Old-World Simplicity Meets Everyday Comfort
What makes this bread so special isn’t just the ingredients—it’s the intention behind it. It’s a humble dough, enriched slightly with milk and oil, nothing flashy. What transforms it into a showstopper is what’s hidden inside: a soft, buttery swirl of mashed chickpeas sautéed with garlic and red pepper.
It’s bread that feeds the soul.
The chickpea filling is rustic but brilliant. The texture is slightly creamy, the garlic adds warmth, the red pepper brings sweetness and color, and the butter ties it all together. When this mixture is layered into the dough and baked, the result is a golden loaf that’s tender, aromatic, and unlike anything most people have tasted.
It feels new, but it also feels old—like something your grandmother might have made if she had chickpeas and just the right kind of afternoon.
Ingredients Table
Ingredient
Quantity
Notes
Warm water
400 ml
Helps activate the yeast
Warm milk
200 ml
Adds richness to the dough
Sugar
10 g
Feeds the yeast
Vegetable oil
30 ml
For moisture in the dough
Instant yeast
8 g
For a quick and reliable rise
All-purpose flour
850 g
Main structure of the bread
Soft butter
150 g
Spread into dough before filling
Cooked chickpeas
200 g
Slightly mashed for texture
Red bell pepper
100 g
Finely chopped
Garlic
4 cloves
Minced for aromatic depth
Salt
To taste
Adjust based on preference
Directions
Activate the Yeast: In a large bowl, mix the warm water, warm milk, sugar, and instant yeast. Let it rest for 5–10 minutes until frothy.
Make the Dough: Add vegetable oil and gradually incorporate the flour while mixing. Knead for 8–10 minutes until you have a soft, elastic dough. Cover with a cloth and let it rise in a warm place for 1 hour.
Prepare the Filling: While the dough is rising, sauté the garlic and chopped red bell pepper in a bit of oil until fragrant. Add the mashed chickpeas and cook for a couple of minutes. Season with salt and let cool.
Shape the Dough: Punch down the risen dough and divide into equal portions. Roll each into a flat rectangle.
Layer with Butter and Filling: Spread a thin layer of soft butter over the surface of the dough, then evenly distribute the chickpea filling on top.
Roll and Shape: Roll up the dough tightly into logs. Shape as loaves, rolls, spirals, or your preferred style. Place on a parchment-lined or greased baking tray.
Final Proof: Let the shaped dough rise again for 30–45 minutes until noticeably puffy.
Bake: Bake in a preheated oven at 180°C (350°F) for 25–30 minutes, or until golden brown and cooked through.
Cool and Serve: Allow to cool slightly before serving. Best enjoyed warm, but keeps well for 1–2 days at room temperature.
Nutritional Information (Per Serving – Approx. 1/12 of Recipe)
Nutrient
Amount (Approx.)
Calories
290 kcal
Protein
7 g
Fat
9 g
Carbohydrates
42 g
Fiber
3.5 g
Sugars
1.5 g
Sodium
Varies (based on added salt)
Why This Recipe Works So Well
1. A Soft Dough That Delivers
The base dough is enriched with both warm milk and a bit of oil, which ensures tenderness and elasticity. It’s soft to the touch and bakes up with a delicate crumb that’s perfect for soaking in flavor from the filling.
The combination of milk and water in the liquid base makes it more moist and rich than traditional lean doughs. This is essential when pairing it with a filling—you need structure, but you also need softness to let the layers melt together.
2. The Savory Filling That Surprises Everyone
Chickpeas may not be the first thing people expect to find inside bread, but once they taste this version, they’ll understand. Mashed slightly and sautéed with garlic and bell pepper, chickpeas become creamy, earthy, and hearty—without being heavy.
The peppers provide sweetness and freshness, balancing the richness of the butter. Garlic gives the entire loaf an irresistible aroma that wafts through the house while it bakes. Every bite becomes a layered experience of texture and taste.
3. The Buttery Binding Trick
Here’s where the baker’s wisdom really shines: before layering in the chickpea filling, you spread soft butter across the rolled-out dough. Not melted butter—softened. This little trick adds richness, but it also helps seal the dough, allowing the filling to stick and infuse each layer.
When baked, the butter creates just enough steam inside to puff the layers while binding the savory filling to the dough. The result is soft, layered perfection.
How to Serve It: Endless Possibilities
This bread is incredibly versatile. It’s satisfying enough to stand on its own but also plays beautifully alongside other dishes. Here are a few of the best ways to serve it:
Fresh out of the oven with a drizzle of olive oil or tahini
Sliced and served with a bowl of lentil soup or stew
Grilled into a pressed sandwich with fresh greens and tomatoes
Toasted and dipped into olive oil with za’atar or herbs
As a hearty breakfast alongside eggs or shakshuka
You can even use the same dough and filling method to shape the bread into spirals, braids, or pull-apart rolls for entertaining.
The Nutrition Bonus: A Smart Indulgence
Yes, it’s delicious—but it’s also surprisingly nourishing.
Chickpeas bring fiber, plant-based protein, and complex carbohydrates to the table. They help keep you full longer and stabilize blood sugar, especially when combined with the slow-digesting starches in the bread.
Garlic and bell pepper contribute antioxidants and anti-inflammatory compounds, while the butter (used in moderation) adds flavor and richness without overwhelming the dish.
If you want to go a little lighter, you can use less butter or substitute a plant-based spread. But honestly? Sometimes a little real butter goes a long way in making a dish feel complete.
Frequently Asked Questions (FAQs)
Can I use canned chickpeas?
Yes, canned chickpeas work perfectly. Just rinse and drain them well before mashing. If you have dried chickpeas and time to soak and cook them from scratch, go for it—they’ll offer a firmer texture and richer flavor.
What kind of flour should I use?
All-purpose flour works beautifully and keeps the texture soft. You can substitute up to 30% of the flour with whole wheat for added fiber and a slightly nuttier flavor, though the bread will be a bit denser.
Can I make this dairy-free?
Yes. You can replace the milk with any unsweetened plant-based milk (like oat or almond milk) and use a dairy-free butter substitute or olive oil instead of butter. Just note that it may slightly change the richness.
Can I freeze it?
Absolutely. After baking and cooling, you can slice the bread and freeze it in a sealed bag for up to 2 months. Toast slices straight from the freezer, or reheat the whole loaf at 160°C (325°F) wrapped in foil.
Can I add other ingredients to the filling?
Yes! This recipe is wonderfully flexible. Try adding finely chopped spinach, caramelized onions, crushed chili flakes, or even sun-dried tomatoes. The chickpea base can handle a variety of flavor profiles.
How long does it keep?
Stored at room temperature in an airtight container or wrapped in foil, the bread stays soft for up to 2 days. For longer storage, refrigerate for up to 5 days and reheat before serving.
Can I shape it differently?
Definitely. You can bake it as one large loaf, divide the dough into mini loaves, twist it into a braid, or roll it into pinwheels for a more decorative presentation.
Why This Bread Deserves a Place in Your Recipe Collection
Not every bread needs to be airy and delicate. Sometimes, the best bread is the one that fills your kitchen with the smell of garlic, makes your family look up from their phones, and leaves your guests asking for seconds.
This chickpea-stuffed bread is humble and hearty—but deeply satisfying. It’s the kind of recipe that builds memories. A recipe that you can make with your kids on a rainy day. A recipe that carries tradition in a new form. A recipe that quietly becomes your go-to when you want to feed and comfort at the same time.
Conclusion: A Hidden Gem You’ll Want to Share
Some recipes come and go. Others stay with you because they speak to something deeper than taste—they speak to care, to effort, to creativity. This savory bread is one of those recipes.
Whether you’re a seasoned baker or a weekend kitchen adventurer, this loaf will surprise you. Not because it’s difficult. But because something so simple, so honest, and so practical can still taste so unforgettable.
Give it a try, and don’t be surprised if your family gathers around the kitchen before it’s even out of the oven. Just smile and say, “It’s a trick I learned from a baker.”
It was one of those mornings. The kind where you wake up a little later than usual, the coffee takes too long to kick in, and your stomach reminds you—loudly—that it needs something comforting.
I remember opening the fridge, half-hoping there would be a breakfast miracle inside. But the shelves were nearly bare. A few eggs. A couple of potatoes. Some leftover bacon from the weekend. Half a block of cheddar that had seen better days. It wasn’t much, but it was enough.
I didn’t follow a recipe. I grated the potatoes, stirred in the cheese and bacon, added a bit of flour and milk, cracked in the eggs, and hoped for the best. The batter sizzled as it hit the pan, and within minutes, my kitchen filled with the smell of golden crust, melty cheese, and smoky bacon.
That was the first time I made what’s now become a weekend staple in my home. A quick, crispy, savory breakfast that never fails to satisfy—made from just two potatoes, two eggs, and a few simple extras.
Why This Recipe Works (and Why You’ll Come Back to It Again and Again)
You know a recipe is special when it’s not just delicious—it’s dependable. This one is just that. It’s the kind of breakfast that feels indulgent but comes together in under 30 minutes. It uses pantry staples. It’s flexible. And it works every time.
Whether you call them fritters, patties, pancakes, or savory breakfast cakes, the magic here is in the balance. The potatoes form the crisp outer shell, while the eggs and flour give structure and hold everything together. Cheese adds richness, bacon brings salt and texture, and the final product is golden on the outside and fluffy in the center.
It’s breakfast comfort food—but with enough structure and protein to actually keep you full.
Ingredients Table
Ingredient
Quantity
Notes
Potatoes, peeled and grated
2 medium (about 300 g)
Squeeze out excess moisture before using
Bacon, cooked and crumbled
6 strips
Cooked crisp for texture
Cheddar cheese, shredded
1 cup (100 g)
Use sharp cheddar for more flavor
Parmesan cheese, grated
¼ cup (25 g)
Adds saltiness and crispiness
Eggs
2 large
Binds the mixture
All-purpose flour
¼ cup (30 g)
Helps form structure
Milk
½ cup (120 ml)
Adds moisture to the batter
Butter, melted
2 tablespoons
For richness
Baking powder
1 teaspoon
Helps lighten the texture
Salt
½ teaspoon
Adjust to taste
Black pepper
½ teaspoon
Adds subtle spice
Green onions or chives
2 tablespoons (optional)
For freshness and color
Directions
Preheat and Prepare Preheat a skillet over medium heat and lightly grease with butter or oil. In the meantime, squeeze the grated potatoes in a clean towel to remove excess moisture.
Mix the Batter In a large bowl, combine the grated potatoes, crumbled bacon, cheddar, parmesan, flour, baking powder, salt, pepper, and optional green onions.
Add Wet Ingredients In a separate bowl, whisk together the eggs, milk, and melted butter. Pour this into the dry mixture and stir until well combined.
Cook the Fritters Scoop about 1/4 cup of the mixture into the hot skillet and flatten slightly with a spatula. Cook for 3–4 minutes per side, or until golden brown and crisp.
Serve Warm Remove from pan and place on paper towels to drain. Serve hot on its own or with sour cream, hot sauce, or poached eggs on top.
Nutritional Information (Per Serving – Approx. 1 of 4 fritters)
Nutrient
Amount (Approx.)
Calories
280 kcal
Protein
12 g
Fat
18 g
Carbohydrates
18 g
Fiber
1.5 g
Sugars
1 g
Sodium
~580 mg
A Closer Look: Why Each Element Matters
Potatoes: The Crunch and the Canvas
Grated potatoes serve as the foundation of the recipe. When wrung out properly, they crisp up beautifully on the skillet, creating a golden crust while keeping a soft bite inside. They carry the flavor of the cheese and bacon and add that beloved breakfast hash brown vibe.
Eggs: The Unsung Binder
Two eggs are all it takes to pull everything together. They bind the mixture without weighing it down, ensuring your fritters are light, moist, and easy to flip.
Bacon and Cheese: The Flavor Bomb
Let’s be honest—this wouldn’t be the same without the salty, smoky kick of bacon and the creamy melt of cheddar. These two ingredients bring depth to every bite. Parmesan adds a bonus umami edge and helps crisp the exterior even more.
Flour and Baking Powder: A Bit of Lift
Flour gives structure while baking powder adds a subtle lift, helping the fritters puff just enough to stay light and satisfying.
Butter and Milk: For Moisture and Richness
Melted butter infuses the batter with richness, while milk softens the mix and helps the interior stay tender.
Optional Herbs: That Fresh Finish
A sprinkle of chopped green onions or chives can transform the flavor, adding a bright contrast to the savory base. Optional—but highly recommended.
Why This Breakfast Recipe Stands Out
1. It’s Quick Enough for Weekdays, Special Enough for Weekends
You can prep and cook these in about 25 minutes. That’s faster than most brunch orders. But the result? Restaurant-quality texture and flavor. They look impressive, taste incredible, and feel like a treat—even when made in your pajamas.
2. It’s Budget-Friendly and Accessible
No fancy ingredients. No specialty tools. This recipe is built from staples you probably already have in your fridge and pantry. It’s a great way to use up leftover bacon, cheese, or herbs. And with just two eggs and two potatoes, it’s a full meal for a few dollars.
3. It’s Kid-Approved and Crowd-Pleasing
Whether you’re cooking for little ones, picky eaters, or brunch guests, this recipe hits all the right notes: cheesy, crispy, warm, and familiar. You can serve them plain, with a dipping sauce, or topped with a fried egg or sour cream.
Serving Ideas to Elevate Your Breakfast
With sour cream and chopped chives for a creamy, herby finish
Topped with poached eggs and hot sauce for a brunch-style dish
Served alongside a fresh salad or avocado slices for balance
Dipped in sriracha mayo, ranch, or yogurt-garlic sauce
With a side of fruit and coffee for the perfect weekend spread
Frequently Asked Questions (FAQs)
Can I make these ahead of time?
Yes. You can prepare the batter ahead and keep it in the fridge for up to 12 hours. You can also cook the fritters and reheat them in a skillet or oven. Avoid microwaving as it can soften the crispiness.
Can I bake them instead of frying?
Absolutely. While pan-frying gives you that golden crisp edge, you can bake them at 200°C (400°F) for about 20–25 minutes on a parchment-lined tray. Flip halfway through to ensure even browning.
What can I use instead of bacon?
Cooked sausage, chopped turkey, or even sautéed mushrooms work well. For a vegetarian version, omit the meat entirely and consider adding more cheese or veggies like spinach or zucchini.
Can I use sweet potatoes?
Yes. Sweet potatoes add a slightly sweeter note and work beautifully with cheese. Just be sure to squeeze out any extra moisture before mixing.
How do I keep them from falling apart?
Make sure to squeeze the grated potatoes dry and don’t overmix the batter. Also, ensure your skillet is properly preheated and don’t flip too early—let the underside get crisp before turning.
Can I freeze them?
Yes. Let the fritters cool completely, then store in a freezer-safe container with parchment between layers. Reheat from frozen in the oven or toaster oven for best results.
Are they gluten-free?
As written, this recipe contains flour, but you can easily make it gluten-free by swapping in a 1:1 gluten-free flour blend or oat flour. The structure remains solid, and the taste is just as good.
The Joy of Small Ingredients with Big Impact
The beauty of this recipe lies in its modesty. Two eggs. Two potatoes. A bit of cheese and bacon. Somehow, these simple ingredients come together to create something more than the sum of their parts.
It’s not just about what’s in the bowl. It’s about what it becomes: a warm, satisfying meal that fills the kitchen with comforting smells and gives you a quiet moment of joy before the day begins.
It’s about using what you have, not overthinking it, and ending up with something that feels intentional. Something that tells your family—or just yourself—that today is worth starting slowly and deliciously.
Conclusion: Your New Go-To Breakfast Staple
This recipe is more than just a quick breakfast. It’s a reminder that great food doesn’t have to be complicated. That creativity can live in simple ingredients. That comfort and satisfaction can come from the quiet crackle of a fritter hitting a hot pan.
Once you try this “Two Potatoes & Two Eggs” breakfast, it might just become your default. The thing you whip up when mornings feel cold, when guests drop by unexpectedly, or when you simply want to treat yourself to something warm, cheesy, and crisp.
Because the best meals aren’t always the most elaborate—they’re the ones that make you feel good. And this recipe? It delivers, every single time.
For years, I rushed through breakfast like it was a checkbox. A piece of toast here. Maybe cereal if I had time. Mornings felt mechanical—something to survive, not enjoy. That all changed one quiet weekend.
It was a gray Sunday. The kind where the house feels still and the light is soft. I opened the fridge without a plan. A quarter of an onion. A few bell peppers. Some ham left from last night’s dinner. And eggs. I cracked four into a bowl, whisked them absentmindedly, tossed the rest in a pan, and waited.
What came out wasn’t just an omelette—it was an awakening.
It was golden and fluffy, with melted cheese oozing through sautéed vegetables and savory ham. It was warm in my hands and comforting in a way I hadn’t expected from such simple ingredients. It wasn’t just breakfast. It was nourishment, rhythm, and pause.
From that day on, my mornings changed. And this omelette? It became a ritual.
What Makes This Omelette So Special?
We all know omelettes. They’re classic. Quick. Familiar. But when made well, they can become so much more than an everyday dish. They become a canvas—soft, warm, and versatile.
This particular recipe brings balance. It’s neither overly rich nor too simple. It’s just right—loaded with color, texture, and flavor in every bite.
1. Balanced Flavor in Every Forkful
The sweetness of the red bell pepper. The crunch of the green. The bite of chopped onion, softened in butter. All of it wrapped around tender ham and gooey cheese, embraced by soft, fluffy eggs.
No single ingredient dominates. Instead, they work together—like instruments in a kitchen symphony. And that’s the difference between a good omelette and a great one.
2. Customizable for Everyone at the Table
This recipe is a starting point. From here, you can take it anywhere. Want it spicier? Add jalapeños or chili flakes. Want it meat-free? Swap the ham for mushrooms or spinach. Looking for a breakfast-for-dinner moment? Add crispy potatoes on the side and a simple salad.
The beauty is in its adaptability. You can cater it to every taste, diet, or mood—without losing what makes it great.
3. Texture That’s Comforting and Satisfying
No rubbery eggs. No dry edges. When made right, this omelette is buttery, creamy, and just the right level of melt-in-your-mouth. The eggs form a soft shell, barely holding together the savory goodness inside. Every bite is a contrast—silky, crisp, stretchy, soft.
And yes, it’s ready in minutes—but it tastes like something you thought about all morning.
Ingredients Table
Ingredient
Quantity
Notes
Butter
1 tablespoon
For sautéing and flavor
Onion, chopped
1/4
Use white or yellow
Green bell pepper, chopped
1/4
Adds freshness and crunch
Red bell pepper, chopped
1/4
Adds sweetness and color
Minced ham
1/2 cup
Cooked; can substitute with turkey ham
Eggs
4
Large; lightly beaten
Shredded cheese
1/2 cup
Any variety – cheddar, mozzarella, etc.
Directions
Sauté the Veggies and Ham Heat a non-stick skillet over medium heat. Add butter and let it melt. Sauté the chopped onion, green and red bell peppers for 2–3 minutes until slightly softened. Add the minced ham and cook for another 1–2 minutes. Remove mixture from the pan and set aside.
Cook the Eggs Wipe the skillet clean if necessary, reduce heat to medium-low, and pour in the beaten eggs. Swirl the pan to spread the eggs evenly. Cook without stirring until the eggs are mostly set but still slightly glossy on top.
Add the Filling Spoon the sautéed vegetable and ham mixture onto one half of the omelette. Sprinkle shredded cheese over the top.
Fold and Finish Carefully fold the omelette in half using a spatula. Cook for another 30 seconds to 1 minute to melt the cheese and finish cooking the eggs.
Serve Hot Slide the omelette onto a plate and serve immediately. Add fresh herbs or a dash of hot sauce if desired.
Nutritional Information (Per Serving – 1 Omelette)
Nutrient
Amount
Calories
~370 kcal
Protein
25 g
Fat
28 g
Carbohydrates
4 g
Fiber
0.8 g
Sugars
1.5 g
Sodium
~640 mg
Perfect for Every Occasion
You might think an omelette is just a quick breakfast fix, but this version wears many hats:
Weekday Breakfast
When mornings are rushed and you need something fast yet filling, this omelette delivers. You can prep the ingredients the night before, and have breakfast on the table in 10 minutes flat.
Brunch Showstopper
Hosting friends or family for brunch? Serve this alongside toast, roasted tomatoes, or even a mimosa bar. It’s visually impressive and endlessly customizable—making it a centerpiece without the fuss.
Post-Workout Refuel
Packed with protein and healthy fats, this omelette is a perfect recovery meal. Add some avocado or leafy greens and you’ve got a powerhouse plate.
Late-Night Comfort Food
We’ve all had those nights. This is the meal that satisfies without guilt. Quick, warm, and hearty—it’s what your body and mind need.
Common Questions About Omelettes, Answered
What’s the secret to a fluffy omelette?
The key is gentle heat and a light hand. Over-whisking the eggs or cooking them on high heat can lead to rubbery results. Let the eggs set slowly, and don’t overfill them—you want the fold to feel natural, not forced.
Can I use different vegetables or meats?
Absolutely. This recipe welcomes substitutions. Try mushrooms, zucchini, cherry tomatoes, or spinach. For meat, cooked bacon, turkey, sausage, or even leftover grilled chicken work well.
Is this recipe kid-friendly?
Yes. In fact, many parents use this as a gateway to introduce more vegetables to picky eaters. You can start with fewer ingredients or chop them finer for a smoother texture.
Can I make this omelette ahead of time?
While omelettes are best fresh, you can prep the filling ingredients in advance and store them in the fridge. Reheating a full omelette is possible but can slightly affect texture. If you need to make breakfast ahead, consider turning this into a baked egg casserole using the same ingredients.
Which cheese works best?
Cheddar is a classic choice, but mozzarella, Swiss, pepper jack, or feta all bring something different to the plate. It depends on the flavor you want—sharp, creamy, melty, or tangy.
Can I make it dairy-free?
Yes. Swap butter with olive oil or a plant-based margarine, and use a dairy-free cheese or omit it entirely. The veggies and ham will still give you plenty of flavor.
How do I know when the eggs are done?
The omelette should be set but still slightly glossy on top before folding. The residual heat will finish cooking the eggs after it’s off the stove. Overcooked eggs turn dry quickly, so aim for just-cooked rather than firm.
Tips for an Unforgettable Omelette Experience
Pre-cook fillings. Raw vegetables and meats release moisture and can make your omelette soggy. Sauté them first for better flavor and texture.
Don’t overcrowd. Less is more. Overloading the filling makes the omelette hard to fold and affects cooking.
Use a non-stick skillet. This gives you control, prevents sticking, and helps achieve a golden finish.
Let the eggs rest after cooking. Just a minute or two helps everything settle, making slicing and serving easier—and tastier.
A Staple That Never Gets Old
The reason I keep coming back to this omelette isn’t just how easy it is. It’s how consistently satisfying it feels. Some meals fill you up. This one lifts you up.
Maybe it’s the way the onions soften in butter. Maybe it’s the contrast between melted cheese and crisped ham. Or maybe it’s the simplicity. The sense that, no matter how busy life gets, you can always take a few minutes to feed yourself something real.
In a world of complicated recipes and 12-step dishes, this omelette is refreshingly honest. It says: “Here, this is enough.”
And more often than not, it truly is.
Conclusion: A Golden Standard Worth Holding Onto
There’s a reason the omelette has survived generations, cultures, and cuisines. It’s versatile. It’s quick. It’s delicious. But more than that—it’s personal.
Whether you’re folding it for yourself on a quiet morning or flipping a skillet full of flavor for a table of loved ones, you’re taking part in a timeless tradition. A ritual of nourishment, care, and creativity.
This perfect omelette isn’t about precision—it’s about presence. About waking up, slowing down, and making something with your own two hands. It’s about starting the day with intention, one skillet at a time.
So next time you find yourself with a few eggs, some vegetables, and a little cheese—don’t hesitate. Make the omelette. Savor it. And let it remind you how good simple things can be.