Growing up, the smell of freshly baked bread was an invitation to gather around the table. In our home, bread was more than just a side—it was a symbol of warmth, connection, and nourishment. I remember my grandmother, who made everything from scratch, filling the house with the most delightful aromas as she kneaded dough with love and patience. There was something magical about that moment when she pulled the warm loaf from the oven, its golden crust crackling as we eagerly waited to slather it with butter.
As time passed, I found myself seeking that same joy of homemade bread, but with a modern twist. The busy pace of life left little room for lengthy preparation, yet I still craved that comforting, warm loaf. It was then that I discovered the secret to making bread in minutes, using just four ingredients. The idea seemed almost too simple, but as soon as I tried it, I realized that sometimes, the best things come from simplicity.
This recipe is not just about bread; it’s about bringing back the warmth of home, the joy of creating something from scratch, and the satisfaction of enjoying a fresh, homemade loaf in no time at all. This quick and easy bread can be made in a matter of minutes, without the need for complex ingredients or hours of waiting. Whether you’re looking for a companion to your morning coffee or a warm addition to your evening meal, this bread delivers on all fronts.
The Allure of Homemade Bread: More Than Just Food
There’s something deeply satisfying about the act of making bread. For centuries, people have relied on bread as a staple food, providing nourishment and comfort in equal measure. Bread has been at the heart of every culture, every tradition. In fact, many of us can trace the history of our families back to the kitchen, where bread-making was an essential part of daily life.
What’s so special about this 4-ingredient bread is that it cuts through all the complexity. It’s a simple recipe that anyone can make, whether you’re an experienced baker or a complete beginner. In the past, bread making was a lengthy process—dough had to rise, kneading took time, and the oven had to be preheated for ages. But today, with just a few ingredients and a bit of effort, you can enjoy the same comforting satisfaction in a fraction of the time. It’s like reclaiming that sense of home and comfort with ease.
This bread isn’t just about convenience; it’s about bringing the feeling of a fresh-baked loaf to your kitchen without the hassle. It’s about sitting down with your family or friends and sharing a simple moment of joy, with a soft, fluffy piece of bread in hand. It’s these small moments that make all the difference in our busy lives.
Ingredients:
Ingredient
Amount
Flour
450 grams (16 oz)
Vegetable oil
2 tablespoons (30 ml)
Hot water
240 ml (1 cup)
Salt
To taste
Directions:
Combine Dry Ingredients: In a large mixing bowl, sift the flour and add salt to taste. Stir to ensure even distribution.
Add Wet Ingredients: Gradually pour the vegetable oil into the flour mixture. Then, slowly add the hot water, stirring continuously until a dough begins to form.
Knead the Dough: Transfer the dough onto a lightly floured surface and knead for 3-5 minutes, until smooth and elastic.
Shape the Dough: Roll the dough into your preferred shape, whether round, oval, or smaller portions for rolls or flatbreads.
Cook the Bread: Heat a skillet or frying pan over medium heat and lightly grease it with a bit of oil. Place the dough into the hot pan and cook each side for about 3-4 minutes until golden brown and fully cooked.
Serve and Enjoy: Remove the bread from the pan, allow it to cool slightly, and serve. This simple bread pairs beautifully with breakfast spreads, butter, or as a delightful side for tea time.
Nutritional Information:
Nutrient
Amount (per serving)
Calories
140 kcal
Protein
3 g
Carbohydrates
28 g
Dietary Fiber
1 g
Sugars
0 g
Fat
3.5 g
Saturated Fat
0.5 g
Sodium
250 mg
Calcium
10 mg
Iron
1.5 mg
Why This Simple Bread Is Perfect for Any Occasion
This bread recipe is incredibly versatile. It’s perfect for breakfast, a snack, or as a side dish at dinner. There are few things as comforting as enjoying a slice of fresh bread with a steaming cup of tea or coffee. The texture is light and fluffy, making it the perfect companion for spreads like butter, jam, or honey. Whether you choose to keep it plain or get creative with toppings, this bread adapts to your preferences, elevating any meal.
The beauty of this recipe lies in its simplicity. It requires only four common ingredients that are likely already in your pantry, making it a perfect solution when you’re pressed for time but still want to enjoy something homemade. No yeast, no long rising times, just a quick, easy dough that you can shape and cook right away.
Another great thing about this bread is that it’s quick to make but doesn’t compromise on flavor or texture. The vegetable oil gives it a soft, tender crumb, while the hot water helps bring everything together smoothly. The result is a light, airy bread with a subtle richness that pairs perfectly with just about anything. Whether you use it to soak up your favorite soup or serve it with a savory meal, it’s bound to become a household favorite.
Frequently Asked Questions (FAQs)
Q: Can I use different types of flour for this recipe? A: Absolutely! While this recipe works best with all-purpose flour, you can experiment with whole wheat flour or gluten-free flour if you prefer. Keep in mind that different flours may change the texture slightly, so you may need to adjust the amount of water or oil slightly.
Q: Can I make this bread ahead of time? A: This bread is best served fresh, as it tends to dry out a bit after a day or two. However, you can store any leftovers in an airtight container for up to 2 days. To revive the bread, simply reheat it in the oven for a few minutes.
Q: How can I add extra flavor to this bread? A: This bread is quite neutral, making it perfect for both sweet and savory pairings. To add more flavor, you can mix in herbs like rosemary or thyme, or grated cheese for a savory twist. For a sweet version, consider adding a touch of cinnamon or nutmeg to the dough.
Q: Can I make this bread into rolls? A: Yes, absolutely! Simply divide the dough into smaller portions and shape them into rolls before cooking. Keep in mind that smaller rolls will cook faster, so check them after 10-12 minutes of cooking.
Q: Do I need to let the dough rise? A: No, this recipe doesn’t require any rising time, which is one of the reasons it’s so quick and easy. The dough comes together quickly, and you can begin cooking it immediately.
The Beauty of Baking: How Simple Ingredients Create Something Special
Baking bread is an act of love. It’s one of the few ways we can take something simple—like flour, oil, and water—and transform it into something that nourishes both the body and soul. This simple bread recipe is a reminder that we don’t need extravagant ingredients or complicated techniques to create something that feels special. Sometimes, the most profound pleasures in life come from the simplest things, like sharing a warm loaf of bread with those we love.
Every time you make this bread, you’re participating in a tradition that spans generations. The method may be simpler now, but the satisfaction is the same. Whether you enjoy it as part of a family breakfast or as a quick snack during the day, this bread brings the joy of homemade goodness to your table in no time at all. It’s a recipe that’s perfect for any occasion, a delicious reminder that good things don’t always require a lot of time or effort.
Conclusion: A Simple Bread, a Big Impact
In our fast-paced world, we often forget the beauty of simplicity. This 4-ingredient bread recipe is a perfect reminder that not everything needs to be complicated to be enjoyable. It offers a way to bring the warmth and comfort of homemade bread into your home without spending hours in the kitchen.
Whether you’re looking to satisfy your hunger with something comforting or simply want a quick and easy recipe to impress guests, this bread delivers on both taste and convenience. It’s more than just food; it’s about creating moments of connection, warmth, and nourishment that will stay with you long after the last bite.
The next time you’re in need of a fresh, homemade bread that doesn’t require a lot of time or ingredients, turn to this simple recipe. It will become a go-to in your kitchen—just like the bread that brought my family together all those years ago. After all, bread has always been more than just a side dish; it’s the heart of the meal.
When I was growing up, mealtime was always a family affair. Whether it was a bustling weeknight or a calm Sunday evening, the kitchen became a place where we gathered, shared stories, and enjoyed a homemade meal that made us feel whole. One dish that always stood out during those cozy family dinners was a simple, yet delicious potato skillet. My mother had a way of transforming humble ingredients into a warm, flavorful meal that everyone loved. It was the kind of dish that brought a sense of comfort and satisfaction without being complicated or fussy.
Over time, I began experimenting with the flavors and textures that made those moments around the dinner table so memorable. This recipe, Better Than Pizza: The Ultimate Veggie-Packed Potato Skillet, is my modern take on that childhood favorite. It’s a dish that brings the same warmth and joy but with a fresh, veggie-packed twist that delivers the ultimate balance of flavor and nutrition.
While it may not be pizza, it’s every bit as satisfying. The crispy potatoes combined with vibrant, tender vegetables make for a comforting, easy-to-make meal that you can enjoy any day of the week. It reminds me of those nights when we would sit around the table together, full of laughter and conversation, enjoying something simple yet extraordinary. It’s a recipe that not only nourishes your body but also fills your heart.
Why This Dish is More Than Just a Meal
In a world where meals are often rushed or overly complicated, this potato skillet offers a refreshing change. It’s one of those recipes that reminds us that sometimes the best meals are the simplest. There’s a beauty in the way potatoes, onions, carrots, red peppers, and scallions come together to create something greater than the sum of its parts. This dish is the epitome of comfort food with a healthy twist.
As much as I love elaborate meals, there’s something deeply satisfying about preparing a dish that uses fresh, everyday ingredients and doesn’t require hours of prep. You can make this dish in under 30 minutes, which means it’s the perfect solution for a busy day when you want a home-cooked meal that doesn’t take too much time or effort. Whether it’s a busy workday or a lazy weekend, this veggie-packed potato skillet is a simple yet hearty dish that will make you feel nourished and content.
Ingredients:
Ingredient
Amount
Potatoes (grated)
3 medium
Onion (finely chopped)
1
Vegetable oil
3 tablespoons (20 ml)
Carrot (grated)
1
Red pepper (chopped)
1
Salt
1 teaspoon
Black pepper
1 teaspoon
Scallions (finely chopped)
1 bunch
Directions:
Prepare the Ingredients: Start by grating the potatoes and carrot. Finely chop the onion, red pepper, and scallions to ensure everything cooks evenly.
Sauté the Onion: In a large skillet, heat the vegetable oil over medium heat. Add the chopped onion and sauté for about 2-3 minutes, until softened and aromatic.
Cook the Potatoes and Carrot: Add the grated potatoes and carrot to the skillet. Season with salt and black pepper, and spread the mixture evenly in the skillet. Cook for 8-10 minutes, stirring occasionally, until the potatoes and carrots begin to turn golden and crisp up.
Add the Red Pepper: Once the potatoes and carrots are cooked, stir in the chopped red pepper. Continue cooking for another 3-4 minutes, allowing the peppers to soften but still retain some crunch.
Finish with Scallions: Sprinkle the finely chopped scallions over the skillet and mix them into the vegetables. Cook for another 1-2 minutes until the scallions have softened and become fragrant.
Serve and Enjoy: Once the veggies are cooked to your desired crispiness, remove the skillet from heat. Serve the veggie-packed potato skillet warm as a hearty meal or a savory side dish.
Nutritional Information:
Nutrient
Amount (per serving)
Calories
180 kcal
Protein
3 g
Carbohydrates
35 g
Dietary Fiber
5 g
Sugars
6 g
Fat
7 g
Saturated Fat
1 g
Sodium
300 mg
Vitamin A
850 IU
Vitamin C
35 mg
Calcium
30 mg
Iron
1.5 mg
The Versatility of Potatoes: More Than Just a Side Dish
One of the reasons I love this recipe is because of the humble potato. Potatoes often get a bad rap for being too starchy or heavy, but they are far more versatile and nutritious than many people realize. Not only are potatoes an excellent source of vitamin C, but they are also rich in potassium, which is essential for maintaining healthy blood pressure levels and proper heart function. When paired with fresh vegetables, potatoes become a nutrient-dense foundation for a filling meal.
The best part about potatoes is that they can be easily adapted to different cooking methods and flavor profiles. From mashed potatoes to roasted wedges, and now in this skillet, they take on whatever seasoning or ingredients you pair them with. In this recipe, the potatoes are grated, which helps them cook faster and absorb the flavors of the other vegetables and seasonings. The result is a crispy, golden crust with a tender, flavorful interior that will leave you craving more.
The Power of Vegetables: Boosting Flavor and Nutrition
While the potatoes are the star of the show, the vegetables in this recipe are equally important. Carrots, red peppers, onions, and scallions not only provide vibrant color and texture but also pack in essential vitamins and minerals that contribute to a balanced diet.
Carrots are a fantastic source of vitamin A, which supports eye health, and they add a natural sweetness that contrasts beautifully with the savory potatoes. Red peppers are high in vitamin C, which boosts immunity and helps the body absorb iron. Onions and scallions provide antioxidants and compounds that support heart health and may even help reduce inflammation.
By including a variety of vegetables in this dish, you’re not just adding color and flavor, you’re creating a nutrient-rich meal that supports overall well-being. This is what makes the veggie-packed potato skillet so appealing—it’s a wholesome, filling meal that’s also light on the stomach and rich in vitamins, minerals, and fiber.
Perfect for Any Occasion: A Flexible, Crowd-Pleasing Dish
Whether you’re looking for a quick weeknight dinner, a side dish for a family gathering, or even a hearty breakfast, this veggie-packed potato skillet fits the bill. The beauty of this recipe is in its simplicity and adaptability. You can serve it alongside your favorite protein, enjoy it on its own, or even top it with a fried egg for an extra protein boost.
What’s more, this dish can easily be customized to suit your preferences. If you’re a fan of spicier foods, you can add some chili flakes or hot sauce to give it a bit of heat. For those who love cheese, you can sprinkle some grated cheese on top towards the end of cooking, letting it melt and create a deliciously gooey topping. The possibilities are endless, and you can make it your own.
Frequently Asked Questions (FAQs)
1. Can I make this dish ahead of time? Yes, you can prepare this dish in advance and store it in the fridge for up to 2-3 days. To reheat, simply warm it up in a skillet over medium heat until heated through. It makes for an easy and tasty meal prep option.
2. Can I add more vegetables to this dish? Absolutely! This recipe is versatile and can be modified to include any vegetables you like. Consider adding mushrooms, zucchini, or spinach for extra flavor and nutrition.
3. Can I make this recipe vegan? Yes, this recipe is naturally vegan. Just make sure to use plant-based oil and skip any dairy-based toppings like cheese or butter.
4. What can I serve this with? This veggie-packed potato skillet pairs wonderfully with a variety of dishes. Serve it as a side to roasted meats, grilled chicken, or fish. It’s also great with a fresh green salad or as a filling breakfast topped with a fried egg.
5. Can I use sweet potatoes instead of regular potatoes? Yes, you can substitute regular potatoes with sweet potatoes. Sweet potatoes will add a slightly sweeter flavor and extra nutrients like beta-carotene, which is great for eye health.
Conclusion: A Simple, Nourishing Meal for the Soul
Better Than Pizza: The Ultimate Veggie-Packed Potato Skillet is more than just a recipe—it’s a reflection of what it means to create something comforting and satisfying with simple ingredients. This dish takes me back to a time when food was all about connection, comfort, and love. It’s the perfect example of how you don’t need complex ingredients or techniques to create a meal that’s full of flavor, warmth, and nutrition.
This recipe is one that will always have a special place in my heart because it reminds me of the love and care my family put into every meal. As you make this dish, I hope it brings a bit of that same warmth and joy to your home. It’s not just about the food, but about the moments you share around the table with those you care about. Simple, nourishing, and delicious—this potato skillet is a meal that will bring people together, filling both stomachs and hearts with comfort.
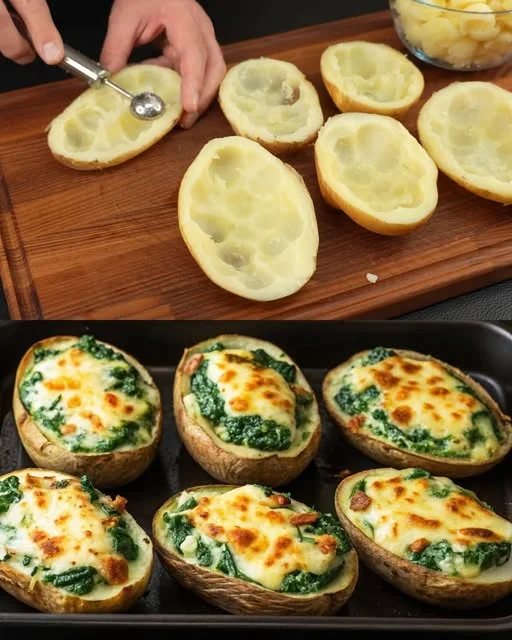
Some dishes have the power to bring us back to our roots. The smell of freshly cooked potatoes, the crisp warmth of sautéed garlic, and the tender spinach—these are the scents that remind me of family dinners growing up. My grandmother, a wonderful cook who always found joy in preparing simple yet nourishing meals, would often create dishes that spoke to both heart and stomach. One of the dishes she would make on those busy evenings when the family gathered was a humble combination of potatoes and spinach.
It wasn’t anything extravagant, but it was full of love. It was a meal that felt comforting, wholesome, and always just what we needed. The warmth of the potatoes paired with the earthy flavor of the spinach felt like a gentle hug. As I grew older, I realized that it wasn’t the complex or expensive ingredients that made the meal special, but the care with which it was prepared and the moments shared around the dinner table.
As I started cooking on my own, I wanted to recreate that feeling of warmth and nostalgia. And so, I put together my version of that simple, comforting dish: Savory Spinach & Potato Delight. It’s a recipe that takes me back to my roots while offering a fresh spin with the addition of bright seasonings like paprika and lemon juice. It’s not just about filling your stomach—it’s about filling your heart with the same comfort and joy that my grandmother instilled in me. This dish is a perfect balance of hearty potatoes and vibrant spinach, seasoned to perfection with a dash of lemon and fresh herbs.
The Benefits of Spinach and Potatoes: A Nutritional Powerhouse
This dish not only brings nostalgia but also packs a punch when it comes to nutrition. Both potatoes and spinach are incredibly versatile and nutrient-dense foods, making them ideal ingredients for a wholesome meal.
Potatoes, often unfairly labeled as “just carbs,” are actually a fantastic source of vitamins, minerals, and fiber when prepared in a healthy way. Rich in potassium, potatoes help maintain healthy blood pressure levels and ensure proper heart and muscle function. They also contain vitamin C, which supports immune health and enhances iron absorption from plant-based sources. While potatoes may have a reputation for being starchy, they are actually a complex carbohydrate that provides long-lasting energy—especially when paired with the fiber from spinach.
Spinach, on the other hand, is a nutritional powerhouse. This leafy green is a great source of iron, which is essential for transporting oxygen throughout the body. It also contains a wealth of vitamins A and K, both of which support eye health, skin regeneration, and bone strength. The antioxidants found in spinach, such as lutein and beta-carotene, also help reduce oxidative stress in the body, promoting overall health and longevity. Paired with potatoes, spinach creates a meal that is as beneficial as it is delicious.
Ingredients:
Ingredient
Amount
Potatoes (peeled and diced)
4 medium
Fresh spinach (washed and chopped)
4 cups
Olive oil
2 tablespoons
Garlic (minced)
2 cloves
Salt
1/2 teaspoon
Ground black pepper
1/4 teaspoon
Paprika
1/2 teaspoon
Red onion (finely chopped)
1 small
Lemon juice
1 tablespoon
Fresh parsley (chopped)
2 tablespoons
Directions:
Cook the Potatoes: Start by boiling the diced potatoes in a large pot of salted water. Cook for about 8-10 minutes, or until they are fork-tender. Drain and set aside.
Sauté the Aromatics: In a large skillet, heat the olive oil over medium heat. Add the minced garlic and chopped red onion, sautéing for about 2-3 minutes until softened and fragrant.
Add the Spinach: Toss in the fresh spinach, stirring occasionally until it wilts, which should take about 2 minutes.
Combine the Potatoes: Add the boiled potatoes to the skillet with the spinach and onion. Stir gently to mix all the ingredients together.
Season: Sprinkle the dish with salt, pepper, and paprika. Add a squeeze of lemon juice to brighten up the flavors, then stir everything together to coat evenly.
Garnish and Serve: Sprinkle freshly chopped parsley on top before serving for a burst of color and freshness. Serve warm as a side dish or light meal.
Nutritional Information:
Nutrient
Amount (per serving)
Calories
180 kcal
Protein
4 g
Carbohydrates
34 g
Dietary Fiber
5 g
Sugars
3 g
Fat
6 g
Saturated Fat
1 g
Sodium
220 mg
Vitamin A
1500 IU
Vitamin C
15 mg
Calcium
40 mg
Iron
2 mg
Why You Should Try This Dish
This Savory Spinach & Potato Delight is the perfect dish for anyone looking for a healthy, satisfying, and easy-to-make meal. Whether you’re looking for a quick weeknight dinner, a light side dish, or a nutrient-packed snack, this recipe has you covered. It’s simple enough to whip up on a busy day but flavorful enough to make you feel like you’re indulging in something special.
Additionally, this dish can easily be customized to suit your dietary preferences or available ingredients. It can be made vegan by substituting the olive oil for another plant-based fat, and you can even experiment with adding your favorite herbs and spices to elevate the flavor. It’s one of those recipes that allows you to get creative in the kitchen while still keeping things healthy and balanced.
But beyond its nutritional value and versatility, what truly makes this recipe stand out is its simplicity. There’s something beautiful in the way that humble ingredients can come together to create a meal that’s comforting, satisfying, and nourishing all at once. And as you take each bite, you’ll likely find yourself thinking about the way food can bring us back to the heart of what truly matters—family, tradition, and shared memories.
FAQs About Savory Spinach & Potato Delight
1. Can I make this recipe ahead of time?
Yes, this dish is perfect for meal prep! You can make it in advance and store it in an airtight container in the fridge for up to 3-4 days. The flavors may even improve as they marinate together. When ready to serve, simply reheat in the microwave or on the stovetop until warmed through.
2. Can I use frozen spinach instead of fresh?
While fresh spinach offers the best texture and flavor for this dish, frozen spinach can certainly be used as an alternative. Just make sure to thaw and drain the spinach thoroughly to avoid excess moisture in the dish.
3. Can I add other vegetables to this recipe?
Absolutely! This recipe is incredibly versatile, so feel free to add in other vegetables like bell peppers, zucchini, or mushrooms to make it more hearty. Adding roasted tomatoes or sautéed leeks could also enhance the flavor profile.
4. How can I make this dish spicier?
If you prefer a bit of heat, you can easily adjust the spice level by adding chili flakes, hot sauce, or even diced fresh chili peppers to the dish. Paprika can also be substituted for smoked paprika for a deeper, smokier flavor.
5. Can I use a different type of potato?
While I recommend using starchy potatoes such as Russet or Yukon Gold for their texture and flavor, feel free to experiment with other varieties like red potatoes or sweet potatoes. Just keep in mind that different types of potatoes may alter the dish’s consistency and flavor slightly.
6. Is this dish suitable for gluten-free diets?
Yes, this dish is naturally gluten-free! As long as you stick to the ingredients listed, you can enjoy it without any concern. It’s a great option for those following gluten-free diets or looking for a nutritious meal.
7. Can I add protein to this dish?
Yes, this dish can easily be turned into a more protein-packed meal. You can add grilled chicken, tofu, or beans to the mix for added protein. A sprinkle of feta or goat cheese also works wonderfully as a topping if you’re looking to add some creaminess and extra flavor.
Conclusion: More Than Just a Meal
The beauty of the Savory Spinach & Potato Delight lies in its simplicity. It’s a dish that not only satisfies the body but nourishes the soul as well. It evokes memories of family gatherings and quiet dinners, of moments spent around the table with loved ones, sharing food and conversation.
It’s a reminder that some of the best meals are not those that require the most elaborate ingredients or the longest preparation time, but rather those that are made with love, care, and an understanding of how food brings us together. Whether you’re cooking for one or for a crowd, this recipe is a testament to the power of wholesome ingredients and the joy of cooking something that’s both healthy and heartwarming.
So, the next time you’re looking for a meal that brings a sense of comfort, nostalgia, and nourishment, turn to this Savory Spinach & Potato Delight. It’s more than just a dish—it’s a reminder that food is an expression of care, and that simple, wholesome ingredients have the power to connect us to our past while fueling us for the future. Enjoy it as a standalone meal, a side dish, or a perfect companion to your favorite protein. No matter how you serve it, one thing is certain: it’s a meal that will leave you feeling warm, satisfied, and content.
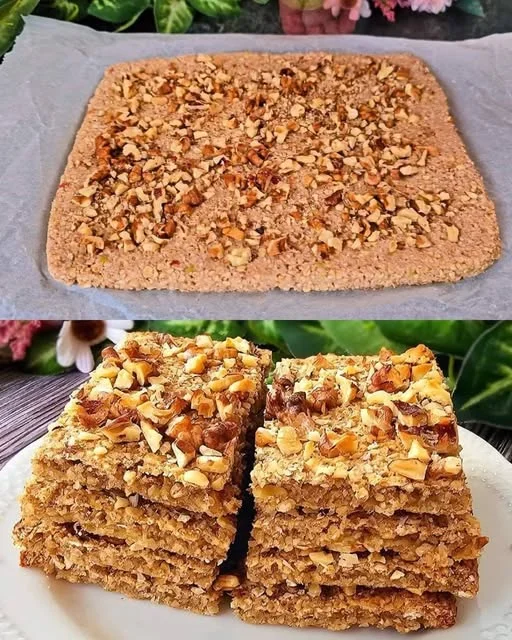
As a child, I remember spending countless afternoons in the kitchen with my grandmother, the smell of freshly baked treats wafting through the air as we prepared simple, wholesome recipes together. One of her favorites was a batch of oat cookies, made with whatever fruits or nuts she had on hand. She always believed in the power of nature’s ingredients, and every recipe had a story behind it. I remember the warmth in her smile as she handed me the spoon to stir the batter, showing me how love and care could transform a few simple ingredients into something magical.
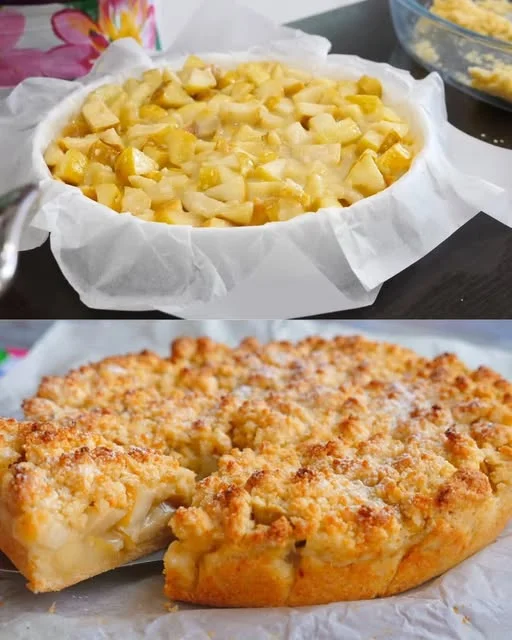
As I grew older, I found that these small, heartfelt moments in the kitchen became more than just cooking; they were about connecting to the present and honoring traditions. In today’s fast-paced world, it can be hard to make time for those moments. But when I created this recipe for Wholesome Oat & Apple Power Bites, I felt that familiar sense of comfort and nostalgia. The simplicity of oats and apples combined with the sweetness of dried cranberries and the lightness of whipped egg whites brought me right back to those afternoons in the kitchen with my grandmother.
These power bites are not just a treat, but a way to reclaim those moments, to create something nourishing and delicious, and to share the love of good food with those we care about. They are the perfect blend of wholesome ingredients that satisfy cravings without compromising on health. Packed with fiber, protein, and vitamins, these oat and apple bites are a wonderful addition to any diet, whether enjoyed as a snack, breakfast, or dessert.
Why Choose Oats and Apples?
Oats have been a beloved staple for centuries, known for their ability to provide lasting energy and support heart health. They’re a complex carbohydrate that digests slowly, keeping you fuller for longer, making them an excellent choice for those looking to maintain stable energy levels throughout the day. The natural fiber in oats also aids digestion, supports healthy cholesterol levels, and helps regulate blood sugar. Apples, on the other hand, are packed with antioxidants, vitamins, and fiber. They are a rich source of vitamin C, which plays a crucial role in boosting the immune system and promoting healthy skin. Together, these ingredients not only offer a delicious flavor combination but also provide a multitude of health benefits.
The addition of dried cranberries in this recipe not only elevates the taste but also provides a dose of antioxidants, fiber, and vitamins. Cranberries are known for their ability to promote urinary tract health, and they add a subtle tartness that balances the sweetness of the apples. By using minimal added sugar in this recipe, you can enjoy a treat that tastes indulgent while being mindful of your health goals.
Ingredients:
Ingredient
Amount
Rolled oats
230 g (2 1/2 cup)
Baking powder
1 teaspoon (6 g)
Ground cinnamon
1/2 teaspoon
Medium apples (peeled and diced)
2
Eggs (separate yolks from whites)
3
Vanilla extract
1 teaspoon
Dried cranberries
40 g (1/4 cup)
Salt
a pinch
Directions:
Prepare the Ingredients: Preheat the oven to 180°C (350°F) and line a baking sheet with parchment paper. Peel and dice the apples. Separate the egg yolks from the whites, placing the yolks in one bowl and the whites in another.
Mix the Dry Ingredients: In a large mixing bowl, combine the rolled oats, baking powder, cinnamon, and a pinch of salt. Stir to ensure everything is evenly distributed.
Add the Wet Ingredients: To the dry ingredients, add the egg yolks, vanilla extract, and diced apples. Mix gently until all the ingredients are incorporated.
Whisk the Egg Whites: In a separate bowl, whisk the egg whites until stiff peaks form. Carefully fold the whipped egg whites into the oat mixture to create a light and airy batter.
Shape and Bake: Use a spoon to scoop out portions of the mixture and form them into small cookies on the prepared baking sheet. Sprinkle the dried cranberries on top of each cookie. Bake in the preheated oven for about 12-15 minutes, or until golden brown around the edges.
Cool and Serve: Allow the cookies to cool on the baking sheet for a few minutes before transferring them to a wire rack to cool completely. Enjoy your wholesome oat & apple power bites!
Nutritional Information:
Nutrient
Amount (per serving)
Calories
120 kcal
Protein
3.5 g
Carbohydrates
18 g
Dietary Fiber
3 g
Sugars
8 g
Fat
4 g
Saturated Fat
0.5 g
Sodium
100 mg
Vitamin A
100 IU
Vitamin C
5 mg
Calcium
25 mg
Iron
1 mg
A Perfectly Balanced Snack: Nutritional Benefits
One of the best things about the Wholesome Oat & Apple Power Bites is that they combine the best of both worlds: indulgence and nutrition. In just one serving, you get a satisfying snack that nourishes your body and curbs your sweet cravings without the guilt.
Each bite is rich in protein, which is essential for building and repairing muscles, as well as supporting a healthy metabolism. The fiber from oats and apples helps keep the digestive system running smoothly, while also promoting feelings of fullness and satiety. This makes these bites an excellent choice for those looking to maintain a healthy weight or support their digestive health.
The blend of healthy fats in these bites—largely from eggs—also plays a vital role in supporting cognitive function and maintaining hormonal balance. Eggs are a complete source of protein and provide key nutrients like omega-3 fatty acids, which are important for heart health. They also contain choline, a nutrient that supports brain health and liver function.
Additionally, these bites are a great source of vitamin C from the apples and cranberries. Vitamin C is vital for the growth and repair of tissues, the healing of wounds, and the maintenance of healthy skin. With the inclusion of cinnamon, which has anti-inflammatory properties, the recipe also packs a punch of flavor and health benefits.
Common FAQs About Wholesome Oat & Apple Power Bites
1. Can I substitute other fruits for apples?
Yes! While apples are a core ingredient in this recipe, you can easily swap them for other fruits based on what’s in season or your personal preferences. Pears, for example, would make an excellent substitute, offering a similar texture and sweetness. You can also try using mashed bananas for a naturally sweet flavor. Just make sure to adjust the sweetness to your liking, as different fruits may have varying levels of natural sugar.
2. How do I store these oat and apple bites?
These power bites store incredibly well! After they’ve cooled completely, you can place them in an airtight container and keep them at room temperature for up to 3-4 days. For longer storage, you can refrigerate them for up to a week or freeze them for up to 3 months. If freezing, make sure to layer them between parchment paper to prevent them from sticking together.
3. Can I make these bites vegan?
Yes, you can make these power bites vegan by substituting the eggs with flax eggs or chia eggs. To make one flax egg, simply mix 1 tablespoon of ground flaxseeds with 3 tablespoons of water, and let it sit for 5 minutes to thicken. This will work as a binding agent, just like the egg whites in the original recipe. For the egg yolks, you can either omit them or substitute them with an additional tablespoon of ground flaxseed.
4. Are these bites gluten-free?
Yes, this recipe is naturally gluten-free as long as you ensure that the oats you use are certified gluten-free. Some oats are processed in facilities that also process gluten-containing grains, so it’s important to check the label to ensure they are free from cross-contamination.
5. Can I make these bites without dried cranberries?
While dried cranberries add a lovely tartness and chewiness to these bites, you can substitute them with other dried fruits such as raisins, currants, or dried cherries. You could also opt for nuts like chopped almonds, walnuts, or pecans for an added crunch.
6. Can I reduce the sugar content?
Absolutely! The recipe contains minimal added sugar thanks to the natural sweetness of the apples and cranberries. If you prefer a lower sugar content, you can reduce or omit the sugar entirely. The recipe is flexible, and the oats and fruits will still provide a naturally sweet flavor without the need for added sugar.
Ideal Occasions to Enjoy Wholesome Oat & Apple Power Bites
These delicious bites are incredibly versatile, making them perfect for a variety of occasions:
Breakfast on the Go: Perfect for busy mornings when you need a quick, nutritious breakfast. Grab a couple of power bites with a cup of coffee or tea, and you’ve got yourself a satisfying start to the day.
Post-Workout Snack: The protein and healthy fats in these bites make them an ideal choice for replenishing your body after a workout. They help support muscle recovery and keep you feeling full longer.
Midday Snack: Keep a batch of these bites in your pantry or fridge to curb your afternoon cravings. They are a great alternative to store-bought snacks, which can often be full of unhealthy additives and sugars.
Healthy Dessert: If you’re craving something sweet after dinner but want to keep it light, these oat and apple power bites are the perfect guilt-free dessert option. They satisfy your sweet tooth without the added calories and sugar of traditional desserts.
Lunchbox Treats: Pack these power bites in your child’s lunchbox for a nutritious and tasty treat that will fuel them through the day. They’re perfect for school or work lunches and easy to transport.
Conclusion: A Recipe That Brings Comfort and Nourishment
Wholesome Oat & Apple Power Bites are more than just a simple recipe—they represent the connection to something greater. They bring the nourishment of wholesome ingredients together with the heartwarming feeling of homemade love. Whether enjoyed as a snack, breakfast, or dessert, these power bites offer a delicious, healthy option for those looking to fuel their day in a wholesome way.
As you bake these treats in your own kitchen, remember the joy that food can bring. Every bite is an opportunity to reconnect with the nourishing power of nature and the love of family traditions. The next time you make these oat and apple power bites, I encourage you to take a moment to savor not just the taste, but the memories, the connection, and the sense of wellbeing they provide. They’re a reminder that simple, homemade food can be the most satisfying and nourishing choice.
There’s something about the smell of warm oatmeal and baked apples that instantly takes me back to childhood. Mornings in my grandmother’s kitchen were always filled with the comforting aroma of cinnamon, oats, and fresh fruit. She believed that breakfast should be both nourishing and satisfying, and she had a way of turning simple, wholesome ingredients into something truly special.
One of my fondest memories is helping her make oatmeal cookies—not the sugar-loaded, store-bought kind, but soft, hearty cookies made with mashed bananas, apples, and just the right amount of warmth from the oven. I’d watch as she carefully mixed the ingredients, shaping them into perfect little rounds with her hands, humming softly as she worked. The anticipation as they baked was almost too much to handle, but when they finally came out—golden, soft, and naturally sweetened—I knew it was worth the wait.
This Oat & Apple Breakfast Cookie recipe is inspired by those mornings. It’s a modern twist on my grandmother’s simple, hearty treats—packed with fiber, protein, and natural sweetness, but without any refined sugars or processed ingredients. Whether you enjoy them fresh out of the oven or as a grab-and-go breakfast, these cookies are a delicious reminder that healthy eating doesn’t have to be complicated.
Why You’ll Love These Breakfast Cookies
These cookies are not just delicious; they’re also incredibly nutritious and versatile. Here’s why they deserve a spot in your kitchen:
1. Naturally Sweetened & Guilt-Free
Unlike traditional cookies loaded with sugar, these breakfast cookies get their natural sweetness from bananas and apples. This makes them perfect for kids, health-conscious eaters, and anyone looking to reduce processed sugar intake.
2. Packed with Nutrients
Oats provide fiber, helping with digestion and keeping you full longer.
Bananas add natural sweetness, potassium, and a boost of energy.
Eggs bring in protein and structure to hold the cookies together.
Yogurt adds calcium and probiotics for gut health.
Apples bring in vitamins, fiber, and a refreshing burst of flavor.
3. Quick and Easy to Make
With just a handful of ingredients and minimal prep time, you can have a batch of these cookies ready in under 30 minutes.
4. Perfect for Meal Prep
Make a batch at the start of the week, and you’ll have a healthy, ready-to-eat breakfast or snack for busy mornings. These cookies store well and can even be frozen for later.
5. Kid-Approved & School-Friendly
If you’re looking for a nut-free and wholesome treat for lunchboxes, these cookies are the answer. They’re soft, easy to eat, and naturally appealing to children.
Ingredients
Ingredient
Quantity
Oatmeal
1 cup
Bananas, mashed
2
Yogurt (plain or Greek)
100g
Eggs
2
Apple, chopped
1
Avocado oil (for greasing)
As needed
Directions
Preheat the oven to 180°C (350°F) and line a baking sheet with parchment paper.
In a large mixing bowl, mash the bananas until smooth.
Add the eggs and yogurt, whisking until well combined.
Stir in the oatmeal and chopped apple, mixing until a thick batter forms.
Lightly grease your hands or a spoon with avocado oil and shape the mixture into small cookie rounds.
Arrange the cookies on the prepared baking sheet, ensuring space between each.
Bake for 15-18 minutes, or until the edges are golden brown and slightly firm.
Let them cool for a few minutes before serving. Enjoy fresh or store for later!
Nutritional Information (Per Cookie)
Nutrient
Amount
Calories
~90 kcal
Protein
~3g
Carbohydrates
~14g
Fiber
~2g
Sugars
~5g
Fat
~3g
Saturated Fat
~0.5g
Sodium
~20mg
Ways to Customize Your Cookies
One of the best things about these cookies is how easy they are to customize. Whether you have dietary preferences or just want to switch things up, here are a few ways to adapt the recipe:
1. Make Them Vegan
Swap out the eggs for flax eggs (1 tablespoon flaxseed meal + 3 tablespoons water per egg) and use a dairy-free yogurt alternative.
2. Add More Flavor
A dash of cinnamon or nutmeg for extra warmth.
A splash of vanilla extract for a subtle sweetness.
A handful of chopped nuts or seeds for crunch and healthy fats.
3. Boost the Protein
Mix in a tablespoon of chia seeds or hemp seeds.
Add a scoop of protein powder (adjust liquid accordingly).
4. Change Up the Fruit
While apples add great texture and natural sweetness, you can swap them for:
Berries (blueberries, raspberries) for a juicy twist.
Shredded carrots for a carrot cake-inspired version.
Diced pears for a soft, mild sweetness.
5. Make Them Crunchier
For a crispier texture, bake them for an extra 3-5 minutes until the edges are slightly browned.
Frequently Asked Questions (FAQs)
1. Can I Make These Cookies Ahead of Time?
Yes! These cookies are perfect for meal prep. Store them in an airtight container at room temperature for up to 3 days, in the fridge for up to a week, or freeze them for up to 3 months.
2. How Do I Reheat These Cookies?
If you like them warm, just pop them in the microwave for 10-15 seconds or in the oven at 150°C (300°F) for a few minutes to refresh their texture.
3. Are These Cookies Gluten-Free?
Yes, as long as you use certified gluten-free oats, this recipe is completely gluten-free.
4. Can I Use Instant Oats Instead of Rolled Oats?
Yes, but the texture will be softer and less chewy. If you prefer a heartier bite, stick to rolled oats.
5. What Type of Yogurt Works Best?
Plain Greek yogurt is a great option because it’s thick and high in protein. However, regular plain yogurt or dairy-free alternatives like coconut yogurt work just as well.
6. Can I Add Sweetener?
These cookies are naturally sweet, but if you want a little more sweetness, try adding:
A drizzle of honey or maple syrup
A few chopped dates or raisins
7. Can Kids Eat These?
Absolutely! These cookies are kid-friendly and packed with nutrients, making them a great alternative to store-bought sugary snacks.
The Perfect Anytime Snack
Healthy eating doesn’t have to mean complicated recipes or bland flavors. These Wholesome Oat & Apple Breakfast Cookies prove that simple ingredients can create something truly delicious and satisfying.
With their soft texture, natural sweetness, and nutrient-packed ingredients, these cookies are perfect for: ✔ A quick, grab-and-go breakfast ✔ A post-workout snack ✔ A school-friendly lunchbox treat ✔ A healthy dessert alternative
They’re easy to make, endlessly customizable, and made with real, whole foods—just the way breakfast should be.
So the next time you’re craving something warm, comforting, and nourishing, skip the store-bought granola bars and whip up a batch of these delicious homemade cookies. They might just become your new favorite breakfast!
There’s something undeniably comforting about the smell of buttery, golden pastry baking in the oven. It brings back memories of family gatherings, holiday mornings, and cozy afternoons spent in the kitchen. I remember the first time I made puff pastry rolls—I was in my grandmother’s kitchen, watching her effortlessly roll out the dough, layer it with rich, melty cheese and savory ham, and brush it with golden egg wash. The anticipation as the rolls baked, filling the air with an irresistible aroma, made the wait almost unbearable. But when they came out of the oven, flaky and bubbling with cheese, they were absolute perfection.
That moment stuck with me, and now, whenever I bake these Golden Crispy Ham & Cheese Puff Rolls, I feel like I’m bringing a little piece of that warmth and tradition into my own home. Whether you’re making them for a weekend brunch, a quick snack, or as a party appetizer, these rolls are guaranteed to bring people together—because great food is meant to be shared.
What Makes These Puff Rolls Special?
Puff pastry is one of those magical ingredients that can turn simple ingredients into something extraordinary. The combination of flaky, buttery layers with melted cheese and savory ham creates a perfect contrast of textures and flavors. Here’s what makes this recipe stand out:
Perfectly Crisp & Buttery Texture – The light, airy layers of puff pastry turn golden and crisp in the oven, making every bite satisfyingly flaky.
Rich & Savory Filling – Ham and cheese are a classic duo, creating the ultimate umami-packed filling that’s both creamy and salty.
Garlic Butter Infusion – Brushing the pastry with a garlic butter mixture before rolling adds an extra layer of richness and flavor.
Quick & Easy – Since this recipe uses store-bought puff pastry, you can whip up these rolls in no time without compromising on taste.
Great for Any Occasion – Whether it’s breakfast, a brunch gathering, a lunchbox treat, or a party appetizer, these rolls fit the occasion.
Ingredients
Ingredient
Quantity
Puff pastry
400g (14 oz)
Fresh parsley, chopped
25g (0.9 oz)
Butter, melted
30g (1.1 oz)
Salt
3g (0.1 oz)
Garlic, minced
10g (0.4 oz)
Ham, sliced
150g (5.3 oz)
Cheese (mozzarella or cheddar), grated
150g (5.3 oz)
Egg (for egg wash)
1
Directions
Preheat & Prepare
Preheat your oven to 200°C (400°F) and line a baking tray with parchment paper.
Lightly flour a clean surface and roll out the puff pastry into a rectangle.
Make the Garlic Butter
In a small bowl, mix the melted butter, minced garlic, chopped parsley, and salt.
Assemble the Rolls
Brush the garlic butter mixture evenly over the rolled-out puff pastry.
Layer the sliced ham evenly across the surface, followed by the grated cheese.
Roll & Slice
Carefully roll the pastry tightly from one end to the other, creating a log.
Slice into equal-sized rolls (about 2-3 cm thick) and place them on the prepared baking tray.
Egg Wash & Bake
Beat the egg and brush it over the top of each roll for a golden finish.
Bake in the preheated oven for 15-20 minutes, or until golden brown and crispy.
Serve & Enjoy
Let the rolls cool for a few minutes before serving. Enjoy warm as a snack, appetizer, or breakfast treat!
Nutritional Information (Per Serving)
Nutrient
Amount
Calories
~320 kcal
Protein
~12g
Carbohydrates
~25g
Fiber
~1g
Sugars
~1g
Fat
~20g
Saturated Fat
~10g
Sodium
~450mg
The Magic of Puff Pastry
Puff pastry is a baker’s best friend when it comes to effortless elegance. Its many layers are created through a process called lamination, where butter is folded into the dough multiple times to create those signature flaky layers. When baked, the water in the butter turns into steam, causing the pastry to rise and develop that crisp, airy texture we all love.
The best part? Store-bought puff pastry works just as well as homemade, making it easy for anyone to create restaurant-quality pastry dishes at home. Just remember to keep it cold until you’re ready to use it, as this helps maintain the flakiness.
Why You’ll Love These Rolls
This recipe is more than just a snack—it’s a versatile crowd-pleaser. Here’s why you’ll keep coming back to it:
1. Customizable to Your Taste
Not a fan of ham? Swap it for turkey, salami, or even smoked salmon. Want a stronger cheese flavor? Try gruyère, gouda, or blue cheese instead of mozzarella or cheddar. You can even add extras like spinach, caramelized onions, or sun-dried tomatoes for a unique twist.
2. A Perfect Make-Ahead Recipe
Busy schedule? No problem. These rolls can be prepped in advance and stored in the fridge or freezer until you’re ready to bake. Just pop them in the oven, and you’ll have a fresh, homemade treat in minutes.
3. Pairs Well with Dips & Sides
These puff pastry rolls are delicious on their own, but they also pair beautifully with mustard dips, garlic aioli, or a side of tomato soup. Serve them as part of a brunch spread with fresh fruit and scrambled eggs, or as an appetizer with a side of marinated olives and a cheese platter.
Frequently Asked Questions (FAQs)
1. Can I Make These Ahead of Time?
Yes! You can assemble the rolls, place them on a baking sheet, and refrigerate them for up to 24 hours before baking. If freezing, place the unbaked rolls in a single layer on a tray until frozen, then transfer them to a freezer bag. Bake directly from frozen, adding a few extra minutes to the cooking time.
2. What Other Fillings Can I Use?
This recipe is highly adaptable! Try different fillings like:
Spinach & Feta for a Mediterranean twist
Pesto & Sun-Dried Tomato for a bold, herby flavor
Bacon & Caramelized Onion for a smoky-sweet combination
Mushroom & Gruyère for an earthy, cheesy bite
3. How Do I Prevent the Pastry from Becoming Soggy?
Use cold ingredients – Warm puff pastry softens quickly and won’t hold its shape as well.
Pat dry any moisture-heavy ingredients – If using vegetables or wet cheeses, blot them with a paper towel before adding them to the pastry.
Avoid overfilling – Too much filling can cause leaks and make the pastry soggy.
4. Can I Use Homemade Puff Pastry?
Yes! If you have the time, homemade puff pastry adds an extra level of freshness and flakiness. However, high-quality store-bought versions work just as well.
5. How Do I Store and Reheat Leftovers?
Store leftover puff pastry rolls in an airtight container in the fridge for up to 3 days. Reheat in the oven at 180°C (350°F) for 5-7 minutes to restore crispiness. Avoid microwaving, as it can make the pastry soft.
The Perfect Treat for Every Occasion
There’s something truly magical about the combination of flaky puff pastry, savory ham, melty cheese, and aromatic garlic butter. Whether you’re serving them as a brunch centerpiece, a party appetizer, or a satisfying snack, these Golden Crispy Ham & Cheese Puff Rolls never fail to impress.
Food has a way of bringing people together, and this recipe is no exception. It’s simple enough for a casual weekend treat, yet elegant enough for special gatherings. And with endless variations to explore, it’s a dish you’ll never get tired of making.
So, the next time you’re craving something warm, buttery, and irresistibly cheesy, roll up your sleeves and give this recipe a try. You won’t regret it.
There’s something incredibly comforting about the smell of cinnamon and baked oats filling the kitchen on a slow morning. It reminds me of my childhood when my grandmother would prepare a warm bowl of oatmeal, topped with fresh apples and nuts. It wasn’t just about the food—it was the love and care that went into making it. Those quiet mornings, sitting at the table with a cozy blanket wrapped around me, taught me that breakfast is more than just fuel. It’s a ritual, a moment of self-care, and an act of nourishment.
Now, as life gets busier, I often find myself craving that same warmth and comfort. That’s why I created this Wholesome Morning Oatmeal Delight—a recipe that brings together the heartwarming flavors of apples, bananas, oats, and nuts in a simple yet nutritious dish. Whether baked into bars, cooked as pancakes, or enjoyed straight from the bowl, this oatmeal-based recipe is a reminder to slow down, savor each bite, and start the day with something truly nourishing.
Why This Recipe Stands Out
With countless oatmeal recipes out there, you might wonder what makes this one special. The answer lies in its balance of flavor, texture, and nutrition. It’s not just about making a healthy breakfast—it’s about creating a meal that feels indulgent while still being packed with wholesome ingredients.
Naturally Sweet & Flavorful: Thanks to mashed banana, grated apple, and a touch of cinnamon, this dish is naturally sweet without the need for refined sugar.
Rich in Fiber & Healthy Fats: The combination of oats, nuts, and coconut oil provides lasting energy and keeps you full for hours.
Versatile & Adaptable: Whether you prefer it as a baked oatmeal, pancakes, or a warm bowl of porridge, this recipe can be tailored to fit your morning routine.
Quick & Easy: With minimal prep and simple ingredients, it’s a great option for busy mornings when you still want a nourishing meal.
Ingredients
Ingredient
Quantity
Oats (ground into flour)
100g (~1 cup)
Oats (whole)
50g (~1/2 cup)
Apple (grated)
1
Banana (mashed)
1
Cinnamon (or to taste)
1/2 tsp
Coconut oil (or preferred oil)
2 tbsp
Nuts or almonds (chopped)
40g (~1/3 cup)
Honey or maple syrup (optional)
1 tbsp
Baking powder
1/2 tsp
Milk or plant-based alternative
120ml (~1/2 cup)
Vanilla extract
1/2 tsp
Directions
Prepare the Dry Ingredients In a large bowl, combine the oat flour, whole oats, cinnamon, baking powder, and chopped nuts. Mix well.
Incorporate the Wet Ingredients In a separate bowl, mash the banana and mix it with grated apple, coconut oil, vanilla extract, and milk. Stir until smooth.
Blend & Sweeten Gradually add the wet ingredients to the dry mixture, stirring continuously to form a thick batter. If desired, mix in honey or maple syrup for added sweetness.
Bake or Cook
For Baked Oatmeal: Preheat the oven to 180°C (350°F). Pour the mixture into a greased baking dish and bake for 25-30 minutes or until golden brown.
For Pancakes: Heat a pan over medium heat, lightly grease with oil, and cook spoonfuls of the batter for 2-3 minutes per side until golden brown.
Serve & Enjoy Let it cool slightly before serving. Top with fresh fruit, yogurt, or nut butter for extra flavor.
Nutritional Information (Per Serving)
Nutrient
Amount
Calories
~250 kcal
Protein
~6g
Carbohydrates
~35g
Fiber
~5g
Sugars (natural)
~10g
Fat
~10g
Saturated Fat
~4g
Health Benefits of This Nutrient-Dense Recipe
This recipe isn’t just comforting—it’s packed with essential nutrients that support overall well-being. Here’s what each key ingredient brings to the table:
Oats: A Powerhouse of Nutrition
Oats are one of the best sources of soluble fiber, which helps:
Regulate blood sugar levels by slowing digestion and preventing spikes.
Promote heart health by reducing cholesterol levels.
Improve gut health by supporting beneficial bacteria in the digestive system.
Banana & Apple: Natural Sweeteners with a Health Boost
Instead of refined sugar, this recipe uses the natural sweetness of fruit, which comes with added benefits:
Bananas provide potassium, an essential mineral for muscle function and hydration.
Apples are rich in antioxidants and fiber, which help with digestion and keep you feeling full.
Nuts & Coconut Oil: Healthy Fats for Sustained Energy
Including healthy fats in your breakfast helps:
Support brain function by providing essential fatty acids.
Keep you full longer by slowing down digestion.
Enhance nutrient absorption, especially fat-soluble vitamins like A, D, E, and K.
Ways to Enjoy This Recipe
One of the best things about this recipe is its versatility. Depending on your preference, you can prepare it in different ways:
Baked Oatmeal: Pour the mixture into a baking dish and bake until golden brown. Slice into squares for an easy grab-and-go breakfast.
Oatmeal Pancakes: Scoop batter onto a hot pan for hearty pancakes that pair beautifully with fresh fruit or nut butter.
Warm Oatmeal Bowl: Cook the ingredients on the stovetop for a creamy, comforting bowl of oatmeal.
Feel free to get creative with toppings! Try adding Greek yogurt, chia seeds, shredded coconut, or even a drizzle of nut butter for extra richness.
Frequently Asked Questions (FAQs)
1. Can I make this recipe ahead of time?
Absolutely! This dish is great for meal prep. If you choose to bake it, you can store it in an airtight container in the fridge for up to five days. Simply reheat in the microwave or oven before serving.
2. Can I use different types of nuts?
Yes! Feel free to use any nuts you prefer, such as walnuts, pecans, or cashews. You can also leave them out entirely if you have allergies or prefer a nut-free version.
3. Can I make this recipe vegan?
Yes, this recipe is already dairy-free, and you can ensure it’s fully vegan by using a plant-based milk alternative and skipping the honey (opt for maple syrup instead).
4. Is this recipe gluten-free?
Yes, as long as you use certified gluten-free oats, this recipe is completely gluten-free.
5. Can I add protein powder for extra protein?
Definitely! Adding a scoop of your favorite protein powder can make this meal even more satisfying, especially if you’re looking for a post-workout breakfast.
6. Can I freeze this recipe?
Yes! If making baked oatmeal or pancakes, let them cool completely, then store them in a freezer-safe bag. They can be reheated in the toaster, microwave, or oven when needed.
The Perfect Breakfast for Any Occasion
Whether you’re looking for a quick weekday breakfast, a nourishing post-workout meal, or a cozy weekend brunch, this Wholesome Morning Oatmeal Delight has you covered. It’s a dish that satisfies both the body and the soul—bringing warmth, energy, and a sense of home to your mornings.
Life moves fast, and mornings can feel rushed. But taking a few moments to nourish yourself with something homemade can set the tone for the entire day. So, the next time you crave something comforting yet nutritious, remember that a simple combination of oats, fruit, and nuts can create a meal that’s not just food—but a moment of self-care.
Start your day with a bowl, a bite, or a bar of this oatmeal delight—and embrace the feeling of home, no matter where life takes you.
Introduction to the Caramel Brownie Cheesecake Recipe
What Makes This Dessert Special?
The Caramel Brownie Cheesecake is a delightful fusion of flavors and textures. Imagine biting into a rich, creamy cheesecake layered atop a fudgy brownie base, all drizzled with luscious caramel. This dessert is not just a treat for the taste buds; it’s a feast for the eyes too! The combination of chocolate, cream cheese, and caramel creates a symphony of sweetness that is hard to resist. Each slice offers a perfect balance of creaminess and chewiness, making it a standout dessert for any occasion.
What truly sets this dessert apart is its versatility. You can customize it to suit your taste. Whether you prefer a nutty crunch with pecans or a smooth finish with a hint of espresso, the options are endless. This Caramel Brownie Cheesecake is perfect for celebrations, family gatherings, or simply as a sweet indulgence after dinner. It’s a dessert that brings people together, sparking joy and creating lasting memories.
A Brief History of Cheesecake and Brownies
Cheesecake has a rich history that dates back to ancient Greece. The earliest known cheesecake was made with simple ingredients like cheese, honey, and flour. Over the centuries, this dessert evolved, with various cultures adding their unique twists. Today, cheesecake is loved worldwide, with countless variations, including the creamy New York style and the light and fluffy Japanese version.
On the other hand, brownies emerged in the United States in the late 19th century. They are believed to have been created by accident when a baker forgot to add baking powder to a chocolate cake recipe. The result was a dense, fudgy treat that quickly gained popularity. Brownies have since become a beloved dessert, often enjoyed on their own or as a base for other desserts, like our Caramel Brownie Cheesecake.
Combining these two classic desserts into one creates a unique experience that celebrates their rich histories while offering a modern twist. The Caramel Brownie Cheesecake is not just a dessert; it’s a delicious journey through time, blending tradition with innovation.
Ingredients for the Caramel Brownie Cheesecake Recipe
Essential Ingredients
To create the perfect Caramel Brownie Cheesecake, you’ll need a selection of essential ingredients. These components work together to form the rich, creamy, and decadent layers that make this dessert so special. Here’s what you’ll need:
1 cup graham cracker crumbs: This forms the base of your cheesecake, providing a crunchy texture.
1/4 cup unsweetened cocoa powder: This adds a deep chocolate flavor to the crust.
1/4 cup granulated sugar: Sweetens the crust and balances the flavors.
1/2 cup unsalted butter, melted: Binds the crust ingredients together.
2 (8-ounce) packages cream cheese, softened: The star of the cheesecake filling, giving it a creamy texture.
1 cup granulated sugar: Sweetens the cheesecake filling.
1 teaspoon vanilla extract: Enhances the overall flavor of the cheesecake.
3 large eggs: Provides structure and richness to the filling.
1 cup semi-sweet chocolate chips: Adds a delicious chocolate flavor to the cheesecake.
1/2 cup caramel sauce: Drizzled throughout the cheesecake for a sweet, gooey finish.
Optional Ingredients for Customization
While the essential ingredients create a fantastic Caramel Brownie Cheesecake, you can also customize it to suit your taste. Here are some optional ingredients to consider:
1/4 cup chopped pecans: Adds a delightful crunch and nutty flavor. You can also use walnuts if you prefer.
1 teaspoon espresso powder: For a richer flavor, this can enhance the chocolate notes in the cheesecake.
Different flavored extracts: Such as almond or hazelnut, can be used instead of vanilla for a unique twist.
Fruit toppings: Fresh berries or sliced bananas can be added for a fruity contrast to the rich cheesecake.
Feel free to mix and match these optional ingredients to create a Caramel Brownie Cheesecake that’s uniquely yours. The possibilities are endless, and your creativity will make this dessert even more special!
Step-by-Step Preparation of the Caramel Brownie Cheesecake Recipe
Step 1: Preparing the Brownie Base
To start, you’ll want to prepare the brownie base. In a medium bowl, combine the graham cracker crumbs, unsweetened cocoa powder, and granulated sugar. Mix these dry ingredients well. Next, pour in the melted unsalted butter. Stir until everything is evenly coated and resembles wet sand. This mixture will form the crust of your cheesecake.
Now, take your prepared springform pan and press the crumb mixture firmly into the bottom. Make sure it’s packed tightly to create a solid base. This step is crucial, as it will hold the cheesecake layers together. Once done, set the pan aside while you prepare the cheesecake filling.
Step 2: Making the Cheesecake Filling
In a large mixing bowl, beat the softened cream cheese using an electric mixer. Mix until it’s smooth and creamy, which should take about 2-3 minutes. Gradually add in the granulated sugar and vanilla extract, mixing until well combined. It’s important to scrape down the sides of the bowl to ensure everything is mixed evenly.
Next, add the eggs one at a time. Mix on low speed just until combined after each addition. Be careful not to overmix, as this can lead to cracks in your cheesecake. Once all the eggs are incorporated, it’s time to add the melted chocolate chips. Make sure they have cooled slightly before folding them into the cream cheese mixture. This will give your cheesecake a rich chocolate flavor.
Step 3: Combining Brownie and Cheesecake Layers
Now that your brownie base and cheesecake filling are ready, it’s time to combine them. Pour half of the cheesecake batter over the prepared crust in the springform pan. Use a spatula to spread it evenly. Then, drizzle half of the caramel sauce over this layer. This will create a delicious caramel swirl in the cheesecake.
Next, pour the remaining cheesecake batter on top. Again, spread it evenly. To finish, take the remaining caramel sauce and drizzle it over the top layer of the batter. Use a knife or toothpick to gently swirl the caramel into the cheesecake. This adds a beautiful marbled effect and enhances the flavor.
Step 4: Adding the Caramel Topping
If you’re using chopped pecans, sprinkle them on top of the cheesecake now. This step is optional but adds a nice crunch and flavor. The pecans will toast slightly during baking, enhancing their taste. If you prefer a nut-free version, feel free to skip this step. Your cheesecake is now ready for the oven!
Step 5: Baking the Cheesecake
Preheat your oven to 325°F (163°C). Place the springform pan in the oven and bake for 55-60 minutes. The cheesecake is done when the center is set but still slightly jiggly. This is important, as overbaking can lead to a dry cheesecake. Once baked, turn off the oven and crack the door open. Let the cheesecake cool in the oven for about 1 hour. This gradual cooling helps prevent cracks.
Step 6: Cooling and Setting
After an hour, remove the cheesecake from the oven. Allow it to cool completely at room temperature. Once cooled, cover it with plastic wrap and refrigerate for at least 4 hours, or overnight if possible. Chilling the cheesecake allows the flavors to meld and the texture to set perfectly. When you’re ready to serve, carefully remove the sides of the springform pan. Your Caramel Brownie Cheesecake is now ready to be enjoyed!
Variations of the Caramel Brownie Cheesecake Recipe
Gluten-Free Options
If you or your guests are following a gluten-free diet, you can easily adapt the Caramel Brownie Cheesecake recipe. Start by using gluten-free graham cracker crumbs for the crust. Many brands offer gluten-free options that taste just as delicious. Additionally, ensure that the chocolate chips and caramel sauce you choose are labeled gluten-free. This way, you can enjoy the same rich flavors without any gluten concerns. Your gluten-free version will still be creamy, decadent, and utterly satisfying!
Vegan Alternatives
For those who prefer a vegan dessert, you can make a delightful vegan Caramel Brownie Cheesecake. Replace the cream cheese with a vegan cream cheese alternative, which is widely available in stores. Instead of eggs, use flaxseed meal or chia seeds mixed with water as a binding agent. For the crust, ensure that your graham cracker crumbs are vegan-friendly. You can also substitute the butter with coconut oil or a vegan butter alternative. With these simple swaps, you can create a delicious vegan cheesecake that everyone will love!
Flavor Variations (e.g., Chocolate, Nutty)
One of the best parts of making a Caramel Brownie Cheesecake is the ability to customize the flavors. For a richer chocolate experience, consider adding more cocoa powder to the crust or using dark chocolate chips in the filling. If you enjoy nutty flavors, you can incorporate almond or hazelnut extracts into the cheesecake batter. Additionally, try adding crushed nuts like walnuts or almonds into the batter for extra texture. You can even swirl in some fruit purees, like raspberry or strawberry, for a fruity twist. The possibilities are endless, allowing you to create a cheesecake that perfectly suits your taste!
Cooking Note for the Caramel Brownie Cheesecake Recipe
Tips for Perfect Baking
Baking a Caramel Brownie Cheesecake can be a delightful experience, but a few tips can help ensure your dessert turns out perfectly every time. First, always use room temperature ingredients. This includes the cream cheese and eggs. Room temperature ingredients blend more smoothly, resulting in a creamier filling.
Next, avoid overmixing the batter. When you add the eggs, mix just until combined. Overmixing can introduce too much air, leading to cracks in your cheesecake. Also, consider using a water bath while baking. This method helps maintain moisture in the oven, preventing the cheesecake from drying out. To do this, wrap the outside of your springform pan with aluminum foil and place it in a larger pan filled with hot water.
Lastly, remember to let your cheesecake cool gradually. After baking, turn off the oven and crack the door open. This gradual cooling process helps prevent sudden temperature changes that can cause cracks. Patience is key, so allow your cheesecake to cool completely before refrigerating it. Following these tips will help you achieve a smooth, creamy, and crack-free Caramel Brownie Cheesecake!
Common Mistakes to Avoid
Even the best bakers can make mistakes, so here are some common pitfalls to watch out for when making your Caramel Brownie Cheesecake. One frequent error is not greasing the springform pan properly. This can lead to sticking, making it difficult to remove the cheesecake later. Always grease the pan well to ensure easy release.
Another mistake is not allowing the cheesecake to set long enough in the refrigerator. Chilling is crucial for the flavors to meld and the texture to firm up. If you cut into it too soon, you may end up with a gooey mess instead of clean slices.
Additionally, be cautious with the baking time. Every oven is different, so keep an eye on your cheesecake as it bakes. If it looks too jiggly in the center, it may need a few more minutes. However, be careful not to overbake, as this can lead to a dry texture.
Lastly, don’t skip the cooling step in the oven. Cracking can occur if you take the cheesecake out of the oven too quickly. By following these tips and avoiding common mistakes, you’ll be well on your way to creating a stunning Caramel Brownie Cheesecake that will impress everyone!
Serving Suggestions for the Caramel Brownie Cheesecake Recipe
Ideal Pairings
When it comes to serving your Caramel Brownie Cheesecake, the right accompaniments can elevate the experience. Here are some delightful pairings to consider:
Vanilla Ice Cream: A scoop of creamy vanilla ice cream complements the rich flavors of the cheesecake beautifully. The cold ice cream contrasts perfectly with the warm caramel, creating a delightful balance.
Whipped Cream: Light and fluffy whipped cream adds a touch of elegance. You can even sweeten it with a hint of vanilla or a sprinkle of cocoa powder for an extra flavor boost.
Fresh Berries: Raspberries, strawberries, or blueberries provide a refreshing tartness that cuts through the sweetness of the cheesecake. They also add a pop of color to your dessert plate.
Chocolate Sauce: For chocolate lovers, a drizzle of chocolate sauce can enhance the dessert’s richness. It’s a simple way to add an extra layer of indulgence.
Coffee: A cup of freshly brewed coffee pairs wonderfully with the cheesecake. The bitterness of the coffee balances the sweetness, making each bite even more enjoyable.
Feel free to mix and match these pairings to create a dessert experience that suits your taste and impresses your guests!
Presentation Tips
Presentation is key when serving your Caramel Brownie Cheesecake. Here are some tips to make your dessert look as good as it tastes:
Use a Cake Stand: Elevate your cheesecake on a decorative cake stand. This adds height and makes it the centerpiece of your dessert table.
Garnish with Caramel Drizzle: Before serving, drizzle additional caramel sauce over the top. This not only enhances the flavor but also creates an eye-catching design.
Add Fresh Fruit: Scatter fresh berries around the cheesecake on the serving plate. This adds color and freshness, making the dessert more inviting.
Chocolate Shavings: For a touch of elegance, sprinkle chocolate shavings on top. This adds a sophisticated look and a hint of extra chocolate flavor.
Slice Neatly: Use a sharp knife to cut clean slices. Wipe the knife with a damp cloth between cuts for perfectly shaped pieces.
With these serving suggestions and presentation tips, your Caramel Brownie Cheesecake will not only taste amazing but also look stunning on any table!
Tips for the Perfect Caramel Brownie Cheesecake Recipe
Storage Tips
Storing your Caramel Brownie Cheesecake properly is essential to maintain its delicious flavor and creamy texture. Here are some helpful storage tips:
Refrigeration: Always store your cheesecake in the refrigerator. Cover it with plastic wrap or aluminum foil to prevent it from absorbing any odors from other foods. This will keep it fresh for up to 5 days.
Freezing: If you want to keep your cheesecake for a longer period, you can freeze it. Wrap individual slices in plastic wrap and then place them in an airtight container. This way, you can enjoy a slice whenever you crave it! Frozen cheesecake can last for up to 2 months.
Thawing: To thaw frozen cheesecake, simply transfer it to the refrigerator for several hours or overnight. Avoid thawing at room temperature, as this can affect the texture.
Serving After Storage: If you’ve stored your cheesecake in the fridge, let it sit at room temperature for about 15-20 minutes before serving. This will enhance the flavors and make it easier to slice.
Reheating Instructions
While cheesecake is typically enjoyed cold, you may want to warm it slightly for a different experience. Here’s how to reheat your Caramel Brownie Cheesecake:
Microwave: Place a slice of cheesecake on a microwave-safe plate. Heat it in the microwave for about 10-15 seconds. Check to see if it’s warm enough; if not, heat in additional 5-second intervals. Be careful not to overheat, as this can change the texture.
Oven: Preheat your oven to 250°F (120°C). Place the cheesecake on a baking sheet and cover it loosely with aluminum foil. Heat for about 10-15 minutes, or until warmed through. This method helps maintain the creamy texture.
Serving Warm: Warm cheesecake pairs wonderfully with a scoop of ice cream or a drizzle of hot caramel sauce. It creates a delightful contrast of temperatures that enhances the overall dessert experience.
By following these storage and reheating tips, you can enjoy your Caramel Brownie Cheesecake at its best, whether it’s fresh out of the oven or after a few days in the fridge!
Breakdown of Time for the Caramel Brownie Cheesecake Recipe
Prep Time
Preparing your Caramel Brownie Cheesecake is a fun and engaging process. The prep time for this recipe is approximately 30 minutes. During this time, you will gather all your ingredients, prepare the brownie base, and mix the cheesecake filling. Make sure to have everything ready before you start, as this will make the process smoother and more enjoyable. Remember, taking your time during prep can lead to a better final product!
Cooking Time
The cooking time for the Caramel Brownie Cheesecake is about 55-60 minutes. This is when the cheesecake bakes in the oven, allowing it to set perfectly. Keep an eye on it as it bakes, ensuring the center remains slightly jiggly. After baking, you will also need to let it cool in the oven for an additional hour. This gradual cooling helps prevent cracks and ensures a smooth texture.
Total Time
In total, you should expect to spend around 6 hours to make your Caramel Brownie Cheesecake. This includes the prep time, cooking time, and the necessary chilling time in the refrigerator. Chilling is crucial, as it allows the flavors to meld and the cheesecake to set properly. For the best results, consider making it a day ahead of when you plan to serve it. This way, you can enjoy a deliciously rich dessert without any last-minute stress!
Nutritional Information for the Caramel Brownie Cheesecake Recipe
Calories and Macronutrients
Understanding the nutritional content of your Caramel Brownie Cheesecake can help you enjoy it mindfully. Each serving of this delicious dessert contains approximately 350 calories. Here’s a breakdown of the macronutrients per serving:
Calories: 350
Net Carbs: 25g
Protein: 6g
Fat: 25g
These values can vary slightly based on the specific brands of ingredients you use. For instance, using low-fat cream cheese can reduce the overall fat content. Additionally, if you choose to add nuts or other toppings, this will also affect the nutritional profile. Keeping track of these details can help you enjoy your cheesecake while being aware of your dietary choices.
Health Considerations
While the Caramel Brownie Cheesecake is a delightful treat, it’s important to consider its nutritional aspects. The dessert is rich in calories and fat, primarily due to the cream cheese and butter. However, it also provides some protein from the eggs and cream cheese, which can be beneficial in moderation.
If you’re watching your sugar intake, you might want to enjoy this cheesecake as an occasional indulgence rather than a regular dessert. For those with dietary restrictions, there are options to modify the recipe. For example, using sugar substitutes can lower the sugar content, and gluten-free ingredients can accommodate those with gluten sensitivities.
Ultimately, enjoying a slice of Caramel Brownie Cheesecake can be part of a balanced diet. Just remember to savor each bite and share it with friends and family for a truly delightful experience!
FAQs About the Caramel Brownie Cheesecake Recipe
Can I make this cheesecake ahead of time?
Absolutely! In fact, making the Caramel Brownie Cheesecake ahead of time is a great idea. This dessert benefits from chilling, as it allows the flavors to meld beautifully. You can prepare it a day or two in advance. Just make sure to cover it well with plastic wrap or aluminum foil to keep it fresh in the refrigerator. When you’re ready to serve, simply remove it from the fridge and let it sit at room temperature for a bit before slicing. This will enhance the flavors and make it easier to cut.
How do I store leftovers?
Storing leftovers properly is key to enjoying your Caramel Brownie Cheesecake later. First, make sure the cheesecake is completely cooled. Then, cover it tightly with plastic wrap or aluminum foil. You can also place it in an airtight container. Store it in the refrigerator, where it will stay fresh for up to 5 days. If you have individual slices, you can wrap them separately for easy access. Just remember to let them sit at room temperature for about 15-20 minutes before serving for the best taste!
Can I freeze the Caramel Brownie Cheesecake?
Yes, you can freeze the Caramel Brownie Cheesecake! Freezing is a great way to preserve this delicious dessert for later enjoyment. To freeze, wrap the cheesecake tightly in plastic wrap, then place it in an airtight container. If you prefer, you can also freeze individual slices. The cheesecake can be frozen for up to 2 months. When you’re ready to enjoy it, transfer it to the refrigerator to thaw overnight. Avoid thawing at room temperature, as this can affect the texture.
What can I substitute for cream cheese?
If you need a substitute for cream cheese, there are several options available. For a similar texture, you can use mascarpone cheese or ricotta cheese. Both will give you a creamy consistency, though the flavor may vary slightly. If you’re looking for a dairy-free option, consider using a vegan cream cheese alternative, which is widely available in stores. You can also make your own by blending soaked cashews with a bit of lemon juice and nutritional yeast for flavor. These substitutes will help you create a delicious cheesecake without compromising on taste!
Conclusion on the Caramel Brownie Cheesecake Recipe
Final Thoughts and Encouragement to Try the Recipe
The Caramel Brownie Cheesecake is more than just a dessert; it’s a celebration of flavors and textures that brings joy to any occasion. With its rich layers of creamy cheesecake, fudgy brownie base, and sweet caramel drizzle, this recipe is sure to impress your family and friends. Whether you’re hosting a gathering or simply treating yourself, this cheesecake is a delightful choice that will leave everyone wanting more.
As you embark on your baking journey, remember that the key to a successful Caramel Brownie Cheesecake lies in the details. From using room temperature ingredients to allowing the cheesecake to cool gradually, each step contributes to the final result. Don’t hesitate to experiment with flavors and toppings to make this recipe your own. The possibilities are endless, and your creativity will shine through in every bite.
So, gather your ingredients, roll up your sleeves, and dive into the world of baking! We encourage you to try this Caramel Brownie Cheesecake recipe and share it with your loved ones. The smiles and compliments you receive will be worth every moment spent in the kitchen. Happy baking!
Introduction to Mediterranean Chicken Bowls with Feta
If you’re looking for a delicious and healthy meal, Mediterranean Chicken Bowls with Feta are a fantastic choice. These bowls are not only colorful and vibrant but also packed with flavors that transport you straight to the sunny shores of the Mediterranean. Imagine tender chicken, fluffy quinoa, and fresh vegetables all topped with a creamy feta sauce. It’s a dish that’s sure to please everyone at the table!
What makes these bowls so special? First, they are incredibly versatile. You can easily customize them to suit your taste or dietary needs. Whether you prefer a vegetarian option or want to switch up the protein, the possibilities are endless. Plus, they are quick to prepare, making them perfect for busy weeknights or meal prep for the week ahead.
In addition to being tasty, Mediterranean Chicken Bowls with Feta are also nutritious. They are loaded with protein from the chicken and quinoa, while the fresh vegetables add essential vitamins and minerals. The feta sauce not only enhances the flavor but also provides a creamy texture that ties everything together beautifully.
So, gather your ingredients and get ready to create a meal that’s not only satisfying but also good for you. Let’s dive into the ingredients you’ll need to whip up these delightful Mediterranean Chicken Bowls with Feta!
Ingredients for Mediterranean Chicken Bowls with Feta
To create your Mediterranean Chicken Bowls with Feta, you’ll need a variety of fresh and wholesome ingredients. Each component plays a vital role in building flavor and nutrition. Here’s what you’ll need:
2 cups cooked quinoa: This serves as the hearty base of your bowl, providing protein and fiber.
1 pound boneless, skinless chicken breasts: A lean protein source that keeps the dish filling and satisfying.
1 tablespoon olive oil: This adds richness and helps in cooking the chicken to perfection.
1 teaspoon garlic powder: A must-have for that aromatic flavor.
1 teaspoon paprika: This spice gives a warm color and a hint of smokiness.
1 teaspoon dried oregano: A classic Mediterranean herb that enhances the overall taste.
Salt and pepper to taste: Essential for seasoning your chicken and vegetables.
1 cup cherry tomatoes, halved: These add a burst of sweetness and freshness.
1 cucumber, diced: A crunchy element that balances the dish.
1 cup baby spinach: This leafy green boosts the nutritional value.
1/2 red onion, thinly sliced: For a sharp, zesty flavor.
1/2 cup feta cheese, crumbled: The star of the show, adding creaminess and tang.
1/4 cup plain Greek yogurt: This makes the feta sauce smooth and rich.
2 tablespoons lemon juice: A splash of acidity that brightens the dish.
1 tablespoon fresh dill, chopped (or 1 teaspoon dried dill): This herb adds a refreshing touch.
With these ingredients, you’re well on your way to creating a delightful meal. Each item contributes to the overall flavor and texture, making your Mediterranean Chicken Bowls with Feta a feast for both the eyes and the palate. Now, let’s move on to the step-by-step preparation!
Step-by-Step Preparation of Mediterranean Chicken Bowls with Feta
Now that you have gathered all the ingredients, it’s time to dive into the preparation of your Mediterranean Chicken Bowls with Feta. This process is straightforward and can be broken down into four simple steps. Let’s get started!
Step 1: Marinating the Chicken
First, you’ll want to marinate the chicken to infuse it with flavor. In a small bowl, mix together the garlic powder, paprika, oregano, salt, and pepper. This spice blend is key to achieving that delicious Mediterranean taste. Rub this mixture all over the chicken breasts, ensuring they are well-coated. For even better flavor, consider letting the chicken marinate for at least 30 minutes. This allows the spices to penetrate the meat, making it more flavorful.
Step 2: Cooking the Chicken
Next, heat the olive oil in a skillet over medium-high heat. Once the oil is hot, carefully place the marinated chicken breasts in the skillet. Sear them for about 2-3 minutes on each side until they turn golden brown. This step not only adds color but also locks in the juices. After searing, transfer the chicken to a prepared baking sheet lined with parchment paper. Bake the chicken in a preheated oven at 400°F for 15-20 minutes. You’ll know it’s done when the internal temperature reaches 165°F. Once cooked, let the chicken rest for 5 minutes before slicing it into strips.
Step 3: Preparing the Vegetables
While the chicken is baking, it’s time to prepare the fresh vegetables. Start by halving the cherry tomatoes and dicing the cucumber. Then, thinly slice the red onion. Finally, rinse the baby spinach under cold water and pat it dry. These fresh ingredients will add crunch and color to your bowls, making them visually appealing and nutritious.
Step 4: Assembling the Mediterranean Chicken Bowls with Feta
Now comes the fun part—assembling your Mediterranean Chicken Bowls with Feta! In serving bowls, layer the cooked quinoa as the base. Next, add the sliced chicken on top. Then, arrange the cherry tomatoes, diced cucumber, baby spinach, and red onion around the chicken. Finally, drizzle the creamy feta sauce over the top. To make the feta sauce, simply combine the crumbled feta cheese, Greek yogurt, lemon juice, and dill in a bowl. Mix until smooth and creamy. This sauce will tie all the flavors together beautifully!
And there you have it! Your Mediterranean Chicken Bowls with Feta are ready to be enjoyed. They are not only delicious but also packed with nutrients, making them a perfect meal for any occasion.
Variations of Mediterranean Chicken Bowls with Feta
While the classic Mediterranean Chicken Bowls with Feta are delightful, there are many ways to switch things up! Whether you’re looking for vegetarian options or different protein choices, these variations will keep your meals exciting and flavorful. Let’s explore some tasty alternatives!
Vegetarian Options
If you want to enjoy a meat-free version, there are plenty of delicious vegetarian options. One great substitute for chicken is roasted chickpeas. They add a nice crunch and are packed with protein. Simply toss canned chickpeas with olive oil and your favorite spices, then roast them in the oven until crispy.
Another option is to use grilled or roasted vegetables. Bell peppers, zucchini, and eggplant work wonderfully. Just season them with olive oil, salt, and pepper, then grill or roast until tender. You can also add falafel for a fun twist. These little balls of ground chickpeas are full of flavor and pair perfectly with the feta sauce.
Lastly, consider using tofu or tempeh. Marinate them in the same spice blend as the chicken, then cook until golden. This will give you a hearty and satisfying vegetarian bowl that everyone will love!
Different Protein Choices
If you’re looking to switch up the protein in your Mediterranean Chicken Bowls with Feta, there are many delicious options. For a seafood twist, try using shrimp or salmon. Season them with the same spices and cook until they are just done. Seafood adds a light and fresh flavor that complements the other ingredients beautifully.
You can also use turkey breast as a lean alternative to chicken. It cooks similarly and absorbs flavors well. Just follow the same cooking instructions as you would for chicken.
For a unique flavor, consider using lamb. Ground lamb or lamb chops can bring a rich taste to your bowls. Just remember to adjust the cooking time based on the cut you choose. Each of these protein options will create a delightful Mediterranean Chicken Bowl with Feta that’s sure to impress!
Cooking Note for Mediterranean Chicken Bowls with Feta
When preparing Mediterranean Chicken Bowls with Feta, a few cooking notes can help ensure your dish turns out perfectly every time. First, always use a meat thermometer to check the chicken’s internal temperature. This guarantees that your chicken is cooked through and safe to eat. Remember, the ideal temperature is 165°F.
Next, consider the quality of your ingredients. Fresh vegetables and high-quality feta cheese can significantly enhance the flavor of your bowls. Whenever possible, opt for organic produce and artisanal feta for the best taste. Additionally, if you have access to fresh herbs, such as dill or oregano, use them instead of dried. Fresh herbs provide a vibrant flavor that dried herbs simply can’t match.
Another tip is to let the chicken rest after baking. This step allows the juices to redistribute throughout the meat, making it more tender and juicy. If you slice the chicken too soon, you may end up with dry pieces.
Lastly, feel free to adjust the spice levels to your liking. If you enjoy a bit of heat, consider adding a pinch of cayenne pepper or red pepper flakes to the spice mix. This will give your Mediterranean Chicken Bowls with Feta an extra kick!
By keeping these cooking notes in mind, you’ll create a delicious and satisfying meal that everyone will love. Now, let’s move on to some serving suggestions to elevate your Mediterranean Chicken Bowls with Feta even further!
Serving Suggestions for Mediterranean Chicken Bowls with Feta
Once your Mediterranean Chicken Bowls with Feta are beautifully assembled, it’s time to think about how to serve them. Presentation can elevate your meal, making it even more enjoyable. Here are some delightful serving suggestions to enhance your dining experience:
Garnish with Fresh Herbs: A sprinkle of fresh herbs, like parsley or extra dill, can add a pop of color and freshness. This simple touch makes your bowls look more appealing and adds an aromatic flavor.
Serve with Pita Bread: Pair your bowls with warm pita bread or pita chips. This adds a fun, crunchy element and is perfect for scooping up the delicious feta sauce.
Add a Side Salad: Consider serving a light side salad alongside your bowls. A simple mix of greens, cucumbers, and a lemon vinaigrette complements the flavors of the Mediterranean Chicken Bowls with Feta beautifully.
Include Hummus: A small serving of hummus can be a great addition. It pairs well with the chicken and veggies, providing a creamy texture that enhances the overall meal.
Offer Lemon Wedges: A squeeze of fresh lemon juice over the bowls just before serving can brighten the flavors. It adds a zesty kick that balances the richness of the feta sauce.
Customize with Extra Toppings: Encourage your guests to customize their bowls with additional toppings. Options like sliced olives, avocado, or roasted nuts can add unique flavors and textures.
These serving suggestions not only enhance the visual appeal of your Mediterranean Chicken Bowls with Feta but also provide a variety of flavors and textures. Whether you’re hosting a dinner party or enjoying a family meal, these ideas will make your dining experience even more delightful. Now that you have your bowls ready to serve, let’s explore some tips for perfecting your Mediterranean Chicken Bowls with Feta!
Tips for Perfect Mediterranean Chicken Bowls with Feta
Creating the perfect Mediterranean Chicken Bowls with Feta is all about attention to detail. With a few simple tips, you can elevate your dish and impress your family or guests. Here are some helpful suggestions to ensure your bowls turn out delicious every time:
Use Fresh Ingredients: Fresh vegetables and herbs make a big difference in flavor. Always choose ripe cherry tomatoes, crisp cucumbers, and vibrant greens. Fresh herbs like dill and oregano will enhance the taste of your feta sauce.
Cook Quinoa Properly: Rinse your quinoa before cooking to remove any bitterness. Use a 2:1 water-to-quinoa ratio for fluffy results. This will ensure your quinoa is light and airy, making it a perfect base for your bowls.
Don’t Overcook the Chicken: Keep an eye on the chicken while it bakes. Overcooking can lead to dry meat. Use a meat thermometer to check for doneness, aiming for 165°F. This will keep your chicken juicy and tender.
Customize the Spice Blend: Feel free to adjust the spice blend to suit your taste. If you love heat, add some cayenne pepper or chili powder. For a milder flavor, reduce the paprika or oregano.
Layer Ingredients Thoughtfully: When assembling your bowls, layer the ingredients thoughtfully. Start with quinoa, then add chicken, followed by vegetables. This not only looks appealing but also ensures every bite is balanced.
Make Extra Feta Sauce: If you love the creamy feta sauce, consider making extra. It can be used as a dip for pita bread or drizzled over salads. This versatile sauce adds flavor to many dishes!
Serve Immediately: For the best experience, serve your Mediterranean Chicken Bowls with Feta immediately after assembling. This keeps the ingredients fresh and the flavors vibrant.
By following these tips, you’ll create Mediterranean Chicken Bowls with Feta that are not only delicious but also visually stunning. Enjoy the process of cooking and savor the delightful flavors of the Mediterranean!
Breakdown of Time for Mediterranean Chicken Bowls with Feta
When preparing Mediterranean Chicken Bowls with Feta, it’s helpful to know how much time you’ll need for each step. This way, you can plan your cooking efficiently and enjoy a delicious meal without feeling rushed. Here’s a breakdown of the time required for each part of the process:
Prep Time
The prep time for Mediterranean Chicken Bowls with Feta is approximately 20-30 minutes. This includes gathering your ingredients, marinating the chicken, and preparing the vegetables. If you choose to marinate the chicken for longer, you may want to add an extra 30 minutes to an hour. This will enhance the flavor even more!
Cooking Time
Cooking the chicken takes about 15-20 minutes. After searing the chicken in the skillet, you’ll bake it in the oven until it reaches the perfect internal temperature of 165°F. While the chicken is cooking, you can prepare the feta sauce, which only takes about 5 minutes. So, overall, the cooking time is around 20-25 minutes.
Total Time
In total, you can expect to spend about 40-55 minutes from start to finish when making Mediterranean Chicken Bowls with Feta. This includes both prep and cooking time. If you marinate the chicken ahead of time, you can cut down on the active cooking time, making it even quicker to enjoy this delightful meal!
With this time breakdown, you can easily fit Mediterranean Chicken Bowls with Feta into your busy schedule. Whether it’s a weeknight dinner or a weekend meal prep, you’ll have a delicious and nutritious dish ready in no time!
Nutritional Information for Mediterranean Chicken Bowls with Feta
Understanding the nutritional content of your meals is essential for maintaining a balanced diet. Mediterranean Chicken Bowls with Feta not only taste great but also provide a variety of nutrients. Here’s a closer look at the nutritional information for this delicious dish:
Calories
450 calories. This makes it a satisfying meal that can fit well into a healthy eating plan. The combination of protein, healthy fats, and carbohydrates ensures that you feel full and energized after enjoying this dish.
Protein
35 grams of protein. This high protein content comes primarily from the chicken and quinoa, making it an excellent choice for those looking to build muscle or maintain a healthy weight. Protein is essential for repairing tissues and keeping you feeling satiated throughout the day.
Sodium
600 milligrams per serving. While this is a reasonable amount, it’s always a good idea to monitor your sodium intake, especially if you are watching your salt consumption. You can reduce sodium levels by using low-sodium feta cheese or adjusting the amount of salt you add during cooking.
Overall, Mediterranean Chicken Bowls with Feta are a nutritious option that provides a well-rounded meal. With a good balance of calories, protein, and moderate sodium, they can be a delightful addition to your weekly meal plan. Now that you know the nutritional benefits, let’s address some frequently asked questions about this tasty dish!
FAQs about Mediterranean Chicken Bowls with Feta
Can I make Mediterranean Chicken Bowls with Feta ahead of time?
Absolutely! Mediterranean Chicken Bowls with Feta can be prepared ahead of time, making them perfect for meal prep. You can cook the chicken and quinoa in advance, then store them in the refrigerator. When you’re ready to eat, simply reheat the chicken and quinoa, and assemble your bowls with fresh vegetables and feta sauce. This way, you’ll have a delicious meal ready in minutes!
What can I substitute for feta cheese in Mediterranean Chicken Bowls with Feta?
If you’re looking for a substitute for feta cheese, there are several options. Goat cheese is a great alternative, offering a similar creamy texture and tangy flavor. For a dairy-free option, try using crumbled tofu mixed with a bit of lemon juice and nutritional yeast. This will give you a cheesy flavor without the dairy. Additionally, you can use ricotta cheese or even a vegan feta if you prefer a plant-based option.
Are Mediterranean Chicken Bowls with Feta healthy?
Yes, Mediterranean Chicken Bowls with Feta are a healthy meal choice! They are packed with lean protein from the chicken, fiber from the quinoa, and a variety of vitamins and minerals from the fresh vegetables. The feta sauce adds flavor without excessive calories. Overall, this dish provides a balanced mix of nutrients, making it a wholesome option for any meal.
How can I customize Mediterranean Chicken Bowls with Feta for dietary restrictions?
Customizing Mediterranean Chicken Bowls with Feta for dietary restrictions is easy! For gluten-free options, ensure you use gluten-free grains like quinoa or brown rice. If you’re vegetarian, replace the chicken with roasted chickpeas or grilled vegetables. For a low-carb version, you can use cauliflower rice instead of quinoa. Additionally, if you have dairy restrictions, simply swap out the feta cheese for a dairy-free alternative. These adjustments will help you enjoy this delicious meal while accommodating your dietary needs!
Conclusion on Mediterranean Chicken Bowls with Feta
In conclusion, Mediterranean Chicken Bowls with Feta are a delightful and nutritious meal option that brings the vibrant flavors of the Mediterranean right to your table. With their colorful ingredients and creamy feta sauce, these bowls are not only visually appealing but also packed with essential nutrients. They offer a perfect balance of protein, healthy fats, and carbohydrates, making them a satisfying choice for lunch or dinner.
Whether you’re preparing a quick weeknight meal or planning for a gathering, these bowls are versatile and easy to customize. You can switch up the proteins, add more vegetables, or even create a vegetarian version to suit your preferences. The possibilities are endless, allowing you to enjoy this dish in various ways.
Moreover, the step-by-step preparation makes it simple for anyone to create this delicious meal at home. With just a few fresh ingredients and some basic cooking techniques, you can whip up a dish that’s sure to impress family and friends alike.
So, why not give Mediterranean Chicken Bowls with Feta a try? You’ll not only enjoy a tasty meal but also nourish your body with wholesome ingredients. Embrace the flavors of the Mediterranean and make this dish a regular part of your meal rotation. Happy cooking!
Introduction to Cilantro Lime Chicken Bowls with Peach Salsa Recipe
Cilantro Lime Chicken Bowls with Peach Salsa Recipe is a delightful dish that combines zesty flavors with wholesome ingredients. This recipe is perfect for busy weeknights or casual gatherings with friends and family.
Imagine tender chicken breasts marinated in a blend of spices, grilled to perfection, and served over a bed of fluffy rice. The addition of creamy avocado, sweet corn, and juicy cherry tomatoes creates a colorful and nutritious bowl. But the star of the show is the homemade peach salsa, which adds a refreshing twist that will tantalize your taste buds.
Not only is this dish packed with flavor, but it also offers a balanced meal with protein, healthy fats, and fiber. Plus, it’s versatile! You can easily customize it to suit your dietary preferences or use whatever ingredients you have on hand. Whether you’re a seasoned cook or a kitchen novice, this recipe is straightforward and rewarding.
So, roll up your sleeves and get ready to whip up a meal that’s sure to impress. Let’s dive into the ingredients you’ll need to create these scrumptious bowls!
Ingredients for Cilantro Lime Chicken Bowls with Peach Salsa Recipe
Cilantro Lime Chicken Bowls with Peach Salsa Recipe, you’ll need a variety of fresh and flavorful ingredients. Here’s a complete list to help you gather everything you need:
These ingredients come together to create a colorful and nutritious meal that’s bursting with flavor. The combination of spices on the chicken, paired with the sweetness of the peach salsa, makes for a delightful experience. Now that you have your ingredients ready, let’s move on to the preparation steps!
Preparation of Cilantro Lime Chicken Bowls with Peach Salsa Recipe
Cilantro Lime Chicken Bowls with Peach Salsa Recipe. This process is simple and straightforward, making it easy for anyone to follow. Let’s break it down into four easy steps!
Step 1: Marinating the Chicken
First, we need to marinate the chicken to infuse it with flavor. In a small bowl, mix together the chili powder, cumin, garlic powder, onion powder, salt, and pepper. This spice blend will give the chicken a delicious kick. Once mixed, rub the spice mixture all over the chicken breasts. Make sure to coat them evenly for the best flavor. After that, drizzle the chicken with lime juice and let it marinate for at least 15 minutes. This step is crucial as it helps tenderize the chicken and enhances the taste.
Step 2: Preparing the Peach Salsa
While the chicken is marinating, it’s the perfect time to prepare the peach salsa. In a medium bowl, combine the diced peaches, finely chopped red onion, and minced jalapeño if you’re using it. The jalapeño adds a nice heat, but feel free to skip it if you prefer a milder salsa. Squeeze in the juice of one lime and sprinkle with salt. Mix everything well and set it aside. Letting the salsa sit for a bit allows the flavors to meld together, making it even tastier!
Step 3: Cooking the Chicken
Once the chicken has marinated, it’s time to cook it. Heat the olive oil in a skillet over medium-high heat. When the oil is hot, add the chicken breasts. Cook them for about 6-7 minutes on each side, or until they are fully cooked and no longer pink in the center. To ensure they are cooked through, you can use a meat thermometer; the internal temperature should reach 165°F (75°C). After cooking, remove the chicken from the skillet and let it rest for about 5 minutes before slicing. This resting period helps keep the chicken juicy.
Step 4: Assembling the Bowls
Now comes the fun part—assembling your bowls! Start by dividing the cooked rice among four bowls. On top of the rice, add a generous scoop of black beans, corn, diced avocado, and halved cherry tomatoes. Next, slice the rested chicken and place it on top of the veggies. Finally, add a generous scoop of your homemade peach salsa. For an extra touch, garnish with chopped cilantro and a squeeze of lime juice if desired. Your vibrant and delicious bowls are now ready to be enjoyed!
Variation of Cilantro Lime Chicken Bowls with Peach Salsa Recipe
Cilantro Lime Chicken Bowls with Peach Salsa Recipe is already a delightful dish, there are many ways to switch things up! Whether you want to try different proteins or explore various salsa options, these variations can add a new twist to your meal. Let’s take a look at some exciting alternatives!
Alternative Proteins
If you’re looking to change the protein in your bowls, there are plenty of delicious options. Here are a few ideas:
Grilled Shrimp: Shrimp cooks quickly and adds a lovely seafood flavor. Marinate them in the same spices as the chicken for a seamless transition.
Tofu: For a vegetarian option, use firm tofu. Press it to remove excess moisture, then cube and marinate it in the spice mix before cooking.
Steak: Thinly sliced steak can bring a hearty touch to your bowls. Season it with the same spices and grill or pan-sear it to your liking.
Turkey: Ground turkey is a lean alternative. Cook it in a skillet with the spices until browned and fully cooked.
These alternative proteins not only change the flavor profile but also cater to different dietary preferences. Feel free to experiment and find your favorite!
Different Salsa Options
The peach salsa is a star in this recipe, but you can easily switch it up for variety. Here are some tasty salsa alternatives:
Mango Salsa: Swap peaches for ripe mangoes for a tropical twist. Combine diced mango, red onion, lime juice, and cilantro for a sweet and tangy flavor.
Pineapple Salsa: Use diced pineapple instead of peaches. Add jalapeños for heat and red onion for crunch. This salsa pairs wonderfully with chicken!
Tomato Salsa: A classic option! Mix diced tomatoes, onion, cilantro, lime juice, and jalapeños for a fresh and zesty salsa.
Avocado Salsa: For a creamy alternative, mash ripe avocados with lime juice, diced tomatoes, and onions. This adds a rich texture to your bowls.
These salsa variations can enhance your bowls and keep things exciting. Feel free to mix and match proteins and salsas to create your perfect meal!
Cooking Note for Cilantro Lime Chicken Bowls with Peach Salsa Recipe
Cilantro Lime Chicken Bowls with Peach Salsa Recipe, there are a few cooking notes to keep in mind. These tips will help ensure that your meal turns out perfectly every time. Let’s explore some essential points to consider!
First, always ensure your chicken is at room temperature before cooking. This helps it cook evenly. If you take the chicken straight from the fridge, it may take longer to cook through, leading to uneven results.
Next, don’t rush the marinating process. Allowing the chicken to marinate for at least 15 minutes is crucial. If you have more time, consider marinating it for up to an hour. This extra time allows the spices to penetrate the meat, enhancing the flavor.
When cooking the chicken, avoid overcrowding the skillet. If you have more than two chicken breasts, consider cooking them in batches. Overcrowding can cause the chicken to steam instead of sear, resulting in a less desirable texture.
Additionally, using a meat thermometer is a great way to ensure your chicken is cooked perfectly. The internal temperature should reach 165°F (75°C). This guarantees that the chicken is safe to eat while remaining juicy and tender.
Lastly, let the chicken rest after cooking. This step is often overlooked but is essential for juicy chicken. Resting allows the juices to redistribute throughout the meat, preventing them from spilling out when you slice it.
Cilantro Lime Chicken Bowls with Peach Salsa Recipe to a whole new level. Enjoy the process and savor the delicious results!
Serving Suggestions for Cilantro Lime Chicken Bowls with Peach Salsa Recipe
Cilantro Lime Chicken Bowls with Peach Salsa Recipe, it’s time to think about how to serve them. Presentation can elevate your meal, making it even more enjoyable. Here are some delightful serving suggestions to enhance your dining experience:
Colorful Bowls: Use vibrant bowls to serve your chicken bowls. Bright colors can make the meal more appealing and fun. Consider using bowls in shades of blue or green to complement the fresh ingredients.
Family Style: For a casual gathering, serve the ingredients in separate bowls. This allows everyone to customize their own bowls, choosing their favorite toppings and portions.
Garnish: Don’t forget to garnish! A sprinkle of extra cilantro or a few lime wedges on the side can add a fresh touch. You can also add a dollop of sour cream or Greek yogurt for creaminess.
Pair with Drinks: Consider serving your bowls with refreshing drinks. A chilled limeade or iced tea pairs wonderfully with the zesty flavors of the dish. For adults, a light beer or a fruity cocktail can complement the meal nicely.
Side Dishes: If you want to make the meal more filling, consider adding side dishes. A simple green salad with a light vinaigrette or tortilla chips with guacamole can be great additions.
Leftover Lunch: If you have leftovers, pack them in a container for lunch the next day. The flavors will meld together, making for a delicious meal that’s easy to take on the go.
Cilantro Lime Chicken Bowls with Peach Salsa Recipe. Whether you’re hosting a dinner party or enjoying a quiet meal at home, these tips will make your meal memorable!
Tips for Perfecting Your Cilantro Lime Chicken Bowls with Peach Salsa Recipe
Cilantro Lime Chicken Bowls with Peach Salsa Recipe, consider these helpful tips. They will ensure that every bite is bursting with flavor and that your meal is a hit with family and friends!
Use Fresh Ingredients: Fresh ingredients make a big difference in flavor. Choose ripe peaches, fresh cilantro, and high-quality chicken. The better the ingredients, the tastier your dish will be!
Adjust Spice Levels: If you love heat, feel free to increase the amount of chili powder or add more jalapeño to the salsa. On the other hand, if you prefer milder flavors, reduce the spices to suit your taste.
Experiment with Marinades: While the spice blend is delicious, you can also try marinating the chicken in lime juice and olive oil alone. This will give it a zesty flavor without the spices.
Let the Salsa Chill: For the best flavor, let your peach salsa chill in the fridge for at least 30 minutes before serving. This allows the flavors to meld together beautifully.
Mix Up the Grains: While rice is a great base, consider using other grains like quinoa or farro. These options add different textures and flavors to your bowls.
Top with Cheese: For an extra layer of flavor, sprinkle some crumbled feta or cotija cheese on top of your bowls. The creaminess pairs well with the other ingredients.
Make it a Meal Prep Option: This recipe is perfect for meal prep! Cook a larger batch and store the components separately in the fridge. This way, you can enjoy fresh bowls throughout the week.
Garnish Creatively: Besides cilantro, consider garnishing with lime zest or a sprinkle of chili flakes for added color and flavor. A little creativity goes a long way!
Cilantro Lime Chicken Bowls with Peach Salsa Recipe. Enjoy the process and have fun experimenting with flavors!
Breakdown of Time for Cilantro Lime Chicken Bowls with Peach Salsa Recipe
Cilantro Lime Chicken Bowls with Peach Salsa Recipe can help you plan your cooking efficiently. Here’s a breakdown of the time required for preparation and cooking, so you can enjoy your meal without any rush!
Prep Time
The prep time for this recipe is approximately 20 minutes. This includes:
Gathering all your ingredients.
Marinating the chicken, which takes about 15 minutes.
Preparing the peach salsa, which should take around 5 minutes.
By organizing your ingredients and following the steps, you can make the most of this time. It’s a great way to get everything ready while the chicken absorbs those delicious flavors!
Cooking Time
Cilantro Lime Chicken Bowls with Peach Salsa Recipe is about 15 minutes. This includes:
Cooking the chicken in the skillet for about 12-14 minutes.
Allowing the chicken to rest for 5 minutes before slicing.
During the cooking time, you can also prepare your rice or any other base you choose. This multitasking can help you save time and keep everything on track!
Total Time
In total, you can expect the entire process to take around 35 minutes. This includes both prep and cooking time. Here’s a quick summary:
Prep Time: 20 minutes
Cooking Time: 15 minutes
Total Time: 35 minutes
Cilantro Lime Chicken Bowls with Peach Salsa Recipe perfect for busy weeknights or when you want to impress guests without spending hours in the kitchen. Enjoy your cooking adventure!
Nutritional Information for Cilantro Lime Chicken Bowls with Peach Salsa Recipe
Cilantro Lime Chicken Bowls with Peach Salsa Recipe not only delights your taste buds but also provides a nutritious option for your meals. Let’s break down the key nutritional components of this delicious dish!
Calories
Cilantro Lime Chicken Bowls with Peach Salsa Recipe contains approximately 450 calories. This makes it a satisfying meal that won’t weigh you down. The combination of protein from the chicken, healthy fats from the avocado, and carbohydrates from the rice ensures you get a well-rounded meal.
Protein
Protein is vital for muscle repair and overall health. In this recipe, you’ll find about 30 grams of protein per serving. The chicken breasts are the primary source of protein, making this dish an excellent choice for those looking to increase their protein intake. Pairing it with black beans also adds to the protein content, making it a filling option.
Sodium
When it comes to sodium, this recipe contains around 600 milligrams per serving. While sodium is necessary for bodily functions, it’s essential to monitor your intake. To reduce sodium levels, consider using low-sodium black beans and adjusting the amount of salt you add during cooking. This way, you can enjoy the flavors without overdoing it on sodium.
Cilantro Lime Chicken Bowls with Peach Salsa Recipe offers a balanced meal that is not only delicious but also nutritious. With its combination of calories, protein, and sodium, it’s a great option for anyone looking to enjoy a healthy and satisfying dish!
FAQs about Cilantro Lime Chicken Bowls with Peach Salsa Recipe
Can I use frozen chicken for this recipe?
Cilantro Lime Chicken Bowls with Peach Salsa Recipe. However, it’s important to thaw the chicken completely before marinating and cooking. You can thaw it overnight in the refrigerator or use the defrost setting on your microwave. Once thawed, follow the marinating and cooking steps as usual. Just remember that cooking times may vary slightly, so ensure the chicken reaches an internal temperature of 165°F (75°C) for safety.
What can I substitute for peaches in the salsa?
If you don’t have peaches on hand, there are several delicious substitutes for the salsa. Mango is a fantastic option, offering a similar sweetness and texture. Pineapple can also work well, adding a tropical flair. For a more traditional salsa, you can use diced tomatoes or even avocados for a creamy twist. Each of these alternatives will bring its unique flavor to the dish, so feel free to experiment!
How can I make this recipe spicier?
Cilantro Lime Chicken Bowls with Peach Salsa Recipe, there are a few easy ways to do so. First, you can increase the amount of chili powder in the spice mix. Additionally, consider adding more jalapeño to the salsa or using a spicier variety, like serrano peppers. For an extra kick, drizzle some hot sauce over the assembled bowls. Adjust the spice levels to suit your taste, and enjoy the fiery flavors!
Can I prepare the chicken ahead of time?
Absolutely! Preparing the chicken ahead of time can save you valuable minutes during busy weeknights. You can marinate the chicken in advance and store it in the refrigerator for up to 24 hours. When you’re ready to cook, simply take it out, let it come to room temperature, and cook as directed. This not only saves time but also allows the flavors to deepen, making your meal even more delicious!
Conclusion on Cilantro Lime Chicken Bowls with Peach Salsa Recipe
Cilantro Lime Chicken Bowls with Peach Salsa Recipe is a delightful and nutritious meal that brings together vibrant flavors and wholesome ingredients. This dish is not only easy to prepare but also offers endless possibilities for customization. Whether you’re cooking for yourself, your family, or hosting friends, these bowls are sure to impress.
The combination of marinated chicken, fresh vegetables, and the sweet and tangy peach salsa creates a harmonious balance that tantalizes the taste buds. Plus, with the option to switch up proteins and salsas, you can keep this recipe exciting and fresh every time you make it.
Cilantro Lime Chicken Bowls with Peach Salsa Recipe is a perfect way to explore new flavors and techniques. So gather your ingredients, roll up your sleeves, and get ready to create a meal that’s not only delicious but also nourishing.
We hope you enjoy making and sharing this recipe as much as we do. Happy cooking!