

Growing up, Easter was always a special time in my family. It wasn’t just about the Easter egg hunts or the excitement of finding a chocolate bunny hidden in the backyard—it was about tradition. My grandmother had a way of turning the simplest moments into something magical, and one of my favorite memories was baking sugar cookies with her every spring. The sweet aroma of vanilla and butter filled the kitchen as we rolled out the dough, cutting each cookie into fun shapes, dusting them with sprinkles, and giggling as we sneaked bites of raw dough when she wasn’t looking.
Now, as a parent, I find myself recreating that magic with my own children. These Chocolate-Dipped Easter Bunny Sugar Cookies have become a staple in our home, not just because they taste incredible, but because they bring people together. Whether you’re baking them with little hands eager to help or making them as a delightful surprise for an Easter gathering, these cookies capture the joy of the season in every bite.
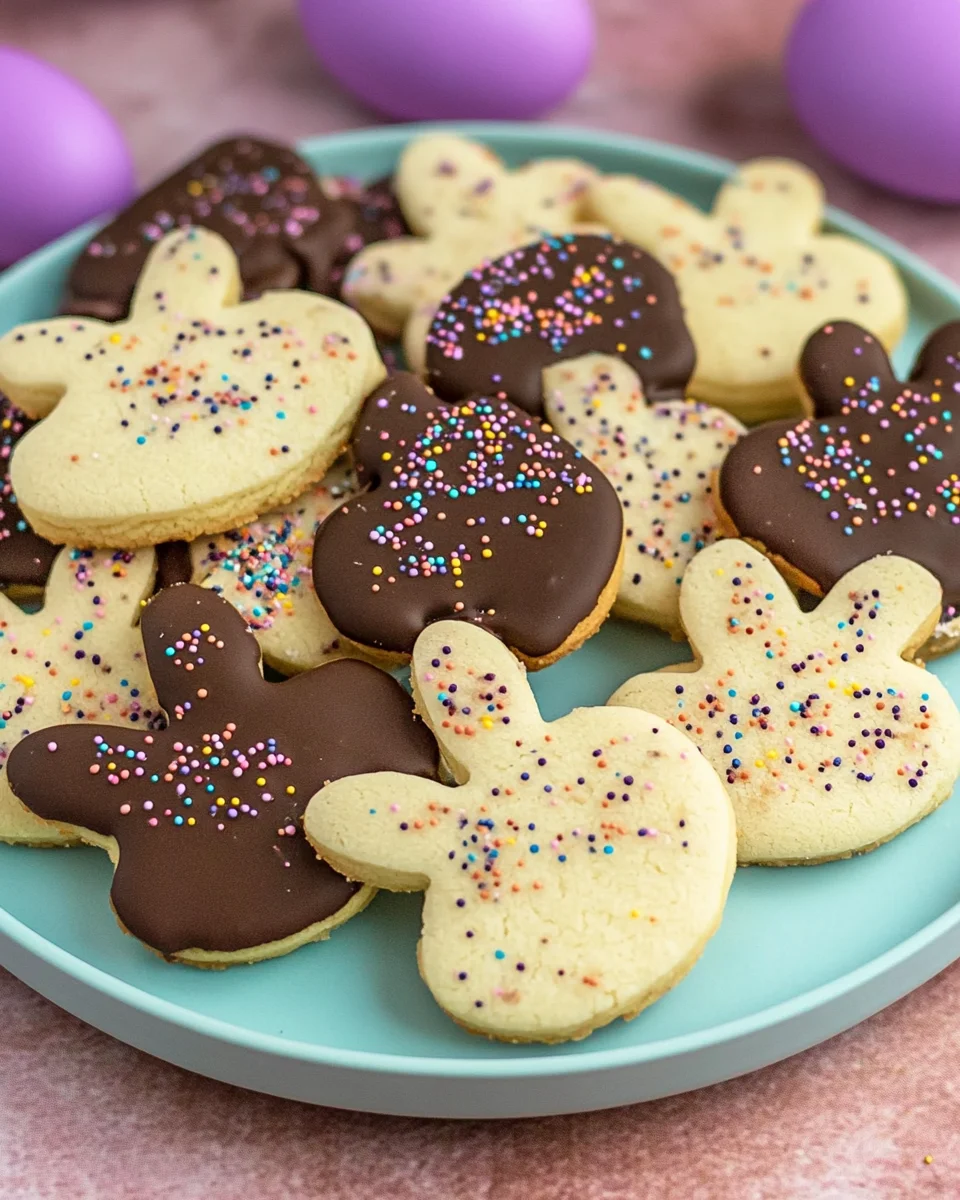
Why You’ll Love These Easter Bunny Sugar Cookies
Easter baking should be easy, fun, and, most importantly, delicious. These cookies check all the boxes. Here’s why they are a must-try:
- Perfectly Soft Texture – These cookies have a delicate crisp edge with a soft, buttery center that melts in your mouth.
- Festive and Fun – The pastel sprinkles and chocolate dip make them a visually stunning treat that fits right in with Easter festivities.
- Kid-Friendly Recipe – From mixing the dough to cutting out bunnies and decorating with sprinkles, kids will love getting involved.
- Simple Ingredients, Big Flavor – Made with pantry staples, these cookies are full of rich vanilla and buttery goodness.
- Versatile for Any Occasion – Though perfect for Easter, you can swap out the cookie cutter shape and sprinkle colors to make them suitable for any holiday or celebration.
The Secret to the Perfect Sugar Cookie
Anyone who has baked sugar cookies before knows that they can be a bit finicky. Too much flour, and they turn out dry. Too little chilling time, and they spread too much. Here are some key tips to ensure success every time:
1. Measure Flour Correctly
One of the most common mistakes in baking sugar cookies is adding too much flour. The best way to measure is by using the spoon-and-level method—spoon the flour into the measuring cup, then level it off with a knife. Avoid scooping directly from the bag, as this compacts the flour and leads to dense cookies.
2. Don’t Skip the Chilling Step
Refrigerating the dough is crucial for two reasons: it allows the butter to firm up, preventing the cookies from spreading too much in the oven, and it enhances the flavor. Ideally, chill the dough for at least an hour, but overnight is even better.
3. Rolling Out Dough with Plastic Wrap
Instead of using extra flour when rolling out your dough, try placing it between two sheets of plastic wrap. This prevents sticking without adding excess flour, which can make the cookies tough.
4. Even Thickness is Key
For uniform baking, aim to roll the dough to about ⅓-inch thickness. If your cookies are too thin, they’ll bake too quickly and become crisp rather than soft. If they’re too thick, they may not bake evenly.
5. Watch the Bake Time Carefully
Sugar cookies are best when they are just barely golden on the edges. Overbaking will make them crunchy instead of soft. Check them around the 8-minute mark and remove them once they are set but still slightly soft in the center—they will continue to firm up as they cool.
Customizing Your Easter Bunny Cookies
One of the best things about these cookies is that they are completely customizable! Here are a few creative ideas to make them your own:
1. Alternative Toppings
Not a fan of chocolate-dipped cookies? Try these instead:
- Buttercream Frosting – Pipe pastel-colored buttercream on top for a whimsical, fluffy look.
- Royal Icing – Decorate with detailed designs using royal icing for a professional finish.
- Colored Sanding Sugar – Sprinkle colored sugar over a thin glaze for a sparkly effect.
2. Flavor Twists
While the classic vanilla flavor is always a hit, consider these variations:
- Lemon Zest – Add a teaspoon of fresh lemon zest for a bright, citrusy twist.
- Almond Extract – Swap half of the vanilla for almond extract for a nutty depth.
- Coconut Flakes – Sprinkle coconut on the chocolate-dipped section for a tropical touch.
3. Shape Variations
If you don’t have a bunny-shaped cookie cutter, don’t worry! You can use any Easter-themed shape, such as:
- Eggs
- Chicks
- Flowers
- Carrots
Ingredients
For the Cookies:
- 3 cups all-purpose flour
- 2 teaspoons baking powder
- 1 teaspoon salt
- 1 cup unsalted butter, room temperature
- 1 cup granulated sugar
- 1 large egg, room temperature
- 2 teaspoons vanilla extract
- ½ cup pastel sprinkles (plus more for decorating)
For the Chocolate Coating:
- 1 cup semisweet chocolate chips
- 1 teaspoon vegetable shortening (if needed for consistency)
Directions
Step 1: Mix the Dry Ingredients
In a medium bowl, whisk together the flour, baking powder, and salt. Set aside.
Step 2: Cream the Butter and Sugar
Using a stand mixer with the paddle attachment (or a hand mixer), cream the butter until smooth. Add sugar and beat until light and fluffy.
Step 3: Combine Wet and Dry Ingredients
Mix in the egg and vanilla until fully incorporated. Gradually add the flour mixture, one cup at a time, until just combined. Gently fold in the pastel sprinkles.
Step 4: Chill the Dough
Divide the dough into two large balls, wrap in plastic wrap, and flatten into thick disks. Refrigerate for at least one hour or overnight.
Step 5: Roll and Cut
Preheat oven to 350°F (175°C). Line a baking sheet with parchment paper. Roll out the chilled dough between plastic wrap (or on a lightly floured surface) to ⅓-inch thickness. Use a bunny-shaped cookie cutter to cut out cookies and place them on the prepared baking sheet.
Step 6: Bake and Cool
Bake for 8-10 minutes or until edges are just lightly golden. Let cookies cool on the sheet for a few minutes before transferring to a wire rack.
Step 7: Dip in Chocolate
Melt the chocolate chips in a microwave-safe bowl for 60 seconds, stirring until smooth. If the chocolate is too thick, add a teaspoon of vegetable shortening.
Step 8: Decorate
Dip each cooled cookie partially in melted chocolate, then sprinkle extra pastel sprinkles on top. Place cookies back on the wire rack until the chocolate sets.
Nutritional Information (Per Cookie)
- Calories: 202
- Total Fat: 11g
- Saturated Fat: 6g
- Cholesterol: 29mg
- Sodium: 150mg
- Carbohydrates: 26g
- Fiber: 1g
- Sugar: 13g
- Protein: 2g
Enjoy these adorable and delicious Easter Bunny Sugar Cookies—perfect for your holiday dessert table!
Frequently Asked Questions
1. Can I Make These Cookies Ahead of Time?
Yes! These cookies store beautifully. You can make them up to 2 weeks in advance and keep them in an airtight container in the fridge. If you want to keep them longer, freeze them for up to 3 months.
2. Can I Freeze the Dough?
Absolutely. After making the dough, shape it into flattened disks, wrap in plastic wrap, and store in a freezer bag. When ready to bake, thaw the dough in the refrigerator overnight before rolling and cutting.
3. What’s the Best Chocolate for Dipping?
Semi-sweet chocolate chips work great, but you can also use dark, white, or even colored candy melts for a more festive look. If your melted chocolate is too thick, add a teaspoon of vegetable shortening to thin it out.
4. Can I Make These Cookies Gluten-Free?
Yes! Simply substitute the all-purpose flour with a 1:1 gluten-free flour blend. Make sure it contains xanthan gum for the best texture.
5. Why Did My Cookies Spread Too Much?
If your cookies spread too much, the butter may have been too warm. Make sure to chill your dough thoroughly before baking. Additionally, avoid overmixing the dough, as this can cause spreading.
The Sweetest Easter Tradition
Baking is more than just mixing ingredients—it’s about creating moments, traditions, and memories that last a lifetime. These Easter Bunny Sugar Cookies aren’t just delicious; they bring joy to those who make and share them. Whether you’re baking with family, surprising a friend, or simply indulging in a sweet treat for yourself, these cookies add a touch of magic to the holiday.
So gather your ingredients, roll out the dough, and let the scent of freshly baked sugar cookies fill your home. And as you take that first bite—soft, buttery, with a hint of crunch from the sprinkles—know that you’re not just enjoying a cookie. You’re carrying on a tradition of love, warmth, and Easter cheer.

The Magic of Easter Bunny Sugar Cookies
Ingredients
Method
- edients – In a medium bowl, whisk together flour, baking powder, and salt. Set aside.
- Cream the Butter & Sugar – Using a stand mixer with a paddle attachment (or a hand mixer), beat the butter until smooth. Add sugar and continue beating until light and fluffy.
- Combine Wet & Dry Ingredients – Mix in the egg and vanilla until fully incorporated. Gradually add the flour mixture, one cup at a time, mixing until just combined. Gently fold in pastel sprinkles.
- Chill the Dough – Divide the dough into two large balls, wrap in plastic wrap, and flatten into thick disks. Refrigerate for at least one hour or overnight.
- Roll & Cut the Cookies – Preheat oven to 350°F (175°C). Line a baking sheet with parchment paper. Roll out the chilled dough between plastic wrap (or on a lightly floured surface) to ⅓-inch thickness. Use a bunny-shaped cookie cutter to cut out cookies and place them on the prepared baking sheet.
- Bake & Cool – Bake for 8-10 minutes or until edges are just lightly golden. Let cookies cool on the sheet for a few minutes before transferring to a wire rack.
- Dip in Chocolate – Melt chocolate chips in a microwave-safe bowl for 60 seconds, stirring until smooth. If needed, add a teaspoon of vegetable shortening for a smoother consistency.
- Decorate – Dip each cooled cookie partially in melted chocolate, then sprinkle with extra pastel sprinkles. Place cookies back on the wire rack until the chocolate sets.
Notes
- Store in an airtight container at room temperature for up to 5 days or freeze for up to 3 months.
- For extra fun, drizzle additional white or dark chocolate over the cookies after dipping.
- These cookies make great Easter gifts when wrapped in decorative bags!