The Story Behind the Simple Flourless Cake

It’s a rainy Sunday afternoon, the kind where the sky seems to stretch endlessly in shades of gray. The sound of raindrops against the window creates a soothing rhythm, and it’s in these moments that I find myself reaching for ingredients that don’t require perfection, just comfort. There’s something about baking on days like these that feels like an invitation to slow down and embrace simplicity.

This is how I came across the idea for this flourless cake – a recipe so uncomplicated and so satisfying that it became my go-to during moments when I needed something quick, yet incredibly delicious. It doesn’t require complicated tools or intricate techniques, making it perfect for anyone, no matter their baking experience.

I remember the first time I made this cake. It was a spontaneous decision after a long week of work, with a need for something to sweeten the day. The recipe caught my eye because it didn’t require flour – something I didn’t have at the moment. What I did have, however, were eggs, sugar, yoghurt, and a few pantry staples. The result was magical. The cake was light yet decadent, creamy yet airy, and I realized I had found something extraordinary in its simplicity.

Why Flourless Cake is the Perfect Dessert

In a world of complex recipes and extravagant desserts, sometimes the simplest ones hold the most joy. This flourless cake embodies that sentiment. It’s a dessert that anyone can make, even with limited ingredients. It’s a dessert that doesn’t require special tools or skills but still delivers a mouthwatering result.

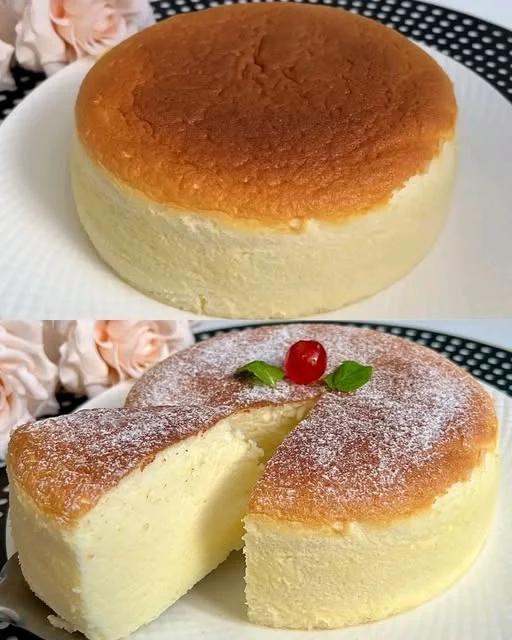
The beauty of this cake lies in its texture – it’s soft, light, and delicately sweet. It doesn’t rely on the richness of butter or the heaviness of flour. Instead, it leans into the natural creaminess of yoghurt and the airy fluffiness of whipped egg whites. The result is a cake that feels indulgent without feeling overly rich or heavy. This makes it the perfect dessert to enjoy after a meal without feeling overwhelmed.

Additionally, the cake’s simplicity makes it highly versatile. You can easily adjust the flavor profile by adding vanilla, citrus zest, or spices. It’s also a wonderful base for topping with fresh berries, a dusting of powdered sugar, or a drizzle of chocolate sauce. The possibilities are endless, and the best part is that the cake is naturally gluten-free, making it an excellent choice for those with dietary restrictions.

Ingredients

IngredientAmount
Egg yolks4
Natural yoghurt400g
Sugar40g
Corn starch50g
Baking powder2g
Egg whites4
Pinch of salt1
Sugar (for egg whites)40g

Directions

  1. Prepare the Ingredients: Preheat your oven to 180°C (350°F). Grease and line a cake pan.
  2. Whisk Egg Yolks and Sugar: In a large bowl, whisk the egg yolks with 40g of sugar until the mixture becomes pale and slightly fluffy.
  3. Add the Wet Ingredients: Add the natural yoghurt and mix until smooth. Gradually incorporate the corn starch and baking powder into the mixture until fully combined.
  4. Whisk Egg Whites: In a separate clean bowl, whisk the egg whites with a pinch of salt until stiff peaks form. Gradually add 40g of sugar and continue whisking until glossy.
  5. Combine Mixtures: Gently fold the egg whites into the yolk mixture. Be careful not to deflate the mixture. Stir until fully incorporated.
  6. Bake: Pour the batter into the prepared cake pan and bake for 30-35 minutes, or until a toothpick comes out clean when inserted into the center.
  7. Cool and Serve: Let the cake cool in the pan for 10 minutes before transferring it to a wire rack. Serve and enjoy!

Nutritional Information (Per Serving)

NutrientAmount
Calories120 kcal
Protein7g
Carbohydrates16g
Fat5g
Fiber0g
Sugar15g

Frequently Asked Questions

1. Can I make this cake without egg whites?

Unfortunately, egg whites are a key component in giving this cake its light and fluffy texture. If you are allergic to eggs or prefer a vegan version, you can experiment with egg substitutes like aquafaba (the liquid from canned chickpeas). While it may not be an exact replica, it will give you a similar airy texture.

2. Can I replace the natural yoghurt with something else?

Yes! While natural yoghurt adds a rich creaminess to the cake, you can substitute it with buttermilk, sour cream, or even a dairy-free alternative like coconut yogurt. Keep in mind that the flavor and texture may vary slightly, but the cake will still be delicious.

3. How can I store this cake?

The flourless cake can be stored in an airtight container at room temperature for up to 3 days. If you want to keep it for longer, you can refrigerate it for up to a week. Just make sure to let it come to room temperature before serving for the best texture and flavor.

4. Can I freeze this cake?

Yes, this cake freezes well! Allow it to cool completely, then wrap it tightly in plastic wrap and foil before placing it in the freezer. It can be frozen for up to 3 months. To enjoy, simply thaw at room temperature or warm it in the oven.

5. Can I add flavors to this cake?

Absolutely! This flourless cake is a great base for flavor experimentation. You can add vanilla extract, citrus zest (lemon, orange), or even a bit of cinnamon or nutmeg. For a richer taste, you can also mix in a bit of melted chocolate or cocoa powder.

6. How do I know when the cake is done baking?

The cake is done when it has set and is slightly golden on top. A toothpick inserted into the center should come out clean or with just a few crumbs. The cake will continue to set as it cools, so don’t worry if it’s a little soft when you first take it out of the oven.

7. Can I make this cake ahead of time?

Yes, this cake is a great make-ahead option. It’s best when allowed to cool completely before serving, and it actually improves in flavor after a day or two. You can make it ahead of time and store it for later.

Why This Cake is Perfect for Every Day

We live in a world where everything is constantly moving. With the hustle and bustle of life, there’s little room for overly complicated tasks, including baking. This cake doesn’t demand precision or too much time. With just a few simple ingredients, it offers a quick solution to satisfy any dessert cravings, while also being light enough for any occasion. Whether it’s an afternoon treat with coffee, an after-dinner delight, or a dessert for a weekend family gathering, this cake fits in perfectly.

What makes it even more special is its versatility. You can adjust the sweetness to your liking, add fruits, or enjoy it on its own. It’s also a great way to use up ingredients that might otherwise go to waste, like extra egg yolks or yoghurt nearing its expiration date.

As a home cook, there’s nothing more satisfying than baking a cake that comes together effortlessly, but tastes as though you’ve slaved over it for hours. It’s a beautiful reminder that simplicity doesn’t mean sacrificing quality. Sometimes, the best things in life are the ones that are uncomplicated and come straight from the heart.

Conclusion: A Cake to Cherish

This flourless cake is a treasure that offers more than just sweetness. It’s a recipe that embodies the essence of comfort food – simple, nourishing, and satisfying. It’s a cake that invites you to pause and savor each bite, while also reminding us of the joy in simplicity.

Whether you make it for yourself on a quiet evening or share it with friends and family, this cake will never disappoint. It’s the perfect balance of lightness and indulgence, offering a moment of sweetness amidst the chaos of everyday life. So the next time you need a quick dessert or something to brighten your day, let this flourless cake be your go-to recipe. It’s sure to become a favorite in your baking repertoire, just like it has for so many others.

The Secret Bread Recipe: A Journey to Homemade Comfort

There’s something truly magical about the scent of freshly baked bread that fills a home. It’s a scent that brings a sense of warmth, comfort, and nostalgia—a smell that can transform even the most ordinary kitchen into a sanctuary. I remember the first time I made bread with my grandmother. Her kitchen, always bustling with activity, would be filled with laughter and the hum of the oven. The rhythm of kneading dough and the joy of watching it rise was a dance she had perfected over the years. There was a simple, yet profound beauty in that process—mixing humble ingredients into something extraordinary.

As I grew older, I lost touch with the art of bread making, but that feeling of connection to the past and to my roots always stayed with me. One day, I decided to revisit this lost art. This “Secret Bread Recipe” is my homage to those cherished memories. It’s a recipe that encapsulates the simplicity and joy of baking, while also offering a few secrets of its own. The result is a loaf that is light, soft, and golden, with a satisfying, buttery flavor that transports you right back to those cozy afternoons spent in my grandmother’s kitchen.

This bread is more than just a recipe—it’s an invitation to create something special, to gather your loved ones around the table, and to experience the joy of baking. Whether you’re a seasoned baker or just beginning your journey into the world of homemade bread, this recipe will guide you every step of the way. It’s a bread that tells a story—a story that starts in the kitchen, where simple ingredients come together to form something greater than the sum of their parts.

Why You Should Try This Secret Bread Recipe

There’s an art to bread making. It’s not just about following a recipe—it’s about understanding the relationship between yeast, flour, water, and time. This bread recipe is designed to bring you that perfect balance: the perfect amount of rise, a beautifully soft texture, and a golden crust that you’ll want to break into with both hands. Here’s why this bread recipe stands out:

  1. The Simplicity of Ingredients: It uses pantry staples—flour, yeast, milk, butter, eggs—ingredients that you likely already have in your kitchen. The real secret is how these ingredients come together to create something that feels like magic.
  2. The Perfect Balance of Fluff and Structure: The combination of egg whites and yeast gives this bread an airy texture while maintaining enough structure to hold up to your favorite spreads or sandwiches. It’s soft enough to melt in your mouth yet firm enough to hold up as a base for toppings.
  3. Buttery Finish with a Fresh Herb Twist: The addition of butter at the end and a sprinkle of chopped parsley elevates this bread from basic to exceptional. The butter enhances the flavor, while the parsley adds a touch of freshness and color.
  4. Versatility for Every Meal: Whether you’re enjoying it as a warm, crusty side for soup, using it for sandwiches, or simply slathering it with jam and butter, this bread is a versatile addition to any meal. It’s a comforting staple that can easily become the star of the table.

Ingredients

IngredientAmount
Sugar1 tablespoon (20 grams)
Dry Yeast1 packet (10 grams)
Warm Milk2 cups (400 ml)
Egg Whites2
Oil1 tea glass (100 ml)
Flour6 cups (720 grams)
Salt1 teaspoon (8 grams)
Chopped ParsleyA pinch
Butter100 grams

Directions

  1. Activate the Yeast: In a small bowl, combine the warm milk and sugar. Sprinkle the dry yeast over the top and let it sit for 5-10 minutes until the yeast begins to foam.
  2. Mix Wet Ingredients: In a large bowl, whisk together the egg whites and oil. Add the yeast mixture once it is activated and stir well.
  3. Combine Dry Ingredients: In another bowl, mix the flour and salt together. Gradually add the dry ingredients into the wet mixture, stirring to combine until a dough begins to form.
  4. Knead the Dough: Transfer the dough onto a floured surface and knead for about 8-10 minutes, until the dough is smooth and elastic.
  5. First Rise: Place the dough in a lightly oiled bowl, cover it with a clean kitchen towel, and allow it to rise for 1-2 hours, or until it has doubled in size.
  6. Shape the Dough: Once the dough has risen, punch it down to release air. Divide it into smaller pieces or shape it into one large loaf, depending on your preference.
  7. Second Rise: Place the shaped dough onto a greased baking tray and cover it again. Let it rise for another 30 minutes.
  8. Prepare the Topping: While the dough rises, whisk the egg yolks in a small bowl. After the second rise, brush the dough with the egg yolks for a golden finish.
  9. Bake: Preheat your oven to 180°C (350°F). Place the dough into the oven and bake for 25-30 minutes, or until the bread is golden brown and sounds hollow when tapped on the bottom.
  10. Finish: Remove the bread from the oven, brush it with melted butter, and sprinkle the chopped parsley on top for a fresh, aromatic finish.

Nutritional Information (per serving)

NutrientAmount
Calories220 kcal
Carbohydrates35g
Protein6g
Fat8g
Fiber2g
Sodium200mg

FAQs About the Secret Bread Recipe

1. What makes this bread “secret”? The secret behind this bread is in the simplicity and combination of ingredients that work in harmony to create the perfect loaf. The use of both egg whites and yeast gives it a light texture without compromising on structure, while the final step of brushing the bread with butter and parsley adds a touch of richness and a fresh, herby aroma that elevates the flavor profile.

2. Can I substitute the dry yeast with fresh yeast? Yes! If you’re using fresh yeast, use about 30 grams of fresh yeast to replace the 10 grams of dry yeast in the recipe. You’ll need to activate it in warm milk just as you would with the dry yeast, but fresh yeast might require a slightly longer time to bloom.

3. Can I make this bread without eggs? While eggs help create a tender crumb and rich texture, you can replace them with an egg substitute if needed. For example, use flaxseed meal as a vegan alternative (1 tablespoon flaxseed meal mixed with 3 tablespoons water for each egg). However, keep in mind that the texture may vary slightly.

4. How can I store this bread? This bread is best enjoyed fresh out of the oven, but you can store it for up to 2-3 days in an airtight container. To keep it fresh for longer, consider freezing it in slices. When you’re ready to enjoy, just pop it in the toaster or warm it up in the oven.

5. Can I add other herbs or ingredients to this bread? Absolutely! Feel free to experiment with herbs and spices to suit your taste. Rosemary, thyme, or garlic would all make excellent additions to this bread. You could even mix in some cheese or olives for a savory twist.

6. Can I make this bread without using milk? If you don’t want to use milk, you can substitute it with water, almond milk, or another plant-based milk of your choice. Keep in mind that this might slightly affect the flavor, but the bread will still be delicious.

The Process of Making the Secret Bread: A Lesson in Patience

While baking bread can seem like a daunting task, the beauty of this recipe lies in its simplicity. The time you spend allowing the dough to rise and develop flavor is crucial. Yeast needs time to work its magic—transforming simple ingredients into something extraordinary.

Bread making is as much about patience as it is about technique. The first rise, where the dough expands and becomes airy, is a moment of quiet anticipation. This is where the dough becomes something more than flour and water; it becomes the foundation for a meal, a tradition, and a connection to the past. As the dough rises, you’re reminded that good things take time—and the results are worth the wait.

Conclusion: The Legacy of Homemade Bread

In today’s fast-paced world, it’s easy to forget the joy and satisfaction that comes from making something from scratch. This Secret Bread Recipe brings you back to the basics—using simple ingredients and a little bit of time to create something extraordinary. Whether you’re baking it for a special occasion, a family meal, or just to enjoy the comfort of a warm loaf at home, this bread has the power to transform your kitchen into a place of magic.

As you knead the dough, let it rise, and finally take that first bite of fresh, homemade bread, you’ll realize that baking is more than just a task—it’s a tradition. It’s a way to nourish not only your body but also your soul. Each loaf tells a story, and this one will certainly become a story of your own—a story of warmth, comfort, and the joy of creating something meaningful from scratch.

So, gather your ingredients, get your hands a little floury, and let the magic of homemade bread fill your kitchen. This Secret Bread Recipe is sure to become a family favorite, passed down through generations, just like the stories that came before it.

A Fresh Twist on Breakfast: The Savory Oatmeal & Tomato Skillet

There’s something about a hearty breakfast that makes the day feel right from the very start. As a child, I remember my mom in the kitchen, early mornings filled with the warm smells of fresh cooking. But one dish that always stood out to me was her version of savory oatmeal, which she would make when we had just a few ingredients left in the pantry. Little did I know at the time, this “scrap meal” would soon become my favorite go-to recipe for starting my day.

Over the years, I’ve added my own twist to it, taking it beyond the basic oatmeal and exploring the flavors of tomatoes, herbs, and eggs. The beauty of this dish lies in its versatility and comfort, with just a few key ingredients that come together to create a satisfying, nutritious breakfast. This savory oatmeal is packed with flavor, hearty enough to fuel your day, and light enough to feel fresh and energized.

It’s perfect for those mornings when you want something different from the usual sweet oatmeal, yet still need that warm, comforting start to the day. The combination of oatmeal’s rich texture with the tangy flavor of tomatoes and the richness of mozzarella makes it a meal that leaves you feeling full and content. This recipe is easy to make, flexible with ingredients, and a great way to switch things up on a busy morning.

The Savory Oatmeal Journey: Why You Should Try It

When most people think of oatmeal, they picture a sweet breakfast—something along the lines of cinnamon, sugar, or fruits like bananas or berries. While these traditional oatmeal variations are delicious, savory oatmeal has its own appeal. It’s a creative departure from the norm, offering a meal that’s equally satisfying, but with a balance of flavors that you wouldn’t expect.

This oatmeal isn’t just for breakfast either. It’s a versatile meal that can easily work as a lunch or dinner dish when you’re looking for something light but filling. The combination of oat flakes, eggs, tomatoes, and mozzarella is both comforting and healthy. Oats are rich in fiber, which promotes digestive health, and the tomatoes add a fresh, juicy element, while eggs provide protein to keep you satisfied longer.

In fact, savory oatmeal dishes are gaining popularity across the world for their ability to be both customizable and nutritious. The key is to balance savory, acidic, and umami flavors to create a satisfying meal. In this recipe, tomatoes and mozzarella provide the perfect contrast to the base of oats. Add a sprinkle of herbs and a dash of lemon juice, and you’ve got a bowl of savory, cheesy goodness.

Ingredients

IngredientAmount
Oatmeal1 cup
Yogurt3 tablespoons
Lemon juice1 teaspoon
Provencal herbs1 teaspoon
Salt1 teaspoon
Eggs2
Tomatoes (diced)1-2
Mozzarella cheese, shreddedTo taste
Avocado oil (for frying)As needed

Instructions

  1. Prepare the Oatmeal Base: In a small bowl, mix together the oatmeal, yogurt, lemon juice, Provencal herbs, and salt. Stir until the mixture is well combined.
  2. Cook the Oatmeal: Heat a non-stick skillet over medium heat and add a little avocado oil for frying. Once the pan is hot, pour in the oatmeal mixture, spreading it evenly.
  3. Add the Eggs: Crack the two eggs directly onto the oatmeal mixture. Cover the skillet with a lid and let the eggs cook for about 3-4 minutes, or until the yolks are cooked to your preference.
  4. Add the Tomatoes: While the eggs are cooking, dice the tomatoes and sprinkle them over the cooking oatmeal. Allow them to soften slightly as the dish continues to cook.
  5. Finish with Cheese: Once the eggs are done to your liking, sprinkle shredded mozzarella cheese on top and cover the skillet for 1-2 minutes, just long enough to melt the cheese.
  6. Serve and Enjoy: Once everything is cooked through, carefully transfer the oatmeal to plates and serve warm. Optionally, drizzle a bit more avocado oil on top for extra richness.

Nutritional Information (per serving)

NutrientAmount
Calories290 kcal
Carbohydrates25g
Protein14g
Fat18g
Fiber5g
Sugar5g
Sodium350mg

Ingredients That Make This Dish Special

Oats form the base of this recipe, but what truly elevates it are the supporting ingredients. A few eggs add richness, while fresh tomatoes offer a natural sweetness and acidity. Mozzarella cheese gives a creamy, melt-in-your-mouth texture, and the avocado oil for frying adds a smooth, healthy fat that ties everything together.

What I love most about this dish is that it uses ingredients most of us already have in our kitchens. Oats are an incredibly versatile pantry staple, but when combined with fresh ingredients like tomatoes and mozzarella, they transform into something special. And if you’re looking for ways to make it even more exciting, feel free to add extra vegetables, herbs, or different cheeses.

Frequently Asked Questions

1. Can I make this recipe vegan?

Absolutely! You can substitute the eggs with a plant-based egg alternative, such as a flax egg (made from ground flaxseed and water) or tofu scramble for a similar texture. As for the cheese, you can use any dairy-free cheese alternative you like. The key to this recipe is the versatility of the ingredients, allowing for creative substitutions that maintain the dish’s delicious balance.

2. What can I substitute if I don’t have mozzarella cheese?

Mozzarella is a mild and melty cheese, but you can easily substitute it with other cheeses like cheddar, goat cheese, or even feta. If you prefer something less creamy, a harder cheese like Parmesan would also work well and add a more intense flavor.

3. Is it possible to make this recipe gluten-free?

Yes! This recipe is naturally gluten-free as it uses only oats, which are gluten-free if you choose certified gluten-free oats. Just be sure to double-check that all your other ingredients are gluten-free, especially the cheese, if you’re using any processed varieties that may contain gluten.

4. Can I add other vegetables to this recipe?

Definitely! Feel free to add other vegetables to boost the flavor and nutritional value of the dish. Bell peppers, spinach, mushrooms, or even roasted sweet potatoes would all be excellent additions. The beauty of this recipe is that you can adjust the ingredients to suit your tastes and dietary preferences.

5. Can I meal prep this recipe?

Yes! This recipe can be made ahead of time and stored in an airtight container in the refrigerator for up to 2-3 days. To reheat, simply place it in the microwave or on the stovetop with a little splash of water or broth to loosen it up. This makes it a perfect meal prep option for busy mornings.

6. What can I serve this dish with?

This savory oatmeal pairs beautifully with a variety of sides. For a complete meal, you can serve it alongside a simple side salad with fresh greens or some avocado slices for added creaminess. For extra protein, consider adding a side of grilled chicken or a piece of whole-grain toast.

A Meal for Every Mood

While this savory oatmeal dish is perfect for breakfast, it’s not just confined to mornings. I’ve found that it makes for an excellent lunch when I’m craving something light but filling. It’s the kind of meal that doesn’t feel heavy, but it’s still substantial enough to satisfy you for hours. The addition of fresh tomatoes and eggs makes it a great balance of carbs, protein, and fats.

I also appreciate how customizable it is. Whether you’re using leftover tomatoes or fresh mozzarella, or even changing the herbs, each variation makes the dish feel new. The best part is how simple it is to prepare—sometimes, I throw everything into the pan and let it cook while I sip my coffee. It’s a low-effort, high-reward meal.

Conclusion: The Ultimate Comfort Food

Savory oatmeal with tomatoes, eggs, and mozzarella is a dish that brings comfort to the table. Whether it’s the middle of winter or a warm summer morning, this meal has a way of satisfying both body and soul. It’s a recipe that feels familiar and nourishing, while still being bold and flavorful. With just a few ingredients, you can create something that tastes like it came straight from a gourmet kitchen.

This dish is a celebration of simple ingredients brought together in a way that feels exciting and satisfying. It’s perfect for those who want something different from the usual sweet oatmeal or those looking for a savory breakfast or lunch option. The combination of oats, eggs, tomatoes, and cheese makes it a comforting, filling meal, while the addition of fresh herbs and spices keeps it light and refreshing.

Give this recipe a try next time you’re craving a meal that’s both wholesome and delicious, and enjoy a new twist on your regular oatmeal routine!

Nutty Apple Oatmeal Delight: A Wholesome Breakfast to Start Your Day

There’s something special about the first meal of the day. It sets the tone, fuels your body, and, if done right, can feel like a comforting ritual rather than just another task. For me, that ritual has always been tied to oatmeal. Growing up, my grandmother would make the most delicious, heartwarming bowls of oatmeal, filling the kitchen with the sweet aroma of cinnamon and baked apples. It wasn’t just about eating; it was about feeling cared for, about knowing that something as simple as a bowl of oats could provide warmth, comfort, and energy for the day ahead.

Even now, as I prepare my own morning meals, I still find myself drawn to those same flavors. This Nutty Apple Oatmeal Delight is inspired by those childhood mornings. It’s a perfect balance of creamy oats, the natural sweetness of banana and apple, and the rich crunch of nuts. The cinnamon ties everything together, offering a depth of flavor that is both familiar and satisfying. Whether you’re looking for a nutritious breakfast or simply a moment of warmth in your busy day, this oatmeal recipe is the perfect choice.

Why This Oatmeal Recipe Stands Out

Oatmeal has long been considered one of the healthiest breakfasts you can have. But what makes this version extra special is the combination of flavors and textures that elevate it from a simple bowl of oats to a gourmet experience. Here’s what makes this Nutty Apple Oatmeal Delight unique:

  1. A Natural Sweetness Without Added Sugar – The mashed banana and apple provide a natural sweetness that eliminates the need for added sugars, making this dish a healthier choice.
  2. A Perfect Balance of Textures – The mix of ground oats and whole oat flakes ensures a creamy yet slightly chewy consistency, while the chopped nuts add a delightful crunch.
  3. Aromatic and Comforting Flavors – Cinnamon, apples, and nuts create an inviting aroma and deep, cozy flavors that make this meal feel extra special.
  4. Rich in Fiber and Nutrients – Oats are packed with fiber, which supports digestion and keeps you feeling full, while the nuts provide healthy fats and protein.
  5. Customizable and Versatile – You can swap the nuts for seeds, use different fruits, or add extra toppings to make it your own.

Ingredients

IngredientAmount
Oat flakes, ground100g (1 cup)
Oat flakes50g (1/2 cup)
Cinnamon1 teaspoon
Apple, chopped1
Banana, mashed1
Coconut oil (or preferred oil)2 tablespoons
Nuts or almonds25g (1/4 cup)

Step-by-Step Directions for the Perfect Bowl of Oatmeal

  1. Prepare the Base – Start by grinding half of the oats to create a fine oat flour. This step ensures a creamier texture while still maintaining some chewy whole oats.
  2. Combine the Ingredients – In a pot, mix the ground oats, whole oats, and cinnamon. Add milk or water and stir well.
  3. Simmer to Perfection – Heat the mixture over medium heat, stirring occasionally, until it thickens and becomes creamy.
  4. Incorporate the Fruits – Once the oats have softened, stir in the mashed banana and chopped apple. Let them cook for a couple of minutes to release their natural sweetness.
  5. Add the Final Touches – Stir in the coconut oil for a rich, smooth texture. Sprinkle in the nuts for crunch.
  6. Serve and Enjoy – Pour the oatmeal into a bowl, top with extra apple slices or nuts if desired, and enjoy while warm.

Nutritional Information (Per Serving)

NutrientAmount
Calories~250-300 kcal
Carbohydrates~35g
Protein~6g
Fat~12g
Fiber~5gStart your day with a bowl of Nutty Apple Oatmeal Delight! This easy-to-make recipe combines fiber-rich oats with the sweetness of banana and apple, enhanced with a warm touch of cinnamon and a satisfying crunch from nuts. Perfect for a healthy, filling breakfast that will keep you energized all day long. A cozy meal that brings comfort, nutrition, and a smile with every spoonful.

FAQs: Everything You Need to Know About This Oatmeal Recipe

1. Can I use instant oats instead of rolled oats?
Yes, but keep in mind that instant oats cook faster and may result in a softer texture. If you prefer a heartier consistency, stick with rolled or old-fashioned oats.

2. What can I use instead of banana for natural sweetness?
You can substitute mashed pumpkin, unsweetened applesauce, or blended dates for a similar sweetness without added sugars.

3. Can I prepare this oatmeal the night before?
Absolutely! You can make overnight oats by mixing all the ingredients in a jar and letting them sit in the fridge overnight. In the morning, just give them a quick stir and enjoy.

4. What are some additional toppings I can use?
Try adding Greek yogurt, flaxseeds, chia seeds, shredded coconut, or a drizzle of honey for an extra layer of flavor.

5. Is this recipe suitable for meal prep?
Yes! You can make a batch and store it in airtight containers in the refrigerator for up to 3 days. Simply reheat with a splash of milk or water before serving.

Conclusion: A Simple Recipe with Big Benefits

A bowl of Nutty Apple Oatmeal Delight is more than just breakfast—it’s a nourishing, flavorful start to your day. Whether you’re looking for a quick weekday meal or a slow, comforting weekend breakfast, this recipe delivers in both taste and nutrition. Packed with fiber, natural sweetness, and healthy fats, it keeps you full, energized, and satisfied for hours.

So the next time you’re looking for a breakfast that’s easy to make yet packed with goodness, give this oatmeal recipe a try. It’s a small, simple way to start your day with a moment of warmth, nourishment, and joy.

A Simple Meal, A Lifetime of Memories: The Heart of Tuna Pasta

When I think about food that has stood the test of time, I’m immediately brought back to a dish that has always been a constant in my life—the simple yet satisfying combination of tuna and pasta. As a child, my mother would often make this meal when we needed something quick, comforting, and easy to prepare. It wasn’t just about the taste; it was about the experience of sitting down with my family, laughing, and sharing a meal that felt like home.

There’s something deeply emotional about food that ties us to moments, to memories, and to the people we love. This dish was a staple in our kitchen—a reminder of those evenings when we would gather together after a long day, the smell of garlic and onions filling the air. It wasn’t fancy or extravagant, but it was always satisfying, nourishing, and full of heart. Tuna and pasta became one of those meals that connected generations, passed down through family stories and shared laughter.

To this day, every time I make this dish, I’m transported back to those moments. It’s a meal that, though simple, has the ability to evoke nostalgia and warmth. The flavors come together effortlessly, each bite comforting and familiar. This tuna pasta recipe isn’t just food; it’s a connection to my past and the traditions that shaped my love for cooking.

The Allure of Simplicity: Why Tuna Pasta Is Timeless

Tuna and pasta may sound simple, but there’s a beauty in its simplicity. At the core of this dish are a few basic ingredients that, when combined, create something deeply satisfying. The beauty lies in the balance of flavors and textures. The tuna adds a savory, rich taste, while the pasta provides a satisfying base. The onions and garlic bring depth, while the fresh basil and thyme offer an aromatic, herbal lift.

One of the reasons this dish has endured over time is its versatility. It can be easily customized to suit your taste or what’s available in your pantry. Want a little heat? Add chili peppers. Craving a burst of acidity? Toss in some capers or a squeeze of lemon. This dish doesn’t need to be overly complicated to shine—it’s a perfect example of how simple ingredients can come together in a way that feels both familiar and exciting.

The combination of canned tuna and pasta also makes it a practical choice for any busy weeknight or when you’re looking to clear out your pantry. The ingredients are pantry staples, so you don’t need to make a special trip to the grocery store. And yet, despite its humble roots, the dish can feel luxurious and satisfying, especially with a sprinkle of fresh cheese and parsley to finish.

Ingredients

Ingredients
1 can of tuna
Olive oil (for sautéing)
1 onion, chopped
2 cloves of garlic, minced
Chili pepper (optional)
Fresh basil and thymeTo taste
250g pastaAny type of your preference
500 ml water
1 tomato, diced
50g cheese (grated)Preferably Parmesan or mozzarella
Fresh parsleyFor garnish
1 tbsp tomato paste
Capers (optional)For added briny flavor

Directions

  1. Sauté the Aromatics: Heat a tablespoon of olive oil in a large pan over medium heat. Add the chopped onion and cook for about 5 minutes, or until softened. Add the minced garlic and chili pepper (if using) and cook for another minute, allowing the flavors to bloom.
  2. Incorporate Tomato Paste: Stir in the tomato paste, cooking for 2-3 minutes until it darkens slightly and releases its flavors.
  3. Cook the Pasta: Bring 500 ml of water to a boil in a separate pot. Add the pasta and cook according to the package instructions until al dente. Drain the pasta, reserving a bit of the pasta water.
  4. Combine Tuna and Veggies: Add the canned tuna to the pan with the sautéed onion and garlic mixture. Break up the tuna with a spoon. Stir in the diced tomato and cook for a few more minutes until the tomato softens. Add fresh basil and thyme, then season with salt and pepper to taste.
  5. Combine Pasta with Sauce: Add the cooked pasta to the tuna and tomato sauce. If the sauce is too thick, add a little of the reserved pasta water to achieve your desired consistency. Stir well to coat the pasta with the sauce.
  6. Finish with Cheese and Garnish: Sprinkle the grated cheese over the pasta and toss it into the sauce to melt the cheese. Garnish with fresh parsley and, if desired, capers for an extra burst of flavor.

Nutrients

NutrientAmount per Serving
Calories400 kcal
Protein25 g
Carbohydrates45 g
Fat14 g
Fiber3 g
Sugars4 g

The Versatility of Tuna and Pasta: Customizing to Taste

One of the most wonderful aspects of this recipe is its adaptability. While the core ingredients—tuna, pasta, and a few aromatics—remain constant, there are countless ways to personalize this dish based on what you have on hand or what you’re craving. Here are a few ideas for customizing your tuna pasta:

  1. Adding Vegetables
    If you love incorporating more vegetables into your meals, this dish is perfect for experimenting. Consider adding spinach, zucchini, or even mushrooms for added texture and flavor. If you have frozen peas or sweet corn on hand, those work wonderfully as well.
  2. Choosing Different Pasta
    The type of pasta you choose can change the entire dish. While traditional spaghetti is a great option, you could also try penne, fusilli, or farfalle for a fun twist. The shape of the pasta can alter the way the sauce clings, giving each bite a slightly different texture.
  3. Spice It Up
    For those who enjoy a little heat, adding chili pepper (as suggested in the recipe) can really elevate the dish. You can also experiment with red pepper flakes, a dash of hot sauce, or even a sprinkle of smoked paprika for a smoky kick.
  4. Herb Variations
    The fresh basil and thyme in this dish provide a fragrant herbaceous note, but don’t be afraid to experiment with other herbs. Try oregano for an Italian twist, or add rosemary for a deeper, earthy flavor. Fresh parsley is an excellent garnish, adding a pop of color and brightness.
  5. Cheese Choices
    While mozzarella or Parmesan is often the go-to for this recipe, feel free to experiment with other cheeses. A sharp cheddar could add a unique richness, while goat cheese could provide a creamy tang. For an extra indulgent option, a sprinkle of ricotta or a dollop of cream could turn this dish into a creamy, comforting meal.

The Nutritional Benefits of Tuna and Pasta

Though tuna pasta is known for its comfort, it’s also surprisingly nutritious. Packed with protein from the tuna and a good dose of fiber from the pasta (especially if you opt for whole wheat or gluten-free pasta), this dish can keep you feeling full and satisfied without the heaviness that some other comfort foods bring.

Protein
Tuna is an excellent source of lean protein. It’s rich in essential amino acids that help build and repair muscle, making this dish a great post-workout meal. Protein also helps keep you feeling fuller for longer, reducing the chances of overeating or snacking between meals.

Healthy Fats
Though not as high in fat as some other dishes, the olive oil used to sauté the onions and garlic is a heart-healthy fat. Olive oil is a staple of the Mediterranean diet, known for its anti-inflammatory properties and benefits to cardiovascular health.

Carbohydrates
The pasta in this dish provides a source of complex carbohydrates. These carbs are an important part of a balanced diet, providing energy and helping stabilize blood sugar levels. Whole wheat pasta is a great option if you’re looking for additional fiber.

Vitamins and Minerals
The addition of herbs like basil and thyme offers a range of vitamins and minerals, including Vitamin C, Vitamin A, and various antioxidants. These help support your immune system and overall health.

Frequently Asked Questions

Can I use a different type of pasta?
Yes! While traditional pasta works best, you can experiment with various types like whole wheat, gluten-free, or even spiralized zucchini for a low-carb option.

What if I don’t have fresh herbs?
If you don’t have fresh basil or thyme, you can use dried herbs instead. Just be sure to adjust the quantities, as dried herbs are more concentrated in flavor than fresh ones.

Can I make this dish vegetarian?
Yes, you can easily adapt this recipe to be vegetarian by replacing the tuna with sautéed mushrooms or a plant-based protein of your choice.

Can I make this dish ahead of time?
Tuna pasta is best enjoyed fresh, but you can make it ahead of time and store it in the refrigerator for up to 2 days. Reheat it on the stove with a splash of water to keep the sauce from drying out.

What can I serve with tuna pasta?
This dish pairs well with a side salad, garlic bread, or even some roasted vegetables. A light white wine, such as Pinot Grigio, can complement the meal perfectly.

Conclusion: A Meal that Speaks to the Heart

Tuna and pasta may seem like a simple combination, but it’s a meal that carries with it a sense of home and comfort. Its humble origins remind us that sometimes the best meals are the simplest ones, and it’s the little moments we share over these meals that become the most cherished memories. Whether you’re cooking for yourself or sharing it with friends and family, this dish brings people together, one bite at a time.

As I continue to make this dish in my own kitchen, I think about the countless times I’ve shared it with loved ones. It’s more than just a recipe—it’s a piece of my history, my connection to the past, and a tradition I hope to pass on. In a world full of complex recipes and extravagant meals, sometimes it’s the most straightforward dishes, like tuna and pasta, that remind us of the joy found in simplicity. So, whether you’re looking for a quick weeknight meal or a comforting dish that brings back memories, this tuna pasta recipe will always be there to deliver warmth, flavor, and a sense of belonging.

A Journey of Flavor: The Comfort of Cheese and Veggies

There’s something magical about the feeling of comfort food. For me, it’s a dish like this one—cheese, fresh vegetables, and a touch of herbs. It reminds me of weekends spent with my family, gathering around the kitchen to share simple yet delicious meals. Growing up, my mother was the heart of our home. She had an innate talent for creating comforting meals that nourished both body and soul, but she always knew that the simplest dishes could hold the most meaning.

I vividly recall those quiet Saturday mornings when we would all come together in the kitchen. The smell of sizzling butter and sautéing vegetables would fill the air, and I knew that something extraordinary was being made. There was a constant buzz of conversation, but the true magic was in the food—a blend of flavors that seemed so effortless yet somehow perfectly balanced. This dish, with its combination of cheese, peppers, olives, and dill, was one of those family staples. It was so simple, yet every bite seemed to evoke a memory of love and warmth that transcended the meal itself.

Even today, as I prepare this dish in my own kitchen, I feel a sense of nostalgia that transports me back to those moments. The beauty of this recipe is in its simplicity—no complicated techniques, no extravagant ingredients, just fresh, wholesome flavors coming together to create something truly comforting. This dish is more than just food; it is a reminder of family, tradition, and the importance of making time to sit down and share a meal with the people we love.

The Allure of Fresh Ingredients

At the heart of this dish is the combination of fresh vegetables and cheeses. The sweet yellow and red peppers provide a satisfying crunch and sweetness that complement the richness of the cheeses. Mozzarella adds a smooth, mild flavor, while feta brings a sharp, briny contrast. These ingredients aren’t just thrown together—they harmonize beautifully, creating a well-rounded taste that dances on the palate.

The dill, with its bright, herbaceous flavor, acts as a refreshing note that balances the richness of the cheese and the earthiness of the peppers. The olives introduce a slight brininess that enhances the other flavors, rounding out the dish and adding an unexpected depth.

This recipe is the embodiment of how the freshest ingredients, when treated simply, can produce something remarkable. Whether you’re preparing it for a special occasion or just for a quiet dinner at home, this dish’s colorful, vibrant mix of vegetables and cheese provides both comfort and excitement. There’s a reason these ingredients have been used in so many cultures—they bring out the best in each other, creating a dish that is more than the sum of its parts.

Ingredients

Ingredients
2 chicken eggs
50 ml vegetable oil
100 ml milk
5g baking powder
130g flour
1 raw sweet yellow pepper
1 raw sweet red pepper
1 tomato
50g green olives
100g feta cheese
A bunch of dill
100g hard mozzarella cheese
20g butter

Directions

  1. Prepare the Vegetables: Begin by chopping the sweet yellow and red peppers into small cubes. Dice the tomato and slice the green olives into rings. Set all the vegetables aside for easy access.
  2. Make the Batter: In a large bowl, crack the eggs and lightly beat them. Add the vegetable oil and milk to the eggs and mix until smooth. Stir in the flour and baking powder, continuing to mix until you have a smooth batter.
  3. Add the Veggies and Cheese: Gently fold the prepared peppers, diced tomato, sliced olives, and fresh dill into the batter. Crumble the feta cheese and add it to the mixture. Grate the mozzarella cheese and mix it in as well.
  4. Cook the Dish: Heat a pan over medium heat and melt the butter in it. Once the butter has melted, pour the batter into the pan, spreading it evenly. Cook for approximately 5-7 minutes on each side, or until the dish is golden brown and firm to the touch.
  5. Serve and Enjoy: Once cooked through, remove the dish from the pan and slice it into portions. Garnish with extra fresh dill if desired. Serve hot and enjoy this flavorful mix of veggies, cheese, and herbs!

Nutrients

NutrientAmount per Serving
Calories220 kcal
Protein8 g
Carbohydrates18 g
Fat14 g
Fiber2 g
Sugars4 g

Why This Recipe Works: The Perfect Combination of Ingredients

1. Vegetables for Texture and Freshness
The raw sweet yellow and red peppers offer a beautiful balance of sweetness and crunch, providing a satisfying texture contrast to the soft cheeses. The tomato brings juiciness, while the olives add a salty bite that complements the sweetness of the peppers and tomato. This is a combination that works incredibly well on the palate, with each bite providing a new sensation, yet everything feels harmonized.

2. Cheeses for Creaminess and Sharpness
Cheese, especially mozzarella and feta, is the heart of this dish. The mozzarella melts beautifully into the batter, creating pockets of gooey deliciousness. The feta, on the other hand, crumbles and distributes throughout the dish, providing sharp, tangy bites that cut through the richness of the mozzarella and oil. The contrast between the two cheeses creates a dynamic flavor profile that enhances every element in the dish.

3. Herbs for Brightness and Aroma
The dill is the final touch that ties everything together. Its light, aromatic flavor lifts the richness of the cheese and oil, providing a fresh, clean contrast. This herb is not just an afterthought; it brings the whole dish to life. The fragrance of fresh dill adds to the sensory experience, turning this simple dish into something special.

4. Simplicity of Method
Perhaps what makes this dish even more beloved is how simple it is to prepare. There’s no need for complex cooking methods or fancy equipment—just a pan, a few basic ingredients, and a little bit of time. This is a recipe anyone can make, no matter their cooking experience, yet it consistently delivers exceptional results.

Frequently Asked Questions

1. Can I substitute the feta cheese?
Yes! If you’re not a fan of feta or don’t have it on hand, you can substitute it with goat cheese, ricotta, or even cream cheese. Each cheese will bring a different texture and flavor, but the dish will still be delicious. Goat cheese will add a tangy, creamy element, while ricotta will make the dish even more airy and soft.

2. Can I make this dish vegetarian or vegan?
Yes! To make the dish vegetarian, simply omit the butter or substitute it with olive oil. For a vegan version, you can replace the eggs with a plant-based egg substitute and choose vegan versions of mozzarella and feta cheese. The rest of the ingredients will work wonderfully without the dairy.

3. What can I serve this dish with?
This dish pairs beautifully with a light green salad or a side of roasted vegetables. You can also serve it with a creamy soup, like a tomato bisque, to create a comforting meal. If you’re looking for something more substantial, a side of quinoa or couscous would work well to balance the flavors.

4. Can I add other vegetables?
Absolutely! This recipe is incredibly versatile. Feel free to add other vegetables like spinach, zucchini, or mushrooms. You can even try adding some chopped spinach for extra greens or swap out the peppers for some roasted eggplant.

5. How can I store the leftovers?
This dish can be stored in an airtight container in the refrigerator for up to three days. It also reheats well in the microwave or on the stove. Just make sure to reheat it gently so that the cheese doesn’t become too tough or rubbery.

Conclusion: The Comfort of Simplicity

The beauty of this dish lies in its simplicity. It’s not fancy or complex, but it is full of flavor and warmth. It’s the kind of dish that feels like a hug from the inside—comforting, satisfying, and delicious in its own uncomplicated way. Whether you’re making it for a casual weeknight dinner or sharing it with friends at a special gathering, this flavorful mix of vegetables, cheese, and herbs will undoubtedly become a favorite.

As I make this dish in my own kitchen, I’m reminded that cooking doesn’t always have to be elaborate to be meaningful. Sometimes, the most memorable meals are the ones made with love, shared with those we care about, and savored slowly over conversation. This dish will always be more than just a recipe to me; it’s a tradition, a connection to the past, and a reminder of how something simple can be extraordinary. So, next time you’re craving a dish that’s both comforting and full of flavor, look no further than this delicious cheese and veggie medley.

Lemon Yogurt Cake: A Simple Slice of Joy

For many of us, the kitchen is not just a place where meals are made—it’s a space filled with memories. Growing up, baking was a form of therapy for my mother. She would often bake simple cakes, one of our favorites being a lemon yogurt cake. I can still recall the joy of walking into the kitchen and being greeted by the zesty fragrance of lemons and the soft, airy scent of a freshly baked cake. There was always something so comforting about her lemon yogurt cake. It was light, refreshing, and so simple, yet it never failed to satisfy.

That cake became more than just a dessert for me. It symbolized love, tradition, and the care that went into every little detail of family life. The days spent in the kitchen, mixing ingredients and waiting for the cake to rise in the oven, were some of my fondest memories. As I got older, I started baking this cake myself, passing on the tradition and creating new memories with my own family. It was my way of connecting with the past and making new traditions. It reminded me that some of the best things in life are the simplest, and that a good cake, made with love, can make any day a little brighter.

The beauty of this cake is in its simplicity. It doesn’t require any elaborate techniques or expensive ingredients, yet it’s always a crowd-pleaser. The natural yogurt adds moisture, while the lemon zest brings a bright, tangy flavor that makes every bite refreshing. Whether you’re making it for a special occasion or just because you need a little pick-me-up, this lemon yogurt cake will always hit the spot. It’s a reminder that sometimes, it’s the simplest things in life that bring us the most joy.

Why Lemon Yogurt Cake Is So Special

Lemon yogurt cake holds a special place in the hearts of many bakers. It’s a humble recipe that combines basic ingredients like yogurt, lemon, and flour, but the result is a cake that’s light, airy, and bursting with flavor. There’s a reason why this cake is often referred to as the “everyday cake.” It’s the kind of cake that’s perfect for any occasion, from a casual afternoon snack to a dessert at a family gathering.

The combination of yogurt and lemon in this cake is what makes it so unique. The yogurt not only adds moisture, ensuring that the cake is soft and tender, but it also adds a subtle tang that balances the sweetness of the sugar. The lemon zest infuses the cake with a fresh, vibrant flavor that’s both uplifting and comforting. It’s a cake that manages to be both refreshing and satisfying, making it the perfect treat for any time of year.

What makes this cake even more appealing is its versatility. You can enjoy it as is, or you can dress it up with a glaze or frosting, depending on your preferences. You can also add a handful of berries, or perhaps a sprinkle of powdered sugar, to make it even more special. It’s the kind of cake that can easily be adapted to suit your taste, while still maintaining its simplicity and charm.

One of the best aspects of lemon yogurt cake is how quick and easy it is to make. Unlike many other cakes that require a long list of ingredients or complicated techniques, this cake can be whipped up in no time. With just one egg, some basic pantry staples, and a few minutes of your time, you can have a cake that feels like it came straight from the bakery. It’s the ideal choice for anyone looking to bake something delicious without a lot of fuss.

Ingredients

For the Cake
1 egg
A pinch of salt
70g sugar
Grated lemon zest (or 8g vanilla sugar)
70ml oil
125g natural yogurt
2 tablespoons lemon juice
150g flour
8g baking powder

Directions

  1. Combine Wet Ingredients: In a large mixing bowl, whisk together the egg, pinch of salt, and sugar until smooth. Add in the grated lemon zest (or vanilla sugar), oil, yogurt, and lemon juice, mixing until well combined.
  2. Add Dry Ingredients: In a separate bowl, combine the flour and baking powder. Gradually add this dry mixture to the wet ingredients, stirring until just combined and the batter is smooth.
  3. Bake the Cake: Preheat your oven to 180°C (350°F). Pour the batter into a greased or lined cake pan. Bake for 20-25 minutes, or until a toothpick inserted into the center comes out clean.
  4. Cool and Serve: Let the cake cool for a few minutes before removing it from the pan. Slice and enjoy the refreshing, light lemon yogurt cake.

Nutrients

NutrientAmount per Serving
Calories180 kcal
Protein4 g
Carbohydrates26 g
Fat7 g
Fiber1 g
Sugars14 g

Frequently Asked Questions

1. Can I use flavored yogurt instead of plain yogurt? While plain yogurt is ideal for this recipe because it adds a subtle tanginess without overpowering the flavor, you can use flavored yogurt if you prefer. Just be mindful of the flavor you choose, as it will influence the final taste of the cake. For example, using lemon-flavored yogurt can enhance the lemon flavor, while berry-flavored yogurt will add a fruity twist.

2. Can I make this cake gluten-free? Yes, you can easily adapt this cake to be gluten-free by substituting the all-purpose flour with a gluten-free flour blend. Be sure to check the measurements on the gluten-free flour package, as you may need to make slight adjustments to the flour-to-liquid ratio.

3. How can I make this cake more moist? If you prefer an even moister cake, you can add an extra 2 tablespoons of yogurt to the batter or increase the amount of lemon juice slightly. You can also use a little bit of sour cream in place of some of the yogurt for added richness.

4. How can I store this cake? This cake stays fresh for several days when stored in an airtight container at room temperature. If you have any leftovers, you can also store it in the refrigerator for up to five days. You can also freeze slices of the cake for up to a month if you’d like to save some for later.

5. Can I add frosting or glaze to this cake? Absolutely! While the cake is delicious on its own, adding a glaze or frosting can make it even more special. A simple lemon glaze made from powdered sugar and lemon juice is a perfect complement. Alternatively, you can add a cream cheese frosting for a richer flavor.

6. Can I make this cake ahead of time? Yes, this cake can be made ahead of time. It keeps well for a few days, so it’s an excellent option for meal prep or a party. Just be sure to store it properly in an airtight container to keep it fresh.

Tips for Perfecting Your Lemon Yogurt Cake

  1. Room Temperature Ingredients: Ensure that your yogurt and egg are at room temperature before mixing them together. This helps them blend more easily and results in a smoother batter.
  2. Don’t Overmix: When adding the dry ingredients to the wet mixture, stir just until combined. Overmixing the batter can result in a dense cake.
  3. Zest the Lemon Carefully: Be sure to zest the lemon finely, avoiding the white pith underneath the peel, which can be bitter.
  4. Oven Temperature: Make sure your oven is fully preheated before baking the cake to ensure it bakes evenly.
  5. Optional Add-ins: Feel free to experiment with add-ins like poppy seeds, a handful of berries, or even a light dusting of cinnamon to create a flavor variation.

Conclusion: A Cake to Share and Cherish

Lemon yogurt cake is a timeless recipe that continues to bring joy to kitchens across the world. Its simplicity, light texture, and refreshing lemon flavor make it the perfect treat for any occasion. Whether you’re baking it to celebrate a special moment or simply to enjoy a quiet afternoon with a cup of tea, this cake is sure to brighten your day.

The beauty of this recipe is that it’s so much more than just a cake. It’s a connection to memories, a way to share love, and an opportunity to make new traditions. With its quick prep time and minimal ingredients, this cake proves that sometimes the best things in life are the simplest. It’s a reminder that you don’t need complex recipes or intricate techniques to create something truly wonderful. All you need is a little time, a few ingredients, and the desire to create something delicious.

As you bake this cake, take a moment to reflect on the memories it may bring—whether they’re from your own childhood or from a time you shared with loved ones. Let this cake be a part of your tradition, a slice of joy that you pass down to others. In the end, the true magic of lemon yogurt cake lies not only in its flavor but in the way it brings people together, one bite at a time.

Hearty Vegetable Soup: A Bowl of Warmth and Comfort

There’s something incredibly comforting about a bowl of soup. For me, it’s more than just the warmth it provides or the richness of the flavors—it’s a memory, a moment of connection. I remember as a child, walking home from school on cold autumn days, the scent of soup simmering on the stove would greet me before I even opened the door. It wasn’t just any soup. It was my grandmother’s vegetable soup, a simple yet hearty combination of fresh vegetables, flavorful broth, and just the right amount of seasoning.

My grandmother, a woman of few words but infinite love, would make this soup with whatever vegetables she had in the garden. It was never the same twice—always full of surprises and comfort. She would stir the pot slowly, allowing the vegetables to soften, creating an aroma so inviting that it seemed to wrap around you like a warm hug. There was no rush. The slow cooking was part of the process, part of the love that went into every bite.

That soup became more than just a meal for me. It represented family, tradition, and the feeling of being cared for. As the years went by, I started making this soup myself. Though the recipe has evolved, it still carries that same sense of comfort and warmth. It reminds me of home, of simpler times, and of those I love. Every time I make it, I think of my grandmother and the joy she found in feeding those she cared about.

The beauty of vegetable soup lies in its simplicity. It’s a dish that can be adapted to any season, any occasion, and any taste. With just a few fresh ingredients and a slow simmer, it turns into something so much more. It’s a reminder that, sometimes, the best meals don’t need to be complicated; they simply need to be made with care and love. Whether it’s a cold winter evening or a gathering with friends and family, this vegetable soup is sure to warm your heart and nourish your soul.

Why Vegetable Soup Is More Than Just a Meal

At its core, vegetable soup is the embodiment of comfort. It’s a dish that transcends time, geography, and culture. Every culture has its own version, but the essence remains the same: a nourishing, hearty meal made with the freshest seasonal vegetables, rich broth, and a combination of flavors that are both familiar and satisfying. What makes this soup particularly special is its versatility. You can adjust the ingredients to suit your preferences, making it an ideal dish to cook year-round, using whatever vegetables are in season.

But the appeal of vegetable soup is not only its flavor. It’s the ritual of preparing it. The chopping, sautéing, and simmering all create an experience, not just a dish. The kitchen fills with the scent of garlic, onions, and fresh vegetables as they begin to soften and meld together. With each stir, the soup becomes something more, something that grows with time. It’s the kind of meal that you can make in large batches, sharing it with others and knowing that the joy you feel in making it will be shared with everyone who eats it.

In many ways, vegetable soup is a communal dish. Whether you’re cooking for yourself or a crowd, the process of making it can be an act of self-care or a way to show others that you care. It’s the perfect dish to make for a family dinner, a get-together, or even to bring to a friend in need. The warmth and nourishment it provides extend beyond the physical—it touches the heart, reminding us that food has the power to heal and bring us together.

Ingredients

For the Soup
1 onion, chopped
Olive oil for frying
1 celery stalk, chopped
1 carrot, chopped
1 red pepper, chopped
1 green pepper, chopped
2 garlic cloves, minced
1 leek, cleaned and sliced
3 potatoes, peeled and diced
2 tablespoons flour
200ml (1 cup) vegetable broth
1.5 liters (7 cups) vegetable broth
Salt and black pepper to taste
100g (1/2 cup) noodles
Dried parsleyFor garnish

Directions

  1. Sauté the Vegetables: Heat olive oil in a large pot over medium heat. Add the chopped onion, celery, carrot, red pepper, and green pepper. Cook for about 5-7 minutes until the vegetables begin to soften and the onions become translucent.
  2. Add Garlic and Leek: Stir in the minced garlic and sliced leek, and cook for an additional 2-3 minutes until the garlic is fragrant and the leek softens.
  3. Create the Soup Base: Sprinkle the flour over the sautéed vegetables and stir well to combine. Cook for 1-2 minutes to eliminate the raw flour taste.
  4. Add Broth and Potatoes: Gradually pour in the vegetable broth, beginning with the 200ml (1 cup), followed by the remaining 1.5 liters (7 cups). Add the diced potatoes, and bring the soup to a boil.
  5. Simmer the Soup: Once boiling, reduce the heat and let the soup simmer for 20-25 minutes, or until the potatoes are tender.
  6. Add Noodles and Season: Stir in the noodles and cook for another 8-10 minutes, or until the noodles are soft. Season with salt and black pepper to taste.
  7. Serve and Garnish: Once the noodles are cooked, remove the soup from the heat. Ladle the soup into bowls, and garnish with a sprinkle of dried parsley before serving.

Nutrients

NutrientAmount per Serving
Calories150 kcal
Protein4 g
Carbohydrates30 g
Fat2 g
Fiber5 g
Sugars6 g

Frequently Asked Questions

1. Can I use frozen vegetables instead of fresh?

Yes, frozen vegetables can be a great substitute for fresh ingredients in this soup. They’re convenient and often just as nutritious, especially when fresh vegetables are out of season. However, keep in mind that frozen vegetables may soften quicker than fresh ones, so you might want to adjust the cooking time slightly to avoid overcooking them.

2. How can I make this soup vegan or vegetarian?

This vegetable soup is naturally vegan and vegetarian, as it is made entirely from plant-based ingredients. However, if you’re concerned about the broth, make sure you use a vegetable broth that is vegan or vegetarian-friendly. Some store-bought broths may contain animal products like chicken or beef, so check the label to be sure.

3. Can I add protein to the soup?

Yes, you can add protein to the soup if you like. Adding beans, lentils, or even tofu can boost the protein content and make the soup more filling. If you prefer a meat option, shredded chicken or ground turkey can also be incorporated into the soup. Just be sure to adjust the cooking times based on the protein you choose.

4. How can I make the soup thicker?

If you prefer a thicker soup, there are a few options. You can mash some of the cooked vegetables directly in the pot to create a creamier texture. Alternatively, you can blend a portion of the soup using an immersion blender or regular blender. Another option is to add a tablespoon or two of flour or cornstarch to the broth to help thicken it up.

5. Can I store leftovers?

Yes, this vegetable soup stores very well. Allow it to cool completely before transferring it to an airtight container. It will keep in the refrigerator for 3-4 days. You can also freeze it for up to 3 months. When reheating, you may need to add a little extra broth to adjust the consistency, as the soup can thicken after being stored.

6. Can I make this soup in a slow cooker?

Absolutely! To make this soup in a slow cooker, simply add all the ingredients to the crockpot, set it on low, and let it cook for 6-8 hours. The result will be just as delicious, with the added convenience of hands-off cooking. If you’re using noodles, you can add them in the last 30 minutes of cooking to avoid them getting too soft.

Additional Tips and Variations

1. Experiment with Seasonings: One of the great things about vegetable soup is that you can easily tailor it to your taste. Add herbs like thyme, rosemary, or bay leaves for extra depth of flavor. A splash of lemon juice or a dash of hot sauce can also bring a new dimension to the soup.

2. Add Greens: Kale, spinach, or swiss chard are great additions to this soup. Simply chop them up and add them during the last 10-15 minutes of cooking for a burst of color and added nutrients.

3. Make it Creamy: If you prefer a creamy vegetable soup, consider adding a splash of coconut milk, heavy cream, or a dollop of sour cream just before serving. This will create a silky-smooth texture that’s perfect for a comforting winter meal.

4. Spice It Up: For those who enjoy a little heat, consider adding red pepper flakes, chili powder, or even diced jalapeños to the soup. This will give the dish a kick and complement the sweetness of the vegetables.

Conclusion: A Hearty Soup That Brings Comfort and Joy

Vegetable soup is more than just a meal—it’s a tradition, a source of comfort, and a reminder of the simple pleasures in life. Whether you’re cooking for yourself or sharing it with others, the act of making and enjoying this soup is a celebration of care, warmth, and nourishment. As the soup simmers away on the stove, it brings people together, creating a space for connection, conversation, and joy.

This recipe, rooted in the flavors of home, offers a timeless combination of fresh vegetables and savory broth that will never go out of style. It’s versatile, adaptable, and full of heart. So the next time you need a comforting meal, reach for this vegetable soup and let it nourish not only your body but also your soul.

Cheesy Skillet Garlic Bread: A Recipe That Brings Us Together

When I think back to my childhood, one of the most comforting memories I have is sitting at the dinner table, the aroma of garlic bread filling the room as my family gathered together. The bread was always warm, golden, and topped with melted cheese that stretched as we tore off pieces. The buttery, garlicky aroma would bring everyone into the kitchen, and without a word, we’d reach for a slice, savoring every bite. There was something about the simplicity of garlic bread—its crispy exterior, soft interior, and mouthwatering cheese—that made it more than just a side dish. It became a part of family gatherings, a snack during movie nights, and even a treat when we had guests over.

As I grew older, I began experimenting with recipes and making this classic garlic bread myself. One of my favorites became this Cheesy Skillet Garlic Bread, a recipe that takes everything I love about garlic bread and elevates it with a crispy, cheesy topping, all made right in the skillet. This recipe brings the same sense of warmth and togetherness that I experienced growing up. It’s perfect for any occasion, whether you’re having a family meal, celebrating with friends, or enjoying a cozy night in.

The beauty of this recipe lies in its simplicity. While the traditional method of baking garlic bread in the oven is great, cooking it in a skillet on the stovetop adds a delightful crispy texture that makes every bite even more irresistible. The rich, garlicky butter mixture, combined with melty cheese, creates the perfect balance of flavors that can transform any meal into something truly special. And just like the bread I grew up with, it has a way of bringing people together—sharing stories, laughter, and, of course, another piece of bread.

Why Skillet Garlic Bread Is a Game-Changer

Garlic bread is a classic dish that never goes out of style. It’s easy to make, versatile, and incredibly satisfying. The simple combination of bread, butter, garlic, and herbs creates a flavor profile that’s universally loved. However, this skillet version takes it to the next level. The crispy golden crust that forms on the outside of the bread, coupled with the gooey cheese, makes it a mouthwatering treat that’s difficult to resist.

Unlike traditional oven-baked garlic bread, which can sometimes result in uneven cooking or a soft, soggy center, the skillet method ensures that each piece is perfectly crisp and evenly cooked. The heat from the skillet creates a beautiful crust while locking in the flavors. Additionally, by topping the bread with cheese, the dish transforms from a simple side to a main character in any meal.

This skillet garlic bread is versatile enough to pair with pasta, soups, salads, or simply served as a snack on its own. Whether you’re serving it with a hearty pasta dish or using it to mop up sauce from your favorite stew, it’s a perfect companion to so many meals. The addition of cheese not only enhances the flavor but also gives the bread a rich, indulgent quality that makes it a crowd favorite.

Ingredients

For the Dough
1 teaspoon yeast (3 grams)
1 tablespoon sugar (12 grams)
1 tablespoon butter (14 grams)
½ cup lukewarm milk (110 ml)
1 cup all-purpose flour (120 grams)
¼ teaspoon salt (1.5 grams)

Directions

  1. Activate the Yeast: In a small bowl, combine the lukewarm milk, sugar, and yeast. Stir to dissolve the sugar and let the mixture sit for about 5 minutes until it becomes frothy.
  2. Prepare the Dough: In a large mixing bowl, combine the all-purpose flour and salt. Add the yeast mixture and melted butter, then mix to form a dough. Knead the dough for about 5-7 minutes until it becomes smooth and elastic.
  3. Let the Dough Rise: Place the dough in a lightly greased bowl, cover it with a clean cloth, and let it rise for 1-1.5 hours, or until it has doubled in size.
  4. Shape the Dough: Punch down the dough and transfer it to a lightly floured surface. Roll it out into a flat disc shape, large enough to fit your skillet.
  5. Cook the Bread: Heat a skillet over medium heat. Carefully place the dough in the skillet and cook for about 3-4 minutes on one side until lightly golden. Flip the bread over and cook for another 3-4 minutes on the other side.
  6. Prepare the Garlic Butter: While the bread is cooking, melt some butter and mix with garlic. Brush the mixture over the top of the bread as it cooks.
  7. Add Cheese: Once both sides of the bread are golden, sprinkle your favorite shredded cheese on top and cover the skillet for 1-2 minutes, allowing the cheese to melt and become bubbly.
  8. Serve: Remove the skillet from the heat, slice the cheesy garlic bread, and serve immediately.

Nutrients

NutrientAmount per Serving
Calories180 kcal
Protein6 g
Carbohydrates26 g
Fat7 g
Fiber1 g
Sugars2 g

FAQs About Cheesy Skillet Garlic Bread

1. Can I use any type of bread for this recipe?

While this recipe uses a classic all-purpose bread, you can absolutely switch it up depending on your preferences. Baguettes, ciabatta, or even sourdough work wonderfully as alternatives. The key is to choose a bread that has a slightly crusty exterior and a soft interior to hold up well when cooking in the skillet. Avoid soft, airy bread like sandwich bread as it may not crisp up as well.

2. What cheese should I use for the cheesy topping?

Mozzarella cheese is the go-to option for this recipe because of its meltability and mild flavor that pairs perfectly with garlic. However, feel free to get creative with other cheeses. Parmesan adds a sharp, salty contrast to the creamy mozzarella, while cheddar can introduce a richer flavor. A combination of cheeses, such as a blend of mozzarella and cheddar, works beautifully as well.

3. Can I make this recipe without cheese?

Absolutely! If you’re looking for a lighter version of garlic bread, you can easily omit the cheese and enjoy the bread with just the garlic butter mixture. The garlic, butter, and herbs alone provide an incredibly flavorful base. You could also top the bread with fresh herbs like parsley or basil for an added burst of flavor.

4. How do I store leftovers?

Leftovers can be stored in an airtight container at room temperature for up to two days. If you have more than that, you can freeze the bread by wrapping it tightly in plastic wrap and then in foil. To reheat, place the bread on a skillet over low heat until warmed through, or you can pop it in the oven for a few minutes to crisp it back up.

5. Can I prepare the garlic bread ahead of time?

Yes, you can prepare the garlic butter and spread it on the bread ahead of time. Simply assemble the bread and store it in the refrigerator for up to 24 hours before cooking. When ready, heat the skillet and cook the bread as directed, adding cheese and finishing the recipe. This makes it an ideal option for busy weeknights or when hosting guests.

6. Can I add more seasonings to the garlic butter mixture?

Definitely! The garlic butter in this recipe can be customized to suit your taste. You can add dried herbs like oregano, thyme, or rosemary for an herbal twist. For a spicy kick, a pinch of red pepper flakes can give the bread a little heat. Experimenting with different spices allows you to tailor the flavor to your liking.

The Perfect Pairings: What to Serve with Skillet Garlic Bread

While this cheesy garlic bread is fantastic on its own, it pairs beautifully with a wide variety of dishes. Here are some of the best ways to enjoy it:

1. Pasta Dishes: Skillet garlic bread is a classic companion to pasta, especially hearty, sauce-heavy dishes like spaghetti bolognese, lasagna, or penne arrabbiata. The bread acts as a vehicle to scoop up every last drop of delicious sauce.

2. Soups and Stews: This bread is the perfect accompaniment to a steaming bowl of soup or stew. Whether you’re serving a rich tomato soup, a creamy potato leek soup, or a hearty beef stew, the garlic bread will help you savor every bite.

3. Salads: Pair your skillet garlic bread with a fresh green salad. The crunchy, garlicky bread contrasts nicely with the crispness of the salad, creating a perfect balance of textures and flavors.

4. Barbecue: If you’re grilling up some steaks, burgers, or chicken, serve a slice of cheesy garlic bread alongside. The smoky flavors of the barbecue mix wonderfully with the rich, buttery bread.

Conclusion: Bringing People Together One Slice at a Time

Cheesy Skillet Garlic Bread is more than just a side dish—it’s a celebration of flavor, comfort, and togetherness. The process of making this bread, from mixing the dough to watching it cook and melt with cheese in the skillet, is an experience that brings a sense of accomplishment and anticipation. But it’s not just about the recipe. It’s about the people you share it with and the memories you create around the table. Whether it’s a casual family dinner or a festive gathering, this garlic bread has a way of making every meal feel special.

As the cheese melts and the garlic butter crisps up in the skillet, you can’t help but smile. It’s a reminder that food, at its core, is about more than just filling our stomachs. It’s about the warmth, the connection, and the love we share with those we hold dear. So next time you find yourself in need of a comforting meal or a crowd-pleasing snack, turn to this cheesy skillet garlic bread. It’s a dish that brings people together and fills hearts with warmth, one slice at a time.

Cabbage Casserole: A Comforting Classic with a Modern Twist

Growing up, my family would gather around the dinner table, the warm aroma of a freshly baked casserole filling the room. These moments were a mix of laughter, storytelling, and the quiet comfort of food that brought us together. The humble cabbage, often seen as a simple ingredient, had the power to transform into something hearty and delicious when combined with the right flavors. It wasn’t just about the meal itself—it was about the memories created, the love shared, and the joy of savoring a home-cooked dish that made you feel like you were wrapped in a warm blanket.

Over time, I’ve come to realize that these dishes, much like the cabbage casserole, are more than just recipes—they are bridges to nostalgia, traditions, and the love of those who prepare them. This cabbage casserole recipe takes me back to those childhood days, with a little modern twist. It’s a recipe that is both simple and deeply satisfying, perfect for cozy nights or family gatherings. The combination of soft, tender cabbage, mixed with the creaminess of Greek yogurt and the melt-in-your-mouth mozzarella cheese, offers a flavor-packed experience that takes the humble cabbage to new heights.

If you’re looking for a comforting, healthy dish that is easy to make, this cabbage casserole is the answer. It’s packed with nutrients, flavor, and a sense of familiarity that will instantly make you feel at home. Whether you’re preparing it for a family meal or a gathering with friends, this dish brings the kind of warmth and comfort that food is meant to offer.

Why Cabbage Casserole is a Perfect Addition to Your Meals

Cabbage casserole is a unique blend of wholesome ingredients that make it not only delicious but also nutritious. It’s a great way to incorporate more vegetables into your diet without compromising on flavor. The cabbage provides fiber, antioxidants, and vitamins, while the Greek yogurt adds a creamy texture without the heavy calories of traditional creamy sauces. Zucchini and carrots further enhance the dish’s texture and nutritional profile, providing a boost of vitamins and minerals. The addition of mozzarella cheese brings richness and helps bind the casserole together, creating a dish that’s as comforting as it is satisfying.

What makes this casserole even more special is its versatility. You can adapt the recipe to suit various dietary needs or preferences. If you’re looking for a gluten-free option, this recipe naturally fits the bill. You can also easily adjust the seasoning or swap ingredients to suit your taste. For example, if you prefer a tangy kick, you can add some lemon zest or a touch of vinegar to the dish. The beauty of this recipe is its ability to take on different flavors while still remaining true to its comforting essence.

Ingredients

For the Casserole
500 grams cabbage, shredded
Salt, to taste
2 eggs, beaten
1 onion, chopped
1 carrot, grated
2 zucchinis, grated
50 grams Greek yogurt
Black pepper, to taste
Olive oil, for greasing
30 grams Greek yogurt (additional)
50 grams mozzarella cheese, grated
For the Sauce
3 tablespoons Greek yogurt
1 teaspoon mustard
1 clove garlic, minced

Directions

  1. Prepare the Casserole Base: Preheat the oven to 180°C (350°F). Grease a casserole dish with olive oil.
  2. Mix the Cabbage: In a large bowl, combine the shredded cabbage, chopped onion, grated carrot, and grated zucchinis. Add salt and black pepper to taste.
  3. Add Eggs and Yogurt: Beat the eggs and mix them with the Greek yogurt (50 grams). Pour this mixture over the vegetables and toss everything together until well-coated.
  4. Assemble the Casserole: Transfer the vegetable and egg mixture into the prepared casserole dish. Spread evenly. Top with grated mozzarella cheese and additional Greek yogurt (30 grams).
  5. Bake: Bake for about 30-35 minutes or until the top is golden and the casserole is firm.
  6. Prepare the Sauce: While the casserole bakes, combine the Greek yogurt, mustard, and minced garlic in a small bowl. Stir until smooth.
  7. Serve: Once the casserole is ready, drizzle the creamy sauce over the top and serve hot.

Nutrients

NutrientAmount per Serving
Calories180 kcal
Protein8 g
Carbohydrates10 g
Fat12 g
Fiber3 g
Sugars5 g

FAQs About Cabbage Casserole

1. Can I prepare this cabbage casserole ahead of time?

Yes, you can absolutely prepare this casserole ahead of time. In fact, it often tastes even better the next day as the flavors have time to meld together. To do so, assemble the casserole as instructed but without baking it. Cover it tightly with plastic wrap or aluminum foil and refrigerate for up to 24 hours. When you’re ready to bake it, just preheat the oven and cook according to the original instructions. This makes it a great option for meal prepping or for busy weeknights.

2. Can I use a different type of cheese?

While mozzarella is the classic cheese used in this recipe, you can definitely swap it out for other cheeses based on your preferences. Cheddar, Parmesan, or even a combination of cheeses would work beautifully. Keep in mind that different cheeses will bring different flavors, so experiment to find the perfect cheese combination that suits your taste.

3. Is there a way to make this casserole vegan?

Yes, it’s easy to make this cabbage casserole vegan-friendly! To replace the eggs, use a flaxseed meal or chia seed mixture. Combine 1 tablespoon of flaxseed meal or chia seeds with 3 tablespoons of water and let it sit for a few minutes to create an egg-like texture. For the Greek yogurt, you can use a plant-based yogurt such as almond or coconut yogurt. Lastly, replace the mozzarella cheese with a vegan cheese alternative that melts well, or simply skip the cheese if you prefer a lighter version.

4. Can I freeze leftover cabbage casserole?

Absolutely! This casserole freezes wonderfully. After baking, allow it to cool completely before wrapping it tightly in plastic wrap or aluminum foil. Store it in an airtight container or freezer bag for up to 3 months. To reheat, thaw it overnight in the fridge and bake at 180°C (350°F) for 15-20 minutes until heated through. You can also reheat it directly from the freezer, though this may take a little longer.

5. What can I serve this cabbage casserole with?

Cabbage casserole is a hearty dish that pairs well with a variety of sides. You can serve it alongside a fresh green salad for a lighter option or with some roasted potatoes for a more substantial meal. If you want to keep it light, a simple side of sautéed spinach or roasted Brussels sprouts would complement the dish perfectly. For a complete meal, consider serving it with a protein like grilled chicken or a slice of whole-grain bread to scoop up the creamy sauce.

6. Is this cabbage casserole suitable for a low-carb diet?

Yes, this casserole is naturally low in carbs, making it suitable for a low-carb diet. The vegetables provide fiber and essential nutrients without adding excessive carbs, and the Greek yogurt and mozzarella add protein and healthy fats. If you’re looking to reduce carbs even further, you can use less of the root vegetables like carrots or zucchini and focus more on cabbage as the base.

The Nutritional Benefits of Cabbage

Cabbage is often underrated in the vegetable world, but it deserves far more recognition for its impressive health benefits. Rich in fiber, cabbage helps support digestive health, keeps you feeling full longer, and can even aid in weight management. It’s also a great source of Vitamin C, which supports immune function, skin health, and overall wellness. Cabbage is also packed with antioxidants, which help reduce inflammation and protect against chronic diseases.

When combined with the other ingredients in the casserole, cabbage’s benefits are further enhanced. The Greek yogurt adds probiotics, which promote gut health, while the mozzarella cheese contributes calcium and protein, both essential for maintaining strong bones and muscles.

Why This Recipe is More Than Just a Meal

Cabbage casserole, like many family recipes, holds a special place in the heart. It’s the type of dish that not only nourishes the body but also brings people together. The simplicity of the ingredients makes it approachable, yet the flavors come together in such a way that each bite feels satisfying. Whether you’re sharing it with family on a Sunday evening or preparing it for a gathering, this casserole has the power to evoke feelings of warmth and belonging.

As I reflect on the importance of food in our lives, I realize that it’s not just about the sustenance it provides but the memories and experiences that are woven into each dish. This cabbage casserole, with its rich flavors and creamy sauce, is a reminder of the joy that food can bring. It’s a reminder that even the simplest ingredients can create something truly special. And perhaps, just like those childhood dinners, this cabbage casserole will become a tradition in your own family, offering comfort and connection for years to come.

Conclusion: A Dish That Warms the Heart and Soul

In a world that often moves too fast, there’s something truly special about slowing down and enjoying a comforting, home-cooked meal. This cabbage casserole, with its blend of fresh vegetables, creamy yogurt, and savory cheese, is a dish that not only nourishes the body but also nurtures the soul. Whether you’re making it for a quiet dinner at home or sharing it with loved ones, this casserole is a beautiful reminder that food has the power to bring people together, create lasting memories, and provide comfort in the most delicious way possible.

So, next time you find yourself in need of a hearty, nutritious dish, reach for this cabbage casserole recipe. It’s more than just a meal—it’s a connection to the past, a celebration of the present, and a dish that will warm your heart for years to come.