Cannelloni with Minced Meat: A Hearty Family Classic

It was one of those chilly winter evenings when I was a child. The sky outside was a blanket of grey, and the wind howled against the windows of our cozy kitchen. My mother, always the heart of our home, had been preparing dinner for hours. There was something special about the way she cooked—each dish felt like a hug from the inside. But it was her cannelloni with minced meat that held a special place in our family’s heart.

Every time my mom made cannelloni, we knew it was going to be a meal to remember. The aroma of simmering tomato sauce, garlic, and freshly cooked beef filled the house, making everyone in the family gather around the table long before dinner time. The dish wasn’t just about the food; it was about the experience—the laughter, the conversations, and the warmth that permeated our home as we shared a meal together.

Over the years, I’ve made this dish countless times for my own family. Each time I prepare it, I’m transported back to those moments when the world outside seemed to fade away, and it was just us, gathered around the table, enjoying something truly special. The recipe has remained mostly unchanged through the generations—its heartiness and comfort still bring that same joy to my table today. And now, as I prepare this dish, I see the same sense of anticipation and delight in my children’s eyes, and it fills me with warmth and gratitude.

Cannelloni with minced meat isn’t just a meal; it’s a tradition that continues to bring families together. It’s a dish that speaks of love, memories, and the importance of sharing a meal with those we care about. Each bite is a connection to the past, a reminder of those who came before us and the joy of enjoying simple, home-cooked food.

Why Choose Cannelloni with Minced Meat?

Cannelloni with minced meat is a dish that balances richness and simplicity. Its layers of pasta, savory beef filling, and creamy cheese make it an ideal meal for any occasion—whether it’s a Sunday dinner, a holiday gathering, or a casual family meal. The beauty of this dish lies in its versatility; you can make it as simple or as elaborate as you like. Whether you prefer a basic beef filling or want to elevate it with spices and herbs, cannelloni provides endless possibilities for creativity in the kitchen.

Unlike many pasta dishes, cannelloni offers a unique texture experience. The pasta tubes are hearty and firm, perfect for holding the flavorful minced meat filling. When baked, they soften just enough to absorb the flavors of the sauce while maintaining their structure. Each bite is a delightful contrast of soft pasta, juicy meat, and creamy cheese, creating a mouthwatering combination that is both satisfying and comforting.

For those who love Italian cuisine, cannelloni with minced meat is a must-try. It’s a hearty meal that is not only delicious but also a great way to showcase the magic of combining basic ingredients into something extraordinary. Whether you are cooking for a family or hosting friends, this dish is sure to impress.

Ingredients

For the Beef Filling:

IngredientAmount
Minced beef (about 4-5 cups)1.2 kg
Chicken eggs2
SaltTo taste
Ground black pepperTo taste
Dried ground sweet paprikaTo taste
Onion, finely chopped1

Directions:

  1. Prepare the Beef Filling
    In a large pan over medium heat, cook the finely chopped onion until it becomes translucent. Add the minced beef to the pan, breaking it up as it cooks. Stir frequently until the beef is browned and cooked through, about 10-15 minutes. Season with salt, black pepper, and dried sweet paprika to taste.
  2. Combine Eggs
    Once the beef mixture has cooled slightly, add the two beaten eggs and mix well. The eggs will help bind the filling and give it a smooth texture.
  3. Fill the Cannelloni
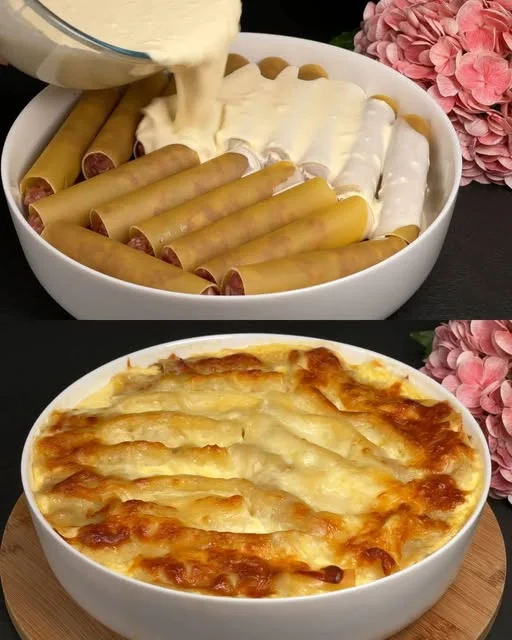
    Carefully spoon the beef mixture into the uncooked cannelloni tubes, filling them as much as possible. Place the filled cannelloni in a baking dish that has been lightly greased or coated with a thin layer of tomato sauce.
  4. Bake the Cannelloni
    Once all the tubes are filled and arranged in the dish, cover the cannelloni with your favorite tomato sauce and a generous amount of shredded cheese. Cover the dish with foil and bake in a preheated oven at 375°F (190°C) for about 30 minutes. Remove the foil and bake for an additional 10 minutes to brown the cheese and sauce.
  5. Serve and Enjoy
    After baking, let the cannelloni rest for a few minutes before serving. Top with fresh herbs, a sprinkle of Parmesan, or extra tomato sauce if desired.

Nutrients (Per Serving, Approx.)

NutrientAmount
Calories350 kcal
Protein25 g
Fat20 g
Carbohydrates15 g
Sugars4 g
Fiber2 g
Sodium500 mg
Calcium10% DV

FAQs: Everything You Need to Know About Cannelloni with Minced Meat

Q: Can I prepare cannelloni in advance?

A: Yes, absolutely! Cannelloni is perfect for preparing ahead of time. You can assemble the dish, cover it tightly with plastic wrap, and store it in the fridge for up to a day before baking. If you want to store it longer, you can also freeze the assembled cannelloni before baking. Just make sure to cover it well with foil and store it in an airtight container. When ready to bake, you may need to add extra time if baking from frozen.

Q: Can I use different types of meat for the filling?

A: Yes! While minced beef is the traditional filling for cannelloni, you can easily substitute it with ground turkey, chicken, or lamb. If you want a more adventurous twist, try using pork or even a combination of meats. Each type of meat will bring its own unique flavor and texture to the dish, so feel free to experiment based on your preferences.

Q: Can I make this recipe vegetarian?

A: Yes, you can! If you prefer a vegetarian version of this dish, you can replace the minced meat with vegetables like spinach, mushrooms, zucchini, or a mixture of other hearty vegetables. For added richness, you can use ricotta or mozzarella cheese in place of the meat filling. The sauce and spices can remain the same, creating a delicious vegetarian alternative.

Q: What kind of sauce should I use for cannelloni?

A: Tomato sauce is the traditional choice for cannelloni, but you can also use a béchamel sauce for a richer, creamier version. A combination of both tomato sauce and béchamel creates a beautifully balanced dish with layers of flavor. If you’re feeling adventurous, you could also try a pesto sauce for a unique spin.

Q: How can I make my cannelloni extra creamy?

A: To achieve a creamy cannelloni, use a generous amount of ricotta, mozzarella, or even cream cheese in the filling. You can also add a little heavy cream to the tomato sauce or béchamel sauce for added richness. Don’t forget to top your dish with a good layer of cheese—baking it until golden and bubbling will create a deliciously creamy, cheesy crust.

Q: Can I make cannelloni gluten-free?

A: Yes, it’s possible to make gluten-free cannelloni. Simply use gluten-free pasta tubes and ensure that all other ingredients are free from gluten (e.g., make sure the sauce and spices do not contain any gluten-based additives). The filling itself, as long as it’s made with gluten-free ingredients, will work beautifully.

Q: How can I make sure my cannelloni doesn’t dry out?

A: The key to a moist cannelloni is making sure the pasta doesn’t overbake. Cover the baking dish with foil for the first 30 minutes of baking to help retain moisture. After removing the foil, let the cannelloni bake for an additional 10-15 minutes to allow the cheese to brown and the sauce to thicken. If you’re concerned about it drying out, you can always add a little extra sauce before baking.

The Significance of Sharing a Meal Like Cannelloni with Minced Meat

There’s something deeply personal about sharing a home-cooked meal. It’s not just about the food; it’s about the experience of gathering around the table, sharing stories, and connecting with others. Meals like cannelloni with minced meat are more than just nourishment—they are a symbol of love, family, and tradition.

In a world where we often rush from one task to the next, making time to sit down and enjoy a meal with loved ones is increasingly rare. But when we do, it’s moments like these that create lasting memories. The act of cooking and sharing a meal is a celebration of togetherness, and it’s in these simple, everyday rituals that we find the true meaning of comfort and joy.

As you prepare this dish for your family or friends, take a moment to appreciate the effort and care that goes into making something from scratch. The time spent in the kitchen, the memories you’ll create, and the smiles around the table are what truly make this meal special. Cannelloni with minced meat may seem like a simple dish, but it holds the power to bring people together and create a sense of belonging, warmth, and happiness.

Conclusion: A Dish that Transcends Generations

Cannelloni with minced meat is more than just a recipe; it’s a tradition that connects generations. It’s a reminder of the importance of sharing meals, of making time for family, and of savoring the moments that truly matter. Whether you’re enjoying it with family at home or serving it to guests, this dish brings comfort, warmth, and a sense of togetherness.

As you take that first bite, remember that you’re not just enjoying a meal—you’re carrying forward a tradition, creating new memories, and celebrating the joy of good food and great company. So the next time you’re looking for a meal that will fill your home with warmth, laughter, and love, look no further than cannelloni with minced meat. It’s more than just a dinner; it’s an experience, and one that will stay with you long after the last bite.

Print
clock clock iconcutlery cutlery iconflag flag iconfolder folder iconinstagram instagram iconpinterest pinterest iconfacebook facebook iconprint print iconsquares squares iconheart heart iconheart solid heart solid icon

Cannelloni with Minced Meat: A Hearty Family Classic


  • Author: Paul
  • Total Time: 1 hour 5 minutes
  • Yield: 68 servings 1x

Description

Cannelloni with minced meat is the ultimate comfort food, featuring tender pasta tubes stuffed with a savory beef filling, topped with a rich tomato sauce and gooey melted cheese. This classic Italian dish is perfect for family gatherings, weeknight dinners, or special occasions. The hearty filling and creamy cheese make it a satisfying and flavorful meal that will surely impress everyone at your table.


Ingredients

Scale
  • 1.2 kg minced beef (about 45 cups)
  • 2 chicken eggs
  • Salt to taste
  • Ground black pepper to taste
  • Dried ground sweet paprika to taste
  • 1 onion, finely chopped
  • 1214 cannelloni tubes (uncooked)
  • 4 cups tomato sauce (store-bought or homemade)
  • 2 cups shredded mozzarella cheese (for topping)
  • 1/2 cup grated Parmesan cheese (optional, for garnish)

Instructions

  1. Prepare the Beef Filling: In a large pan over medium heat, cook the finely chopped onion until softened. Add the minced beef, breaking it up as it cooks. Season with salt, black pepper, and sweet paprika to taste. Cook until the beef is browned and fully cooked through. Let it cool for a few minutes before mixing in the beaten eggs. This will help bind the mixture together for filling the pasta tubes.
  2. Stuff the Cannelloni: Using a spoon, carefully stuff each cannelloni tube with the prepared beef filling. Be generous with the filling to ensure each tube is packed tightly. Place the stuffed cannelloni in a greased baking dish.
  3. Assemble the Dish: Pour the tomato sauce evenly over the stuffed cannelloni. Sprinkle the shredded mozzarella cheese over the top, ensuring it covers the entire dish. If desired, add a bit of grated Parmesan cheese for extra flavor.
  4. Bake the Cannelloni: Preheat the oven to 375°F (190°C). Cover the baking dish with aluminum foil and bake for 30 minutes. After 30 minutes, remove the foil and continue to bake for an additional 10 minutes or until the cheese is golden and bubbling.
  5. Serve and Enjoy: Once baked, remove the cannelloni from the oven and let it rest for a few minutes. Serve with a side salad or some crusty bread, and enjoy the delicious flavors of homemade Italian cuisine.

Notes

  • Make-Ahead: You can assemble the cannelloni in advance and store it in the fridge for up to 24 hours before baking. If you freeze the assembled dish, it will keep for up to 3 months. Just be sure to bake it from frozen and add extra cooking time.
  • Cheese: Feel free to mix up the cheese toppings. Ricotta, Parmesan, or a blend of Italian cheeses will all work wonderfully in this dish.
  • Sauce: If you prefer a more robust sauce, you can add garlic, herbs, or even a splash of red wine to your tomato sauce for added depth of flavor.
  • Prep Time: 20 minutes
  • Cook Time: 45 minutes
  • Category: Main Dish
  • Method: Baking
  • Cuisine: Italian-Inspired

Easy Mini Cheesecakes Recipe: A Bite-Sized Delight with a Big Impact

When I was younger, one of my fondest memories was gathering around the kitchen with my family. My mother, the heart of our home, would often make cheesecake for special occasions. While the full-sized version was undeniably delicious, there was something uniquely satisfying about those individual servings—small, perfect, and just for you. It wasn’t just the taste that made those mini cheesecakes so memorable; it was the tradition of making them together, the laughter, and the shared excitement as we waited for them to cool.

I still remember how my siblings and I would argue over who would get the last mini cheesecake, even though we knew there would be more next time. It became a tradition, a rite of passage at family gatherings. Over time, I’ve made my own version of those mini cheesecakes, carrying forward the tradition and creating new memories. The joy of seeing my friends and family enjoy these little bites of heaven is one of the greatest pleasures I experience in the kitchen.

As I make these mini cheesecakes now, it’s a reminder of those days—how a simple dessert could bring so much joy and create lasting memories. It’s not just about the cheesecake, but the connections and experiences that come with sharing food. Whether you’re making them for a birthday, a holiday gathering, or just because, these mini cheesecakes are sure to make any moment feel a little more special.

Ingredients

For the Cheesecake Filling:

IngredientAmount
Full-fat cream cheese, room temperature10.5 oz (300 g)
Granulated sugar½ cup (100 g)
Large eggs, room temperature2
Vanilla extract1 teaspoon
Lemon juice1 tablespoon
All-purpose flour1 ½ tablespoons (14 g)
Full-fat sour cream, room temperature¾ cup (185 g)

Directions:

  1. Preheat the Oven and Prepare Pans
    Preheat your oven to 325°F (163°C). Line a muffin tin with paper liners or grease it lightly to prevent the cheesecakes from sticking.
  2. Prepare the Cheesecake Filling
    In a large mixing bowl, beat the cream cheese and granulated sugar until smooth and creamy, about 2-3 minutes. Add the eggs one at a time, beating well after each addition. Stir in the vanilla extract, lemon juice, and flour, and continue mixing until fully combined. Finally, fold in the sour cream and mix until smooth.
  3. Fill the Muffin Tin
    Pour the cheesecake batter evenly into the muffin tin, filling each cup almost to the top. Use a spoon or spatula to smooth the tops.
  4. Bake the Mini Cheesecakes
    Bake for 18-20 minutes, or until the edges are set and the centers are slightly jiggly. Be careful not to overbake, as the cheesecakes will firm up as they cool.
  5. Cool and Chill
    Allow the mini cheesecakes to cool to room temperature before transferring them to the refrigerator. Chill for at least 2 hours, or preferably overnight, to ensure they are fully set.
  6. Serve
    Once chilled, remove the mini cheesecakes from the muffin tin and serve. You can garnish with fresh berries or a drizzle of fruit sauce for an extra touch.

Nutrients (Per Serving, Approx.)

NutrientAmount
Calories220 kcal
Protein5 g
Fat18 g
Carbohydrates14 g
Sugars12 g
Fiber0 g
Calcium8% DV
Vitamin A10% DV

Why Mini Cheesecakes? A Perfect Individual Serving

Cheesecake has long been a classic dessert beloved by many. But there’s something about mini cheesecakes that elevates the experience. Unlike traditional cheesecakes that require slicing and serving, mini cheesecakes are the ultimate in convenience, presentation, and portion control. These individual servings provide the perfect balance of rich, creamy filling and a slightly crumbly base, all in one perfect bite.

Mini cheesecakes also allow for creativity. You can easily add personal touches by experimenting with different flavors, toppings, and crusts. Whether you stick with the classic graham cracker crust or opt for something a little different like a chocolate cookie crust or a nutty base, the possibilities are endless. You can even layer them with different fillings—think chocolate ganache, berry compote, or even caramel.

What makes mini cheesecakes so special, though, is their versatility. You can serve them at just about any occasion: birthday parties, dinner parties, holiday meals, or even casual gatherings with friends and family. Their individual portions make them perfect for sharing and enjoying without the need for cutting a whole cheesecake.

FAQs: Everything You Need to Know About Mini Cheesecakes

Q: Can I make mini cheesecakes in advance?
A: Yes, mini cheesecakes are perfect for making ahead of time. In fact, they often taste even better after being chilled for a few hours or overnight. After baking and cooling the mini cheesecakes, store them in an airtight container in the refrigerator. They will keep fresh for up to 3-4 days. This makes them an excellent option for preparing desserts for parties or gatherings ahead of time.

Q: Can I freeze mini cheesecakes?
A: Absolutely! Mini cheesecakes freeze wonderfully. After they’ve completely cooled, wrap each mini cheesecake in plastic wrap and place them in an airtight container or a freezer-safe bag. They will stay fresh in the freezer for up to 2-3 months. To thaw, simply remove them from the freezer and place them in the refrigerator for several hours before serving.

Q: Can I make the crust without graham crackers?
A: Yes! While graham cracker crust is a classic choice, you can use other options based on your preferences. You can substitute graham crackers with crushed cookies like Oreos, Digestive biscuits, or even Nilla wafers. For a nutty twist, try crushed almonds, pecans, or walnuts. Just be sure to adjust the amount of sugar depending on the sweetness of your crust base.

Q: Can I add flavor variations to the mini cheesecake filling?
A: Definitely! The base cheesecake filling is very versatile. You can add various flavorings to the batter to customize it. For a chocolate cheesecake, add melted chocolate or cocoa powder to the mix. For a fruit-flavored twist, try adding a layer of fruit puree, such as strawberry or raspberry, to the cheesecake filling. You can even swirl in some caramel or coffee flavoring for a more decadent version.

Q: Can I substitute the sour cream in the filling?
A: Yes, you can substitute sour cream with Greek yogurt for a slightly tangier flavor and a thicker texture. If you’re looking for a lighter alternative, whipped cream cheese or even mascarpone cheese can work as a substitute, though the flavor will differ slightly. Just keep in mind that the texture of the cheesecake may vary depending on the ingredient substitutions.

Q: How do I know when the mini cheesecakes are done baking?
A: Mini cheesecakes are done when the edges are set and the centers are slightly jiggly. It’s important not to overbake them, as they will continue to firm up as they cool. If the tops of the cheesecakes begin to brown, they are likely overcooked. If you’re unsure, using an instant-read thermometer can help. The internal temperature should reach around 150°F (65°C) for perfectly baked mini cheesecakes.

The Secret to Perfect Mini Cheesecakes

While making mini cheesecakes may seem simple, there are a few key tips to ensure your dessert turns out perfectly every time. The first secret lies in using room-temperature ingredients. This includes the cream cheese, eggs, and sour cream. Room-temperature ingredients blend more smoothly, resulting in a creamier and more uniform filling. Cold ingredients can lead to a lumpy batter, which could affect the texture of the final product.

Another crucial tip is not to overmix the filling. Overmixing can introduce excess air into the batter, which may cause cracks to form as the mini cheesecakes bake. Mix the ingredients just until they are combined, and avoid beating the batter too vigorously.

Also, be patient when cooling the mini cheesecakes. After baking, let them cool in the muffin tin for about 10-15 minutes before transferring them to a wire rack. Once they reach room temperature, place them in the fridge to chill for at least a few hours before serving. This allows the cheesecakes to firm up and enhances the flavors.

Conclusion: A Tradition Passed Down

These Easy Mini Cheesecakes are more than just a dessert—they’re a way to create memories, share moments, and experience the joy of baking with those you love. Whether you’re making them for a special occasion or just as a sweet treat for the family, they bring a sense of warmth and comfort to any gathering. I often find myself reflecting on the times spent with my family in the kitchen, and it’s moments like these that make baking so special.

With their creamy, rich texture and endless flavor possibilities, mini cheesecakes are bound to become a new tradition for you and your loved ones. So, roll up your sleeves, gather your ingredients, and prepare to create a dessert that’s sure to be cherished for years to come.

Whether you serve them plain or with a decadent topping, these mini cheesecakes will leave everyone asking for seconds. The best part? The memories you create along the way will be as sweet as the cheesecakes themselves.

Print
clock clock iconcutlery cutlery iconflag flag iconfolder folder iconinstagram instagram iconpinterest pinterest iconfacebook facebook iconprint print iconsquares squares iconheart heart iconheart solid heart solid icon

Easy Mini Cheesecakes Recipe: A Bite-Sized Delight with a Big Impact


  • Author: Paul
  • Total Time: 2 hours 30 minutes
  • Yield: 12 mini cheesecakes 1x

Description

These Easy Mini Cheesecakes are the perfect way to enjoy a rich, creamy dessert in an individual, portion-controlled serving. With a smooth cheesecake filling topped with a subtle hint of lemon, these bite-sized wonders are perfect for any occasion—whether it’s a family gathering, a party, or just a sweet treat to enjoy at home. The combination of cream cheese, eggs, sour cream, and vanilla gives these mini cheesecakes their signature melt-in-your-mouth texture that everyone will love. No fuss, no slicing, just pure cheesecake bliss.


Ingredients

Scale
  • 10.5 oz (300 g) full-fat cream cheese, room temperature
  • ½ cup (100 g) granulated sugar
  • 2 large eggs, room temperature
  • 1 teaspoon vanilla extract
  • 1 tablespoon lemon juice
  • 1 ½ tablespoons (14 g) all-purpose flour
  • ¾ cup (185 g) full-fat sour cream, room temperature

Instructions

  1. Preheat Oven & Prepare Muffin Tin: Preheat your oven to 325°F (163°C). Line a muffin tin with paper liners or lightly grease it to prevent the mini cheesecakes from sticking.
  2. Mix the Filling: In a large mixing bowl, beat the cream cheese and granulated sugar together until smooth and creamy. Add the eggs, one at a time, beating well after each addition. Stir in the vanilla extract, lemon juice, and flour until fully combined. Lastly, fold in the sour cream and mix until smooth.
  3. Fill Muffin Cups: Evenly pour the cheesecake batter into each muffin cup, filling each one almost to the top. Smooth the tops with a spatula.
  4. Bake: Bake for 18-20 minutes, or until the edges are set and the centers are slightly jiggly. Be careful not to overbake, as the cheesecakes will continue to set as they cool.
  5. Cool & Chill: Allow the mini cheesecakes to cool to room temperature, then refrigerate them for at least 2 hours, or preferably overnight, to let them fully set.
  6. Serve & Enjoy: Once chilled, remove the mini cheesecakes from the muffin tin and serve. Garnish with fresh berries, whipped cream, or a drizzle of caramel sauce if desired.

Notes

  • You can make these mini cheesecakes ahead of time. They stay fresh in the fridge for up to 3-4 days, making them perfect for prepping before a gathering.
  • If you prefer a different topping, try a berry compote or drizzle some melted chocolate on top for a richer treat.
  • You can freeze these mini cheesecakes for up to 2-3 months. Wrap each one tightly in plastic wrap and store in an airtight container in the freezer. Thaw them in the fridge before serving.
  • Prep Time: 10 minutes
  • Cook Time: 20 minutes
  • Category: Dessert
  • Method: Baking
  • Cuisine: American

I Can’t Stop Eating This Delicious and Creamy Summer Dessert: A Sweet Tradition

Growing up, there was a dessert that never failed to bring the family together. It wasn’t a grandiose, multi-layered cake or an elaborate pie. It was a simple, creamy dessert that filled the kitchen with its sweet fragrance and vibrant colors. My grandmother would make it during the summer, when the sun was hot and the days seemed endless. It wasn’t just a dessert; it was an experience, a moment of calm amidst the hustle of the day.

Every bite of this dessert felt like a warm embrace, soothing and sweet with every spoonful. As a child, I didn’t know exactly what went into it. I didn’t care, either. All I knew was that it was something special, something that could transform any regular afternoon into a celebration. The way the fruit cocktail blended with the creamy layers was a delicate dance of textures and flavors, and the colors made it even more inviting—vibrant reds, yellows, and greens swirling together like the hues of a summer sunset.

Years have passed, and that same dessert continues to bring joy to my family. Though I’ve grown older, every time I prepare this creamy summer treat, the memories flood back. The laughter, the warmth, the feeling of togetherness—it all comes rushing in. Now, it’s my turn to pass it on, to create those same moments of nostalgia and joy for the next generation. Each time I make this dish, I’m not just recreating a recipe; I’m recreating memories that are as sweet as the dessert itself.

A Sweet Summer Staple: Why This Dessert Is So Special

There’s a certain magic in a dessert that has been passed down through generations. It’s not just about the ingredients; it’s about the memories that linger long after the last bite is gone. The reason this particular summer dessert is so beloved is because it checks every box. It’s easy to prepare, delightfully creamy, and refreshingly sweet—everything you want in a summer treat.

What makes it truly stand out, however, is the use of simple, everyday ingredients. The combination of fruit cocktail, creamy milk, and colorful jelly creates a dessert that’s both indulgent and refreshing. The creamy base—made from a blend of evaporated milk, condensed milk, and heavy cream—offers the perfect balance of richness without overwhelming the palate. The fruit cocktail adds a burst of juicy sweetness, while the jelly cubes bring texture and a visual appeal that is simply irresistible.

Whether you’re serving it at a family reunion, a summer picnic, or a simple gathering of friends, this dessert has a way of brightening up the room. It’s a dessert that’s as much about the experience as it is about the taste. The joy comes not just from eating, but from sharing something that has been a part of your life, a part of your story.

Ingredients

IngredientAmount
Water4 cups
White sugar1/4 cup
White unflavored jelly powder25 grams
Fruit cocktail (or fresh fruits of your choice)835 grams
All-purpose cream or heavy cream250 ml
Condensed milk300 ml
Evaporated milk or fresh milk2 cups
Red food coloringAs desired
Yellow food coloringAs desired
Green food coloringAs desired

Directions

  1. Make the Jelly
    In a saucepan, combine 4 cups of water, white sugar, and jelly powder. Stir continuously over medium heat until the mixture begins to boil and the jelly powder is completely dissolved.
  2. Divide and Color
    Remove from heat and divide the jelly mixture into three separate containers. Add a few drops of red food coloring to one, yellow to the second, and green to the third. Stir each until color is evenly distributed.
  3. Set the Jelly
    Pour the colored jelly into flat trays and let them cool at room temperature. Once cooled, refrigerate for at least 1 hour or until fully set. Cut into small cubes.
  4. Assemble the Dessert
    In a large mixing bowl, combine fruit cocktail (drained), jelly cubes, all-purpose cream, condensed milk, and evaporated milk. Mix gently until everything is well incorporated.
  5. Chill and Serve
    Cover and refrigerate for at least 2 hours before serving. Serve chilled for a refreshing, creamy summer treat.

Nutrients (per serving, approx.)

NutrientAmount
Calories280–320 kcal
Protein4–5 g
Fat10–12 g
Carbohydrates40–45 g
Sugars25–30 g
Fiber1–2 g
Calcium15–20% DV
Vitamin C8–12% DV

FAQs: Everything You Need to Know

Q: Can I use fresh fruit instead of fruit cocktail?
A: Absolutely! If you prefer fresh fruit, you can use a combination of diced tropical fruits like pineapple, mango, and papaya. Just make sure to cut the fruits into small, bite-sized pieces so that they mix well with the creamy base. You can even experiment with berries, peaches, or apples for a seasonal twist.

Q: What kind of jelly can I use for this dessert?
A: This recipe calls for white, unflavored jelly powder, but you can easily substitute it with flavored jelly powder if you prefer. Feel free to play with different colors and flavors—strawberry, mango, or orange jellies can add their own unique flair to the dessert. Just be sure to adjust the amount of sugar based on the sweetness of the jelly.

Q: Can I make this dessert in advance?
A: Yes! In fact, this dessert is even better when made ahead of time. The flavors meld together overnight, and the jelly cubes firm up nicely. You can prepare it a day in advance and store it in the refrigerator. Just be sure to give it a good stir before serving.

Q: How can I make this dessert lighter?
A: To reduce the calorie content, you can substitute the heavy cream with a lighter version or use yogurt instead of the evaporated milk. For a dairy-free option, use coconut milk or almond milk in place of the condensed and evaporated milk. The dessert will still be delicious, though the texture may be slightly different.

Q: Can I use gelatin instead of jelly powder?
A: Yes, you can use gelatin if you prefer. Simply dissolve it in boiling water and add food coloring to achieve the same vibrant effect. Keep in mind that the texture may vary slightly, but the result will still be a wonderful treat.

Q: How long does this dessert last in the fridge?
A: When stored in an airtight container, this dessert will last for about 3-4 days in the refrigerator. However, it’s best to consume it within the first 2 days for the freshest flavor and texture.

The Perfect Dessert for Every Occasion

This creamy summer dessert isn’t just a dish for the summer—it’s a dish for every occasion that calls for celebration, no matter the season. Whether it’s a hot summer afternoon or a cold winter evening, this dessert provides a sweet escape. The cooling, creamy texture and the burst of fruity flavor offer a refreshing break from the usual treats we indulge in. It’s a dish that can adapt to any event or gathering, making it versatile and timeless.

It’s also a dessert that encourages creativity. With so many variations, you can make it your own, whether by adding more fruits, experimenting with different jellies, or adjusting the level of sweetness. It’s a blank canvas that allows you to customize the dessert to suit your taste.

Conclusion: A Tradition Worth Sharing

As I sit down to enjoy a bowl of this dessert, I am reminded of the way food brings people together. It’s not just about eating; it’s about sharing experiences, stories, and traditions. This creamy summer dessert is more than just a recipe; it’s a part of my story, a link to my past, and an opportunity to create new memories with those I love.

Every time I make this dessert, I’m not just following a list of ingredients. I’m continuing a tradition that has been passed down through generations, a tradition that brings comfort, joy, and sweetness into my life. It’s a dessert that transcends time and trends—a dessert that will continue to bring smiles for many years to come.

So, the next time you find yourself looking for a refreshing and creamy treat, consider making this dessert. Whether it’s for a special occasion or just a simple family gathering, it has the power to turn any moment into something truly memorable.

Print
clock clock iconcutlery cutlery iconflag flag iconfolder folder iconinstagram instagram iconpinterest pinterest iconfacebook facebook iconprint print iconsquares squares iconheart heart iconheart solid heart solid icon

I Can’t Stop Eating This Delicious and Creamy Summer Dessert: A Sweet Tradition


  • Author: Paul
  • Total Time: 2 hours 25 minutes
  • Yield: 68 servings 1x

Description

This creamy and refreshing summer dessert is a perfect blend of colorful jelly cubes, sweet fruit cocktail, and a rich creamy base. Light, cool, and indulgent, it’s a dish that will make every summer gathering memorable. With its vibrant colors and delightful flavors, this dessert is perfect for family reunions, picnics, or just a treat to cool off during the heat.


Ingredients

Scale
  • 4 cups water
  • 1/4 cup white sugar
  • 25 grams white unflavored jelly powder
  • 835 grams fruit cocktail (or fresh fruits of your choice)
  • 250 ml all-purpose cream or heavy cream
  • 300 ml condensed milk
  • 2 cups evaporated milk or fresh milk
  • Red food coloring (as desired)
  • Yellow food coloring (as desired)
  • Green food coloring (as desired)

Instructions

  1. Prepare the Jelly: In a saucepan, mix 4 cups of water, white sugar, and jelly powder. Stir constantly over medium heat until the jelly powder dissolves completely and the mixture starts to boil.
  2. Color the Jelly: Remove the saucepan from the heat and divide the jelly mixture into three separate bowls. Add a few drops of red food coloring to one bowl, yellow to another, and green to the third. Stir until each bowl is evenly colored.
  3. Set the Jelly: Pour the colored jelly into flat trays or shallow containers and let it cool to room temperature. Once cooled, refrigerate for about an hour, or until the jelly is completely set.
  4. Cut the Jelly: After the jelly has set, cut it into small cubes and set them aside.
  5. Prepare the Creamy Base: In a large mixing bowl, combine fruit cocktail (drained), the jelly cubes, heavy cream, condensed milk, and evaporated milk. Stir gently until well combined.
  6. Chill and Serve: Transfer the mixture to a serving dish, cover it, and refrigerate for at least 2 hours to let the flavors meld. Serve chilled for the best texture and flavor.

Notes

  • You can substitute the fruit cocktail with fresh diced tropical fruits like pineapple, mango, or berries.
  • If you’re using fresh fruit, make sure to cut it into small, bite-sized pieces to mix well with the creamy base.
  • This dessert can be prepared a day in advance, which allows the flavors to blend even more. Just be sure to stir gently before serving.
  • For a lighter version, use low-fat cream or replace heavy cream with yogurt.
  • Feel free to experiment with other food colorings or jelly flavors to personalize the dessert to your liking.
  • Prep Time: 15 minutes
  • Cook Time: 10 minutes
  • Category: Dessert
  • Method: Stovetop
  • Cuisine: International

Potato Cheese Pancakes: A Golden Bite of Comfort

There’s something about the sound of potatoes sizzling in oil that reminds me of home—of my grandmother standing by the stove, gently flipping golden fritters with a patience that only time can teach. Her kitchen always smelled of warmth: onions browning, cheese melting, herbs mingling in the air like quiet whispers. Those childhood mornings were simple, almost sacred—no rush, no distractions—just the slow rhythm of grating, stirring, and frying.

Years later, in the middle of a hectic week, I found myself longing for that same comfort. I had a few potatoes in the pantry, some leftover cheddar in the fridge, and a craving for something nostalgic. I wasn’t following a recipe—I was following a feeling. The result? Crispy, cheesy potato pancakes that transported me straight back to those quiet mornings and the comfort of my grandmother’s kitchen.

These potato cheese pancakes are more than just a quick fix or a snack. They’re crispy on the outside, melty and savory on the inside, and best served hot with a side of calm. Whether you’re feeding your family, your friends, or just your soul after a long day—this dish promises to bring warmth to your table and joy to your bite.

The Beauty of Simplicity: Why These Pancakes Work

At their core, these pancakes are built from kitchen staples: potatoes, onions, cheese, eggs, and flour. But don’t let the simplicity fool you—what they lack in complexity, they more than make up for in flavor and texture. The combination of shredded potato and cheddar cheese creates a crust that crackles with every bite, while the inside remains tender and rich.

The key is balance. The starch from the potatoes binds with the flour and eggs, while the cheese adds moisture, richness, and a sharp, tangy bite that keeps you coming back for more. A hint of onion rounds out the flavor and adds depth—think comfort food, with a touch of rustic elegance.

This recipe doesn’t require fancy tools or culinary finesse. It’s forgiving, flexible, and inviting—an ideal candidate for beginners and seasoned home cooks alike.

Ingredients

IngredientAmount
Potatoes, peeled and grated4 large
Onion, finely grated1 small
Cheddar cheese, grated1 cup
Eggs, beaten2
All-purpose flour3 tablespoons
Salt1 teaspoon
Black pepper1/2 teaspoon
Vegetable oil (for frying)As needed

Directions

  1. Prep the Potatoes
    Grate the peeled potatoes and place them in a clean kitchen towel. Squeeze out as much excess water as possible to ensure the pancakes become crispy, not soggy.
  2. Mix the Base
    In a large mixing bowl, combine the grated potatoes, grated onion, cheddar cheese, beaten eggs, flour, salt, and pepper. Mix until the ingredients are fully incorporated and evenly coated.
  3. Heat the Oil
    In a large skillet or non-stick pan, heat a thin layer of vegetable oil over medium heat.
  4. Cook to Golden Perfection
    Scoop spoonfuls of the potato mixture into the pan and flatten gently into small pancakes. Cook for 3–4 minutes on each side, or until golden brown and crispy. Adjust the heat as necessary to avoid burning.
  5. Drain and Serve
    Transfer the cooked pancakes to a plate lined with paper towels to drain excess oil. Serve hot with sour cream, yogurt, or your favorite dipping sauce.

Nutritional Information (Per Serving – Approximate)

NutrientAmount
Calories260 kcal
Protein9 g
Carbohydrates25 g
Fats14 g
Fiber2 g
Sodium480 mg
Cholesterol95 mg

Healthier Than You Think

At first glance, anything fried might raise a few eyebrows in a health-conscious kitchen. But these potato cheese pancakes can be made surprisingly wholesome, especially when pan-fried in a small amount of vegetable or olive oil instead of deep-fried. You can also tweak the recipe by:

  • Using whole-wheat or chickpea flour for added fiber and protein
  • Swapping cheddar for a lower-fat or plant-based cheese
  • Adding grated carrots, zucchini, or spinach for extra nutrients
  • Using egg whites or a flaxseed substitute to cut cholesterol

These little changes let you enjoy the crispy, golden goodness without the guilt—and they make this recipe fit a variety of diets and nutritional needs.

Versatility on a Plate

Another reason this dish is such a household favorite? It’s endlessly adaptable.

  • For breakfast: Top with a poached egg and avocado slices.
  • For lunch: Serve with a crisp side salad and a dollop of Greek yogurt or sour cream.
  • For dinner: Pair with grilled vegetables or tuck into wraps for a vegetarian twist.
  • For kids: Serve with ketchup, mild salsa, or even apple sauce—they’ll devour them.

You can also get creative with add-ins: think chopped herbs, cooked bacon, sun-dried tomatoes, jalapeños, or even a sprinkle of parmesan on top before frying.

These pancakes can shift and shape themselves to suit the moment—quick snack, comforting dinner, or savory brunch centerpiece.

Potato Pancake FAQ

Q: Can I make the mixture in advance?
A: It’s best to cook the pancakes soon after grating the potatoes to avoid them turning grey and soggy. However, you can prep the rest of the ingredients and have them ready to mix in at the last minute.

Q: What kind of potatoes should I use?
A: Starchy varieties like Russets or Yukon Golds work best. They release less water and give you a crispier result.

Q: Can I bake them instead of frying?
A: Yes! While frying gives a classic crispy texture, you can bake them at 200°C (400°F) on a greased baking sheet for about 20–25 minutes, flipping halfway.

Q: Can I freeze these pancakes?
A: Absolutely. After frying, let them cool completely, then freeze in a single layer. Reheat in a toaster oven or skillet to restore their crispness.

Q: How do I keep them from falling apart?
A: Make sure to squeeze out as much moisture from the grated potatoes as possible. Also, don’t skip the flour and egg—they help bind everything together.

Q: What dipping sauces pair well with these?
A: Try sour cream, garlic yogurt sauce, spicy aioli, sweet chili sauce, or even marinara for a pizza-like experience.

A Note on Tradition and Togetherness

Every culture has its version of the potato pancake. From the Jewish latke, to Eastern European draniki, to Korean gamjajeon, these humble cakes have fed generations. They speak to resilience, to making something extraordinary out of simple, humble ingredients.

This particular version adds the indulgence of cheese, a touch of onion for boldness, and the freedom to make it your own. In many ways, it’s a modern homage to an old tradition—proof that comfort food can evolve and still remain grounding.

Food like this has the power to bring people together. Whether you’re making these for family brunch, a lazy weekend breakfast, or a rainy day snack, there’s a kind of shared joy that happens around a plate of warm, cheesy pancakes.

Conclusion: Crispy on the Outside, Comfort on the Inside

Potato cheese pancakes are more than just a quick fry-up—they’re a reminder that joy can come from the simplest things. From the satisfying sizzle in the pan to the first bite of crisp edges and melty cheese, they bring together texture, flavor, and nostalgia in one golden round.

In a world that often demands complexity, these pancakes offer ease. In a world that moves fast, they slow us down. And in kitchens that carry stories, they add their own—a story of comfort, of resourcefulness, and of sharing.

So the next time you’re wondering what to do with a few potatoes and a bit of cheese, don’t reach for takeout or processed snacks. Reach for the grater, heat up that skillet, and let these pancakes bring the warmth of tradition—and a little personal magic—back into your kitchen.

Print
clock clock iconcutlery cutlery iconflag flag iconfolder folder iconinstagram instagram iconpinterest pinterest iconfacebook facebook iconprint print iconsquares squares iconheart heart iconheart solid heart solid icon

Potato Cheese Pancakes: A Golden Bite of Comfort


  • Author: Paul
  • Total Time: 35 minutes
  • Yield: 46 servings 1x

Description

Golden, crispy, and irresistibly cheesy, these potato cheese pancakes are the ultimate comfort food with a savory twist. Perfect for breakfast, brunch, or a cozy snack, they bring together simple ingredients in the most delicious way.


Ingredients

Scale
  • 4 large potatoes, peeled and grated
  • 1 small onion, finely grated
  • 1 cup cheddar cheese, grated
  • 2 eggs, beaten
  • 3 tablespoons all-purpose flour
  • 1 teaspoon salt
  • 1/2 teaspoon black pepper
  • Vegetable oil, for frying

Instructions

  1. Place the grated potatoes in a clean kitchen towel and squeeze out as much moisture as possible.
  2. In a large bowl, mix the grated potatoes, grated onion, cheddar cheese, beaten eggs, flour, salt, and black pepper until well combined.
  3. Heat a thin layer of vegetable oil in a skillet over medium heat.
  4. Scoop 2–3 tablespoons of the mixture into the pan for each pancake and flatten slightly with a spatula.
  5. Cook for 3–4 minutes per side, or until golden brown and crispy.
  6. Transfer to a plate lined with paper towels to remove excess oil.
  7. Serve hot with sour cream, yogurt, or a sprinkle of herbs.

Notes

  • You can substitute cheddar with mozzarella, feta, or a mix of cheeses.
  • For extra crispiness, use a cast iron skillet and avoid overcrowding the pan.
  • Add chopped parsley or chives to the mix for a fresh herbal flavor.
  • These pancakes can be kept warm in the oven at 200°F (95°C) until ready to serve.
  • Prep Time: 15 minutes
  • Cook Time: 20 minutes
  • Category: Breakfast
  • Method: Pan-fried
  • Cuisine: Comfort Food

Forget Blood Sugar and Obesity: The Lentil & Cheese Miracle Bake

I used to begin every day on a rollercoaster of energy—spiking with sweet breakfasts and crashing just before lunch. Cereal, toast with jam, even fruit-laden smoothies—none of them seemed to carry me through. What made it worse was that as someone with a family history of diabetes, I constantly worried about my blood sugar. But then came one random Wednesday morning—a bit of fridge rummaging, a handful of soaked lentils, and a craving for something hearty—that everything changed.

That morning, I threw together some lentils, eggs, yogurt, and cheese, thinking it would be a one-off experiment. Instead, it became a weekly ritual. The result was a moist, savory bake that filled the house with the aroma of toasted cumin and melting cheese. It wasn’t just delicious—it was empowering. I had unknowingly created something that kept me full for hours, balanced my energy, and made me feel proud of what I put on my plate.

This Lentil & Cheese Bake isn’t just a recipe. It’s a declaration that wholesome food can be effortless, blood-sugar-friendly, and deeply satisfying. If you’ve ever wanted to skip the crash, nourish your body, and feel grounded all day long—this one’s for you.

Why This Lentil Bake Is a Game-Changer

There’s no shortage of “healthy” recipes online, but not many tick all the boxes: simple ingredients, minimal prep, high protein, low glycemic impact, and deeply satisfying flavor. This lentil and cheese bake delivers all that and more. Here’s why it’s more than just a dish:

1. Stabilizes Blood Sugar Naturally

Lentils are low on the glycemic index and high in fiber and protein, making them ideal for slowing digestion and maintaining steady blood sugar levels. Paired with the fat and protein in eggs, yogurt, and cheese, this dish helps keep insulin spikes at bay. It’s not only diabetic-friendly—it’s fatigue-fighting, too.

2. Nutrient-Dense Without the Guilt

Forget calorie counting—this recipe is about nourishment. Every ingredient offers real value. Lentils bring iron, folate, and complex carbs; eggs provide choline and protein; yogurt contributes probiotics and calcium; and black cumin adds anti-inflammatory properties. You’re not just eating—you’re fortifying.

3. A Perfect Breakfast, Brunch, or Light Dinner

This is the kind of recipe that doesn’t scream “diet food.” It’s warming, filling, and honestly feels indulgent thanks to the cheese and herbs. Whether served warm with a side salad or cold straight from the fridge, it adapts to your day. Bonus: it travels well and makes excellent leftovers.

Ingredients

IngredientAmount
Lentils1 glass (170 g)
Eggs3
Olive oilHalf a tea glass (50 ml)
Yoghurt1 tea glass (100 ml)
Baking powder1 packet (10 g)
Black cumin1 tablespoon
Chili pepper flakes1 teaspoon
Cheese (feta, cheddar, etc.)1 bowl
Parsley, choppedAs desired

Directions

  1. Prepare the Lentils
    Soak the lentils in water for at least 2–3 hours, or overnight if possible. Drain and rinse them well before using.
  2. Blend the Base
    Add the soaked lentils to a food processor or blender along with the eggs, olive oil, and yogurt. Blend until you have a smooth, thick batter.
  3. Add Flavor and Rise
    Transfer the mixture to a bowl and mix in the baking powder, black cumin, chili pepper flakes, and chopped parsley. Stir in your chosen cheese last to preserve its texture.
  4. Bake to Perfection
    Preheat your oven to 180°C (350°F). Pour the batter into a greased baking dish or a parchment-lined loaf pan. Smooth the top with a spatula.
  5. Golden and Set
    Bake for 35–40 minutes, or until the top is golden and a toothpick inserted into the center comes out clean.
  6. Cool and Slice
    Let it rest for 10 minutes before slicing. Serve warm or at room temperature. Ideal for breakfast, snack, or a light dinner.

Nutritional Information (Per Slice – Approximate)

NutrientAmount
Calories180–220 kcal
Protein10–12 g
Carbohydrates15–18 g
Dietary Fiber3–5 g
Fat9–12 g
Saturated Fat2–4 g
Sugar<2 g
SodiumVaries by cheese

Creative Variations to Make It Yours

One of the best parts of this recipe is its flexibility. It’s a canvas waiting for your culinary brushstrokes.

  • Cheese Swap: Use sharp cheddar for richness, feta for tang, or mozzarella for stretch.
  • Add Veggies: Grated zucchini, sautéed onions, or chopped spinach mix in effortlessly.
  • Spice It Up: Add smoked paprika, turmeric, or curry powder to amplify the flavor profile.
  • Make It Vegan: Use a flax egg substitute, dairy-free yogurt, and vegan cheese alternatives. While the texture may change slightly, the flavor remains bold.

Serving Suggestions

While this dish stands confidently on its own, you can elevate it with simple pairings:

  • Fresh cucumber-tomato salad with a lemon-olive oil drizzle
  • Avocado slices with a sprinkle of sea salt and chili flakes
  • Fermented veggies or kimchi for gut-boosting crunch
  • A dollop of labneh or Greek yogurt on top for creamy contrast

Whether warm out of the oven or cold for lunch on the go, the lentil and cheese bake is humble, hearty, and undeniably satisfying.

Frequently Asked Questions (FAQs)

Can I use canned lentils instead of soaking dry lentils?

Technically yes, though the texture may be softer and slightly wetter. If using canned lentils, drain them thoroughly and reduce the amount of yogurt slightly to compensate.

Is this recipe gluten-free?

Yes! Lentils are naturally gluten-free, and the rest of the ingredients (eggs, yogurt, cheese, herbs) contain no gluten. Always check packaging to ensure your baking powder and cheese are certified gluten-free if you’re highly sensitive.

Can I freeze the lentil bake?

Absolutely. After baking, let it cool completely, then cut into portions and wrap individually. Store in the freezer for up to 3 months. Reheat in the oven or microwave as needed.

How do I know when it’s done baking?

The bake is ready when the top is golden and set, and a knife inserted into the center comes out clean. If the top browns too quickly, tent with foil for the last 10 minutes of baking.

What kind of yogurt works best?

Plain whole milk yogurt is ideal for richness, but low-fat yogurt or even Greek yogurt can be used. Just make sure it’s unsweetened.

Is it suitable for kids?

Yes! It’s soft, cheesy, and packed with protein—great for lunchboxes or a healthy after-school snack. If your kids are sensitive to spice, reduce or omit the chili flakes.

What are Provençal herbs, and can I substitute them?

Provençal herbs are a blend commonly including thyme, rosemary, oregano, and savory. If you don’t have a pre-made mix, feel free to use dried oregano or thyme individually. Even chopped fresh herbs work beautifully.

Health Benefits Snapshot

This dish doesn’t just taste great—it supports your wellness goals too:

  • Supports blood sugar balance
  • High in plant-based and animal protein
  • Rich in fiber for digestion
  • Packed with calcium, iron, and B vitamins
  • Contains healthy fats for satiety
  • Promotes longer-lasting energy without a crash

It’s the kind of food that nourishes deeply without weighing you down.

A Dish With Heart

What I love most about this lentil bake is that it doesn’t try to impress—it simply shows up. It’s the dish you turn to when you want to feel good, inside and out. It doesn’t rely on trends or fancy ingredients. It’s grounded, familiar, and timeless.

It’s also deeply nostalgic. Growing up in a home where lentils were often on the stove, this bake feels like a modern echo of my childhood—an upgraded version that still honors those simple roots. Every time I make it, I feel connected to those memories, and also to the future I’m building—a future where food feels like care.

Conclusion: From Your Oven to Your Lifestyle

If you’re looking for a practical yet powerful way to eat smarter, feel better, and still enjoy every bite, this Lentil & Cheese Bake is the answer. It doesn’t just address blood sugar concerns—it redefines what comfort food can be. Whether you’re a parent trying to serve balanced meals, a student on a budget, or just someone tired of energy crashes, this recipe has your back.

So soak your lentils tonight. Let tomorrow’s breakfast or lunch be something that loves you back—with warmth, flavor, and lasting fuel.

Print
clock clock iconcutlery cutlery iconflag flag iconfolder folder iconinstagram instagram iconpinterest pinterest iconfacebook facebook iconprint print iconsquares squares iconheart heart iconheart solid heart solid icon

Forget Blood Sugar and Obesity: The Lentil & Cheese Miracle Bake


  • Author: Paul
  • Total Time: 45 minutes
  • Yield: 46 servings 1x

Description

This nourishing lentil and cheese bake is packed with plant protein, healthy fats, and gut-friendly ingredients. It’s a wholesome alternative to carb-heavy breakfasts and snacks—perfect for stabilizing blood sugar while still delivering big on flavor. With its cheesy, herb-infused goodness, you won’t believe how good healthy can taste.


Ingredients

Scale
  • 1 glass (170 g) lentils, soaked
  • 3 eggs
  • Half a tea glass (50 ml) olive oil
  • 1 tea glass (100 ml) yogurt
  • 1 packet (10 g) baking powder
  • 1 tablespoon black cumin
  • 1 teaspoon chili pepper flakes
  • 1 bowl cheese of your choice (e.g., feta, cheddar)
  • Parsley, chopped (as desired)

Instructions

  1. Soak the lentils for at least 2–3 hours (or overnight), then drain and rinse well.
  2. In a food processor, blend the soaked lentils with eggs, olive oil, and yogurt until smooth and thick.
  3. Transfer the mixture to a bowl. Stir in baking powder, black cumin, chili pepper flakes, chopped parsley, and cheese. Mix until well combined.
  4. Preheat the oven to 180°C (350°F).
  5. Pour the batter into a greased or parchment-lined baking dish or loaf pan.
  6. Smooth the top and bake for 30–35 minutes, or until golden and set in the center.
  7. Let cool slightly before slicing. Serve warm or at room temperature.

Notes

  • You can use red or green lentils; red ones will give a softer texture.
  • Feta adds a salty punch, while cheddar melts beautifully—feel free to mix.
  • Leftovers keep well in the fridge for up to 3 days and taste great reheated or cold.
  • Perfect as a protein-rich snack, lunchbox addition, or even a low-carb dinner side.
  • Prep Time: 10 minutes
  • Cook Time: 35 minutes
  • Category: Breakfast
  • Method: Baking
  • Cuisine: Mediterranean-inspired

1 Cup Oatmeal! Better Than Pizza: The Savory Pancake That Changed My Mornings

There’s a certain kind of quiet magic that happens on a slow Sunday morning—when the sun stretches gently through the curtains, the coffee is still warm, and the only sound is the soft clatter of a mixing bowl. That’s where this recipe was born—not in a whirlwind of inspiration, but in a very real, very sleepy morning moment when my fridge was nearly empty, my stomach was grumbling, and all I had was a cup of oatmeal, two eggs, and a craving for something comforting.

That morning, I wasn’t looking to impress anyone. I just wanted something warm and savory. I had made sweet oatmeal more times than I could count, but I needed a break from the usual brown sugar and cinnamon. I wanted something that made me feel nourished and excited to eat—something that brought the comfort of pizza, but with ingredients I already had. That’s how the Savory Oatmeal Egg Pancake came to be.

The moment I took the first bite—crispy on the edges, soft and cheesy in the middle, with pops of herby brightness—I knew I had stumbled into something special. It wasn’t just better than what I had expected—it was honestly better than pizza.

This recipe has since become a staple in my kitchen: endlessly flexible, budget-friendly, and shockingly satisfying. Whether you’re a breakfast lover, a busy parent, or someone just looking for a quick fix that feels indulgent but is actually nourishing, this dish will meet you where you are.

What Makes This Recipe Special

This isn’t just another pancake. It’s a fusion of wholesome oatmeal, protein-packed eggs, creamy cheese, and fragrant herbs—cooked to a golden perfection. Here’s why it stands out:

1. It’s Comfort Food Without the Guilt

While pizza is delicious, it’s often heavy and leaves you feeling sluggish. This pancake delivers the same kind of cheesy, savory satisfaction but with none of the greasy regret. The oatmeal gives it fiber and a gentle heartiness, while the eggs and milk provide richness and protein.

2. Pantry Staples Only

No complicated ingredients, no expensive cheese blends, no fancy flour mixes. This recipe relies on what most people already have at home. You don’t need to run to a gourmet grocery store—you just need a cup of oats and a little bit of creativity.

3. One Bowl, One Pan, No Fuss

Everything comes together in one bowl, and it cooks in one pan. It’s minimal cleanup, maximum reward. This makes it perfect for those hectic mornings or even weeknight dinners when energy is low but expectations are high.

4. Customizable for Every Taste

Once you’ve made the base version, the possibilities are endless. Add spinach for a green boost, sun-dried tomatoes for tang, or swap out the mozzarella for feta or cheddar. It’s a blank canvas for your cravings.

Ingredients

IngredientAmount
Oatmeal1 cup
Eggs2
Milk1 cup
Green onions, choppedAs desired
Mozzarella cheese, shreddedAs desired
SaltTo taste
Chili flakesTo taste
Dry Provençal herbsTo taste
Oil (for frying)As needed
Sesame seeds (for garnish)Optional

Directions

  1. Blend the Base
    In a mixing bowl, combine 1 cup of oatmeal with 1 cup of milk. Let it sit for 5–10 minutes to soften. Then add the eggs and blend until you get a smooth, pourable batter.
  2. Season and Enrich
    Stir in chopped green onions, shredded mozzarella, salt, chili flakes, and Provençal herbs. Mix well to evenly distribute the flavors.
  3. Heat and Cook
    Heat a non-stick skillet over medium heat and add a drizzle of oil. Pour a ladle of batter into the skillet, spreading it gently into a pancake shape.
  4. Golden Perfection
    Cook each side for about 2–3 minutes until golden brown and cooked through. Repeat with remaining batter, adding oil as needed.
  5. Finish with Flair
    Garnish warm pancakes with a sprinkle of sesame seeds and an extra pinch of green onions or herbs, if desired. Serve hot.

Nutritional Information (Per Serving – Approximate)

NutrientAmount
Calories230–280 kcal
Protein11–14 g
Carbohydrates22–26 g
Fat10–14 g
Fiber3–4 g
Calcium150–200 mg

Savory Oatmeal Pancakes: The Nutritional Edge

We live in a world that’s becoming more conscious of what we put into our bodies—and rightly so. Unlike traditional pancakes or pizza slices, these savory oatmeal pancakes bring a solid nutritional profile:

  • High in Fiber: Thanks to the oats, which keep you full longer and support digestion.
  • Packed with Protein: Eggs and cheese make it a satisfying and energizing meal.
  • Low in Refined Carbs: There’s no white flour involved, making this a better choice for blood sugar control.
  • Naturally Gluten-Free (if you use certified GF oats): Great for those with dietary restrictions.

It’s the kind of meal that feels like an indulgence but functions like a superfood breakfast.

Frequently Asked Questions

Can I make this recipe ahead of time?

Yes! You can prepare the batter ahead of time and store it in the fridge for up to 24 hours. Alternatively, cook the pancakes and store them in an airtight container in the refrigerator for 2–3 days. Reheat in a skillet or toaster oven for best texture.

Can I bake instead of fry?

Absolutely. To bake, preheat your oven to 375°F (190°C), pour the batter into a greased muffin tin or baking dish, and bake for about 20–25 minutes, or until the tops are golden and set. This method is especially useful if you’re making a larger batch.

Is this kid-friendly?

Very much so. The mild flavors of cheese and herbs are a hit with kids. You can tone down the chili flakes or omit them altogether if your child prefers less spice. You can even cut them into fun shapes using cookie cutters once cooked.

Can I make it dairy-free?

Yes. Use your favorite plant-based milk (like oat, almond, or soy) and a dairy-free cheese alternative. It still holds together well and tastes delicious.

What kind of oats should I use?

Rolled oats work best as they soften easily and blend well. You can use quick oats too, but the texture will be slightly finer. Avoid steel-cut oats unless you pre-cook them, as they’re too coarse for this quick recipe.

Can I freeze these pancakes?

Yes! Let them cool completely, then stack with parchment paper in between and freeze in a zip-top bag. Reheat in a toaster or skillet for a quick grab-and-go breakfast.

Creative Variations to Try

One of the best things about this recipe is how easy it is to reinvent it with what you have on hand. Here are a few exciting ideas:

Mediterranean Twist

Add crumbled feta, chopped olives, and sun-dried tomatoes to the batter. Top with a sprinkle of oregano and a dollop of Greek yogurt.

Southwestern Style

Mix in corn kernels, diced jalapeño, and cheddar cheese. Serve with a spoonful of salsa or guacamole on the side.

Mushroom & Thyme

Sauté mushrooms and thyme before mixing them into the batter. A sprinkle of parmesan on top adds an umami kick.

Spinach and Ricotta

Wilt a handful of spinach and fold it into the batter with a spoonful of ricotta. It’s rich, creamy, and packed with nutrients.

Why Savory Pancakes Deserve the Spotlight

We often associate pancakes with sweetness—maple syrup, bananas, berries—but savory pancakes are like a quiet revolution in the breakfast world. They’re comforting, flavorful, and more balanced in terms of nutrition. They also translate beautifully to any meal of the day. Breakfast? Obviously. Lunch? Just add a side salad. Dinner? Pair with soup or roasted veggies.

The beauty of savory pancakes is that they feel indulgent without being heavy. They nourish your body while making your taste buds genuinely happy.

Final Thoughts: Sometimes Simple is Better

In a world where recipes often ask for fifteen ingredients, two hours of prep, and three appliances, this one is a breath of fresh air. It reminds us that simplicity can be extraordinary—that a cup of oatmeal and a couple of eggs can turn into something crave-worthy.

There’s joy in discovering that what you already have in your pantry can surprise you. That food doesn’t need to be fancy to be good. That breakfast can feel like comfort, nourishment, and creativity all in one bite.

So next time you’re staring into your fridge wondering what to cook, remember this little gem of a recipe. Pull out that oatmeal, crack those eggs, and make something better than pizza—because sometimes, the best meals start with nothing more than what you already have.

Print
clock clock iconcutlery cutlery iconflag flag iconfolder folder iconinstagram instagram iconpinterest pinterest iconfacebook facebook iconprint print iconsquares squares iconheart heart iconheart solid heart solid icon

1 Cup Oatmeal! Better Than Pizza: The Savory Pancake That Changed My Mornings


  • Author: Paul
  • Total Time: 20 minutes
  • Yield: 46 pancakes 1x

Description

Savory, cheesy, and loaded with flavor, these oatmeal egg pancakes are a game-changer for breakfast or brunch. Made with pantry staples like oatmeal, eggs, and milk, they come together quickly and taste like your favorite comfort food—with a healthier twist.


Ingredients

Scale
  • 1 cup oatmeal
  • 2 eggs
  • 1 cup milk
  • Green onions, chopped (as desired)
  • Mozzarella cheese, shredded (as desired)
  • Salt, to taste
  • Chili flakes, to taste
  • Dry Provençal herbs, to taste
  • Oil for frying
  • Sesame seeds, for garnish (optional)

Instructions

  1. In a mixing bowl, combine the oatmeal and milk. Let it sit for 5–10 minutes to allow the oats to soften and absorb the liquid.
  2. Add the eggs to the mixture and whisk until you have a smooth, thick batter.
  3. Stir in the chopped green onions, shredded mozzarella, salt, chili flakes, and Provençal herbs. Mix well to distribute the flavors evenly.
  4. Heat a non-stick skillet or pan over medium heat. Add a drizzle of oil.
  5. Pour a scoop of the batter onto the pan and gently spread it out into a round pancake shape.
  6. Cook for 2–3 minutes on each side, or until golden brown and fully cooked through.
  7. Transfer to a plate, garnish with sesame seeds and a sprinkle of extra herbs or green onions if desired.
  8. Serve hot with your favorite dipping sauce or enjoy on its own!

Notes

  • You can use quick oats or rolled oats. If using steel-cut oats, pre-cook them before using.
  • Mozzarella adds a creamy, stretchy texture, but feel free to swap with cheddar or feta for a different flavor profile.
  • These pancakes are great on their own or paired with Greek yogurt, avocado, or a spicy chutney.
  • If you like it spicier, add a dash of hot sauce into the batter or serve on the side.
  • For a gluten-free version, ensure your oats are certified gluten-free.
  • Prep Time: 10 minutes
  • Cook Time: 10 minutes
  • Category: Breakfast
  • Method: Stovetop
  • Cuisine: Healthy Comfort Food

A Bowl of Comfort That Started With Nothing But Eggs and Noodles

There are meals that impress with complex flavors, long ingredient lists, and time-intensive techniques. Then there are meals that bring comfort in their simplicity—where flavor comes from tradition, love, and the little things you have on hand. For me, the golden egg pasta skillet is exactly that.

I first learned about this dish as a college student living in a small apartment, far from home, scraping meals together with whatever I had in the pantry. One night, all I had were a handful of eggs, some pasta, a bit of butter, and a block of Parmesan that had hardened slightly at the back of the fridge. Oh—and bacon, because what struggling student doesn’t have an emergency pack for “just in case” meals? That night, hungry and uninspired, I tossed it all together. What came out of the skillet was pure comfort: silky, egg-coated noodles, a rich kick of umami from the cheese, and crispy bacon tying it all together. I never forgot that first bite.

This dish became a regular feature in my weekly rotation—not because it was fancy, but because it made me feel taken care of. It reminded me that cooking isn’t about extravagance. It’s about creating nourishment and joy with what you have.

The Magic of Minimalism: Why This Recipe Works

The reason this golden egg pasta skillet continues to surprise people lies in its sheer simplicity. There’s no need for heavy cream or complicated sauces. The eggs, when stirred into hot pasta, create a luscious, custard-like coating that hugs every strand. It’s the same trick used in classic Italian carbonara, though this dish is a more rustic, stripped-down cousin of that iconic recipe.

Butter adds richness, Parmesan brings depth and nuttiness, and bacon gives just the right amount of savory edge. Everything else—seasoning, texture, aroma—falls into place naturally. It’s a little lesson in balance, taught by ingredients you probably already have in your kitchen.

Ingredients:

IngredientAmount
Pasta200 grams
Eggs6
SaltTo taste
Black pepperTo taste
Butter4 tablespoons
Parmesan cheese (grated)70 grams
Bacon (chopped)100 grams

Directions:

  1. Boil the Pasta: Cook the pasta in salted water until al dente. Drain and set aside.
  2. Cook the Bacon: In a large skillet, cook the chopped bacon over medium heat until crispy. Remove and set aside, leaving a bit of the fat in the pan.
  3. Melt the Butter: Add the butter to the same skillet. Once melted, return the pasta to the pan and toss to coat.
  4. Add Eggs: Crack the eggs directly into the pasta and stir constantly over low heat until they begin to scramble and cling to the noodles, forming a rich, creamy coating.
  5. Season and Finish: Add salt, pepper, Parmesan cheese, and the cooked bacon. Toss everything together until well combined.
  6. Serve Hot: Plate immediately and enjoy while warm and cheesy.

Nutritional Information (Per Serving – Serves 4):

NutrientAmount
Calories~520 kcal
Protein~23g
Carbohydrates~45g
Fat~28g
Fiber~2g
Sodium~580mg

Perfect for Busy Days and Tight Budgets

Let’s face it—there are days when you want a hot, homemade meal but don’t have the energy or time for anything complicated. This dish comes together in 15 minutes, uses a single pan, and doesn’t require any special skills. And best of all? It’s incredibly affordable.

That’s what makes it so appealing for families, students, or anyone watching their grocery bills. A few eggs, some pasta, and a touch of cheese go a long way here. Even if you leave out the bacon for a vegetarian version, you’ll still have a delicious, satisfying meal.

Nutritional Thoughts

While the recipe includes butter and cheese, it can easily be adapted to your needs. You can cut back on the butter, use turkey bacon, or even add greens like spinach or peas for a pop of nutrition. Eggs bring protein, and the pasta provides energy from carbohydrates, making this a well-rounded dish with plenty of flexibility.

Frequently Asked Questions

Can I make this dish vegetarian?
Absolutely. Simply omit the bacon or replace it with sautéed mushrooms or smoked tofu. The rest of the dish will still shine with the richness of eggs, butter, and cheese.

What kind of pasta works best?
Spaghetti or fettuccine are classics, but this dish works well with any shape. Even short pasta like penne or fusilli will soak up the egg mixture and flavors beautifully.

Can I add vegetables?
Yes, and it’s a great way to bulk up the dish. Add quick-cooking veggies like spinach, cherry tomatoes, or frozen peas. Toss them in just before the eggs for a balanced meal.

Is this the same as carbonara?
Not exactly. While similar in approach, traditional carbonara uses guanciale (pork cheek), no butter, and typically excludes cream. This version is more of a comfort-food shortcut, inspired by carbonara but designed for everyday ease.

What if I don’t have Parmesan cheese?
No problem—use what you have! Pecorino Romano, aged cheddar, or even a bit of cream cheese in a pinch can add a creamy, tangy richness.

How do I avoid scrambled eggs in my pasta?
The trick is to remove the pan from direct heat before adding the eggs and stir constantly. The residual heat from the pasta will gently cook the eggs and create a creamy texture without scrambling.

Variations You Can Try

  • Add heat: Sprinkle in red pepper flakes or a dash of hot sauce for a little kick.
  • Go Mediterranean: Toss in olives, sun-dried tomatoes, and chopped basil.
  • Make it extra creamy: Add a splash of reserved pasta water when mixing in the eggs to loosen the sauce and give it a silky finish.
  • Bake it: Transfer the finished dish to a baking dish, top with extra cheese, and bake for 10 minutes for a golden crust.

A Dish That Grows With You

What makes this dish so special isn’t just how it tastes. It’s that it evolves with you. I made this as a broke student, then as a busy young professional, and now as someone who cooks for friends and family. It’s always welcome at the table. It’s easy, adaptable, and most importantly, it’s full of heart.

You don’t need much to make something memorable—just a few ingredients and the patience to treat them with care.

Conclusion: The Joy of Simple Food

Sometimes the best meals come from modest beginnings. This golden egg pasta skillet is proof that you don’t need extravagant ingredients or endless steps to create something satisfying. Whether you’re feeding yourself at the end of a long day or making something quick and hearty for your family, this recipe delivers every time.

It’s a meal that brings warmth, comfort, and a little culinary magic—all with things you probably already have in your kitchen. And those are the meals we end up loving the most.

Print
clock clock iconcutlery cutlery iconflag flag iconfolder folder iconinstagram instagram iconpinterest pinterest iconfacebook facebook iconprint print iconsquares squares iconheart heart iconheart solid heart solid icon

A Bowl of Comfort That Started With Nothing But Eggs and Noodles


  • Author: Paul
  • Total Time: 20 minutes
  • Yield: 46 servings 1x

Description

This golden egg pasta skillet is the ultimate quick and budget-friendly comfort food. Creamy eggs, salty Parmesan, crispy bacon, and tender noodles come together with just a few simple ingredients. It’s ready in minutes, rich in flavor, and perfect for lazy dinners or a filling lunch. You’ll be amazed at what eggs and pasta can do when paired just right.


Ingredients

Scale
  • 200 grams of pasta
  • 6 eggs
  • Salt, to taste
  • Pepper, to taste
  • 4 tablespoons of butter
  • 70 grams of Parmesan cheese, grated
  • 100 grams of bacon, chopped

Instructions

  1. Cook the pasta in salted boiling water until al dente. Drain and set aside.
  2. In a skillet, cook the chopped bacon until crispy. Remove bacon and set aside, leaving a bit of the fat in the pan.
  3. Add the butter to the same skillet. Once melted, add the drained pasta and toss to coat in the butter.
  4. Crack the eggs directly into the pan with the pasta. Stir continuously over low heat until the eggs gently cook and coat the pasta.
  5. Add grated Parmesan cheese, cooked bacon, salt, and pepper. Mix well until creamy and fully combined.
  6. Serve hot, optionally topped with extra cheese or chopped herbs.

Notes

  • Stir the eggs continuously to avoid scrambling—you’re aiming for a silky sauce.
  • Add a splash of reserved pasta water if the mixture is too thick.
  • Try using pancetta or turkey bacon for variations.
  • This recipe works best with spaghetti, fettuccine, or other long pasta shapes.
  • Prep Time: 5 minutes
  • Cook Time: 15 minutes
  • Category: Main Dish
  • Method: Stovetop
  • Cuisine: European-inspired

A Bowl of Comfort: The Hearty Vegetable Stew That Reminds Me of Home

Growing up, there were nights when my family was too busy to sit down to a big meal, but my mother always found a way to prepare something comforting and nourishing. I can still remember the smell of her vegetable stews simmering on the stove, filling the house with warmth and a sense of calm. It was more than just food—it was a ritual, an act of love, and a reminder that no matter how busy or hectic life got, there was always a moment to pause, to nourish the body, and to reconnect with the ones we loved.

I was never too young to understand the power of a warm meal, and the vegetable stew she made was one of those dishes that became ingrained in my memory. Simple, fresh ingredients like potatoes, carrots, and zucchini, combined in a pot with fragrant garlic, onions, and fresh parsley, transformed into something so much more than the sum of its parts. Each spoonful was comforting, soothing, and satisfying—qualities I’ve come to cherish in every bowl of vegetable stew I make.

Today, as an adult, I find myself reaching for the same hearty vegetable stew when I need something quick, nourishing, and light. It’s a dish that feels like home, a dish that brings back memories of shared meals with family, laughter, and the love that fills a kitchen when it’s alive with cooking. It’s simple, but it’s everything I need on those busy evenings when I crave something wholesome but not heavy. And every time I make it, I’m reminded of the timeless comfort of a homemade meal.

The Beauty of Simple Ingredients

There’s something magical about dishes that rely on simple ingredients, and vegetable stew is the epitome of that magic. In today’s world of complex recipes and fast food, there’s a certain beauty in the simplicity of a vegetable-based dish that doesn’t rely on an abundance of exotic ingredients or complicated techniques.

The beauty of this vegetable stew lies in the fact that it doesn’t need anything fancy. The main ingredients are vegetables—potatoes, carrots, and zucchini—along with the essentials: olive oil, onion, garlic, salt, and water. Despite the humble ingredients, the stew becomes a flavorful and satisfying dish thanks to the way the vegetables meld together and absorb the fragrant spices. The olive oil gives it a rich, savory base, while the garlic and onion add depth and warmth. The tomatoes bring a burst of brightness and color, while the fresh parsley is the perfect finishing touch, offering both flavor and a touch of freshness.

For those of us who’ve grown up with homemade meals, the ingredients in this stew are familiar and comforting. They are staples that remind us of home cooking and the joy of creating something with love and care.

Ingredients:

IngredientQuantity
Potatoes5-7
Onion1
Olive oilTo taste
Carrot1
Zucchini2-3
Water700 ml (2.5 cups)
Fresh parsley (chopped)To taste
BreadTo serve
Tomatoes1-2
GarlicTo taste
SaltTo taste

Directions:

  1. Prepare the Vegetables: Peel and chop the potatoes, carrot, and zucchini into bite-sized pieces. Finely chop the onion and garlic.
  2. Sauté the Onion and Garlic: Heat olive oil in a large pot over medium heat. Add the chopped onion and garlic, and sauté until they become fragrant and translucent.
  3. Add the Vegetables: Add the chopped potatoes, carrots, and zucchini to the pot. Stir to combine, then cook for 2-3 minutes.
  4. Add Water and Simmer: Pour in the water and bring the mixture to a boil. Reduce the heat and let it simmer for 20-25 minutes, or until the vegetables are tender.
  5. Season: Chop the tomatoes and add them to the stew, along with salt to taste. Continue cooking for another 5 minutes.
  6. Serve: Ladle the stew into bowls, garnish with freshly chopped parsley, and serve with slices of bread for a comforting meal.

Nutritional Information (per serving):

NutrientAmount
Calories150 kcal
Protein3 g
Carbohydrates30 g
Fat5 g
Fiber4 g
Sugars5 g

A Versatile Dish for Every Season

One of the things I love most about vegetable stew is its versatility. It’s a dish that can be made year-round, adjusting slightly to suit the season or the vegetables you have available. In the colder months, when root vegetables are in abundance, I load up the stew with more potatoes, carrots, and onions. In the summer, when zucchini is plentiful, I let it shine in the stew, adding a lightness that’s perfect for warmer weather.

You can also adjust the recipe to suit your dietary preferences or needs. Whether you’re looking for a vegan dish, gluten-free meal, or something that pairs well with a slice of crusty bread, vegetable stew can easily be adapted to meet those needs. It’s a wonderfully flexible dish that can be adjusted to your taste, ensuring that it always feels fresh and exciting.

The Health Benefits of Vegetable Stew

Vegetable stew is not only comforting, but it’s also incredibly healthy. Packed with nutrient-rich vegetables, this stew provides a variety of vitamins and minerals that are essential for good health. Potatoes are an excellent source of potassium, which supports healthy muscle and nerve function, while carrots are rich in beta-carotene, which supports eye health and immune function. Zucchini is full of water and antioxidants, which help hydrate the body and protect against cellular damage.

Olive oil, the base for this stew, is rich in healthy fats that support heart health. Garlic and onions, both commonly found in Mediterranean diets, are known for their anti-inflammatory and immune-boosting properties. Fresh parsley adds an extra dose of vitamins and antioxidants, ensuring that this dish not only nourishes the body but also supports overall well-being.

Vegetable stew is naturally low in calories and packed with fiber, making it a filling dish that won’t leave you feeling sluggish. Whether you’re trying to eat lighter or simply want a nourishing meal that provides sustained energy, this stew is the perfect option.

FAQs About Vegetable Stew

Can I make this stew ahead of time?
Yes, vegetable stew actually tastes even better when allowed to sit for a few hours or overnight. The flavors meld together over time, making the stew richer and more flavorful. You can easily prepare it in advance and store it in the refrigerator for up to 3 days. It also freezes well, so you can store individual servings for later.

What other vegetables can I add to this stew?
The beauty of this recipe is its versatility. You can add any number of vegetables, such as bell peppers, parsnips, sweet potatoes, or green beans. If you have leftover vegetables in your fridge, this stew is the perfect dish to use them up.

Can I make this stew spicy?
Absolutely! If you enjoy spicy foods, you can add chili flakes, cayenne pepper, or even fresh jalapeños to the stew to give it a kick. Adjust the heat level to suit your personal preference.

Is this stew suitable for vegans?
Yes, this vegetable stew is naturally vegan. It contains no animal products, making it a perfect option for those following a plant-based diet.

Can I add protein to this stew?
If you want to make the stew more filling, you can add protein such as lentils, beans, or even tofu. Adding a protein source can turn this dish into a hearty and satisfying main course.

Conclusion: The Comfort of a Homemade Meal

As I sit down to enjoy a bowl of vegetable stew, I’m reminded of the power of food to bring people together. It’s not just about the ingredients or the flavors—it’s about the memories, the connections, and the moments of comfort that a meal can create. This vegetable stew is more than just a recipe; it’s a reflection of home, of love, and of the importance of nourishing both body and soul. Whether you’re making it for yourself or sharing it with others, this stew will always have a place at the table, offering warmth, comfort, and a taste of home with every bite.

With its simple, fresh ingredients and comforting flavors, vegetable stew is a timeless dish that can be enjoyed by anyone, anywhere. It’s a meal that’s not only healthy and satisfying but also deeply rooted in the traditions of family and home-cooked goodness.

Print
clock clock iconcutlery cutlery iconflag flag iconfolder folder iconinstagram instagram iconpinterest pinterest iconfacebook facebook iconprint print iconsquares squares iconheart heart iconheart solid heart solid icon

A Bowl of Comfort: The Hearty Vegetable Stew That Reminds Me of Home


  • Author: Paul
  • Total Time: 40 minutes
  • Yield: 46 servings 1x

Description

This light vegetable stew is packed with simple, fresh ingredients that bring warmth and nourishment to the table. With tender potatoes, zucchini, and carrots simmered in a gentle garlic-infused broth, it’s the perfect quick dinner for a cozy night. Balanced, comforting, and delightfully rustic—this is one of those meals you’ll keep coming back to.


Ingredients

Scale
  • 57 potatoes, peeled and diced
  • 1 onion, finely chopped
  • Olive oil, to taste
  • 1 carrot, peeled and sliced
  • 23 zucchini, chopped
  • 700 ml (2.5 cups) water
  • Fresh parsley, chopped (for garnish)
  • Bread, for serving
  • 12 tomatoes, chopped
  • Garlic, minced (to taste)
  • Salt, to taste

Instructions

  1. In a large pot, heat a drizzle of olive oil over medium heat. Sauté the chopped onion and garlic until fragrant and translucent.
  2. Add the carrots, potatoes, and zucchini to the pot. Stir and let cook for a couple of minutes.
  3. Add the chopped tomatoes and stir to combine.
  4. Pour in the water, add a pinch of salt, and bring the mixture to a boil.
  5. Reduce the heat and let the stew simmer for about 20–25 minutes, or until the vegetables are tender.
  6. Taste and adjust seasoning if needed. Serve hot, garnished with chopped fresh parsley and slices of warm bread on the side.

Notes

  • For extra depth, add a dash of paprika or a vegetable bouillon cube to the simmering water.
  • Feel free to toss in any other veggies you have on hand, like bell peppers or green beans.
  • This stew is even better the next day as the flavors deepen.
  • Prep Time: 15 minutes
  • Cook Time: 25 minutes
  • Category: Soup
  • Method: Stovetop
  • Cuisine: Mediterranean-inspired

Crispy Veggie Fritters: A Heartwarming Tradition That Brings Comfort and Flavor

There’s a certain magic that happens when simple ingredients are combined and transformed into something extraordinary. Growing up, I often found myself in the kitchen with my mother, experimenting with whatever fresh vegetables we had on hand. I’ll never forget the first time we made fritters together. It was a rainy afternoon, and we were searching for ways to use up the bounty of vegetables we had in our fridge. With the comforting aroma of fresh herbs and sizzling vegetables filling the air, we created our first batch of veggie fritters. The combination of grated zucchini, potatoes, and carrots brought out the natural sweetness of the vegetables, while the cheese added a rich, savory depth that made each bite irresistible.

As the years passed, I kept experimenting with the recipe, adding my own touches to the fritters while keeping the essence of my mother’s cooking close to my heart. These crispy veggie fritters, with their golden, crunchy exterior and soft, flavorful interior, became a staple in my household. They’re versatile, easy to make, and always bring comfort—whether as a snack, appetizer, or a side dish for any meal. I often make them for family gatherings, and each time I do, I’m reminded of those rainy afternoons spent in the kitchen, creating something simple yet unforgettable.

Why These Veggie Fritters Stand Out

What makes these fritters truly special is how they balance the sweetness of vegetables with the richness of Suluguni cheese. Suluguni cheese is a semi-soft cheese that’s commonly used in Eastern European and Caucasian cuisine. It has a slightly tangy, salty flavor that perfectly complements the neutral taste of the vegetables. When grated, Suluguni adds a layer of depth to the fritters, giving them a delightful savory flavor that makes them stand out from other veggie fritters.

The vegetables—zucchini, potatoes, and carrots—each bring something unique to the table. Zucchini is soft, hydrating, and mild, while potatoes provide heartiness and texture. Carrots, with their natural sweetness, tie everything together, making the fritters not only flavorful but also visually appealing with their vibrant color.

Together, these ingredients create a balance that’s both nutritious and delicious. The beauty of this recipe lies in its simplicity. There’s no need for complicated ingredients or fancy equipment. Just fresh, wholesome produce, a few pantry staples, and a bit of creativity. These fritters are easy to make and are always a hit, whether you’re serving them at a family dinner or taking them to a potluck.

Ingredients:

IngredientQuantity
Zucchini1
Potatoes2
Carrot1
Suluguni cheese (grated)100g
Spring onion (chopped)To taste
Eggs2
SaltTo taste
Black pepperTo taste

Directions:

  1. Prepare Vegetables: Grate the zucchini, potatoes, and carrot using a coarse grater. Place the grated vegetables into a clean kitchen towel or cheesecloth and squeeze out any excess moisture.
  2. Mix the Ingredients: In a large bowl, combine the grated vegetables, grated Suluguni cheese, chopped spring onion, and eggs. Season with salt and black pepper to taste. Mix everything together until well combined.
  3. Fry the Fritters: Heat a little oil in a frying pan over medium heat. Using a spoon, form small portions of the mixture into patties and carefully place them in the pan. Fry the fritters for 3-4 minutes on each side, or until golden and crispy.
  4. Drain and Serve: Remove the fritters from the pan and place them on paper towels to drain any excess oil. Serve immediately with your favorite dipping sauce or as a side dish.

Nutritional Information (per fritter):

NutrientAmount
Calories90 kcal
Protein4 g
Carbohydrates12 g
Fat4 g
Fiber2 g
Sugars3 g

The Health Benefits of These Veggie Fritters

These veggie fritters aren’t just tasty—they’re also packed with essential nutrients. Potatoes are a great source of vitamins like vitamin C, B6, and potassium. They’re also rich in fiber, which can help with digestion and promote satiety. Zucchini is a low-calorie vegetable that’s high in antioxidants and water, making it a great addition to any meal for added hydration and nutritional value. Carrots are an excellent source of beta-carotene, which supports eye health and immune function.

The addition of Suluguni cheese offers a good dose of protein and calcium, which are essential for maintaining strong bones and muscle health. Furthermore, the cheese gives the fritters a rich, satisfying flavor, reducing the need for added fats or sauces.

These fritters are also flexible when it comes to dietary preferences. They’re naturally vegetarian and can be easily adapted for vegan diets by substituting the eggs with flaxseed or chia seed egg replacers and using a dairy-free cheese alternative. This makes them a versatile option for a wide range of dietary needs.

FAQs About Veggie Fritters

Can I use other types of cheese?
While Suluguni cheese is traditional for this recipe, it can be substituted with other cheeses such as mozzarella, feta, or even cheddar. Each cheese will bring its own flavor profile to the fritters, so feel free to experiment and find the cheese you prefer.

Can I make these fritters ahead of time?
Yes, you can prepare the fritters ahead of time! Simply form the fritters and store them in the refrigerator for up to 24 hours before frying. Alternatively, you can freeze the fritters after they’ve been shaped but before frying. When you’re ready to cook them, just fry them directly from the freezer—no need to thaw!

How can I make these fritters gluten-free?
This recipe is naturally gluten-free because it doesn’t rely on any flour or breadcrumbs. If you’d like to make them a little crispier, you can add a tablespoon or two of gluten-free flour or cornstarch to the mixture.

Can I add other vegetables?
Absolutely! These fritters are incredibly versatile, and you can add vegetables like spinach, corn, or bell peppers to the mixture for extra flavor and nutrition. Just be sure to remove excess moisture from the vegetables before adding them to the mixture.

How do I store leftover fritters?
Store any leftover fritters in an airtight container in the refrigerator for up to 3 days. You can also freeze them for up to 2 months. To reheat, simply warm them in a hot skillet or in the oven to maintain their crispiness.

Can I make these fritters without eggs?
Yes! To make these fritters egg-free, use a flaxseed or chia seed egg replacement. Simply mix one tablespoon of ground flaxseed or chia seeds with 3 tablespoons of water, and let it sit for 5 minutes to form a gel-like consistency. This will bind the fritter mixture together just as eggs do.

Versatility: Enjoy Fritters in Different Ways

While these fritters are perfect as a snack or appetizer, they can easily be incorporated into a full meal. Serve them alongside a fresh green salad for a light lunch or dinner. Pair them with a tangy yogurt-based dip or a spicy salsa for extra flavor. They can also be served with a dollop of sour cream, which adds a creamy contrast to the crispy fritters.

For a heartier meal, these fritters can be used as a filling for a sandwich. Take two fritters and sandwich them between slices of whole grain bread, along with some fresh greens and your favorite spread for a quick, delicious lunch. The fritters can also be served as a side dish to grilled meats or roasted vegetables, making them a great addition to any dinner table.

Conclusion: A Taste of Comfort in Every Bite

These crispy veggie fritters are more than just a recipe—they’re a reminder of the joy of cooking, the simplicity of fresh ingredients, and the comfort of sharing food with loved ones. Whether you’re making them for a family meal, a casual gathering, or just to enjoy as a snack, they’ll always bring a sense of warmth and satisfaction. The combination of zucchini, potatoes, carrots, and Suluguni cheese creates a dish that’s both nutritious and irresistibly delicious, proving that sometimes the simplest ingredients are the most powerful.

So, the next time you find yourself with a few extra vegetables in your fridge, turn them into these crispy fritters. You’ll be amazed at how such humble ingredients can come together to create something truly memorable. The magic is in the combination, the love you put into making them, and the memories you create around the table.

Print
clock clock iconcutlery cutlery iconflag flag iconfolder folder iconinstagram instagram iconpinterest pinterest iconfacebook facebook iconprint print iconsquares squares iconheart heart iconheart solid heart solid icon

Crispy Veggie Fritters: A Heartwarming Tradition That Brings Comfort and Flavor


  • Author: Paul
  • Total Time: 25 minutes
  • Yield: 12 fritters 1x

Description

These crispy veggie fritters are a delightful combination of grated zucchini, potatoes, carrots, and the rich flavor of Suluguni cheese. Lightly seasoned and perfectly crispy on the outside with a tender, flavorful interior, they’re perfect as a snack, appetizer, or a side dish to complement your meals. Easy to make and full of wholesome ingredients, these fritters are sure to become a favorite in your kitchen.


Ingredients

Scale
  • 1 zucchini, grated
  • 2 potatoes, grated
  • 1 carrot, grated
  • 100g Suluguni cheese, grated
  • Spring onion, chopped (to taste)
  • 2 eggs
  • Salt, to taste
  • Black pepper, to taste

Instructions

  1. Prepare the Vegetables: Grate the zucchini, potatoes, and carrot. Once grated, place the vegetables in a clean towel and squeeze out any excess moisture to prevent soggy fritters.
  2. Mix the Ingredients: In a large mixing bowl, combine the grated vegetables, grated Suluguni cheese, chopped spring onion, and eggs. Season with salt and black pepper to taste. Stir well until the mixture is evenly combined.
  3. Form Fritters: Heat a little oil in a frying pan over medium heat. Using a spoon, form small patties from the mixture and gently place them in the hot pan.
  4. Fry the Fritters: Cook the fritters for 3-4 minutes on each side or until they are golden brown and crispy.
  5. Drain and Serve: Remove the fritters from the pan and place them on a paper towel to drain excess oil. Serve immediately while hot and crispy.

Notes

  • To avoid soggy fritters, ensure that you remove as much moisture as possible from the grated vegetables.
  • You can substitute Suluguni cheese with mozzarella or feta for a different flavor.
  • For a healthier version, you can bake the fritters in the oven instead of frying them. Place the fritters on a parchment-lined baking sheet and bake at 375°F (190°C) for 20-25 minutes, flipping halfway through.
  • If you prefer to make these fritters ahead of time, you can refrigerate the uncooked fritters for up to 24 hours or freeze them for longer storage.
  • Prep Time: 10 minutes
  • Cook Time: 15 minutes
  • Category: Snack
  • Method: Frying
  • Cuisine: European-inspired

Banana Muffins: A Sweet and Nutty Journey to Comfort

There’s something undeniably comforting about the smell of freshly baked muffins wafting through the house. I still remember the mornings I spent with my grandmother, learning to bake in her warm kitchen. She would always use whatever ingredients were at hand, often swapping out traditional flour for alternatives like almond flour. One morning, we had a bunch of overripe bananas that nobody wanted to eat, and she suggested we make banana muffins. We didn’t have a recipe at the time, but with a bit of experimentation, we created a simple, yet deeply satisfying muffin that quickly became a family favorite.

These banana muffins, made with almond flour, hold a special place in my heart. They’re the perfect mix of sweet and nutty, with just the right amount of moisture from the bananas. I’ve since added my own twist to the recipe, but the essence of those mornings with my grandmother remains. What started as a way to salvage overripe bananas has turned into a treasured recipe I turn to on busy mornings, lazy weekends, or when I need something that feels like a hug from the inside out.

Why Almond Flour?

You might wonder what makes almond flour the star of this banana muffin recipe. While traditional muffins are often made with wheat flour, almond flour offers a gluten-free alternative that adds a nutty richness to the muffins. It also gives these muffins a lighter, fluffier texture compared to the denser, heavier outcome you might expect from all-purpose flour. Almond flour is made from finely ground almonds, and it contains more protein and fiber than typical wheat flour, making these muffins not only gluten-free but also more nutritious.

For those who are mindful of their carbohydrate intake or want a recipe that’s naturally lower in glycemic index, almond flour is a great option. It doesn’t spike blood sugar as quickly as regular flour might, which can help you feel full longer and keep your energy levels steady throughout the day.

Ingredients:

IngredientQuantity
Mashed bananas170g (about 3/4 cup)
Whole eggs2 (about 55g each)
Dark brown sugar50g (about 1/4 cup)
Vanilla extract1/2 tsp
Almond flour200g (about 2 cups)

Directions:

  1. Preheat the Oven and Prepare Muffin Tin: Preheat your oven to 350°F (175°C) and grease or line a muffin tin with paper liners.
  2. Mix Wet Ingredients: In a large bowl, combine the mashed bananas, eggs, dark brown sugar, and vanilla extract. Stir well until fully combined.
  3. Add Almond Flour: Gradually mix in the almond flour, ensuring there are no lumps and the batter is smooth.
  4. Fill the Muffin Tin: Pour the batter evenly into the muffin tin, filling each cup about two-thirds full.
  5. Bake the Muffins: Place the muffin tin in the preheated oven and bake for 18-22 minutes, or until a toothpick inserted into the center of a muffin comes out clean.
  6. Cool and Serve: Allow the muffins to cool for a few minutes in the tin before transferring them to a wire rack to cool completely. Enjoy!

Nutritional Information (per muffin):

NutrientAmount
Calories180 kcal
Protein5 g
Carbohydrates21 g
Fat10 g
Fiber3 g
Sugars12 g

The Role of Bananas: Sweetness and Moisture

The bananas in these muffins do more than just sweeten the batter—they provide natural moisture that helps keep the muffins soft and tender. Ripe bananas are packed with natural sugars, which give these muffins their subtle sweetness. Unlike refined sugar, the sugar from bananas comes with added nutrients like potassium, vitamin C, and dietary fiber, making these muffins a healthier option than many others that rely on processed sugars.

Using overripe bananas is key in this recipe. When bananas are left to ripen past their usual yellow stage, they become incredibly sweet, making them perfect for baking. The sugar content of the bananas increases as they ripen, and their texture softens, which helps them blend seamlessly into the muffin batter, creating a more moist and flavorful result.

Health Benefits and Why You’ll Love These Muffins

These banana muffins aren’t just a delicious treat—they’re also a healthier option compared to traditional baked goods. Thanks to the almond flour, they’re naturally gluten-free, making them a great choice for anyone following a gluten-free diet. The bananas add a natural sweetness without the need for added sugar, and the muffins are packed with healthy fats from the almonds.

Almond flour is also a good source of vitamin E, magnesium, and antioxidants, all of which are important for maintaining a healthy body. Plus, almond flour has a lower glycemic index than regular flour, which means these muffins are less likely to cause spikes in your blood sugar levels. They provide a steady release of energy, making them a perfect choice for breakfast, a snack, or a post-workout treat.

In addition, this recipe uses only a small amount of dark brown sugar, so you’re not overwhelmed with an excess of sweetness. The natural flavors from the bananas and the nutty richness from the almond flour take center stage, with the brown sugar adding a touch of caramelized depth. The result is a muffin that’s perfectly balanced and won’t leave you feeling sluggish or weighed down after you eat it.

A Versatile Recipe: Customizing Your Muffins

One of the best parts about this banana muffin recipe is its versatility. While the base ingredients are simple, there are endless possibilities to customize these muffins according to your preferences. For example, you could add in chocolate chips, chopped nuts, or dried fruit for extra texture and flavor. Cinnamon or nutmeg would complement the bananas beautifully if you’re looking for a warming, spiced note in your muffins.

For those who like a little extra crunch, adding chopped walnuts or slivered almonds into the batter can give the muffins an added layer of texture. Alternatively, you can top the muffins with a sprinkling of oats or seeds before baking for an extra bite.

This recipe also works as a great base for making mini muffins. You can simply divide the batter among smaller muffin cups, and they’ll bake in a fraction of the time, making them perfect for little hands or for when you’re craving just one bite-sized treat.

Storing and Freezing Banana Muffins

If you’ve made a large batch of these banana muffins, you’ll want to know how to store them properly. After baking, allow the muffins to cool completely before storing them in an airtight container. They can be kept at room temperature for up to 2 days or refrigerated for up to 5 days. To keep them fresher for longer, you can also freeze them. Simply wrap the muffins tightly in plastic wrap or store them in a freezer-safe bag, and they’ll last for up to 3 months.

When you’re ready to eat them, simply defrost the muffins at room temperature or pop them in the microwave for a few seconds to enjoy them warm, just as if they were freshly baked. This makes them perfect for meal prep or for those days when you want a quick and easy breakfast or snack.

Frequently Asked Questions

Can I substitute almond flour with another type of flour? Yes, you can use other flours such as coconut flour or oat flour, but the texture and taste may vary. Almond flour is the best option for a soft, moist muffin that holds together well. If you’re not gluten-free, you can substitute all-purpose flour as well.

Can I make these muffins without eggs? If you’re looking for an egg-free version, you can substitute the eggs with flax eggs (1 tablespoon of flaxseed meal mixed with 2 tablespoons of water for each egg) or applesauce. However, the texture may be slightly different, and the muffins might be a bit denser.

Can I add other fruits to this recipe? Absolutely! You can experiment with adding other fruits, like blueberries, strawberries, or even diced apples. Just be sure to adjust the moisture content accordingly—if you’re adding a lot of extra fruit, you might need to reduce the number of bananas slightly or add a bit more almond flour.

Conclusion: A Comforting, Healthy Treat

These banana muffins are a true reminder that sometimes the simplest recipes hold the most joy. With just a handful of ingredients, you can create something that is both delicious and nutritious. Whether you’re using up overripe bananas or simply craving something comforting to start your day, this recipe is one you’ll return to again and again.

The muffins are rich in nutrients, naturally sweetened with bananas, and made with almond flour for a gluten-free option that’s both light and filling. They are not just a breakfast treat—they’re a versatile snack that can be customized to fit your preferences. The best part? They’re easy to make and can be enjoyed by anyone, whether you’re following a specific diet or just looking for something wholesome to enjoy with your morning coffee.

From my kitchen to yours, I hope these banana muffins bring as much comfort and joy as they have to me over the years.

Print
clock clock iconcutlery cutlery iconflag flag iconfolder folder iconinstagram instagram iconpinterest pinterest iconfacebook facebook iconprint print iconsquares squares iconheart heart iconheart solid heart solid icon

Banana Muffins: A Sweet and Nutty Journey to Comfort


  • Author: Paul
  • Total Time: 30 minutes
  • Yield: 12 muffins 1x

Description

These banana muffins are the perfect blend of sweetness and texture, with the richness of almond flour and the natural sweetness of ripe bananas. They’re not just gluten-free, but they also offer a healthy dose of protein, fiber, and healthy fats. Whether you’re looking for a nutritious breakfast or a satisfying snack, these muffins are sure to hit the spot. Quick to prepare, they’re a delightful addition to any morning routine!


Ingredients

Scale
  • 170g mashed bananas (about 3/4 cup)
  • 2 whole eggs (about 55g each)
  • 50g dark brown sugar (about 1/4 cup)
  • 1/2 tsp vanilla extract
  • 200g almond flour (about 2 cups)

Instructions

  1. Preheat Oven and Prepare Muffin Tin: Preheat your oven to 350°F (175°C) and grease or line a muffin tin with paper liners.
  2. Mix Wet Ingredients: In a large bowl, combine the mashed bananas, eggs, dark brown sugar, and vanilla extract. Stir until fully combined.
  3. Add Almond Flour: Gradually mix in the almond flour until the batter is smooth and there are no lumps.
  4. Fill Muffin Tin: Pour the batter evenly into the muffin tin, filling each cup about two-thirds full.
  5. Bake the Muffins: Place the muffin tin in the preheated oven and bake for 18-22 minutes, or until a toothpick inserted into the center of a muffin comes out clean.
  6. Cool and Serve: Allow the muffins to cool in the tin for a few minutes before transferring them to a wire rack to cool completely. Enjoy!

Notes

  • For best results, use very ripe bananas as they provide the best sweetness and moisture for the muffins.
  • You can substitute the almond flour with other flour types, but this will alter the texture and flavor.
  • Add-ins like chocolate chips, nuts, or dried fruit can be mixed into the batter for extra flavor and texture.
  • Store muffins in an airtight container at room temperature for up to 3 days, or freeze for longer storage.
  • Prep Time: 5 minutes
  • Cook Time: 25 minutes
  • Category: Breakfast
  • Method: Baking
  • Cuisine: American