How to Make the Best Shrimp Étouffée: A Flavorful Cajun Classic

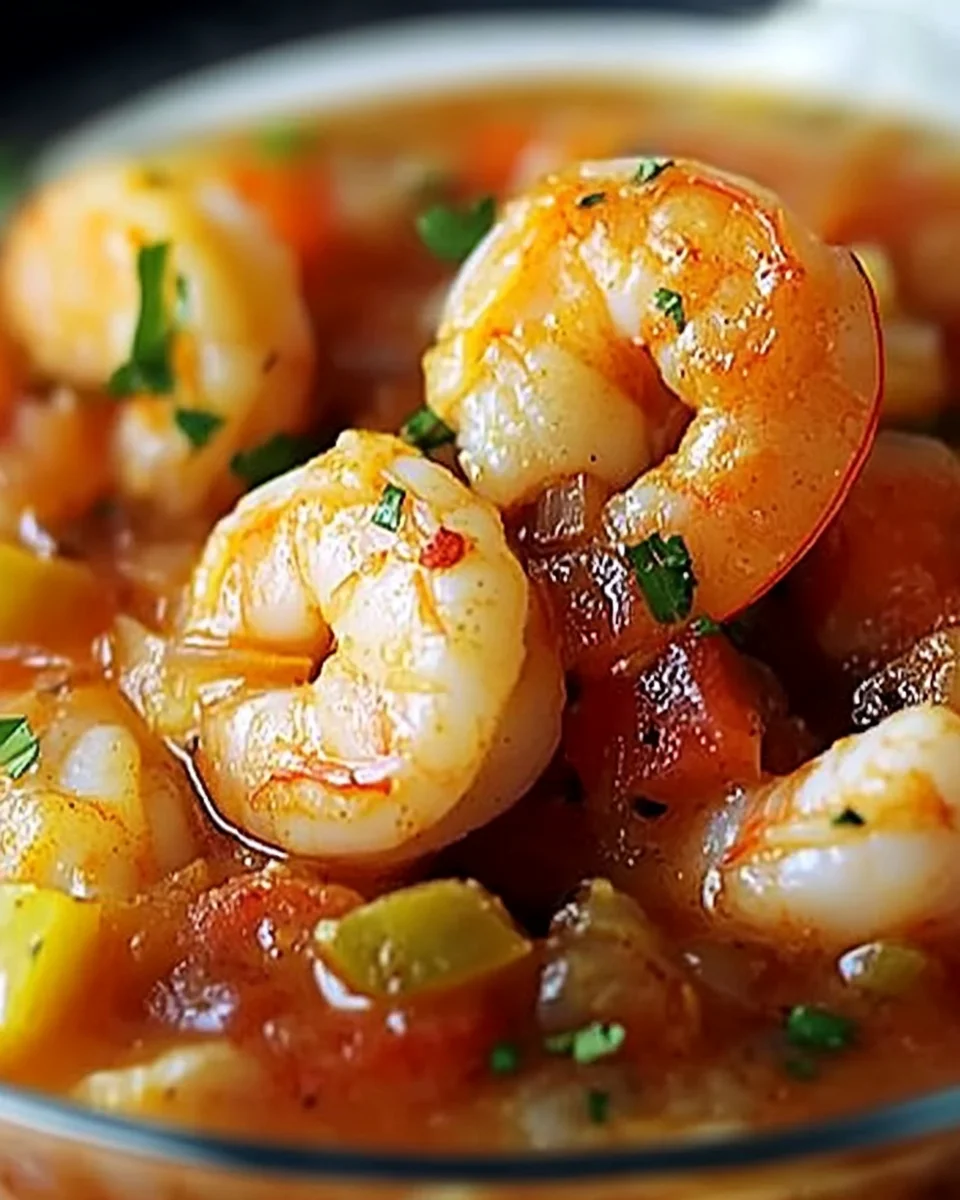
When you’re craving a meal that’s rich, comforting, and packed with bold flavors, Shrimp Étouffée is the answer. This classic Louisiana dish combines tender shrimp, a luscious sauce, and the unmistakable blend of Cajun spices that transports you straight to the heart of the South. Whether you’re new to Cajun cooking or looking to perfect your skills, this guide will walk you through creating a truly unforgettable Shrimp Étouffée.

Why Shrimp Étouffée Deserves a Place on Your Table

Shrimp Étouffée isn’t just a dish—it’s an experience. It’s the kind of meal that fills your kitchen with tantalizing aromas and brings people together over its hearty, soul-satisfying flavors. This dish is perfect for:

  • Impressing guests with a sophisticated yet approachable meal.
  • Experiencing the rich culinary traditions of Louisiana.
  • Savoring a dish that’s as versatile as it is delicious.

Ingredients for Shrimp Étouffée

Here’s a breakdown of everything you’ll need to make Shrimp Étouffée. The ingredients are simple, but together, they create a complex and layered flavor profile.

IngredientAmountNotes
Shrimp1 poundPeeled, deveined, and tail-off recommended.
Butter2 tablespoonsUnsalted for better control of seasoning.
Onion1, choppedYellow onion works best.
Bell pepper1, choppedGreen or red for added sweetness.
Celery2 stalks, choppedA core ingredient in Cajun cuisine.
Garlic4 cloves, mincedFresh for maximum flavor.
Diced tomatoes1 can (14.5 oz)Drained for a thicker sauce.
Seafood stock2 cupsHomemade or store-bought.
Flour1 tablespoonFor thickening the sauce.
Cajun seasoning1 teaspoonAdjust to your spice preference.
Paprika1 teaspoonSweet or smoked, depending on your taste.
Thyme½ teaspoonDried or fresh works well.
Bay leaf1Adds depth of flavor.
Salt and pepperTo tasteFor seasoning the dish.
Parsley¼ cup, choppedFor garnish and freshness.
Cooked riceFor servingWhite or brown rice complements perfectly.

Step-by-Step Guide to Making Shrimp Étouffée

1. Prepare Your Ingredients

Before you start cooking, take a few minutes to prep all your ingredients. Chop the onion, bell pepper, celery, and garlic. Peel and devein the shrimp if necessary.

2. Make the Base: The Holy Trinity

The “holy trinity” of Cajun cooking—onion, bell pepper, and celery—is the flavor foundation of this dish. Melt the butter in a large skillet over medium heat, then sauté the chopped vegetables until softened, about 5–7 minutes.

3. Add Garlic and Seasoning

Stir in the minced garlic, Cajun seasoning, paprika, and thyme. Cook for another minute, letting the spices bloom and infuse the vegetables with their aroma.

4. Create a Roux

Sprinkle the flour over the vegetable mixture and stir constantly for 2–3 minutes. This roux thickens the sauce and adds a nutty flavor to the dish.

5. Incorporate the Liquids

Slowly pour in the seafood stock, stirring continuously to avoid lumps. Add the diced tomatoes and bay leaf. Bring the mixture to a gentle simmer, allowing the flavors to meld together.

6. Cook the Shrimp

Add the shrimp to the skillet and cook until they turn pink and opaque, about 3–5 minutes. Be careful not to overcook, as shrimp can become rubbery if cooked too long.

7. Adjust Seasoning

Taste the sauce and adjust the seasoning with salt and pepper as needed.

8. Serve and Garnish

Remove the bay leaf, then spoon the Shrimp Étouffée over a bed of cooked rice. Garnish with freshly chopped parsley for a burst of color and freshness.

Expert Tips for Perfect Shrimp Étouffée

  • Fresh shrimp make all the difference: For the best flavor, use fresh shrimp if possible. Frozen shrimp are a great alternative but should be thawed and drained well.
  • Customize the spice level: If you prefer a milder dish, reduce the Cajun seasoning. For more heat, add a pinch of cayenne pepper.
  • Make it ahead: The sauce can be prepared a day in advance. Reheat gently and add the shrimp just before serving.
  • Don’t skip the seafood stock: It’s the backbone of the sauce, enhancing the seafood flavors in the dish.

Nutritional Information

NutrientAmount (Per Serving)Notes
Calories320Based on 4 servings.
Protein25gFrom shrimp and stock.
Carbohydrates25gPrimarily from rice.
Fat12gIncludes butter and shrimp.
Sodium840mgAdjust salt to your taste.

The History and Culture Behind Shrimp Étouffée

Shrimp Étouffée has its roots in the vibrant culinary traditions of Louisiana. “Étouffée” means “smothered” in French, reflecting the dish’s method of cooking shrimp in a rich, flavorful sauce. This dish is a shining example of how Creole and Cajun cultures blend to create something uniquely delicious.

Serving Suggestions

Shrimp Étouffée pairs beautifully with:

  • A side of crusty French bread to soak up the sauce.
  • A crisp green salad for a refreshing contrast.
  • A cold glass of white wine, such as Sauvignon Blanc or Chardonnay.

FAQs About Shrimp Étouffée

1. What is the difference between gumbo and étouffée?

While both are iconic Louisiana dishes, gumbo is a soup or stew with a thinner consistency, often made with a roux and served over rice. Étouffée, on the other hand, is thicker and more sauce-like, with the rice served underneath.

2. Can I use other proteins instead of shrimp?

Absolutely! Crawfish is a traditional alternative, but you can also use chicken, sausage, or a combination of proteins.

3. What can I use instead of seafood stock?

If seafood stock isn’t available, chicken stock or vegetable broth can be used as a substitute. Add a splash of fish sauce for a hint of seafood flavor.

4. How do I store leftovers?

Store leftover Shrimp Étouffée in an airtight container in the refrigerator for up to 3 days. Reheat gently on the stovetop or in the microwave.

5. Can I make Shrimp Étouffée gluten-free?

Yes, simply replace the flour with a gluten-free alternative like cornstarch or rice flour.

6. Why is my sauce too thin?

If the sauce isn’t thick enough, let it simmer uncovered for a few minutes to reduce. Alternatively, mix a teaspoon of flour or cornstarch with water and stir it into the sauce.

Final Thoughts: Bring the Flavors of Louisiana to Your Kitchen

Making Shrimp Étouffée at home is easier than you think, and the rewards are well worth the effort. It’s a dish that combines warmth, spice, and comfort in every bite. So, gather your ingredients, grab your skillet, and get ready to impress yourself (and your loved ones) with this irresistible Cajun classic.

Ready to explore more Cajun recipes? Start your culinary journey today, and don’t forget to share your results and tips with us. Let the good times roll—Bon appétit!

The Ultimate Guide to Italian Ground Beef and Rice Skillet

When it comes to quick, hearty, and delicious meals, nothing beats the convenience and flavor of a one-pan dish. An Italian Ground Beef and Rice Skillet is the perfect solution for busy weeknights or when you’re craving a satisfying comfort meal. With aromatic spices, savory beef, tender rice, and a medley of vegetables, this dish is not only filling but also packed with flavor. Let’s dive into what makes this dish a crowd-pleaser and how you can easily whip it up in your own kitchen.

Why You’ll Love This Recipe

Cooking can sometimes feel like a chore, but this recipe transforms a few simple ingredients into something magical. You’ll love this dish because:

  • It’s a complete meal in one skillet, minimizing cleanup.
  • The flavors are bold and comforting, reminiscent of classic Italian cuisine.
  • It’s customizable, allowing you to adjust ingredients to suit your taste.
  • It’s a family-friendly dish that even picky eaters will enjoy.

Ingredients You’ll Need

Here’s everything required for this flavorful Italian skillet. Simple pantry staples come together to create a dish that’s bursting with character.

IngredientAmountNotes
Olive oil1 tablespoonUse extra virgin for a richer flavor.
Onion1, diced fineYellow onion works best.
Red bell pepper1, seeded and dicedAdds sweetness and color.
Sun-dried tomatoes¼ cup, drained and choppedUse oil-packed for enhanced flavor.
Garlic3 cloves, minced or gratedFresh is ideal for a robust taste.
Kosher salt2 teaspoonsAdjust to taste.
Ground beef1 poundLean or regular, as per preference.
Long-grain white rice1½ cups, rinsed wellRinsing removes excess starch.
Garlic powder1 teaspoonAdds depth of flavor.
Dried oregano1 teaspoonKey to Italian seasoning.
Fresh rosemary2 tablespoons, minced, dividedFor a fresh and herby aroma.
Diced tomatoes1 (15-ounce) can, drainedUse high-quality canned tomatoes.
Parmesan cheese½ cup, gratedMore for serving if desired.
Beef broth or water2½ cupsUse broth for added richness.
ParsleyMinced, for servingFor garnish and a pop of freshness.

Step-by-Step Instructions

1. Prep Your Ingredients

Begin by prepping all your ingredients. Dice the onion and bell pepper, chop the sun-dried tomatoes, and mince the garlic. Rinse the rice under cold water to remove excess starch, ensuring it cooks up fluffy and separate.

2. Sauté the Aromatics

Heat the olive oil in a large skillet over medium heat. Add the diced onion and bell pepper. Sauté for 3–4 minutes until softened. Stir in the sun-dried tomatoes and garlic, cooking for another minute until fragrant.

3. Cook the Ground Beef

Add the ground beef to the skillet. Use a wooden spoon to break it into smaller pieces. Cook until browned and no longer pink, about 5–6 minutes. Season with kosher salt.

4. Incorporate the Spices and Herbs

Sprinkle in the garlic powder, dried oregano, and half of the minced rosemary. Stir well to combine, ensuring the beef absorbs all the flavors.

5. Add the Rice and Liquids

Pour in the rinsed rice, diced tomatoes, and beef broth (or water). Mix everything together, ensuring the rice is evenly distributed. Bring the mixture to a gentle boil.

6. Simmer to Perfection

Reduce the heat to low, cover the skillet, and let it simmer for 18–20 minutes. Stir occasionally to prevent sticking. The rice should absorb all the liquid and become tender.

7. Finish with Cheese and Herbs

Once the rice is cooked, stir in the grated Parmesan cheese and the remaining minced rosemary. Taste and adjust seasoning as needed.

8. Garnish and Serve

Transfer the skillet to the table, garnish with fresh parsley, and serve with additional Parmesan cheese on the side.

Tips for the Perfect Italian Ground Beef and Rice Skillet

  • Use fresh herbs: Fresh rosemary and parsley add a bright, herby flavor that dried herbs can’t replicate.
  • Don’t skip rinsing the rice: This step is crucial to avoid a sticky or gummy texture.
  • Adjust the liquid ratio: Depending on your skillet size and stove, you may need a splash more liquid if the rice isn’t fully cooked.
  • Experiment with add-ins: Mushrooms, spinach, or zucchini make excellent additions to this dish.

Nutritional Information

NutrientAmount (Per Serving)Notes
Calories420Based on 6 servings.
Protein25gFrom ground beef and cheese.
Carbohydrates38gMainly from the rice.
Fat18gIncludes healthy fats from olive oil.
Sodium820mgAdjust salt to reduce sodium.

Why This Recipe Works

This Italian Ground Beef and Rice Skillet combines the hearty texture of ground beef with the tender fluffiness of rice, all tied together with rich, tomatoey flavors. The dish is balanced, with enough herbs and spices to elevate the taste without overwhelming the palate. The one-skillet method ensures every bite is infused with the flavors of the ingredients.

Serving Suggestions

Pair this skillet meal with a side of crusty garlic bread or a light green salad for a complete dinner. For an extra-special touch, drizzle a bit of balsamic glaze over the top before serving.

FAQs

1. Can I use brown rice instead of white rice?

Yes, but adjust the cooking time and liquid ratio, as brown rice takes longer to cook.

2. What can I substitute for beef broth?

You can use chicken broth, vegetable broth, or even water with a splash of soy sauce for depth.

3. How can I make this dish vegetarian?

Replace the ground beef with plant-based ground meat or lentils and use vegetable broth.

4. Can I freeze leftovers?

Yes, this dish freezes well. Store it in an airtight container for up to 3 months. Thaw and reheat on the stovetop or microwave.

5. What other cheeses can I use?

Mozzarella, Pecorino Romano, or even a mix of Italian cheeses work wonderfully in this recipe.

6. Can I make this ahead of time?

Absolutely! This dish reheats beautifully, making it perfect for meal prep or make-ahead dinners.

Final Thoughts and Call to Action

Cooking doesn’t have to be complicated. With this Italian Ground Beef and Rice Skillet, you have a dish that’s easy, flavorful, and sure to satisfy. Why not give it a try tonight? Share your experience or tweaks to the recipe in the comments below. Don’t forget to sprinkle on a little extra Parmesan for good measure—because who doesn’t love cheese?

Ready to explore more quick and delicious recipes? Check out our collection of one-pan meals and elevate your dinner game today!

Slow-Cooker Creamy Sun-Dried Tomato Gnocchi with Delicata Squash & Spinach

Picture this: a cozy evening with the smell of something warm and savory filling your home. That’s the magic of slow-cooking. Today, you’re in for a treat with a dish that’s comforting, flavorful, and packed with wholesome ingredients—Slow-Cooker Creamy Sun-Dried Tomato Gnocchi with Delicata Squash & Spinach. This recipe is perfect for those busy days when you need something hearty and effortless.

Why You’ll Love This Recipe

If you love meals that combine rich, creamy textures with vibrant, fresh flavors, this dish will become a new favorite. The gnocchi turns perfectly tender in the slow cooker, soaking up the delicious cream sauce infused with sun-dried tomatoes and garlic. Meanwhile, the sweet delicata squash and nutritious spinach add layers of flavor and color.

Ingredients You’ll Need

Here’s everything you need to create this comforting dish:

IngredientQuantity
Unsalted vegetable broth4 cups
Chopped sun-dried tomatoes¼ cup
Shelf-stable potato gnocchi1 (16-ounce) package
Delicata squash, halved, seeded, cut into ½-inch pieces1 small
Garlic, grated2 cloves
Heavy cream½ cup
Ground pepper½ teaspoon, plus more for serving
Baby spinach1 (5-ounce) package
Fresh basil, chopped¼ cup
Grated Parmesan cheeseFor serving

How to Prepare Slow-Cooker Creamy Sun-Dried Tomato Gnocchi

Step 1: Prep Your Ingredients

  • Wash and cut the delicata squash. No need to peel—the skin becomes tender as it cooks.
  • Chop the sun-dried tomatoes and basil, grate the garlic, and measure out your broth and cream.

Step 2: Combine Ingredients in the Slow Cooker

Add the vegetable broth, sun-dried tomatoes, gnocchi, delicata squash, and garlic to the slow cooker. Stir to combine, ensuring the gnocchi is submerged in the broth.

Step 3: Slow Cook to Perfection

Cover the slow cooker and set it to cook on low for 4 hours or on high for 2 hours. Check halfway through to give everything a quick stir.

Step 4: Add Cream and Spinach

About 20 minutes before serving, stir in the heavy cream, spinach, and ground pepper. Allow the spinach to wilt and the cream to blend with the other ingredients.

Step 5: Garnish and Serve

Once everything is cooked and fragrant, garnish with fresh basil and grated Parmesan cheese. Serve warm with extra pepper to taste.

Tips for Making the Best Slow-Cooker Gnocchi Dish

1. Choosing the Right Gnocchi

Shelf-stable gnocchi works best in this recipe as it holds up well during slow cooking without turning mushy.

2. Picking a Squash

Delicata squash is ideal for its sweet, nutty flavor and edible skin. However, you can substitute butternut squash if delicata isn’t available.

3. Boosting the Flavor

For an extra burst of flavor, consider adding a splash of white wine to the broth or a pinch of red pepper flakes for a hint of heat.

Nutritional Information (Per Serving)

NutrientAmount
Calories~320
Protein8g
Carbohydrates45g
Fat12g
Fiber6g

Why This Recipe Is Perfect for Any Occasion

Whether you’re hosting a dinner party, meal-prepping for the week, or just looking for a comforting dish to end the day, this recipe checks all the boxes. It’s vegetarian, adaptable to various diets, and a crowd-pleaser.

Pairing Suggestions

  • Wine: A crisp Pinot Grigio or a buttery Chardonnay complements the creamy flavors beautifully.
  • Side Dish: Serve with a simple green salad or a crusty baguette to soak up the sauce.

FAQs About Slow-Cooker Creamy Sun-Dried Tomato Gnocchi

1. Can I use frozen gnocchi?

Frozen gnocchi can be used, but it’s best to thaw it first to prevent excess moisture from altering the dish’s consistency.

2. Can I make this recipe vegan?

Absolutely! Swap the heavy cream for coconut cream or cashew cream and use vegan Parmesan for garnish.

3. How long does this dish keep?

Store leftovers in an airtight container in the refrigerator for up to 3 days. Reheat gently on the stovetop or microwave.

4. Can I add protein to this dish?

Yes, grilled chicken, shrimp, or even white beans would be delicious additions.

5. What other vegetables can I use?

Zucchini, kale, or mushrooms make excellent substitutes or additions.

6. Do I need to pre-cook the gnocchi?

Nope! The gnocchi cooks directly in the broth, soaking up all the flavors.

Final Thoughts

Making Slow-Cooker Creamy Sun-Dried Tomato Gnocchi with Delicata Squash & Spinach is like giving yourself a warm hug. It’s easy to prepare, full of nourishing ingredients, and bursting with flavor. Whether you’re cooking for yourself, your family, or friends, this dish delivers comfort and joy with every bite.

Pro Tip: Double the recipe if you’re feeding a crowd or want extra leftovers for the week!

Slow Cooker Gnocchi

Slow-Cooker Creamy Sun-Dried Tomato Gnocchi with Delicata Squash & Spinach is a hearty, flavorful dish perfect for busy days. With tender gnocchi, sweet delicata squash, and a rich, creamy sauce infused with sun-dried tomatoes and garlic, this meal is comfort food at its finest.
Prep Time 10 minutes
Cook Time 4 hours
Total Time 4 hours 10 minutes
Servings: 4
Course: Main Course
Cuisine: Italian-inspired

Ingredients
  

  • 4 cups unsalted vegetable broth
  • ¼ cup chopped sun-dried tomatoes
  • 1 16-ounce package shelf-stable potato gnocchi
  • 1 small delicata squash halved, seeded, and cut into ½-inch pieces
  • 2 cloves garlic grated
  • ½ cup heavy cream
  • ½ teaspoon ground pepper plus more for serving
  • 1 5-ounce package baby spinach
  • ¼ cup fresh basil chopped
  • Grated Parmesan cheese for serving

Method
 

  1. Prep Your Ingredients:
  2. Wash and cut the delicata squash. No need to peel—the skin becomes tender as it cooks.
  3. Chop sun-dried tomatoes and basil, grate the garlic, and measure out the broth and cream.
  4. Combine Ingredients in the Slow Cooker:
  5. Add vegetable broth, sun-dried tomatoes, gnocchi, delicata squash, and garlic to the slow cooker.
  6. Stir to combine, ensuring gnocchi is submerged.
  7. Slow Cook to Perfection:
  8. Cover the slow cooker and cook on low for 4 hours or high for 2 hours. Stir halfway through.
  9. Add Cream and Spinach:
  10. About 20 minutes before serving, stir in heavy cream, spinach, and ground pepper.
  11. Allow spinach to wilt and cream to blend with other ingredients.
  12. Garnish and Serve:
  13. Garnish with fresh basil and grated Parmesan cheese.
  14. Serve warm with extra pepper to taste.

Notes

Tips for Success
  • Use shelf-stable gnocchi for best results, as it holds up well during slow cooking.
  • If delicata squash isn’t available, substitute with butternut squash.
  • For extra flavor, add a splash of white wine to the broth or a pinch of red pepper flakes.
Pairing Suggestions
  • Wine: Pair with a crisp Pinot Grigio or buttery Chardonnay.
  • Side Dish: Serve with a simple green salad or crusty baguette to soak up the sauce.
Storage and Reheating
  • Store leftovers in an airtight container in the refrigerator for up to 3 days.
  • Reheat gently on the stovetop or in the microwave.
FAQs
  1. Can I use frozen gnocchi?
    • Yes, but thaw it first to avoid excess moisture.
  2. Can I make this recipe vegan?
    • Swap heavy cream for coconut cream or cashew cream, and use vegan Parmesan for garnish.
  3. Can I add protein?
    • Yes, grilled chicken, shrimp, or white beans would be delicious additions.
  4. What other vegetables can I use?
    • Zucchini, kale, or mushrooms are great substitutes or additions.
Enjoy the cozy flavors of this Slow-Cooker Creamy Sun-Dried Tomato Gnocchi with Delicata Squash & Spinach. Perfect for any occasion, this recipe will fill your home with warmth and your plate with joy!

Veggie Sausage White Bean Skillet with Kale & Sun-Dried Tomatoes: A Flavorful and Nourishing Meal

Picture this: a cozy evening, the tantalizing aroma of sautéed garlic filling the air, and a hearty, wholesome skillet dish coming together in minutes. That’s exactly what this veggie sausage white bean skillet with kale & sun-dried tomatoes promises. It’s a dish that feels indulgent yet is packed with nourishing ingredients, making it perfect for weeknights or when you want to impress guests without breaking a sweat.

Why You’ll Love This Recipe

This skillet recipe combines the earthy flavors of white beans, the savory goodness of veggie sausage, and the tangy punch of sun-dried tomatoes. Add nutrient-rich kale and a hint of spice, and you’ve got a one-pan wonder that’s:

  • Easy to Make: With minimal prep and just one pan, cleanup is a breeze.
  • Packed with Nutrition: High in protein, fiber, and vitamins, it’s a well-rounded meal.
  • Vegan-Friendly: Perfect for plant-based eaters, with an optional vegan parmesan topping.

Ingredients You’ll Need

Here’s everything you’ll need to whip up this delicious skillet dish:

IngredientQuantityNotes
White beans2 cans (19 oz/591 ml)Drained, rinsed & divided
Vegetable stock1 ⅓ cupsAdds depth to the dish
Olive oil2 tablespoonsFor sautéing
Veggie sausages4Sliced into 1-inch pieces
Shallot1 mediumSmall dice
Sun-dried tomatoes¼ cupFinely chopped
Garlic3 clovesMinced
Nutritional yeast2 tablespoonsAdds a cheesy, nutty flavor
Dried oregano½ teaspoonEnhances the herbal notes
Ground chilies (optional)¼ teaspoonFor a touch of heat
Sea salt and black pepperTo tasteAdjust to preference
Balsamic vinegar1 teaspoonAdds a subtle tang
Kale4 cupsChopped, stems removed
Vegan parmesan (optional)As desiredFor garnish
Chili crisp or ground chiliesFor servingOptional, for extra heat

Step-by-Step Recipe Guide

1. Prepare Your Ingredients

Before you start cooking, take a moment to prep everything. Chop the kale, dice the shallot, and slice the veggie sausages. Having everything ready makes cooking stress-free and efficient.

2. Sauté the Aromatics

Heat the olive oil in a large skillet over medium heat. Add the diced shallot and cook until softened, about 3 minutes. Toss in the minced garlic and sun-dried tomatoes, stirring for another minute until fragrant.

3. Brown the Veggie Sausages

Add the sliced veggie sausages to the skillet. Let them brown on all sides, stirring occasionally, for about 5–7 minutes. This step brings out their savory flavors and gives them a slight crispness.

4. Add the White Beans and Seasonings

Stir in half of the white beans, reserving the rest for later. Sprinkle in the oregano, ground chilies (if using), nutritional yeast, and a pinch of salt and pepper. Cook for 2–3 minutes to let the flavors meld.

5. Create the Sauce

Pour in the vegetable stock and balsamic vinegar. Use a wooden spoon to scrape up any browned bits from the skillet—this adds depth to the dish. Let the mixture simmer gently for 5 minutes.

6. Blend for Creaminess

Using an immersion blender, partially blend the skillet mixture to create a creamy base. Alternatively, you can transfer a portion to a countertop blender and then return it to the skillet. Leave some beans whole for texture.

7. Incorporate the Kale

Add the chopped kale to the skillet in batches, stirring until it wilts. This will take about 2–3 minutes.

8. Finish with Remaining Beans

Stir in the reserved white beans and cook for another 2–3 minutes until everything is heated through. Adjust seasoning with more salt, pepper, or balsamic vinegar as needed.

9. Serve and Garnish

Serve the skillet hot, topped with vegan parmesan, a drizzle of chili crisp, or extra ground chilies for heat. Pair it with crusty bread or enjoy it as is.

Nutritional Benefits of This Dish

NutrientBenefit
Protein (White Beans, Veggie Sausages)Supports muscle health and keeps you full
Fiber (Kale, Beans)Aids digestion and promotes gut health
Iron (Kale, Nutritional Yeast)Boosts energy and combats fatigue
Vitamins A & C (Kale)Strengthens immunity and skin health

Tips for Success

1. Use Quality Ingredients

Opt for organic kale and high-quality sun-dried tomatoes packed in oil for the best flavor.

2. Customize the Heat Level

Adjust the ground chilies or chili crisp to your spice preference.

3. Make It Gluten-Free

Ensure your veggie sausages are gluten-free if necessary.

4. Store Leftovers Properly

Refrigerate leftovers in an airtight container for up to 3 days. Reheat gently to preserve the texture.

Variations to Try

  • Mediterranean Twist: Add a handful of olives and a sprinkle of fresh parsley for a Mediterranean flair.
  • Hearty Winter Version: Substitute kale with spinach or chard, and add a splash of plant-based cream for richness.
  • Spicy Version: Use hot veggie sausages and double the ground chilies for extra kick.

FAQs About Veggie Sausage White Bean Skillet with Kale & Sun-Dried Tomatoes

1. Can I use fresh tomatoes instead of sun-dried tomatoes?
Yes, but sun-dried tomatoes provide a concentrated flavor that enhances the dish. If using fresh, consider roasting them first.

2. What’s a good substitute for kale?
Spinach, Swiss chard, or even collard greens work well in place of kale.

3. Can I make this dish ahead of time?
Absolutely! Prepare the dish up to the final step, then reheat and add the garnishes before serving.

4. Is this recipe freezer-friendly?
Yes, you can freeze portions in airtight containers for up to a month. However, the texture of the kale may soften upon reheating.

5. What pairs well with this dish?
Serve it with crusty bread, a simple side salad, or over rice for a complete meal.

6. Can I omit the nutritional yeast?
Yes, but the yeast adds a cheesy, umami flavor. You can substitute it with vegan cheese or a splash of soy sauce for depth.

Final Thoughts: Make This Skillet Your Go-To Meal

This veggie sausage white bean skillet with kale & sun-dried tomatoes is more than just a meal—it’s an experience of bold flavors and comforting textures. Whether you’re feeding your family or treating yourself, it’s sure to become a favorite.

Ready to try it? Gather your ingredients and get cooking—you won’t regret it!

Veggie Sausage White Bean Skillet with Kale & Sun-Dried Tomatoes

This hearty skillet dish combines earthy white beans, savory veggie sausage, tangy sun-dried tomatoes, and nutrient-packed kale. Quick, wholesome, and utterly satisfying, it’s a perfect choice for plant-based eaters or anyone craving a delicious, nourishing meal.
Prep Time 10 minutes
Cook Time 20 minutes
Total Time 30 minutes
Servings: 4 servings
Course: Main Course
Cuisine: Vegan, Mediterranean

Ingredients
  

  • 2 cans 19 oz each white beans, drained and rinsed, divided
  • 1 ⅓ cups vegetable stock
  • 2 tablespoons olive oil
  • 4 veggie sausages sliced into 1-inch pieces
  • 1 medium shallot finely diced
  • ¼ cup sun-dried tomatoes finely chopped
  • 3 cloves garlic minced
  • 2 tablespoons nutritional yeast
  • ½ teaspoon dried oregano
  • ¼ teaspoon ground chilies optional
  • Sea salt and black pepper to taste
  • 1 teaspoon balsamic vinegar
  • 4 cups kale chopped, stems removed
  • Vegan parmesan optional, for garnish
  • Chili crisp or ground chilies optional, for serving

Method
 

  1. Prepare Ingredients
  2. Chop kale, dice the shallot, and slice veggie sausages.
  3. Sauté Aromatics
  4. Heat olive oil in a large skillet over medium heat.
  5. Sauté shallot until softened (about 3 minutes).
  6. Add garlic and sun-dried tomatoes; cook until fragrant (1 minute).
  7. Brown the Veggie Sausages
  8. Add sausage slices; cook, stirring occasionally, until browned (5–7 minutes).
  9. Add Beans & Seasonings
  10. Stir in half the white beans, oregano, ground chilies (if using), nutritional yeast, salt, and pepper.
  11. Cook for 2–3 minutes.
  12. Create the Sauce
  13. Pour in vegetable stock and balsamic vinegar.
  14. Scrape up browned bits from the skillet; simmer for 5 minutes.
  15. Blend for Creaminess
  16. Partially blend the mixture with an immersion blender for a creamy texture, leaving some beans whole.
  17. Add Kale
  18. Stir in kale in batches; cook until wilted (2–3 minutes).
  19. Finish with Remaining Beans
  20. Add reserved white beans; cook until heated through (2–3 minutes).
  21. Adjust seasoning with salt, pepper, or balsamic vinegar.
  22. Serve
  23. Top with vegan parmesan and chili crisp (optional).
  24. Pair with crusty bread or enjoy as is.

Notes

  • Substitutions: Replace kale with spinach or Swiss chard for variety.
  • Storage: Refrigerate leftovers in an airtight container for up to 3 days.
  • Spicy Option: Increase ground chilies or use hot veggie sausages.
This recipe is easy to customize, perfect for meal prep, and ideal for cozy dinners. Enjoy!

Vegetarian Pot Pie: A Comforting and Wholesome Meal by Erin Clarke

When the weather turns chilly, few things are as comforting as a warm, flaky pot pie fresh out of the oven. This Vegetarian Pot Pie recipe by Erin Clarke offers a nutritious twist on a classic comfort food, delivering a flavorful medley of vegetables, beans, and a tender crust. Whether you’re a lifelong vegetarian or simply looking for a meatless dinner option, this recipe will satisfy your cravings and warm your soul.

Why You’ll Love This Vegetarian Pot Pie

  • It’s packed with wholesome ingredients like mushrooms, peas, and beans, offering a healthy, nutrient-rich meal.
  • The recipe is versatile, allowing you to customize the filling to your taste or dietary preferences.
  • Using almond milk and a dairy-free crust makes this pot pie suitable for those with dietary restrictions.
  • It’s easy enough for a weeknight dinner but fancy enough for entertaining guests.

Ingredients for Vegetarian Pot Pie

Here’s a complete list of ingredients you’ll need to bring this recipe to life. You can double or triple the recipe if you’re cooking for a crowd.

Ingredients1x2x3x
Unsalted butter3 tbsp6 tbsp9 tbsp
Cremini (baby bella) mushrooms10 oz20 oz30 oz
Celery (diced)2 medium stalks4 medium stalks6 medium stalks
Garlic powder1 ½ tsp3 tsp4 ½ tsp
Kosher salt½ tsp1 tsp1 ½ tsp
Ground black pepper¼ tsp½ tsp¾ tsp
All-purpose flour (or GF flour)¼ cup½ cup¾ cup
Almond milk (or milk of choice)2 cups4 cups6 cups
Reduced sodium white beans1 (15-oz) can2 (15-oz) cans3 (15-oz) cans
Mixed peas and carrots (frozen)12 oz24 oz36 oz
Frozen pearl onions½ cup1 cup1 ½ cups
Fresh thyme (chopped)1 tbsp2 tbsp3 tbsp
Balsamic vinegar1 tbsp2 tbsp3 tbsp
Prepared pie crust123
Egg (for egg wash)123

Step-by-Step Guide to Making Vegetarian Pot Pie

1. Preparing the Vegetables

Start by gathering your ingredients and prepping your vegetables. Dice the celery, clean and slice the mushrooms, and rinse the white beans if using canned.

  • Pro Tip: Use frozen vegetables like peas, carrots, and pearl onions to save time. No need to thaw them before adding to the filling.

2. Sauté the Base

In a large skillet:

  1. Melt the butter over medium heat.
  2. Add the mushrooms and celery. Sauté until softened and lightly browned, about 5-7 minutes.
  3. Sprinkle in the garlic powder, kosher salt, and black pepper, stirring to coat the vegetables evenly.

3. Thicken the Sauce

  1. Stir in the flour to form a roux. Cook for 1 minute, stirring constantly to prevent burning.
  2. Gradually pour in the almond milk, whisking to eliminate lumps.
  3. Simmer the mixture until it thickens into a creamy sauce, about 3-5 minutes.

4. Combine the Filling

  1. Add the drained white beans, frozen vegetables, and pearl onions to the skillet.
  2. Stir in the fresh thyme and balsamic vinegar for a flavorful finish.
  3. Taste the filling and adjust the seasoning if needed.

5. Assemble the Pot Pie

  1. Transfer the vegetable filling into a pie dish or individual ramekins.
  2. Roll out the prepared pie crust and lay it over the filling, trimming any excess dough.
  3. Crimp the edges to seal and cut small slits in the top to allow steam to escape.

6. Add the Egg Wash

Whisk together the egg and water, then brush it lightly over the crust. This step ensures a beautiful golden-brown finish.

7. Bake to Perfection

Preheat your oven to 400°F (200°C). Place the pot pie on the center rack and bake for 25-30 minutes, or until the crust is golden and flaky.

Tips for the Best Vegetarian Pot Pie

  1. Customize the Filling
    Swap out vegetables or add your favorites, like sweet potatoes, spinach, or zucchini.
  2. Make It Gluten-Free
    Use a gluten-free flour blend and a gluten-free pie crust.
  3. Enhance the Flavor
    Add a splash of white wine to the sauce for extra depth.
  4. Save Time
    Use store-bought pie crust or phyllo dough for a quick alternative.

Nutritional Information

NutrientPer Serving
Calories290
Protein10g
Carbohydrates34g
Fat11g
Fiber7g
Sugar5g
Sodium430mg

FAQs About Vegetarian Pot Pie

1. Can I freeze Vegetarian Pot Pie?
Yes! You can freeze the assembled, unbaked pot pie for up to three months. Bake from frozen, adding 15-20 minutes to the baking time.

2. What can I use instead of almond milk?
Any milk of your choice will work, including soy, oat, or cow’s milk.

3. How do I prevent a soggy crust?
Make sure your filling is not overly liquidy, and bake the pie on the lower rack for a crisp bottom crust.

4. Can I make this recipe vegan?
Absolutely! Use a dairy-free butter alternative, skip the egg wash, and ensure your pie crust is vegan-friendly.

5. What can I serve with Vegetarian Pot Pie?
Pair it with a light green salad or roasted Brussels sprouts for a complete meal.

6. How long does leftover pot pie last?
Store leftovers in an airtight container in the refrigerator for up to four days. Reheat in the oven for best results.

Conclusion: A Dish Worth Repeating

This Vegetarian Pot Pie by Erin Clarke is more than just a recipe—it’s a celebration of wholesome ingredients and cozy flavors. Whether you’re cooking for family, friends, or just yourself, this dish is sure to impress. So grab your apron and make this comforting pot pie a staple in your kitchen!

Ready to try it? Let us know how your pot pie turns out and share your favorite variations!

Vegetarian Pot Pie

Warm your soul with this comforting and wholesome Vegetarian Pot Pie. Packed with a medley of flavorful vegetables, creamy beans, and a flaky crust, this recipe is perfect for chilly nights. It’s easy to customize and brings together nutrition and indulgence in every bite.
Prep Time 20 minutes
Cook Time 30 minutes
Total Time 50 minutes
Servings: 6
Course: Main Course
Cuisine: American

Ingredients
  

  • 3 tbsp unsalted butter
  • 10 oz cremini baby bella mushrooms, sliced
  • 2 medium stalks celery diced
  • 1 ½ tsp garlic powder
  • ½ tsp kosher salt
  • ¼ tsp ground black pepper
  • ¼ cup all-purpose flour or gluten-free flour
  • 2 cups almond milk or milk of choice
  • 1 15-oz can reduced sodium white beans, rinsed and drained
  • 12 oz frozen mixed peas and carrots
  • ½ cup frozen pearl onions
  • 1 tbsp fresh thyme chopped
  • 1 tbsp balsamic vinegar
  • 1 prepared pie crust

Method
 

  1. Prepare the Vegetables
  2. Dice celery, slice mushrooms, and rinse white beans. Use frozen vegetables to save time—no need to thaw.
  3. Sauté the Base
  4. Melt butter in a large skillet over medium heat.
  5. Add mushrooms and celery, sauté until softened (5-7 minutes).
  6. Stir in garlic powder, salt, and pepper.
  7. Thicken the Sauce
  8. Sprinkle in flour and cook for 1 minute, stirring constantly.
  9. Gradually whisk in almond milk.
  10. Simmer until the sauce thickens, about 3-5 minutes.
  11. Combine the Filling
  12. Add white beans, frozen vegetables, and pearl onions.
  13. Stir in thyme and balsamic vinegar. Adjust seasoning if needed.
  14. Assemble the Pot Pie
  15. Pour the filling into a pie dish or ramekins.
  16. Lay the prepared pie crust over the filling, trim excess dough, and crimp edges.
  17. Cut small slits in the crust for steam to escape.
  18. Apply Egg Wash
  19. Whisk the egg with a splash of water and brush it over the crust for a golden finish.
  20. Bake
  21. Preheat the oven to 400°F (200°C).
  22. Bake on the center rack for 25-30 minutes, until the crust is golden brown.

Notes

  • Customize the Filling: Swap in your favorite vegetables like spinach or zucchini.
  • Make It Gluten-Free: Use gluten-free flour and a gluten-free crust.
  • Enhance the Flavor: Add a splash of white wine to the sauce.
  • Save Time: Opt for store-bought crust or phyllo dough.

Cheesy Scalloped Potatoes and Ham: Irresistibly Creamy Delight!

Introduction to Cheesy Scalloped Potatoes and Ham

Ah, Cheesy Scalloped Potatoes and Ham! Just saying it makes my mouth water. This dish is like a warm hug on a plate, perfect for those hectic days when you crave comfort without the fuss. Imagine layers of tender potatoes, savory ham, and gooey cheese, all enveloped in a creamy sauce. It’s a symphony of flavors that dances on your taste buds. Whether you’re a busy mom juggling a million things or a professional looking for a quick yet impressive meal, this recipe is your go-to. Trust me, it’s a crowd-pleaser that never disappoints!

Why You’ll Love This Cheesy Scalloped Potatoes and Ham

This Cheesy Scalloped Potatoes and Ham dish is a lifesaver for those busy nights. It’s quick to prepare, yet tastes like you’ve spent hours in the kitchen. The creamy sauce and melty cheese make it irresistibly delicious, while the ham adds a savory touch. Plus, it’s a one-dish wonder, meaning less cleanup and more time to relax. Your family will adore it!

Ingredients for Cheesy Scalloped Potatoes and Ham

Let’s dive into the heart of this dish—the ingredients. First, you’ll need some potatoes, the starchy stars that soak up all that creamy goodness. Choose a variety like Yukon Gold for their buttery texture. Next, diced cooked ham adds a savory depth, perfect for using up leftovers. Sharp cheddar cheese is a must for that tangy, melty layer of deliciousness.

For the sauce, you’ll combine milk and heavy cream, creating a rich base that ties everything together. A bit of all-purpose flour helps thicken the sauce, while unsalted butter adds a touch of indulgence. Seasonings like garlic powder, onion powder, salt, and black pepper bring out the flavors, with a hint of paprika and dried thyme for warmth and earthiness.

Feel free to get creative! Swap cheddar for Gruyère or mozzarella for a different cheesy twist. And if you’re feeling adventurous, toss in some sautéed onions or garlic for extra flavor. Remember, the exact quantities are listed at the bottom of the article for easy printing.

How to Make Cheesy Scalloped Potatoes and Ham

Preheat and Prepare

First things first, let’s get that oven ready. Preheat it to 350°F (175°C). While it warms up, grease a 9×13-inch baking dish with butter or a quick spray of cooking oil. This will ensure our cheesy scalloped potatoes and ham don’t stick, making cleanup a breeze.

Make the Cream Sauce

Now, onto the creamy magic! In a large saucepan over medium heat, melt the butter. Stir in the flour, garlic powder, onion powder, salt, pepper, paprika, and thyme. Cook for about a minute, stirring constantly. This step is crucial for a smooth sauce.

Gradually whisk in the milk and heavy cream. Keep stirring as the mixture thickens and bubbles, which should take about 5-7 minutes. This creamy concoction is the heart of our dish, so take your time to get it just right.

Layer the Ingredients

With the sauce ready, it’s time to layer. Start by placing half of the sliced potatoes in the prepared baking dish. Pour half of the cream sauce over the potatoes, ensuring they’re well-coated. Sprinkle half of the diced ham and cheese on top.

Repeat the process with the remaining potatoes, sauce, ham, and cheese. This layering creates a delightful blend of flavors in every bite.

Bake to Perfection

Cover the baking dish with aluminum foil to keep the moisture in. Pop it into the preheated oven and bake for 45 minutes. After that, remove the foil and bake for an additional 15-20 minutes. You’ll know it’s done when the potatoes are tender and the top is golden brown and bubbly.

Let it Rest

Once out of the oven, let the dish cool for about 10 minutes. This resting period allows the sauce to thicken and the flavors to meld beautifully. Trust me, the wait is worth it!

Tips for Success

  • Use a mandoline slicer for evenly thin potato slices, ensuring even cooking.
  • Let the cream sauce cool slightly before layering to prevent curdling.
  • For a crispy top, broil the dish for a minute after baking.
  • Test potato doneness with a fork; it should easily pierce through.
  • Allow the dish to rest before serving for a thicker, more cohesive sauce.

Equipment Needed

  • 9×13-inch baking dish – a must for even cooking.
  • Large saucepan – perfect for making the creamy sauce.
  • Whisk – essential for a smooth, lump-free sauce.
  • Mandoline slicer – for quick, uniform potato slices.
  • Aluminum foil – helps retain moisture during baking.
  • Oven mitts – safety first when handling hot dishes!

Variations

  • For a smoky twist, add a handful of cooked, crumbled bacon to the layers.
  • Swap the ham for cooked chicken or turkey for a different protein option.
  • Make it vegetarian by omitting the ham and adding sautéed mushrooms or spinach.
  • Use sweet potatoes instead of regular potatoes for a sweeter, nutrient-rich version.
  • For a spicy kick, sprinkle in some red pepper flakes or diced jalapeños.
  • Try a dairy-free version by using coconut milk and vegan cheese alternatives.

Serving Suggestions

  • Pair with a crisp green salad for a refreshing contrast.
  • Serve alongside steamed green beans or asparagus for added color.
  • A glass of chilled white wine complements the creamy flavors beautifully.
  • Garnish with fresh parsley or chives for a pop of color and flavor.
  • For a heartier meal, add a warm, crusty bread on the side.

FAQs about Cheesy Scalloped Potatoes and Ham

Can I make Cheesy Scalloped Potatoes and Ham ahead of time?

Absolutely! You can prepare the dish up to the baking step, cover it, and refrigerate for up to 24 hours. When you’re ready to enjoy, simply bake as directed, adding a few extra minutes if needed to ensure it’s heated through.

What type of potatoes work best for this recipe?

Yukon Gold potatoes are my go-to for their buttery texture and ability to hold their shape. However, Russet potatoes also work well, offering a fluffier texture. Both varieties soak up the creamy sauce beautifully.

Can I freeze Cheesy Scalloped Potatoes and Ham?

Yes, you can freeze it! After baking, let the dish cool completely, then cover tightly and freeze for up to 2 months. To reheat, thaw in the fridge overnight and bake at 350°F until heated through.

How can I make this dish gluten-free?

To make it gluten-free, simply substitute the all-purpose flour with a gluten-free flour blend. Ensure all other ingredients, like the ham and cheese, are certified gluten-free as well.

What can I use instead of heavy cream?


If you’re looking to lighten up the dish, you can replace heavy cream with half-and-half or whole milk. Keep in mind, this may slightly alter the creaminess, but it will still be delicious!

Final Thoughts

There’s something truly magical about Cheesy Scalloped Potatoes and Ham. It’s a dish that brings warmth and comfort to any table, wrapping you in a cozy embrace with every bite. Whether you’re sharing it with family on a bustling weeknight or serving it to friends at a weekend gathering, it never fails to impress. The creamy layers, the savory ham, and the gooey cheese create a symphony of flavors that linger long after the meal is over. So, go ahead, indulge in this delightful creation, and let it become a cherished part of your culinary repertoire. Enjoy every delicious moment!

Cheesy Scalloped Potatoes and Ham
Paul

Cheesy Scalloped Potatoes and Ham: Irresistibly Creamy Delight!

Cheesy Scalloped Potatoes and Ham is a creamy and delicious dish featuring layers of thinly sliced potatoes, diced ham, and sharp cheddar cheese, all baked to perfection in a rich cream sauce.
Prep Time 15 minutes
Cook Time 1 hour 5 minutes
Total Time 1 hour 20 minutes
Servings: 6 servings
Course: Main Course
Cuisine: American
Calories: 350

Ingredients
  

  • 4 cups thinly sliced potatoes about 4 medium potatoes
  • 2 cups diced cooked ham
  • 1 cup shredded sharp cheddar cheese
  • 1 cup milk
  • 1 cup heavy cream
  • 1/4 cup all-purpose flour
  • 1/4 cup unsalted butter
  • 1 teaspoon garlic powder
  • 1 teaspoon onion powder
  • 1/2 teaspoon salt
  • 1/4 teaspoon black pepper
  • 1/4 teaspoon paprika
  • 1/4 teaspoon dried thyme

Method
 

  1. Preheat your oven to 350°F (175°C). Grease a 9×13-inch baking dish with butter or cooking spray.
  2. In a large saucepan over medium heat, melt the butter. Stir in the flour, garlic powder, onion powder, salt, pepper, paprika, and thyme. Cook for about 1 minute, stirring constantly.
  3. Gradually whisk in the milk and heavy cream. Continue to cook, stirring frequently, until the mixture thickens and bubbles, about 5-7 minutes.
  4. Layer half of the sliced potatoes in the prepared baking dish. Pour half of the cream sauce over the potatoes, then sprinkle half of the diced ham and half of the cheese on top. Repeat with the remaining potatoes, sauce, ham, and cheese.
  5. Cover the baking dish with aluminum foil and bake for 45 minutes. Remove the foil and bake for an additional 15-20 minutes, or until the potatoes are tender and the top is golden brown and bubbly.
  6. Let the dish cool for about 10 minutes before serving to allow the sauce to thicken.

Notes

  • For added flavor, mix in some sautéed onions or garlic with the ham.
  • Substitute the cheddar cheese with Gruyère or mozzarella for a different cheesy flavor.

White Chicken Chili: The Ultimate Comfort Food Recipe

There’s something about a warm bowl of White Chicken Chili that instantly makes you feel at home. Whether it’s a chilly evening or a casual dinner with friends, this creamy and flavorful dish is the perfect meal to soothe your soul. If you’ve been searching for a recipe that’s simple yet packed with flavor, you’re in the right place. Let’s dive into everything you need to know about making this crowd-pleaser.

What Makes White Chicken Chili So Special?

Unlike traditional red chili, White Chicken Chili offers a lighter and creamier twist. It combines tender chicken, hearty beans, and a medley of spices that create a perfect balance of heat and comfort. The addition of poblano and Anaheim peppers gives it a smoky depth, while garnishes like cilantro and lime add brightness.

Ingredients You’ll Need

Here’s everything you’ll need to create your own pot of White Chicken Chili:

IngredientQuantity
Vegetable oil2 tablespoons
Yellow onions, finely chopped2 medium
Jalapeño peppers, seeded, chopped2
Poblano peppers, seeded, chopped2
Anaheim peppers, seeded, chopped2
Ground cumin1 tablespoon
Chili powder1½ teaspoons
Smoked paprika¾ teaspoon
Cayenne pepper½ teaspoon
Salt, divided1 teaspoon
Garlic cloves, minced6 cloves
All-purpose flour2 tablespoons
Chicken stock4 cups (960 ml)
Cannellini beans, rinsed, drained45 oz (1.28 kg), divided
Cooked chicken, chopped3 cups (420 g)
Lime juice1 tablespoon
Heavy cream½ cup (119 ml)

Garnishes

  • Lime wedges
  • Monterey Jack cheese
  • Fresh cilantro
  • Sour cream

Step-By-Step Instructions to Make White Chicken Chili

1. Prepare Your Ingredients

Start by chopping all the vegetables and cooking the chicken if it isn’t pre-cooked. Having everything ready makes the cooking process seamless.

2. Sauté the Aromatics

Heat the vegetable oil in a large pot over medium heat. Add the finely chopped onions and cook until they’re translucent, about 5 minutes. Toss in the jalapeño, poblano, and Anaheim peppers, and sauté for another 4–5 minutes.

3. Spice Things Up

Sprinkle in the ground cumin, chili powder, smoked paprika, cayenne pepper, and half the salt. Stir well to coat the vegetables evenly. Let the spices toast for about 1 minute, releasing their fragrant aroma.

4. Add the Garlic and Flour

Stir in the minced garlic and cook for another minute. Next, sprinkle the all-purpose flour over the mixture and stir continuously for 2 minutes. This will thicken the chili later.

5. Pour in the Chicken Stock

Gradually pour in the chicken stock, stirring constantly to prevent lumps. Bring the mixture to a simmer.

6. Incorporate the Beans

Take half of the cannellini beans and mash them with a fork or blender to create a thick paste. Add both the mashed and whole beans to the pot, stirring to combine.

7. Add the Chicken

Toss in the cooked, chopped chicken. Simmer the chili on low heat for 20 minutes, allowing the flavors to meld together beautifully.

8. Finish with Creaminess

Stir in the lime juice and heavy cream. Cook for an additional 5 minutes, but do not let the chili boil, as the cream may curdle.

Serving Suggestions

Garnish Like a Pro

Ladle your White Chicken Chili into bowls and top with your favorite garnishes:

  • Shredded Monterey Jack cheese for a gooey texture.
  • Fresh cilantro for a burst of color and flavor.
  • A dollop of sour cream for extra creaminess.
  • Lime wedges for a zesty kick.

What to Pair It With

Serve your chili with warm cornbread, tortilla chips, or even a side salad. The possibilities are endless!

Why You’ll Love This Recipe

  • Quick and Easy: With simple ingredients and straightforward steps, it’s perfect for weeknights.
  • Customizable: Adjust the spice levels or swap out ingredients to suit your taste.
  • Family-Friendly: A hit with kids and adults alike.

Tips for Perfect White Chicken Chili

1. Use Fresh Ingredients

Freshly chopped vegetables and high-quality chicken stock make all the difference.

2. Adjust the Spice Level

Want more heat? Leave the seeds in the jalapeños or add an extra pinch of cayenne pepper. Prefer milder flavors? Reduce the chili powder.

3. Make It Ahead

White Chicken Chili tastes even better the next day as the flavors deepen. Store it in an airtight container in the refrigerator for up to 3 days.

4. Freeze for Later

This chili freezes beautifully. Portion it into freezer-safe containers and enjoy a quick meal anytime.

Nutritional Information (Per Serving)

NutrientAmount
Calories350
Protein25 g
Fat15 g
Carbohydrates30 g
Fiber8 g

FAQs About White Chicken Chili

1. Can I Use Rotisserie Chicken?

Absolutely! Rotisserie chicken works wonderfully in this recipe and saves time.

2. Can I Make It in a Slow Cooker?

Yes, sauté the vegetables and spices first, then transfer everything to a slow cooker. Cook on low for 6–8 hours or high for 3–4 hours.

3. What Beans Can I Substitute for Cannellini?

Great Northern beans or navy beans are excellent alternatives.

4. Can I Make This Recipe Vegetarian?

Swap the chicken for tofu or extra beans and use vegetable stock instead of chicken stock.

5. How Do I Thicken My Chili?

If you prefer a thicker chili, mash more beans or add a cornstarch slurry (1 tablespoon cornstarch mixed with 2 tablespoons water).

6. Can I Use Coconut Milk Instead of Cream?

Yes, coconut milk can be a dairy-free alternative, though it will slightly alter the flavor.

Conclusion: Make It Your Own

There’s no one right way to make White Chicken Chili—it’s all about finding the balance that works for you. With its comforting warmth and layers of flavor, this dish is sure to become a staple in your kitchen.

Ready to Try It?

Gather your ingredients, follow the steps, and savor the magic of a homemade bowl of White Chicken Chili.

White Chicken Chili Recipe Overview

Warm, creamy, and packed with smoky flavors, this White Chicken Chili is the ultimate comfort food. Perfect for chilly evenings or casual dinners, it's a crowd-pleaser that's simple to make and even better to eat.
Prep Time 15 minutes
Cook Time 40 minutes
Total Time 55 minutes
Servings: 8 servings
Course: Main Course
Cuisine: American

Ingredients
  

  • 2 tablespoons vegetable oil
  • 2 medium yellow onions finely chopped
  • 2 jalapeño peppers seeded and chopped
  • 2 poblano peppers seeded and chopped
  • 2 Anaheim peppers seeded and chopped
  • 1 tablespoon ground cumin
  • teaspoons chili powder
  • ¾ teaspoon smoked paprika
  • ½ teaspoon cayenne pepper
  • 1 teaspoon salt divided
  • 6 garlic cloves minced
  • 2 tablespoons all-purpose flour
  • 4 cups 960 ml chicken stock
  • 45 oz 1.28 kg cannellini beans, rinsed and drained (divided)
  • 3 cups 420 g cooked chicken, chopped
  • 1 tablespoon lime juice
  • ½ cup 119 ml heavy cream
  • Garnishes:
  • Lime wedges
  • Shredded Monterey Jack cheese
  • Fresh cilantro
  • Sour cream

Method
 

  1. Prepare Ingredients: Chop all vegetables and cook chicken if needed.
  2. Sauté Aromatics: Heat vegetable oil in a large pot over medium heat. Cook onions until translucent (5 minutes). Add jalapeño, poblano, and Anaheim peppers, and sauté for 4–5 minutes.
  3. Toast Spices: Stir in cumin, chili powder, smoked paprika, cayenne pepper, and half the salt. Cook for 1 minute.
  4. Add Garlic & Flour: Stir in garlic and cook for 1 minute. Sprinkle flour and stir for 2 minutes.
  5. Add Stock & Simmer: Slowly pour in chicken stock while stirring. Bring to a simmer.
  6. Incorporate Beans: Mash half the beans into a paste and add both mashed and whole beans to the pot. Stir to combine.
  7. Add Chicken: Stir in chopped chicken and simmer for 20 minutes on low heat.
  8. Finish with Cream: Add lime juice and heavy cream. Cook for 5 more minutes without boiling.

Notes

Tips

  • Adjust Spice Level: Add or reduce jalapeños or cayenne pepper based on your heat preference.
  • Make Ahead: Tastes even better the next day.
  • Freezer-Friendly: Store in portions for up to 3 months.
Enjoy this creamy, flavorful dish as a cozy dinner or a meal-prep favorite!

Leftover Turkey Wild Rice Soup: The Ultimate Comfort Food Recipe

When the holidays wind down, you’re often left with an abundance of turkey and a desire for something comforting and hearty. That’s where Leftover Turkey Wild Rice Soup comes to the rescue. This dish transforms leftover turkey into a rich, flavorful soup, perfect for cozy nights or post-celebration meals. Packed with fresh vegetables, wholesome wild rice, and a creamy texture, it’s a recipe that not only reduces waste but also warms your soul.

Why You’ll Love Leftover Turkey Wild Rice Soup

This soup is more than just a way to use up leftovers. It’s a wholesome and satisfying dish that balances rich flavors with nourishing ingredients. Whether it’s the creamy texture, the earthy wild rice, or the savory turkey, every bite feels like a warm hug. Plus, it’s incredibly versatile—you can customize the ingredients to fit your preferences!

Ingredients for Leftover Turkey Wild Rice Soup

To get started, gather these simple and accessible ingredients. Here’s a table to help you adjust quantities based on your needs.

Ingredients0.5x1x2x3x
Medium onion (chopped)0.5123
Medium carrots (peeled, chopped)1246
Celery sticks (chopped)1.5369
Olive oil0.5 tbsp1 tbsp2 tbsp3 tbsp
Butter1 tbsp2 tbsp4 tbsp6 tbsp
Garlic (minced)1.5 cloves3 cloves6 cloves9 cloves
Italian seasoning1/8 tsp1/4 tsp1/2 tsp3/4 tsp
Flour1.5 tbsp3 tbsp6 tbsp9 tbsp
Chicken broth3 cups6 cups12 cups18 cups
Uncooked wild rice0.5 cup1 cup2 cups3 cups
Cooked turkey (shredded)1 cup2 cups4 cups6 cups
Cremini mushrooms (sliced)3.5 oz7 oz14 oz21 oz
Salt & pepperTo tasteTo tasteTo tasteTo taste
Heavy cream (optional)1/4 cup1/2 cup1 cup1.5 cups

Step-by-Step Instructions

1. Prep Your Ingredients

Before you begin cooking, ensure all your ingredients are chopped, minced, and measured. This will make the process smoother and more enjoyable.

2. Sauté the Vegetables

In a large pot, heat the olive oil and butter over medium heat. Add the chopped onion, carrots, and celery. Sauté for about 5–7 minutes until the vegetables are softened and fragrant.

3. Add Garlic and Seasonings

Stir in the minced garlic and Italian seasoning. Cook for another 1–2 minutes, allowing the garlic to release its aroma.

4. Create a Roux

Sprinkle the flour evenly over the sautéed vegetables. Stir well to coat them, cooking for about 1–2 minutes. This step thickens the soup and adds depth.

5. Pour in the Broth

Gradually add the chicken broth while stirring to avoid lumps. Increase the heat and bring the mixture to a boil.

6. Cook the Wild Rice

Reduce the heat to medium-low and add the uncooked wild rice. Cover the pot and let the rice simmer for 40–50 minutes, stirring occasionally.

7. Add the Turkey and Mushrooms

Once the rice is tender, add the shredded turkey and sliced mushrooms. Simmer for another 10 minutes, ensuring the mushrooms soften and the turkey is warmed through.

8. Optional: Add Cream

For a creamier soup, stir in the heavy cream during the last 5 minutes of cooking. Adjust the seasoning with salt and pepper to taste.

9. Serve and Enjoy

Ladle the soup into bowls, garnish with fresh parsley if desired, and serve with crusty bread or crackers.

Tips for the Best Turkey Wild Rice Soup

  • Use Homemade Broth: If you have leftover turkey bones, make your own broth for an even richer flavor.
  • Don’t Overcook the Rice: Wild rice has a firmer texture than regular rice. Avoid overcooking to maintain its chewiness.
  • Freeze for Later: This soup freezes beautifully. Store in an airtight container and enjoy up to three months later.

Nutritional Information

NutrientPer Serving
Calories250–300
Protein20–25g
Carbohydrates25–30g
Fat10–15g
Fiber3–4g

Frequently Asked Questions

1. Can I use leftover chicken instead of turkey?
Absolutely! Leftover chicken works just as well in this recipe.

2. What can I substitute for heavy cream?
You can use half-and-half or coconut milk for a lighter option.

3. How long does this soup last in the fridge?
Stored in an airtight container, it will stay fresh for 3–4 days.

4. Can I make this soup gluten-free?
Yes, substitute the flour with gluten-free flour or cornstarch.

5. Do I need to pre-cook the wild rice?
No, the rice cooks directly in the soup, absorbing the flavors as it simmers.

6. What can I serve with this soup?
Pair it with crusty bread, a side salad, or a grilled cheese sandwich for a complete meal.

Conclusion

Leftover Turkey Wild Rice Soup is a delicious way to give your holiday leftovers a second life. It’s hearty, easy to make, and packed with comforting flavors. Whether you’re sharing it with family or saving portions for busy weekdays, this recipe is sure to become a favorite.

Ready to transform your leftovers into a culinary masterpiece? Try this recipe today!

Leftover Turkey Wild Rice Soup recipe.

Transform your holiday leftovers into the ultimate comfort food with this Leftover Turkey Wild Rice Soup. Creamy, hearty, and packed with nourishing ingredients, this recipe warms your soul while reducing food waste. Perfect for cozy nights and post-celebration meals, it's a delicious way to give your turkey a flavorful second life.
Prep Time 10 minutes
Cook Time 1 hour
Total Time 1 hour 10 minutes
Servings: 6 servings
Course: Soup
Cuisine: American

Ingredients
  

  • 1 medium onion chopped
  • 2 medium carrots peeled and chopped
  • 3 celery sticks chopped
  • 1 tbsp olive oil
  • 2 tbsp butter
  • 3 cloves garlic minced
  • 1/4 tsp Italian seasoning
  • 3 tbsp flour
  • 6 cups chicken broth
  • 1 cup uncooked wild rice
  • 2 cups cooked turkey shredded
  • 7 oz cremini mushrooms sliced
  • Salt and pepper to taste
  • 1/2 cup heavy cream optional

Method
 

  1. Prep Your Ingredients: Chop, mince, and measure all ingredients to streamline the cooking process.
  2. Sauté Vegetables: Heat olive oil and butter in a large pot over medium heat. Add onions, carrots, and celery, and cook for 5–7 minutes until softened.
  3. Add Garlic and Seasoning: Stir in garlic and Italian seasoning, cooking for 1–2 minutes until fragrant.
  4. Make a Roux: Sprinkle flour over the vegetables and stir well. Cook for 1–2 minutes to thicken the base.
  5. Add Broth: Gradually pour in chicken broth, stirring to combine. Bring to a boil.
  6. Cook the Rice: Reduce to medium-low heat and add wild rice. Cover and simmer for 40–50 minutes, stirring occasionally.
  7. Add Turkey and Mushrooms: Stir in shredded turkey and mushrooms. Cook for another 10 minutes.
  8. Optional Creaminess: Add heavy cream for a creamy finish and adjust salt and pepper to taste.
  9. Serve: Ladle the soup into bowls and enjoy with crusty bread or crackers.

Notes

  • Use homemade turkey broth for deeper flavor.
  • For a gluten-free option, swap flour with gluten-free flour or cornstarch.
  • Store leftovers in the fridge for up to 4 days or freeze for 3 months.

Quick Smoky Red Lentil Stew: A Hearty, Flavorful Recipe for Any Day

When it’s cold outside, or you’re simply craving a comforting meal, nothing beats a warm bowl of smoky red lentil stew. This recipe is not just about nourishment—it’s a symphony of rich flavors, vibrant colors, and wholesome ingredients coming together in under an hour. Whether you’re a seasoned chef or just starting in the kitchen, you’ll love how easy and satisfying this dish is to prepare.

Why You’ll Love Quick Smoky Red Lentil Stew

You know the kind of meal that feels like a hug in a bowl? That’s what this smoky red lentil stew delivers. It’s simple, quick, and loaded with good-for-you ingredients like carrots, celery, and protein-packed lentils. The smoky paprika and touch of cayenne create a bold, savory depth that warms you from the inside out. Plus, it’s versatile—perfect for weeknight dinners, meal prep, or a cozy family gathering.

Ingredients You’ll Need

To make this incredible stew, you’ll gather a handful of everyday pantry items and fresh produce.

IngredientQuantity
Olive oil3 tablespoons
Carrots (diced)2 large
Yellow onion (diced)1 medium
Celery (diced)2 stalks
Garlic (minced)3 cloves
Balsamic vinegar1 tablespoon
Smoked paprika2 tablespoons
Ground cumin¼ teaspoon
Cayenne pepper¼ teaspoon
Red lentils (rinsed)1 ¼ cups
Vegetable stock4 cups
Sea salt and black pepperTo taste
Lemon juice2 tablespoons (from ½ a large lemon)
Fresh herbs (chopped)For garnish

Step-by-Step Instructions for the Perfect Smoky Red Lentil Stew

1. Prepare Your Ingredients

Start by gathering and prepping all your ingredients. Dice your carrots, onion, and celery into small, even pieces for even cooking. Rinse the red lentils under cold water to remove any debris or excess starch.

2. Heat the Oil and Sauté the Vegetables

In a large pot or Dutch oven, heat the olive oil over medium heat. Add the carrots, onion, and celery. Sauté for about 5–7 minutes until they start to soften and release their natural sweetness.

3. Add Garlic and Spices

Once the vegetables are fragrant, stir in the minced garlic, smoked paprika, cumin, and cayenne pepper. Cook for another 1–2 minutes to toast the spices, releasing their smoky aroma.

4. Deglaze with Balsamic Vinegar

Pour in the balsamic vinegar and stir well. This step adds a tangy depth to the stew, lifting the flavors and ensuring no bits stick to the bottom of the pot.

5. Add Lentils and Stock

Next, stir in the rinsed red lentils and vegetable stock. Bring the mixture to a gentle boil, then reduce the heat to low. Cover and simmer for 20–25 minutes, stirring occasionally, until the lentils are tender and the stew thickens.

6. Season and Finish with Lemon Juice

Taste the stew and season with sea salt and black pepper as needed. Just before serving, stir in the fresh lemon juice for a bright, zesty finish.

7. Serve and Garnish

Ladle the smoky red lentil stew into bowls and garnish with freshly chopped herbs like parsley, cilantro, or dill. Serve it with crusty bread, rice, or on its own for a wholesome meal.

Tips for the Best Smoky Red Lentil Stew

  • Choose Quality Lentils: Use red lentils for their quick-cooking nature and creamy texture. Avoid substitutes like green or brown lentils, as they don’t break down the same way.
  • Adjust the Spice Level: Love more heat? Add an extra pinch of cayenne pepper. Prefer a milder flavor? Reduce the amount or skip it altogether.
  • Double the Recipe for Meal Prep: This stew stores beautifully. Make a big batch and freeze individual portions for quick, healthy meals during busy weeks.
  • Experiment with Toppings: Crumbled feta, a drizzle of olive oil, or a dollop of yogurt add a touch of indulgence to your stew.

Nutritional Highlights

NutrientPer Serving (Approximate)
Calories250
Protein12g
Fat8g
Carbohydrates35g
Fiber8g
Sodium450mg

This stew is high in plant-based protein, fiber, and vitamins, making it a satisfying and nourishing choice for any meal.

Frequently Asked Questions

1. Can I make this stew ahead of time?

Absolutely! This stew tastes even better the next day as the flavors meld. Store it in an airtight container in the fridge for up to five days or freeze it for three months.

2. What can I serve with smoky red lentil stew?

Pair it with crusty bread, a fresh salad, or rice to create a complete and balanced meal.

3. Can I use canned lentils instead of dried?

You can, but the texture will differ. Reduce the cooking time by half if you’re using canned lentils.

4. How can I make this recipe gluten-free?

This stew is naturally gluten-free as long as your vegetable stock is certified gluten-free.

5. Is there a substitute for smoked paprika?

If smoked paprika isn’t available, try using regular paprika with a dash of liquid smoke for a similar flavor.

6. Can I add more vegetables to this stew?

Absolutely! Bell peppers, sweet potatoes, or zucchini make excellent additions to boost the nutrition and flavor.

A Final Note: Your Perfect Cozy Meal Await

There’s nothing quite like a bowl of quick smoky red lentil stew to bring comfort and joy to your day. Its smoky, savory flavors and hearty texture make it a standout dish that you’ll return to time and time again. Why not give it a try tonight? You’ll impress yourself and anyone lucky enough to share it with you.

Recipe Card for Quick Smoky Red Lentil Stew

Prep Time 10 minutes
Cook Time 35 minutes
Total Time 45 minutes
Servings: 4 servings
Course: Main Course
Cuisine: Mediterranean-Inspired

Ingredients
  

  • 3 tablespoons olive oil
  • 2 large carrots diced
  • 1 medium yellow onion diced
  • 2 stalks celery diced
  • 3 cloves garlic minced
  • 1 tablespoon balsamic vinegar
  • 2 tablespoons smoked paprika
  • ¼ teaspoon ground cumin
  • ¼ teaspoon cayenne pepper
  • 1 ¼ cups red lentils rinsed
  • 4 cups vegetable stock
  • Sea salt and black pepper to taste
  • 2 tablespoons lemon juice from ½ a large lemon
  • Fresh herbs parsley, cilantro, or dill for garnish

Method
 

  1. Prepare Ingredients: Dice the carrots, onion, and celery. Rinse the red lentils under cold water to remove debris and starch.
  2. Sauté Vegetables: Heat olive oil in a large pot over medium heat. Add carrots, onion, and celery. Cook for 5–7 minutes until softened.
  3. Add Garlic and Spices: Stir in minced garlic, smoked paprika, cumin, and cayenne. Sauté for 1–2 minutes until fragrant.
  4. Deglaze with Vinegar: Pour in balsamic vinegar, stirring to lift any bits from the pot.
  5. Combine Lentils and Stock: Add red lentils and vegetable stock. Bring to a boil, then reduce heat to low. Cover and simmer for 20–25 minutes until lentils are tender.
  6. Season and Brighten: Add sea salt, black pepper, and lemon juice. Adjust seasoning to taste.
  7. Serve: Ladle stew into bowls and garnish with fresh herbs. Enjoy with crusty bread or rice.

Notes

  • Make Ahead: The stew tastes even better the next day as flavors meld. Store in the fridge for up to five days or freeze for three months.
  • Customizations: Add extra vegetables like bell peppers or sweet potatoes for variety. Adjust cayenne for desired heat level.
  • Toppings: Enhance with crumbled feta, a dollop of yogurt, or a drizzle of olive oil.

Tex Mex Queso Recipe: The Creamy Delight You Can’t Resist

There’s something magical about dipping into a warm, creamy bowl of Tex Mex queso. It’s a blend of bold flavors, rich textures, and the perfect hint of spice that brings people together—whether at a party, family dinner, or a cozy night in. If you’re a fan of cheesy goodness with a Tex Mex twist, you’re in for a treat. In this guide, you’ll learn how to make an irresistible Tex Mex queso recipe with easy-to-follow steps, scalable portions, and pro tips for getting it just right.

Ingredients for Tex Mex Queso

Before we dive into the recipe, let’s take a look at what you’ll need. Here’s a breakdown of the ingredients with scalable measurements so you can adjust based on how much queso you want.

Ingredients1x2x3x
Canola or vegetable oil1 Tbsp2 Tbsp3 Tbsp
White onion (diced)1/2 large1 large1 1/2 large
Jalapeños (diced)246
Half and half1 cup2 cups3 cups
Yellow American cheese1 lb2 lbs3 lbs
Fresh cilantro (chopped)10-15 sprigs20-30 sprigs30-45 sprigs
Pico de gallo (optional)1/4 cup1/2 cup3/4 cup

Why You’ll Love This Recipe

  1. Customizable Spice Level: You can control the heat by adjusting the number of jalapeños.
  2. Perfect Texture: Using yellow American cheese ensures a silky, smooth consistency.
  3. Authentic Tex Mex Flavors: Fresh cilantro and optional pico de gallo elevate the queso to restaurant-quality.
  4. Versatile Use: Perfect as a dip, topping for nachos, or even a sauce for your favorite Tex Mex dishes.

How to Make Tex Mex Queso

Step 1: Prep Your Ingredients

Start by prepping your vegetables. Dice the white onion and jalapeños into small, even pieces. Chop the cilantro and set aside. If you’re using pico de gallo, have it ready as a garnish.

Step 2: Sauté Aromatics

Heat the canola or vegetable oil in a medium saucepan over medium heat. Once the oil is shimmering, add the diced onions and jalapeños. Sauté for 3–4 minutes until the onions are translucent and the jalapeños are slightly softened.

Step 3: Add Half and Half

Pour in the half and half, stirring constantly to prevent scorching. Let it heat until small bubbles form around the edges, but don’t let it boil.

Step 4: Melt the Cheese

Gradually add the sliced yellow American cheese to the saucepan, stirring constantly. The cheese will slowly melt into the half and half, creating a creamy base. This process takes about 5–7 minutes.

Step 5: Stir in Fresh Cilantro

Once the queso reaches a smooth consistency, stir in the chopped fresh cilantro. The cilantro adds a burst of freshness that balances the richness of the cheese.

Step 6: Garnish and Serve

Transfer your queso to a serving bowl and top with pico de gallo if desired. Serve immediately with tortilla chips, veggies, or as a sauce for your favorite Tex Mex dish.

Tips for the Perfect Tex Mex Queso

  • Use Fresh Ingredients: Fresh onions, jalapeños, and cilantro make a noticeable difference in flavor.
  • Don’t Rush the Cheese: Add the cheese slowly and stir continuously to prevent clumping.
  • Keep It Warm: If you’re serving queso at a party, use a small slow cooker or warming tray to keep it smooth and dippable.
  • Experiment with Toppings: Try adding cooked chorizo, roasted corn, or diced avocado for extra flair.

Variations to Try

Spicy Queso Blanco

Swap yellow American cheese for white American cheese and add a pinch of cayenne pepper for a spicy twist.

Loaded Tex Mex Queso

Add browned ground beef or crumbled sausage for a hearty dip that could double as a meal.

Vegan Queso

Use plant-based cheese and unsweetened almond milk instead of half and half. Blend in nutritional yeast for extra cheesy flavor.

Serving Ideas for Tex Mex Queso

  1. Classic Dip: Serve with tortilla chips for a crowd-pleasing appetizer.
  2. Nachos: Drizzle over a plate of tortilla chips topped with beans, jalapeños, and guacamole.
  3. Baked Potatoes: Use queso as a topping for loaded baked potatoes.
  4. Tex Mex Burgers: Spread queso over grilled burgers for a cheesy, spicy kick.

Nutritional Information (Per Serving, Approx. 1/4 Cup)

NutrientAmount
Calories150
Fat12g
Saturated Fat7g
Cholesterol35mg
Sodium400mg
Carbohydrates3g
Protein6g

FAQs About Tex Mex Queso

1. What’s the best cheese for Tex Mex queso?

Yellow American cheese is ideal for Tex Mex queso because it melts smoothly and delivers a rich, creamy texture.

2. Can I make queso ahead of time?

Yes! You can prepare the queso a day in advance and reheat it over low heat, stirring in a splash of milk or half and half to refresh its consistency.

3. How do I store leftovers?

Store leftover queso in an airtight container in the refrigerator for up to three days. Reheat gently on the stovetop or in the microwave.

4. Can I freeze Tex Mex queso?

While it’s possible, freezing queso may affect its texture. It’s best enjoyed fresh or refrigerated for short-term storage.

5. Is Tex Mex queso gluten-free?

Yes, this recipe is naturally gluten-free, provided all ingredients (like cheese and pico de gallo) are checked for cross-contamination.

6. How do I make it less spicy?

Remove the seeds and membranes from the jalapeños or reduce the amount used for a milder flavor.

Final Thoughts and Actionable Tip

Now that you know how to make the ultimate Tex Mex queso, it’s time to bring the flavors of the Southwest into your kitchen. Whether you’re hosting friends, planning a family gathering, or simply craving something cheesy and indulgent, this recipe is your go-to guide. Don’t forget to customize it with your favorite toppings and variations for a personal touch.

Ready to impress with your Tex Mex queso skills? Grab your ingredients and start cooking today!

Recipe Content for Tex Mex Queso Recipe

Dive into the creamy, cheesy goodness of Tex Mex queso, a crowd-pleaser perfect for any occasion. This easy-to-make dip combines rich flavors, a hint of spice, and smooth textures that are impossible to resist.
Prep Time 10 minutes
Cook Time 15 minutes
Total Time 25 minutes
Servings: 8 servings
Course: Appetizer
Cuisine: Tex-Mex

Ingredients
  

  • 1 Tbsp canola or vegetable oil
  • ½ large white onion diced
  • 2 jalapeños diced
  • 1 cup half and half
  • 1 lb yellow American cheese sliced
  • 10-15 sprigs fresh cilantro chopped
  • ¼ cup pico de gallo optional, for garnish

Method
 

  1. Prep Ingredients: Dice the onion and jalapeños, and chop the cilantro. Prepare pico de gallo if using.
  2. Sauté Aromatics: Heat oil in a medium saucepan over medium heat. Add onions and jalapeños, sautéing for 3-4 minutes until softened.
  3. Heat Half and Half: Pour in the half and half, stirring constantly. Heat until small bubbles form around the edges—do not boil.
  4. Melt the Cheese: Gradually add sliced cheese, stirring until fully melted and smooth (about 5-7 minutes).
  5. Add Cilantro: Stir in chopped cilantro for a burst of freshness.
  6. Serve: Transfer queso to a serving bowl, garnish with pico de gallo if desired, and serve immediately with tortilla chips or your favorite Tex Mex dishes.

Notes

  • Adjust spice level by varying the amount of jalapeños.
  • For extra toppings, consider cooked chorizo, roasted corn, or diced avocado.
  • To keep queso warm for parties, use a slow cooker or warming tray.