Crispy Chicken Taquitos Recipe for a Delicious Snack

What Are Taquitos?

Taquitos are a delicious Mexican dish that consists of small rolled tortillas filled with various ingredients. Traditionally, they are made with corn tortillas, which are filled with meat, cheese, or beans, and then fried until crispy. The name “taquito” translates to “small taco,” and they are often served as a snack or appetizer. These tasty treats are perfect for parties, game days, or a cozy family dinner. With their crunchy exterior and flavorful filling, taquitos are sure to please everyone at the table.

Why You’ll Love This Crispy Chicken Taquitos Recipe

This Crispy Chicken Taquitos Recipe is a must-try for several reasons. First, it combines tender, shredded chicken with a blend of savory cheeses and spices, creating a mouthwatering filling. The crispy texture of the fried tortillas adds an irresistible crunch that complements the soft filling perfectly. Plus, they are easy to make and can be customized to suit your taste. Whether you prefer them spicy or mild, you can adjust the seasonings to your liking.

Another reason to love this recipe is its versatility. You can serve these taquitos as a main dish or as a fun appetizer. They pair wonderfully with a variety of dipping sauces, such as sour cream or salsa, making them a hit at any gathering. Additionally, they are a great way to use up leftover chicken, turning it into a delightful meal that everyone will enjoy. So, gather your ingredients and get ready to impress your family and friends with these crispy, flavorful taquitos!

Ingredients for Crispy Chicken Taquitos Recipe

To create the perfect Crispy Chicken Taquitos, you’ll need a few simple ingredients. Each component plays a vital role in delivering that delicious flavor and satisfying crunch. Here’s what you’ll need:

  • 2 cups cooked, shredded chicken
  • 1 cup shredded cheddar cheese
  • 1 cup shredded Monterey Jack cheese
  • 1 teaspoon garlic powder
  • 1 teaspoon onion powder
  • 1 teaspoon cumin
  • 1 teaspoon chili powder
  • 1/2 teaspoon salt
  • 1/4 teaspoon black pepper
  • 12 small corn tortillas
  • 1/4 cup vegetable oil (for frying)
  • Sour cream and salsa (for serving)

These ingredients come together to create a delightful combination of flavors. The shredded chicken provides a hearty base, while the cheeses add creaminess and richness. The spices, including garlic powder, onion powder, cumin, and chili powder, infuse the filling with a warm, savory taste. The corn tortillas are essential for that classic taquito texture, and frying them in vegetable oil gives them that golden, crispy finish.

Feel free to get creative! You can add other ingredients like black beans or corn to enhance the filling. This flexibility allows you to tailor the recipe to your preferences, making it a fun and enjoyable cooking experience. Now that you have your ingredients ready, let’s move on to the preparation steps!

Preparation of Crispy Chicken Taquitos Recipe

Step 1: Preparing the Chicken Filling

To kick off your Crispy Chicken Taquitos Recipe, start by preparing the chicken filling. In a large bowl, combine the cooked, shredded chicken with the shredded cheddar and Monterey Jack cheeses. Next, sprinkle in the garlic powder, onion powder, cumin, chili powder, salt, and black pepper. Mix everything together until well combined. This step is crucial as it ensures that every bite is packed with flavor. The spices will give your filling a delightful kick, while the cheeses will add creaminess. Set this mixture aside while you warm the tortillas.

Step 2: Assembling the Taquitos

Now that your filling is ready, it’s time to assemble the taquitos. Heat a skillet over medium heat and lightly warm the corn tortillas for about 30 seconds on each side. This makes them pliable and easier to roll. Once warmed, take a tortilla and place about 2 tablespoons of the chicken mixture in the center. Roll the tortilla tightly around the filling, ensuring the seam is on the bottom. If needed, secure the taquito with a toothpick to keep it from unrolling. Repeat this process until all the tortillas are filled and rolled. This step is where the fun begins, as you can get creative with how tightly you roll them!

Step 3: Frying the Taquitos

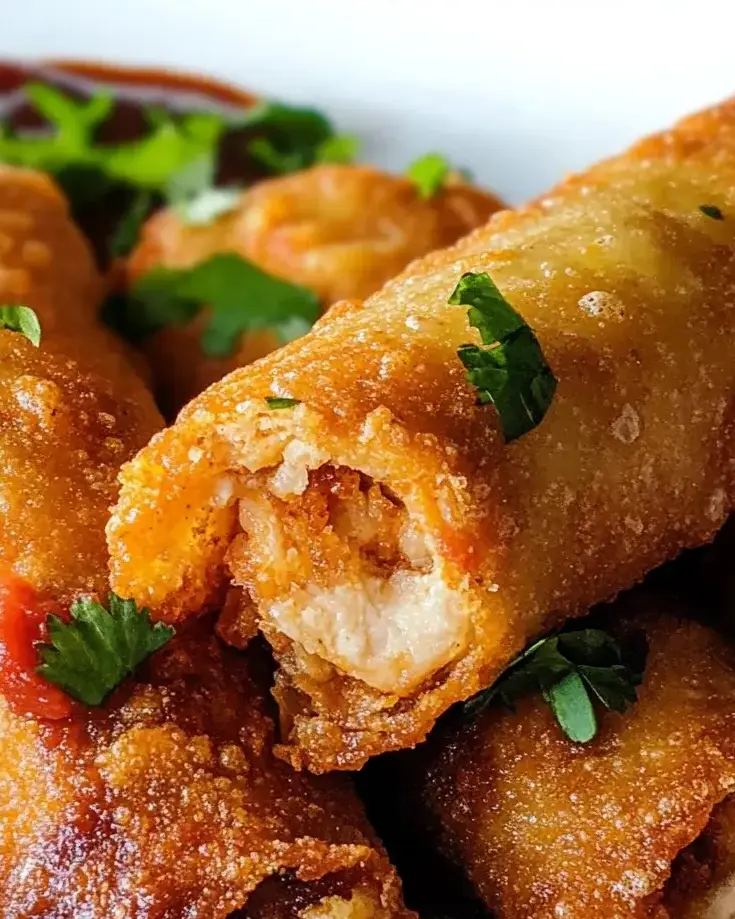
With your taquitos assembled, it’s time to fry them to crispy perfection. In a large frying pan, heat the vegetable oil over medium-high heat. Once the oil is hot, carefully add the taquitos seam side down. Fry them for about 2-3 minutes on each side, or until they turn golden brown and crispy. Be sure to keep an eye on them to prevent burning. Once they are done, use a slotted spoon to remove the taquitos from the oil and place them on a paper towel-lined plate. This will help drain any excess oil, keeping your taquitos crispy and delicious.

Step 4: Serving the Taquitos

Finally, it’s time to serve your Crispy Chicken Taquitos! Arrange them on a serving platter while they are still hot. They are best enjoyed fresh out of the frying pan. Serve with a side of sour cream and salsa for dipping. The coolness of the sour cream pairs perfectly with the warm, crispy taquitos. You can also add some chopped cilantro or sliced jalapeños for an extra touch. Enjoy your homemade taquitos with family and friends, and watch them disappear in no time!

Variation of Crispy Chicken Taquitos Recipe

Vegetarian Options

If you’re looking for a meat-free alternative, these Crispy Chicken Taquitos can easily be transformed into a delicious vegetarian dish. Instead of chicken, consider using a combination of black beans, corn, and sautéed vegetables. You can use bell peppers, onions, and zucchini for a colorful and nutritious filling. Simply mix these ingredients with the same spices used in the original recipe for that flavorful kick.

Another great option is to use mashed sweet potatoes or refried beans as the base. These ingredients not only add a creamy texture but also provide a satisfying taste. Don’t forget to include your favorite cheeses, like cheddar or Monterey Jack, to keep that cheesy goodness intact. With these vegetarian options, you can enjoy the same crispy, crunchy taquitos while catering to different dietary preferences.

Spicy Chicken Taquitos

If you love a bit of heat, why not spice things up with Spicy Chicken Taquitos? To achieve this, simply add some diced jalapeños or chopped green chilies to the chicken filling. This will give your taquitos a delightful kick that spice lovers will appreciate. You can also increase the amount of chili powder or add a dash of cayenne pepper for an extra layer of heat.

For an even bolder flavor, consider using spicy salsa or hot sauce as a dipping option. This will enhance the overall experience and make your taquitos stand out. Remember, the beauty of this recipe lies in its versatility, so feel free to adjust the spice levels according to your taste. Whether you prefer them mild or fiery, these variations will surely satisfy your cravings!

Cooking Note for Crispy Chicken Taquitos Recipe

When preparing your Crispy Chicken Taquitos, there are a few important cooking notes to keep in mind. These tips will help ensure that your taquitos turn out perfectly crispy and delicious every time.

First, make sure your oil is hot enough before adding the taquitos. If the oil isn’t hot, the taquitos may absorb too much oil and become greasy instead of crispy. A good way to test the oil is to drop a small piece of tortilla into it. If it sizzles immediately, the oil is ready for frying.

Next, avoid overcrowding the frying pan. Frying too many taquitos at once can lower the oil temperature, leading to soggy taquitos. Instead, fry them in batches, giving each taquito enough space to cook evenly. This will help achieve that golden-brown color and crunchy texture that everyone loves.

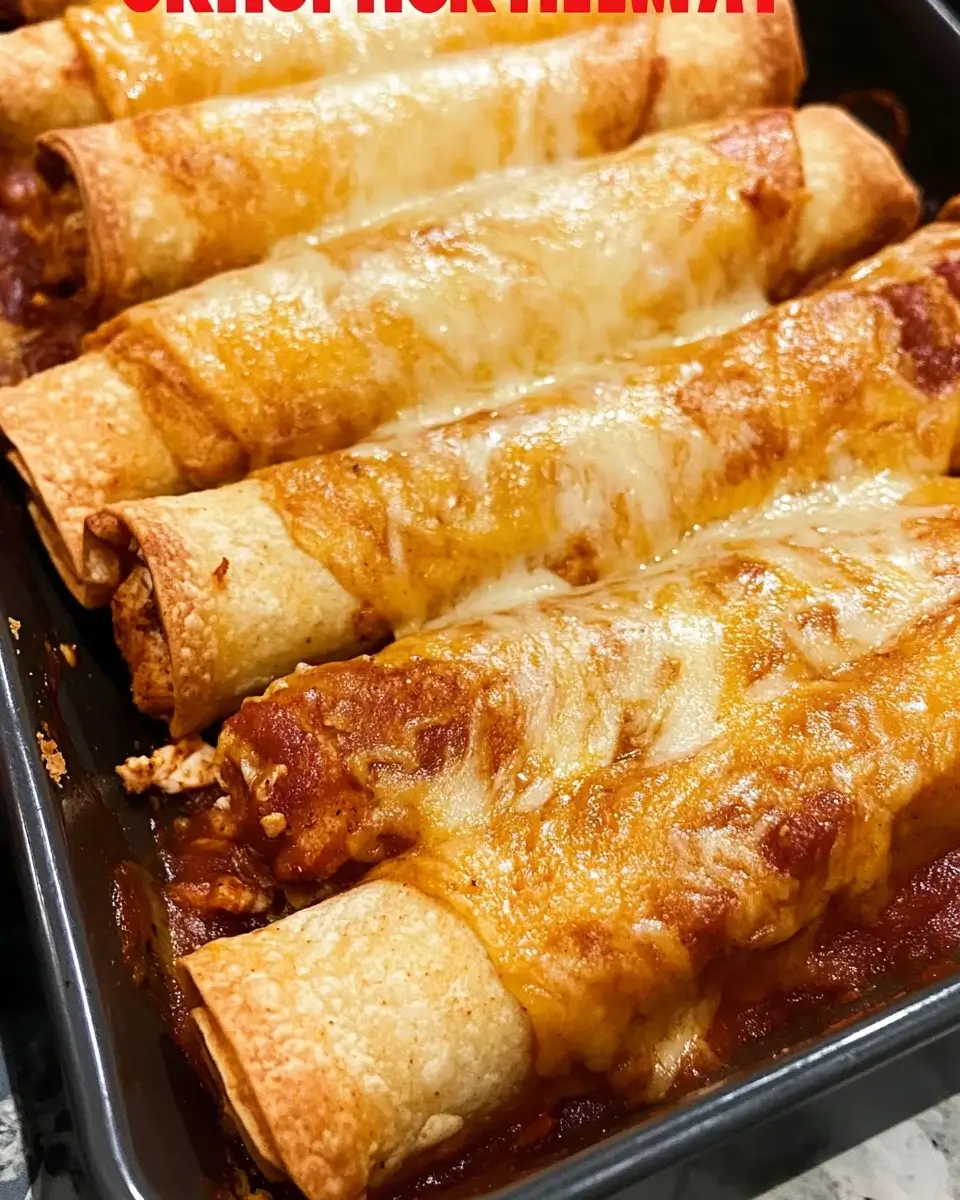
Additionally, if you prefer a healthier option, consider baking your taquitos instead of frying. Preheat your oven to 400°F (200°C) and place the assembled taquitos on a baking sheet. Brush them lightly with oil and bake for 20-25 minutes, or until they are crispy and golden. This method reduces the amount of oil used while still delivering a satisfying crunch.

Lastly, let the taquitos cool for a minute or two after frying. This will help them firm up a bit, making them easier to handle and eat. Enjoy your cooking experience, and remember that practice makes perfect. With these cooking notes, you’ll be well on your way to mastering the art of making Crispy Chicken Taquitos!

Serving Suggestions for Crispy Chicken Taquitos Recipe

Dipping Sauces

When it comes to serving your Crispy Chicken Taquitos, the right dipping sauces can elevate the experience. Here are some delicious options to consider:

  • Sour Cream: A classic choice, sour cream adds a cool and creamy contrast to the crispy taquitos. You can even mix in some lime juice or chopped cilantro for an extra zing.
  • Salsa: Whether you prefer mild or spicy, salsa is a fantastic accompaniment. Fresh tomato salsa, corn salsa, or even a zesty mango salsa can enhance the flavors of your taquitos.
  • Guacamole: This creamy avocado dip is a crowd favorite. Its rich texture pairs beautifully with the crunch of the taquitos, making each bite a delight.
  • Hot Sauce: For those who love heat, a drizzle of your favorite hot sauce can add a fiery kick. Try different varieties to find your perfect match!
  • Chipotle Sauce: A smoky chipotle sauce can add depth and flavor. You can make your own by blending chipotle peppers in adobo sauce with sour cream or mayonnaise.

Feel free to mix and match these sauces to create a dipping station that caters to everyone’s taste. Your guests will love trying different combinations with their taquitos!

Side Dishes

To round out your meal, consider serving some tasty side dishes alongside your Crispy Chicken Taquitos. Here are a few ideas:

  • Mexican Rice: Fluffy, seasoned rice is a perfect complement to taquitos. You can make it with tomatoes, onions, and spices for added flavor.
  • Refried Beans: Creamy refried beans are a hearty side that pairs well with taquitos. You can serve them plain or topped with cheese and jalapeños.
  • Fresh Salad: A light salad with lettuce, tomatoes, and avocado can balance the richness of the taquitos. Drizzle with a lime vinaigrette for a refreshing touch.
  • Grilled Vegetables: Colorful grilled veggies, such as bell peppers and zucchini, add a healthy and flavorful side to your meal.
  • Elote (Mexican Street Corn): This delicious corn dish, topped with cheese, lime, and chili powder, is a fun and tasty addition to your taquito feast.

These side dishes not only enhance the meal but also provide a variety of flavors and textures. Your Crispy Chicken Taquitos will shine even brighter when paired with these delightful accompaniments!

Tips for Perfect Crispy Chicken Taquitos Recipe

Creating the perfect Crispy Chicken Taquitos is all about attention to detail. Here are some helpful tips to ensure your taquitos turn out crispy, flavorful, and utterly delicious every time:

  • Use Fresh Ingredients: Fresh ingredients make a big difference in flavor. Opt for freshly cooked chicken and high-quality cheeses. This will enhance the overall taste of your taquitos.
  • Warm Tortillas: Always warm your corn tortillas before filling them. This step prevents them from cracking while rolling and helps them stay pliable. A quick 30 seconds in a skillet does the trick!
  • Don’t Overfill: When adding the chicken mixture to the tortillas, be careful not to overfill them. About 2 tablespoons is perfect. Overfilling can make it difficult to roll them tightly and may cause them to burst while frying.
  • Maintain Oil Temperature: Keep an eye on the oil temperature while frying. If it’s too hot, the taquitos may burn. If it’s too cool, they will absorb too much oil. Aim for a steady medium-high heat for the best results.
  • Fry in Batches: Fry your taquitos in small batches. This allows each taquito to cook evenly and become crispy without overcrowding the pan. It also helps maintain the oil temperature.
  • Let Them Drain: After frying, place the taquitos on a paper towel-lined plate. This will help absorb excess oil and keep them crispy. Avoid stacking them too soon, as this can make them soggy.
  • Experiment with Fillings: Don’t hesitate to get creative with your fillings! Try adding different spices, vegetables, or even different types of meat. This will keep your taquitos exciting and new every time you make them.
  • Serve Immediately: For the best experience, serve your taquitos right after frying. They are at their crispiest and most delicious when enjoyed fresh out of the pan.

By following these tips, you’ll be well on your way to mastering the art of making Crispy Chicken Taquitos. Each bite will be a delightful combination of crunch and flavor, making your meal a hit with family and friends!

Breakdown of Time for Crispy Chicken Taquitos Recipe

Prep Time

The prep time for your Crispy Chicken Taquitos is quite manageable. You’ll need about 15-20 minutes to gather your ingredients and prepare the chicken filling. This includes shredding the chicken and mixing it with the cheeses and spices. Warming the tortillas will also take a few minutes. Overall, you can expect to spend around 20 minutes on preparation, making it a quick and easy process.

Cooking Time

Once your taquitos are assembled, the cooking time is relatively short. Frying the taquitos will take about 6-8 minutes in total, with 2-3 minutes on each side until they are golden brown and crispy. If you choose to bake them instead, the cooking time will be around 20-25 minutes at 400°F (200°C). This flexibility allows you to decide how you want to cook them based on your preference and time constraints.

Total Time

In total, you can expect the entire process of making Crispy Chicken Taquitos to take about 30-45 minutes. This includes both prep and cooking time. It’s a fantastic option for a weeknight dinner or a fun gathering with friends. With such a quick turnaround, you can enjoy these delicious taquitos in no time!

Nutritional Information for Crispy Chicken Taquitos Recipe

Calories

When it comes to enjoying your Crispy Chicken Taquitos, it’s good to know the calorie content. Each serving contains approximately 320 calories. This makes them a satisfying option for a meal or snack without going overboard on calories. The combination of chicken, cheese, and spices provides a hearty and flavorful experience while keeping the calorie count reasonable. Enjoying these taquitos in moderation can fit well into a balanced diet.

Protein

Protein is an essential nutrient, and these taquitos deliver! Each serving offers about 18 grams of protein. The shredded chicken and cheese contribute significantly to this protein content, making these taquitos a great choice for those looking to boost their protein intake. Protein is vital for muscle repair and growth, making these taquitos not only delicious but also beneficial for your body.

Sodium

It’s important to be mindful of sodium intake, especially for those watching their salt consumption. Each serving of Crispy Chicken Taquitos contains around 600 milligrams of sodium. This amount is typical for many savory dishes, but if you’re concerned about sodium levels, consider using low-sodium chicken or cheese options. Additionally, you can control the amount of salt added to the filling. By making these small adjustments, you can enjoy your taquitos while keeping your sodium intake in check.

FAQs about Crispy Chicken Taquitos Recipe

Can I make Crispy Chicken Taquitos in advance?

Yes, you can prepare Crispy Chicken Taquitos in advance! To do this, assemble the taquitos but do not fry them right away. Instead, place them on a baking sheet lined with parchment paper and cover them with plastic wrap. You can store them in the refrigerator for up to 24 hours. When you’re ready to enjoy them, simply fry or bake them as directed in the recipe. This makes it easy to have a delicious meal ready to go, especially for busy weeknights or gatherings!

What can I use instead of chicken in the taquitos?

If you’re looking for alternatives to chicken, there are plenty of options! You can use shredded beef, pork, or turkey for a different flavor. For a vegetarian option, consider using black beans, refried beans, or sautéed vegetables like bell peppers and zucchini. You can also mix in some cheese for added creaminess. The key is to keep the spices the same to maintain that delicious flavor profile. Feel free to get creative and customize the filling to suit your taste!

How do I store leftover taquitos?

Storing leftover Crispy Chicken Taquitos is simple! Allow them to cool completely, then place them in an airtight container. You can keep them in the refrigerator for up to 3 days. If you want to store them for a longer period, consider freezing them. Wrap each taquito in plastic wrap and place them in a freezer-safe bag. They can be frozen for up to 2 months. When you’re ready to eat them, reheat in the oven or air fryer for the best texture!

Can I bake the taquitos instead of frying them?

Absolutely! Baking is a healthier alternative to frying. To bake your Crispy Chicken Taquitos, preheat your oven to 400°F (200°C). Arrange the assembled taquitos on a baking sheet lined with parchment paper. Lightly brush them with vegetable oil to help them crisp up. Bake for 20-25 minutes, or until they are golden brown and crispy. This method reduces the amount of oil used while still delivering that satisfying crunch. Enjoy your baked taquitos with your favorite dipping sauces!

Conclusion on Crispy Chicken Taquitos Recipe

In conclusion, the Crispy Chicken Taquitos Recipe is a delightful dish that brings together flavor, texture, and versatility. Whether you’re preparing them for a family dinner, a party, or just a cozy night in, these taquitos are sure to impress. With their crunchy exterior and savory filling, they offer a satisfying bite that everyone will love.

Not only are they easy to make, but they also allow for creativity in the kitchen. You can customize the filling to suit your taste, whether you prefer a classic chicken version or a spicy twist. Plus, the option to bake instead of fry makes them a healthier choice without sacrificing flavor. The variety of dipping sauces and side dishes you can serve alongside them only adds to their appeal.

As you gather your ingredients and follow the steps outlined in this recipe, remember that cooking is all about enjoyment. Don’t hesitate to experiment with different flavors and ingredients. The more you make these taquitos, the more you’ll discover your favorite combinations. So, roll up your sleeves, get cooking, and enjoy the deliciousness of homemade Crispy Chicken Taquitos!

We hope this recipe inspires you to create a memorable meal that brings family and friends together. Happy cooking!

Paul

Crispy Chicken Taquitos Recipe for a Delicious Snack

Crispy, cheesy, and packed with flavor, these Beef and Cheese Taquitos are everything you love about comfort food wrapped in a crunchy shell. Filled with juicy slow-cooked shredded beef and melty cheese, then pan-fried, air-fried, or baked to perfection—they’re a crowd-pleasing favorite for parties, snacks, or weeknight dinners.
Prep Time 25 minutes
Servings: 16 taquitos
Course: Appetizer, Main Dish, Snack
Cuisine: Mexican-inspired

Ingredients
  

  • For the Taquitos3 cups Mexican shredded beef1 cup freshly shredded Monterrey Jack cheese1 cup freshly shredded sharp cheddar cheese16 corn tortillas 5–6 inchesVegetable oil or cooking spray (for frying or baking)Toothpicks, for securing taquitos
  • For the Shredded Beef1 3–4 lb boneless chuck roast, trimmed and cut into 7–8 chunks1½ tablespoons vegetable oil
  • Spice Rub1 tablespoon chili powder1 tablespoon ground cumin1 tablespoon kosher salt½ tablespoon garlic powder½ tablespoon onion powder½ tablespoon smoked paprika1 teaspoon black pepper1 teaspoon ground coriander½ to 1½ teaspoons chipotle chili pepper to taste
  • Braising Liquid1 cup reduced-sodium beef broth1 cup salsa mild or medium1 (4 oz) can mild diced green chilies (undrained)2 tablespoons tomato paste2 tablespoons lime juice2 tablespoons brown sugar1 to 3 teaspoons liquid smoke (mesquite or hickory)1 tablespoon granulated beef bouillon or crushed cubes1 tablespoon dried oregano

Method
 

  1. Prepare the Beef: Combine all spice rub ingredients. Pat beef chunks dry, then rub evenly with the spice mix.
  2. Sear the Beef: In a skillet over medium-high heat, warm oil and sear beef chunks on all sides.
  3. Slow Cook: Transfer beef to a slow cooker. Add all braising ingredients. Cook on LOW for 6–8 hours or HIGH for 3½–4½ hours until fork-tender.
  4. Shred and Soak: Shred the cooked beef, discarding excess fat. Return shredded meat to the slow cooker for 20 minutes to soak up flavor.
  5. Warm Tortillas: Microwave tortillas wrapped in damp paper towels to make them pliable.
  6. Assemble Taquitos: Add about 3 tablespoons of shredded beef and 2 tablespoons of cheese to each tortilla. Roll tightly and secure with a toothpick.
Cook the Taquitos:
  1. Pan Fry: Heat ½ inch oil in a skillet to 350°F. Fry seam-side down for 3–4 minutes, rotating until golden.
  2. Air Fry: Spray or brush with oil. Air fry at 400°F for 6–8 minutes, flipping halfway.
  3. Bake: Place taquitos on a rack, brush with oil, and bake at 425°F for 15–20 minutes until crisp.
  4. Serve: Let cool slightly. Remove toothpicks and serve with guacamole, salsa, or sour cream.

Notes

Warming tortillas is key to preventing cracks—don’t skip it!
Use flour tortillas for a softer roll or different texture.
These freeze great—freeze before baking or frying, then cook from frozen.
Make it your own with additional fillings like sautéed peppers, corn, or beans.

Salmon Avocado Lime Cocktail is a refreshing delight.

A Nostalgic Bite into My Childhood

There’s a certain kind of magic in food that doesn’t just feed our stomachs, but wraps itself around our memories and moments. The first time I had a salmon cocktail, I was ten years old, balancing on the edge of my aunt’s velvet dining chair, clutching a miniature crystal cup filled with mysterious layers. It was New Year’s Eve, and everything felt unusually elegant: the grown-ups in wool suits and silk scarves, the sounds of Ella Fitzgerald dancing through the room, and the twinkling glow of candlelight over glossy appetizers. But that cocktail—layered with smoked salmon, crisp lettuce, and a pink-hued sauce that tasted like joy—was my entire world in that moment.

Years later, when I began collecting recipes that made me feel, that salmon cocktail made its way to the top of the list. It wasn’t just the flavor; it was the quiet elegance it brought, the way it fit into any moment from an impromptu brunch to a festive dinner, and the way it reminded me that simple things can be beautifully memorable.

This isn’t just a recipe. It’s an experience—one you can recreate and reinvent.

The Revival of a Retro Classic

Salmon cocktail is more than just an appetizer—it’s a homage to mid-century culinary glam. Once a star of 1960s dinner parties, often served in glass coupe bowls alongside shrimp cocktail, this dish has made a flavorful return in recent years. With the rise of “new nostalgia” in food culture, we’re seeing the resurrection of retro bites that blend timeless appeal with modern-day sophistication.

Warm smoked salmon, which gives this cocktail its signature richness, offers a depth that cold-smoked or raw fish often lacks. Combined with the lightness of crisp greens and the tangy-sweet whisper of a cocktail sauce (yes, with a hint of whiskey), the result is a beautifully balanced dish. Each bite delivers contrast—soft and crunchy, smoky and zesty, creamy and fresh.

What sets this revival apart is its versatility. Modern food lovers are experimenting by swapping out salmon for shrimp, tofu, even rotisserie chicken. It’s a recipe that adapts to your fridge, your crowd, and your imagination.

Why This Dish Belongs in Your Entertaining Arsenal

Elegant, effortless, and endlessly flexible.

That’s how I’d describe this salmon cocktail to anyone wondering whether it’s worth their time. While some appetizers demand precise timing or complex techniques, this one simply requires assembly. No cooking (unless you count boiling an egg), no special gadgets—just fresh ingredients and a little layering love.

What makes this dish particularly magical for entertaining is the visual appeal. Serve it in a cocktail glass, a coupe, or even a small jar and you’ve instantly elevated your table. It gives the impression of effort and sophistication, even if you’ve whipped it up in under ten minutes.

And here’s a secret: guests always remember the first thing they eat. Let this be that thing.

Beyond the Starter: Unexpected Ways to Serve It

The traditional presentation in a glass is undeniably charming, but this salmon cocktail has many lives. Here are a few fun and creative ways to reimagine it:

  • Tartine-Style: Spoon the layered components over a thick slice of toasted sourdough for an open-faced starter.
  • Party Spoons: Use porcelain appetizer spoons to serve bite-sized versions at cocktail parties.
  • Jar it Up: Pack it in small mason jars for picnic-ready appetizers or an upscale lunchbox treat.
  • Wrap it Up: Tuck the components into a butter lettuce leaf for a fresh, hand-held twist.
  • Brunch Board: Serve the ingredients deconstructed on a board with bagel chips, soft-boiled eggs, and capers.

Whether you’re hosting a formal dinner or a cozy brunch with friends, this cocktail can bend and twist to match the tone.


Flavor Profile: The Smoky Heartbeat of the Dish

Let’s talk taste. Warm smoked salmon is the undisputed hero here. Its flaky texture and full-bodied smoky profile anchor the dish, standing in perfect harmony with the creamy, slightly piquant cocktail sauce.

The sauce itself is a riff on the classic Marie Rose or Thousand Island—mayonnaise and ketchup form the base, spiked here with whiskey and a drop of Tabasco for complexity. It’s bold, but not overpowering. Each supporting player (cherry tomatoes, crisp lettuce, hard-boiled egg) brings its own subtle contrast—bright, juicy, crunchy, mellow.

It’s a balance of umami, acid, and richness that makes every bite feel both indulgent and refreshing.

Frequently Asked Questions About Salmon Cocktail

Can I make this ahead of time?

Yes—mostly. You can prep all components in advance (slice tomatoes, boil eggs, mix sauce), but wait to assemble until just before serving to keep the lettuce crisp and vibrant.

What’s the difference between warm and cold smoked salmon?

Warm smoked salmon is smoked at higher temperatures, resulting in a firmer, flakier texture and richer flavor. Cold-smoked salmon is more delicate and often used for bagels and lox. For this dish, warm smoked salmon adds the right kind of texture and depth.

Is the whiskey in the sauce necessary?

Not at all. It adds warmth and a subtle complexity, but you can easily omit it or substitute it with a splash of bourbon, white wine, or even apple cider vinegar for acidity.

What are some good vegetarian substitutes?

Smoked tofu or roasted beetroot work wonderfully here. Cubed avocado or marinated mushrooms also offer a lovely meaty texture and flavor.

How do I store leftovers?

While best served fresh, any leftovers can be stored in the fridge, covered, for up to 1 day. Keep in mind the lettuce may lose its crunch.

Can I use canned salmon?

Technically, yes, though it won’t have the same smoky complexity. If using canned, opt for boneless and skinless versions, and consider adding a dash of liquid smoke or smoked paprika to the sauce.

The Joy of Sharing: Why This Dish Matters

At the heart of it, this salmon cocktail is about more than taste—it’s about shared experiences. It’s the kind of dish that gets passed around with knowing smiles, the kind that sparks conversations about holiday memories and family traditions.

When I serve it, I often retell the story of that childhood New Year’s Eve, of my first taste of elegance, of how a simple dish in a tiny glass became an anchor in my food story. I’ve since served it to friends on summer patios, to neighbors at block parties, and to my own kids on rainy Sunday afternoons when we play “restaurant” at home. It never fails to deliver both flavor and a moment.

A Final Thought: More Than a Recipe

So often, we look for dishes that can do it all—easy to make, beautiful to serve, and unforgettable to taste. The salmon cocktail is one of those rare finds. It straddles generations and occasions. It’s as fitting at a holiday party as it is at a lazy brunch. And with just a few tweaks, it welcomes vegetarians, picky eaters, and adventurous palates alike.

But more than anything, it offers a reminder that sometimes the best dishes aren’t the ones that take hours to prepare, but the ones that come with a story—and leave room for new ones to be written.

Paul

Salmon Avocado Lime Cocktail is a refreshing delight.

This Salmon Cocktail is a refined and refreshing starter layered with crisp lettuce, juicy cherry tomatoes, tender smoked salmon, and a creamy homemade cocktail sauce with a subtle kick. Served elegantly in glasses and garnished with herbs and citrus, it’s the perfect light appetizer for brunches, holidays, or any time you want to impress your guests.
Prep Time 15 minutes
Cook Time 10 minutes
Total Time 25 minutes
Servings: 4 servings
Course: Appetizer
Cuisine: European-inspired

Ingredients
  

  • 7 ounces warm smoked salmon or substitute with poached salmon or gravlax3 ounces lettuce (butterhead, romaine, or iceberg), chopped12 cherry tomatoes, halved1 hard-boiled egg, quartered¼ lemon, cut into small wedgesMicrogreens or parsley, for garnish4 tablespoons mayonnaise2 tablespoons ketchup¼ teaspoon Tabasco (optional)1 tablespoon whiskey (or substitute with bourbon or omit)

Method
 

  1. Chop the lettuce, halve the cherry tomatoes, quarter the hard-boiled egg, and cut the lemon into small pieces.
  2. In a small bowl, whisk together the mayonnaise, ketchup, whiskey, and Tabasco until smooth and creamy to make the cocktail sauce.
  3. In four cocktail glasses, layer the ingredients starting with a base of chopped lettuce.
  4. Add halved cherry tomatoes, then top with pieces of shredded smoked salmon.
  5. Place egg quarters neatly on top.
  6. Drizzle with the prepared cocktail sauce.
  7. Garnish each glass with microgreens and a wedge of lemon.
  8. Serve immediately while fresh and slightly chilled.

Notes

For a lighter version, substitute Greek yogurt for mayonnaise in the sauce.
Make it vegetarian by swapping salmon for avocado or grilled mushrooms.
To prepare ahead, keep ingredients and sauce separate and assemble just before serving to maintain freshness and crunch.

Creamy Garlic Chicken Recipe for a Delicious Dinner

Creamy Garlic Chicken Recipe. This dish is not just a meal; it’s an experience that brings comfort and joy to your dining table. With its rich flavors and creamy texture, it’s perfect for family dinners or special occasions. The combination of tender chicken and a luscious garlic sauce makes it a favorite among many.

What Makes the Creamy Garlic Chicken Recipe Special?

Creamy Garlic Chicken Recipe apart is its simplicity and versatility. First, the use of fresh garlic adds a robust flavor that elevates the dish. Garlic is known for its health benefits, including boosting the immune system and improving heart health. Second, the creamy sauce, made with heavy cream and Parmesan cheese, creates a velvety texture that pairs beautifully with the chicken.

Moreover, this recipe is adaptable. You can easily modify it to suit your taste preferences. Whether you want to add vegetables or switch up the protein, the possibilities are endless. Plus, it’s quick to prepare, making it ideal for busy weeknights or last-minute gatherings.

Creamy Garlic Chicken Recipe is a delightful blend of flavors and textures that promises to satisfy your cravings. So, let’s dive into the ingredients and get started on this culinary adventure!

Ingredients for Creamy Garlic Chicken Recipe

Creamy Garlic Chicken Recipe, you’ll need a few simple yet flavorful ingredients. Each component plays a vital role in bringing this dish to life. Here’s what you’ll need:

  • 2 pounds boneless, skinless chicken breasts: This is the star of the dish, providing a tender and juicy base.
  • 2 tablespoons olive oil: Used for cooking the chicken, it adds a rich flavor and helps achieve a golden crust.
  • 4 cloves garlic, minced: Fresh garlic is essential for that aromatic and savory taste.
  • 1 cup heavy cream: This ingredient gives the sauce its creamy texture and richness.
  • 1 cup chicken broth: It enhances the flavor of the sauce and keeps it moist.
  • 1 teaspoon Italian seasoning: A blend of herbs that adds depth and warmth to the dish.
  • Salt and pepper to taste: Essential for seasoning and bringing out the flavors of the other ingredients.
  • 1 cup grated Parmesan cheese: This cheese melts beautifully, adding a nutty flavor to the sauce.
  • Fresh parsley, chopped (for garnish): A sprinkle of parsley adds a pop of color and freshness to the finished dish.

Creamy Garlic Chicken Recipe.

Step-by-Step Preparation of Creamy Garlic Chicken Recipe

Creamy Garlic Chicken Recipe. This process is straightforward and will guide you to create a delicious meal that’s sure to impress. Let’s get started!

Step 1: Preparing the Chicken

First, take the boneless, skinless chicken breasts and pat them dry with a paper towel. This helps the chicken brown nicely. Next, season both sides of the chicken with salt and pepper. This simple seasoning enhances the chicken’s natural flavor. Once seasoned, set the chicken aside while you prepare the skillet.

Step 2: Making the Creamy Garlic Sauce

In a large skillet, heat the olive oil over medium-high heat. Once the oil is hot, add the minced garlic. Sauté the garlic for about one minute until it becomes fragrant. Be careful not to burn it, as burnt garlic can taste bitter. After the garlic is aromatic, pour in the chicken broth. Bring it to a gentle simmer, scraping up any browned bits from the bottom of the skillet. This adds extra flavor to your sauce!

Next, stir in the heavy cream and Italian seasoning. Allow the mixture to simmer for about 3-4 minutes. This will help the sauce thicken slightly, creating that creamy texture we all love.

Step 3: Cooking the Chicken

Now it’s time to cook the chicken! Carefully add the seasoned chicken breasts to the skillet. Cook them for about 6-7 minutes on each side, or until they are golden brown and cooked through. You can check for doneness by cutting into the thickest part of the chicken; it should be white and juices should run clear. Once cooked, remove the chicken from the skillet and set it aside on a plate.

Step 4: Combining Chicken and Sauce

With the chicken cooked, it’s time to bring everything together. In the same skillet, add the grated Parmesan cheese to the creamy garlic sauce. Stir until the cheese melts and the sauce becomes smooth. Then, return the chicken to the skillet, coating it well in the creamy sauce. Let it simmer for an additional 2-3 minutes to heat through. This step ensures that every bite of chicken is enveloped in that delicious sauce.

Creamy Garlic Chicken Recipe is ready to be served! Garnish with freshly chopped parsley for a touch of color and freshness. Now, let’s explore some variations to make this dish even more exciting!

Variations of Creamy Garlic Chicken Recipe

Creamy Garlic Chicken Recipe is a fantastic base that allows for many delicious variations. Whether you want to add some veggies or switch up the protein, there are plenty of ways to make this dish your own. Let’s explore some exciting options!

Adding Vegetables to the Creamy Garlic Chicken Recipe

Creamy Garlic Chicken Recipe not only enhances the flavor but also boosts the nutritional value. Here are some great options:

  • Spinach: Add fresh spinach to the sauce just before serving. It wilts quickly and adds a lovely color and flavor.
  • Mushrooms: Sauté sliced mushrooms with the garlic for a rich, earthy taste that complements the creaminess.
  • Broccoli: Steam or sauté broccoli florets and mix them into the sauce for a crunchy texture.
  • Bell Peppers: Diced bell peppers can add a sweet crunch. Sauté them along with the garlic for a colorful addition.

These vegetables not only add flavor but also make your meal more colorful and appealing. Feel free to mix and match based on your preferences!

Alternative Proteins for Creamy Garlic Chicken Recipe

Creamy Garlic Chicken Recipe, there are several tasty alternatives. Here are a few ideas:

  • Chicken Thighs: For a juicier option, use boneless, skinless chicken thighs. They have more flavor and stay tender.
  • Turkey: Ground turkey or turkey cutlets can be a leaner choice that works well with the creamy sauce.
  • Pork Chops: Boneless pork chops can be used instead of chicken for a different flavor profile.
  • Tofu: For a vegetarian option, firm tofu can be used. Just make sure to press it to remove excess moisture before cooking.

Creamy Garlic Chicken Recipe, let’s move on to some important cooking notes!

Cooking Note for Creamy Garlic Chicken Recipe

Creamy Garlic Chicken Recipe, there are a few essential cooking notes to keep in mind. These tips will help ensure that your dish turns out perfectly every time. Let’s take a look at some important points to consider:

  • Use Fresh Ingredients: Fresh garlic and high-quality chicken make a significant difference in flavor. Fresh ingredients enhance the overall taste of your dish.
  • Don’t Overcook the Chicken: Overcooking can lead to dry chicken. Use a meat thermometer to check for doneness; the internal temperature should reach 165°F (75°C).
  • Adjust the Sauce Consistency: If the sauce is too thick, add a splash of chicken broth or water to reach your desired consistency. If it’s too thin, let it simmer a bit longer to thicken.
  • Season Gradually: Taste the sauce as you go. Adjust the salt and pepper to your liking, but remember that Parmesan cheese adds saltiness, so be cautious.
  • Let It Rest: After cooking, let the chicken rest for a few minutes before serving. This allows the juices to redistribute, keeping the chicken moist.

Creamy Garlic Chicken Recipe to new heights. Each step is crucial in creating a dish that is not only delicious but also visually appealing. Now that you’re equipped with these tips, let’s explore some serving suggestions to complement your meal!

Serving Suggestions for Creamy Garlic Chicken Recipe

Creamy Garlic Chicken Recipe is ready, it’s time to think about how to serve it. The right sides can enhance the flavors of the dish and create a well-rounded meal. Here are some delightful serving suggestions that pair beautifully with your creamy chicken:

  • Garlic Bread: A classic choice! Serve warm garlic bread on the side to soak up the delicious creamy sauce.
  • Steamed Rice: Fluffy white or brown rice is perfect for balancing the richness of the sauce. It’s a great way to enjoy every last drop!
  • Pasta: Serve the creamy garlic chicken over a bed of pasta, such as fettuccine or penne. The pasta will absorb the sauce, making each bite flavorful.
  • Mashed Potatoes: Creamy mashed potatoes are a comforting side that complements the chicken perfectly. They add a hearty element to the meal.
  • Roasted Vegetables: A mix of seasonal roasted vegetables, like carrots, zucchini, and bell peppers, adds color and nutrition to your plate.
  • Salad: A fresh green salad with a light vinaigrette can provide a refreshing contrast to the rich flavors of the chicken.

Creamy Garlic Chicken Recipe to new heights. Now that you have some ideas for serving, let’s move on to tips for perfecting your dish!

Tips for Perfecting Your Creamy Garlic Chicken Recipe

Creamy Garlic Chicken Recipe, there are several tips and tricks you can follow. These will help you achieve the best flavor and texture, ensuring that your dish is a hit every time. Let’s explore some essential tips for perfecting your creamy chicken!

  • Marinate for Extra Flavor: For a deeper flavor, consider marinating the chicken in lemon juice, garlic, and herbs for a few hours before cooking. This adds a zesty kick and enhances the overall taste.
  • Use a Cast Iron Skillet: If you have one, a cast iron skillet is perfect for this recipe. It retains heat well and gives the chicken a beautiful sear.
  • Experiment with Cheese: While Parmesan is traditional, feel free to experiment with other cheeses like Asiago or Pecorino Romano for a different flavor profile.
  • Adjust the Garlic: If you love garlic, don’t hesitate to add more! You can also roast the garlic beforehand for a sweeter, milder flavor.
  • Finish with Fresh Herbs: Besides parsley, consider adding fresh basil or thyme just before serving. This adds a burst of freshness and elevates the dish.
  • Serve Immediately: For the best experience, serve the Creamy Garlic Chicken Recipe right after cooking. The sauce is creamiest when fresh!

Creamy Garlic Chicken Recipe. Each suggestion is designed to help you create a dish that not only tastes amazing but also impresses your guests. Now that you’re equipped with these tips, let’s break down the time needed for this delicious recipe!

Breakdown of Time for Creamy Garlic Chicken Recipe

Creamy Garlic Chicken Recipe is essential for planning your meal. Knowing how long each step takes can help you manage your kitchen time effectively. Here’s a breakdown of the time needed for this delicious dish:

Prep Time

Creamy Garlic Chicken Recipe is approximately 15 minutes. During this time, you will gather all your ingredients, season the chicken, and prepare the garlic and any vegetables you wish to add. Having everything ready before you start cooking makes the process smoother and more enjoyable.

Cooking Time

The cooking time for this recipe is about 20-25 minutes. This includes cooking the chicken until it’s golden brown and preparing the creamy garlic sauce. The chicken will take around 12-14 minutes to cook through, while the sauce will simmer for about 8-10 minutes to achieve the perfect consistency. This quick cooking time makes it an ideal choice for busy weeknights!

Total Time

Creamy Garlic Chicken Recipe to take around 35-40 minutes from start to finish. This includes both prep and cooking time. With such a short time commitment, you can enjoy a delicious, homemade meal without spending hours in the kitchen. Now that you know how to manage your time, let’s take a look at the nutritional information for this delightful dish!

Nutritional Information for Creamy Garlic Chicken Recipe

Creamy Garlic Chicken Recipe is essential for those who are mindful of their dietary choices. This dish is not only delicious but also packed with nutrients that can fit into a balanced meal plan. Let’s break down the key nutritional components of this creamy delight.

Calories

Creamy Garlic Chicken Recipe contains approximately 550 calories. This calorie count includes the chicken, creamy sauce, and Parmesan cheese. While it may seem high, the calories come from wholesome ingredients that provide energy and satisfaction. Enjoying this dish in moderation can be part of a healthy diet.

Protein

Creamy Garlic Chicken Recipe a great option for those looking to increase their protein intake while enjoying a flavorful meal.

Sodium

Creamy Garlic Chicken Recipe is approximately 800 milligrams per serving. This amount can vary based on the chicken broth and cheese used. If you’re watching your sodium intake, consider using low-sodium chicken broth and adjusting the salt added during cooking. This way, you can enjoy the creamy goodness without compromising your dietary needs.

Creamy Garlic Chicken Recipe offers a balanced mix of calories, protein, and sodium. It’s a satisfying meal that can fit into various dietary plans. Now that you have a clear understanding of the nutritional aspects, let’s move on to some frequently asked questions about this delightful dish!

FAQs about Creamy Garlic Chicken Recipe

Can I use chicken thighs instead of breasts in the Creamy Garlic Chicken Recipe?

Creamy Garlic Chicken Recipe. Chicken thighs are juicier and have a richer flavor, making them a great alternative. Just remember to adjust the cooking time slightly, as thighs may take a few minutes longer to cook through. Always check that the internal temperature reaches 165°F (75°C) for safety.

How can I make the Creamy Garlic Chicken Recipe dairy-free?

Creamy Garlic Chicken Recipe dairy-free, you can substitute the heavy cream with coconut cream or a dairy-free cream alternative. Additionally, use nutritional yeast instead of Parmesan cheese for a cheesy flavor without dairy. Adjust the seasoning to taste, as these alternatives may have different flavor profiles. This way, you can enjoy the creamy goodness without any dairy!

What sides pair well with the Creamy Garlic Chicken Recipe?

Creamy Garlic Chicken Recipe. Here are some popular options:

  • Garlic Bread: Perfect for soaking up the creamy sauce.
  • Steamed Vegetables: Broccoli, green beans, or asparagus add color and nutrition.
  • Rice or Pasta: Fluffy rice or pasta can balance the richness of the dish.
  • Salad: A fresh green salad with a light dressing provides a refreshing contrast.

These sides not only complement the flavors of the chicken but also create a well-rounded meal.

Can I prepare the Creamy Garlic Chicken Recipe in advance?

Creamy Garlic Chicken Recipe in advance! You can cook the chicken and sauce ahead of time, then store them separately in the refrigerator. When you’re ready to serve, simply reheat the chicken and sauce together in a skillet over low heat until warmed through. This makes it a convenient option for meal prep or busy weeknights!

Conclusion on Creamy Garlic Chicken Recipe

Creamy Garlic Chicken Recipe is a delightful dish that combines simplicity with rich flavors. It’s perfect for any occasion, whether you’re hosting a dinner party or enjoying a cozy family meal. The tender chicken, enveloped in a creamy garlic sauce, creates a satisfying experience that will leave everyone asking for seconds.

This recipe is not only easy to prepare but also highly adaptable. You can customize it by adding your favorite vegetables or trying different proteins. The tips and variations provided will help you make this dish your own, ensuring that it remains a staple in your kitchen.

Creamy Garlic Chicken Recipe is sure to please even the pickiest eaters.

So, gather your ingredients, follow the steps, and enjoy the deliciousness of this creamy delight. Whether you serve it with garlic bread, pasta, or a fresh salad, you’re in for a treat. Happy cooking!

Paul

Creamy Garlic Chicken Recipe for a Delicious Dinner

This Creamy Garlic Chicken is the definition of effortless indulgence—tender chicken breasts baked under a rich layer of seasoned cream cheese, Italian cheese, and garlic, then finished with a gooey cheddar topping. It’s simple to prepare, packed with flavor, and perfect for a comforting weeknight dinner.
Prep Time 10 minutes
Cook Time 50 minutes
Total Time 1 hour
Servings: 4 servings
Course: Main Dish
Cuisine: American

Ingredients
  

  • 4 boneless skinless chicken breasts1 cup shredded Italian blend cheese½ cup shredded cheddar cheese1 cup cream cheese (softened for easier mixing, but not required)1 teaspoon minced garlic1 teaspoon Italian seasoning (or ½ teaspoon for a milder flavor)Salt and pepper to tasteNon-stick cooking spray

Method
 

  1. Preheat the oven to 375°F (190°C). Lightly coat a 9×13 inch baking dish with non-stick spray.
  2. In a mixing bowl, combine cream cheese, shredded Italian cheese, garlic, and Italian seasoning. Mix until creamy.
  3. Place the chicken breasts into the prepared baking dish. Season with salt and pepper as desired.
  4. Spread the creamy garlic mixture evenly over each piece of chicken using a spatula.
  5. Cover the dish with foil and bake for about 45 minutes, or until the chicken is fully cooked and no longer pink in the center.
  6. Remove the foil, sprinkle the shredded cheddar cheese over the top of the chicken, and return to the oven uncovered. Bake for another 5 minutes until the cheese is fully melted and bubbly.
  7. Serve hot with your favorite sides like garlic mashed potatoes, roasted veggies, or a crisp green salad.

Notes

Make sure the cream cheese is softened for easy mixing and smoother texture.
For extra flavor, add a pinch of red pepper flakes or chopped fresh herbs like parsley or basil to the cheese mixture.
This dish pairs well with pasta or rice to soak up the creamy sauce.
Store leftovers in an airtight container in the fridge for up to 3 days. Reheat gently to maintain creaminess.

Carrot Cake with Cream Cheese Frosting is a must-try!

The History of Carrot Cake

Carrot cake has a rich and fascinating history that dates back to medieval times. In those days, people used carrots as a sweetener because sugar was scarce and expensive. The sweetness of carrots made them a popular ingredient in various dishes. Over the years, this humble vegetable transformed into the delightful dessert we know today.

In the 20th century, carrot cake gained popularity in the United States, especially during the health food movement. Bakers began to experiment with different ingredients, leading to the creation of the moist and flavorful cake we enjoy now. The addition of spices, nuts, and, of course, cream cheese frosting, made it a favorite for many. Today, carrot cake is often served at birthdays, weddings, and other celebrations, showcasing its timeless appeal.

Why Choose Carrot Cake with Cream Cheese Frosting?

Carrot cake with cream cheese frosting is a delightful choice for several reasons. First, it combines the natural sweetness of carrots with warm spices like cinnamon and nutmeg, creating a comforting flavor profile. The cream cheese frosting adds a rich, tangy contrast that perfectly complements the cake’s sweetness.

Moreover, this cake is incredibly versatile. You can easily customize it by adding nuts, fruits, or even swapping ingredients to suit dietary needs. Whether you’re baking for a special occasion or just to enjoy a slice with your afternoon tea, this recipe is sure to impress. Plus, it’s a great way to sneak in some veggies, making it a slightly healthier dessert option!

In summary, carrot cake with cream cheese frosting is not just a treat for the taste buds; it also carries a rich history and offers endless possibilities for customization. So, let’s dive into the ingredients and get started on this delicious journey!

Ingredients for Carrot Cake with Cream Cheese Frosting Recipe

To create a delicious carrot cake with cream cheese frosting, you’ll need a variety of ingredients. Each component plays a vital role in achieving the perfect flavor and texture. Here’s what you’ll need:

For the Carrot Cake:

  • 2 cups all-purpose flour
  • 2 cups granulated sugar
  • 1 teaspoon baking powder
  • 1 teaspoon baking soda
  • 1 teaspoon ground cinnamon
  • 1/2 teaspoon ground nutmeg
  • 1/2 teaspoon salt
  • 1 cup vegetable oil
  • 4 large eggs
  • 3 cups grated carrots (about 6 medium carrots)
  • 1 cup crushed pineapple, drained
  • 1/2 cup chopped walnuts or pecans (optional)
  • 1 teaspoon vanilla extract

For the Cream Cheese Frosting:

  • 8 ounces cream cheese, softened
  • 1/2 cup unsalted butter, softened
  • 4 cups powdered sugar
  • 1 teaspoon vanilla extract
  • 1-2 tablespoons milk (as needed for consistency)

These ingredients come together to create a moist and flavorful cake that is sure to delight everyone. The combination of grated carrots and crushed pineapple adds natural sweetness and moisture, while the spices enhance the overall flavor. The cream cheese frosting, with its rich and tangy taste, perfectly balances the sweetness of the cake.

Now that you have your ingredients ready, let’s move on to the step-by-step preparation of this delightful carrot cake with cream cheese frosting!

Step-by-Step Preparation of Carrot Cake with Cream Cheese Frosting Recipe

Step 1: Prepping the Ingredients

Before you start baking, it’s essential to prep your ingredients. First, gather all the items listed in the ingredients section. Make sure your eggs are at room temperature, as this helps them mix better. Next, grate the carrots using a box grater or food processor. You want them finely grated for even distribution in the cake. If you’re using nuts, chop them into small pieces. This will add a delightful crunch to your cake.

Step 2: Mixing the Dry Ingredients

In a large mixing bowl, combine the dry ingredients. Start by whisking together the all-purpose flour, granulated sugar, baking powder, baking soda, ground cinnamon, ground nutmeg, and salt. Mixing these ingredients well ensures that the leavening agents are evenly distributed. This step is crucial for achieving a light and fluffy cake. Set this bowl aside while you prepare the wet ingredients.

Step 3: Combining Wet Ingredients

In another bowl, it’s time to mix the wet ingredients. Pour in the vegetable oil and crack in the eggs. Add the grated carrots, crushed pineapple, and vanilla extract. Using a whisk or electric mixer, blend these ingredients until they are well combined. The mixture should be smooth and slightly thick. This is where the magic begins, as the carrots and pineapple will add moisture and flavor to your cake.

Step 4: Incorporating Carrots and Nuts

Now, it’s time to bring the two mixtures together. Gradually add the wet ingredients to the dry ingredients. Stir gently until just combined. Be careful not to overmix, as this can make the cake dense. If you’re using nuts, fold them in at this stage. The nuts will add a lovely texture and flavor to your cake, making each bite delightful.

Step 5: Baking the Cake

Once your batter is ready, it’s time to bake! Divide the batter evenly between the two prepared 9-inch round cake pans. Smooth the tops with a spatula for even baking. Place the pans in the preheated oven and bake for 25-30 minutes. To check if they’re done, insert a toothpick into the center. If it comes out clean, your cakes are ready! Allow them to cool in the pans for about 10 minutes before transferring them to wire racks to cool completely.

Step 6: Preparing the Cream Cheese Frosting

While the cakes are cooling, you can prepare the cream cheese frosting. In a medium bowl, beat the softened cream cheese and unsalted butter together until smooth and creamy. Gradually add the powdered sugar and vanilla extract, mixing until well combined. If the frosting is too thick, add milk one tablespoon at a time until you reach your desired consistency. The frosting should be spreadable but not runny.

Step 7: Frosting the Cake

Once the cakes are completely cool, it’s time to frost! Place one layer of cake on a serving plate. Spread a generous layer of cream cheese frosting on top. Then, carefully place the second layer on top. Frost the top and sides of the cake with the remaining frosting. For a decorative touch, you can sprinkle additional chopped nuts or grated carrots on top. Slice and serve this delicious carrot cake with cream cheese frosting to your eager guests!

Variations of Carrot Cake with Cream Cheese Frosting Recipe

Carrot cake with cream cheese frosting is a classic dessert, but there are many ways to put a unique spin on this beloved recipe. Here are some exciting variations to consider:

Gluten-Free Options

If you or your guests are gluten-sensitive, you can easily make a gluten-free carrot cake. Simply substitute the all-purpose flour with a gluten-free flour blend. Make sure to check that all other ingredients, like baking powder and baking soda, are also gluten-free. This way, everyone can enjoy a slice of this delicious cake!

Vegan Alternatives

For a vegan version of carrot cake, you can replace the eggs with flaxseed meal or applesauce. To make flax eggs, mix one tablespoon of flaxseed meal with three tablespoons of water and let it sit for a few minutes until it thickens. Additionally, use a plant-based butter and dairy-free cream cheese for the frosting. This way, you can enjoy a moist and flavorful cake without any animal products.

Adding Fruits and Nuts

To enhance the flavor and texture of your carrot cake, consider adding fruits and nuts. Raisins or shredded coconut can be mixed into the batter for added sweetness and chewiness. You can also experiment with different nuts, such as pecans or almonds, to give your cake a delightful crunch. These additions not only elevate the taste but also make your cake even more special!

With these variations, you can customize your carrot cake with cream cheese frosting to suit any dietary preference or personal taste. Whether you stick to the classic recipe or try something new, this cake is sure to be a hit!

Cooking Note for Carrot Cake with Cream Cheese Frosting Recipe

When baking a delicious carrot cake with cream cheese frosting, a few cooking notes can help ensure your cake turns out perfectly. First, always preheat your oven before placing the cake inside. This step is crucial for even baking. Additionally, make sure to grease and flour your cake pans well. This will prevent the cake from sticking and make it easier to remove once baked.

Another important tip is to use fresh ingredients. Fresh carrots will provide the best flavor and moisture. If you’re using canned pineapple, ensure it’s well-drained to avoid excess moisture in the batter. Also, remember to let your cakes cool completely before frosting. If the cakes are warm, the frosting may melt and slide off, ruining your beautiful creation.

Lastly, feel free to experiment with the spices. While cinnamon and nutmeg are traditional, you can add a pinch of ginger or allspice for a unique twist. These small adjustments can elevate the flavor profile of your carrot cake, making it even more delightful!

Serving Suggestions for Carrot Cake with Cream Cheese Frosting Recipe

Carrot cake with cream cheese frosting is a versatile dessert that can be served in various ways. Here are some serving suggestions to enhance your experience:

  • Pair with Coffee or Tea: This cake pairs wonderfully with a cup of coffee or tea. The warm flavors of the spices complement the drink perfectly.
  • Garnish with Fresh Fruits: Consider adding fresh fruits like berries or slices of orange on the side. They add a refreshing contrast to the rich cake.
  • Serve with Ice Cream: For an indulgent treat, serve a slice of carrot cake with a scoop of vanilla or cream cheese ice cream. The cold ice cream balances the warm spices beautifully.
  • Make Mini Cakes: For a fun twist, bake the batter in muffin tins to create mini carrot cakes. Frost them individually for a delightful treat at parties.

These serving suggestions can elevate your carrot cake with cream cheese frosting experience, making it even more enjoyable for you and your guests!

Tips for Perfecting Your Carrot Cake with Cream Cheese Frosting Recipe

To ensure your carrot cake with cream cheese frosting turns out perfectly every time, consider these helpful tips:

  • Measure Ingredients Accurately: Use measuring cups and spoons for precise measurements. This helps maintain the right balance of flavors and textures.
  • Don’t Overmix: When combining wet and dry ingredients, mix until just combined. Overmixing can lead to a dense cake.
  • Use Room Temperature Ingredients: Ingredients like eggs and butter should be at room temperature. This helps them blend better and creates a smoother batter.
  • Cool Completely: Allow the cakes to cool completely before frosting. This prevents the frosting from melting and ensures a beautiful finish.
  • Store Properly: If you have leftovers, store the cake in an airtight container in the refrigerator. It can last for several days, maintaining its delicious flavor.

By following these tips, you can perfect your carrot cake with cream cheese frosting and impress everyone with your baking skills!

Cooking Note for Carrot Cake with Cream Cheese Frosting Recipe

When baking a delicious carrot cake with cream cheese frosting, a few cooking notes can help ensure your cake turns out perfectly. First, always preheat your oven before placing the cake inside. This step is crucial for even baking. Additionally, make sure to grease and flour your cake pans well. This will prevent the cake from sticking and make it easier to remove once baked.

Another important tip is to use fresh ingredients. Fresh carrots will provide the best flavor and moisture. If you’re using canned pineapple, ensure it’s well-drained to avoid excess moisture in the batter. Also, remember to let your cakes cool completely before frosting. If the cakes are warm, the frosting may melt and slide off, ruining your beautiful creation.

Lastly, feel free to experiment with the spices. While cinnamon and nutmeg are traditional, you can add a pinch of ginger or allspice for a unique twist. These small adjustments can elevate the flavor profile of your carrot cake, making it even more delightful!

By keeping these cooking notes in mind, you can create a scrumptious carrot cake with cream cheese frosting that will impress your family and friends. Happy baking!

Serving Suggestions for Carrot Cake with Cream Cheese Frosting Recipe

Carrot cake with cream cheese frosting is a delightful dessert that can be enjoyed in many ways. Here are some creative serving suggestions to enhance your experience:

  • Pair with Coffee or Tea: This cake pairs wonderfully with a warm cup of coffee or tea. The spices in the cake complement the flavors of your drink, making for a cozy treat.
  • Garnish with Fresh Fruits: Adding fresh fruits like berries or slices of orange on the side can provide a refreshing contrast to the rich cake. The acidity of the fruits balances the sweetness beautifully.
  • Serve with Ice Cream: For an indulgent twist, serve a slice of carrot cake with a scoop of vanilla or cream cheese ice cream. The cold ice cream melts slightly on the warm cake, creating a delicious combination.
  • Make Mini Cakes: For a fun presentation, bake the batter in muffin tins to create mini carrot cakes. Frost them individually for a delightful treat at parties or gatherings.
  • Top with Whipped Cream: A dollop of freshly whipped cream on top of each slice adds a light and airy texture, enhancing the overall experience.
  • Drizzle with Caramel Sauce: For an extra touch of sweetness, drizzle some caramel sauce over the frosted cake. This adds a rich flavor that pairs well with the cream cheese frosting.

These serving suggestions can elevate your carrot cake with cream cheese frosting experience, making it even more enjoyable for you and your guests. Whether you’re celebrating a special occasion or simply enjoying a slice at home, these ideas will surely impress!

Tips for Perfecting Your Carrot Cake with Cream Cheese Frosting Recipe

To ensure your carrot cake with cream cheese frosting turns out perfectly every time, consider these helpful tips:

  • Measure Ingredients Accurately: Use measuring cups and spoons for precise measurements. This helps maintain the right balance of flavors and textures.
  • Don’t Overmix: When combining wet and dry ingredients, mix until just combined. Overmixing can lead to a dense cake.
  • Use Room Temperature Ingredients: Ingredients like eggs and butter should be at room temperature. This helps them blend better and creates a smoother batter.
  • Cool Completely: Allow the cakes to cool completely before frosting. This prevents the frosting from melting and ensures a beautiful finish.
  • Store Properly: If you have leftovers, store the cake in an airtight container in the refrigerator. It can last for several days, maintaining its delicious flavor.
  • Experiment with Spices: While cinnamon and nutmeg are traditional, feel free to add a pinch of ginger or allspice for a unique twist. These small adjustments can elevate the flavor profile of your carrot cake.
  • Use Fresh Ingredients: Fresh carrots will provide the best flavor and moisture. If you’re using canned pineapple, ensure it’s well-drained to avoid excess moisture in the batter.
  • Test for Doneness: Use a toothpick to check if the cakes are done. Insert it into the center; if it comes out clean, your cakes are ready!

By following these tips, you can perfect your carrot cake with cream cheese frosting and impress everyone with your baking skills! Happy baking!

Breakdown of Time for Carrot Cake with Cream Cheese Frosting Recipe

Prep Time

Preparing your carrot cake with cream cheese frosting is a delightful process that doesn’t take too long. The prep time for this recipe is approximately 20-30 minutes. During this time, you will gather your ingredients, grate the carrots, and mix the wet and dry components. Make sure to have everything ready before you start baking. This will make the process smoother and more enjoyable!

Cooking Time

The cooking time for your carrot cake is about 25-30 minutes. This is when the magic happens! As the cake bakes, your kitchen will fill with the warm, inviting aroma of spices and sweet carrots. To ensure your cake is perfectly baked, check for doneness by inserting a toothpick into the center. If it comes out clean, your cake is ready to cool.

Total Time

In total, you can expect to spend around 1 hour to 1 hour and 15 minutes on this recipe. This includes both prep and cooking time. Once the cakes are baked and cooled, you’ll spend a little extra time frosting them. But trust me, the effort is worth it! You’ll end up with a delicious carrot cake with cream cheese frosting that’s perfect for any occasion.

Nutritional Information for Carrot Cake with Cream Cheese Frosting Recipe

Calories

When indulging in a slice of carrot cake with cream cheese frosting, it’s essential to be aware of its caloric content. Each serving contains approximately 350 calories. This number can vary slightly based on the specific ingredients used and any variations you may choose to incorporate. While this cake is a delightful treat, enjoying it in moderation is key to maintaining a balanced diet.

Protein

In terms of protein, each slice of carrot cake provides about 3 grams. While this may not seem like a lot, it contributes to your daily protein intake, especially when paired with other nutritious foods. The eggs and nuts in the recipe help boost the protein content, making it a more satisfying dessert option.

Sodium

For those monitoring their sodium intake, it’s good to know that each serving of carrot cake with cream cheese frosting contains around 200 milligrams of sodium. This amount is relatively moderate, especially considering that sodium is often found in many processed foods. By making this cake at home, you have control over the ingredients, allowing you to adjust the sodium levels to suit your dietary needs.

Overall, while carrot cake with cream cheese frosting is a delicious dessert, being mindful of its nutritional information can help you enjoy it as part of a balanced diet. Remember, it’s all about moderation and making informed choices!

FAQs about Carrot Cake with Cream Cheese Frosting Recipe

Can I make carrot cake without nuts?

Absolutely! You can make carrot cake without nuts if you prefer a nut-free version. Simply omit the chopped walnuts or pecans from the recipe. The cake will still be delicious and moist thanks to the carrots and pineapple. If you want to add some texture, consider including raisins or shredded coconut instead. This way, you can enjoy a delightful carrot cake that suits your taste!

How do I store leftover carrot cake?

Storing leftover carrot cake is easy! First, make sure the cake is completely cooled. Then, place it in an airtight container to keep it fresh. You can store it in the refrigerator for up to a week. If you want to keep it longer, consider freezing it. Wrap individual slices in plastic wrap and then place them in a freezer-safe bag. This way, you can enjoy a slice of carrot cake whenever you crave it!

Can I use store-bought cream cheese frosting?

Yes, you can use store-bought cream cheese frosting if you’re short on time or prefer convenience. Just make sure to choose a high-quality brand for the best flavor. However, homemade frosting is often creamier and more flavorful. If you decide to go with store-bought, you can still add a personal touch by mixing in a little vanilla extract or a dash of cinnamon for extra flavor!

What can I substitute for eggs in carrot cake?

If you need an egg substitute for your carrot cake, there are several options! You can use 1/4 cup of unsweetened applesauce for each egg. Another great option is to mix one tablespoon of flaxseed meal with three tablespoons of water. Let it sit for a few minutes until it thickens, and then use it as you would an egg. These substitutes will help keep your cake moist and delicious while making it suitable for those with egg allergies or dietary restrictions.

Conclusion on Carrot Cake with Cream Cheese Frosting Recipe

In conclusion, carrot cake with cream cheese frosting is a delightful dessert that brings together the natural sweetness of carrots and the rich, tangy flavor of cream cheese. This recipe not only offers a delicious treat but also allows for creativity and customization. Whether you choose to add nuts, fruits, or even make it gluten-free or vegan, the possibilities are endless!

As you embark on your baking journey, remember the importance of using fresh ingredients and following the steps carefully. With a little patience and practice, you can create a moist and flavorful cake that will impress your family and friends. The warm spices and creamy frosting make this cake perfect for any occasion, from birthdays to casual gatherings.

So, gather your ingredients, preheat your oven, and get ready to enjoy the wonderful aroma of baking carrot cake. Once it’s ready, slice it up, serve it with your favorite beverage, and watch as everyone savors each bite. Happy baking, and may your carrot cake with cream cheese frosting become a cherished recipe in your home!

Paul

Carrot Cake with Cream Cheese Frosting is a must-try!

Jack’s Carrot Cake is a rich and flavorful dessert packed with juicy raisins, grated carrots, pineapple, coconut, and walnuts—layered with tangy cream cheese frosting. Moist, nostalgic, and full of comforting textures, it’s the ultimate showstopper for spring holidays, birthdays, or cozy weekend baking.
Prep Time 30 minutes
Cook Time 40 minutes
Total Time 1 hour 10 minutes
Servings: 12 servings
Course: Dessert
Cuisine: American

Ingredients
  

  • For the Cake1 cup raisins2 tablespoons dark rumButter and flour for preparing pans2 cups all-purpose flour1½ teaspoons baking powder1½ teaspoons baking soda½ teaspoon salt1½ teaspoons ground cinnamon2 cups granulated sugar¼ cup vegetable oil3 whole eggs1 cup unsweetened applesauce1½ teaspoons vanilla extract2 cups grated carrots1 cup crushed pineapple with juice1 cup sweetened shredded coconut plus 2 tablespoons for garnish1 cup chopped walnuts, plus 2 tablespoons for garnish
  • For the Cream Cheese Frosting1 cup unsalted butter softened2 packages cream cheese, 8 oz each, softened2 teaspoons vanilla extract2 pounds powdered sugar

Method
 

  1. Microwave raisins and dark rum for 1 minute, then set aside to soak.Butter and flour two 9-inch round cake pans and line the bottoms with parchment paper.Preheat oven to 350°F (175°C).In a medium bowl, whisk together flour, baking powder, baking soda, salt, and cinnamon.In a stand mixer, cream sugar and vegetable oil on medium speed for 1 minute.Add eggs one at a time, mixing well after each. Add applesauce and vanilla, then mix and scrape down the sides of the bowl.Gradually add dry ingredients to the wet mixture on low speed until just combined.Stir in grated carrots, crushed pineapple (with juice), and shredded coconut.Fold in soaked raisins and chopped walnuts by hand.Divide the batter evenly between the prepared pans.Bake for 35–40 minutes or until a toothpick inserted in the center comes out clean.Cool in pans for 10 minutes, then transfer cakes to wire racks and remove parchment while still warm.To make the frosting, beat softened butter and cream cheese in a large bowl until smooth.Add vanilla, then gradually beat in powdered sugar until frosting is light and creamy.Level the cakes if necessary. Place the first cake layer on a serving plate with a small dab of frosting underneath to keep it steady.Spread a 1/4-inch layer of frosting on top. Add the second cake layer and frost the top and sides.Use a star tip and pastry bag to pipe decorative borders. Sprinkle the remaining coconut and walnuts over the top.Serve immediately or refrigerate until ready to enjoy.

Notes

Soaking the raisins in rum boosts flavor—orange juice works as an alcohol-free substitute.
Make ahead by baking the cake layers one day early and refrigerating them tightly wrapped.
You can freeze unfrosted cake layers for up to one month. Thaw before frosting.
Use a serrated knife or cake leveler for clean layers if they dome slightly during baking.

Grilled Chicken Avocado Strawberry Salad is a must-try!

Are you looking for a fresh and delicious meal that’s both healthy and satisfying? Look no further than the Grilled Chicken Avocado Strawberry Salad! This vibrant dish combines the juicy flavors of grilled chicken with the sweetness of strawberries and the creaminess of avocado. It’s perfect for a light lunch or a hearty dinner.

Not only is this salad visually appealing, but it also packs a nutritional punch. With lean protein from the chicken, healthy fats from the avocado, and a variety of vitamins from the mixed greens and fruits, you’ll feel energized and full after enjoying this meal. Plus, it’s easy to prepare, making it a great option for busy weeknights or weekend gatherings.

In this article, we’ll guide you through the ingredients, preparation steps, and even some variations to keep your taste buds excited. Whether you’re a seasoned chef or a kitchen novice, you’ll find this recipe simple and enjoyable. So, let’s dive into the world of flavors and textures that make the Grilled Chicken Avocado Strawberry Salad a must-try!

Ingredients for Grilled Chicken Avocado Strawberry Salad

To create the delightful Grilled Chicken Avocado Strawberry Salad, you’ll need a selection of fresh and wholesome ingredients. Here’s what you’ll need:

  • 2 boneless, skinless chicken breasts (about 1 pound)
  • 1 teaspoon olive oil
  • Salt and pepper to taste
  • 6 cups mixed salad greens (such as spinach, arugula, and romaine)
  • 1 cup strawberries, hulled and sliced
  • 1 avocado, diced
  • 1/4 cup red onion, thinly sliced
  • 1/4 cup feta cheese, crumbled
  • 1/4 cup walnuts or pecans, chopped (optional)
  • 1/4 cup balsamic vinaigrette dressing

These ingredients come together to create a colorful and nutritious salad. The chicken provides lean protein, while the strawberries and avocado add a burst of flavor and healthy fats. The feta cheese gives a creamy texture, and the nuts add a delightful crunch. Feel free to adjust the quantities based on your preferences or dietary needs!

Now that you have your ingredients ready, let’s move on to the preparation steps to bring this delicious salad to life!

Preparation of Grilled Chicken Avocado Strawberry Salad

Now that you have gathered all your ingredients, it’s time to prepare the Grilled Chicken Avocado Strawberry Salad. This process is straightforward and will have you enjoying your meal in no time. Let’s break it down into easy steps!

Step 1: Preparing the Chicken

First, take the boneless, skinless chicken breasts and place them on a clean cutting board. Drizzle 1 teaspoon of olive oil over the chicken. This will help keep the chicken moist while grilling. Next, season both sides with salt and pepper to taste. Make sure to rub the seasoning into the meat for better flavor. Once seasoned, set the chicken aside while you prepare the grill.

Step 2: Grilling the Chicken

Preheat your grill to medium-high heat. This is important for achieving that perfect grilled flavor. Once the grill is hot, place the chicken breasts on it. Grill each side for about 6-7 minutes. You’ll know the chicken is done when it reaches an internal temperature of 165°F. After grilling, remove the chicken from the grill and let it rest for 5 minutes. This resting period allows the juices to redistribute, making the chicken tender and juicy. After resting, slice the chicken into strips.

Step 3: Preparing the Salad Ingredients

While the chicken is grilling, you can prepare the salad ingredients. In a large bowl, combine 6 cups of mixed salad greens. You can use a mix of spinach, arugula, and romaine for a variety of textures and flavors. Next, add 1 cup of hulled and sliced strawberries, 1 diced avocado, and 1/4 cup of thinly sliced red onion. These ingredients will add freshness and color to your salad. Toss them gently to mix everything together.

Step 4: Assembling the Grilled Chicken Avocado Strawberry Salad

Now it’s time to bring everything together! Start by placing the sliced grilled chicken on top of the salad mixture. Then, sprinkle 1/4 cup of crumbled feta cheese over the salad for a creamy touch. If you like a bit of crunch, add 1/4 cup of chopped walnuts or pecans. Finally, drizzle 1/4 cup of balsamic vinaigrette dressing over the salad. Toss everything gently to combine, ensuring that the dressing coats all the ingredients evenly. Your Grilled Chicken Avocado Strawberry Salad is now ready to serve!

Variation of Grilled Chicken Avocado Strawberry Salad

While the Grilled Chicken Avocado Strawberry Salad is delicious as is, there are many ways to customize it to suit your taste or dietary needs. Let’s explore some alternative proteins and seasonal fruit options that can elevate this salad even further!

Alternative Proteins

If you’re looking to switch things up, consider using different proteins in your salad. Here are a few tasty alternatives:

  • Grilled Shrimp: Shrimp cooks quickly and adds a delightful seafood flavor. Just season and grill them for a few minutes until they turn pink.
  • Tofu: For a vegetarian option, marinate and grill tofu. It absorbs flavors well and provides a good source of protein.
  • Steak: Grilled steak can add a rich, hearty flavor. Slice it thinly and place it on top of your salad for a satisfying meal.
  • Chickpeas: Roasted chickpeas are a great plant-based protein. They add crunch and are packed with nutrients.

These alternatives not only change the flavor profile but also cater to different dietary preferences. Feel free to experiment and find your favorite combination!

Seasonal Fruit Options

Fruits can bring a burst of freshness to your salad. Depending on the season, you can swap strawberries for other fruits. Here are some delicious options:

  • Blueberries: These tiny berries are sweet and juicy, making them a perfect addition to your salad.
  • Peaches: Sliced peaches add a lovely sweetness and a hint of summer. Grill them for an extra smoky flavor!
  • Mango: Diced mango brings a tropical twist. Its sweetness pairs wonderfully with the creamy avocado.
  • Apples: Crisp apple slices can add a nice crunch and a hint of tartness to balance the flavors.

By incorporating seasonal fruits, you can keep your Grilled Chicken Avocado Strawberry Salad exciting and fresh all year round. Enjoy experimenting with these variations to create your perfect salad!

Cooking Note for Grilled Chicken Avocado Strawberry Salad

When preparing the Grilled Chicken Avocado Strawberry Salad, a few cooking notes can help ensure your dish turns out perfectly every time. These tips will enhance the flavors and textures, making your salad even more enjoyable.

First, always use fresh ingredients. Fresh salad greens, ripe avocados, and juicy strawberries will elevate the taste of your salad. If possible, buy organic produce to avoid pesticides and enjoy the best flavors.

Next, consider marinating the chicken before grilling. A simple marinade of olive oil, lemon juice, garlic, and herbs can add depth to the chicken’s flavor. Allow the chicken to marinate for at least 30 minutes, or even overnight, for the best results.

When grilling, ensure your grill is preheated properly. A hot grill will create beautiful grill marks and seal in the juices of the chicken. If you’re using a grill pan, make sure it’s hot enough to achieve a nice sear.

Additionally, let the grilled chicken rest after cooking. This step is crucial as it allows the juices to redistribute throughout the meat, resulting in a tender and juicy chicken. Cutting into the chicken too soon can lead to dryness.

Lastly, when assembling your salad, toss the ingredients gently. This helps to keep the salad greens crisp and prevents them from wilting. Drizzle the dressing just before serving to maintain the freshness of the salad.

By following these cooking notes, you’ll create a delightful Grilled Chicken Avocado Strawberry Salad that’s bursting with flavor and texture. Enjoy your culinary adventure!

Serving Suggestions for Grilled Chicken Avocado Strawberry Salad

Once you’ve prepared your Grilled Chicken Avocado Strawberry Salad, it’s time to think about how to serve it. This salad is not only delicious but also visually appealing, making it a great centerpiece for any meal. Here are some serving suggestions to enhance your dining experience:

  • Chilled Plates: For an extra touch, chill your serving plates in the refrigerator before plating the salad. This keeps the salad cool and refreshing, especially on warm days.
  • Garnish with Fresh Herbs: Adding a sprinkle of fresh herbs like basil or mint can elevate the flavor. These herbs add a pop of color and a burst of freshness.
  • Pair with a Light Beverage: Serve your salad with a light beverage, such as iced tea or sparkling water. A refreshing drink complements the salad’s flavors beautifully.
  • Serve as a Main Course: This salad is hearty enough to be a main dish. Pair it with a slice of whole-grain bread or a side of quinoa for a complete meal.
  • Family Style: For gatherings, consider serving the salad family-style. Place the salad in a large bowl at the center of the table, allowing everyone to help themselves. This creates a warm and inviting atmosphere.
  • Use Mason Jars: For a fun twist, layer the salad ingredients in mason jars. This makes for a great grab-and-go option for lunches or picnics. Just remember to keep the dressing separate until you’re ready to eat!

These serving suggestions will not only enhance the presentation of your Grilled Chicken Avocado Strawberry Salad but also make your meal more enjoyable. Whether you’re hosting a dinner party or enjoying a quiet meal at home, these ideas will help you serve this delightful salad in style!

Tips for Perfecting Your Grilled Chicken Avocado Strawberry Salad

Creating the perfect Grilled Chicken Avocado Strawberry Salad is all about attention to detail. With a few simple tips, you can elevate your salad to a whole new level. Here are some helpful suggestions to ensure your dish is bursting with flavor and freshness!

First, always choose ripe avocados. A perfectly ripe avocado will be creamy and add a rich texture to your salad. To check for ripeness, gently squeeze the avocado. If it yields slightly, it’s ready to use. If it feels hard, let it sit at room temperature for a few days until it softens.

Next, consider the quality of your balsamic vinaigrette. A high-quality dressing can make a significant difference in flavor. If you have time, try making your own dressing with balsamic vinegar, olive oil, honey, and a pinch of salt. This homemade version will enhance the overall taste of your salad.

Don’t forget about seasoning! While you may season the chicken, it’s also essential to season the salad greens. A light sprinkle of salt and pepper on the greens before adding the other ingredients can enhance their flavor. Just be careful not to overdo it!

Another tip is to add texture. Incorporating a variety of ingredients can make your salad more interesting. Consider adding crunchy vegetables like cucumbers or bell peppers. You can also include seeds like sunflower or pumpkin seeds for an extra crunch.

Lastly, serve your salad immediately after assembling it. This ensures that the greens remain crisp and fresh. If you need to prepare it in advance, keep the dressing separate until you’re ready to serve. This will prevent the salad from becoming soggy.

By following these tips, you’ll create a Grilled Chicken Avocado Strawberry Salad that’s not only delicious but also visually stunning. Enjoy the process of making this delightful dish, and don’t hesitate to experiment with flavors and textures!

Breakdown of Time for Grilled Chicken Avocado Strawberry Salad

Understanding the time needed to prepare the Grilled Chicken Avocado Strawberry Salad can help you plan your meal better. Here’s a simple breakdown of the time required for each step, so you can enjoy this delicious dish without any rush!

Prep Time

The prep time for this salad is approximately 15-20 minutes. During this time, you will gather all your ingredients, wash the salad greens, slice the strawberries, dice the avocado, and prepare the chicken. Having everything ready before you start cooking makes the process smoother and more enjoyable.

Cooking Time

Cooking the chicken takes about 12-15 minutes. This includes grilling the chicken for 6-7 minutes on each side. It’s essential to check the internal temperature to ensure it reaches 165°F. While the chicken is grilling, you can prepare the salad ingredients, making the most of your time.

Total Time

In total, you can expect to spend around 30-35 minutes from start to finish. This includes both prep and cooking time. With this quick and easy timeline, you can have a fresh and flavorful Grilled Chicken Avocado Strawberry Salad ready to serve in no time!

Nutritional Information for Grilled Chicken Avocado Strawberry Salad

Understanding the nutritional content of your meals is essential for maintaining a balanced diet. The Grilled Chicken Avocado Strawberry Salad is not only delicious but also packed with nutrients. Let’s break down the key nutritional components of this vibrant salad.

Calories

Each serving of the Grilled Chicken Avocado Strawberry Salad contains approximately 350 calories. This makes it a great option for those looking to enjoy a satisfying meal without consuming too many calories. The combination of lean protein, healthy fats, and fresh vegetables ensures that you’re getting a nutritious meal that keeps you energized throughout the day.

Protein

Protein is vital for building and repairing tissues in our bodies. This salad provides about 30 grams of protein per serving, primarily from the grilled chicken. Including protein in your meals can help you feel fuller for longer, making it easier to manage your appetite. The addition of feta cheese also contributes a small amount of protein, enhancing the overall nutritional value of the dish.

Sodium

When it comes to sodium, each serving of the Grilled Chicken Avocado Strawberry Salad contains around 600 milligrams. While sodium is necessary for various bodily functions, it’s important to monitor your intake. If you’re watching your sodium levels, consider using low-sodium feta cheese or making your own balsamic vinaigrette to control the amount of salt in your salad.

Overall, the Grilled Chicken Avocado Strawberry Salad is a well-rounded meal that offers a good balance of calories, protein, and essential nutrients. Enjoying this salad regularly can contribute to a healthy lifestyle while satisfying your taste buds!

FAQs about Grilled Chicken Avocado Strawberry Salad

Can I make Grilled Chicken Avocado Strawberry Salad ahead of time?

Yes, you can prepare parts of the Grilled Chicken Avocado Strawberry Salad ahead of time! You can grill the chicken and store it in the refrigerator for up to three days. Additionally, you can wash and chop the salad greens, strawberries, and red onion in advance. However, it’s best to wait to add the avocado and dressing until just before serving. This keeps the avocado fresh and prevents the salad from becoming soggy.

What can I substitute for avocado in the salad?

If you’re not a fan of avocado or need a substitute, there are several options! You can use diced mango for a sweet twist or add creamy goat cheese for a similar texture. Another option is to include sliced cucumbers or even roasted sweet potatoes for a different flavor profile. These alternatives will still provide a delicious and satisfying salad experience!

Is Grilled Chicken Avocado Strawberry Salad suitable for meal prep?

Absolutely! The Grilled Chicken Avocado Strawberry Salad is perfect for meal prep. You can prepare the chicken and salad ingredients in advance and store them in separate containers. Just remember to keep the dressing separate until you’re ready to eat. This way, your salad will stay fresh and crisp. It’s a great option for healthy lunches throughout the week!

How can I make Grilled Chicken Avocado Strawberry Salad vegan?

To make the Grilled Chicken Avocado Strawberry Salad vegan, simply replace the chicken with grilled tofu or chickpeas for protein. You can also use a plant-based feta cheese or omit the cheese altogether. For the dressing, ensure that your balsamic vinaigrette is vegan-friendly or make your own using olive oil, balsamic vinegar, and a touch of maple syrup. This way, you can enjoy a delicious and satisfying vegan salad!

Conclusion on Grilled Chicken Avocado Strawberry Salad

In conclusion, the Grilled Chicken Avocado Strawberry Salad is a delightful dish that brings together a medley of flavors and textures. This salad is not only visually appealing but also packed with nutrients, making it a fantastic choice for anyone looking to enjoy a healthy meal. With its combination of lean protein, healthy fats, and fresh produce, it’s a well-rounded option for lunch or dinner.

Whether you’re preparing it for a family gathering, a picnic, or just a quick weeknight meal, this salad is sure to impress. The versatility of the ingredients allows you to customize it to your liking, whether you choose to add different proteins or seasonal fruits. Plus, with the tips and variations provided, you can easily adapt the recipe to suit your taste preferences or dietary needs.

As you embark on your culinary journey with the Grilled Chicken Avocado Strawberry Salad, remember to enjoy the process. Cooking should be a fun and creative experience! So, gather your ingredients, follow the steps, and savor the delicious flavors that come together in this vibrant salad. Your taste buds will thank you!

So, why wait? Grab your ingredients and start making your own Grilled Chicken Avocado Strawberry Salad today. It’s a meal that’s not only good for you but also brings joy to your dining table. Happy cooking!

Paul

Grilled Chicken Avocado Strawberry Salad is a must-try!

Fresh, juicy, and vibrant—this Grilled Chicken Strawberry Avocado Salad is summer in a bowl. Packed with tender grilled chicken, sweet strawberries, creamy avocado, crunchy pecans, and crumbled cheese, all tossed with a homemade strawberry balsamic vinaigrette, it’s a perfect balance of flavor and texture in every bite.
Prep Time 15 minutes
Cook Time 12 minutes
Total Time 27 minutes
Servings: 4 servings
Course: Salad
Cuisine: American

Ingredients
  

  • For the Salad8 cups baby spinach1 cup fresh strawberries sliced1 medium avocado, sliced1/2 cup crumbled feta or goat cheese1/4 cup chopped pecans
  • For the Grilled Chicken1 pound boneless skinless chicken breasts2 tablespoons balsamic vinegar2 tablespoons olive oil1/4 teaspoon salt1/4 teaspoon black pepper
  • For the Strawberry Balsamic Vinaigrette1 cup fresh strawberries hulled1/2 cup olive oil1/4 cup balsamic vinegar1 teaspoon Dijon mustard1 tablespoon honeyPinch of salt

Method
 

  1. In a resealable bag or bowl, combine chicken with olive oil, balsamic vinegar, salt, and pepper. Marinate for 10 minutes, flipping occasionally.Preheat grill to medium-high heat. Grill chicken for 5 to 6 minutes per side until cooked through. Remove from grill and slice thinly.To make the dressing, blend strawberries, olive oil, balsamic vinegar, Dijon mustard, honey, and salt until smooth.Divide spinach, strawberries, avocado slices, crumbled cheese, and pecans among four salad bowls or plates.Top each salad with sliced grilled chicken. Drizzle with about a quarter of the strawberry vinaigrette and toss gently to combine.Serve immediately, with extra dressing on the side if desired.

Notes

Use goat cheese for a tangier contrast, or feta for a saltier flavor.
To make it nut-free, skip the pecans or substitute with sunflower seeds.
This salad is also delicious with grilled shrimp or salmon as a protein swap.
Store extra dressing in the fridge for up to 1 week—shake before using.

Creamy Chicken Corn Soup is a comforting delight.

What Makes This Soup Special?

Creamy Chicken Corn Soup Recipe stands out for its rich flavors and creamy texture. This delightful soup combines tender chicken, sweet corn, and a medley of vegetables, creating a dish that is both hearty and satisfying. The addition of heavy cream gives it a luxurious feel, making it perfect for chilly evenings or when you need a little pick-me-up.

What truly makes this soup special is its versatility. You can easily customize it to suit your taste. Whether you prefer a bit of spice or want to add more veggies, this recipe allows for creativity. Plus, it’s a fantastic way to use up leftover chicken, making it a practical choice for busy weeknights.

The Comfort of Homemade Soup

Creamy Chicken Corn Soup Recipe not only warms your body but also your soul. Each spoonful is packed with nutrients and love, reminding us of family gatherings and cozy nights in.

Making soup from scratch allows you to control the ingredients, ensuring that you’re serving your loved ones a wholesome meal. It’s a wonderful way to bond with family, as everyone can pitch in to help chop vegetables or stir the pot. So, gather your loved ones, and let’s dive into this delicious recipe that promises to bring joy to your table!

Ingredients for Creamy Chicken Corn Soup Recipe

Creamy Chicken Corn Soup Recipe, you’ll need a variety of fresh ingredients. Each component plays a vital role in building the rich flavors and creamy texture that make this soup so special. Here’s what you’ll need:

  • 2 tablespoons olive oil
  • 1 medium onion, diced
  • 2 cloves garlic, minced
  • 1 medium red bell pepper, diced
  • 2 medium carrots, diced
  • 2 stalks celery, diced
  • 4 cups chicken broth
  • 2 cups cooked chicken, shredded
  • 2 cups corn kernels (fresh, frozen, or canned)
  • 1 cup heavy cream
  • 1 teaspoon dried thyme
  • 1 teaspoon paprika
  • Salt and pepper to taste
  • 2 tablespoons fresh parsley, chopped (for garnish)

These ingredients come together to create a comforting bowl of soup that is perfect for any occasion. The olive oil adds a nice richness, while the vegetables provide essential nutrients and flavor. The chicken broth serves as the base, making the soup hearty and filling. With the addition of shredded chicken and corn, you’ll have a delightful mix of textures. Finally, the heavy cream brings everything together, giving the soup its signature creaminess.

Creamy Chicken Corn Soup Recipe not only delicious but also adaptable to your dietary needs!

Step-by-Step Preparation of Creamy Chicken Corn Soup Recipe

Step 1: Gather Your Ingredients

Creamy Chicken Corn Soup Recipe without any interruptions.

Step 2: Prepare the Chicken

If you’re using leftover chicken, shred it into bite-sized pieces. If you need to cook chicken, you can boil or roast it beforehand. Once cooked, let it cool slightly before shredding. This step is crucial as the chicken adds protein and flavor to your soup. Remember, the more tender the chicken, the better your soup will taste!

Step 3: Sauté the Vegetables

Creamy Chicken Corn Soup Recipe.

Step 4: Combine Ingredients

Once your vegetables are tender, it’s time to pour in the chicken broth. Bring the mixture to a boil, then add the shredded chicken and corn. Stir in the heavy cream, dried thyme, paprika, salt, and pepper. This combination of ingredients creates a rich and creamy base for your soup. Make sure to mix everything well to ensure even distribution of flavors.

Step 5: Simmer the Soup

After combining all the ingredients, reduce the heat and let the soup simmer for 15-20 minutes. Stir occasionally to prevent sticking. This simmering time allows the flavors to meld together beautifully. It’s also a great time to enjoy the delicious aroma filling your kitchen!

Step 6: Blend for Creaminess

Creamy Chicken Corn Soup Recipe. Blend until you reach your desired consistency, then return the blended soup to the pot. If you like a chunkier soup, feel free to skip this step!

Step 7: Final Touches

Creamy Chicken Corn Soup Recipe!

Variations of Creamy Chicken Corn Soup Recipe

Adding Different Vegetables

Creamy Chicken Corn Soup Recipe is its flexibility. You can easily add different vegetables to enhance the flavor and nutrition. For instance, consider adding diced potatoes for extra heartiness. Spinach or kale can also be great additions, providing a pop of color and nutrients. If you enjoy a bit of crunch, try adding zucchini or green beans. These vegetables not only add texture but also make the soup more vibrant.

Another option is to include peas or mushrooms. Peas add a sweet burst, while mushrooms bring an earthy flavor. Feel free to experiment with seasonal vegetables, too. This way, you can enjoy a fresh and unique soup every time you make it. Just remember to adjust the cooking time slightly if you add vegetables that require longer cooking, ensuring everything is tender and delicious!

Spicy Twist on Creamy Chicken Corn Soup Recipe

Creamy Chicken Corn Soup Recipe a kick? Adding a bit of heat can elevate the dish and make it even more exciting. Start by incorporating diced jalapeños or serrano peppers when sautéing the vegetables. This will infuse the soup with a warm, spicy flavor right from the beginning.

Creamy Chicken Corn Soup Recipe a hit among those who enjoy a little heat!

Cooking Note for Creamy Chicken Corn Soup Recipe

Creamy Chicken Corn Soup Recipe, there are a few cooking notes to keep in mind to ensure the best results. First, always use fresh ingredients whenever possible. Fresh vegetables and chicken will enhance the flavor and texture of your soup. If you opt for frozen corn, make sure to thaw it before adding it to the pot for even cooking.

Another important tip is to control the heat while cooking. When sautéing the vegetables, medium heat is ideal. This allows them to soften without burning. If the heat is too high, the garlic can easily become bitter, affecting the overall taste of your soup.

As you simmer the soup, keep an eye on the consistency. If it becomes too thick, you can add a little more chicken broth or water to reach your desired texture. Conversely, if you prefer a thicker soup, let it simmer a bit longer to reduce the liquid.

Creamy Chicken Corn Soup Recipe so special. Enjoy the process, and remember that good things take time!

Serving Suggestions for Creamy Chicken Corn Soup Recipe

Best Accompaniments

Creamy Chicken Corn Soup Recipe, the right accompaniments can elevate the meal. A warm, crusty bread is a classic choice. It’s perfect for dipping and soaking up the delicious soup. Consider serving a fresh baguette or homemade garlic bread for a delightful pairing.

Another great option is a simple side salad. A light green salad with mixed greens, cherry tomatoes, and a tangy vinaigrette can balance the richness of the soup. You might also enjoy a side of roasted vegetables, which add a nice contrast in texture and flavor.

If you want to add a bit of crunch, try serving tortilla chips or crackers alongside the soup. They provide a fun texture and can be enjoyed as a snack while you savor your meal. For a heartier option, grilled cheese sandwiches are always a hit, especially with kids. The gooey cheese complements the creamy soup perfectly!

Presentation Tips

Creamy Chicken Corn Soup Recipe. Start by choosing beautiful bowls that enhance the soup’s colors. A white or light-colored bowl can make the vibrant yellow of the corn and the green parsley pop.

When ladling the soup, be generous but avoid overfilling the bowls. Leave a little space at the top for garnishes. Speaking of garnishes, sprinkle fresh parsley on top just before serving. This adds a lovely touch of color and freshness.

For an extra special presentation, consider drizzling a bit of heavy cream or olive oil on top of the soup. This creates a beautiful swirl effect that looks appealing. You can also add a few whole corn kernels or a sprinkle of paprika for added visual interest.

Creamy Chicken Corn Soup Recipe!

Tips for Perfecting Your Creamy Chicken Corn Soup Recipe

Storage Tips

Creamy Chicken Corn Soup Recipe properly is essential for maintaining its delicious flavor and texture. After cooking, allow the soup to cool to room temperature. Once cooled, transfer it to an airtight container. This helps keep the soup fresh and prevents any unwanted odors from affecting its taste.

For best results, store the soup in the refrigerator if you plan to eat it within a few days. It can last up to 3-4 days in the fridge. If you want to keep it longer, consider freezing it. Pour the cooled soup into freezer-safe containers, leaving some space at the top for expansion. The soup can be frozen for up to 3 months. Just remember to label the containers with the date for easy tracking!

When you’re ready to enjoy your soup again, simply thaw it in the refrigerator overnight before reheating. This ensures even heating and helps maintain the soup’s creamy texture.

Reheating Instructions

Creamy Chicken Corn Soup Recipe is a breeze! If you’ve stored it in the refrigerator, pour the desired amount into a pot. Heat it over medium-low heat, stirring occasionally. This gentle heating helps prevent the cream from curdling and keeps the soup smooth.

If you’re reheating from frozen, it’s best to thaw the soup in the refrigerator overnight. Once thawed, follow the same reheating instructions. If the soup seems too thick after reheating, you can add a splash of chicken broth or water to reach your desired consistency.

For a quick option, you can also use the microwave. Place the soup in a microwave-safe bowl, cover it loosely, and heat in 1-minute intervals, stirring in between. This method is fast and convenient, perfect for busy days!

Creamy Chicken Corn Soup Recipe multiple times without losing any of its delightful flavors. So go ahead, make a big batch, and savor the comfort of this delicious soup whenever you like!

Breakdown of Time for Creamy Chicken Corn Soup Recipe

Prep Time

Creamy Chicken Corn Soup Recipe is quick and easy! The prep time typically takes about 15-20 minutes. This includes gathering your ingredients, dicing the vegetables, and shredding the chicken if it’s not already cooked. Having everything ready before you start cooking will make the process smoother and more enjoyable.

Cooking Time

Creamy Chicken Corn Soup Recipe so special.

Total Time

Creamy Chicken Corn Soup that’s sure to please everyone at the table!

Nutritional Information for Creamy Chicken Corn Soup Recipe

Calories

Creamy Chicken Corn Soup contains approximately 320 calories. This makes it a satisfying option without being overly heavy. The balance of ingredients ensures that you get a fulfilling meal while keeping your calorie intake in check.

Protein

Creamy Chicken Corn Soup Recipe provides about 25 grams of protein. The shredded chicken is the primary source of protein, making this soup a great choice for those looking to boost their protein intake. It’s perfect for a post-workout meal or a nutritious lunch that keeps you energized throughout the day.

Sodium

Creamy Chicken Corn Soup contains around 800 milligrams of sodium. This amount can vary based on the chicken broth used and any additional salt added during cooking. If you’re watching your sodium levels, consider using low-sodium chicken broth. This simple swap can help you enjoy the same delicious flavors while keeping your sodium intake lower.

Creamy Chicken Corn Soup Recipe offers a well-rounded nutritional profile. It’s a comforting dish that not only warms your soul but also provides essential nutrients to keep you feeling your best!

FAQs about Creamy Chicken Corn Soup Recipe

Can I use frozen corn in the Creamy Chicken Corn Soup Recipe?

Creamy Chicken Corn Soup Recipe. It’s convenient and saves time. Just make sure to thaw the corn before adding it to the soup. This ensures even cooking and helps maintain the sweet flavor of the corn. Frozen corn is picked at its peak ripeness, so it can be just as tasty as fresh corn!

How can I make the soup healthier?

Creamy Chicken Corn Soup Recipe healthier. First, consider substituting half of the heavy cream with low-fat milk or a plant-based milk alternative. This reduces the fat content while still keeping the soup creamy. You can also add more vegetables, like spinach or zucchini, to boost the nutritional value. Using low-sodium chicken broth is another smart choice to lower sodium levels without sacrificing flavor.

Can I substitute the chicken with another protein?

Creamy Chicken Corn Soup Recipe with other proteins. For a vegetarian option, try using chickpeas or tofu. Both options provide protein and will absorb the flavors of the soup beautifully. If you prefer seafood, shrimp or crab can also be delicious alternatives. Just remember to adjust the cooking time accordingly to ensure everything is cooked perfectly!

How long can I store the Creamy Chicken Corn Soup?

Creamy Chicken Corn Soup Recipe can be stored in the refrigerator for up to 3-4 days. Make sure to keep it in an airtight container to maintain freshness. If you want to keep it longer, consider freezing it. The soup can be frozen for up to 3 months. Just remember to thaw it in the refrigerator overnight before reheating for the best results!

Conclusion on Creamy Chicken Corn Soup Recipe

Creamy Chicken Corn Soup Recipe is a delightful dish that brings warmth and comfort to any table. With its rich flavors and creamy texture, it’s perfect for family dinners or cozy nights in. This recipe not only satisfies your taste buds but also provides a nutritious meal packed with protein and essential vitamins.

Whether you stick to the classic version or explore the various variations, this soup is sure to become a favorite in your household. The flexibility of the ingredients allows you to customize it to your liking, making it a versatile option for any occasion. Plus, the ease of preparation means you can whip it up even on the busiest of days!

Creamy Chicken Corn Soup Recipe, you’re not just serving a meal; you’re sharing a warm hug in a bowl. Happy cooking!

Paul

Creamy Chicken Corn Soup is a comforting delight.

This cozy Chicken Corn Soup is a creamy, comforting bowl of goodness featuring tender chicken thighs, sweet corn, egg noodles, and savory herbs. Finished with a splash of cream and crispy bacon, it’s a hearty dish perfect for chilly nights or soothing weeknight meals.
Prep Time 20 minutes
Cook Time 45 minutes
Total Time 1 hour 5 minutes
Servings: 6 servings
Course: Soup
Cuisine: American

Ingredients
  

  • 1 tablespoon olive oil2 pounds chicken thighs bone-in, skin-on, skins removed and excess fat trimmedSalt and black pepper, to taste1¾ cups chopped yellow onion (about 1 large)1½ cups chopped carrots (about 4 medium)1 cup chopped celery (about 3 ribs)1 tablespoon minced garlic (about 3 cloves)7.5 cups chicken broth (4 cans, 14.5 oz each)3 ears fresh corn, kernels removed (about 3 cups)2 bay leaves1 tablespoon chopped fresh thyme or 1 teaspoon dried thyme2 heaping cups old-fashioned egg noodles (about 4.5 oz)½ cup heavy cream¼ cup chopped fresh parsley6 slices bacon, cooked and chopped

Method
 

  1. Heat olive oil in a large pot over medium-high heat.Pat chicken thighs dry, season with salt and pepper, and sear in the pot for 4–5 minutes per side until browned. Transfer to a plate.In the same pot, sauté onion, carrots, and celery for about 3 minutes. Add garlic and cook for another 30 seconds.Pour in chicken broth and add the chicken back to the pot along with corn cobs (for extra flavor), bay leaves, and thyme. Season with salt and pepper to taste. Bring to a simmer.Reduce heat to low, cover, and simmer for 15–20 minutes. Discard corn cobs. Remove chicken and let it rest for 5–10 minutes before shredding.Add corn kernels and egg noodles to the soup. Cover and simmer until noodles are tender, about 14–20 minutes.Return shredded chicken to the pot and stir in heavy cream and parsley. Adjust seasoning as needed. Remove bay leaves.Serve hot, topped with crispy bacon pieces.

Notes

Use bone-in thighs for extra flavor, but boneless thighs or chicken breast can also work.
Fresh corn off the cob is best, but frozen can be substituted in the off-season.
For a lighter soup, replace heavy cream with whole milk or omit altogether.
Leftovers store well and can be refrigerated for up to 4 days.

Stuffed Baby Peppers with Beef and Rice Recipe delights all!

Stuffed Baby Peppers with Beef and Rice Recipe is a fantastic choice. These colorful little peppers are not only visually appealing but also packed with flavor. They make for a perfect weeknight dinner or a fun dish for gatherings.

Stuffed baby peppers are versatile and can be customized to suit your taste. The combination of ground beef, rice, and spices creates a hearty filling that pairs wonderfully with the sweetness of the peppers. Plus, they are easy to prepare, making them a great option for both novice cooks and seasoned chefs.

In this recipe, we will guide you through each step, ensuring that you achieve perfectly stuffed peppers every time. Whether you’re serving them as a main dish or a side, these stuffed peppers are sure to impress. So, roll up your sleeves and get ready to enjoy a delightful culinary experience!

Ingredients for Stuffed Baby Peppers with Beef and Rice Recipe

Stuffed Baby Peppers with Beef and Rice Recipe, you will need a few simple ingredients. Each component plays a vital role in building flavor and texture. Here’s what you’ll need:

  • 1 pound ground beef
  • 1 cup cooked rice
  • 1 teaspoon garlic powder
  • 1 teaspoon onion powder
  • 1 teaspoon paprika
  • 1 teaspoon salt
  • 1/2 teaspoon black pepper
  • 1/2 cup shredded cheese (cheddar or mozzarella)
  • 12 baby bell peppers (halved and seeds removed)
  • 1 tablespoon olive oil
  • 1/4 cup fresh parsley, chopped (for garnish)

These ingredients are not only easy to find but also affordable. The ground beef provides a rich flavor, while the rice adds a satisfying texture. The spices, including garlic powder and paprika, enhance the overall taste, making each bite delightful. The cheese on top melts beautifully, creating a deliciously gooey finish.

Feel free to get creative! You can adjust the spices to your liking or even add some heat with diced jalapeños. This recipe is all about making it your own while enjoying the classic flavors of stuffed peppers.

Step-by-Step Preparation of Stuffed Baby Peppers with Beef and Rice Recipe

Stuffed Baby Peppers with Beef and Rice Recipe. This step-by-step guide will help you create a delicious dish that is sure to impress. Let’s get started!

Step 1: Preparing the Baby Peppers

First, you need to prepare the baby peppers. Start by washing them under cold water to remove any dirt. Then, carefully slice each pepper in half lengthwise. Use a small spoon to scoop out the seeds and membranes inside. This step is crucial as it allows the flavors to penetrate the peppers while they cook. Once they are halved and cleaned, set them aside on a plate. They should be ready to be stuffed!

Step 2: Cooking the Beef and Rice Mixture

Next, it’s time to cook the beef and rice mixture. In a large bowl, combine the ground beef, cooked rice, garlic powder, onion powder, paprika, salt, and black pepper. Mix everything together until well combined. You can use your hands or a spoon for this. The mixture should be evenly seasoned, ensuring that every bite is flavorful. If you want to add a little kick, consider mixing in some diced jalapeños at this stage!

Step 3: Stuffing the Baby Peppers

Now comes the fun part—stuffing the baby peppers! Take each halved pepper and fill it with the beef and rice mixture. Press down gently to pack the filling in, but be careful not to overstuff. You want the filling to stay inside the pepper while it bakes. Once all the peppers are filled, arrange them in a baking dish. This will help them cook evenly and keep them from tipping over.

Step 4: Baking the Stuffed Baby Peppers

Finally, it’s time to bake your stuffed peppers. Drizzle the olive oil over the stuffed peppers for added flavor and moisture. Cover the baking dish with aluminum foil to keep the peppers from drying out. Bake in a preheated oven at 375°F for 25 minutes. After that, remove the foil and sprinkle the remaining shredded cheese on top of the peppers. Bake for an additional 10 minutes, or until the cheese is melted and bubbly. The aroma will fill your kitchen, making it hard to wait!

Stuffed Baby Peppers with Beef and Rice Recipe!

Variation of Stuffed Baby Peppers with Beef and Rice Recipe

Stuffed Baby Peppers with Beef and Rice Recipe is a hit, there are many ways to switch things up! Whether you’re looking for a vegetarian option or want to explore alternative fillings, this section will guide you through some delicious variations. Let’s dive in!

Vegetarian Option for Stuffed Baby Peppers

If you’re seeking a meat-free meal, the vegetarian version of stuffed baby peppers is a fantastic choice. Instead of ground beef, you can use black beans as the base. They provide a hearty texture and are packed with protein. Here’s how to make it:

  • Replace the 1 pound of ground beef with 1 can (15 oz) of black beans, rinsed and drained.
  • Add 1 cup of cooked quinoa or rice for extra texture.
  • Mix in diced vegetables like corn, zucchini, or spinach for added nutrition.
  • Season with the same spices: garlic powder, onion powder, paprika, salt, and black pepper.

This vegetarian option is not only healthy but also bursting with flavor. The sweetness of the baby peppers pairs beautifully with the savory filling. Plus, it’s a great way to sneak in more veggies!

Alternative Fillings for Stuffed Baby Peppers

Feeling adventurous? There are countless alternative fillings you can try for your stuffed baby peppers. Here are a few ideas to inspire your culinary creativity:

  • Ground Turkey or Chicken: For a lighter option, substitute ground beef with ground turkey or chicken. They are leaner and still provide a delicious flavor.
  • Italian Sausage: For a spicy kick, use Italian sausage instead of beef. The herbs and spices in the sausage will add a wonderful depth of flavor.
  • Rice and Cheese: For a simple yet satisfying filling, mix cooked rice with a variety of cheeses. Add herbs like basil or oregano for an Italian twist.
  • Seafood: For a unique take, consider using shrimp or crab meat mixed with cream cheese and spices. This will create a delightful seafood-stuffed pepper.

Stuffed Baby Peppers with Beef and Rice Recipe to suit your taste preferences. Don’t hesitate to experiment and find your favorite combination!

Cooking Note for Stuffed Baby Peppers with Beef and Rice Recipe

Stuffed Baby Peppers with Beef and Rice Recipe, there are a few cooking notes to keep in mind. These tips will help ensure that your stuffed peppers turn out perfectly every time. Let’s explore some essential points to consider!

First, choose ripe and firm baby bell peppers. They should be vibrant in color and free from blemishes. Fresh peppers not only taste better but also hold their shape during cooking. If you can, opt for a mix of colors like red, yellow, and orange. This adds visual appeal to your dish!

Next, make sure to cook the rice beforehand. Using leftover rice is a great time-saver. Just ensure it’s cooled down before mixing it with the beef. This prevents the filling from becoming too mushy. If you’re using freshly cooked rice, let it sit for a few minutes to cool.

When mixing the beef and rice, don’t overwork the mixture. Gently combine the ingredients to keep the filling tender. Overmixing can lead to a dense texture, which is not what you want in your stuffed peppers.

Another important note is to adjust the baking time based on your oven. Every oven is different, and some may cook faster than others. Keep an eye on the peppers as they bake. You want them to be tender but not mushy. The cheese should be melted and slightly golden for the best flavor.

Lastly, let the stuffed peppers rest for a few minutes after baking. This allows the flavors to meld together and makes them easier to serve. Enjoy your delicious creation with family and friends!

Serving Suggestions for Stuffed Baby Peppers with Beef and Rice Recipe

Stuffed Baby Peppers with Beef and Rice Recipe is ready, it’s time to think about how to serve them! These delightful peppers can be enjoyed in various ways, making them a versatile dish for any occasion. Here are some serving suggestions to elevate your meal:

  • As a Main Course: Serve the stuffed peppers as the star of your dinner plate. Pair them with a side salad for a refreshing contrast. A simple green salad with a light vinaigrette complements the rich flavors of the peppers beautifully.
  • With Dipping Sauces: Consider offering a variety of dipping sauces on the side. A tangy marinara or a creamy ranch dressing can add an extra layer of flavor. Guests can dip their peppers for a fun twist!
  • Over a Bed of Greens: For a lighter option, serve the stuffed peppers over a bed of sautéed spinach or mixed greens. This adds a nutritious element and makes for a colorful presentation.
  • With Grains: Pair the stuffed peppers with a side of quinoa, couscous, or even a fluffy pilaf. These grains can soak up any juices from the peppers, enhancing the overall taste.
  • Garnished with Fresh Herbs: Don’t forget to sprinkle some fresh herbs on top before serving! Chopped cilantro, basil, or even a squeeze of lemon can brighten the dish and add a pop of color.

Stuffed Baby Peppers with Beef and Rice Recipe will surely impress everyone at the table!

Tips for Perfect Stuffed Baby Peppers with Beef and Rice Recipe

Stuffed Baby Peppers with Beef and Rice Recipe is all about attention to detail. With a few helpful tips, you can elevate your dish and ensure it turns out delicious every time. Here are some essential tips to keep in mind:

  • Choose the Right Peppers: Select firm, fresh baby bell peppers. Look for ones that are vibrant in color and free from blemishes. This ensures they hold their shape during cooking and taste great.
  • Don’t Overstuff: While it’s tempting to pack the filling tightly, avoid overstuffing the peppers. Leave a little space at the top to allow for expansion during baking. This helps prevent the filling from spilling out.
  • Season Generously: Make sure to season your beef and rice mixture well. Taste the filling before stuffing the peppers. Adjust the spices to your liking for a more flavorful dish.
  • Use Leftover Rice: If you have leftover rice, use it! Cold rice works best as it helps the filling maintain its texture. Freshly cooked rice can become mushy if mixed while still warm.
  • Experiment with Cheese: While cheddar and mozzarella are great choices, feel free to experiment with different cheeses. Feta, pepper jack, or even goat cheese can add unique flavors to your stuffed peppers.
  • Let Them Rest: After baking, let the stuffed peppers rest for a few minutes before serving. This allows the flavors to meld and makes them easier to handle.
  • Garnish for Presentation: A sprinkle of fresh herbs like parsley or cilantro not only adds color but also enhances the flavor. A squeeze of lemon juice can brighten the dish even more.
  • Adjust Baking Time: Keep an eye on your stuffed peppers as they bake. Ovens can vary, so check for doneness. The peppers should be tender but not mushy, and the cheese should be bubbly and golden.

Stuffed Baby Peppers with Beef and Rice Recipe that is sure to impress your family and friends. Enjoy the process and happy cooking!

Breakdown of Time for Stuffed Baby Peppers with Beef and Rice Recipe

Stuffed Baby Peppers with Beef and Rice Recipe can help you plan your cooking efficiently. Here’s a detailed breakdown of the time you’ll need for preparation and cooking:

Prep Time

The prep time for this recipe is approximately 20 minutes. This includes washing and preparing the baby peppers, cooking the rice if you haven’t done so already, and mixing the beef and rice filling. Taking your time during this stage ensures that everything is ready for the next steps. Remember, a well-prepared kitchen makes for a smoother cooking experience!

Cooking Time

The cooking time for the stuffed peppers is about 35 minutes. This consists of 25 minutes of baking covered with foil, followed by an additional 10 minutes uncovered to melt the cheese. During this time, the peppers will become tender, and the flavors will meld beautifully. Keep an eye on them to ensure they don’t overcook!

Total Time

Stuffed Baby Peppers with Beef and Rice Recipe!

Nutritional Information for Stuffed Baby Peppers with Beef and Rice Recipe

Stuffed Baby Peppers with Beef and Rice Recipe not only satisfies your taste buds but also provides valuable nutrients. Here’s a breakdown of the nutritional information per serving:

Calories

Stuffed Baby Peppers with Beef and Rice Recipe contains approximately 250 calories. This makes it a great option for a filling meal without going overboard on calories. The combination of beef, rice, and peppers provides a satisfying dish that keeps you energized throughout the day.

Protein

Protein is an essential nutrient for building and repairing tissues. Each serving of this recipe offers about 20 grams of protein. The ground beef is a fantastic source of high-quality protein, which is vital for muscle health and overall body function. Pairing it with rice adds a complete amino acid profile, making this dish a well-rounded meal.

Sodium

Stuffed Baby Peppers with Beef and Rice Recipe while keeping your health goals in check.

Overall, this recipe is not only delicious but also provides a good balance of calories, protein, and sodium. Enjoying these stuffed peppers can be part of a healthy and satisfying meal plan!

FAQs about Stuffed Baby Peppers with Beef and Rice Recipe

Can I make Stuffed Baby Peppers with Beef and Rice Recipe ahead of time?

Stuffed Baby Peppers with Beef and Rice Recipe ahead of time, making it a convenient option for busy days. To do this, follow the recipe up to the baking step. Once you’ve stuffed the peppers, cover them tightly with plastic wrap or aluminum foil and store them in the refrigerator. They can be kept for up to 24 hours before baking. When you’re ready to cook, simply remove the cover and bake as directed. This way, you can enjoy a delicious meal without the last-minute rush!

What can I substitute for beef in Stuffed Baby Peppers with Beef and Rice Recipe?

Stuffed Baby Peppers with Beef and Rice Recipe. These meats are leaner but still provide great flavor. For a vegetarian option, consider using black beans or lentils as the base. You can also mix in extra vegetables like corn, zucchini, or mushrooms for added texture and nutrition. The key is to season your filling well, so it remains flavorful regardless of the protein you choose!

How do I store leftovers of Stuffed Baby Peppers with Beef and Rice Recipe?

Stuffed Baby Peppers with Beef and Rice Recipe is simple! Allow the stuffed peppers to cool completely before transferring them to an airtight container. They can be stored in the refrigerator for up to 3-4 days. If you want to keep them longer, consider freezing them. Wrap each stuffed pepper individually in plastic wrap, then place them in a freezer-safe bag or container. They can be frozen for up to 3 months. When you’re ready to enjoy them, thaw in the refrigerator overnight and reheat in the oven or microwave until warmed through. This way, you can savor the delicious flavors of your stuffed peppers even after the initial meal!

Conclusion on Stuffed Baby Peppers with Beef and Rice Recipe

Stuffed Baby Peppers with Beef and Rice Recipe is a delightful dish that brings together flavor, nutrition, and versatility. Whether you’re cooking for a family dinner or hosting friends, these stuffed peppers are sure to impress. Their vibrant colors and delicious filling make them a feast for the eyes and the palate.

By following the simple steps outlined in this recipe, you can create a meal that is not only satisfying but also customizable. With options for vegetarian fillings and alternative proteins, everyone can enjoy this dish. Plus, the nutritional benefits, including protein and essential vitamins, make it a smart choice for any meal plan.

Stuffed Baby Peppers with Beef and Rice Recipe is a canvas for your culinary imagination. So gather your ingredients, invite your loved ones, and enjoy the process of making this delicious dish together!

We hope you find joy in preparing and sharing these stuffed peppers. Happy cooking!

Paul

Stuffed Baby Peppers with Beef and Rice Recipe delights all!

These Mini Peppers Stuffed with Beef & Rice are bite-sized bundles of flavor! Filled with a savory mix of seasoned ground beef, aromatic vegetables, and fluffy rice, then baked until tender, they’re perfect for entertaining or a hearty family meal. Add the optional creamy tomato sauce to take them over the top!
Prep Time 30 minutes
Cook Time 55 minutes
Total Time 1 hour 25 minutes
Servings: 6 servings
Course: Main Course
Cuisine: Eastern European / Russian-inspired

Ingredients
  

  • For the Rice Base1 cup round rice rinsed until water runs clear1 cup chicken broth or water½ teaspoon salt
  • For the Stuffing1 pound ground beef chuck1 medium onion diced1 carrot, shredded2 tomatoes, diced or 6 oz tomato sauce4 pounds mini bell peppers, assorted colors1½ teaspoons kosher salt1 teaspoon ground black pepper3 cloves garlic, pressed½ teaspoon smoked paprika¼ cup chopped parsley½ cup shredded mozzarella cheese, for topping
  • For the Cooking Liquid3 cups boiling chicken broth or water1 teaspoon salt
  • Optional Creamy Tomato Sauce1 onion diced1 carrot, shredded3 tomatoes, diced½ cup white wine1 cup sour cream3 cloves garlic, pressed½ teaspoon kosher salt½ teaspoon ground black pepper
  • Garnish¼ cup chopped parsley

Method
 

  1. Cook the rice by simmering it in broth with salt until liquid is absorbed. Fluff and set aside.In a skillet, heat oil and sauté onions until golden. Add carrots and cook for 5 to 10 more minutes. Stir in tomatoes and garlic, cover, and cook until softened. Let cool.Wash mini peppers, slice off tops, and remove seeds.In a large bowl, combine the cooked rice, sautéed vegetables, raw ground beef, parsley, salt, pepper, garlic, and smoked paprika.Stuff the hollowed mini peppers tightly with the beef-rice mixture. Arrange snugly in a 9×12-inch baking dish.Pour hot seasoned broth into the dish around the peppers, filling halfway up the sides. Cover with foil and bake at 350°F for 45 minutes.Uncover, sprinkle mozzarella cheese on top, and bake an additional 5 to 10 minutes until the cheese is melted.For optional sauce, sauté onion and carrot, then add tomatoes, garlic, and wine. Cook until softened. Stir in sour cream, simmer to thicken, and season to taste.Serve stuffed peppers topped with creamy tomato sauce or sour cream and a sprinkle of parsley.

Notes

You can make the stuffing mixture ahead of time and refrigerate it for up to 24 hours before filling the peppers.
Mini peppers can be swapped for larger sweet peppers if halved and trimmed.
Leftovers reheat well and can also be frozen in airtight containers.
If skipping the sauce, serve with a side of yogurt or sour cream for a creamy contrast.

Baked BBQ Chicken Recipe: A Family Favorite Dish

When it comes to comfort food, few dishes can compete with the deliciousness of baked BBQ chicken. This recipe is not just about flavor; it’s about creating memories around the dinner table. The aroma of chicken baking in the oven, combined with the sweet and tangy scent of barbecue sauce, fills the home with warmth and anticipation. Whether it’s a casual weeknight dinner or a special family gathering, baked BBQ chicken is sure to please everyone.

Why Baked BBQ Chicken is a Family Favorite

Baked BBQ chicken is a family favorite for many reasons. First, it’s incredibly easy to prepare. With just a few simple ingredients, you can create a mouthwatering meal that requires minimal effort. This makes it perfect for busy parents or anyone looking to whip up a quick dinner.

Moreover, the versatility of this dish is unmatched. You can customize the flavors to suit your family’s preferences. Whether you like it sweet, spicy, or smoky, there’s a barbecue sauce out there for everyone. Plus, the chicken thighs remain juicy and tender, ensuring that every bite is packed with flavor.

Another reason baked BBQ chicken shines is its ability to bring people together. Sharing a meal is a time-honored tradition, and this dish encourages conversation and laughter. It’s a great way to bond with loved ones, making it a staple in many households.

In summary, baked BBQ chicken is not just a meal; it’s an experience. Its ease of preparation, flavor versatility, and ability to foster connection make it a beloved choice for families everywhere. So, let’s dive into the ingredients and get started on this delightful recipe!

Ingredients for Baked BBQ Chicken Recipe

To create the perfect baked BBQ chicken, you’ll need a handful of simple ingredients. Each one plays a vital role in delivering that mouthwatering flavor we all love. Here’s what you’ll need:

  • 2 pounds bone-in, skin-on chicken thighs: These are the stars of the dish. The skin helps keep the meat juicy while baking.
  • 1 cup barbecue sauce: Choose your favorite brand! This sauce adds sweetness and tanginess to the chicken.
  • 1 tablespoon olive oil: This helps the spices stick to the chicken and adds a bit of richness.
  • 1 teaspoon garlic powder: Garlic powder gives a wonderful depth of flavor.
  • 1 teaspoon onion powder: This adds a subtle sweetness and enhances the overall taste.
  • 1 teaspoon smoked paprika: For that smoky flavor that makes BBQ chicken irresistible.
  • 1/2 teaspoon salt: Essential for bringing out the flavors in the chicken.
  • 1/2 teaspoon black pepper: Adds a little kick to the dish.
  • 1 tablespoon apple cider vinegar: This adds a tangy finish that balances the sweetness of the barbecue sauce.

With these ingredients on hand, you’re well on your way to making a delicious baked BBQ chicken that your family will love. Remember, the quality of your ingredients can make a big difference, so choose fresh and flavorful options whenever possible. Now that you have everything ready, let’s move on to the preparation steps!

Step-by-Step Preparation of Baked BBQ Chicken Recipe

Now that you have your ingredients ready, it’s time to dive into the step-by-step preparation of your baked BBQ chicken. Following these simple steps will ensure that your chicken turns out juicy, flavorful, and perfectly cooked. Let’s get started!

Step 1: Prepping the Chicken

First, you need to prepare the chicken thighs. Start by rinsing them under cold water. This helps remove any residual blood or impurities. After rinsing, pat the chicken dry with paper towels. This step is crucial because it helps the skin get crispy during baking. Once dried, place the chicken thighs in a large bowl, ready for marinating.

Step 2: Marinating the Chicken

Next, it’s time to marinate the chicken. In a separate bowl, combine the olive oil, garlic powder, onion powder, smoked paprika, salt, and black pepper. Mix these ingredients well to create a flavorful marinade. Now, pour this marinade over the chicken thighs, ensuring each piece is coated evenly. Let the chicken sit for about 15 minutes. This allows the flavors to penetrate the meat, making it even tastier.

Step 3: Preparing the BBQ Sauce

While the chicken is marinating, you can prepare the barbecue sauce. If you’re using store-bought sauce, simply set it aside. However, if you want to make your own, combine your favorite ingredients in a bowl. You can add a splash of apple cider vinegar for extra tang or even a teaspoon of liquid smoke for a deeper flavor. Mix well and taste to adjust the sweetness or spiciness to your liking.

Step 4: Baking the Chicken

Now, it’s time to bake the chicken! Preheat your oven to 400°F. Line a baking sheet with parchment paper for easy cleanup. Place the marinated chicken thighs on the baking sheet, skin side up. Brush a generous amount of barbecue sauce over each piece. Make sure to reserve some sauce for later. Bake the chicken in the preheated oven for 35-40 minutes. You’ll know it’s done when the internal temperature reaches 165°F and the skin is crispy and golden brown.

Step 5: Finishing Touches

As the chicken nears the end of its baking time, brush on an additional layer of barbecue sauce for that extra burst of flavor. This step is optional but highly recommended! Once the chicken is done, remove it from the oven and let it rest for about 5 minutes. This resting period allows the juices to redistribute, ensuring each bite is juicy and tender. If you like, drizzle a bit of apple cider vinegar over the chicken for a tangy kick before serving.

And there you have it! Your baked BBQ chicken is ready to be enjoyed. The combination of flavors and the crispy skin will surely impress your family and friends. Now, let’s explore some delicious variations of this recipe!

Variations of Baked BBQ Chicken Recipe

While the classic baked BBQ chicken recipe is a hit on its own, there are many ways to switch things up! Exploring different sauces and cooking methods can add exciting flavors and textures to your dish. Let’s dive into some tasty variations that you can try!

Different Sauces to Try

Barbecue sauce is the star of this dish, but you can experiment with various sauces to create unique flavors. Here are a few ideas:

  • Honey Mustard Sauce: Mix equal parts honey and mustard for a sweet and tangy twist. Brush it on the chicken before baking for a delightful flavor.
  • Teriyaki Sauce: For an Asian-inspired flair, use teriyaki sauce. It adds a sweet and savory taste that pairs wonderfully with chicken.
  • Buffalo Sauce: If you love heat, try buffalo sauce! It gives the chicken a spicy kick. You can mix it with some melted butter for a richer flavor.
  • Peach BBQ Sauce: For a fruity twist, use peach barbecue sauce. The sweetness of peaches complements the savory chicken beautifully.

Feel free to mix and match these sauces or even create your own signature blend. The possibilities are endless!

Alternative Cooking Methods

While baking is a fantastic way to prepare BBQ chicken, there are other cooking methods that can yield delicious results. Here are a couple of alternatives:

  • Grilling: For a smoky flavor, grill the marinated chicken thighs instead of baking them. Preheat your grill to medium heat and cook the chicken for about 6-8 minutes per side, brushing with barbecue sauce as you go.
  • Slow Cooking: If you prefer a hands-off approach, use a slow cooker. Place the marinated chicken in the slow cooker, add your favorite barbecue sauce, and cook on low for 6-8 hours. The chicken will be incredibly tender and flavorful.

These alternative cooking methods can add a new dimension to your baked BBQ chicken recipe. Whether you choose to grill or slow cook, you’ll still enjoy that delicious flavor that makes this dish a family favorite!

Cooking Note for Baked BBQ Chicken Recipe

Cooking baked BBQ chicken is a delightful experience, but there are a few important notes to keep in mind to ensure your dish turns out perfectly every time. These tips will help you achieve juicy, flavorful chicken with crispy skin that your family will love.

First, always check the quality of your chicken. Fresh, high-quality chicken thighs will yield the best results. Look for thighs that are plump and have a nice layer of fat under the skin. This fat is essential for keeping the meat moist during cooking.

Next, marinating is key! Allowing the chicken to marinate for at least 15 minutes is crucial for flavor absorption. However, if you have more time, consider marinating it for a few hours or even overnight in the refrigerator. This extra time will enhance the flavors even more.

When it comes to baking, using a meat thermometer is highly recommended. This tool ensures that your chicken reaches the safe internal temperature of 165°F. It also helps prevent overcooking, which can lead to dry chicken. Insert the thermometer into the thickest part of the thigh, avoiding the bone for an accurate reading.

Lastly, let the chicken rest after baking. This step is often overlooked but is vital for juicy chicken. Resting allows the juices to redistribute throughout the meat, making each bite tender and flavorful. Cover the chicken loosely with foil while it rests to keep it warm.

By following these cooking notes, you’ll be well on your way to mastering the art of baked BBQ chicken. Enjoy the process, and don’t hesitate to experiment with flavors and techniques to make this dish your own!

Serving Suggestions for Baked BBQ Chicken Recipe

Once your baked BBQ chicken is ready, it’s time to think about how to serve it. The right side dishes and presentation can elevate your meal, making it even more enjoyable for your family and guests. Let’s explore some delicious side dishes that pair well with this flavorful chicken, along with some presentation tips to make your meal look as good as it tastes!

Side Dishes that Pair Well

Choosing the right side dishes can enhance the overall dining experience. Here are some tasty options that complement baked BBQ chicken:

  • Coleslaw: A classic pairing! The crunchiness and tanginess of coleslaw balance the rich flavors of the chicken.
  • Corn on the Cob: Sweet corn is a summer favorite. Grilled or boiled, it adds a delightful sweetness to your plate.
  • Baked Beans: The smoky flavor of baked beans pairs perfectly with BBQ chicken. They add a hearty touch to your meal.
  • Potato Salad: Creamy potato salad is a great side. It’s cool and refreshing, making it a perfect match for warm chicken.
  • Garlic Bread: For a bit of indulgence, serve garlic bread. It’s great for soaking up any extra barbecue sauce!

Feel free to mix and match these sides based on your family’s preferences. Each option brings its own unique flavor, making your meal even more enjoyable.

Presentation Tips

Presentation is key when serving baked BBQ chicken. A well-presented dish can make a simple meal feel special. Here are some tips to enhance your presentation:

  • Use a Colorful Plate: Choose a vibrant plate to make the colors of the chicken and sides pop. A white plate can also work well, providing a clean backdrop.
  • Garnish with Fresh Herbs: Sprinkle some chopped parsley or cilantro over the chicken for a fresh touch. It adds color and a hint of flavor.
  • Arrange Neatly: Place the chicken thighs in a neat row, and arrange the sides around them. This creates an inviting look.
  • Serve with Extra Sauce: Offer a small bowl of barbecue sauce on the side for dipping. It encourages guests to customize their meal.
  • Use a Platter: For family-style dining, serve the chicken on a large platter. This encourages sharing and adds a communal feel to the meal.

By following these serving suggestions and presentation tips, you’ll create a delightful dining experience that your family and friends will love. Enjoy your baked BBQ chicken with these delicious sides, and watch as everyone gathers around the table for a memorable meal!

Tips for Perfecting Your Baked BBQ Chicken Recipe

Perfecting your baked BBQ chicken recipe is all about attention to detail and a few helpful tips. With these suggestions, you can elevate your dish to new heights, ensuring that every bite is juicy, flavorful, and satisfying. Let’s explore some essential tips that will help you master this delicious recipe!

First, consider the marinating time. While 15 minutes is sufficient, marinating the chicken for a few hours or overnight can significantly enhance the flavor. The longer the chicken sits in the marinade, the more it absorbs those delicious spices and seasonings. If you have the time, this extra step is well worth it!

Next, pay attention to the temperature of your oven. An oven thermometer can help ensure that your oven is at the correct temperature. If your oven runs hot or cold, it can affect the cooking time and the final texture of your chicken. A consistent temperature is key to achieving that crispy skin and juicy meat.

Another important tip is to avoid overcrowding the baking sheet. Give each chicken thigh enough space to cook evenly. If the pieces are too close together, they may steam instead of bake, resulting in less crispy skin. If you have more chicken than can fit on one sheet, consider using two sheets or baking in batches.

Don’t forget to baste your chicken! Brushing on additional barbecue sauce during the last few minutes of baking adds a rich layer of flavor. This step not only enhances the taste but also gives the chicken a beautiful, glossy finish. Just be careful not to burn the sauce, as sugars can caramelize quickly.

Lastly, let your chicken rest after baking. This step is crucial for juicy chicken. Resting allows the juices to redistribute throughout the meat, making each bite tender and flavorful. Cover the chicken loosely with foil while it rests to keep it warm.

By following these tips, you’ll be well on your way to perfecting your baked BBQ chicken recipe. Enjoy the process, and don’t hesitate to experiment with flavors and techniques to make this dish your own!

Breakdown of Time for Baked BBQ Chicken Recipe

Understanding the time required for each step in the baked BBQ chicken recipe is essential for planning your meal. Knowing how long to prep and cook will help you serve a delicious dinner without any stress. Here’s a breakdown of the time involved in making this delightful dish.

Prep Time

The prep time for this baked BBQ chicken recipe is quite manageable. You’ll need about 15 minutes to gather your ingredients and prepare the chicken. This includes rinsing, drying, and marinating the chicken thighs. If you choose to make your own barbecue sauce, add an extra 5 minutes for that. Overall, you can expect to spend around 15-20 minutes on prep work.

Cooking Time

Once your chicken is prepped and marinated, it’s time to bake! The cooking time for the chicken is approximately 35-40 minutes in a preheated oven at 400°F. During this time, the chicken will cook through and develop a crispy, golden skin. Remember to check the internal temperature to ensure it reaches 165°F for safe consumption.

Total Time

When you combine the prep time and cooking time, the total time for this baked BBQ chicken recipe is about 50-60 minutes. This makes it a quick and easy option for a weeknight dinner or a weekend gathering. With just under an hour, you can have a flavorful and satisfying meal ready to serve!

Nutritional Information for Baked BBQ Chicken Recipe

Understanding the nutritional information of your meals is essential for maintaining a balanced diet. The baked BBQ chicken recipe not only satisfies your taste buds but also provides valuable nutrients. Here’s a closer look at the nutritional content of this delicious dish.

Calories

Each serving of baked BBQ chicken contains approximately 350 calories. This makes it a hearty yet manageable option for dinner. The calorie count comes primarily from the chicken and the barbecue sauce, which adds flavor and sweetness. If you’re watching your calorie intake, consider pairing the chicken with lighter side dishes to keep your meal balanced.

Protein Content

One of the standout features of this baked BBQ chicken recipe is its protein content. Each serving provides about 28 grams of protein. This is excellent for muscle repair and growth, making it a great choice for active individuals or anyone looking to maintain a healthy diet. The chicken thighs are particularly rich in protein, ensuring that you feel satisfied and full after your meal.

Sodium Levels

When it comes to sodium, each serving contains around 600 milligrams. This level is typical for many barbecue sauces, which can be high in sodium. If you’re concerned about sodium intake, consider using low-sodium barbecue sauce or making your own to control the salt content. Balancing your meal with fresh vegetables can also help offset sodium levels.

In summary, the baked BBQ chicken recipe is not only delicious but also provides a good source of protein while being mindful of calories. By understanding the nutritional information, you can enjoy this dish as part of a healthy and balanced diet.

FAQs about Baked BBQ Chicken Recipe

Can I use skinless chicken for this recipe?

Yes, you can use skinless chicken for this baked BBQ chicken recipe. However, keep in mind that skin-on chicken thighs tend to be juicier and more flavorful due to the fat under the skin. If you choose skinless chicken, consider marinating it longer to enhance the flavor. You may also want to adjust the cooking time, as skinless chicken may cook a bit faster. Just ensure the internal temperature reaches 165°F for safe consumption.

How long should I bake the chicken?

The chicken should be baked for about 35-40 minutes at 400°F. This timing allows the chicken to cook through while developing a crispy skin. To ensure it’s perfectly cooked, use a meat thermometer to check that the internal temperature reaches 165°F. If you’re using larger pieces or a different cut of chicken, you may need to adjust the cooking time accordingly.

What can I substitute for BBQ sauce?

If you don’t have barbecue sauce on hand or prefer a different flavor, there are several tasty substitutes you can use. Some options include:

  • Honey Mustard Sauce: A mix of honey and mustard creates a sweet and tangy alternative.
  • Teriyaki Sauce: This adds a sweet and savory flavor that pairs well with chicken.
  • Buffalo Sauce: For a spicy kick, buffalo sauce is a great choice.
  • Homemade BBQ Sauce: You can easily make your own by combining ketchup, vinegar, brown sugar, and spices.

Feel free to get creative and mix different sauces to find your perfect flavor combination!

Can I make this recipe ahead of time?

Absolutely! You can prepare the baked BBQ chicken ahead of time. To do this, marinate the chicken and store it in the refrigerator for up to 24 hours before baking. This allows the flavors to develop even more. When you’re ready to cook, simply follow the baking instructions. If you have leftovers, they can be stored in an airtight container in the refrigerator for up to 3 days. Reheat in the oven or microwave before serving for a quick meal!

Conclusion on Baked BBQ Chicken Recipe

In conclusion, the baked BBQ chicken recipe is a delightful dish that brings together flavor, ease of preparation, and the joy of sharing a meal with loved ones. With its juicy chicken thighs coated in a rich barbecue sauce, this recipe is sure to become a staple in your kitchen. Whether you’re cooking for a busy weeknight dinner or a weekend gathering, this dish is versatile enough to suit any occasion.

By following the steps outlined in this article, you can create a mouthwatering meal that will impress your family and friends. Remember to experiment with different sauces and cooking methods to find the perfect combination that suits your taste. The beauty of this recipe lies in its adaptability, allowing you to make it your own.

As you enjoy your baked BBQ chicken, take a moment to appreciate the memories created around the dinner table. Food has a unique way of bringing people together, and this dish is no exception. So, gather your loved ones, serve up some delicious baked BBQ chicken, and savor the moments spent together.

Happy cooking, and may your kitchen always be filled with the wonderful aroma of baked BBQ chicken!

Paul

Baked BBQ Chicken Recipe: A Family Favorite Dish

This Oven Baked BBQ Chicken delivers all the sticky-sweet, smoky flavor you love—without the grill! Whether you choose juicy drumsticks, bone-in thighs, or boneless breasts, this easy recipe ensures perfectly caramelized barbecue-glazed chicken straight from your oven. It’s a crowd-pleasing weeknight dinner or weekend feast made simple.
Prep Time 10 minutes
Cook Time 20 minutes
Total Time 30 minutes
Servings: 4 to 6 servings
Course: Main Course
Cuisine: American

Ingredients
  

  • 2 to 3 lbs chicken pieces such as drumsticks thighs, or boneless breastsSalt, to tastePepper, to taste1 to 2 cups barbecue sauce, homemade or store-boughtOptional seasonings: garlic powder, onion powder, paprika

Method
 

  1. For bone-in drumsticks:Preheat oven to 400°F (200°C).Place drumsticks on a baking sheet and season with salt, pepper, and optional spices.Bake for 15 minutes, then flip and bake for an additional 10 minutes.Flip again, brush chicken generously with barbecue sauce, and broil on high for 2 to 4 minutes until the sauce caramelizes.
  2. For bone-in thighs or breasts:Preheat oven to 400°F.Season and bake for 15 minutes.Flip and bake for another 20 minutes.Flip again, brush with barbecue sauce, and broil on high for 2 to 4 minutes.
  3. For boneless skinless breasts:Preheat oven to 400°F.Bake seasoned chicken for 10 minutes.Flip and bake for another 10 minutes.Brush with barbecue sauce and broil for 2 to 3 minutes until sticky and golden.

Notes

For maximum flavor, marinate the chicken in barbecue sauce for 30 minutes before baking.
Use foil-lined pans for easier cleanup.
Keep a close eye while broiling to avoid burning the sauce.
Pair with coleslaw, cornbread, or roasted veggies for a full meal.

Rainbow Cheesecake Recipe: A Colorful Delight Awaits!

Introduction to the Rainbow Cheesecake Recipe

Are you ready to brighten up your dessert table? The Rainbow Cheesecake Recipe is not just a treat for your taste buds; it’s a feast for your eyes too! This delightful dessert combines the creamy richness of cheesecake with vibrant colors that resemble a beautiful rainbow. Perfect for birthdays, celebrations, or just a fun family dessert night, this cheesecake is sure to impress everyone.

What Makes the Rainbow Cheesecake Unique?

What sets the Rainbow Cheesecake apart from traditional cheesecakes? First, it’s the stunning visual appeal. Each slice reveals layers of bright colors, making it a showstopper at any gathering. The combination of flavors and textures also plays a significant role. The creamy filling contrasts beautifully with the crunchy graham cracker crust, creating a delightful experience with every bite.

Moreover, this cheesecake is versatile. You can customize the colors and flavors to suit your preferences. Whether you want a classic rainbow or a themed color palette, the possibilities are endless! Plus, it’s a fun activity to make with kids or friends, allowing everyone to get creative in the kitchen.

In the following sections, we will guide you through the ingredients and step-by-step preparation of this delicious Rainbow Cheesecake Recipe. Get ready to create a dessert that not only tastes amazing but also brings joy and excitement to your table!

Ingredients for the Rainbow Cheesecake Recipe

To create your stunning Rainbow Cheesecake, you’ll need a selection of simple yet essential ingredients. Each component plays a vital role in achieving that creamy texture and vibrant colors. Here’s what you’ll need:

  • 1 ½ cups graham cracker crumbs
  • ½ cup unsalted butter, melted
  • 2 cups cream cheese, softened
  • 1 cup granulated sugar
  • 1 teaspoon vanilla extract
  • 1 cup sour cream
  • 4 large eggs
  • 1 cup heavy cream
  • Food coloring (red, orange, yellow, green, blue, purple)

These ingredients come together to create a rich and colorful cheesecake that everyone will love. The graham cracker crumbs form a delicious crust, while the cream cheese and sour cream provide that classic cheesecake flavor. The addition of heavy cream adds a lightness to the filling, making it even more enjoyable.

Don’t forget the food coloring! This is what transforms your cheesecake into a rainbow masterpiece. You can use gel or liquid food coloring, depending on what you have on hand. Now that you have your ingredients ready, let’s move on to the step-by-step preparation of this delightful Rainbow Cheesecake Recipe!

Step-by-Step Preparation of the Rainbow Cheesecake Recipe

Now that you have gathered all your ingredients, it’s time to dive into the fun part: preparing your Rainbow Cheesecake! Follow these simple steps to create a dessert that will wow your family and friends.

Step 1: Preparing the Crust

Start by preheating your oven to 325°F (163°C). This ensures that your cheesecake bakes evenly. Next, take a 9-inch springform pan and grease it lightly. This will help the cheesecake come out easily once it’s done.

In a medium bowl, combine 1 ½ cups of graham cracker crumbs with ½ cup of melted unsalted butter. Mix them together until the crumbs are fully coated. Then, press this mixture firmly into the bottom of your prepared pan. Make sure it’s even and compact. This crust will provide a delicious base for your cheesecake!

Step 2: Making the Cheesecake Filling

In a large mixing bowl, beat together 2 cups of softened cream cheese and 1 cup of granulated sugar. Use an electric mixer on medium speed until the mixture is smooth and creamy. This step is crucial for a velvety texture.

Next, add 1 teaspoon of vanilla extract and 1 cup of sour cream to the bowl. Mix until everything is well combined. Now, it’s time to add the eggs. Crack 4 large eggs into the bowl, adding them one at a time. Mix on low speed after each addition until just combined. Be careful not to overmix, as this can make your cheesecake dense.

Step 3: Dividing and Coloring the Batter

Once your filling is ready, it’s time to create those vibrant colors! Divide the cheesecake batter evenly into six separate bowls. This will allow you to create each color of the rainbow.

Now, add a few drops of food coloring to each bowl. You can use red, orange, yellow, green, blue, and purple. Mix each bowl until the colors are well incorporated. Don’t be afraid to adjust the colors to your liking; the more vibrant, the better!

Step 4: Layering the Colors

With your colorful batter ready, it’s time to layer the colors into the crust. Start with the first color and pour a layer of batter into the center of the crust. This technique helps create a marbled effect.

Continue pouring each subsequent color in the center, one after the other. You’ll see the colors blend beautifully as you go. Take your time with this step; it’s where the magic happens!

Step 5: Baking the Cheesecake

Now that your cheesecake is layered, it’s time to bake! Place the springform pan in the preheated oven and bake for 50-60 minutes. You’ll know it’s done when the edges are set, but the center is still slightly jiggly. This is important for a creamy texture.

Once baked, turn off the oven and leave the cheesecake inside for an additional hour. This gentle cooling helps prevent cracks on the surface.

Step 6: Cooling and Setting

After the hour is up, carefully remove the cheesecake from the oven. Let it cool to room temperature on a wire rack. Once cooled, cover it and refrigerate for at least 4 hours, or overnight if you can wait! This chilling time allows the flavors to meld and the cheesecake to set perfectly.

When you’re ready to serve, whip 1 cup of heavy cream until soft peaks form. Spread it over the top of the cheesecake for an extra touch of creaminess. Now, your Rainbow Cheesecake is ready to dazzle everyone!

Variation of the Rainbow Cheesecake Recipe

While the classic Rainbow Cheesecake is a delightful treat, there are many ways to customize it. You can play with flavors and colors to create a unique version that suits your taste. Let’s explore some alternative flavors and colors, as well as options for those with dietary restrictions.

Alternative Flavors and Colors

Why not switch things up a bit? Instead of the traditional vanilla flavor, you can experiment with different extracts. For instance, almond extract adds a lovely nutty flavor, while lemon extract gives a refreshing citrus twist. You can even mix in some cocoa powder for a chocolatey version!

When it comes to colors, the sky’s the limit! You can create a pastel rainbow by using less food coloring or opt for a monochromatic look with shades of blue or pink. For a fun twist, try using seasonal colors, like red and green for Christmas or orange and black for Halloween. The possibilities are endless, and it’s a great way to personalize your cheesecake!

Gluten-Free and Vegan Options

If you or your guests have dietary restrictions, don’t worry! You can still enjoy a delicious Rainbow Cheesecake. For a gluten-free version, simply substitute regular graham cracker crumbs with gluten-free ones. Many brands offer tasty options that work perfectly for the crust.

For a vegan version, you can replace the cream cheese with a plant-based alternative. There are many brands available that mimic the creamy texture of traditional cream cheese. Use coconut cream instead of heavy cream for a rich topping. Additionally, replace the eggs with flaxseed meal or a commercial egg replacer to bind the ingredients together. With these adjustments, you can create a delightful vegan Rainbow Cheesecake that everyone can enjoy!

These variations not only cater to different dietary needs but also allow you to get creative in the kitchen. So, gather your ingredients and let your imagination run wild with this Rainbow Cheesecake Recipe!

Cooking Note for the Rainbow Cheesecake Recipe

When making the Rainbow Cheesecake, there are a few important cooking notes to keep in mind. These tips will help ensure that your cheesecake turns out perfectly every time. Let’s dive into some key points to consider during the baking process.

First, always use room temperature ingredients. This includes the cream cheese, eggs, and sour cream. Room temperature ingredients blend more easily, resulting in a smoother batter. If you forget to take them out ahead of time, you can warm the cream cheese slightly in the microwave for about 10 seconds. Just be careful not to melt it!

Next, avoid overmixing the batter. While it’s tempting to whip it until it’s super smooth, overmixing can introduce too much air into the batter. This can lead to cracks in your cheesecake as it bakes. Mix just until combined, and you’ll achieve that creamy texture without the unwanted air bubbles.

Another important note is to use a water bath for baking. This method helps regulate the temperature and keeps the cheesecake moist. To create a water bath, wrap the outside of your springform pan with aluminum foil to prevent leaks. Place the pan in a larger baking dish filled with hot water. This will help your cheesecake bake evenly and reduce the risk of cracks.

Lastly, patience is key! After baking, allow the cheesecake to cool gradually in the oven. This gentle cooling process helps prevent sudden temperature changes that can cause cracks. Once it’s cooled to room temperature, refrigerate it for the recommended time. The longer it chills, the better the flavors will meld together.

By following these cooking notes, you’ll be well on your way to creating a stunning and delicious Rainbow Cheesecake that will impress everyone at your gathering!

Serving Suggestions for the Rainbow Cheesecake Recipe

Now that your Rainbow Cheesecake is beautifully prepared and chilled, it’s time to think about how to serve it! Presentation can elevate your dessert experience, making it even more enjoyable for your guests. Here are some delightful serving suggestions to consider:

  • Garnish with Fresh Fruits: Top your cheesecake with fresh fruits like strawberries, blueberries, or kiwi slices. These not only add a pop of color but also provide a refreshing contrast to the creamy cheesecake.
  • Drizzle with Sauce: A drizzle of chocolate or caramel sauce can enhance the flavor and visual appeal. You can also use fruit sauces, like raspberry or mango, for a fruity twist.
  • Serve with Whipped Cream: As mentioned earlier, whipped cream is a fantastic addition. Spread it over the top or serve it on the side for guests to add as they please.
  • Use Edible Decorations: Consider adding edible glitter or sprinkles to make your cheesecake even more festive. This is especially fun for birthday parties or celebrations!
  • Pair with Beverages: Serve your cheesecake with a side of coffee, tea, or a fruity beverage. A nice cup of herbal tea can complement the flavors beautifully.
  • Slice and Serve: When slicing, use a hot knife for clean cuts. Simply dip the knife in hot water, wipe it dry, and slice through the cheesecake. This will help maintain the beautiful layers.

These serving suggestions will not only enhance the look of your Rainbow Cheesecake but also make it a delightful experience for everyone. Whether it’s a special occasion or a casual family dinner, your cheesecake will surely be the star of the show!

Tips for Perfecting Your Rainbow Cheesecake Recipe

Creating the perfect Rainbow Cheesecake is an art that combines technique, patience, and a little creativity. To help you achieve a stunning and delicious dessert, here are some valuable tips to keep in mind:

  • Use Quality Ingredients: The quality of your ingredients can make a big difference. Opt for high-quality cream cheese and fresh eggs for the best flavor and texture. This will ensure your cheesecake is rich and creamy.
  • Don’t Skip the Cooling Time: Allowing your cheesecake to cool gradually in the oven and then chilling it in the fridge is crucial. This helps prevent cracks and ensures a smooth texture. Patience pays off!
  • Check for Doneness: Keep an eye on your cheesecake while it bakes. It’s done when the edges are set, but the center still has a slight jiggle. Overbaking can lead to a dry cheesecake.
  • Experiment with Colors: Feel free to get creative with your food coloring! You can mix colors to create unique shades or even use natural colorants like beet juice or matcha for a healthier option.
  • Layering Technique: When pouring the batter, aim for the center of the crust. This technique helps create beautiful layers without disturbing the previous colors. Pour slowly and steadily for the best results.
  • Use a Water Bath: As mentioned earlier, a water bath can help your cheesecake bake evenly. It prevents the edges from cooking too quickly while keeping the center creamy. Wrap your pan well to avoid leaks!
  • Chill Before Serving: For the best flavor and texture, serve your cheesecake chilled. This allows the flavors to meld and enhances the overall experience. It’s worth the wait!
  • Practice Makes Perfect: Don’t be discouraged if your first attempt isn’t perfect. Baking is a learning process. Each time you make the Rainbow Cheesecake, you’ll discover new ways to improve!

By following these tips, you’ll be well on your way to mastering the Rainbow Cheesecake Recipe. With a little practice and creativity, you can create a dessert that not only looks amazing but tastes incredible too!

Breakdown of Time for the Rainbow Cheesecake Recipe

Understanding the time required for each step of the Rainbow Cheesecake Recipe is essential for planning your baking session. Here’s a detailed breakdown of the time you’ll need to allocate for preparation, cooking, and cooling.

Prep Time

The prep time for this delightful dessert is approximately 30-40 minutes. This includes gathering your ingredients, preparing the crust, and mixing the cheesecake filling. Make sure to have everything ready before you start, as this will make the process smoother and more enjoyable.

Cooking Time

Once your cheesecake is assembled, the cooking time is about 50-60 minutes. During this time, the cheesecake will bake in the oven. After baking, you’ll leave it in the oven for an additional hour to cool gently. This step is crucial for achieving that perfect creamy texture without cracks.

Total Time

In total, you should plan for about 5 to 6 hours from start to finish, including cooling and chilling time. After baking, it’s important to let the cheesecake cool to room temperature before refrigerating it for at least 4 hours, or ideally overnight. This chilling time allows the flavors to meld beautifully, resulting in a deliciously rich cheesecake.

By understanding the time breakdown, you can better manage your schedule and ensure that your Rainbow Cheesecake turns out perfectly. Happy baking!

Nutritional Information for the Rainbow Cheesecake Recipe

When indulging in a delicious dessert like the Rainbow Cheesecake, it’s important to be aware of its nutritional content. This will help you enjoy it mindfully while still satisfying your sweet tooth. Below, we break down the key nutritional information for each serving of this delightful cheesecake.

Calories

350 calories. This calorie count includes the rich ingredients that make this dessert so creamy and flavorful. While it’s a treat, it’s good to enjoy it in moderation, especially if you’re watching your calorie intake.

Protein

6 grams. The protein comes mainly from the cream cheese and eggs used in the recipe. This makes the cheesecake not only a sweet delight but also a source of some essential nutrients.

Sodium

250 mg of sodium. This sodium level is typical for desserts that include cream cheese and butter. If you’re monitoring your sodium intake, it’s wise to enjoy this cheesecake as an occasional treat rather than a regular indulgence.

Overall, while the Rainbow Cheesecake is a delightful dessert, being aware of its nutritional information can help you make informed choices. Enjoying it as part of a balanced diet will allow you to savor its deliciousness without any guilt!

FAQs about the Rainbow Cheesecake Recipe

Can I make the Rainbow Cheesecake ahead of time?

Absolutely! The Rainbow Cheesecake is perfect for making ahead of time. In fact, it tastes even better after chilling in the fridge for a while. You can prepare it a day or two in advance. Just make sure to cover it well with plastic wrap or aluminum foil to keep it fresh. This way, you can enjoy your dessert without the last-minute rush!

How do I store leftover Rainbow Cheesecake?

Storing leftover Rainbow Cheesecake is easy! Simply cover the cheesecake with plastic wrap or place it in an airtight container. Keep it in the refrigerator, where it will stay fresh for up to 5 days. If you want to keep it longer, you can freeze individual slices. Just wrap them tightly in plastic wrap and then place them in a freezer-safe bag. They can last for up to 2 months in the freezer. When you’re ready to enjoy, thaw in the fridge overnight!

What can I use instead of cream cheese in the Rainbow Cheesecake Recipe?

If you’re looking for alternatives to cream cheese, there are several options! For a vegan version, you can use plant-based cream cheese, which mimics the texture and flavor. Silken tofu blended until smooth is another great substitute. It provides a creamy consistency without dairy. Additionally, you can try using cashew cream, made by soaking cashews and blending them until smooth. Each option will give your cheesecake a unique twist while still being delicious!

Can I use different colors for the Rainbow Cheesecake?

Of course! The beauty of the Rainbow Cheesecake is its versatility. You can use any colors you like to create a stunning visual effect. For a pastel look, use less food coloring. You can also choose seasonal colors, like red and green for Christmas or orange and black for Halloween. Feel free to mix colors to create your own unique shades. The only limit is your imagination!

Conclusion on the Rainbow Cheesecake Recipe

In conclusion, the Rainbow Cheesecake Recipe is a delightful way to bring joy and color to your dessert table. This stunning dessert not only captivates the eyes but also pleases the palate with its creamy texture and rich flavors. Whether you’re celebrating a special occasion or simply indulging in a sweet treat, this cheesecake is sure to impress.

By following the step-by-step instructions and tips provided, you can create a beautiful masterpiece that showcases your baking skills. Remember, the key to a perfect Rainbow Cheesecake lies in using quality ingredients, allowing for proper cooling, and getting creative with colors and flavors. Don’t hesitate to experiment with different extracts or toppings to make it your own!

As you gather your friends and family around the table, the vibrant layers of your Rainbow Cheesecake will surely spark joy and excitement. It’s a dessert that encourages sharing and celebration, making it a wonderful addition to any gathering. So, roll up your sleeves, unleash your creativity, and enjoy the process of making this delightful treat!

Happy baking, and may your Rainbow Cheesecake be as delicious as it is beautiful!

Paul

Rainbow Cheesecake Recipe: A Colorful Delight Awaits!

This no-bake Rainbow Cheesecake is a whimsical dessert layered with vibrant colors and velvety cream cheese filling. With no gelatin or baking required, it’s a party-perfect treat that dazzles on the plate and melts in your mouth.
Prep Time 45 minutes
Total Time 6 hours
Servings: 16 servings
Course: Dessert
Cuisine: American

Ingredients
  

  • 24 graham crackers1 cup butter melted32 ounces cream cheese, softened (4 packages)28 ounces sweetened condensed milk (2 cans)2 tablespoons lemon juice1 tablespoon vanilla extractFood coloring in red, orange, yellow, kelly green, light blue, royal blue, and violet2 cups heavy whipping creamConfetti sprinkles

Method
 

  1. Crush graham crackers into fine crumbs using a food processor or by sealing them in a bag and crushing with a rolling pin. Mix with melted butter until evenly coated. Press firmly into the bottom and sides of a springform pan. Freeze to firm up the crust.
  2. In a large mixing bowl, beat cream cheese, sweetened condensed milk, lemon juice, and vanilla extract until smooth and creamy.
  3. Divide the cheesecake filling evenly into 7 bowls. Tint each portion with a different food coloring to create the rainbow spectrum.
  4. Starting with the red layer, spread it gently over the frozen crust. Freeze for 15 to 30 minutes until set. Continue layering each color in order—orange, yellow, green, light blue, royal blue, and violet—freezing between each to set.
  5. Once the final violet layer is set, whip the heavy cream to stiff peaks. Pipe it around the edges of the cheesecake and top with confetti sprinkles.
  6. Keep the cheesecake in the freezer until ready to serve. For best results, slice while frozen using a warm, clean knife between each cut.

Notes

Be sure each layer is fully set before adding the next to keep colors clean and defined.
Use gel food coloring for the most vibrant hues without thinning the filling.
Store any leftovers tightly covered in the freezer for up to 1 week.
For a more pastel look, use less food coloring per layer.

Corned Beef Hash is a hearty dish for any meal.

What is Corned Beef Hash?

Corned beef hash is a delicious and hearty dish made from chopped corned beef, potatoes, and various vegetables. This savory mix is often seasoned with spices like garlic powder and paprika, giving it a rich flavor. Typically served as a breakfast or brunch option, corned beef hash can also be enjoyed for lunch or dinner. The combination of crispy potatoes and tender corned beef creates a satisfying meal that warms the heart and fills the belly.

The History of Corned Beef Hash

The origins of corned beef hash can be traced back to the 18th century. It was a practical way to use leftover corned beef, especially after festive meals. As people sought to minimize food waste, they began mixing the leftover meat with potatoes and onions, creating a dish that was both economical and delicious. Over the years, corned beef hash has evolved, with various regions adding their unique twists. Today, it remains a beloved comfort food in many households, often enjoyed with eggs on top for an extra touch of flavor.

Ingredients for Corned Beef Hash Recipe

To create a mouthwatering corned beef hash, you’ll need a few simple ingredients. Each component plays a vital role in building the dish’s rich flavor and satisfying texture. Here’s what you’ll need:

  • 2 cups cooked corned beef, chopped: This is the star of the dish, providing a savory and hearty base.
  • 2 cups potatoes, peeled and diced: About 2 medium potatoes will do. They add bulk and a comforting texture.
  • 1 medium onion, diced: Onions bring sweetness and depth to the flavor profile.
  • 1 red bell pepper, diced: This adds a pop of color and a slight sweetness.
  • 2 tablespoons olive oil: Used for sautéing, it helps to crisp up the potatoes and vegetables.
  • 1 teaspoon garlic powder: This enhances the overall flavor with a hint of garlic.
  • 1 teaspoon paprika: Paprika adds warmth and a subtle smokiness.
  • Salt and pepper to taste: Essential for seasoning and bringing out the flavors.
  • 4 large eggs (optional): For those who love a protein boost, eggs can be added for a delicious finish.
  • Fresh parsley, chopped (for garnish): This adds a fresh touch and brightens the dish.

Gathering these ingredients will set you on the right path to making a delightful corned beef hash. Each item contributes to the overall taste, making it a dish that’s not only filling but also bursting with flavor. Now that you have your ingredients ready, let’s move on to the preparation steps!

Step-by-Step Preparation of Corned Beef Hash Recipe

Step 1: Preparing the Ingredients

Before you start cooking, it’s essential to prepare all your ingredients. Begin by chopping the cooked corned beef into small, bite-sized pieces. Next, peel and dice the potatoes into uniform cubes. This ensures even cooking. Then, dice the onion and red bell pepper. Having everything ready will make the cooking process smooth and enjoyable. Remember, a well-prepared kitchen is a happy kitchen!

Step 2: Cooking the Potatoes

Now, it’s time to cook the potatoes. Heat 2 tablespoons of olive oil in a large skillet over medium heat. Once the oil is hot, add the diced potatoes. Season them with salt, pepper, garlic powder, and paprika. Stir well to coat the potatoes evenly. Cook for about 10-15 minutes, stirring occasionally. You want the potatoes to become tender and start to brown. This step is crucial for achieving that crispy texture that makes corned beef hash so delightful!

Step 3: Sautéing the Onions and Corned Beef

While the potatoes are cooking, it’s time to sauté the onions and red bell pepper. After the potatoes are tender, push them to one side of the skillet. Add the diced onions and red bell pepper to the empty side. Cook for about 5 minutes until they soften and become fragrant. Then, mix everything together. Now, stir in the chopped corned beef. Cook for an additional 5-7 minutes, allowing the mixture to crisp up slightly. This step adds layers of flavor to your dish!

Step 4: Combining Ingredients

At this point, all your ingredients should be in the skillet. Give everything a good stir to combine. Make sure the corned beef, potatoes, and vegetables are evenly distributed. This ensures that every bite is packed with flavor. If you’re adding eggs, create four small wells in the hash. Crack an egg into each well. Cover the skillet and let it cook until the eggs are set to your liking, about 5-7 minutes. This adds a lovely richness to the dish!

Step 5: Final Cooking and Serving

Once the eggs are cooked, remove the skillet from the heat. Garnish your corned beef hash with freshly chopped parsley for a pop of color and freshness. Serve it hot, and enjoy the delightful combination of flavors and textures. This dish is perfect for breakfast, brunch, or even a cozy dinner. Your family and friends will surely love it!

Variations of Corned Beef Hash Recipe

Vegetarian Corned Beef Hash

If you’re looking for a meat-free option, a vegetarian corned beef hash is a fantastic choice. Instead of corned beef, use a plant-based substitute like tempeh or seitan. These ingredients provide a similar texture and can absorb the delicious flavors of the spices. You can also add more vegetables, such as mushrooms, zucchini, or spinach, to enhance the dish. The key is to season well with garlic powder, paprika, and a touch of soy sauce for depth. This variation is not only hearty but also packed with nutrients!

Spicy Corned Beef Hash

For those who enjoy a bit of heat, a spicy corned beef hash is the way to go! Start by adding diced jalapeños or serrano peppers to the skillet along with the onions and bell peppers. You can also sprinkle in some cayenne pepper or a dash of your favorite hot sauce while cooking. This will give your hash a delightful kick that pairs perfectly with the savory corned beef. Serve it with a side of avocado or a dollop of sour cream to balance the spice. This variation is sure to wake up your taste buds!

Corned Beef Hash with Eggs

While the original recipe includes eggs, you can get creative with this variation. Instead of simply cracking eggs into the hash, try poaching or frying them separately. Serve the eggs on top of the hash for a beautiful presentation. You can also experiment with different styles, like sunny-side-up or over-easy, depending on your preference. The runny yolk adds a rich creaminess that elevates the dish. This version is perfect for brunch gatherings or a cozy family breakfast!

Cooking Note for Corned Beef Hash Recipe

When preparing your corned beef hash, there are a few important cooking notes to keep in mind. First, using leftover corned beef is a great way to save time and reduce waste. If you have some from a previous meal, it will work perfectly in this recipe. Just make sure to chop it into small pieces for even cooking.

Another tip is to ensure your potatoes are diced evenly. This helps them cook uniformly, resulting in a perfect texture. If you prefer a creamier hash, you can parboil the potatoes for a few minutes before adding them to the skillet. This will speed up the cooking process and give you that desired softness.

Additionally, don’t be afraid to adjust the seasoning to your taste. Everyone has different preferences, so feel free to add more garlic powder, paprika, or even some herbs like thyme or rosemary for an extra flavor boost. Remember, cooking is all about experimenting and finding what works best for you!

Lastly, if you want a crispier hash, let it cook undisturbed for a few minutes before stirring. This allows the bottom layer to brown nicely. Once you achieve that golden crust, you can mix everything together for a delightful crunch in every bite. Enjoy your cooking adventure!

Serving Suggestions for Corned Beef Hash Recipe

Serving corned beef hash is just as important as preparing it. The way you present this dish can enhance the overall dining experience. Here are some delightful serving suggestions to elevate your corned beef hash:

  • With Eggs: As mentioned earlier, serving corned beef hash with eggs is a classic choice. Whether you prefer them fried, poached, or scrambled, eggs add a rich and creamy texture that complements the savory hash beautifully.
  • Fresh Greens: Pair your hash with a side of fresh greens, like arugula or spinach. A light salad dressed with lemon vinaigrette can balance the richness of the hash and add a refreshing crunch.
  • Avocado Slices: Creamy avocado slices on the side can enhance the dish’s flavor. The smoothness of the avocado pairs well with the crispy hash, making each bite delightful.
  • Hot Sauce: For those who enjoy a bit of heat, serve your corned beef hash with a side of hot sauce. A few dashes can elevate the flavors and add an exciting kick.
  • Toast or Biscuits: Serve the hash alongside warm toast or flaky biscuits. This adds a comforting element to the meal and is perfect for soaking up any runny egg yolk.
  • Pickles or Relish: A small serving of pickles or relish can provide a tangy contrast to the savory flavors of the hash. This adds an interesting twist and enhances the overall taste.

These serving suggestions can help you create a well-rounded meal that everyone will enjoy. Whether it’s for breakfast, brunch, or dinner, corned beef hash can be a star on your table. Feel free to mix and match these ideas to find your perfect combination!

Tips for Perfecting Your Corned Beef Hash Recipe

Perfecting your corned beef hash is all about attention to detail and a few handy tips. Here are some suggestions to elevate your dish and ensure it turns out delicious every time:

  • Use Quality Ingredients: Start with high-quality corned beef. If possible, use homemade or freshly cooked corned beef for the best flavor. Fresh vegetables also make a big difference in taste.
  • Don’t Rush the Cooking: Allow the potatoes to cook thoroughly before adding other ingredients. This ensures they become tender and crispy. Patience is key!
  • Experiment with Seasonings: Feel free to play around with different spices. Adding herbs like thyme or rosemary can enhance the flavor profile. A sprinkle of cayenne pepper can also add a nice kick.
  • Adjust the Texture: If you prefer a creamier hash, consider adding a splash of cream or a dollop of sour cream just before serving. This can add richness and depth to the dish.
  • Let it Crisp: For a crispy texture, let the hash sit undisturbed for a few minutes before stirring. This allows the bottom to brown nicely, creating a delightful crunch.
  • Garnish Wisely: Fresh herbs like parsley or chives not only add color but also a burst of freshness. A squeeze of lemon juice can brighten the flavors, making the dish even more enjoyable.

By following these tips, you can create a corned beef hash that is not only tasty but also visually appealing. Enjoy the process of cooking and don’t hesitate to make it your own!

Breakdown of Time for Corned Beef Hash Recipe

Prep Time

Preparing your ingredients is the first step in making corned beef hash. This includes chopping the corned beef, dicing the potatoes, onions, and red bell pepper. Expect to spend about 15-20 minutes on this task. Having everything ready will make the cooking process smoother and more enjoyable.

Cooking Time

The actual cooking time for corned beef hash is approximately 25-30 minutes. This includes cooking the potatoes until they are tender and slightly crispy, sautéing the onions and bell peppers, and combining everything with the corned beef. If you choose to add eggs, allow an additional 5-7 minutes for them to cook to your desired doneness.

Total Time

In total, you should plan for about 45-50 minutes from start to finish. This includes both prep and cooking time. It’s a relatively quick meal to prepare, making it perfect for busy mornings or a cozy weekend brunch. With just a little time and effort, you can enjoy a delicious and hearty corned beef hash that will satisfy everyone at the table!

Nutritional Information for Corned Beef Hash Recipe

Calories

When it comes to enjoying corned beef hash, understanding its caloric content is essential. Each serving of this hearty dish contains approximately 350 calories. This makes it a satisfying meal that can fuel your day without overwhelming your calorie intake. It’s a great option for breakfast or brunch, especially when you need a boost of energy to start your day!

Protein

Corned beef hash is not only delicious but also a good source of protein. Each serving provides about 22 grams of protein. This is beneficial for muscle repair and growth, making it an excellent choice for those who lead an active lifestyle. The combination of corned beef and eggs (if added) contributes significantly to the protein content, helping you feel full and satisfied.

Sodium

While enjoying corned beef hash, it’s important to be mindful of sodium levels. Each serving contains around 800 milligrams of sodium. This is primarily due to the corned beef, which is often cured with salt. If you are watching your sodium intake, consider using low-sodium corned beef or adjusting the amount of added salt in the recipe. Balancing your meal with fresh vegetables can also help mitigate sodium levels while enhancing flavor.

FAQs about Corned Beef Hash Recipe

Can I use leftover corned beef for this recipe?

Absolutely! Using leftover corned beef is a fantastic way to make this dish. In fact, corned beef hash was originally created to utilize leftover meat. Just chop the leftover corned beef into small pieces, and it will work perfectly in this recipe. This not only saves time but also reduces food waste, making your meal both delicious and eco-friendly!

What can I serve with corned beef hash?

Corned beef hash is versatile and pairs well with various sides. You can serve it with eggs cooked to your liking, such as fried or poached, for a hearty breakfast. Fresh greens, like arugula or spinach, add a refreshing touch. Additionally, avocado slices, toast, or biscuits complement the dish beautifully. For those who enjoy a bit of spice, a side of hot sauce can elevate the flavors. Feel free to mix and match these options to create a well-rounded meal!

How do I make corned beef hash crispy?

To achieve that perfect crispy texture in your corned beef hash, let it cook undisturbed for a few minutes before stirring. This allows the bottom layer to brown nicely. Using a hot skillet and enough oil is also crucial. If you prefer an extra crunch, you can increase the cooking time slightly, but be careful not to burn it. A well-cooked hash should have a delightful contrast between crispy edges and tender potatoes!

Can I freeze corned beef hash?

Yes, you can freeze corned beef hash! To do this, allow the hash to cool completely before transferring it to an airtight container or freezer bag. It can be stored in the freezer for up to three months. When you’re ready to enjoy it again, simply thaw it in the refrigerator overnight and reheat it in a skillet over medium heat. You may need to add a splash of water or broth to help it heat evenly. This makes for a quick and convenient meal option!

Conclusion on Corned Beef Hash Recipe

In conclusion, corned beef hash is a delightful dish that brings together the savory flavors of corned beef, tender potatoes, and vibrant vegetables. Its rich history and versatility make it a beloved choice for breakfast, brunch, or even dinner. Whether you stick to the classic recipe or explore the various delicious variations, this dish is sure to satisfy your taste buds.

With simple ingredients and straightforward preparation steps, corned beef hash is accessible for cooks of all skill levels. The ability to customize it with different spices, vegetables, or even eggs allows you to make it your own. Plus, it’s a fantastic way to use up leftover corned beef, reducing waste while creating a hearty meal.

As you gather your ingredients and follow the steps outlined in this article, remember to enjoy the cooking process. The aroma of sizzling potatoes and corned beef will fill your kitchen, creating a warm and inviting atmosphere. So, gather your family or friends, serve up a plate of corned beef hash, and relish the delightful flavors together.

We hope this recipe inspires you to create your own version of corned beef hash. Happy cooking!

Paul

Corned Beef Hash is a hearty dish for any meal.

Corned Beef Hash is the ultimate no-fuss comfort food, made with tender potatoes, flavorful canned corned beef, and golden-crisp edges. Quick to whip up and perfect for breakfast, brunch, or a lazy dinner—especially topped with a runny fried egg.
Prep Time 10 minutes
Cook Time 25 minutes
Total Time 35 minutes
Servings: 4 servings
Course: Breakfast, Brunch, Main
Cuisine: British

Ingredients
  

  • 700 g potatoes peeled and chopped into 3cm cubes340g canned corned beef, cut into 1cm cubes1 onion, finely chopped2 tablespoons sunflower oil or any neutral oil1 tablespoon Worcestershire sauce or Henderson’s RelishSalt and freshly ground black pepper, to taste

Method
 

  1. Place chopped potatoes in a large pot of boiling water and cook until tender, about 10 to 12 minutes. Drain thoroughly and let steam off any excess moisture.
  2. While the potatoes are boiling, heat the oil in a large frying pan over medium heat. Add chopped onions and sauté for about 5 minutes until softened and golden.
  3. Add the drained potatoes to the pan along with the cubed corned beef and Worcestershire sauce. Season generously with salt and pepper.
  4. Increase the heat to high and cook for another 5 to 10 minutes, stirring occasionally, until the potatoes develop a golden, crispy crust.
  5. For extra crunch, place the pan under a hot grill for 2 to 3 minutes until the top is crisped to your liking.
  6. Serve hot, optionally topped with a fried egg, brown sauce, or a side of beans or salad.

Notes

Floury potatoes like Maris Piper or King Edward work best for crisp edges.
Canned corned beef softens during cooking—avoid stirring too often to keep some texture.
Leftovers can be reheated in a hot skillet to bring back the crisp.
This recipe pairs well with poached eggs, sautéed greens, or baked beans for a complete meal.