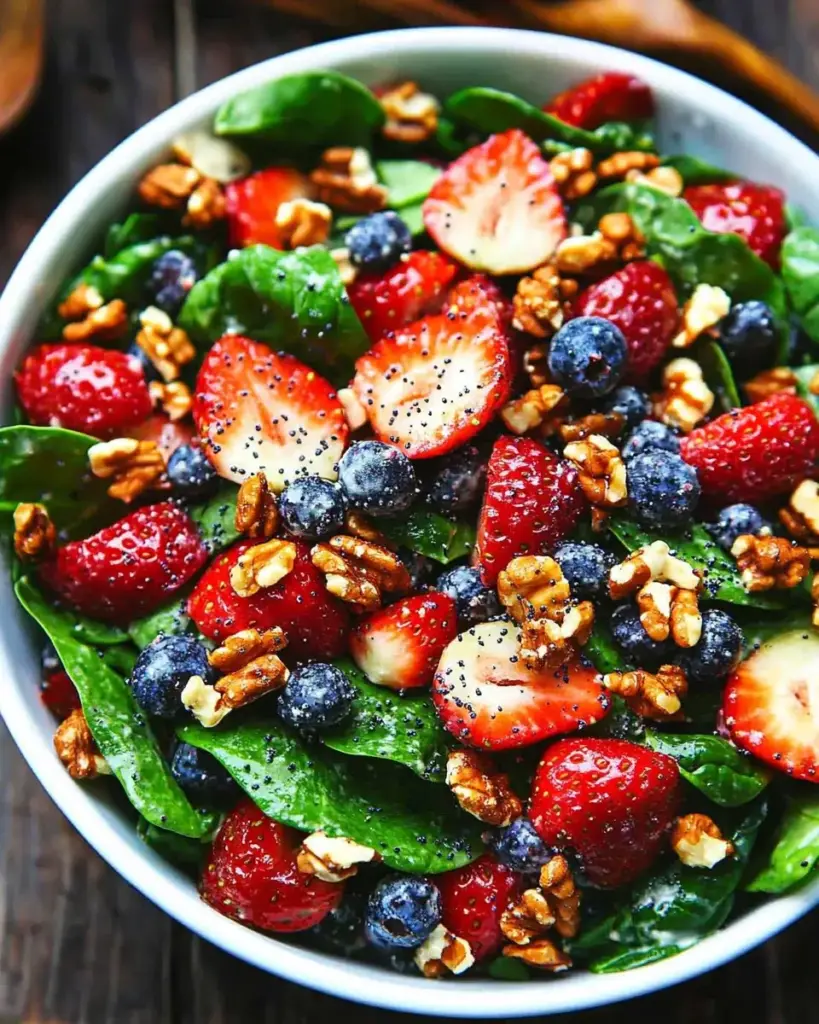
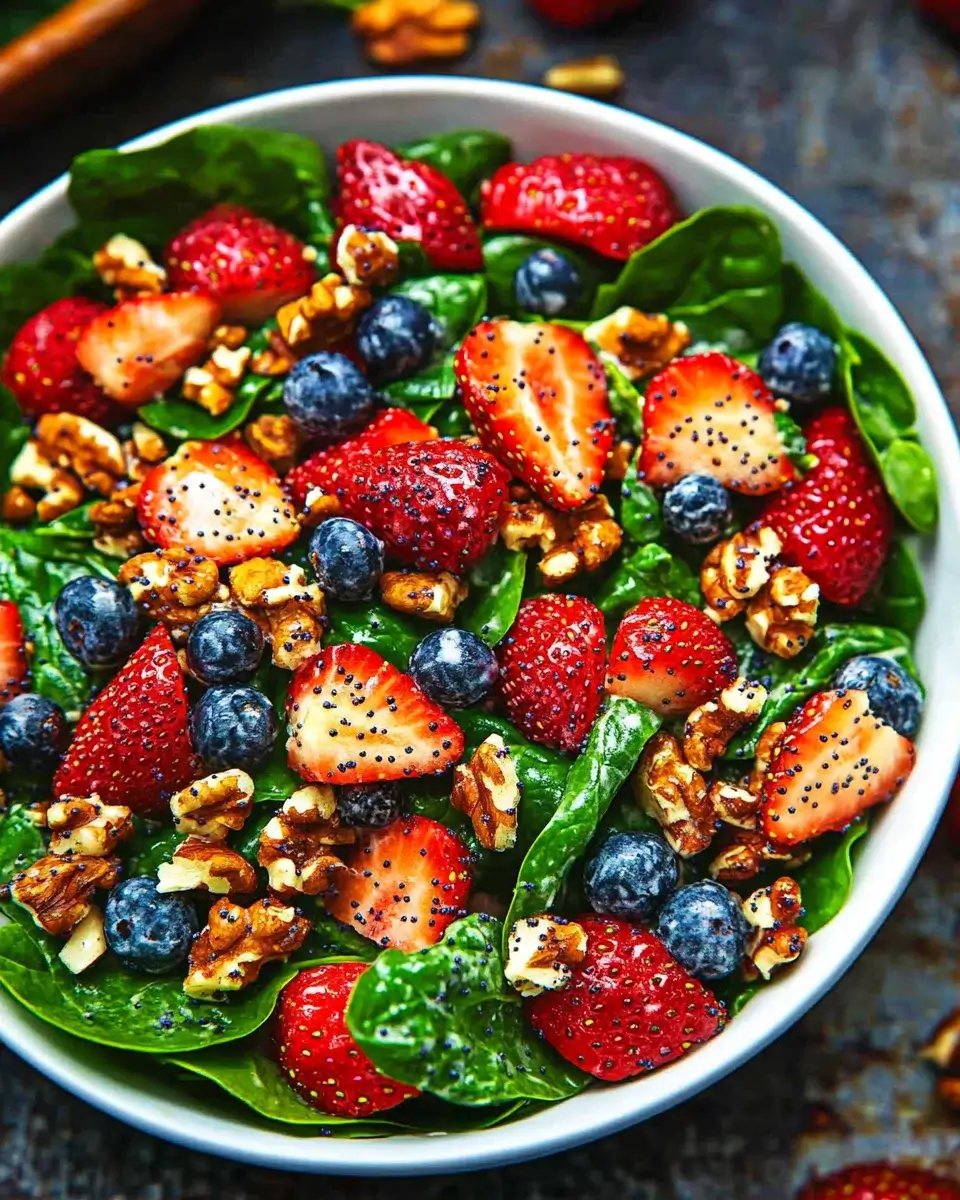
Strawberry Spinach Salad with Poppy Seed Dressing Recipe is delicious!

Introduction to Strawberry Spinach Salad with Poppy Seed Dressing Recipe

The Appeal of Strawberry Spinach Salad

Strawberry Spinach Salad is a delightful dish that brings together vibrant flavors and textures. The combination of fresh baby spinach and sweet strawberries creates a refreshing experience. This salad is not only visually appealing but also packed with nutrients. Spinach is rich in vitamins A and C, while strawberries provide antioxidants and fiber. Together, they make a perfect duo for a healthy meal or side dish.

Moreover, the crunch of toasted pecans adds a satisfying texture. The creamy feta cheese enhances the flavor profile, making each bite a burst of deliciousness. Whether you’re hosting a summer barbecue or looking for a light lunch, this salad is sure to impress. It’s easy to prepare and can be enjoyed by everyone, making it a versatile choice for any occasion.

Why Poppy Seed Dressing Complements This Salad

Poppy seed dressing is the perfect finishing touch for this salad. Its sweet and tangy flavor beautifully complements the strawberries and spinach. The dressing is light yet flavorful, enhancing the overall taste without overpowering the fresh ingredients. Made with simple ingredients like honey and apple cider vinegar, it adds a delightful zing to the salad.

Additionally, the poppy seeds provide a unique crunch that ties the dish together. This dressing is not only easy to make but also elevates the salad to a new level. With its creamy texture and vibrant taste, poppy seed dressing makes every bite enjoyable. It’s a wonderful way to bring out the best in your Strawberry Spinach Salad, making it a must-try recipe for any salad lover.

Ingredients for Strawberry Spinach Salad with Poppy Seed Dressing Recipe

Fresh Ingredients for the Salad

To create a delicious Strawberry Spinach Salad, you need fresh and high-quality ingredients. Start with 4 cups of fresh baby spinach. Make sure it’s washed and dried thoroughly to maintain its crispness. Next, you’ll need 2 cups of strawberries. Choose ripe, juicy strawberries, hulled and sliced for the best flavor. Their natural sweetness will enhance the salad’s overall taste.

Additionally, include 1/2 cup of red onion, thinly sliced. The onion adds a sharp contrast to the sweetness of the strawberries. For a creamy touch, use 1/2 cup of feta cheese, crumbled. This cheese brings a rich flavor that pairs wonderfully with the other ingredients. Finally, add 1/2 cup of toasted pecans. Toasting the pecans enhances their nutty flavor and adds a delightful crunch to the salad.

Essential Ingredients for Poppy Seed Dressing

The poppy seed dressing is a key component of this salad. To make it, gather the following ingredients: 1/4 cup of vegetable oil, which serves as the base of the dressing. You’ll also need 2 tablespoons of apple cider vinegar for a tangy kick. Adding 1 tablespoon of honey provides a touch of sweetness that balances the acidity of the vinegar.

Next, include 1 teaspoon of Dijon mustard. This ingredient adds depth and a slight spiciness to the dressing. Don’t forget 1 teaspoon of poppy seeds, which not only contribute to the flavor but also add a lovely visual appeal. Finally, season with salt and pepper to taste. These simple ingredients come together to create a dressing that perfectly complements the fresh flavors of the salad.

Preparation of Strawberry Spinach Salad with Poppy Seed Dressing Recipe

Step 1: Preparing the Spinach

First, let’s prepare the spinach. Start by rinsing 4 cups of fresh baby spinach under cold water. This step is crucial to remove any dirt or grit. After washing, gently dry the spinach using a salad spinner or by patting it with a clean kitchen towel. It’s important to ensure the spinach is dry to prevent the salad from becoming soggy. Once dried, place the spinach in a large salad bowl, ready for the other ingredients.

Step 2: Slicing the Strawberries

Next, it’s time to slice the strawberries. Take 2 cups of ripe strawberries and hull them carefully. This means removing the green tops and the white core. After hulling, slice the strawberries into thin pieces. Aim for uniform slices to ensure even distribution in the salad. The sweetness of the strawberries will shine through, adding a burst of flavor to each bite. Once sliced, set them aside for the next step.

Step 3: Making the Poppy Seed Dressing

Now, let’s whip up the poppy seed dressing. In a small bowl, combine 1/4 cup of vegetable oil, 2 tablespoons of apple cider vinegar, and 1 tablespoon of honey. Then, add 1 teaspoon of Dijon mustard and 1 teaspoon of poppy seeds. Using a whisk, mix all the ingredients together until they are well blended. Taste the dressing and season with salt and pepper according to your preference. This dressing is light, tangy, and sweet, making it the perfect complement to your salad.

Step 4: Assembling the Salad

With all the components ready, it’s time to assemble the salad. In the large bowl with the spinach, add the sliced strawberries, 1/2 cup of thinly sliced red onion, and 1/2 cup of crumbled feta cheese. The combination of these ingredients creates a colorful and appetizing salad. Finally, sprinkle 1/2 cup of toasted pecans over the top. The pecans will add a delightful crunch and nutty flavor to the mix.

Step 5: Tossing the Salad with Dressing

To finish, drizzle the prepared poppy seed dressing over the assembled salad. Using salad tongs or two large spoons, gently toss the salad to ensure all ingredients are evenly coated with the dressing. Be careful not to crush the strawberries or feta cheese while tossing. Once everything is well mixed, your Strawberry Spinach Salad with Poppy Seed Dressing is ready to serve. Enjoy it immediately for the freshest taste, or chill it in the refrigerator for up to 30 minutes to enhance the flavors.

Variations of Strawberry Spinach Salad with Poppy Seed Dressing Recipe

Adding Nuts for Crunch

One of the best ways to elevate your Strawberry Spinach Salad is by adding different nuts for extra crunch. While pecans are a fantastic choice, you can also experiment with walnuts or almonds. Walnuts have a rich, earthy flavor that pairs well with the sweetness of strawberries. On the other hand, almonds offer a delightful crunch and a slightly sweet taste. Simply toast the nuts in a dry skillet for a few minutes to enhance their flavor before adding them to the salad. This small step can make a big difference in taste and texture, making your salad even more enjoyable.

Incorporating Cheese for Creaminess

Cheese can add a creamy element to your Strawberry Spinach Salad, enhancing its overall flavor. While feta cheese is a popular choice, you can also try goat cheese or blue cheese for a different twist. Goat cheese has a tangy flavor that complements the sweetness of the strawberries beautifully. If you prefer a stronger taste, blue cheese can add a bold flavor that contrasts nicely with the salad’s fresh ingredients. Crumble your chosen cheese over the top of the salad just before serving. This will not only add creaminess but also create a visually appealing dish that is sure to impress your guests.

Cooking Note for Strawberry Spinach Salad with Poppy Seed Dressing Recipe

Tips for Freshness and Flavor

To ensure your Strawberry Spinach Salad with Poppy Seed Dressing is as fresh and flavorful as possible, consider these helpful tips. First, always use fresh ingredients. When selecting spinach, look for vibrant green leaves without any wilting or browning. Fresh strawberries should be bright red and firm, indicating ripeness. Avoid any that are mushy or have dark spots, as these can affect the overall taste of your salad.

Next, prepare the salad just before serving. This helps maintain the crispness of the spinach and the juiciness of the strawberries. If you need to make it ahead of time, keep the dressing separate until you’re ready to serve. This prevents the salad from becoming soggy and ensures that every bite is delightful.

Additionally, consider adding a squeeze of fresh lemon juice over the salad just before serving. This simple step can brighten the flavors and enhance the overall taste. The acidity from the lemon complements the sweetness of the strawberries and the creaminess of the feta cheese beautifully.

Lastly, if you have leftover salad, store it in an airtight container in the refrigerator. However, keep in mind that the salad is best enjoyed fresh. If you notice any ingredients wilting or losing their texture, it’s a sign to enjoy it sooner rather than later. By following these tips, you can create a Strawberry Spinach Salad that is not only delicious but also visually appealing and full of fresh flavors.

Serving Suggestions for Strawberry Spinach Salad with Poppy Seed Dressing Recipe

Ideal Pairings for This Salad

Strawberry Spinach Salad with Poppy Seed Dressing is a versatile dish that pairs wonderfully with various meals. For a light lunch, serve it alongside grilled chicken or fish. The protein complements the salad’s fresh flavors, making it a satisfying meal. If you’re hosting a gathering, this salad is an excellent side dish for barbecued meats or roasted vegetables. The sweetness of the strawberries balances the savory notes of grilled foods.

Additionally, consider serving this salad with a warm quiche or a hearty soup. The contrast between the warm and cold dishes creates a delightful dining experience. For a vegetarian option, pair it with a chickpea salad or a quinoa bowl. These options add protein and make the meal more filling. No matter how you choose to serve it, this salad is sure to be a hit!

Presentation Tips for Serving

Presentation plays a key role in making your Strawberry Spinach Salad visually appealing. Start by using a large, shallow bowl to showcase the vibrant colors of the ingredients. Arrange the spinach as a base, then artfully layer the strawberries, red onion, feta cheese, and pecans on top. This creates a beautiful contrast that is sure to catch the eye.

For an extra touch, consider garnishing the salad with a few whole strawberries or a sprinkle of additional poppy seeds. This adds a pop of color and makes the dish look even more inviting. If you’re serving the salad at a gathering, individual servings in clear cups or jars can create a fun and elegant presentation. This way, guests can easily enjoy their salad while mingling.

Lastly, don’t forget to serve the poppy seed dressing on the side. This allows guests to add as much or as little dressing as they prefer, keeping the salad fresh and crisp. With these presentation tips, your Strawberry Spinach Salad will not only taste amazing but also look stunning on the table!
Tips for Making the Best Strawberry Spinach Salad with Poppy Seed Dressing Recipe

Choosing the Right Strawberries

When it comes to making a delicious Strawberry Spinach Salad, selecting the right strawberries is crucial. Look for strawberries that are bright red and firm to the touch. These qualities indicate ripeness and sweetness. Avoid any strawberries that are dull in color or have dark spots, as these may be overripe or spoiled.

For the best flavor, try to buy strawberries that are in season. In many regions, strawberries are at their peak from late spring to early summer. During this time, they are more likely to be juicy and flavorful. If possible, consider visiting a local farmer’s market. Freshly picked strawberries from local farms often taste better than those that have been shipped long distances.

Additionally, if you can, smell the strawberries before purchasing. A sweet, fragrant aroma is a good sign of ripeness. Once you have selected your strawberries, store them in the refrigerator. Keep them in their original container or a breathable container to prevent moisture buildup. This will help maintain their freshness until you are ready to use them in your salad.

Storing Leftovers Properly

After enjoying your Strawberry Spinach Salad, you may have some leftovers. To keep them fresh, it’s important to store them properly. First, if you have any leftover salad, avoid mixing the dressing with the salad until you are ready to eat it again. This will help prevent the spinach from wilting and the strawberries from becoming mushy.

Place any leftover salad in an airtight container. If you have already added the dressing, try to consume it within a day for the best taste and texture. If the salad is undressed, it can last in the refrigerator for up to two days. However, keep in mind that the quality may decline over time.

When you’re ready to enjoy the leftovers, give the salad a gentle toss to redistribute the ingredients. If it seems a bit dry, you can add a splash of fresh dressing or a squeeze of lemon juice to brighten the flavors. By following these storage tips, you can enjoy your Strawberry Spinach Salad with Poppy Seed Dressing even after the initial serving!

Breakdown of Time for Strawberry Spinach Salad with Poppy Seed Dressing Recipe

Prep Time

The prep time for the Strawberry Spinach Salad with Poppy Seed Dressing is quite short. You can expect to spend about 15 minutes gathering and preparing all the ingredients. This includes washing the spinach, hulling and slicing the strawberries, and slicing the red onion. Additionally, you’ll need a few minutes to make the poppy seed dressing. Overall, this salad is quick to prepare, making it perfect for busy days or last-minute gatherings.

Cooking Time

Interestingly, there is no actual cooking time involved in this recipe. The only heat required is for toasting the pecans, which takes about 5 minutes. Simply place the pecans in a dry skillet over medium heat and stir them until they are fragrant and lightly browned. This step enhances their flavor and adds a delightful crunch to the salad. Other than that, all the ingredients are fresh and ready to eat, making this salad a no-cook option!

Total Time

In total, you can expect to spend around 20 minutes preparing the Strawberry Spinach Salad with Poppy Seed Dressing. This includes the 15 minutes of prep time and the 5 minutes for toasting the pecans. With such a quick preparation time, this salad is an excellent choice for a healthy meal or side dish that doesn’t require much effort. You can easily whip it up for lunch, dinner, or even a picnic!

Nutritional Information for Strawberry Spinach Salad with Poppy Seed Dressing Recipe

Calories and Macronutrients

Understanding the nutritional content of your meals is essential for maintaining a balanced diet. Each serving of the Strawberry Spinach Salad with Poppy Seed Dressing contains approximately 220 calories. This makes it a light yet satisfying option for lunch or dinner. The macronutrient breakdown is as follows:

  • Net Carbohydrates: 10g
  • Protein: 6g
  • Fat: 18g

This salad is low in carbohydrates, making it suitable for those watching their carb intake. The healthy fats from the pecans and dressing provide energy and help keep you feeling full. Additionally, the protein content from the feta cheese and spinach contributes to muscle health and overall well-being.

Health Benefits of Ingredients

The ingredients in this salad not only taste great but also offer numerous health benefits. Spinach is a powerhouse of nutrients, rich in vitamins A, C, and K. These vitamins support eye health, boost the immune system, and promote healthy bones. Strawberries are loaded with antioxidants, which help fight inflammation and protect your cells from damage.

Feta cheese adds calcium and protein, essential for strong bones and muscle function. Pecans are a great source of healthy fats, fiber, and protein, which can help lower cholesterol levels and improve heart health. The poppy seed dressing, made with apple cider vinegar and honey, provides additional antioxidants and can aid digestion.

Incorporating this Strawberry Spinach Salad into your diet can contribute to overall health and wellness. It’s a delicious way to enjoy a variety of nutrients while keeping your meals light and refreshing. So, whether you’re looking for a healthy side dish or a main course, this salad is a fantastic choice!

FAQs about Strawberry Spinach Salad with Poppy Seed Dressing Recipe

Can I make the dressing ahead of time?

Absolutely! You can make the poppy seed dressing ahead of time. In fact, preparing it a few hours or even a day in advance can enhance the flavors. Just store the dressing in an airtight container in the refrigerator. When you’re ready to serve the salad, give it a good shake or stir to mix everything well. This way, you can save time when preparing your meal!

What other fruits can I add to this salad?

Feel free to get creative with your fruit choices! Besides strawberries, you can add other fruits like blueberries, raspberries, or even sliced peaches. Each fruit brings its unique flavor and texture, making the salad even more delightful. Mixing different fruits not only enhances the taste but also adds a pop of color, making your salad visually appealing.

Is this salad suitable for meal prep?

Yes, this salad is great for meal prep! However, it’s best to keep the dressing separate until you’re ready to eat. This helps maintain the freshness of the spinach and prevents it from wilting. You can prepare the salad ingredients and store them in individual containers. When it’s time to enjoy your meal, simply add the dressing and toss everything together. This way, you can enjoy a fresh and healthy salad throughout the week!

How long does the salad last in the fridge?

If stored properly, the Strawberry Spinach Salad can last in the fridge for about 1 to 2 days. However, it’s important to note that the quality may decline over time. If you’ve added the dressing, try to consume it within a day for the best taste. If the salad is undressed, it can last a bit longer. Always check for any signs of wilting or spoilage before eating. Enjoy your salad while it’s fresh for the best experience!

Conclusion on Strawberry Spinach Salad with Poppy Seed Dressing Recipe

Recap of the Recipe’s Highlights

In summary, the Strawberry Spinach Salad with Poppy Seed Dressing is a delightful dish that combines fresh ingredients and vibrant flavors. With its mix of baby spinach, sweet strawberries, and crunchy pecans, this salad is not only visually appealing but also packed with nutrients. The creamy feta cheese adds richness, while the poppy seed dressing ties everything together with its sweet and tangy notes. This recipe is quick to prepare, making it perfect for busy days or special occasions.

Moreover, the versatility of this salad allows for various adaptations. You can easily add different nuts or cheeses to suit your taste. Whether you’re serving it as a light lunch or a side dish at a gathering, this salad is sure to impress your guests. Plus, with its health benefits, you can enjoy it guilt-free!

Encouragement to Try the Recipe

We encourage you to try making the Strawberry Spinach Salad with Poppy Seed Dressing for yourself. It’s a simple yet delicious way to incorporate more fresh produce into your diet. The combination of flavors and textures will surely delight your taste buds. Don’t hesitate to experiment with different fruits and nuts to make it your own!

So, gather your ingredients, whip up this refreshing salad, and enjoy a burst of flavor in every bite. Whether for a family meal or a gathering with friends, this salad is bound to be a hit. Happy cooking!
Paul

Strawberry Spinach Salad with Poppy Seed Dressing Recipe is delicious!

Bright, refreshing, and full of flavor, this Strawberry Spinach Salad is a celebration of sweet berries, creamy feta, and crunchy pecans, all brought together with a rich homemade balsamic glaze. Perfect for summer lunches, garden parties, or as a vibrant side dish!
Prep Time 10 minutes
Cook Time 10 minutes
Total Time 20 minutes
Servings: 6 servings
Course: Salad
Cuisine: American

Ingredients
  

  • For the salad:6 cups fresh baby spinach1 cup strawberries sliced½ cup blueberries½ cup crumbled feta cheese½ cup toasted pecans (some whole, some chopped)
  • For the balsamic glaze dressing:1 cup balsamic vinegar¼ cup honey or brown sugar

Method
 

  1. Make the balsamic glaze:In a small saucepan, combine the balsamic vinegar and honey (or brown sugar). Bring to a gentle boil over medium heat, then reduce to a simmer. Cook for about 10 minutes, stirring occasionally, until the mixture reduces by half and becomes syrupy. Remove from heat and let cool.
  2. Assemble the salad:In a large bowl, combine baby spinach, sliced strawberries, blueberries, and crumbled feta cheese. Toss gently to mix.
  3. Plate and finish:Divide the salad into individual serving bowls or arrange on a platter. Top with whole and chopped toasted pecans. Drizzle each serving with the cooled balsamic glaze just before serving.


Notes

For a heartier version, top the salad with grilled chicken or shrimp. You can also prep the balsamic glaze ahead of time and store it in the fridge for up to one week. Make sure it’s completely cooled before drizzling to avoid wilting the spinach.

Rhubarb Scones with Vanilla Glaze Recipe are delightful!

Introduction to Rhubarb Scones with Vanilla Glaze Recipe

Welcome to the delightful world of baking! Today, we’re diving into a scrumptious treat that combines the tartness of rhubarb with the sweetness of a vanilla glaze. Rhubarb scones with vanilla glaze are not just any ordinary scones; they are a perfect blend of flavors and textures that will make your taste buds dance with joy. Whether you’re enjoying them for breakfast, brunch, or as an afternoon snack, these scones are sure to impress.

What Makes Rhubarb Scones Special?

Rhubarb scones stand out for several reasons. First, rhubarb itself is a unique ingredient. Its tangy flavor adds a refreshing twist to the traditional scone. This contrasts beautifully with the sweetness of the vanilla glaze, creating a delightful balance. Additionally, the texture of these scones is light and flaky, making each bite a pleasure.

Moreover, rhubarb is a seasonal fruit, often associated with spring and early summer. This makes rhubarb scones a wonderful way to celebrate the changing seasons. They are perfect for gatherings, picnics, or simply enjoying at home with a cup of tea or coffee. The vibrant color of rhubarb also adds visual appeal, making these scones not only tasty but also beautiful.

In summary, rhubarb scones with vanilla glaze are special because they combine unique flavors, seasonal ingredients, and a delightful texture. They are a treat that brings joy to any occasion. So, let’s get started on this delicious journey of baking!

Ingredients for Rhubarb Scones with Vanilla Glaze Recipe

To create these delightful rhubarb scones with vanilla glaze, you’ll need a few simple ingredients. Each component plays a vital role in achieving the perfect balance of flavors and textures. Here’s what you’ll need:

  • 2 cups all-purpose flour
  • 1/3 cup granulated sugar
  • 1 tablespoon baking powder
  • 1/2 teaspoon salt
  • 1/2 cup unsalted butter, cold and cubed
  • 1 cup fresh rhubarb, diced
  • 1/2 cup heavy cream
  • 1 large egg
  • 1 teaspoon vanilla extract

For the glaze, you will need:

  • 1 cup powdered sugar
  • 2 tablespoons heavy cream
  • 1/2 teaspoon vanilla extract

These ingredients come together to create a deliciously sweet and tangy treat. The fresh rhubarb adds a unique flavor, while the vanilla glaze provides a lovely finish. Make sure to gather everything before you start baking, as this will help streamline the process and ensure you don’t miss any key components!

Step-by-Step Preparation of Rhubarb Scones with Vanilla Glaze Recipe

Now that you have all your ingredients ready, it’s time to dive into the step-by-step preparation of these delightful rhubarb scones with vanilla glaze. Following these steps will ensure that your scones turn out perfectly every time. Let’s get started!

Step 1: Preheat the Oven

400°F (200°C). This is an important step because a hot oven helps the scones rise and become fluffy. While the oven is heating, you can prepare the rest of your ingredients.

Step 2: Prepare the Rhubarb

1 cup of diced rhubarb. Set it aside for now, as it will be added to the dough later.

Step 3: Mix Dry Ingredients

2 cups of all-purpose flour, 1/3 cup of granulated sugar, 1 tablespoon of baking powder, and 1/2 teaspoon of salt. Use a whisk to mix these dry ingredients well. This ensures that the baking powder and salt are evenly distributed throughout the flour.

Step 4: Combine Wet Ingredients

1/2 cup of heavy cream, 1 large egg, and 1 teaspoon of vanilla extract. Make sure these ingredients are well combined. This mixture will add moisture and flavor to your scone dough.

Step 5: Form the Scone Dough

Now, it’s time to bring everything together! Add the cold, cubed butter to the dry ingredients. Using a pastry cutter or your fingers, blend the butter into the flour mixture until it resembles coarse crumbs. Then, gently fold in the diced rhubarb. Finally, pour the wet ingredients into the dry mixture and stir until just combined. Be careful not to overmix, as this can make the scones tough.

Step 6: Cut and Shape the Scones

1-inch thick. You can use a knife to cut it into wedges or a biscuit cutter to create round scones. The choice is yours! Just make sure they are evenly shaped for even baking.

Step 7: Bake the Scones

15-20 minutes or until they are golden brown. Keep an eye on them, as oven temperatures can vary. You want them to be perfectly baked and slightly firm to the touch.

Step 8: Prepare the Vanilla Glaze

1 cup of powdered sugar, 2 tablespoons of heavy cream, and 1/2 teaspoon of vanilla extract until smooth. This glaze will add a sweet finish to your scones once they cool down.

And there you have it! You’re now ready to enjoy your freshly baked rhubarb scones with vanilla glaze. The aroma in your kitchen will be irresistible!

Variation of Rhubarb Scones with Vanilla Glaze Recipe

While the classic rhubarb scones with vanilla glaze are delicious on their own, there are many ways to switch things up! You can easily customize this recipe to suit your taste or to use what you have on hand. Let’s explore some alternative ingredients and flavor enhancements that can take your scones to the next level.

Alternative Ingredients to Consider

If you want to experiment with different flavors, consider these alternative ingredients:

  • Fruits: Instead of rhubarb, try using fresh strawberries, blueberries, or raspberries. Each fruit brings its own unique sweetness and flavor.
  • Nuts: Adding chopped nuts like walnuts or pecans can give your scones a delightful crunch. Just fold them in with the rhubarb.
  • Spices: A pinch of cinnamon or nutmeg can add warmth and depth to your scones. Sprinkle a little into the dry ingredients for a cozy flavor.
  • Herbs: Fresh herbs like rosemary or thyme can create a savory twist. Use them sparingly to avoid overpowering the sweetness.

These alternatives can help you create a unique scone that suits your preferences or the season. Feel free to mix and match!

Flavor Enhancements for Your Scones

To elevate the flavor of your rhubarb scones, consider these enhancements:

  • Citrus Zest: Adding the zest of a lemon or orange can brighten the flavor. Just a teaspoon will do!
  • Chocolate Chips: For a sweet twist, fold in some chocolate chips. They pair wonderfully with the tartness of rhubarb.
  • Vanilla Bean: Instead of vanilla extract, use the seeds from a vanilla bean for a richer flavor.
  • Glaze Variations: Experiment with different glazes, such as a lemon glaze or a maple syrup glaze, to complement the scones.

These flavor enhancements can make your scones even more delightful. Don’t hesitate to get creative and make this recipe your own!

Cooking Note for Rhubarb Scones with Vanilla Glaze Recipe

When it comes to baking rhubarb scones with vanilla glaze, a few cooking notes can help ensure your scones turn out perfectly every time. Here are some important tips to keep in mind:

  • Use Cold Ingredients: Make sure your butter and heavy cream are cold. This helps create a flaky texture in the scones. Cold butter will not melt into the dough too quickly, allowing for those lovely layers.
  • Don’t Overmix: When combining the wet and dry ingredients, mix just until combined. Overmixing can lead to tough scones. A few lumps are perfectly fine!
  • Chill the Dough: If you have time, consider chilling the dough for about 30 minutes before baking. This can enhance the texture and flavor of your scones.
  • Check for Doneness: Keep an eye on your scones while they bake. They should be golden brown on top and firm to the touch. If they are browning too quickly, you can cover them loosely with aluminum foil.
  • Let Them Cool: Allow the scones to cool for a few minutes on the baking sheet before transferring them to a wire rack. This helps them set and makes them easier to glaze.

By following these cooking notes, you’ll be well on your way to baking delicious rhubarb scones with vanilla glaze that everyone will love. Happy baking!

Serving Suggestions for Rhubarb Scones with Vanilla Glaze Recipe

Now that your rhubarb scones with vanilla glaze are baked to perfection, it’s time to think about how to serve them! These delightful treats can be enjoyed in various ways, making them perfect for any occasion. Here are some serving suggestions to enhance your scone experience.

Best Pairings for Your Scones

Rhubarb scones with vanilla glaze are versatile and can be paired with a variety of accompaniments. Here are some ideas to consider:

  • Tea: A warm cup of tea is a classic pairing. Choose a light herbal tea or a fragrant Earl Grey to complement the flavors of the scones.
  • Coffee: For coffee lovers, a freshly brewed cup of coffee or a latte can enhance the enjoyment of your scones. The rich flavors of coffee balance the sweetness of the glaze.
  • Fresh Fruit: Serve your scones with a side of fresh fruit, such as strawberries or blueberries. This adds a refreshing touch and enhances the fruity notes of the rhubarb.
  • Whipped Cream: A dollop of whipped cream can elevate your scone experience. It adds a creamy texture that pairs beautifully with the tartness of rhubarb.
  • Jam: Consider serving your scones with a spread of fruit jam, like strawberry or raspberry. The sweetness of the jam complements the tangy rhubarb perfectly.

These pairings not only enhance the flavors of your rhubarb scones but also create a delightful presentation. Whether you’re hosting a brunch or enjoying a quiet afternoon treat, these suggestions will make your scone experience even more enjoyable!

Tips for Perfect Rhubarb Scones with Vanilla Glaze Recipe

To ensure your rhubarb scones with vanilla glaze turn out perfectly every time, here are some helpful tips to keep in mind. These simple suggestions can make a big difference in the texture and flavor of your scones.

  • Measure Ingredients Accurately: Use a kitchen scale or measuring cups to ensure you have the right amounts. Accurate measurements are key to achieving the perfect scone texture.
  • Use Fresh Rhubarb: Fresh rhubarb will provide the best flavor and texture. Look for firm, vibrant stalks without any blemishes. If you can, choose rhubarb that is in season for the best taste.
  • Keep Butter Cold: Cold butter is essential for flaky scones. If your kitchen is warm, consider chilling the butter in the freezer for a few minutes before cutting it into the flour mixture.
  • Don’t Overwork the Dough: When mixing the dough, be gentle. Overworking can lead to tough scones. Mix just until the ingredients are combined, and don’t worry about a few lumps.
  • Use a Light Touch: When shaping the dough, use a light touch to avoid compressing it. This helps maintain the airiness of the scones, resulting in a fluffy texture.
  • Brush with Cream: For a golden finish, brush the tops of the scones with a little heavy cream before baking. This adds a lovely sheen and enhances the color.
  • Cool Before Glazing: Allow the scones to cool slightly before drizzling with glaze. This prevents the glaze from melting and ensures a beautiful finish.
  • Store Properly: If you have leftovers, store them in an airtight container at room temperature. They are best enjoyed within a couple of days, but you can also freeze them for later enjoyment.

By following these tips, you’ll be well on your way to baking perfect rhubarb scones with vanilla glaze that everyone will love. Enjoy the process and happy baking!

Breakdown of Time for Rhubarb Scones with Vanilla Glaze Recipe

Understanding the time needed for each step in the rhubarb scones with vanilla glaze recipe can help you plan your baking session better. Here’s a breakdown of the time you’ll need for preparation and cooking.

Prep Time

20 minutes. This includes gathering your ingredients, preheating the oven, and preparing the dough. Make sure to take your time during this stage to ensure everything is measured accurately and mixed well. A little patience here will pay off in the final product!

Cooking Time

15-20 minutes. Keep an eye on them as they bake, looking for that lovely golden brown color. The aroma wafting through your kitchen will be a delightful indicator that they are almost ready!

Total Time

35-40 minutes from start to finish. This includes both prep and cooking time. It’s a quick and rewarding process that results in delicious rhubarb scones with vanilla glaze. Perfect for a busy morning or a spontaneous afternoon treat!

Nutritional Information for Rhubarb Scones with Vanilla Glaze Recipe

Understanding the nutritional content of your rhubarb scones with vanilla glaze is essential for making informed choices. This section will provide you with key nutritional information per serving, helping you enjoy these delightful treats while keeping track of your dietary needs.

Calories

210 calories. This makes them a satisfying yet moderate option for breakfast or a snack. The combination of ingredients contributes to the overall calorie count, with the butter and heavy cream providing richness and flavor.

Protein

3 grams. While this isn’t a high-protein snack, it does contribute to your daily intake. Pairing your scone with a protein-rich beverage, like a glass of milk or a yogurt, can help balance your meal.

Sodium

200 milligrams. This is a moderate amount, making these scones a reasonable choice for most diets. However, if you are watching your sodium intake, consider enjoying them in moderation or adjusting the salt in the recipe.

Overall, rhubarb scones with vanilla glaze can fit nicely into a balanced diet. They provide a delightful treat without excessive calories, making them perfect for special occasions or a cozy afternoon snack. Enjoy them guilt-free, knowing you’re indulging in a delicious and relatively nutritious option!

FAQs about Rhubarb Scones with Vanilla Glaze Recipe

Can I use frozen rhubarb for this recipe?

Yes, you can use frozen rhubarb for this recipe! Just make sure to thaw it completely and drain any excess moisture before adding it to the dough. This will help prevent your scones from becoming too wet. Frozen rhubarb can still provide that lovely tart flavor, making your scones just as delicious!

How do I store leftover scones?

To store leftover rhubarb scones with vanilla glaze, place them in an airtight container at room temperature. They are best enjoyed within a couple of days. If you want to keep them longer, you can freeze them. Just wrap each scone tightly in plastic wrap and place them in a freezer bag. When you’re ready to enjoy, simply thaw them at room temperature or warm them in the oven for a few minutes.

Can I make the dough ahead of time?

Absolutely! You can make the scone dough ahead of time. After mixing the ingredients, wrap the dough tightly in plastic wrap and refrigerate it for up to 24 hours. When you’re ready to bake, simply roll it out and cut it into your desired shapes. This is a great way to save time on busy mornings!

What can I substitute for vanilla in the glaze?

If you don’t have vanilla extract on hand, there are several substitutes you can use in the glaze. Almond extract is a popular choice and adds a lovely flavor. You can also use maple syrup for a different sweetness. Just remember to adjust the amount to taste, as these alternatives can be stronger than vanilla.

Conclusion on Rhubarb Scones with Vanilla Glaze Recipe

In conclusion, rhubarb scones with vanilla glaze are a delightful treat that brings together the unique tartness of rhubarb and the sweet creaminess of vanilla. This recipe is not only easy to follow but also allows for creativity with various flavor enhancements and ingredient substitutions. Whether you’re baking for a special occasion or simply indulging in a cozy afternoon snack, these scones are sure to impress.

As you embark on your baking journey, remember the tips and variations shared throughout this article. They will help you achieve the perfect texture and flavor every time. The joy of baking is not just in the final product but also in the process itself. So, gather your ingredients, preheat your oven, and enjoy the wonderful aroma that fills your kitchen as your scones bake to golden perfection.

Don’t forget to share your delicious creations with family and friends! These rhubarb scones with vanilla glaze are perfect for gatherings, brunches, or simply as a sweet treat to brighten someone’s day. Happy baking, and may your scones always be fluffy and flavorful!

Paul

Rhubarb Scones with Vanilla Glaze Recipe are delightful!

Celebrate the season with these tender and buttery rhubarb scones—perfect for breakfast or brunch. Each scone bursts with tart rhubarb balanced by just the right touch of sweetness. Easy to make and even easier to enjoy warm with butter or jam!
Prep Time 15 minutes
Cook Time 20 minutes
Total Time 35 minutes
Servings: 8 scones
Course: Breakfast/Snack
Cuisine: American

Ingredients
  

  • 1 cup chopped rhubarb about 1 to 3 stalks½ cup granulated sugar2¼ cups all-purpose flour1 tablespoon baking powder½ teaspoon salt1 teaspoon vanilla extract (or almond extract for variation)8 tablespoons unsalted cold butter, cut into small pieces½ cup cold buttermilk or half-and-half (plus more if needed)

Method
 

  1. Preheat the oven to 375°F (190°C) and line a baking sheet with parchment paper.
  2. In a food processor, pulse the flour, sugar, baking powder, and salt until combined.
  3. Add cold butter and pulse 20 to 25 times until the mixture resembles coarse crumbs.
  4. Transfer the mixture to a large bowl. Stir in buttermilk and vanilla extract until a dough begins to form—add a splash more liquid if too dry.
  5. Gently fold in the chopped rhubarb.
  6. Turn dough onto a floured surface, knead briefly, and shape into a rectangle. Cut into rounds with a 3-inch biscuit cutter or slice into squares.
  7. Place scones 2 inches apart on the baking sheet.
  8. Bake for 18 to 22 minutes or until lightly golden on top. Remove and let cool slightly before serving.

Notes

Use fresh, crisp rhubarb for the best texture. If your rhubarb is particularly tart, you can sprinkle a little extra sugar on top before baking. These scones are best enjoyed the same day but can be stored in an airtight container for up to 2 days.

Tropical Sunrise Mocktail Recipe for Refreshing Fun!

Introduction to the Tropical Sunrise Mocktail Recipe

What is a Tropical Sunrise Mocktail?

The Tropical Sunrise Mocktail is a delightful non-alcoholic beverage that brings the essence of a sunny beach right to your glass. This vibrant drink combines the refreshing flavors of orange and pineapple juices, topped with a splash of grenadine syrup. The result is a beautiful layered effect that resembles a stunning sunrise. Perfect for any occasion, this mocktail is not only visually appealing but also bursting with tropical flavors that can transport you to a paradise getaway.

Why Choose a Mocktail?

Choosing a mocktail like the Tropical Sunrise Mocktail is a fantastic option for many reasons. First, it allows everyone to enjoy a festive drink without the effects of alcohol. This makes it suitable for all ages, including kids and those who prefer to avoid alcohol for health or personal reasons. Additionally, mocktails are often lower in calories and sugar compared to their alcoholic counterparts, making them a healthier choice. They also provide a fun and creative way to experiment with flavors and ingredients, ensuring that everyone can find a drink they love. So, whether you’re hosting a party or just enjoying a quiet evening at home, a mocktail can add a splash of joy to your day!

Ingredients for the Tropical Sunrise Mocktail Recipe

To create the perfect Tropical Sunrise Mocktail, you’ll need a few simple ingredients. Each one plays a vital role in delivering that refreshing tropical taste. Here’s what you’ll need:

  • 1 cup orange juice: Freshly squeezed is best for a vibrant flavor.
  • 1/2 cup pineapple juice: This adds a sweet and tangy twist.
  • 1/4 cup grenadine syrup: This syrup gives the drink its beautiful color and sweetness.
  • 1/2 cup club soda: For a fizzy finish that lightens the drink.
  • Ice cubes: Essential for keeping your mocktail chilled.
  • Orange slices and maraschino cherries: These are perfect for garnishing and adding a pop of color.

These ingredients come together to create a delightful drink that is not only tasty but also visually stunning. The combination of orange and pineapple juices provides a refreshing base, while the grenadine syrup adds a touch of sweetness and a beautiful gradient effect. The club soda gives it a bubbly finish, making it a perfect choice for any gathering or celebration.

Step-by-Step Preparation of the Tropical Sunrise Mocktail Recipe

Step 1: Gather Your Ingredients

Before you start making your Tropical Sunrise Mocktail, it’s important to gather all your ingredients. This will make the process smooth and enjoyable. You’ll need:

  • 1 cup of orange juice
  • 1/2 cup of pineapple juice
  • 1/4 cup of grenadine syrup
  • 1/2 cup of club soda
  • Ice cubes
  • Orange slices and maraschino cherries for garnish

Having everything ready will help you create this delicious drink without any interruptions. Plus, it’s always fun to see all the colorful ingredients laid out!

Step 2: Prepare the Fruit Juices

Next, it’s time to prepare your fruit juices. If you’re using freshly squeezed orange juice, make sure to strain it to remove any pulp. This will give your mocktail a smooth texture. For the pineapple juice, you can use store-bought or fresh, depending on your preference. Just make sure it’s chilled for the best taste!

Once your juices are ready, you can move on to the mixing stage. The combination of these two juices is what makes the Tropical Sunrise Mocktail so refreshing and delicious.

Step 3: Mix the Ingredients

Now comes the fun part! Take a tall glass and fill it with ice cubes. This will keep your drink nice and cold. Pour the orange juice and pineapple juice into the glass, filling it about halfway. The vibrant colors of the juices will start to blend beautifully.

Next, slowly pour the grenadine syrup into the glass. Watch as it sinks to the bottom, creating a stunning layered effect that resembles a sunrise. Finally, top off your drink with club soda. This adds a fizzy finish that makes the mocktail even more enjoyable!

Step 4: Garnish and Serve

To make your Tropical Sunrise Mocktail even more appealing, it’s time to garnish! Place an orange slice on the rim of the glass and add a maraschino cherry on top. These garnishes not only look great but also add a hint of extra flavor.

Now, your Tropical Sunrise Mocktail is ready to be served! Enjoy this refreshing drink on a hot day or at your next gathering. It’s sure to impress your guests and bring a taste of the tropics to any occasion!

Variations of the Tropical Sunrise Mocktail Recipe

Adding Different Fruits

One of the best things about the Tropical Sunrise Mocktail is its versatility. You can easily customize it by adding different fruits to enhance the flavor. For instance, consider incorporating mango juice for a sweeter taste or passion fruit juice for a tangy twist. Both options will give your mocktail a unique flair.

Another fun idea is to blend in some fresh fruit pieces. Chunks of ripe strawberries or diced kiwi can add a delightful texture and burst of flavor. Simply muddle the fruit at the bottom of the glass before adding the juices. This not only makes your drink more colorful but also adds a refreshing taste that complements the tropical theme.

Feel free to experiment with other fruit juices as well. Guava, papaya, or even a splash of coconut water can elevate your Tropical Sunrise Mocktail to new heights. The key is to mix and match until you find the perfect combination that suits your taste buds!

Alcoholic Twist: Making it a Cocktail

If you’re looking to turn your Tropical Sunrise Mocktail into a cocktail, it’s quite simple! Just add a splash of your favorite rum or vodka to the mix. This will give your drink an adult twist while still keeping the refreshing tropical flavors intact.

For a classic tropical cocktail, consider using light rum. It blends beautifully with the orange and pineapple juices, enhancing the overall flavor. If you prefer a stronger drink, vodka is a great option as it won’t overpower the fruity taste.

To make it even more exciting, try adding a dash of coconut cream or flavored liqueurs like peach schnapps. This will create a rich and creamy texture that pairs perfectly with the fruity base. Just remember to adjust the amount of grenadine syrup to balance the sweetness.

Whether you stick with the mocktail version or opt for the cocktail twist, the Tropical Sunrise drink is sure to be a hit at any gathering!

Cooking Note for the Tropical Sunrise Mocktail Recipe

When preparing the Tropical Sunrise Mocktail, there are a few important cooking notes to keep in mind. These tips will help you achieve the best flavor and presentation for your drink.

First, always use fresh ingredients whenever possible. Freshly squeezed orange juice and ripe pineapples will enhance the overall taste of your mocktail. If you can, opt for organic fruits to avoid any unwanted chemicals. Fresh ingredients not only taste better but also provide a vibrant color that makes your drink visually appealing.

Next, consider chilling your glasses before serving. This simple step can make a big difference in keeping your mocktail cold and refreshing. Just pop your glasses in the freezer for about 10 minutes before you start mixing. A chilled glass will help maintain the temperature of your drink longer, ensuring that every sip is as delightful as the first.

Another tip is to pour the grenadine syrup slowly and gently. This will help create that beautiful layered effect that resembles a sunrise. If you pour too quickly, the colors may mix, and you won’t achieve the stunning gradient look. Patience is key here!

Lastly, feel free to adjust the sweetness of your mocktail. If you prefer a less sweet drink, you can reduce the amount of grenadine syrup. Alternatively, if you like it sweeter, add a little more syrup or even a splash of simple syrup. The beauty of this recipe is that it can be tailored to your taste.

By following these cooking notes, you’ll ensure that your Tropical Sunrise Mocktail is not only delicious but also a feast for the eyes. Enjoy the process and have fun experimenting with flavors!

Serving Suggestions for the Tropical Sunrise Mocktail Recipe

Ideal Occasions for Serving

The Tropical Sunrise Mocktail is perfect for a variety of occasions. Its vibrant colors and refreshing taste make it an excellent choice for summer parties, barbecues, and beach outings. Imagine sipping this delightful drink while lounging by the pool or enjoying a picnic in the park. It’s sure to bring a smile to everyone’s face!

This mocktail is also a fantastic option for family gatherings and celebrations. Whether it’s a birthday party, baby shower, or holiday get-together, the Tropical Sunrise Mocktail adds a festive touch. Kids and adults alike will appreciate its fruity flavors and beautiful presentation. Plus, it’s a great way to include everyone in the fun, as it’s alcohol-free!

Don’t forget about brunch! Serve the Tropical Sunrise Mocktail alongside your favorite breakfast dishes. Its bright flavors pair wonderfully with pancakes, waffles, or fresh fruit platters. It’s a refreshing alternative to traditional brunch beverages like mimosas or bellinis.

Pairing with Snacks and Appetizers

When it comes to pairing snacks and appetizers with your Tropical Sunrise Mocktail, the options are endless! The fruity and refreshing nature of this drink complements a wide range of foods. Here are some tasty ideas:

  • Fresh Fruit Skewers: Combine chunks of pineapple, strawberries, and melon on skewers for a colorful and healthy snack.
  • Cheese Platter: Serve a variety of cheeses, such as brie, cheddar, and goat cheese, alongside crackers and nuts. The creaminess of the cheese pairs well with the fruity mocktail.
  • Spring Rolls: Fresh vegetable spring rolls with a light dipping sauce make for a refreshing appetizer that complements the tropical flavors.
  • Guacamole and Chips: The creamy texture of guacamole and the crunch of tortilla chips create a delightful contrast to the mocktail.
  • Mini Tacos: Small tacos filled with fresh ingredients like fish, chicken, or veggies can be a fun and flavorful pairing.

These snacks not only enhance the overall experience but also make your gathering more enjoyable. The Tropical Sunrise Mocktail, with its vibrant colors and refreshing taste, will surely be the star of the show!

Tips for Perfecting Your Tropical Sunrise Mocktail Recipe

Choosing the Right Glassware

The glassware you choose can elevate your Tropical Sunrise Mocktail experience. A tall, clear glass is ideal for showcasing the beautiful layers of color in your drink. Look for glasses that hold at least 12 ounces to accommodate the ice and ingredients. A highball or hurricane glass works wonderfully, as they allow for a generous pour and a stunning presentation.

For a fun twist, consider using mason jars or colorful tumblers. These options add a casual vibe, perfect for outdoor gatherings or beach parties. Just remember, the clearer the glass, the more your mocktail will shine! A well-chosen glass not only enhances the visual appeal but also makes sipping your drink even more enjoyable.

Enhancing Flavor with Herbs and Spices

To take your Tropical Sunrise Mocktail to the next level, think about adding herbs and spices. Fresh mint leaves can add a refreshing twist. Simply muddle a few leaves at the bottom of your glass before adding the juices. This will infuse your drink with a delightful minty flavor that pairs beautifully with the tropical fruits.

Another great option is to sprinkle a pinch of cinnamon or nutmeg on top of your mocktail. These spices can add warmth and depth to the drink, making it even more inviting. If you’re feeling adventurous, try adding a splash of ginger ale for a zesty kick. The combination of flavors will create a unique and memorable mocktail experience.

Don’t hesitate to experiment! The beauty of the Tropical Sunrise Mocktail is its versatility. By incorporating herbs and spices, you can create a drink that reflects your personal taste and impresses your guests.

Breakdown of Time for the Tropical Sunrise Mocktail Recipe

Prep Time

Preparing the Tropical Sunrise Mocktail is quick and easy! You’ll need about 10 minutes to gather your ingredients and prepare the fruit juices. If you’re using fresh oranges and pineapples, squeezing and juicing them may take a little longer, but it’s well worth the effort for that fresh taste. Overall, the prep time is minimal, making this mocktail a great choice for any occasion.

Cooking Time

Interestingly, there’s no actual cooking involved in this recipe! The Tropical Sunrise Mocktail is all about mixing and layering the ingredients. Once you have your juices ready, mixing them with grenadine and club soda takes just a few minutes. So, you can whip up this refreshing drink in no time!

Total Time

In total, you can expect to spend around 10 to 15 minutes from start to finish. This includes gathering your ingredients, preparing the juices, mixing everything together, and garnishing your drink. With such a quick preparation time, the Tropical Sunrise Mocktail is perfect for last-minute gatherings or a refreshing treat on a sunny day!

Nutritional Information for the Tropical Sunrise Mocktail Recipe

Calories

When enjoying the Tropical Sunrise Mocktail, you can feel good about its calorie content. Each serving contains approximately 130 calories. This makes it a light and refreshing option for those looking to indulge without overdoing it. The combination of fruit juices provides natural sweetness, which helps keep the calorie count lower compared to many sugary drinks. So, you can sip on this delightful mocktail without any guilt!

Protein

In terms of protein, the Tropical Sunrise Mocktail offers about 1 gram per serving. While this isn’t a significant source of protein, it’s important to remember that this drink is primarily a refreshing beverage rather than a meal replacement. The small amount of protein comes from the fruit juices used in the recipe. If you’re looking to boost your protein intake, consider pairing your mocktail with a protein-rich snack, like nuts or cheese, for a balanced treat.

Sodium

The sodium content in the Tropical Sunrise Mocktail is quite low, making it a heart-healthy choice. Each serving contains less than 10 milligrams of sodium. This is great news for those watching their sodium intake. The natural ingredients in this mocktail contribute to its low sodium level, allowing you to enjoy a flavorful drink without worrying about excess salt. Staying hydrated and refreshed has never been easier!

FAQs about the Tropical Sunrise Mocktail Recipe

Can I make the Tropical Sunrise Mocktail Recipe ahead of time?

Yes, you can prepare some elements of the Tropical Sunrise Mocktail ahead of time! For instance, you can juice the oranges and pineapples and store them in the refrigerator. This will save you time when you’re ready to serve. However, it’s best to mix the drink just before serving to maintain its fizzy texture and beautiful layered effect. If you mix it too early, the grenadine may blend with the juices, losing that stunning sunrise look. So, prepare the juices in advance, but wait to combine everything until you’re ready to enjoy!

What fruits work best in the Tropical Sunrise Mocktail Recipe?

The Tropical Sunrise Mocktail is versatile, and you can use a variety of fruits to enhance its flavor. Besides the classic orange and pineapple juices, consider adding mango, passion fruit, or guava for a unique twist. Fresh fruit pieces like strawberries, kiwi, or even diced peaches can also be muddled into the drink for added texture and flavor. The key is to choose fruits that complement the tropical theme and create a refreshing taste. Feel free to experiment and find your favorite combination!

Is the Tropical Sunrise Mocktail Recipe suitable for kids?

Absolutely! The Tropical Sunrise Mocktail is a fantastic choice for kids. It’s a fun, colorful drink that is completely alcohol-free, making it safe for all ages. The fruity flavors and fizzy club soda are sure to delight young taste buds. Plus, the vibrant presentation with garnishes like orange slices and cherries makes it feel special. Whether it’s a birthday party or a family gathering, kids will love sipping on this refreshing mocktail!

Conclusion on the Tropical Sunrise Mocktail Recipe

In conclusion, the Tropical Sunrise Mocktail is a delightful and refreshing drink that brings a taste of the tropics to any occasion. With its vibrant colors and fruity flavors, this mocktail is perfect for summer gatherings, family celebrations, or simply enjoying a sunny day at home. The combination of orange and pineapple juices, along with the sweet touch of grenadine, creates a beautiful layered effect that is sure to impress your guests.

Not only is this mocktail visually stunning, but it is also a healthier alternative to traditional sugary drinks. With only 130 calories per serving and a low sodium content, you can indulge without guilt. Plus, the versatility of the recipe allows you to customize it with different fruits or even turn it into a cocktail for adult gatherings.

Whether you’re serving it at a brunch, a birthday party, or just as a refreshing treat, the Tropical Sunrise Mocktail is sure to be a hit. So, gather your ingredients, follow the simple steps, and enjoy this delightful drink with family and friends. Cheers to a tropical escape in every sip!

Paul

Tropical Sunrise Mocktail Recipe for Refreshing Fun!

Start your day—or brighten your evening—with this stunning and refreshing Sunrise Mocktail. With a perfect balance of sweet grenadine and citrusy orange juice, this non-alcoholic drink looks like a sunrise in a glass and tastes like pure sunshine. It’s easy, elegant, and a guaranteed crowd-pleaser for brunches or festive gatherings.
Prep Time 5 minutes
Total Time 5 minutes
Servings: 1 serving
Course: Drink
Cuisine: American

Ingredients
  

  • 8 ounces 1 cup orange juice, preferably pulp-free1 ounce (2 tablespoons) grenadineOrange slice, for garnish (optional)Maraschino cherry, for garnish (optional)Ice cubes

Method
 

  1. Fill a highball glass with ice to keep the drink chilled.
  2. Pour in the orange juice, leaving a little room at the top.
  3. Slowly add grenadine by pouring it gently over the back of a spoon or directly into the center of the glass. It will settle at the bottom, creating a beautiful sunrise gradient.
  4. Garnish with an orange slice and a maraschino cherry, if desired.
  5. Serve immediately without stirring to maintain the layered effect.

Notes

For the best presentation, use clear glasses to showcase the layered colors. To make it more tropical, substitute part of the orange juice with pineapple juice. You can also turn it into a cocktail by adding a splash of vodka or rum.

Crumbly Walnut Chocolate Cookies are a must-try treat!

Introduction to Crumbly Walnut Chocolate Cookies

Crumbly Walnut Chocolate Cookies. These cookies are not just a treat; they are a celebration of flavors and textures. Imagine biting into a soft, chocolatey cookie that crumbles just right, revealing the rich taste of walnuts and chocolate chips. It’s a perfect combination that will surely satisfy your sweet tooth.

Whether you’re baking for a special occasion or just want to indulge yourself, these cookies are a fantastic choice. They are easy to make and require simple ingredients that you probably already have in your kitchen. Plus, the aroma of freshly baked cookies wafting through your home is simply irresistible!

Crumbly Walnut Chocolate Cookies stand out is their unique texture. The walnuts add a delightful crunch, while the chocolate chips melt in your mouth, creating a heavenly experience. Each bite is a perfect balance of sweetness and nuttiness, making them a favorite among cookie lovers.

So, roll up your sleeves and get ready to bake! In the following sections, we’ll guide you through the ingredients, preparation steps, and even some variations to try. Let’s embark on this delicious journey together!

Ingredients for Crumbly Walnut Chocolate Cookies

Crumbly Walnut Chocolate Cookies. Having everything ready will make your baking experience smooth and enjoyable. Here’s what you’ll need:

  • 1 cup all-purpose flour
  • 1/2 cup unsweetened cocoa powder
  • 1/2 teaspoon baking powder
  • 1/4 teaspoon salt
  • 1/2 cup unsalted butter, softened
  • 1/2 cup granulated sugar
  • 1/4 cup brown sugar, packed
  • 1 large egg
  • 1 teaspoon vanilla extract
  • 1 cup chopped walnuts
  • 1/2 cup chocolate chips

These ingredients come together to create a cookie that is both rich and satisfying. The all-purpose flour and cocoa powder form the base, while the butter adds a creamy texture. The sugars provide sweetness, and the egg helps bind everything together. Don’t forget the walnuts and chocolate chips, as they are the stars of this recipe!

For those looking to experiment, consider adding a pinch of espresso powder to enhance the chocolate flavor. You can also swap out walnuts for pecans if you prefer a different nutty taste. The possibilities are endless, and that’s what makes baking so much fun!

Now that we have our ingredients ready, let’s move on to the preparation steps to create these delightful cookies!

Preparation of Crumbly Walnut Chocolate Cookies

Crumbly Walnut Chocolate Cookies is straightforward and fun. Follow these steps to create your delicious cookies.

Step 1: Preheat the Oven

First things first, preheat your oven to 350°F (175°C). This step is crucial as it ensures that your cookies bake evenly. While the oven heats up, you can prepare the rest of your ingredients. It’s a great way to save time!

Step 2: Mix the Dry Ingredients

In a medium bowl, whisk together the all-purpose flour, unsweetened cocoa powder, baking powder, and salt. Mixing these dry ingredients first helps to evenly distribute the baking powder and salt throughout the flour. Set this bowl aside for now; we’ll come back to it shortly.

Step 3: Cream the Butter and Sugar

Next, take a large bowl and cream together the softened unsalted butter, granulated sugar, and brown sugar. Use an electric mixer or a whisk to beat them together until the mixture is light and fluffy. This process usually takes about 3-4 minutes. The fluffiness is key to achieving that perfect cookie texture!

Step 4: Combine Wet and Dry Ingredients

Once your butter and sugar are well combined, it’s time to add the egg and vanilla extract. Beat them in until everything is mixed well. Now, gradually add the dry ingredients to the wet mixture. Mix until just combined; be careful not to overmix, as this can make your cookies tough.

Step 5: Fold in the Walnuts and Chocolate

Now comes the fun part! Gently fold in the chopped walnuts and chocolate chips. This step ensures that every cookie has a delightful crunch from the walnuts and a burst of chocolate in every bite. Make sure they are evenly distributed throughout the dough.

Step 6: Shape the Cookies

Using a tablespoon or a cookie scoop, drop rounded balls of dough onto your prepared baking sheet. Make sure to space them about 2 inches apart. This spacing allows the cookies to spread while baking without sticking together. You want them to have room to grow!

Step 7: Bake the Cookies

Finally, it’s time to bake! Place the baking sheet in the preheated oven and bake for 10-12 minutes. You’ll know they’re ready when the edges are set but the centers are still soft. This will give you that perfect crumbly texture. Once baked, allow the cookies to cool on the baking sheet for about 5 minutes before transferring them to a wire rack to cool completely.

Crumbly Walnut Chocolate Cookies are now ready to be enjoyed. The preparation is simple, and the results are absolutely delicious. Let’s move on to some variations you can try to make these cookies even more exciting!

Variation of Crumbly Walnut Chocolate Cookies

Crumbly Walnut Chocolate Cookies are delightful on their own, there’s always room for creativity in the kitchen! Let’s explore some alternative ingredients and a gluten-free version to cater to different tastes and dietary needs. These variations will keep your cookie game exciting and delicious!

Alternative Ingredients for Different Flavors

Crumbly Walnut Chocolate Cookies:

  • Pecans: Swap out walnuts for pecans for a sweeter, buttery flavor. Pecans add a unique twist while still providing that satisfying crunch.
  • Peanut Butter: For a nutty kick, mix in 1/4 cup of creamy peanut butter with the butter and sugars. This will give your cookies a rich, peanut buttery taste.
  • Mint Extract: Add a teaspoon of mint extract to the wet ingredients for a refreshing mint chocolate cookie. This is perfect for those who love minty treats!
  • White Chocolate Chips: Replace regular chocolate chips with white chocolate chips for a sweeter, creamier cookie. The contrast with the cocoa powder is delightful.
  • Dried Fruits: Consider adding 1/2 cup of dried cranberries or cherries for a fruity twist. They add a chewy texture and a burst of flavor.

These alternatives not only change the flavor but also make your cookies unique. Feel free to mix and match to find your favorite combination!

Gluten-Free Version of Crumbly Walnut Chocolate Cookies

Crumbly Walnut Chocolate Cookies:

  • Gluten-Free Flour Blend: Substitute the all-purpose flour with a gluten-free flour blend. Make sure it’s a 1:1 ratio blend that includes xanthan gum for the best results.
  • Oats: You can also use ground oats (oat flour) as a gluten-free alternative. Just blend rolled oats in a food processor until they reach a fine flour consistency.
  • Check Labels: Ensure that all other ingredients, like baking powder and chocolate chips, are labeled gluten-free. This is important to avoid any cross-contamination.

Crumbly Walnut Chocolate Cookies that everyone can enjoy. Baking is all about experimenting, so don’t hesitate to try new things!

Cooking Note for Crumbly Walnut Chocolate Cookies

Crumbly Walnut Chocolate Cookies, a few cooking notes can help ensure your cookies turn out perfectly every time. These tips will guide you through the process and enhance your baking experience.

First, always use room temperature ingredients. This means letting your butter and egg sit out for about 30 minutes before you start. Room temperature butter creams better with sugar, leading to a lighter cookie. Similarly, a room temperature egg mixes more easily into the batter.

Next, be mindful of your mixing technique. When combining the wet and dry ingredients, mix until just combined. Overmixing can lead to tough cookies, which is not what we want! A gentle hand will keep your cookies soft and crumbly.

Another important note is to keep an eye on your baking time. Ovens can vary, so check your cookies a minute or two before the suggested baking time. You want the edges to be set while the centers remain soft. This will give you that delightful crumbly texture.

Lastly, let your cookies cool on the baking sheet for a few minutes before transferring them to a wire rack. This step allows them to firm up slightly, making them easier to move without breaking. Patience is key here!

Crumbly Walnut Chocolate Cookies ever. Happy baking!

Serving Suggestions for Crumbly Walnut Chocolate Cookies

Crumbly Walnut Chocolate Cookies are baked to perfection, it’s time to think about how to serve them! These cookies are not only delicious on their own but can also be paired with various treats and beverages to enhance your snacking experience. Here are some delightful serving suggestions:

  • With a Glass of Milk: There’s nothing quite like enjoying cookies with a cold glass of milk. The creamy texture of milk complements the rich chocolate and nutty flavors of the cookies perfectly.
  • Ice Cream Sandwiches: For a fun twist, sandwich a scoop of your favorite ice cream between two cookies. This creates a delightful dessert that’s perfect for warm days!
  • With Coffee or Tea: Pair your cookies with a hot cup of coffee or tea. The warmth of the beverage enhances the chocolatey goodness and makes for a cozy treat.
  • On a Dessert Platter: Arrange your cookies on a beautiful platter alongside other treats like brownies, mini cupcakes, or fruit. This makes for an impressive dessert spread at parties or gatherings.
  • With Whipped Cream: Top your cookies with a dollop of whipped cream for an extra indulgent treat. You can even drizzle some chocolate sauce on top for added sweetness!

Crumbly Walnut Chocolate Cookies experience, making them even more enjoyable. Whether you’re sharing with friends or savoring them alone, these cookies are sure to bring a smile to your face. So, gather your loved ones, serve up these delightful treats, and enjoy every crumb!

Tips for Perfect Crumbly Walnut Chocolate Cookies

Crumbly Walnut Chocolate Cookies turn out perfectly every time, here are some handy tips to keep in mind. These simple tricks can make a big difference in the texture and flavor of your cookies, helping you achieve that ideal crumbly goodness.

  • Measure Ingredients Accurately: Use measuring cups and spoons for precise measurements. Too much flour can make your cookies dry, while too little can lead to spreading. For best results, spoon flour into the measuring cup and level it off with a knife.
  • Chill the Dough: If you have time, chill the cookie dough for about 30 minutes before baking. This helps the cookies maintain their shape and prevents them from spreading too much in the oven.
  • Use Quality Ingredients: The quality of your ingredients matters! Use fresh cocoa powder, good-quality chocolate chips, and fresh walnuts. This will enhance the overall flavor of your cookies.
  • Don’t Overbake: Keep a close eye on your cookies as they bake. Remove them from the oven when the edges are set but the centers are still soft. They will continue to cook slightly as they cool on the baking sheet.
  • Experiment with Add-Ins: Feel free to get creative! Add a pinch of sea salt on top before baking for a sweet and salty contrast. You can also mix in different types of chocolate chips or nuts for a unique twist.
  • Store Properly: To keep your cookies fresh, store them in an airtight container at room temperature. You can also freeze them for later enjoyment. Just make sure to separate layers with parchment paper to prevent sticking.

Crumbly Walnut Chocolate Cookies that everyone will love. Happy baking!

Breakdown of Time for Crumbly Walnut Chocolate Cookies

Crumbly Walnut Chocolate Cookies can help you plan your baking session better. Here’s a simple breakdown of the time you’ll need for preparation, cooking, and the total time involved in making these delicious cookies.

Prep Time

Crumbly Walnut Chocolate Cookies is approximately 15-20 minutes. This includes gathering your ingredients, measuring them out, and mixing everything together. It’s a quick process, especially once you get the hang of it!

Cooking Time

Once your cookie dough is ready, the cooking time is about 10-12 minutes. Keep an eye on your cookies as they bake. You want the edges to be set while the centers remain soft for that perfect crumbly texture.

Total Time

In total, you can expect to spend around 30-35 minutes from start to finish. This includes both prep and cooking time. It’s a small investment for a batch of delightful cookies that will surely impress your family and friends!

Crumbly Walnut Chocolate Cookies!

Nutritional Information for Crumbly Walnut Chocolate Cookies

Crumbly Walnut Chocolate Cookies can help you enjoy them mindfully. While these cookies are a delightful treat, knowing their nutritional values allows you to balance your diet. Here’s a breakdown of the key nutritional information for each cookie:

Calories

Crumbly Walnut Chocolate Cookie contains approximately 180 calories. This makes them a satisfying snack without being overly indulgent. Enjoying one or two cookies can fit nicely into a balanced diet, especially when paired with a healthy meal or snack.

Protein

These cookies provide about 3 grams of protein per cookie. While they are not a primary source of protein, the addition of walnuts contributes to this value. Nuts are a great way to add some protein and healthy fats to your diet, making these cookies a more nutritious option compared to many other sweet treats.

Sodium

Each cookie contains roughly 100 milligrams of sodium. This is a moderate amount, especially considering that most people consume more sodium than necessary in their daily diets. Keeping an eye on sodium intake is important, but enjoying these cookies in moderation can be part of a healthy lifestyle.

Crumbly Walnut Chocolate Cookies are a delicious treat, they also offer some nutritional benefits. With a balance of calories, protein, and sodium, you can enjoy these cookies as part of a varied diet. Remember, moderation is key, and these cookies can be a delightful addition to your dessert repertoire!

FAQs about Crumbly Walnut Chocolate Cookies

Can I use other nuts instead of walnuts?

Crumbly Walnut Chocolate Cookies. Pecans are a great alternative, offering a sweeter flavor. Almonds or hazelnuts can also work well, adding a unique twist to your cookies. Just make sure to chop them into small pieces for even distribution throughout the dough. Feel free to experiment and find your favorite nut combination!

How do I store Crumbly Walnut Chocolate Cookies?

Crumbly Walnut Chocolate Cookies fresh, store them in an airtight container at room temperature. This will help maintain their crumbly texture and prevent them from becoming stale. If you want to keep them for a longer period, you can freeze the cookies. Just make sure to separate layers with parchment paper to avoid sticking. When you’re ready to enjoy them, simply thaw at room temperature or warm them in the oven for a few minutes.

Can I freeze Crumbly Walnut Chocolate Cookies?

Crumbly Walnut Chocolate Cookies! To do this, allow the cookies to cool completely after baking. Then, place them in a single layer on a baking sheet and freeze until solid. Once frozen, transfer them to an airtight container or a freezer bag. They can be stored in the freezer for up to three months. When you’re ready to enjoy, just thaw them at room temperature or warm them in the oven for a delightful treat!

What can I serve with Crumbly Walnut Chocolate Cookies?

Crumbly Walnut Chocolate Cookies. A classic choice is a glass of cold milk, which pairs perfectly with the rich chocolate flavor. You can also serve them with coffee or tea for a cozy afternoon snack. For a fun twist, try making ice cream sandwiches by placing a scoop of your favorite ice cream between two cookies. Additionally, they can be served on a dessert platter alongside other treats for a festive gathering. The possibilities are endless!

Conclusion on Crumbly Walnut Chocolate Cookies

Crumbly Walnut Chocolate Cookies are a delightful treat that brings joy to any occasion. Their rich chocolate flavor, combined with the satisfying crunch of walnuts, creates a cookie experience that is hard to resist. Whether you’re baking for a special event or simply indulging yourself, these cookies are sure to impress.

Throughout this article, we’ve explored the ingredients, preparation steps, and various ways to customize your cookies. From alternative ingredients to gluten-free options, the versatility of this recipe allows you to cater to different tastes and dietary needs. Plus, with the tips and serving suggestions provided, you can elevate your cookie game to new heights!

Crumbly Walnut Chocolate Cookies that will leave everyone asking for more.

As you embark on your baking journey, don’t hesitate to experiment and make this recipe your own. With each batch, you’ll discover new flavors and textures that will keep your cookie cravings satisfied. Happy baking, and may your kitchen be filled with the sweet aroma of freshly baked cookies!

Paul

Crumbly Walnut Chocolate Cookies are a must-try treat!

These irresistible walnut-studded cookies are soft, buttery, and dipped in silky milk chocolate, with an elegant dark chocolate drizzle and extra crunch from toasted walnuts. They melt in your mouth and make the perfect indulgent treat for gifting, holiday platters, or cozy moments with coffee or tea.
Prep Time 25 minutes
Cook Time 12 minutes
Total Time 1 hour
Course: Dessert
Cuisine: European

Ingredients
  

  • For the Cookie Dough135 g butter melted and cooled8 g vanilla sugar100 g granulated sugar200 g walnuts, finely chopped100 g milk chocolate, finely chopped200 g all-purpose flour3 g baking powder
  • For the Coating300 g milk chocolate20 ml sunflower oil
  • For the GarnishChopped walnutsMelted dark chocolate for drizzling

Method
 

  1. Melt the butter gently over low heat and allow it to cool completely before using.
  2. Use a food processor to finely chop the walnuts and milk chocolate.
  3. In a large bowl, mix the cooled butter with vanilla sugar and granulated sugar. Add the chopped walnuts, chocolate, flour, and baking powder. Knead the mixture into a smooth dough.
  4. Roll dough into 14-gram portions and shape into balls. Place on a baking sheet lined with parchment paper.
  5. Preheat the oven to 200°C (400°F). Bake the cookies for 10 to 12 minutes. Let them cool completely on a wire rack before moving to the next step.
  6. In a double boiler, melt the milk chocolate with sunflower oil. Dip each cooled cookie halfway or fully into the chocolate and place them on parchment to set.
  7. Drizzle with melted dark chocolate and sprinkle with additional chopped walnuts. Allow the cookies to rest until the chocolate has fully set.

Notes

Let the butter cool completely before mixing to prevent overly soft dough.
Toast walnuts in a dry pan for 2 to 3 minutes to intensify their flavor.
If dough feels too soft, chill it in the fridge for 15 to 20 minutes.
Store finished cookies in an airtight container in a cool place for up to one week.

Whipped Feta with Roasted Beets and Pistachios delights!

What Makes This Recipe Special?

Whipped Feta with Roasted Beets and Pistachios is not just a dish; it’s an experience! This recipe combines creamy feta cheese with the earthy sweetness of roasted beets. The addition of crunchy pistachios adds a delightful texture. Together, these ingredients create a beautiful balance of flavors that will impress your guests. Plus, it’s easy to make! You can whip it up in no time, making it perfect for both casual gatherings and elegant dinner parties.

The Perfect Appetizer for Any Occasion

This whipped feta dip is versatile and can be served at any event. Whether you’re hosting a birthday party, a holiday gathering, or just a cozy night in, this dish fits right in. It pairs wonderfully with pita chips, crackers, or fresh veggies, making it a hit among all age groups. Not only does it taste amazing, but it also looks stunning on a platter. The vibrant colors of the beets and the green pistachios create a feast for the eyes. So, if you’re looking for a crowd-pleaser, this recipe is your go-to!

Ingredients for Whipped Feta with Roasted Beets and Pistachios Recipe

To create this delightful Whipped Feta with Roasted Beets and Pistachios, you’ll need a few simple yet flavorful ingredients. Each component plays a vital role in achieving the perfect balance of taste and texture. Here’s what you’ll need:

  • 8 ounces feta cheese, crumbled – This is the star of the dish, providing a creamy and tangy base.
  • 2 ounces cream cheese, softened – It adds richness and helps achieve a smooth consistency.
  • 1/4 cup plain Greek yogurt – This ingredient brings a slight tang and creaminess to the mix.
  • 1 tablespoon olive oil – A drizzle of olive oil enhances the flavors and adds a silky texture.
  • 1 teaspoon lemon juice – Fresh lemon juice brightens the dish and balances the richness.
  • 1/2 teaspoon garlic powder – This adds a subtle garlic flavor without overpowering the other ingredients.
  • 1/4 teaspoon black pepper – A pinch of black pepper adds a hint of spice.
  • 2 medium beets, roasted and diced – Roasted beets contribute sweetness and a beautiful color.
  • 1/4 cup pistachios, chopped – These nuts provide a crunchy texture and nutty flavor.
  • Fresh herbs (such as dill or parsley) for garnish – Fresh herbs add a pop of color and freshness.

Gathering these ingredients will set you on the right path to creating a delicious appetizer that everyone will love. The combination of creamy feta, sweet beets, and crunchy pistachios makes this dish truly special. So, let’s get started on the next steps!

Step-by-Step Preparation of Whipped Feta with Roasted Beets and Pistachios Recipe

Step 1: Preparing the Beets

Before you dive into the cooking, it’s essential to prepare the beets. Start by washing them thoroughly under cold water. This step removes any dirt or grit. Once clean, trim off the tops and tails. You want to ensure they are ready for roasting. After that, wrap each beet in aluminum foil. This will help them cook evenly and retain moisture during roasting.

Step 2: Roasting the Beets

Now, it’s time to roast those beets! Preheat your oven to 400°F. Place the wrapped beets directly on the oven rack or on a baking sheet. Roast them for about 45-60 minutes. The cooking time may vary depending on the size of the beets. You’ll know they’re done when a fork easily pierces through them. Once roasted, remove them from the oven and let them cool. After cooling, peel off the skin and dice the beets into small cubes. This adds a lovely sweetness to your dish.

Step 3: Making the Whipped Feta

While the beets are cooling, you can prepare the whipped feta. In a food processor, combine the crumbled feta cheese, softened cream cheese, and Greek yogurt. Add the olive oil, lemon juice, garlic powder, and black pepper. Blend these ingredients together until the mixture is smooth and creamy. This step is crucial as it creates the base of your dip. The creamy texture will perfectly complement the roasted beets.

Step 4: Combining Ingredients

Once your whipped feta is ready, it’s time to bring everything together. Transfer the whipped feta mixture into a serving bowl. Gently fold in the diced roasted beets, making sure to reserve a few for garnishing later. This step ensures that the beets are evenly distributed throughout the dip, adding both flavor and color. The vibrant pink from the beets will contrast beautifully with the creamy feta.

Step 5: Garnishing with Pistachios

Finally, it’s time to add the finishing touches! Top your whipped feta with the chopped pistachios and the reserved diced beets. This not only enhances the flavor but also adds a delightful crunch. For an extra pop of color, sprinkle some fresh herbs like dill or parsley on top. This garnish will make your dish look even more appealing and inviting. Now, your Whipped Feta with Roasted Beets and Pistachios is ready to serve!

Variations of Whipped Feta with Roasted Beets and Pistachios Recipe

Adding Herbs for Extra Flavor

Herbs can elevate your Whipped Feta with Roasted Beets and Pistachios to new heights! While fresh dill or parsley are great choices, don’t hesitate to experiment. Try adding fresh basil for a sweet, aromatic touch. Chives can bring a mild onion flavor, while mint adds a refreshing twist. Simply chop your chosen herbs finely and fold them into the whipped feta mixture. This not only enhances the flavor but also adds a burst of color. The right herbs can make your dish even more vibrant and appealing!

Alternative Nuts and Seeds

If you want to switch things up, consider using different nuts or seeds. While pistachios provide a lovely crunch, walnuts or almonds can offer a unique flavor profile. Chopped walnuts add a rich, earthy taste, while almonds bring a slightly sweet crunch. For a nut-free option, sunflower seeds or pumpkin seeds can be excellent substitutes. They add texture and a nutty flavor without the allergens. Just remember to toast them lightly for an extra depth of flavor. This way, you can customize your whipped feta dip to suit your taste preferences!

Cooking Note for Whipped Feta with Roasted Beets and Pistachios Recipe

When preparing the Whipped Feta with Roasted Beets and Pistachios, a few cooking notes can help you achieve the best results. First, ensure that your feta cheese is of high quality. The flavor of the feta is crucial, as it serves as the base of the dish. Look for a creamy, tangy feta that will blend well with the other ingredients.

Next, roasting the beets properly is key. If you prefer, you can peel and dice the beets before roasting. However, roasting them whole helps retain their natural sweetness and moisture. Just remember to keep an eye on them while they cook. Overcooked beets can become mushy, which may affect the texture of your dip.

Additionally, when blending the whipped feta, start with the feta and cream cheese first. This allows them to combine smoothly before adding the yogurt and other ingredients. If your mixture seems too thick, you can add a splash of water or more olive oil to reach your desired consistency.

Lastly, let the whipped feta sit for a few minutes before serving. This allows the flavors to meld together beautifully. Serve it at room temperature for the best taste. With these cooking notes in mind, you’ll create a delicious and visually stunning appetizer that everyone will love!

Serving Suggestions for Whipped Feta with Roasted Beets and Pistachios Recipe

Best Pairings with Bread and Crackers

When it comes to serving your Whipped Feta with Roasted Beets and Pistachios, the right accompaniments can elevate the experience. This creamy dip pairs wonderfully with a variety of breads and crackers. For a classic choice, serve it with warm pita bread. The soft texture of pita complements the creamy feta beautifully. You can also opt for crispy crackers, which add a delightful crunch. Look for whole grain or herb-flavored crackers to enhance the taste.

Another great option is to use toasted baguette slices. The crispy exterior and soft interior of the bread create a perfect vessel for the whipped feta. If you want to add a gourmet touch, consider drizzling a little honey on top of the dip before serving. The sweetness of honey contrasts nicely with the tangy feta and earthy beets, creating a flavor explosion in every bite. No matter what you choose, your guests will love dipping into this vibrant and delicious appetizer!

Serving as a Salad Topping

Whipped Feta with Roasted Beets and Pistachios isn’t just for dipping; it also makes a fantastic salad topping! Imagine a fresh green salad adorned with this creamy dip. The vibrant colors of the beets and the crunch of the pistachios will make your salad visually stunning. Simply spoon a generous dollop of the whipped feta on top of a bed of mixed greens. You can add other ingredients like cherry tomatoes, cucumber slices, or avocado for extra flavor and nutrition.

For a heartier option, consider adding grilled chicken or chickpeas to your salad. This will turn your dish into a complete meal. The creamy feta will act as a dressing, providing a rich and tangy flavor that ties everything together. Plus, it’s a great way to incorporate more vegetables into your diet. Whether served as an appetizer or a salad, this whipped feta dip is sure to impress!

Tips for Perfecting Whipped Feta with Roasted Beets and Pistachios Recipe

Choosing the Right Feta

When it comes to making the best Whipped Feta with Roasted Beets and Pistachios, the type of feta you choose can make a big difference. Look for high-quality feta cheese that is creamy and tangy. Feta made from sheep’s milk tends to be richer and more flavorful than cow’s milk feta. If possible, opt for feta that comes in brine, as this helps maintain its moisture and flavor. Crumbled feta is convenient, but if you can find a block, consider crumbling it yourself. This way, you can ensure it’s fresh and has the best texture for whipping. Remember, the feta is the star of this dish, so choosing the right one is key to achieving a delicious result!

Storing Leftovers Properly

If you happen to have any leftovers of your Whipped Feta with Roasted Beets and Pistachios, storing them correctly is essential to maintain freshness. Place the dip in an airtight container and store it in the refrigerator. It’s best to consume it within 3-4 days for optimal taste and texture. If you notice the dip thickening after a day or two, you can stir in a little olive oil or Greek yogurt to restore its creamy consistency. Avoid freezing the whipped feta, as the texture may change once thawed. By following these storage tips, you can enjoy this delightful dip for days to come!

Breakdown of Time for Whipped Feta with Roasted Beets and Pistachios Recipe

Prep Time

Preparing the Whipped Feta with Roasted Beets and Pistachios is a breeze! The prep time for this recipe is approximately 15 minutes. During this time, you will wash and trim the beets, gather your ingredients, and set up your food processor. This quick prep ensures you can enjoy the cooking process without feeling rushed. Plus, it allows you to focus on creating a delicious dish that will impress your guests!

Cooking Time

The cooking time mainly involves roasting the beets. This step takes about 45-60 minutes, depending on the size of the beets. While the beets are roasting, you can prepare the whipped feta mixture. This multitasking makes the most of your time in the kitchen. Once the beets are tender and cooled, you can easily combine them with the whipped feta. Overall, the cooking time is around 60 minutes, but most of it is hands-off while the beets roast in the oven.

Total Time

In total, you can expect to spend about 1 hour and 15 minutes from start to finish. This includes both prep and cooking time. With such a manageable time commitment, you can whip up this delightful appetizer without any hassle. Whether you’re preparing for a gathering or just treating yourself, this recipe is worth every minute!

Breakdown of Time for Whipped Feta with Roasted Beets and Pistachios Recipe

Prep Time

Preparing the Whipped Feta with Roasted Beets and Pistachios is a breeze! The prep time for this recipe is approximately 15 minutes. During this time, you will wash and trim the beets, gather your ingredients, and set up your food processor. This quick prep ensures you can enjoy the cooking process without feeling rushed. Plus, it allows you to focus on creating a delicious dish that will impress your guests!

Cooking Time

The cooking time mainly involves roasting the beets. This step takes about 45-60 minutes, depending on the size of the beets. While the beets are roasting, you can prepare the whipped feta mixture. This multitasking makes the most of your time in the kitchen. Once the beets are tender and cooled, you can easily combine them with the whipped feta. Overall, the cooking time is around 60 minutes, but most of it is hands-off while the beets roast in the oven.

Total Time

In total, you can expect to spend about 1 hour and 15 minutes from start to finish. This includes both prep and cooking time. With such a manageable time commitment, you can whip up this delightful appetizer without any hassle. Whether you’re preparing for a gathering or just treating yourself, this recipe is worth every minute!

Nutritional Information for Whipped Feta with Roasted Beets and Pistachios Recipe

Calories

When it comes to enjoying delicious appetizers, knowing the calorie content can help you make informed choices. Each serving of Whipped Feta with Roasted Beets and Pistachios contains approximately 180 calories. This makes it a relatively light option for a snack or appetizer, allowing you to indulge without feeling guilty. The combination of creamy feta and sweet beets provides a satisfying flavor without excessive calories.

Protein

Protein is an essential nutrient that helps keep you feeling full and satisfied. In this recipe, each serving offers about 8 grams of protein. The feta cheese and Greek yogurt contribute to this protein content, making this dip not only tasty but also nutritious. Including protein in your snacks can help maintain energy levels throughout the day, making this whipped feta a smart choice for any occasion.

Sodium

Sodium is another important factor to consider in your diet. Each serving of Whipped Feta with Roasted Beets and Pistachios contains around 400 milligrams of sodium. While feta cheese naturally has a higher sodium content, it’s essential to balance your overall daily intake. If you’re watching your sodium levels, consider pairing this dip with fresh vegetables instead of salty crackers. This way, you can enjoy the flavors while keeping your sodium intake in check.

FAQs about Whipped Feta with Roasted Beets and Pistachios Recipe

Can I use different types of cheese?

Absolutely! While feta cheese is the star of this recipe, you can experiment with other cheeses. Creamy goat cheese can be a fantastic alternative, offering a tangy flavor. Ricotta cheese is another option that will give a lighter texture. If you prefer a sharper taste, try using aged cheddar. Just keep in mind that each cheese will bring its unique flavor profile, so choose one that you enjoy. Mixing different cheeses can also create a delightful blend!

How long can I store the whipped feta?

Storing your Whipped Feta with Roasted Beets and Pistachios is simple! Place any leftovers in an airtight container and keep them in the refrigerator. It’s best to consume the dip within 3-4 days for the freshest taste. If you notice it thickening, you can stir in a little olive oil or Greek yogurt to restore its creamy consistency. Just remember, this dip is best enjoyed fresh, so try to share it with friends and family!

What can I substitute for beets?

If beets aren’t your thing, don’t worry! There are several delicious substitutes you can use. Roasted sweet potatoes or carrots can add a similar sweetness and vibrant color. For a different twist, consider using roasted red peppers for a smoky flavor. You can also try diced avocado for creaminess without the sweetness. Each substitute will change the flavor slightly, but they will still create a delightful dish. Feel free to get creative!

Conclusion on Whipped Feta with Roasted Beets and Pistachios Recipe

In conclusion, Whipped Feta with Roasted Beets and Pistachios is a delightful dish that brings together a medley of flavors and textures. The creamy feta, sweet roasted beets, and crunchy pistachios create a harmonious balance that is sure to please any palate. This recipe is not only easy to prepare but also versatile, making it suitable for various occasions, from casual get-togethers to elegant dinner parties.

By following the simple steps outlined in this article, you can create a stunning appetizer that will impress your guests. The vibrant colors and rich flavors make it a feast for the eyes and the taste buds. Plus, with the option to customize the recipe with different herbs and nuts, you can make it your own!

Whether you serve it with pita chips, crackers, or as a salad topping, this whipped feta dip is bound to be a hit. So, gather your ingredients, roll up your sleeves, and get ready to enjoy a delicious and nutritious treat. Your friends and family will thank you for introducing them to this fantastic dish!

Paul

Whipped Feta with Roasted Beets and Pistachios delights!

This vibrant plant-based appetizer brings together creamy whipped vegan feta, sweet roasted beets, and crunchy pistachios in a colorful, flavor-packed spread. Perfect for parties, brunch boards, or as a shareable starter, it’s a bold blend of texture, tang, and richness served with warm flatbread or pita.
Prep Time 10 minutes
Cook Time 25 minutes
Total Time 35 minutes
Servings: 4 servings
Course: Appetizer, Main Dish
Cuisine: Vegan, Mediterranean

Ingredients
  

  • For the Base1 large beet about 450g, peeled and cut into 1 to 1 1/2 inch wedges7 oz plain unsweetened non-dairy yogurt (recommended: Culina or Siggi’s for thickness)7 oz vegan feta cheese at room temperature (recommended: Violife or Trader Joe’s)1 to 2 tbsp avocado oil (for roasting)Salt and white pepper, to tasteFluffy flatbread or pita, for serving
  • For the Toppings1/3 cup pistachios lightly choppedCrushed pink peppercorns, to tasteDrizzle of good olive oilOptional: vegan honey or maple syrupOptional: sprinkle of sumac or za’atar

Method
 

  1. Preheat oven to 350°F (175°C). Toss beet wedges in avocado oil, salt, and white pepper. Roast for 20 to 25 minutes or until fork-tender. Set aside to cool slightly.
  2. In a mixing bowl, combine vegan feta and non-dairy yogurt. Add a pinch of salt and white pepper. Beat with a hand mixer or whisk until the mixture is smooth, creamy, and whipped.
  3. Spread the whipped feta mixture onto a large serving plate or shallow bowl. Arrange roasted beets over half the spread.
  4. Top with chopped pistachios, pink peppercorns, and a generous drizzle of olive oil. Add a touch of vegan honey or maple syrup if desired, and finish with a sprinkle of sumac or za’atar for added depth.
  5. Serve immediately with warm flatbread or pita.

Notes

Make sure the vegan feta is at room temperature before whipping for best texture.
Roasted beets can be made a day ahead and stored chilled—bring to room temperature before serving.
Use a thicker yogurt for a fluffier whipped feta base; strained Greek-style non-dairy yogurt works best.
This dish also works well as part of a mezze platter or holiday spread.

Seared Scallops with Brown Butter Sage Sauce delightfully impress.

Seared scallops with brown butter sage sauce is a dish that brings elegance to any dining table. This delightful seafood recipe combines the sweet, delicate flavor of scallops with the rich, nutty taste of brown butter and the aromatic essence of sage. It’s a perfect choice for special occasions or a cozy dinner at home. The beauty of this dish lies not only in its taste but also in its simplicity. With just a few ingredients, you can create a gourmet meal that impresses family and friends.

What Makes Seared Scallops with Brown Butter Sage Sauce Special?

What sets seared scallops with brown butter sage sauce apart is the technique used to cook the scallops. Searing them creates a beautiful golden crust while keeping the inside tender and juicy. The brown butter adds a depth of flavor that elevates the dish. Sage, with its earthy notes, complements the scallops perfectly, making each bite a delightful experience. This dish is not only delicious but also visually appealing, making it a feast for the eyes as well as the palate.

Moreover, this recipe is versatile. You can easily customize it by adding your favorite ingredients or serving it with various sides. Whether you’re a seasoned chef or a beginner, this dish is approachable and rewarding. So, let’s dive into the ingredients and preparation steps to create this culinary masterpiece!

Ingredients for Seared Scallops with Brown Butter Sage Sauce

To create the perfect seared scallops with brown butter sage sauce, you’ll need a handful of fresh and high-quality ingredients. Each component plays a vital role in achieving the rich flavors and delightful textures of this dish. Here’s what you’ll need:

  • 1 pound large sea scallops: Make sure they are patted dry to achieve a nice sear.
  • 4 tablespoons unsalted butter: This will be used to create the brown butter sauce.
  • 8 fresh sage leaves: These add a wonderful aroma and flavor to the dish.
  • 1 tablespoon olive oil: This helps in searing the scallops without burning the butter.
  • Salt and pepper: To season the scallops to perfection.
  • 1 lemon: Cut into wedges for a zesty finish.

These ingredients are simple yet effective. The scallops are the star of the show, while the brown butter sage sauce enhances their natural sweetness. The lemon wedges provide a refreshing contrast, making each bite even more enjoyable. Now that you have your ingredients ready, let’s move on to the preparation steps!

Step-by-Step Preparation of Seared Scallops with Brown Butter Sage Sauce

Now that you have gathered all your ingredients, it’s time to dive into the step-by-step preparation of seared scallops with brown butter sage sauce. This process is straightforward and will guide you to create a delicious dish that will impress anyone at your table. Let’s get started!

Step 1: Preparing the Scallops

First, you need to prepare the scallops. Start by taking your pound of large sea scallops and patting them dry with paper towels. This step is crucial because moisture can prevent the scallops from searing properly. Once they are dry, season both sides with salt and pepper. This simple seasoning enhances the natural sweetness of the scallops and prepares them for cooking.

Step 2: Making the Brown Butter Sage Sauce

Next, let’s move on to the brown butter sage sauce. In a large skillet, heat 1 tablespoon of olive oil over medium-high heat. Once the oil is hot, add 4 tablespoons of unsalted butter. Allow the butter to melt completely. As it melts, watch closely for the color change. After a minute or so, add the 8 fresh sage leaves to the skillet. Stir frequently for about 2-3 minutes. You want the butter to turn a lovely golden brown and develop a nutty aroma. Be careful not to let it burn, as burnt butter can ruin the flavor of your sauce.

Step 3: Searing the Scallops

Now it’s time to sear the scallops! With the skillet still over medium-high heat, carefully add the seasoned scallops in a single layer. Make sure not to overcrowd the pan, as this can lead to steaming instead of searing. Cook the scallops for about 2-3 minutes on one side until they form a beautiful golden crust. Then, gently flip them over and cook for another 2-3 minutes. The scallops should be opaque and cooked through when done. Once cooked, remove them from the skillet and set them aside on a plate.

Step 4: Combining Scallops with the Sauce

Finally, it’s time to bring everything together! Return the cooked scallops to the skillet with the brown butter sage sauce. Gently toss the scallops in the sauce for about 1 minute, ensuring they are well coated. This step allows the scallops to absorb the rich flavors of the brown butter and sage. Once they are nicely coated, remove the skillet from the heat.

Your seared scallops with brown butter sage sauce are now ready to be served! This dish is best enjoyed immediately while the scallops are warm and tender. Next, let’s explore some variations to make this dish even more exciting!

Variation of Seared Scallops with Brown Butter Sage Sauce

While the classic recipe for seared scallops with brown butter sage sauce is delightful on its own, there are many ways to add a unique twist. By incorporating alternative ingredients, you can create a dish that reflects your personal taste or the seasonal ingredients available. Here are some exciting variations to consider:

Alternative Ingredients for a Unique Twist

  • Minced Garlic: For an extra layer of flavor, add minced garlic to the brown butter sage sauce. The garlic will infuse the sauce with a rich aroma and a savory taste that pairs beautifully with the scallops.
  • Shallots: Sautéing finely chopped shallots in the butter before adding sage can add a sweet and mild onion flavor. This will enhance the overall depth of the sauce.
  • White Wine: Deglaze the skillet with a splash of white wine after cooking the scallops. This will add acidity and brightness to the dish, balancing the richness of the butter.
  • Fresh Herbs: Experiment with other fresh herbs like thyme or parsley. These can provide a different aromatic profile and complement the scallops in a new way.
  • Spices: A pinch of red pepper flakes can introduce a subtle heat to the dish. This is perfect for those who enjoy a bit of spice in their seafood.
  • Citrus Zest: Adding lemon or orange zest to the brown butter sauce can brighten the flavors and add a refreshing twist. This is especially delightful during warmer months.

These variations not only enhance the flavor but also allow you to customize the dish to suit your preferences. Feel free to mix and match these ingredients to create your own signature version of seared scallops with brown butter sage sauce. Now that you have some creative ideas, let’s move on to cooking notes to ensure your dish turns out perfectly!

Cooking Note for Seared Scallops with Brown Butter Sage Sauce

Cooking seared scallops with brown butter sage sauce is a delightful experience, but there are a few important notes to keep in mind. These tips will help you achieve the best results and ensure your scallops are perfectly cooked every time.

First, always choose fresh scallops. Freshness is key to achieving that sweet, delicate flavor. If possible, buy scallops from a trusted fishmonger or seafood market. Look for scallops that are firm and have a slightly sweet smell. Avoid any that have a strong fishy odor.

Next, drying the scallops is crucial. Patting them dry with paper towels removes excess moisture. This step is essential for achieving a beautiful golden crust when searing. If the scallops are wet, they will steam instead of sear, resulting in a less desirable texture.

When it comes to cooking, make sure your skillet is hot before adding the scallops. A hot skillet ensures a good sear and prevents sticking. You can test the heat by adding a drop of water to the pan; if it sizzles and evaporates quickly, the skillet is ready.

Additionally, avoid overcrowding the pan. Cooking too many scallops at once can lower the skillet’s temperature, leading to uneven cooking. If you have a lot of scallops, consider cooking them in batches. This way, each scallop gets the attention it deserves.

Lastly, keep an eye on the butter while making the brown butter sage sauce. It can go from perfectly browned to burnt very quickly. Stirring frequently helps monitor the color and aroma. Once it reaches that lovely golden brown, remove it from the heat immediately to prevent burning.

By following these cooking notes, you’ll be well on your way to mastering the art of seared scallops with brown butter sage sauce. Now, let’s explore some serving suggestions to elevate your dish even further!

Serving Suggestions for Seared Scallops with Brown Butter Sage Sauce

Once you’ve prepared your delicious seared scallops with brown butter sage sauce, it’s time to think about how to serve them. The right pairings and side dishes can elevate your meal, making it even more enjoyable. Here are some ideal suggestions to complement your scallops:

Ideal Pairings and Side Dishes

  • Creamy Risotto: A rich, creamy risotto pairs beautifully with scallops. The creamy texture balances the richness of the brown butter sauce, creating a harmonious dish.
  • Garlic Mashed Potatoes: Fluffy garlic mashed potatoes provide a comforting side that complements the scallops. The buttery flavor of the potatoes enhances the overall experience.
  • Seasonal Vegetables: Lightly sautéed or roasted seasonal vegetables, such as asparagus, green beans, or zucchini, add freshness and color to your plate. They also provide a nice crunch that contrasts with the tender scallops.
  • Mixed Green Salad: A simple mixed green salad with a light vinaigrette can cleanse the palate. The crisp greens and tangy dressing offer a refreshing contrast to the rich flavors of the scallops.
  • Citrus Quinoa: Quinoa tossed with citrus zest and herbs makes for a nutritious and flavorful side. The citrus notes will echo the lemon wedges served with the scallops.
  • Crusty Bread: A slice of warm, crusty bread is perfect for soaking up the delicious brown butter sage sauce. It adds a rustic touch to your meal.

When serving your seared scallops, consider arranging them on a beautiful plate. Drizzle the brown butter sage sauce over the scallops and garnish with fresh herbs or additional sage leaves for a stunning presentation. Don’t forget to add lemon wedges on the side for a zesty finish!

With these serving suggestions, your seared scallops with brown butter sage sauce will not only taste amazing but also look like a gourmet dish. Now that you have the perfect meal ready, let’s move on to some tips for perfecting your scallops!

Tips for Perfecting Seared Scallops with Brown Butter Sage Sauce

To truly master the art of cooking seared scallops with brown butter sage sauce, a few tips can make all the difference. These simple yet effective strategies will help you achieve perfectly cooked scallops every time, ensuring a delightful dining experience. Let’s explore some essential tips!

First, always use high-quality scallops. Fresh, large sea scallops are ideal for this recipe. Look for scallops that are firm and have a slight sheen. Avoid any that appear dull or have a strong fishy smell. Fresh scallops will provide the best flavor and texture.

Next, remember to dry your scallops thoroughly. Moisture is the enemy of a good sear. Patting them dry with paper towels removes excess water, allowing for that beautiful golden crust. This step is crucial for achieving the perfect texture.

When it comes to seasoning, don’t be shy! Generously season both sides of the scallops with salt and pepper. This enhances their natural sweetness and adds depth to the dish. A well-seasoned scallop is a delicious scallop!

Another important tip is to ensure your skillet is hot before adding the scallops. A hot skillet helps create a nice sear and prevents sticking. You can test the heat by adding a drop of water; if it sizzles and evaporates quickly, you’re ready to go!

Also, avoid overcrowding the pan. Cooking too many scallops at once can lower the skillet’s temperature, leading to steaming instead of searing. If you have a lot of scallops, consider cooking them in batches. This way, each scallop gets the attention it deserves.

Lastly, keep a close eye on the butter while making the brown butter sage sauce. It can go from perfectly browned to burnt very quickly. Stirring frequently helps monitor the color and aroma. Once it reaches that lovely golden brown, remove it from the heat immediately to prevent burning.

By following these tips, you’ll be well on your way to perfecting your seared scallops with brown butter sage sauce. With practice, you’ll impress your family and friends with this elegant dish. Now, let’s break down the time needed to prepare this delightful meal!

Breakdown of Time for Seared Scallops with Brown Butter Sage Sauce

Understanding the time required for each step in preparing seared scallops with brown butter sage sauce is essential for a smooth cooking experience. Here’s a breakdown of the time you’ll need for preparation and cooking, ensuring you can plan your meal effectively.

Prep Time

The prep time for this dish is quite minimal. You’ll need about 10 minutes to gather and prepare your ingredients. This includes:

  • Patt dry the scallops.
  • Season them with salt and pepper.
  • Chop any additional ingredients if you choose to add variations.

In total, expect to spend around 10 minutes on prep work, making it a quick start to your cooking adventure!

Cooking Time

The cooking time for seared scallops with brown butter sage sauce is approximately 10 minutes. Here’s how it breaks down:

  • Making the brown butter sage sauce takes about 3-4 minutes.
  • Searing the scallops will take around 4-6 minutes, depending on the size of the scallops and the heat of your skillet.

So, in total, you’ll spend about 10 minutes cooking, allowing you to serve a delicious meal in no time!

Total Time

When you combine both the prep and cooking times, the total time to prepare seared scallops with brown butter sage sauce is around 20 minutes. This makes it an excellent choice for a quick yet elegant dinner option. With just 20 minutes, you can impress your guests or treat yourself to a gourmet meal at home!

Nutritional Information for Seared Scallops with Brown Butter Sage Sauce

Understanding the nutritional content of your meals is essential for maintaining a balanced diet. Seared scallops with brown butter sage sauce not only offer a delightful taste but also provide valuable nutrients. Here’s a breakdown of the nutritional information per serving, which serves as a great guide for those mindful of their dietary choices.

Calories

280 calories. This makes it a relatively low-calorie option for a main dish, especially considering the rich flavors and satisfying textures. The calorie count allows you to enjoy a gourmet meal without overindulging.

Protein

30 grams of protein. Scallops are an excellent source of lean protein, making this dish a great choice for those looking to increase their protein intake. Protein is essential for muscle repair and overall health, making this meal both delicious and nutritious.

Sodium

600 milligrams. This amount is reasonable for a seafood dish, especially when considering the seasoning used. However, if you are watching your sodium intake, you can adjust the amount of salt added during cooking. Using fresh herbs and spices can enhance flavor without increasing sodium levels.

Overall, seared scallops with brown butter sage sauce is a nutritious option that fits well into a balanced diet. With its low calorie count, high protein content, and moderate sodium levels, this dish is perfect for a healthy yet indulgent meal. Now that you have the nutritional information, let’s address some frequently asked questions about this delightful recipe!

FAQs about Seared Scallops with Brown Butter Sage Sauce

How do I know when scallops are done cooking?

Knowing when scallops are done cooking is essential for achieving the perfect texture. Cooked scallops should be opaque and firm to the touch. When you cut into them, they should not be translucent. A good rule of thumb is to cook them for about 2-3 minutes on each side. If they have a golden crust and feel slightly springy, they are likely done. Remember, overcooking can make them tough, so keep a close eye on them!

Can I use frozen scallops for this recipe?

Yes, you can use frozen scallops for this recipe! However, it’s important to thaw them properly before cooking. Place the frozen scallops in the refrigerator overnight or submerge them in cold water for about an hour. Once thawed, pat them dry thoroughly to remove excess moisture. This step is crucial for achieving that beautiful sear. Just keep in mind that frozen scallops may have a slightly different texture compared to fresh ones, but they can still be delicious!

What can I substitute for sage in the sauce?

If you don’t have sage on hand or prefer a different flavor, there are several great substitutes. Thyme is an excellent alternative, offering a similar earthy flavor. You can also use fresh parsley for a lighter taste or rosemary for a more robust flavor. Just remember to adjust the quantity according to your taste preferences, as some herbs can be stronger than others. Feel free to experiment and find the combination that you enjoy the most!

How do I store leftovers of Seared Scallops with Brown Butter Sage Sauce?

Storing leftovers of seared scallops with brown butter sage sauce is simple. Allow the scallops to cool to room temperature, then place them in an airtight container. They can be stored in the refrigerator for up to 2 days. When reheating, do so gently in a skillet over low heat to avoid overcooking. You can add a splash of water or broth to help keep them moist. While scallops are best enjoyed fresh, you can still savor the flavors of this dish even as leftovers!

Conclusion on Seared Scallops with Brown Butter Sage Sauce

In conclusion, seared scallops with brown butter sage sauce is a dish that beautifully combines simplicity and elegance. With its rich flavors and delightful textures, this recipe is sure to impress anyone at your dining table. The golden crust of the scallops, paired with the nutty aroma of brown butter and the earthy notes of sage, creates a culinary experience that is both satisfying and memorable.

Whether you’re preparing a special meal for loved ones or treating yourself to a gourmet dinner at home, this dish is a fantastic choice. The quick preparation and cooking time make it accessible for cooks of all skill levels. Plus, the versatility of the recipe allows you to customize it with various ingredients, ensuring that you can make it your own.

As you explore the world of seared scallops, remember the tips and variations shared throughout this article. They will help you perfect your technique and elevate your dish to new heights. Don’t hesitate to experiment with flavors and pairings that resonate with your taste buds.

So, gather your ingredients, follow the steps, and enjoy the delightful experience of cooking and savoring seared scallops with brown butter sage sauce. With each bite, you’ll appreciate the harmony of flavors and the joy of creating a restaurant-quality meal in your own kitchen. Happy cooking!

Paul

Seared Scallops with Brown Butter Sage Sauce delightfully impress.

Elevate your dinner with this elegant scallop pasta dish featuring golden-seared sea scallops, earthy portobello mushrooms, and a fragrant brown butter sage sauce. Served over orecchiette pasta and finished with pine nuts and Parmesan, it’s a perfect balance of richness and refinement for date nights or special occasions.
Prep Time 10 minutes
Cook Time 20 minutes
Total Time 30 minutes
Servings: 2 servings
Course: Main Dish
Cuisine: Italian-Inspired Seafood

Ingredients
  

  • 8 to 10 sea scallops side muscle removed1/2 box orecchiette pasta (approximately 6 oz)2 tbsp finely diced shallot16 oz sliced portobello mushrooms2 tbsp unsalted butter, divided3 to 4 sprigs fresh sage leaves, torn1/4 tsp salt1/4 tsp freshly cracked black pepper1/2 cup reserved pasta water (from cooking pasta)Pine nuts, for garnish (optional)Grated Parmesan cheese, for garnish (optional)

Method
 

  1. Bring a pot of salted water to a boil. Cook orecchiette according to package directions. Reserve 1/2 cup of pasta water before draining.
  2. Pat scallops dry and season one side with salt and pepper.
  3. In a sauté pan, melt 1 tbsp of butter over medium-high heat. Once hot, place scallops seasoned-side down. Sear for 2 minutes.
  4. Add 1/2 tbsp more butter and the torn sage leaves. Flip scallops and cook for an additional 1 to 2 minutes, basting with the sage butter. Remove from the pan and set aside.
  5. In the same pan, add the remaining 1/2 tbsp of butter and the mushrooms. Cover and cook for about 2 minutes until they begin to soften and release their moisture.
  6. Add diced shallots and more sage. Cover again and cook until the shallots are soft and fragrant.
  7. Pour in reserved pasta water and stir to deglaze the pan. Add the cooked pasta and gently mix to coat with the sauce.
  8. Serve pasta topped with seared scallops. Garnish with pine nuts and grated Parmesan if desired.

Notes

Make sure scallops are fully dry before searing to get the best golden crust.
Use a heavy-bottomed pan or cast iron skillet for even browning.
This dish pairs well with a crisp white wine like Sauvignon Blanc or Pinot Grigio.
Optional garnishes like pine nuts and Parmesan add flavor and texture but can be omitted for a simpler finish.

Crispy Wonton Tacos Recipe: A Delicious Twist Awaits!

What Are Crispy Wonton Tacos?

Crispy Wonton Tacos are a delightful fusion of flavors and textures. They combine the classic taco filling with the unique crunch of wonton wrappers. Imagine a crispy shell filled with savory ground meat, fresh vegetables, and creamy toppings. This dish is not only fun to eat but also easy to make. The wonton wrappers provide a light and crispy base, making each bite a satisfying experience. Whether you’re hosting a party or just looking for a quick meal, these tacos are sure to impress!

Why You Should Try This Crispy Wonton Tacos Recipe

There are many reasons to try this Crispy Wonton Tacos Recipe. First, it’s incredibly versatile. You can customize the filling to suit your taste, whether you prefer beef, turkey, or a vegetarian option. Second, the preparation is simple and quick, making it perfect for busy weeknights or last-minute gatherings. Plus, the crispy texture of the wonton shells adds a fun twist to traditional tacos. Finally, they are a hit with both kids and adults, making them a great choice for family meals. So, gather your ingredients and get ready to enjoy a delicious and crispy taco experience!

Ingredients for Crispy Wonton Tacos Recipe

To create the perfect Crispy Wonton Tacos, you’ll need a few simple ingredients. Each component plays a vital role in delivering flavor and texture. Here’s what you’ll need:

  • 1 cup cooked ground beef or turkey
  • 1 cup shredded cheddar cheese
  • 1 cup shredded lettuce
  • 1/2 cup diced tomatoes
  • 1/4 cup sour cream
  • 1/4 cup salsa
  • 1 package (12 oz) wonton wrappers
  • Vegetable oil for frying
  • Salt and pepper to taste

These ingredients come together to create a delicious and satisfying meal. The ground meat provides protein, while the cheese adds creaminess. Fresh lettuce and tomatoes bring a refreshing crunch, and the sour cream and salsa offer a zesty finish. Don’t forget the wonton wrappers, as they are the star of this recipe, giving the tacos their unique crispy texture. With these ingredients on hand, you’re ready to start cooking!

Step-by-Step Preparation of Crispy Wonton Tacos Recipe

Step 1: Preparing the Wonton Wrappers

To start, you need to prepare the wonton wrappers. This step is crucial for achieving that perfect taco shape. First, take the wonton wrappers out of the package and lay them flat on a clean surface. If they are sticking together, gently separate them. Next, you can use a muffin tin or a wooden spoon handle to shape the wrappers. If using a muffin tin, press each wrapper into the cups to form a taco shell. If you prefer the spoon method, fold the wrapper over the handle, creating a taco shape. Make sure to press down firmly to hold the shape. Set these aside while you heat the oil.

Step 2: Making the Filling for Crispy Wonton Tacos

Now, let’s move on to the filling. In a skillet, heat over medium heat. Add your cooked ground beef or turkey to the skillet. Stir it around until it’s heated through. Season the meat with salt and pepper to taste. This step is important because it enhances the flavor of your filling. Once the meat is nicely browned and seasoned, remove it from the heat. Set it aside to cool slightly while you prepare the other ingredients. This filling is the heart of your tacos, so make sure it’s delicious!

Step 3: Assembling the Crispy Wonton Tacos

With your wonton wrappers shaped and the filling ready, it’s time to assemble your tacos! Take a crispy wonton shell and fill it with a generous scoop of the cooked meat. Next, sprinkle shredded cheddar cheese on top. The cheese will melt slightly from the warmth of the meat, adding a creamy texture. Then, add a handful of shredded lettuce and a few diced tomatoes for freshness. Finally, top it off with a dollop of sour cream and a spoonful of salsa. This combination of ingredients creates a burst of flavors in every bite!

Step 4: Frying the Wonton Tacos

Now comes the exciting part—frying the wonton tacos! In a separate pot, heat about 2 inches of vegetable oil over medium-high heat until it reaches 350°F. Carefully place the assembled tacos into the hot oil, a few at a time. Fry them for about 1-2 minutes on each side, or until they turn golden brown and crispy. Use a slotted spoon to remove them from the oil and place them on paper towels to drain any excess oil. This step ensures that your tacos are perfectly crispy and delicious. Enjoy the delightful aroma as they fry!

Variation of Crispy Wonton Tacos Recipe

Vegetarian Options for Crispy Wonton Tacos

If you’re looking for a meat-free alternative, you can easily create delicious vegetarian Crispy Wonton Tacos. Instead of ground beef or turkey, consider using black beans or lentils as your protein source. Both options are packed with flavor and nutrients. To prepare, simply heat the beans or lentils in a skillet with some spices like cumin and chili powder for added taste. You can also mix in some sautéed bell peppers or corn for extra texture and sweetness. Once your filling is ready, follow the same assembly and frying steps as the original recipe. These vegetarian tacos are not only tasty but also a great way to enjoy a healthy meal!

Spicy Twist on Crispy Wonton Tacos

If you love a bit of heat, why not add a spicy twist to your Crispy Wonton Tacos? Start by mixing diced jalapeños or serrano peppers into your meat filling. This will give your tacos a nice kick! You can also use spicy salsa or add a few dashes of hot sauce to the sour cream for an extra layer of flavor. For those who enjoy a smoky taste, consider adding chipotle peppers in adobo sauce to your meat mixture. This will not only spice things up but also add a rich, smoky flavor. Assemble and fry your tacos as usual, and get ready for a delightful explosion of flavors that will tantalize your taste buds!

Cooking Note for Crispy Wonton Tacos Recipe

When preparing your Crispy Wonton Tacos, there are a few important cooking notes to keep in mind. These tips will help ensure that your tacos turn out perfectly every time. First, always monitor the temperature of the oil while frying. If the oil is too hot, the wonton wrappers may burn quickly. Conversely, if the oil is not hot enough, the wrappers will absorb too much oil and become greasy instead of crispy. A thermometer can be a handy tool to maintain the right temperature, ideally around 350°F.

Additionally, frying in small batches is key. Overcrowding the pot can lower the oil temperature, leading to soggy tacos. Fry just a few at a time, allowing each taco to cook evenly. Once they are golden brown, remove them promptly to prevent overcooking. After frying, placing the tacos on paper towels helps absorb any excess oil, keeping them crispy.

Lastly, feel free to experiment with different fillings and toppings. The beauty of this recipe lies in its versatility. You can try various meats, beans, or even seafood. Toppings like guacamole, pico de gallo, or even a sprinkle of cilantro can elevate your tacos to new heights. Enjoy the cooking process, and don’t hesitate to make this recipe your own!

Serving Suggestions for Crispy Wonton Tacos Recipe

Best Dips and Sauces for Crispy Wonton Tacos

When it comes to serving your Crispy Wonton Tacos, the right dips and sauces can elevate the experience. Here are some fantastic options to consider:

  • Sour Cream: A classic choice, sour cream adds a creamy texture that balances the spices in the tacos.
  • Salsa: Whether you prefer mild or spicy, salsa brings a fresh and zesty flavor that complements the tacos perfectly.
  • Guacamole: This creamy avocado dip adds richness and a hint of lime, making it a delicious pairing with the crispy shells.
  • Chipotle Sauce: For those who enjoy a smoky flavor, a chipotle sauce can add a delightful kick to your tacos.
  • Hot Sauce: A few dashes of your favorite hot sauce can spice things up and add an extra layer of flavor.

Feel free to mix and match these dips to find your perfect combination. Having a variety of sauces on the table allows everyone to customize their tacos to their liking, making your meal even more enjoyable!

Pairing Drinks with Crispy Wonton Tacos

To complete your meal, consider pairing your Crispy Wonton Tacos with refreshing drinks. Here are some great options:

  • Margaritas: A classic margarita, whether frozen or on the rocks, pairs beautifully with the flavors of the tacos.
  • Beer: Light beers, such as lagers or pilsners, complement the crispy texture and savory filling of the tacos.
  • Iced Tea: A refreshing glass of iced tea, sweetened or unsweetened, can cleanse the palate between bites.
  • Lemonade: The tartness of lemonade provides a nice contrast to the rich flavors of the tacos.
  • Sparkling Water: For a non-alcoholic option, sparkling water with a slice of lime is a refreshing choice.

Choosing the right drink can enhance your dining experience. So, whether you’re hosting a party or enjoying a family dinner, these drink pairings will surely impress your guests!

Tips for Perfecting Your Crispy Wonton Tacos Recipe

To make your Crispy Wonton Tacos truly unforgettable, consider these helpful tips. They will guide you in achieving the perfect balance of flavors and textures, ensuring that every bite is a delight!

  • Choose Fresh Wonton Wrappers: Always use fresh wonton wrappers for the best results. Check the expiration date and avoid any that appear dried out or cracked. Fresh wrappers will fry up crispier and taste better.
  • Season Your Filling: Don’t forget to season your meat or vegetarian filling well. Adding spices like cumin, garlic powder, or onion powder can enhance the flavor significantly. Taste as you go to find the perfect balance!
  • Experiment with Fillings: Feel free to get creative with your fillings. Try adding sautéed onions, bell peppers, or even corn for added flavor and texture. The more variety, the more exciting your tacos will be!
  • Keep Oil Temperature Steady: Maintaining the right oil temperature is crucial. If the oil cools down too much, the wonton wrappers will absorb oil and become greasy. Use a thermometer to keep it around 350°F for optimal frying.
  • Don’t Overcrowd the Pot: Fry your tacos in small batches. Overcrowding can lower the oil temperature and lead to uneven cooking. Give each taco enough space to fry properly.
  • Let Them Drain: After frying, place your tacos on paper towels to drain excess oil. This step helps keep them crispy and prevents them from becoming soggy.
  • Serve Immediately: Crispy Wonton Tacos are best enjoyed fresh out of the fryer. Serve them immediately to maintain their crunchiness. If you need to prepare them ahead of time, keep the filling warm and fry the shells just before serving.
  • Garnish for Presentation: A sprinkle of fresh cilantro or green onions can add a pop of color and freshness to your tacos. Presentation matters, and a little garnish can make your dish look even more appetizing!

By following these tips, you’ll be well on your way to mastering the art of Crispy Wonton Tacos. Enjoy the process, and don’t hesitate to make this recipe your own!

Breakdown of Time for Crispy Wonton Tacos Recipe

Prep Time

The prep time for your Crispy Wonton Tacos is quite manageable. You can expect to spend about 15-20 minutes gathering your ingredients and preparing the wonton wrappers and filling. This includes cooking the ground meat and seasoning it to perfection. If you’re using a vegetarian option, the prep time remains similar, as you’ll still need to prepare your filling. Overall, this step is quick and straightforward, making it easy to get started on your delicious meal!

Cooking Time

Once your ingredients are ready, the cooking time is relatively short. Frying the wonton tacos will take about 10-15 minutes. This includes heating the oil and frying the tacos in small batches. Each batch will take around 3-4 minutes to achieve that golden brown and crispy texture. Keep an eye on the oil temperature to ensure the best results. With a little patience, you’ll have perfectly fried tacos in no time!

Total Time

In total, you can expect the entire process of making Crispy Wonton Tacos to take about 30-35 minutes. This includes both prep and cooking time. It’s a quick and fun recipe that’s perfect for busy weeknights or spontaneous gatherings. With just a little effort, you’ll have a delicious meal ready to serve in under an hour. So, gather your ingredients and get cooking!

Nutritional Information for Crispy Wonton Tacos Recipe

Calories in Crispy Wonton Tacos

When it comes to enjoying Crispy Wonton Tacos, understanding the calorie content is essential. Each serving of these delightful tacos contains approximately 350 calories. This makes them a satisfying option for a meal without going overboard on calories. The combination of protein, fats, and carbohydrates in this recipe provides a balanced meal that can keep you energized throughout the day. Enjoying these tacos in moderation can fit well into a healthy diet!

Protein Content in Crispy Wonton Tacos

Protein is a vital nutrient, and Crispy Wonton Tacos deliver a good amount. Each serving contains about 20 grams of protein, primarily from the ground beef or turkey. Protein is essential for building and repairing tissues, making it an important part of your diet. If you opt for a vegetarian filling, such as black beans or lentils, you can still achieve a similar protein content. This makes the tacos a great choice for those looking to increase their protein intake while enjoying a delicious meal!

Sodium Levels in Crispy Wonton Tacos

Monitoring sodium intake is important for maintaining a healthy lifestyle. Each serving of Crispy Wonton Tacos contains approximately 600 mg of sodium. This level can vary based on the specific ingredients you use, especially if you add sauces or seasonings. To keep sodium levels in check, consider using low-sodium options for your fillings and toppings. By being mindful of your choices, you can enjoy these tasty tacos while keeping your sodium intake within a healthy range!

FAQs About Crispy Wonton Tacos Recipe

Can I make Crispy Wonton Tacos ahead of time?

Yes, you can prepare some components of your Crispy Wonton Tacos ahead of time! You can cook the filling and store it in the refrigerator for up to 2 days. Just reheat it before assembling your tacos. However, it’s best to fry the wonton wrappers just before serving. This way, they stay crispy and delicious. If you want to save time, you can also shape the wonton wrappers in advance and keep them covered with a damp cloth to prevent them from drying out.

What can I use instead of wonton wrappers?

If you can’t find wonton wrappers, there are several alternatives you can use. You can try using egg roll wrappers, which are slightly thicker but can still create a crispy shell. Another option is to use tortillas, either corn or flour, for a different texture. If you’re looking for a gluten-free option, consider using rice paper wrappers. Just keep in mind that the cooking method may vary slightly depending on the type of wrapper you choose.

How do I store leftover Crispy Wonton Tacos?

To store leftover Crispy Wonton Tacos, place them in an airtight container in the refrigerator. They can last for about 2-3 days. However, the wonton wrappers may lose their crispiness over time. To reheat, you can place them in an oven at 350°F for about 10 minutes to help restore some of their crunch. Alternatively, you can use an air fryer for a few minutes to achieve a crispy texture again. Just be sure to check that the filling is heated through before serving!

Can I bake Crispy Wonton Tacos instead of frying them?

Absolutely! If you prefer a healthier option, you can bake your Crispy Wonton Tacos instead of frying them. Preheat your oven to 375°F. Lightly brush or spray the shaped wonton wrappers with cooking oil and place them on a baking sheet. Bake for about 10-12 minutes, flipping halfway through, until they are golden brown and crispy. While they may not be as crispy as fried ones, baking is a great alternative that still yields delicious results!

Conclusion on Crispy Wonton Tacos Recipe

In conclusion, Crispy Wonton Tacos are a delightful and versatile dish that brings a unique twist to traditional tacos. With their crunchy wonton shells and flavorful fillings, they are perfect for any occasion, whether it’s a family dinner or a fun gathering with friends. The ease of preparation and the ability to customize the ingredients make this recipe a must-try for anyone looking to impress their guests or simply enjoy a delicious meal at home.

By following the steps outlined in this article, you can create a batch of Crispy Wonton Tacos that are sure to be a hit. Remember to experiment with different fillings and toppings to find your favorite combination. Whether you choose to stick with the classic meat filling or opt for a vegetarian version, the possibilities are endless!

Don’t forget to pair your tacos with tasty dips and refreshing drinks to enhance your dining experience. With a little creativity and the right ingredients, you can turn a simple recipe into a culinary masterpiece. So, gather your loved ones, whip up some Crispy Wonton Tacos, and enjoy the delightful flavors and textures that this dish has to offer. Happy cooking!

Paul

Crispy Wonton Tacos Recipe: A Delicious Twist Awaits!

These copycat Applebee’s wonton tacos are the perfect fusion of crunchy, tangy, and savory. A crispy wonton shell is packed with flavorful marinated chicken, zesty slaw, and fresh garnishes—perfect as a crowd-pleasing appetizer or a fun, light dinner with bold Asian-inspired flair.
Prep Time 15 minutes
Cook Time 10 minutes
Total Time 25 minutes
Servings: 4 servings
Course: Appetizer, Main Dish
Cuisine: Asian-American Fusion

Ingredients
  

  • Wonton Shells4 wonton wrappersOlive oil for brushing
  • Chicken and Marinade8 oz boneless skinless chicken breasts, finely diced2 tbsp stir fry sauce4 tbsp Asian sesame vinaigrette dressing1 tbsp soy sauce1 tbsp teriyaki sauce1 tbsp olive oilBlack pepper, to taste
  • Crunchy Slaw Mix4 tbsp Dole slaw mix just the vegetables, no dressing1 tbsp coleslaw dressing2 tbsp chopped green onion tops1 tbsp Asian sesame vinaigrette (reserved from marinade)
  • Garnishes2 tbsp chopped fresh cilantro2 tbsp sliced almonds

Method
 

  1. Preheat the oven to 375°F (190°C). Lightly brush wonton wrappers with olive oil and drape them over the edges of a baking dish or taco rack to form a taco shape. Bake for about 5 minutes or until golden brown and crisp. Let cool in position.
  2. In a bowl, mix the diced chicken with stir fry sauce, 3 tbsp of the Asian sesame vinaigrette, soy sauce, and teriyaki sauce.
  3. Heat olive oil in a skillet over medium-high heat. Add the marinated chicken and cook until fully done, stirring occasionally. Season with black pepper to taste.
  4. In another bowl, combine slaw mix, green onions, coleslaw dressing, and the reserved 1 tbsp of vinaigrette. Toss to coat evenly.
  5. Assemble the tacos by filling each wonton shell with cooked chicken, then layering the slaw on top. Garnish with chopped cilantro and sliced almonds. Serve immediately.

Notes

To reduce sodium, opt for low-sodium soy sauce and dressings.
These tacos are best served fresh to preserve the crunch of the wonton shells.
If you don’t have a taco rack, use an inverted muffin tin to shape the wontons for baking.
Great as party appetizers or served with a side of jasmine rice or edamame.

Chocolate Pistachio Cookies Recipe for Sweet Indulgence

Introduction to Chocolate Pistachio Cookies Recipe

Chocolate Pistachio Cookies Recipe is not just a dessert; it’s an experience that brings joy to every bite. Whether you’re baking for a special occasion or just to satisfy your sweet tooth, these cookies are sure to impress.

The Perfect Combination of Flavors

Imagine biting into a warm cookie, where the smooth, melted chocolate mingles with the nutty flavor of pistachios. It’s a match made in heaven! The sweetness of the chocolate balances perfectly with the slight saltiness of the pistachios. This delightful contrast creates a cookie that is both satisfying and exciting.

Chocolate Pistachio Cookies Recipe is not only easy to follow but also allows for creativity. You can adjust the ingredients to suit your taste, making it a versatile choice for any baker.

So, gather your ingredients and get ready to create a batch of cookies that will have everyone asking for seconds. Let’s explore the ingredients you’ll need to make these delicious cookies!

Ingredients for Chocolate Pistachio Cookies Recipe

Chocolate Pistachio Cookies, you’ll need a few simple ingredients. Each one plays a vital role in achieving that delightful flavor and texture. Here’s what you’ll need:

  • 1 cup unsalted butter, softened
  • 1 cup granulated sugar
  • 1 cup brown sugar, packed
  • 2 large eggs
  • 2 teaspoons vanilla extract
  • 3 cups all-purpose flour
  • 1 teaspoon baking soda
  • 1/2 teaspoon salt
  • 1 cup semi-sweet chocolate chips
  • 1 cup shelled pistachios, roughly chopped

These ingredients are easy to find at your local grocery store. The unsalted butter gives the cookies a rich flavor, while the combination of granulated and brown sugar adds sweetness and moisture. Eggs help bind everything together, and vanilla extract enhances the overall taste.

When it comes to the dry ingredients, all-purpose flour provides the structure, while baking soda helps the cookies rise. A pinch of salt balances the sweetness and brings out the flavors. Finally, the semi-sweet chocolate chips and chopped pistachios are the stars of the show, adding that irresistible chocolatey goodness and a delightful crunch.

Chocolate Pistachio Cookies!

Step-by-Step Preparation of Chocolate Pistachio Cookies Recipe

Chocolate Pistachio Cookies. Follow these simple steps to ensure your cookies turn out perfectly every time!

Step 1: Preheat the Oven

First things first, preheat your oven to 350°F (175°C). This step is crucial as it ensures that your cookies bake evenly. While the oven is heating up, you can prepare your baking sheet. Line it with parchment paper to prevent the cookies from sticking. This will make cleanup a breeze!

Step 2: Prepare the Cookie Dough

In a large mixing bowl, cream together the softened butter, granulated sugar, and brown sugar. Use an electric mixer or a sturdy wooden spoon to mix until the mixture is light and fluffy. This process usually takes about 2-3 minutes. Next, add the eggs one at a time, mixing well after each addition. Don’t forget to stir in the vanilla extract, as it adds a wonderful aroma and flavor to your cookie dough.

Step 3: Incorporate Chocolate and Pistachios

In a separate bowl, whisk together the all-purpose flour, baking soda, and salt. Gradually add this dry mixture to the wet ingredients. Mix until just combined; be careful not to overmix, as this can make your cookies tough. Now, it’s time for the fun part! Gently fold in the semi-sweet chocolate chips and the roughly chopped pistachios. This is where your cookies get their delightful texture and flavor.

Step 4: Shape the Cookies

Using a tablespoon or a cookie scoop, drop rounded tablespoons of dough onto the prepared baking sheet. Make sure to space them about 2 inches apart. This spacing allows the cookies to spread while baking without merging into one another. If you like, you can also roll the dough into balls for a more uniform shape.

Step 5: Bake the Cookies

Now, it’s time to bake! Place the baking sheet in the preheated oven and bake for 10-12 minutes. Keep an eye on them; you want the edges to be golden brown while the centers remain soft. Once they’re done, remove the cookies from the oven and let them cool on the baking sheet for about 5 minutes. After that, transfer them to a wire rack to cool completely. This cooling process helps them set perfectly!

Chocolate Pistachio Cookies. They’re perfect for sharing or enjoying all by yourself. Let’s explore some variations you can try to make these cookies even more exciting!

Variation of Chocolate Pistachio Cookies Recipe

Chocolate Pistachio Cookies Recipe is already a treat, there’s always room for creativity in the kitchen! You can easily switch things up by trying alternative ingredients or different flavor combinations. Let’s explore some exciting variations that can elevate your cookie game!

Alternative Ingredients to Try

Sometimes, you might want to experiment with different ingredients to suit your taste or dietary needs. Here are a few alternatives you can consider:

  • Nut Substitutes: If you’re not a fan of pistachios, feel free to swap them out for almonds, walnuts, or even pecans. Each nut brings its unique flavor and texture.
  • Chocolate Choices: Instead of semi-sweet chocolate chips, try using dark chocolate or white chocolate chips. You can even mix different types of chocolate for a more complex flavor.
  • Flour Options: For a gluten-free version, substitute all-purpose flour with almond flour or a gluten-free flour blend. Just be aware that the texture may vary slightly.
  • Sweetener Variations: If you prefer a healthier option, consider using coconut sugar or honey instead of granulated sugar. This can add a different sweetness and flavor profile.

Different Flavor Combinations

Why stop at chocolate and pistachios? Here are some fun flavor combinations to try:

  • Mint Chocolate: Add a few drops of peppermint extract to the dough for a refreshing minty twist. This pairs wonderfully with chocolate!
  • Coconut Delight: Mix in shredded coconut for a tropical flair. The coconut adds a chewy texture that complements the chocolate and nuts.
  • Spiced Cookies: Incorporate a teaspoon of cinnamon or nutmeg into the dry ingredients for a warm, spiced flavor. This is perfect for cozy gatherings!
  • Fruit Infusion: Add dried cranberries or cherries for a fruity burst. The tartness of the fruit balances the sweetness of the cookies beautifully.

Chocolate Pistachio Cookies Recipe to your liking. So, don’t hesitate to get creative and make these cookies your own!

Cooking Note for Chocolate Pistachio Cookies Recipe

Chocolate Pistachio Cookies Recipe. Here are some essential cooking notes to keep in mind:

  • Room Temperature Ingredients: Ensure that your butter and eggs are at room temperature before you start. This helps them blend more easily, resulting in a smoother cookie dough.
  • Measuring Flour: When measuring flour, use the spoon-and-level method. Spoon the flour into your measuring cup and level it off with a knife. This prevents packing, which can lead to dry cookies.
  • Chilling the Dough: For a chewier texture, consider chilling the cookie dough for at least 30 minutes before baking. This helps the flavors meld and can prevent the cookies from spreading too much.
  • Watch the Baking Time: Every oven is different, so keep an eye on your cookies as they bake. Remove them from the oven when the edges are golden brown, but the centers still look slightly underbaked. They will continue to cook on the baking sheet.
  • Storing Cookies: To keep your cookies fresh, store them in an airtight container at room temperature. They can last up to a week, but we doubt they’ll last that long!

Chocolate Pistachio Cookies turn out perfectly every time. Happy baking!

Serving Suggestions for Chocolate Pistachio Cookies Recipe

Chocolate Pistachio Cookies are baked and cooled, it’s time to think about how to serve them. The right presentation and pairing can elevate your cookie experience. Here are some delightful serving suggestions to consider!

Pairing with Beverages

What’s better than enjoying a cookie with a perfect drink? Here are some beverage pairings that complement the rich flavors of your cookies:

  • Milk: A classic choice! The creaminess of milk balances the sweetness of the cookies. Whether you prefer whole, almond, or oat milk, it’s a match made in heaven.
  • Coffee: For adults, a warm cup of coffee enhances the chocolate flavor. Try a rich espresso or a smooth latte for a delightful experience.
  • Tea: Herbal teas, like chamomile or mint, can provide a refreshing contrast. Green tea also works well, offering a light and healthy option.
  • Hot Chocolate: For a double chocolate treat, serve your cookies with a warm cup of hot chocolate. Top it with whipped cream for extra indulgence!

These beverages not only enhance the flavors but also create a cozy atmosphere for enjoying your cookies. So, grab your favorite drink and get ready to savor every bite!

Presentation Ideas

Chocolate Pistachio Cookies can make a big difference. Here are some fun and creative ideas to impress your guests:

  • Cookie Platter: Arrange your cookies on a beautiful platter. You can add some fresh fruits or nuts around them for a colorful touch.
  • Gift Jars: For a thoughtful gift, layer the cookies in a mason jar. Tie a ribbon around it and add a tag with the recipe. It’s a sweet surprise for friends and family!
  • Cookie Stacks: Stack a few cookies and secure them with a ribbon or twine. This makes for a charming presentation that’s perfect for parties.
  • Decorative Plates: Use decorative plates or napkins that match the occasion. This adds a festive touch, whether it’s a birthday, holiday, or just a cozy gathering.

Chocolate Pistachio Cookies will not only taste amazing but also look delightful. Enjoy sharing them with loved ones or savoring them all by yourself!

Tips for Perfecting Your Chocolate Pistachio Cookies Recipe

Chocolate Pistachio Cookies turn out perfectly every time, consider these helpful tips. Each suggestion can enhance the flavor, texture, and overall experience of your cookies. Let’s dive into some expert advice!

  • Use Quality Ingredients: The quality of your ingredients can significantly impact the final product. Opt for high-quality chocolate chips and fresh pistachios. This will elevate the taste of your cookies.
  • Don’t Overmix: When combining the dry and wet ingredients, mix until just combined. Overmixing can lead to tough cookies. A gentle hand will keep them soft and chewy.
  • Experiment with Add-Ins: Feel free to add more flavor! Consider mixing in a handful of dried fruits, like cranberries or cherries, for a fruity twist. You can also add a sprinkle of sea salt on top before baking for a sweet and salty contrast.
  • Adjust Baking Time: Every oven is different. Start checking your cookies a minute or two before the recommended baking time. Remove them when the edges are golden but the centers look slightly underbaked. They will firm up as they cool.
  • Cool Completely: Allow your cookies to cool completely on a wire rack. This helps them set properly and enhances their texture. Warm cookies are delicious, but cooled cookies are easier to stack and store.
  • Store Properly: To keep your cookies fresh, store them in an airtight container. You can also separate layers with parchment paper to prevent sticking. They’ll stay delicious for up to a week!
  • Try Different Shapes: Get creative with the shape of your cookies! Use cookie cutters for fun shapes or make them into bars for easy serving. This adds a unique touch to your cookie presentation.

Chocolate Pistachio Cookies Recipe. Each batch will be a delightful treat that you and your loved ones will enjoy. Happy baking!

Breakdown of Time for Chocolate Pistachio Cookies Recipe

Chocolate Pistachio Cookies Recipe can help you plan your baking session better. Here’s a simple breakdown of the time required for preparation, cooking, and the total time to enjoy your delicious cookies!

Prep Time

The prep time for making these delightful cookies is approximately 15-20 minutes. This includes gathering your ingredients, creaming the butter and sugars, and mixing in the eggs and vanilla. Additionally, you’ll need time to whisk the dry ingredients and fold in the chocolate chips and pistachios. If you choose to chill the dough for a chewier texture, add an extra 30 minutes to this time.

Cooking Time

Once your cookie dough is ready, the cooking time is quite short! You’ll need about 10-12 minutes to bake the cookies in the preheated oven. Keep an eye on them, as baking times can vary slightly depending on your oven. The goal is to achieve golden edges while keeping the centers soft and chewy.

Total Time

Chocolate Pistachio Cookies Recipe a quick and rewarding treat to whip up, perfect for any occasion. So, gather your ingredients and get ready to enjoy some freshly baked cookies in no time!

Nutritional Information for Chocolate Pistachio Cookies Recipe

Chocolate Pistachio Cookies Recipe can help you enjoy them even more. Whether you’re counting calories or just curious about what’s in your treats, here’s a breakdown of the key nutritional information per cookie.

Calories

Each cookie contains approximately 180 calories. This makes them a delightful treat that can fit into a balanced diet. Enjoying one or two cookies as a snack or dessert can satisfy your sweet cravings without going overboard.

Protein Content

In terms of protein, each cookie provides about 3 grams. While this isn’t a high protein snack, the addition of pistachios does contribute some healthy protein to your diet. Pairing these cookies with a glass of milk can boost your protein intake even further!

Sodium Levels

Each cookie contains roughly 100 milligrams of sodium. This is a moderate amount, especially considering that most people consume more sodium than needed in their daily diets. The salt in the recipe helps enhance the flavors of the chocolate and pistachios, making each bite even more enjoyable.

Chocolate Pistachio Cookies with a little more awareness. Remember, moderation is key, and these cookies can be a delightful part of your overall diet!

FAQs about Chocolate Pistachio Cookies Recipe

Can I use different nuts in the Chocolate Pistachio Cookies Recipe?

Chocolate Pistachio Cookies Recipe. Each nut brings its unique flavor and texture, allowing you to customize your cookies to your liking. Just make sure to chop the nuts roughly, so they mix well into the dough!

How do I store leftover Chocolate Pistachio Cookies?

Chocolate Pistachio Cookies fresh, store them in an airtight container at room temperature. This will help maintain their chewy texture and delicious flavor. If you want to keep them for a longer period, you can also refrigerate them. Just remember to let them come to room temperature before enjoying them again. They can last up to a week, but we doubt they’ll last that long!

Can I freeze the cookie dough for later use?

Yes, you can freeze the cookie dough! This is a great way to have fresh cookies on hand whenever you want. Simply scoop the dough into rounded tablespoons and place them on a baking sheet. Freeze them until solid, then transfer the dough balls to a freezer-safe bag or container. When you’re ready to bake, just take out the desired amount and bake them straight from the freezer, adding a minute or two to the baking time.

What type of chocolate is best for the Chocolate Pistachio Cookies Recipe?

Chocolate Pistachio Cookies Recipe. They provide a nice balance of sweetness and richness. However, feel free to experiment with different types of chocolate! Dark chocolate adds a more intense flavor, while milk chocolate offers a sweeter taste. You can even mix different types of chocolate for a delightful combination!

Chocolate Pistachio Cookies Recipe. Enjoy the process and happy baking!

Conclusion on Chocolate Pistachio Cookies Recipe

Chocolate Pistachio Cookies Recipe is a delightful way to indulge your sweet tooth while enjoying the unique flavors of chocolate and pistachios. This recipe is not only simple to follow but also allows for creativity and personalization. Whether you stick to the classic version or experiment with various ingredients, each batch promises to be a treat.

As you bake these cookies, remember the joy they bring to gatherings, celebrations, or even a quiet evening at home. The combination of soft, chewy centers and crunchy pistachios creates a texture that is simply irresistible. Plus, the rich chocolate flavor makes every bite a moment of bliss.

Chocolate Pistachio Cookies!

Paul

Chocolate Pistachio Cookies Recipe for Sweet Indulgence

These rich chocolate cookies stuffed with a crunchy pistachio kataifi center have taken Dubai by storm—and for good reason. With fudgy centers, crispy edges, and a nutty, creamy surprise inside, they’re a next-level treat that’s both indulgent and unforgettable.
Prep Time 25 minutes
Total Time 2 hours 10 minutes
Servings: 12 servings
Course: Dessert
Cuisine: Fusion / Middle Eastern-Inspired

Ingredients
  

  • For the chocolate cookie dough:200g unsalted butter softened125g light brown sugar100g white caster sugar2 large eggs, room temperature250g self-raising flour100g plain flour50g cocoa powder½ teaspoon salt100g milk chocolate chips
  • For the pistachio kataifi filling:1 teaspoon unsalted butter2 filo pastry sheets about 75g total200g pistachio cream, reserve 2 tablespoons for decoration

Method
 

  1. In a saucepan, melt 1 teaspoon butter over low heat. Tear the filo pastry sheets into small pieces and add to the pan. Toast over medium heat for 5 to 10 minutes until golden and crisp.
  2. Microwave the pistachio cream for 10 to 20 seconds until soft. Stir it into the toasted filo mixture, reserving 2 tablespoons for drizzling later. Let the mixture cool completely.
  3. In a large bowl, beat the softened butter until smooth but not fully creamed. Add both sugars and mix until combined into a sandy texture.
  4. Add the eggs and mix. The batter may look messy at this stage.
  5. In a separate bowl, whisk together the self-raising flour, plain flour, cocoa powder, and salt. Gradually fold the dry ingredients into the wet mixture until combined.
  6. Stir in the milk chocolate chips.
  7. Line a baking tray with parchment paper (make sure it fits in your freezer). Scoop heaped tablespoons of dough and flatten in your palm. Place 1 teaspoon of pistachio filling in the center and seal the dough around it to form a ball.
  8. Repeat to make 12 cookie balls. Freeze for 90 minutes.
  9. Preheat the oven to 200°C fan / 220°C conventional. Place the baking tray in the oven to preheat for 5 minutes.
  10. Place 4 to 5 frozen cookie balls on the hot tray, spaced apart. Bake for 12 to 15 minutes, until edges are set and centers remain soft.
  11. Let cookies cool on the tray for 15 minutes.
  12. Warm the reserved pistachio cream slightly and drizzle or pipe over the cooled cookies. Serve warm or store at room temperature for up to 4 to 5 days.

Notes

Freeze the stuffed cookie dough balls fully to prevent spreading.
Pistachio cream can be found in specialty or Middle Eastern markets—or substituted with Nutella for a variation.
Ensure the filo is golden and crunchy before mixing it with the cream to maintain the texture inside the cookie.

Spicy Beef Noodle Soup warms your heart and soul.

Welcome to the world of Spicy Beef Noodle Soup! This dish is not just a meal; it’s an experience that warms the heart and tantalizes the taste buds. With its rich flavors and comforting aroma, it has become a favorite in many households. Whether you’re looking for a cozy dinner or a dish to impress your guests, this recipe is sure to deliver.

What Makes Spicy Beef Noodle Soup Unique?

What sets Spicy Beef Noodle Soup apart from other noodle dishes? It’s all about the balance of flavors. The combination of tender beef, aromatic herbs, and spicy chili paste creates a symphony of taste. The broth is the star of the show, simmered to perfection with ingredients like lemongrass and garlic. Each spoonful is a burst of flavor that warms you from the inside out.

Moreover, the texture of the rice vermicelli noodles adds a delightful chewiness that complements the tender beef. The freshness of the garnishes, like basil and bean sprouts, brings a refreshing contrast to the rich broth. This unique blend of flavors and textures makes Spicy Beef Noodle Soup a standout dish that you’ll want to make again and again.

The Cultural Significance of Spicy Beef Noodle Soup

Spicy Beef Noodle Soup is more than just a delicious meal; it holds cultural significance in many Asian cuisines. Often enjoyed during family gatherings and celebrations, this dish symbolizes warmth and togetherness. In various cultures, sharing a bowl of soup is a way to bond with loved ones, making it a cherished tradition.

In addition, the soup reflects the culinary heritage of its origins. Each region has its own twist on the recipe, showcasing local ingredients and flavors. This adaptability allows Spicy Beef Noodle Soup to resonate with people from different backgrounds, making it a beloved dish worldwide. So, as you prepare this recipe, remember that you’re not just cooking; you’re participating in a rich cultural tradition that brings people together.

Ingredients for Spicy Beef Noodle Soup Recipe

To create a delicious bowl of Spicy Beef Noodle Soup, you’ll need a variety of fresh ingredients. Each component plays a vital role in building the rich flavors that make this dish so special. Here’s what you’ll need:

  • 1 pound beef shank, cut into 1-inch pieces
  • 1 pound beef brisket, cut into 1-inch pieces
  • 8 cups beef broth for a hearty base
  • 2 cups water to balance the broth
  • 1 medium onion, quartered for sweetness
  • 4 cloves garlic, minced for flavor
  • 2 stalks lemongrass, trimmed and smashed to release aroma
  • 2 tablespoons fish sauce for umami depth
  • 1 tablespoon soy sauce to enhance the savory notes
  • 1 tablespoon chili paste (adjust to taste for spice level)
  • 1 teaspoon sugar to balance flavors
  • 1 teaspoon salt to season
  • 1 package (14 ounces) rice vermicelli noodles for the perfect texture
  • 1 cup bean sprouts for crunch
  • 1 cup fresh basil leaves for freshness
  • 1 lime, cut into wedges for a zesty finish
  • Sliced jalapeños (optional) for extra heat

Gathering these ingredients will set you on the right path to making a flavorful Spicy Beef Noodle Soup. Each item contributes to the overall taste and experience of the dish. So, make sure to choose fresh and high-quality ingredients for the best results!

Step-by-Step Preparation of Spicy Beef Noodle Soup Recipe

Now that you have all your ingredients ready, it’s time to dive into the cooking process. Making Spicy Beef Noodle Soup is straightforward, and each step builds on the last to create a delicious and hearty meal. Let’s get started!

Step 1: Preparing the Broth

First, you’ll want to prepare the broth, which is the heart of your Spicy Beef Noodle Soup. In a large pot, combine the beef shank, beef brisket, beef broth, and water. Add the quartered onion, minced garlic, and smashed lemongrass. These ingredients will infuse the broth with rich flavors.

Next, stir in the fish sauce, soy sauce, chili paste, sugar, and salt. Bring the mixture to a boil over medium-high heat. Once it starts bubbling, reduce the heat to low and cover the pot. Let it simmer for about 1.5 to 2 hours. This slow cooking allows the beef to become tender and the flavors to meld beautifully.

Step 2: Cooking the Beef

While the broth simmers, the beef will cook to perfection. After about 1.5 hours, check the beef for tenderness. It should be easy to shred with a fork. Once it’s ready, carefully remove the beef from the pot and let it cool slightly. After cooling, slice the beef into thin strips. This will make it easy to serve in the soup later.

Step 3: Preparing the Noodles

While the beef is cooling, it’s time to prepare the rice vermicelli noodles. Follow the package instructions for cooking. Typically, you’ll need to soak them in hot water for a few minutes until they are soft. Once cooked, drain the noodles and set them aside. This step ensures that your noodles are ready to soak up the delicious broth.

Step 4: Combining Ingredients

After the beef is sliced and the noodles are ready, it’s time to combine everything. Strain the broth through a fine mesh sieve to remove any solids, returning the clear broth to the pot. This step is crucial for a smooth and flavorful soup. Taste the broth and adjust the seasoning if needed.

Now, it’s time to assemble your bowls. Place a portion of the cooked rice vermicelli noodles in each bowl. Top with the sliced beef, and ladle the hot broth over the top. This layering of ingredients ensures that every bite is packed with flavor.

Step 5: Final Touches and Serving

To finish off your Spicy Beef Noodle Soup, it’s all about the garnishes. Add a generous handful of bean sprouts and fresh basil leaves to each bowl. Squeeze a lime wedge over the soup for a zesty kick. If you like it spicy, feel free to add sliced jalapeños on top. These final touches not only enhance the flavor but also add a beautiful presentation to your dish.

Now, your Spicy Beef Noodle Soup is ready to be enjoyed! Serve it hot and watch as everyone digs in with delight. This comforting dish is sure to become a favorite in your home.

Variations of Spicy Beef Noodle Soup Recipe

While the traditional Spicy Beef Noodle Soup is a delight, there are many ways to customize this dish to suit different tastes and dietary preferences. Here are some exciting variations to consider:

Vegetarian Alternatives

If you’re looking for a vegetarian option, you can easily adapt the Spicy Beef Noodle Soup recipe. Instead of beef, use hearty vegetables like mushrooms, tofu, or tempeh. These ingredients provide a satisfying texture and absorb the flavors of the broth beautifully.

For the broth, replace beef broth with vegetable broth. You can still include the same aromatic ingredients like garlic, lemongrass, and onion to create a rich flavor base. Additionally, consider adding a splash of soy sauce and a bit of chili paste for that signature spice. This vegetarian version is not only delicious but also packed with nutrients!

Different Types of Noodles to Use

While rice vermicelli noodles are a classic choice for Spicy Beef Noodle Soup, you can experiment with various types of noodles to change the dish’s texture and flavor. For instance, try using egg noodles for a heartier bite or udon noodles for a chewier experience. Both options will complement the rich broth well.

If you prefer a gluten-free option, consider using rice noodles or even zucchini noodles for a lighter twist. Each type of noodle brings its unique character to the soup, allowing you to enjoy a new experience with every bowl. Feel free to mix and match based on your preferences!

Cooking Note for Spicy Beef Noodle Soup Recipe

Cooking Spicy Beef Noodle Soup is a rewarding experience, but there are a few important notes to keep in mind to ensure your dish turns out perfectly. First, the quality of your ingredients plays a significant role in the final flavor. Always opt for fresh, high-quality beef and vegetables. This will enhance the overall taste of your soup.

When simmering the broth, patience is key. Allowing the beef to cook slowly helps to develop deep flavors. If you’re short on time, you can use a pressure cooker to speed up the process. However, the traditional method of simmering will yield a richer broth.

Another tip is to taste your broth as it cooks. Adjust the seasoning gradually, especially the chili paste, to achieve your desired spice level. Remember, you can always add more spice, but it’s hard to take it away once it’s in!

Lastly, don’t forget about the garnishes. They are not just for decoration; they add freshness and crunch to the soup. The combination of bean sprouts, basil, and lime elevates the dish, making each bite a delightful experience.

By keeping these cooking notes in mind, you’ll be well on your way to creating a delicious and satisfying bowl of Spicy Beef Noodle Soup that everyone will love!

Serving Suggestions for Spicy Beef Noodle Soup Recipe

Once your Spicy Beef Noodle Soup is ready, it’s time to think about how to serve it. The right accompaniments and presentation can elevate your dish, making it even more enjoyable. Here are some suggestions to enhance your dining experience.

Ideal Accompaniments

To complement the rich flavors of Spicy Beef Noodle Soup, consider serving it with a few tasty sides. Here are some ideal accompaniments:

  • Spring Rolls: Crispy spring rolls filled with vegetables or shrimp make a delightful starter. Their crunch pairs well with the soup’s warmth.
  • Pickled Vegetables: A side of pickled carrots and daikon adds a tangy contrast to the spicy broth. The acidity helps balance the flavors.
  • Chili Oil: For those who love extra heat, serve a small dish of chili oil on the side. Diners can drizzle it over their soup to customize the spice level.
  • Rice: A bowl of steamed jasmine rice can be a great addition. It’s perfect for soaking up the delicious broth.

These accompaniments not only enhance the meal but also provide a variety of textures and flavors that make dining more enjoyable.

Presentation Tips

Presentation is key when serving Spicy Beef Noodle Soup. A well-presented dish can make the meal feel special. Here are some tips to make your soup visually appealing:

  • Use Clear Bowls: Serving the soup in clear bowls allows the vibrant colors of the ingredients to shine through. It creates an inviting look.
  • Garnish Generously: Don’t skimp on the garnishes! A handful of fresh basil, a sprinkle of bean sprouts, and a lime wedge on the side add color and freshness.
  • Layer Ingredients: When assembling the soup, layer the noodles, beef, and broth carefully. This creates a beautiful presentation and ensures each bowl is filled with flavor.
  • Serve with a Smile: Finally, don’t forget the most important part of presentation—your smile! Sharing a meal is about connection, so enjoy the moment with your loved ones.

By following these serving suggestions and presentation tips, your Spicy Beef Noodle Soup will not only taste amazing but also look stunning on the table. Enjoy your culinary creation!

Tips for Perfecting Your Spicy Beef Noodle Soup Recipe

Creating the perfect Spicy Beef Noodle Soup is an art that can be refined with a few helpful tips. Whether you’re a seasoned cook or a beginner, avoiding common mistakes and enhancing flavor profiles can elevate your dish to new heights. Let’s explore how to make your soup truly exceptional!

Common Mistakes to Avoid

Even the best recipes can go awry if certain mistakes are made. Here are some common pitfalls to watch out for:

  • Not Skimming the Broth: As your broth simmers, foam and impurities may rise to the surface. Skimming these off ensures a clearer, cleaner broth.
  • Overcooking the Beef: While you want tender beef, overcooking can lead to a mushy texture. Keep an eye on the cooking time and check for tenderness regularly.
  • Ignoring Seasoning: Taste your broth as it cooks. Adjust the seasoning gradually, especially the fish sauce and chili paste, to achieve the perfect balance.
  • Using Stale Ingredients: Fresh ingredients make a world of difference. Always choose high-quality beef, herbs, and spices for the best flavor.
  • Skipping the Garnishes: Garnishes are not just for looks! They add freshness and crunch. Don’t skip the bean sprouts, basil, and lime—they complete the dish.

By avoiding these common mistakes, you’ll be on your way to a delicious bowl of Spicy Beef Noodle Soup that impresses everyone!

Enhancing Flavor Profiles

To take your Spicy Beef Noodle Soup to the next level, consider these tips for enhancing flavor profiles:

  • Add Aromatics: Incorporate additional herbs like cilantro or mint for a fresh twist. These herbs can brighten the flavors and add complexity.
  • Experiment with Spices: Try adding star anise, cinnamon, or cloves during the simmering process. These spices can deepen the flavor and add warmth.
  • Use Homemade Broth: If possible, make your own beef broth. It’s richer and more flavorful than store-bought options, giving your soup a homemade touch.
  • Incorporate Vegetables: Adding vegetables like bok choy, mushrooms, or carrots can enhance the soup’s flavor and nutrition. They also add color and texture.
  • Finish with a Drizzle: A drizzle of sesame oil or chili oil just before serving can elevate the dish, adding a nutty flavor and a hint of spice.

By implementing these tips, you’ll create a Spicy Beef Noodle Soup that’s bursting with flavor and sure to impress your family and friends. Enjoy the process and happy cooking!

Breakdown of Time for Spicy Beef Noodle Soup Recipe

Understanding the time required for each step in the Spicy Beef Noodle Soup recipe can help you plan your cooking efficiently. Here’s a breakdown of the time you’ll need for preparation and cooking:

Prep Time

Prep time is essential for gathering and preparing your ingredients. For this recipe, you should allocate about 20 to 30 minutes. This includes:

  • Chopping the beef into 1-inch pieces.
  • Quartering the onion and mincing the garlic.
  • Trimming and smashing the lemongrass.
  • Measuring out the fish sauce, soy sauce, chili paste, and other ingredients.
  • Preparing the rice vermicelli noodles.

Taking your time during prep ensures that everything is ready when you start cooking, making the process smoother and more enjoyable.

Cooking Time

The cooking time for Spicy Beef Noodle Soup is where the magic happens. You’ll need about 1.5 to 2 hours for simmering the broth. Here’s how it breaks down:

  • Bringing the broth to a boil: approximately 10 minutes.
  • Simmering the broth with beef and aromatics: 1.5 to 2 hours.
  • Cooking the rice vermicelli noodles: about 5 to 7 minutes.

During the simmering phase, you can relax or prepare your garnishes, making the most of your time in the kitchen.

Total Time

When you combine both prep and cooking times, the total time for making Spicy Beef Noodle Soup is around 2 to 2.5 hours. This includes:

  • Prep Time: 20 to 30 minutes
  • Cooking Time: 1.5 to 2 hours

With a little patience and planning, you’ll have a delicious bowl of Spicy Beef Noodle Soup ready to serve. Enjoy the process and the delightful flavors that come together in this comforting dish!

Nutritional Information for Spicy Beef Noodle Soup Recipe

Understanding the nutritional content of your meals is essential for maintaining a balanced diet. Spicy Beef Noodle Soup is not only delicious but also provides a good mix of nutrients. Here’s a closer look at the nutritional information for this hearty dish.

Calories

450 calories. This makes it a satisfying meal that can keep you full without being overly heavy. The combination of beef, noodles, and fresh vegetables contributes to the overall calorie count, providing energy for your day.

Protein Content

30 grams of protein per serving. The beef shank and brisket are excellent sources of high-quality protein, making this soup a great option for those looking to increase their protein intake. This protein content helps support muscle health and keeps you feeling satisfied longer.

Sodium Levels

1,200 milligrams of sodium. This level is primarily due to the beef broth, fish sauce, and soy sauce used in the recipe. If you’re watching your sodium intake, consider using low-sodium broth and adjusting the amount of fish sauce and soy sauce to suit your dietary needs.

Overall, Spicy Beef Noodle Soup is a nutritious meal that offers a good balance of calories, protein, and flavor. By being aware of the nutritional information, you can enjoy this comforting dish while keeping your health goals in mind.

Nutritional Information for Spicy Beef Noodle Soup Recipe

Understanding the nutritional content of your meals is essential for maintaining a balanced diet. Spicy Beef Noodle Soup is not only delicious but also provides a good mix of nutrients. Here’s a closer look at the nutritional information for this hearty dish.

Calories

450 calories. This makes it a satisfying meal that can keep you full without being overly heavy. The combination of beef, noodles, and fresh vegetables contributes to the overall calorie count, providing energy for your day.

Protein Content

30 grams of protein per serving. The beef shank and brisket are excellent sources of high-quality protein, making this soup a great option for those looking to increase their protein intake. This protein content helps support muscle health and keeps you feeling satisfied longer.

Sodium Levels

1,200 milligrams of sodium. This level is primarily due to the beef broth, fish sauce, and soy sauce used in the recipe. If you’re watching your sodium intake, consider using low-sodium broth and adjusting the amount of fish sauce and soy sauce to suit your dietary needs.

Overall, Spicy Beef Noodle Soup is a nutritious meal that offers a good balance of calories, protein, and flavor. By being aware of the nutritional information, you can enjoy this comforting dish while keeping your health goals in mind.

FAQs about Spicy Beef Noodle Soup Recipe

Can I make Spicy Beef Noodle Soup in advance?

Absolutely! Spicy Beef Noodle Soup can be made in advance, making it a great option for meal prep. After cooking, let the soup cool completely before storing it in an airtight container. You can keep it in the refrigerator for up to three days. When you’re ready to enjoy it, simply reheat on the stove until hot. However, it’s best to store the noodles separately to prevent them from becoming mushy. Add the noodles just before serving for the best texture.

What can I substitute for beef in the Spicy Beef Noodle Soup Recipe?

If you’re looking for alternatives to beef, there are several options you can try. Chicken is a popular substitute; just adjust the cooking time as chicken cooks faster than beef. For a vegetarian option, tofu or tempeh works wonderfully. You can also use hearty vegetables like mushrooms or eggplant to add texture and flavor. Just remember to adjust the cooking times accordingly to ensure everything is cooked perfectly!

How spicy is the Spicy Beef Noodle Soup Recipe?

The spice level of Spicy Beef Noodle Soup can be adjusted to your liking. The recipe includes chili paste, which adds heat. If you prefer a milder soup, start with a smaller amount of chili paste and gradually increase it to your taste. You can also add sliced jalapeños as a garnish for those who enjoy extra heat. Remember, you can always add more spice, but it’s hard to take it away once it’s in!

Can I freeze Spicy Beef Noodle Soup?

Yes, you can freeze Spicy Beef Noodle Soup! To do this, allow the soup to cool completely, then transfer it to a freezer-safe container. It can be stored in the freezer for up to three months. When you’re ready to enjoy it, thaw it in the refrigerator overnight and reheat on the stove. Again, it’s best to freeze the noodles separately to maintain their texture. Add them fresh when you reheat the soup for the best results.

Conclusion on Spicy Beef Noodle Soup Recipe

In conclusion, Spicy Beef Noodle Soup is a delightful dish that brings warmth and comfort to any table. With its rich flavors, tender beef, and aromatic broth, it’s a meal that can be enjoyed by everyone. Whether you’re cooking for family or friends, this recipe is sure to impress and satisfy.

As you’ve learned, the process of making this soup is straightforward and rewarding. From preparing the broth to garnishing with fresh herbs, each step contributes to the overall experience. Plus, the variations allow you to customize the dish to suit your taste or dietary needs, making it versatile for any occasion.

Remember, cooking is not just about following a recipe; it’s about enjoying the journey and sharing delicious food with loved ones. So, gather your ingredients, roll up your sleeves, and dive into the world of Spicy Beef Noodle Soup. You’ll create not just a meal, but a memorable experience that brings people together.

We hope you enjoy making and savoring this comforting dish. Happy cooking!

Paul

Spicy Beef Noodle Soup warms your heart and soul.

This bold and aromatic beef noodle soup from Hue, Vietnam, is deeply flavored with lemongrass, shrimp paste, and spicy chili oil. Rich bone broth, tender meats, and thick round noodles come together in a bowl that’s complex, comforting, and irresistibly spicy.
Prep Time 45 minutes
Cook Time 2 hours
Total Time 2 hours 45 minutes
Servings: 6 servings
Course: Main Course
Cuisine: Vietnamese

Ingredients
  

  • For the broth:2 pounds pork bones2 pounds beef brisket7 quarts water1 large white onion
  • Spices:1 piece ginger 2×2 inches, sliced2 stalks lemongrass, smashed and cut into 3-inch pieces5 garlic cloves1 cinnamon stick5 whole cloves
  • Oil infusion:¼ cup pure sesame oil1 tablespoon annatto seeds5 medium shallots minced5 garlic cloves, minced
  • Seasoning mix:2 tablespoons sesame oil2 teaspoons red pepper flakes3 tablespoons minced lemongrass2 tablespoons shrimp paste2 tablespoons chicken bouillon1 tablespoon Kosher salt2 tablespoons fish sauce
  • Soup add-ins:1 medium white onion thinly sliced5 stalks green onion, chopped1 pound beef tenderloin, thinly sliced1 bag Hue-style round rice noodles
  • Fresh accompaniments:Shredded water spinachShredded banana flowerBeansproutsFresh oregano kinh giớiLime wedgesShredded red cabbage, optional
  • Dipping sauce:2 tablespoons fish sauce3 slices Thai chili1 tablespoon shrimp paste

Method
 

  1. Boil pork bones for 10 minutes. Drain and rinse. Repeat with brisket. Set both aside.
  2. Toast ginger, garlic, cinnamon stick, cloves, and lemongrass until aromatic. Tie the cinnamon and lemongrass in a bundle, place remaining spices in a sachet.
  3. In a large stockpot, boil 7 quarts of water. Add cleaned pork bones and brisket. Bring back to a boil.
  4. Add the spice sachet and tied bundle. Simmer for 45 minutes. Then add the large white onion and simmer for another 45 minutes, skimming off impurities regularly.
  5. In a small pan, heat sesame oil with annatto seeds for 5 minutes to extract color. Strain the oil, then sauté minced shallots and garlic in the oil for 3 to 4 minutes. Set aside.
  6. In the same pan, heat additional sesame oil and sauté red pepper flakes, minced lemongrass, and shrimp paste for 3 to 4 minutes. Set aside.
  7. In a small bowl, combine fish sauce, bouillon, and salt with ½ cup hot broth to dissolve.
  8. Remove brisket from the broth and thinly slice. Discard all solids from broth. Add 8 cups hot water to dilute. Return to a simmer. Add both oil and seasoning mixtures. Simmer for 20 minutes.
  9. Keep the broth warm. Blanch beef tenderloin slices briefly. Cook noodles per package instructions and rinse.
  10. Assemble each bowl with noodles, sliced brisket, raw tenderloin, sliced white onion, and chopped green onions. Ladle hot broth over the top to cook the tenderloin.
  11. Serve immediately with the fresh vegetable plate and dipping sauce on the side.

Notes

Use Hue-style round rice noodles for authentic texture.
Annatto seeds give the broth its signature orange-red hue.
Shrimp paste is essential for umami depth—don’t skip it.
Make ahead by preparing the broth and toppings a day in advance and assembling bowls to order.

Spicy Chicken Étouffée Recipe is a must-try dish!

Welcome to the world of Spicy Chicken Étouffée! This dish is a delightful blend of flavors that will transport your taste buds straight to the heart of Louisiana. If you’re looking for a comforting meal that’s both hearty and satisfying, you’ve come to the right place. In this section, we’ll explore what étouffée is and delve into its rich history.

What is Étouffée?

Étouffée is a classic Cajun and Creole dish that means “smothered” in French. Traditionally, it features a protein, like chicken or seafood, cooked in a thick, flavorful sauce. The dish is often served over rice, making it a complete meal. The sauce is usually made with a roux, which is a mixture of flour and fat, and is combined with vegetables and spices. This creates a rich, savory flavor that is simply irresistible.

In our Spicy Chicken Étouffée recipe, we use tender chicken thighs, which soak up the delicious sauce. The combination of spices, including Cajun seasoning, adds a kick that makes this dish stand out. Whether you’re a fan of spicy food or just looking to try something new, this recipe is sure to please!

The Origins of Spicy Chicken Étouffée

The origins of étouffée can be traced back to Louisiana, where French, Spanish, and African influences blend together. This dish is a testament to the rich culinary heritage of the region. While the exact history is a bit murky, it is believed that étouffée became popular in the 1950s. It was often served at family gatherings and celebrations, showcasing the warmth and hospitality of Southern culture.

Over the years, many variations of étouffée have emerged, with each cook adding their unique twist. The Spicy Chicken Étouffée recipe you’ll find here is a modern take on this beloved classic. It captures the essence of traditional flavors while making it accessible for home cooks everywhere. So, let’s dive into the ingredients and get cooking!

Ingredients for Spicy Chicken Étouffée Recipe

To create a mouthwatering Spicy Chicken Étouffée, you’ll need a selection of fresh ingredients that come together to form a rich and flavorful dish. Here’s what you’ll need:

  • 2 tablespoons vegetable oil
  • 1 medium onion, diced
  • 1 green bell pepper, diced
  • 2 celery stalks, diced
  • 3 cloves garlic, minced
  • 1 pound boneless, skinless chicken thighs, cut into bite-sized pieces
  • 2 tablespoons all-purpose flour
  • 2 cups chicken broth
  • 1 can (14.5 ounces) diced tomatoes, undrained
  • 1 tablespoon Cajun seasoning
  • 1 teaspoon Worcestershire sauce
  • Salt and pepper to taste
  • 2 green onions, sliced (for garnish)
  • Cooked white rice (for serving)

These ingredients are not only easy to find but also work together to create a deliciously spicy and comforting meal. The combination of vegetables adds depth, while the chicken provides a hearty base. The Cajun seasoning brings the heat, making this dish a true delight for spice lovers. Now that you have your ingredients ready, let’s move on to the step-by-step preparation of this fantastic recipe!

Step-by-Step Preparation of Spicy Chicken Étouffée Recipe

Now that you have gathered all your ingredients, it’s time to bring them together in a delicious Spicy Chicken Étouffée. Follow these simple steps to create a dish that will impress your family and friends!

Step 1: Preparing the Roux

The first step in making a great étouffée is preparing the roux. In a large skillet or Dutch oven, heat the vegetable oil over medium heat. Once the oil is hot, sprinkle in the flour. Stir the mixture constantly for about 5-7 minutes. You want the roux to turn a nice golden brown color. This step is crucial as it adds depth and flavor to your dish. Be careful not to burn it, as that can ruin the taste!

Step 2: Sautéing the Vegetables

Next, it’s time to add the diced onion, green bell pepper, and celery to the roux. These vegetables are known as the “holy trinity” in Cajun cooking. Sauté them for about 5 minutes until they soften. The aroma will fill your kitchen, making it hard to resist! After that, stir in the minced garlic and cook for an additional minute. This will enhance the flavor even more.

Step 3: Adding the Chicken

Now, add the bite-sized pieces of chicken thighs to the skillet. Cook them for about 5-7 minutes, stirring occasionally. You want the chicken to brown nicely on all sides. This step locks in the juices and adds a wonderful texture to your étouffée. Once the chicken is browned, you’re ready for the next step!

Step 4: Incorporating the Spices and Broth

It’s time to bring in the flavors! Sprinkle the Cajun seasoning over the chicken and vegetables. Then, pour in the chicken broth gradually, stirring constantly to avoid lumps. Add the undrained diced tomatoes, Worcestershire sauce, salt, and pepper. Mix everything well to combine. The sauce should start to thicken as it heats up, creating a rich and flavorful base for your étouffée.

Step 5: Simmering the Étouffée

Bring the mixture to a gentle simmer. Once it’s bubbling, reduce the heat to low. Cover the skillet and let it cook for 25-30 minutes. Stir occasionally to ensure nothing sticks to the bottom. This simmering time allows the chicken to become tender and the flavors to meld beautifully. Your kitchen will smell amazing during this time!

Step 6: Final Touches and Serving

After simmering, taste your étouffée and adjust the seasoning if needed. If you like it spicier, feel free to add more Cajun seasoning or a dash of hot sauce. Once you’re satisfied with the flavor, it’s time to serve! Spoon the spicy chicken étouffée over a bed of cooked white rice. Garnish with sliced green onions for a fresh touch. Enjoy your delicious creation!

Variations of Spicy Chicken Étouffée Recipe

While the classic Spicy Chicken Étouffée is a favorite for many, there are several delightful variations you can try. Each version brings its unique twist to this beloved dish, allowing you to explore different flavors and ingredients. Let’s take a look at two popular variations: Seafood Étouffée and Vegetarian Étouffée options.

Seafood Étouffée

If you’re a seafood lover, you’ll adore Seafood Étouffée! This variation replaces chicken with shrimp, crawfish, or a mix of both. The process remains similar, but the cooking time may vary slightly. Seafood cooks faster than chicken, so be sure to add it during the last 10-15 minutes of simmering. This way, the seafood stays tender and juicy. The rich sauce pairs perfectly with the natural sweetness of the seafood, creating a dish that’s both comforting and indulgent. Serve it over rice, and you’ll have a delightful meal that’s sure to impress!

Vegetarian Étouffée Options

For those who prefer a meatless option, Vegetarian Étouffée is a fantastic choice. You can substitute the chicken with hearty vegetables like mushrooms, zucchini, or eggplant. Additionally, you can add beans or lentils for protein. Follow the same steps as the original recipe, but sauté the vegetables until they are tender. The roux and spices will still provide that rich flavor you love. This version is not only delicious but also packed with nutrients, making it a great option for everyone at the table!

These variations allow you to customize your Spicy Chicken Étouffée to suit your taste preferences. Whether you choose seafood or go vegetarian, you’ll still enjoy the comforting essence of this classic dish. So, don’t hesitate to experiment and make it your own!

Cooking Note for Spicy Chicken Étouffée Recipe

When preparing your Spicy Chicken Étouffée, there are a few important cooking notes to keep in mind. These tips will help ensure that your dish turns out perfectly every time, enhancing both flavor and texture.

First, the roux is a crucial element in this recipe. It’s essential to cook it slowly and stir constantly. This prevents burning and allows the roux to develop a rich, nutty flavor. If you find that your roux is browning too quickly, reduce the heat. Patience is key here!

Next, the choice of chicken is important. Boneless, skinless chicken thighs are recommended for their tenderness and flavor. However, if you prefer chicken breasts, you can use them too. Just remember that they may cook faster, so adjust your cooking time accordingly.

Another tip is to taste as you go. The seasoning can vary based on personal preference. If you enjoy a spicier dish, feel free to add more Cajun seasoning or hot sauce. On the other hand, if you prefer a milder flavor, you can reduce the amount of seasoning used.

Lastly, don’t skip the garnishing step! Sliced green onions not only add a pop of color but also a fresh crunch that complements the rich sauce beautifully. Serve your Spicy Chicken Étouffée hot over rice for the best experience.

By following these cooking notes, you’ll be well on your way to creating a delicious and satisfying Spicy Chicken Étouffée that your family and friends will love!

Serving Suggestions for Spicy Chicken Étouffée Recipe

Serving your Spicy Chicken Étouffée is just as important as preparing it. The right accompaniments can elevate your meal and enhance the overall dining experience. Here are some delightful serving suggestions to consider:

  • White Rice: The classic choice! Serve your étouffée over a generous scoop of fluffy white rice. The rice absorbs the rich sauce, making each bite a burst of flavor.
  • Crusty Bread: A side of crusty French bread or a warm baguette is perfect for soaking up the delicious sauce. It adds a nice texture and complements the dish beautifully.
  • Green Salad: A light green salad with a tangy vinaigrette can balance the richness of the étouffée. Consider using mixed greens, cherry tomatoes, and cucumbers for a refreshing contrast.
  • Coleslaw: A creamy coleslaw can add a crunchy texture and a cool flavor that pairs well with the spicy chicken. The creaminess helps to mellow out the heat.
  • Pickled Vegetables: For a zesty kick, serve pickled vegetables on the side. They add a tangy crunch that complements the savory flavors of the étouffée.
  • Hot Sauce: If you love heat, keep a bottle of your favorite hot sauce on the table. This allows everyone to customize their spice level according to their taste.

These serving suggestions not only enhance the flavor of your Spicy Chicken Étouffée but also create a well-rounded meal. Whether you’re hosting a dinner party or enjoying a cozy family meal, these sides will impress your guests and make your dish even more enjoyable. So, gather your loved ones, serve up your delicious étouffée, and savor every bite!

Tips for Perfecting Your Spicy Chicken Étouffée Recipe

Creating the perfect Spicy Chicken Étouffée is all about attention to detail and a few helpful tips. With these suggestions, you can elevate your dish and impress everyone at the table. Let’s dive into some essential tips for perfecting your recipe!

First, focus on the roux. The color and flavor of your roux can make a big difference. Aim for a deep golden brown, which adds a rich, nutty flavor. Stir constantly to prevent burning. If you’re new to making a roux, don’t rush it. Patience is key!

Next, consider the seasoning. Cajun seasoning is a must, but feel free to adjust the amount based on your spice tolerance. If you want a milder dish, start with less and add more as needed. You can also experiment with additional spices like paprika or cayenne pepper for extra heat.

Using fresh ingredients is another important tip. Fresh vegetables and herbs will enhance the overall flavor of your étouffée. If possible, choose organic produce for the best taste. Fresh green onions as a garnish add a nice crunch and brightness to the dish.

Don’t forget to let your étouffée simmer long enough. This allows the flavors to meld beautifully. Stir occasionally to prevent sticking, and keep the heat low to maintain a gentle simmer. The longer it simmers, the more flavorful it becomes!

Lastly, serve your Spicy Chicken Étouffée hot and fresh. The dish is best enjoyed right after cooking. If you have leftovers, store them in an airtight container in the fridge. Reheat gently on the stove, adding a splash of broth if needed to loosen the sauce.

By following these tips, you’ll be well on your way to mastering the art of Spicy Chicken Étouffée. Enjoy the process, and don’t hesitate to make it your own!

Breakdown of Time for Spicy Chicken Étouffée Recipe

Understanding the time needed for each step in your Spicy Chicken Étouffée recipe can help you plan your cooking better. Here’s a simple breakdown of the time required for preparation and cooking.

Prep Time

The prep time for this delicious dish is approximately 15-20 minutes. During this time, you will gather all your ingredients, chop the vegetables, and cut the chicken into bite-sized pieces. Having everything ready before you start cooking makes the process smoother and more enjoyable.

Cooking Time

The cooking time for Spicy Chicken Étouffée is about 30-35 minutes. This includes sautéing the vegetables, browning the chicken, and simmering the dish to allow the flavors to meld together. It’s important to keep an eye on the pot and stir occasionally to prevent sticking.

Total Time

In total, you can expect to spend around 45-55 minutes from start to finish. This includes both prep and cooking time. With this quick and easy timeline, you can have a hearty and flavorful meal ready in no time!

Nutritional Information for Spicy Chicken Étouffée Recipe

Understanding the nutritional content of your Spicy Chicken Étouffée is essential for maintaining a balanced diet. This dish not only satisfies your taste buds but also provides a good amount of nutrients. Here’s a breakdown of the key nutritional information per serving:

Calories

Each serving of Spicy Chicken Étouffée contains approximately 380 calories. This makes it a hearty meal that can fit well into your daily caloric intake. The combination of chicken, vegetables, and rice provides a satisfying and filling dish without going overboard on calories.

Protein

Protein is an important part of any meal, and this recipe delivers! With about 30 grams of protein per serving, the Spicy Chicken Étouffée is a great source of this essential nutrient. The chicken thighs contribute significantly to the protein content, helping to keep you full and energized throughout the day.

Sodium

When it comes to sodium, each serving contains around 800 milligrams. While this is a reasonable amount for a flavorful dish, it’s important to be mindful of your overall sodium intake, especially if you are watching your salt consumption. You can reduce the sodium by using low-sodium chicken broth and adjusting the amount of added salt to suit your taste.

Overall, the Spicy Chicken Étouffée is a well-rounded meal that offers a good balance of calories, protein, and flavor. Enjoying this dish as part of a varied diet can help you maintain a healthy lifestyle while indulging in delicious flavors!

FAQs about Spicy Chicken Étouffée Recipe

Can I make Spicy Chicken Étouffée ahead of time?

Absolutely! Making Spicy Chicken Étouffée ahead of time is a great idea. In fact, the flavors often deepen and improve after sitting for a while. You can prepare the dish, let it cool, and then store it in an airtight container in the refrigerator. It will stay fresh for up to three days. When you’re ready to enjoy it, simply reheat it on the stove over low heat, adding a splash of chicken broth if needed to loosen the sauce. This makes it a perfect option for meal prep or a busy weeknight dinner!

What can I serve with Spicy Chicken Étouffée?

There are many delicious options to serve alongside your Spicy Chicken Étouffée. The classic choice is fluffy white rice, which absorbs the rich sauce beautifully. You can also pair it with crusty French bread for dipping. A light green salad with a tangy vinaigrette can provide a refreshing contrast to the dish’s richness. Additionally, consider serving coleslaw or pickled vegetables for a crunchy texture. These sides not only complement the étouffée but also create a well-rounded meal that everyone will enjoy!

How spicy is Spicy Chicken Étouffée?

The spice level of Spicy Chicken Étouffée can vary based on your preferences. The Cajun seasoning adds a nice kick, but you can adjust the heat to suit your taste. If you prefer a milder dish, start with less seasoning and add more as needed. For those who love heat, consider adding diced jalapeños or a dash of hot sauce. Remember, you can always add more spice, but it’s hard to take it away once it’s in the dish!

Can I use other meats in Spicy Chicken Étouffée?

Yes, you can definitely use other meats in your Spicy Chicken Étouffée! While chicken is the traditional choice, you can substitute it with shrimp, crawfish, or even sausage for a different flavor profile. If you choose seafood, add it during the last 10-15 minutes of cooking to ensure it stays tender. For a heartier option, consider using pork or beef. Each variation will bring its unique taste to the dish while still maintaining the essence of a classic étouffée!

Conclusion on Spicy Chicken Étouffée Recipe

In conclusion, the Spicy Chicken Étouffée recipe is a wonderful way to experience the rich flavors of Cajun and Creole cuisine. This dish not only showcases the delightful combination of spices and ingredients but also brings a sense of warmth and comfort to your dining table. Whether you’re cooking for family, friends, or just for yourself, this recipe is sure to impress.

As you’ve learned, the key to a great étouffée lies in the preparation of the roux and the careful selection of fresh ingredients. The balance of flavors, from the savory chicken to the aromatic vegetables, creates a dish that is both hearty and satisfying. Plus, with the option to customize it to your taste—whether you prefer seafood or a vegetarian version—you can make this dish your own.

Don’t forget the importance of serving suggestions! Pairing your étouffée with fluffy white rice, crusty bread, or a refreshing salad can elevate the meal even further. And remember, this dish is perfect for meal prep, allowing you to enjoy the delicious flavors throughout the week.

So, gather your ingredients, roll up your sleeves, and dive into the delightful world of Spicy Chicken Étouffée. With each bite, you’ll savor the essence of Louisiana cooking, bringing a little bit of Southern charm into your home. Happy cooking!

Paul

Spicy Chicken Étouffée Recipe is a must-try dish!

Rich, rustic, and bursting with bold Southern flavor, this Chicken Étouffée simmers tender chicken thighs in a savory roux-based sauce full of peppers, onions, garlic, and Cajun spices. Serve it over rice for a true taste of the bayou in every bite.
Prep Time 20 minutes
Cook Time 50 minutes
Total Time 1 hour 10 minutes
Servings: 6 servings
Course: Main Course
Cuisine: Cajun/Creole

Ingredients
  

  • 3 pounds boneless chicken thighs2 to 3 teaspoons Cajun seasoning to taste1 tablespoon avocado oil or vegetable oil8 tablespoons unsalted butter½ cup all-purpose flour1 large onion, finely chopped1 green bell pepper, finely chopped1 red bell pepper, finely chopped2 stalks celery, finely chopped5 green onions, divided (use half in cooking, half for garnish)6 garlic cloves, minced3 cups chicken broth, warmed1 teaspoon browning sauce, optional (like Kitchen Bouquet)¼ cup loosely packed chopped parsley leavesCooked white rice, for serving

Method
 

  1. Finely chop the onion, bell peppers, celery, green onions, and parsley. Mince the garlic. Season the chicken thighs well with Cajun seasoning.
  2. In a large skillet or Dutch oven, heat the oil over medium-high heat. Sear the chicken in batches, 3 to 5 minutes per side, until browned but not fully cooked. Remove and set aside.
  3. Lower the heat to medium. In the same pan, melt the butter and whisk in the flour to make a roux. Stir constantly for 10 to 15 minutes until it reaches a rich peanut butter color.
  4. Stir in the onion, green and red bell peppers, celery, and half of the green onions. Sauté for about 10 minutes, then add garlic and cook for another minute.
  5. Slowly whisk in the warmed chicken broth, stirring constantly to avoid lumps. Add the optional browning sauce for deeper color and flavor.
  6. Return the seared chicken to the pan. Simmer uncovered over low heat for about 30 minutes, or until the sauce has thickened and the chicken is fully cooked through.
  7. Remove the chicken, chop into bite-sized pieces, and return it to the skillet. Stir in chopped parsley and adjust seasoning to taste.
  8. Serve hot over cooked white rice and garnish with the remaining green onions.

Notes

For a spicier version, add cayenne or use spicy Cajun seasoning.
Don’t rush the roux—it’s the key to the deep flavor of traditional étouffée.
This dish tastes even better the next day after the flavors meld.